Go Back
- 200g Biscoff biscuits, crushed - 100g unsalted butter, melted - 400g cream cheese, at room temperature - 100g powdered sugar - 200ml heavy whipping cream - 100g Biscoff spread - 1 teaspoon vanilla extract - A pinch of salt - Extra crushed Biscoff biscuits for topping Each ingredient plays a key role in making these bars. The Biscoff biscuits give a sweet and spiced flavor to the crust. This flavor is perfect with the creamy filling. You need unsalted butter to bind the crust. It adds richness to the base. Cream cheese makes the filling smooth and creamy. It balances the sweetness of the powdered sugar. Heavy whipping cream adds volume and lightens the texture. Biscoff spread adds a tasty twist. It brings a caramel-like flavor to the mix. Vanilla extract enhances all the flavors. The pinch of salt brightens the sweetness. Finally, extra crushed Biscoff biscuits are great for topping. They add crunch and look nice on the bars. If you need to substitute, there are great options. For Biscoff biscuits, you can use speculoos cookies or graham crackers. Instead of unsalted butter, you can use coconut oil. If you want a lighter filling, consider using Greek yogurt instead of cream cheese. For the heavy cream, try using coconut cream for a dairy-free option. If you do not have Biscoff spread, peanut butter or Nutella works well. You can skip the vanilla extract, but it does add nice flavor. Lastly, for a salt-free version, you can skip the pinch of salt altogether. These swaps make the recipe flexible and fun! Start by crushing 200g of Biscoff biscuits in a bowl. You can use a food processor or a rolling pin for this. The goal is to have fine crumbs. Next, melt 100g of unsalted butter. Pour this melted butter over the biscuit crumbs. Mix them well until the crumbs look like wet sand. Now, take a 9x9 inch square baking dish and line it with parchment paper. This helps with easy removal later. Press the biscuit mixture evenly into the bottom of the dish. Make sure it is packed tightly. This forms a solid crust. Place the dish in the refrigerator while you prepare the filling. This helps the crust to set nicely. In a large mixing bowl, add 400g of cream cheese that is at room temperature. Beat it with 100g of powdered sugar using a hand mixer. Mix until it is smooth and creamy. Then, add 1 teaspoon of vanilla extract and a pinch of salt. Mix again to blend these flavors. Next, whip 200ml of heavy whipping cream in a separate bowl. You want stiff peaks to form. This makes the filling light and fluffy. Gently fold the whipped cream into the cream cheese mixture. Be careful not to deflate the whipped cream. Now, melt 100g of Biscoff spread in the microwave for about 20-30 seconds. It should be slightly runny. Fold this melted spread into the cream cheese mixture. You want to create a lovely marbling effect. Take the chilled biscuit crust out of the refrigerator. Pour the cheesecake filling over the crust. Use a spatula to spread it evenly. Make sure the top is smooth. Now, sprinkle extra crushed Biscoff biscuits on top for a nice finish. Cover the dish with plastic wrap and place it back in the fridge. Let it chill for at least 4 hours. This helps the bars to set firmly. Once set, lift the cheesecake bars out of the dish using the parchment paper. Cut them into squares and serve. Enjoy your delicious no bake Biscoff cheesecake bars! To get the right texture, focus on the cream cheese. Let it sit out until it is soft. This step helps it mix well with the sugar. When you whip the heavy cream, beat it until it forms stiff peaks. This adds air and lightness to your bars. Gently fold the whipped cream into the cream cheese mix. Be careful not to deflate the cream. This folding keeps the bars fluffy and creamy. Store your No Bake Biscoff Cheesecake Bars in the fridge. Use an airtight container to keep them fresh. They will last up to five days this way. If you want longer storage, freeze them. Cut the bars into squares and wrap them in plastic wrap. Place them in a freezer-safe container. They can last up to three months in the freezer. When ready to eat, thaw them in the fridge overnight. When serving these cheesecake bars, presentation is key. Cut them into even squares for a neat look. You can top each bar with a drizzle of melted Biscoff spread. This adds a rich flavor and looks great. For a fun twist, add fresh fruit like berries. They contrast nicely with the creamy filling. You can also sprinkle extra crushed Biscoff biscuits on top for crunch. Enjoy these bars with coffee or tea for a perfect treat. {{image_2}} You can change the taste of your No Bake Biscoff Cheesecake Bars in fun ways. One great idea is to add chocolate. Just melt some dark or milk chocolate and swirl it into the filling. This adds a rich taste that pairs well with Biscoff. You can also use fruit toppings. Fresh strawberries or raspberries add a nice, tart contrast. Simply mash the fruit and spread it on top after the bars set. Each bite will offer a new flavor experience! If you need gluten-free options, this recipe can still work! Swap out Biscoff biscuits for gluten-free cookies. Many brands offer tasty alternatives that hold up well. Ensure the Biscoff spread is also gluten-free, as some brands are. This way, everyone can enjoy these delicious bars without worry. While Biscoff biscuits shine in this recipe, you can try other cookies too. For a chocolate twist, use Oreo cookies. They create a rich, chocolatey base. For a nutty flavor, consider using almond or hazelnut cookies. Just crush and mix them with melted butter as you would with Biscoff. Each alternative gives a unique touch to your cheesecake bars, making them fun to explore! To keep your No Bake Biscoff Cheesecake Bars fresh, store them in the fridge. Cover the bars with plastic wrap or aluminum foil to prevent them from drying out. The bars can stay good for up to five days. If you notice any moisture, it’s best to eat them right away. Keeping them cool helps maintain their creamy texture. If you want to save some for later, you can freeze them. Cut the cheesecake bars into squares first. Then, wrap each piece in plastic wrap. Place them in an airtight container or freezer bag. They can last up to three months in the freezer. This way, you can enjoy a sweet treat anytime! When you’re ready to eat your frozen cheesecake bars, remove them from the freezer. Take off the wrap and place them in the fridge for about four hours. If you’re in a hurry, you can leave them at room temperature for about 30 minutes. Just be careful not to let them sit too long, or they might get too soft. Enjoy your delicious and easy treat! Yes, you can use non-dairy options. For cream cheese, try a plant-based version. Look for coconut or cashew cream cheese. Use a non-dairy heavy cream to whip. These swaps work well in this recipe. You can store these bars in the fridge for about 5 days. Make sure to keep them in an airtight container. They will stay fresh and tasty. If you want to keep them longer, freeze them. You can use other spreads like cookie butter or Nutella. For a nutty taste, try almond butter. Sunflower seed butter is a great nut-free option. Each choice will change the flavor a bit, but they all taste good! This blog post covered how to make delicious no-bake Biscoff cheesecake bars. We went over the ingredients, their descriptions, and substitutions. You learned step-by-step instructions for the crust, filling, and assembly. I shared tips for perfecting texture and storing your bars for maximum freshness. You also discovered serving ideas and variations to customize your treat. In short, making these bars is fun and easy with great results. Enjoy your cheesecake bars!

No Bake Biscoff Cheesecake Bars

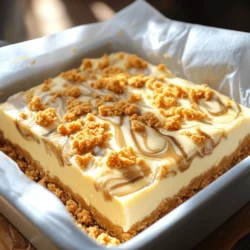
Indulge in the creamy, dreamy delight of No Bake Biscoff Cheesecake Bars! These easy-to-make dessert bars feature a buttery Biscoff crust and a luscious filling that combines cream cheese and sweet Biscoff spread. Perfect for any occasion, this no-bake recipe will satisfy your sweet tooth in just 15 minutes of prep time. Click through now to explore the full recipe and impress your friends and family with this irresistible treat!

Ingredients
  

200g Biscoff biscuits, crushed

100g unsalted butter, melted

400g cream cheese, at room temperature

100g powdered sugar

200ml heavy whipping cream

100g Biscoff spread

1 teaspoon vanilla extract

A pinch of salt

Extra crushed Biscoff biscuits for topping

Instructions
 

In a mixing bowl, combine the crushed Biscoff biscuits and melted butter. Mix until the mixture resembles wet sand.

    Press the biscuit mixture firmly into the bottom of a lined 9x9 inch square baking dish to create a crust layer. Place in the refrigerator to set while you prepare the filling.

      In a large mixing bowl, beat the cream cheese with powdered sugar until smooth and creamy.

        Add the vanilla extract and a pinch of salt to the cream cheese mixture and mix well.

          In a separate bowl, whip the heavy cream until stiff peaks form.

            Gently fold the whipped cream into the cream cheese mixture until fully blended.

              Melt the Biscoff spread in the microwave for about 20-30 seconds until slightly runny, then fold it into the cream cheese mixture, creating a marbling effect.

                Pour the cheesecake filling over the chilled biscuit crust, spreading evenly with a spatula.

                  Smooth the top and sprinkle extra crushed Biscoff biscuits on top for garnish.

                    Cover and refrigerate for at least 4 hours, or until set.

                      Once set, lift the cheesecake bars out of the dish using the parchment paper, cut into squares, and serve.

                        Prep Time: 15 minutes | Total Time: 4 hours 15 minutes | Servings: 12 bars