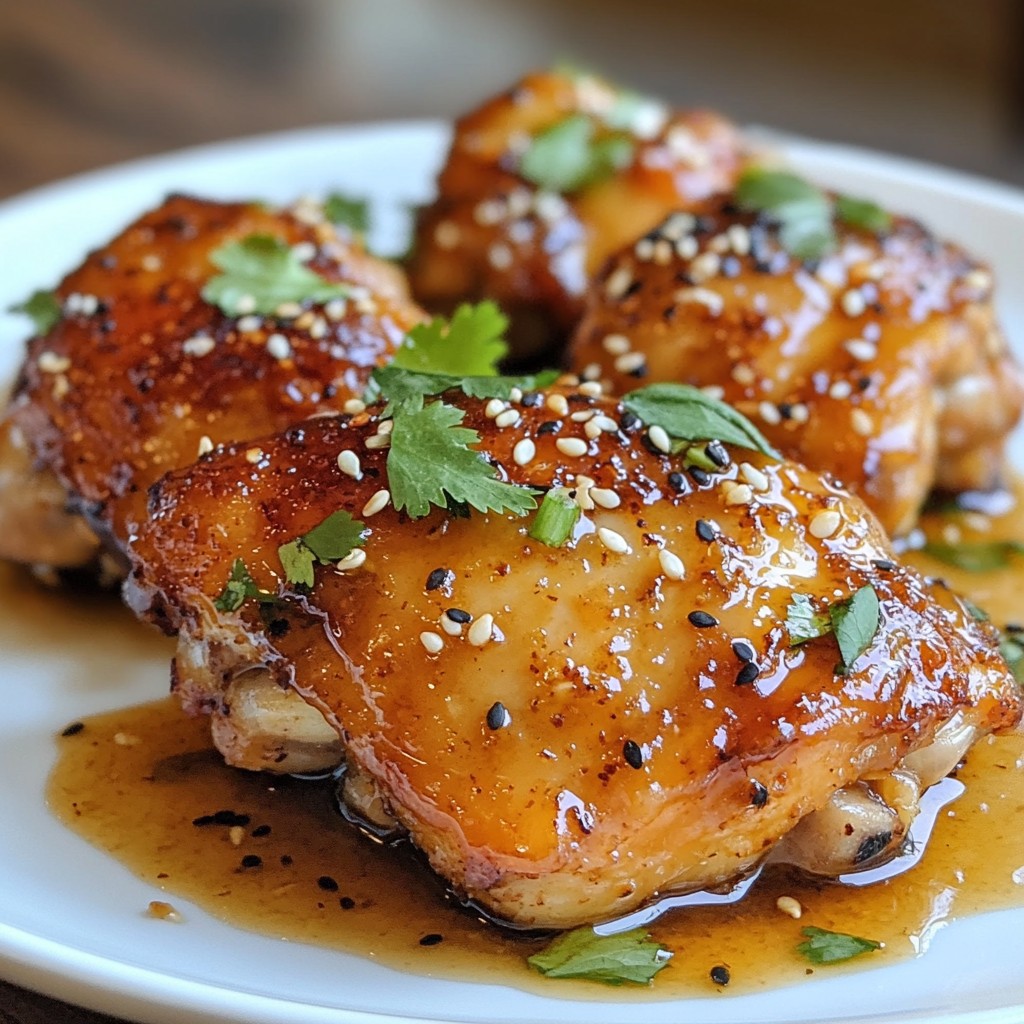
Ready to impress your family at dinner? This Baked Dinner Honey Garlic Chicken Thighs recipe is a crowd-pleaser that’s easy to make. With a sweet and savory sauce, this dish creates a mouthwatering meal that everyone will enjoy. I’ll guide you through every step, sharing tips to ensure your chicken turns out juicy and full of flavor. Let’s get cooking and bring that delicious smell to your kitchen!
Why I Love This Recipe
- Flavorful Harmony: The combination of honey, garlic, and ginger creates a delightful balance of sweetness and savory notes that is simply irresistible.
- Easy Preparation: This recipe requires minimal prep work, making it perfect for busy weeknights or when you want to impress guests without spending hours in the kitchen.
- Crispy Skin Perfection: Baking the chicken thighs at a high temperature ensures that the skin turns beautifully crispy while keeping the meat juicy and tender.
- Customizable Garnish: Add fresh cilantro and sesame seeds for a pop of color and texture, or keep it simple for a classic presentation.
Ingredients
List of Ingredients
- 6 bone-in, skin-on chicken thighs
- 1/3 cup honey
- 1/4 cup low sodium soy sauce
- 4 cloves garlic, minced
- 1 tablespoon fresh ginger, grated
- 1 tablespoon apple cider vinegar
- 2 tablespoons olive oil
- Salt and pepper to taste
- Fresh cilantro for garnish (optional)
- Sesame seeds for garnish (optional)
Important Ingredient Notes
Bone-in, skin-on chicken thighs keep the meat juicy. The skin crisps up nicely. Honey adds sweetness, while soy sauce gives depth. Garlic and ginger bring bold flavors, making the dish pop. Apple cider vinegar balances the sweetness. Use low sodium soy sauce for a lighter touch. Always taste and adjust salt and pepper as needed.
Suggested Tools and Equipment
You will need a few simple tools:
- Baking dish
- Aluminum foil for easy cleanup
- Medium mixing bowl
- Whisk for blending the sauce
- Measuring cups and spoons
- Knife and cutting board for garlic and ginger
These tools make the process smooth and fun. Enjoy creating this tasty dish!
Step-by-Step Instructions
Prepping the Oven and Chicken
Start by preheating your oven to 400°F (200°C). This step is key for crispy skin. Next, grab a baking dish and line it with aluminum foil. This makes cleanup a breeze. Now, take your six bone-in, skin-on chicken thighs. Rinse them under cold water and pat them dry. This helps the skin get crispy. Season both sides with salt and pepper. Simple seasoning makes a big difference.
Making the Honey Garlic Sauce
In a medium bowl, mix together your sauce. Combine 1/3 cup honey, 1/4 cup low-sodium soy sauce, and 4 minced garlic cloves. Add 1 tablespoon of fresh, grated ginger and 1 tablespoon of apple cider vinegar. Then, pour in 2 tablespoons of olive oil. Whisk everything until it blends well. This sweet and savory sauce is the star of the dish.
Baking the Chicken Thighs
Place the seasoned chicken thighs in the baking dish, skin side up. Now, pour the honey garlic sauce all over the chicken. Make sure every piece gets coated. This adds flavor and moisture. Bake in your preheated oven for 35-40 minutes. Check that the chicken is cooked through. The skin should be crispy and golden. Halfway through, baste the chicken with the sauce. This step boosts the flavor even more. Once done, let the chicken rest for 5 minutes before serving. Garnish with fresh cilantro and sesame seeds for a nice touch. Enjoy your delicious meal!
Tips & Tricks
Tips for Perfectly Cooked Chicken
To ensure your chicken thighs cook just right, follow these tips:
- Choose bone-in thighs: They stay juicy and flavorful.
- Dry the skin: Pat the chicken dry for a crispier skin.
- Use a meat thermometer: Cook until it reaches 165°F (74°C).
- Let it rest: Wait five minutes after baking to keep the juices in.
Common Mistakes to Avoid
Many home cooks make several common mistakes. Here are a few to keep in mind:
- Skipping the seasoning: Always season your chicken with salt and pepper.
- Not preheating the oven: Preheat for crispy skin and even cooking.
- Overcrowding the pan: Leave space between chicken thighs for better heat circulation.
- Ignoring basting: Baste halfway through for extra flavor and moisture.
Enhancing Flavor Profiles
To make this dish even better, try these ideas:
- Add spices: A pinch of chili flakes can give a spicy kick.
- Use fresh herbs: Thyme or rosemary adds a nice touch.
- Try different honeys: Varieties like wildflower or clover can change the taste.
- Add citrus: A splash of lemon or lime juice brightens the dish.
Pro Tips
- Marinade for Extra Flavor: Allow the chicken to marinate in the honey garlic sauce for at least 30 minutes or up to overnight in the fridge for enhanced flavor.
- Use a Meat Thermometer: For perfectly cooked chicken, use a meat thermometer to ensure the internal temperature reaches 165°F (74°C).
- Broil for Crispiness: If the skin isn’t as crispy as you’d like, turn on the broiler for the last 2-3 minutes of cooking, watching closely to prevent burning.
- Serve with Sides: Pair the chicken with steamed vegetables or rice to complement the sweet and savory flavor of the dish.
Variations
Using Different Cuts of Chicken
You can use other chicken cuts for this recipe. Boneless chicken thighs work well. They cook faster and stay juicy. Chicken breasts are another option, but they need careful cooking to avoid drying out. Drumsticks also soak up the honey garlic sauce nicely. Just adjust the baking time based on the cut you choose.
Alternative Marinade Ingredients
Feel free to swap out some ingredients in the marinade. You can use maple syrup instead of honey for a different taste. If you want a spicy kick, add some red pepper flakes or sriracha. Try using coconut aminos instead of soy sauce for a gluten-free option. Fresh herbs like thyme or rosemary can add a nice twist to the flavor.
Side Dishes to Pair With
Pair your honey garlic chicken thighs with tasty sides. Steamed rice absorbs the sauce well and makes a great base. Roasted veggies, like broccoli or carrots, add color and nutrients. A fresh salad can balance the meal. For a fun twist, try garlic bread to soak up that yummy sauce.
Storage Info
How to Store Leftovers
To store leftovers, let the chicken cool first. Place the chicken in an airtight container. Make sure to pour any leftover sauce over the chicken. This helps keep it moist. You can store it in the fridge for up to four days.
Reheating Instructions
To reheat, preheat your oven to 350°F (175°C). Place the chicken in a baking dish. Cover it with foil to prevent drying out. Heat for about 20-25 minutes or until hot. You can also use a microwave for quick reheating. Just cover the chicken and heat for 2-3 minutes.
Freezing Tips
If you want to freeze the chicken, do so right after cooking. Allow it to cool completely. Wrap each piece tightly in plastic wrap. Then, place them in a freezer-safe bag. You can freeze it for up to three months. When ready to eat, thaw in the fridge overnight before reheating.
FAQs
How long do I bake chicken thighs?
You bake chicken thighs for 35 to 40 minutes at 400°F (200°C). Check if they are done by using a meat thermometer. The internal temperature should reach 165°F (74°C). This ensures the chicken is safe to eat and juicy. For crispy skin, don’t skip basting the thighs halfway through cooking.
Can I use boneless chicken thighs?
Yes, you can use boneless chicken thighs. The cooking time will change. Boneless thighs take about 25 to 30 minutes in the oven. Keep an eye on the temperature to ensure they cook through. They will still soak up the honey garlic sauce well, making them tasty!
What goes well with honey garlic chicken thighs?
Honey garlic chicken thighs pair well with rice or quinoa. Their flavor also matches nicely with steamed broccoli or green beans. You can add a fresh salad for crunch and color. Feel free to get creative with sides! These combinations make your meal complete and satisfying.
In this post, we covered how to make honey garlic chicken thighs. We listed the ingredients and shared key notes. You learned step-by-step instructions, from prepping the oven to baking the chicken. We offered tips for perfect cooking and suggested tasty variations. Finally, we covered storage and answered common questions.
Now, you can confidently prepare this dish. Enjoy your cooking journey and share your delicious results!