Skip to content
DisclaimerTerms Of UseGDPR PolicyCookie Policy

Home Cooking Style

  • Home
  • Drinks
  • Appetizers
  • Dinner
  • Dessert
  • About
  • Contact
  • Privacy Policy
DisclaimerTerms Of UseGDPR PolicyCookie Policy

NO-ING-IMG

To make crispy fried green tomatoes, you will need the following ingredients: - 4 medium green tomatoes, sliced into 1/4-inch thick rounds - 1 cup all-purpose flour - 1 cup cornmeal - 1 teaspoon paprika - 1 teaspoon garlic powder - 1 teaspoon salt - 1/2 teaspoon black pepper - 2 large eggs, beaten - 1/2 cup buttermilk (or milk with 1 tablespoon vinegar mixed in, let sit for 5 mins) - Oil for frying (such as vegetable or canola oil) Green tomatoes are firm and tart. They are not fully ripe, which gives them their unique taste. Choose tomatoes that feel heavy for their size. Look for smooth skin and no soft spots. These qualities ensure you get a perfect crunch when frying. The combination of flour and cornmeal creates a crispy coating. The flour adds structure, while the cornmeal gives texture and flavor. If you prefer gluten-free options, you can use gluten-free flour instead of all-purpose flour. For a lighter dish, try baking instead of frying. You can also use almond milk or oat milk in place of buttermilk for a dairy-free option. If you want extra flavor, add some cayenne pepper to the flour mix for a spicy kick. These swaps help you enjoy crispy fried green tomatoes in a way that fits your needs! For the complete recipe, check out the Full Recipe. First, wash your green tomatoes well. Then, slice them into 1/4-inch thick rounds. Lay these slices on paper towels and sprinkle a little salt on top. This helps draw out moisture. Let them sit for about 10 minutes. After that, pat them dry with more paper towels. This step makes them crispier when fried. Now it’s time to set up your breading station. In one bowl, mix the flour, paprika, garlic powder, salt, and black pepper. In another bowl, whisk the beaten eggs and buttermilk together until smooth. In a third bowl, put the cornmeal. Take each tomato slice and dip it first in the flour mixture. Shake off any extra flour. Next, dip it in the egg mixture and let the excess drip off. Finally, coat it in the cornmeal. Press gently to make sure it sticks. Repeat this for all the slices. For frying, heat about 1/4 inch of oil in a large skillet over medium-high heat. Once the oil is hot, carefully add a few tomato slices. Don’t crowd the pan. Fry them for about 3-4 minutes on each side until they are golden brown. When done, remove them and place on a plate lined with paper towels to absorb any extra oil. Keep frying until all slices are cooked. To get that perfect crust, make sure your oil is hot enough before frying. If the oil is too cool, the tomatoes will soak up oil and become soggy. You can test the heat by dropping a small piece of batter into the oil. If it sizzles, it’s ready. Also, don’t rush the cooking. Let each slice fry long enough to become golden. This gives you a nice crunch. Finally, pat the fried slices with paper towels right after frying. This helps remove excess oil for that crispy finish. For the full recipe, follow the detailed steps above and enjoy your crispy fried green tomatoes! To enhance the flavor of your crispy fried green tomatoes, consider these simple tips: - Salt the tomatoes: After slicing, sprinkle salt and let them sit. This step removes excess moisture and intensifies the tomato flavor. - Add spices: Mix different spices into your flour. Try cayenne for heat or thyme for a herbal note. - Double dip: For extra crunch, dip each slice back into the egg mixture and cornmeal again. Frying can be tricky. Avoid these common pitfalls: - Crowding the pan: Fry only a few slices at a time. Overcrowding cools the oil and leads to soggy tomatoes. - Wrong oil temperature: If the oil is too cold, the tomatoes absorb oil. If too hot, they burn. Aim for 350°F. - Not drying tomatoes: Failing to dry the salted tomatoes can lead to excessive oil absorption. Using the right tools makes a big difference. Here’s what I recommend: - Cast iron skillet: This retains heat well and provides even cooking. - Thermometer: A kitchen thermometer helps you check the oil's temperature. - Slotted spatula: This tool lets you remove the tomatoes easily while draining excess oil. These tips will help you create crispy fried green tomatoes that are packed with flavor and texture. For the full recipe, refer back to the earlier section. Enjoy your cooking! {{image_2}} To kick up the flavor, try a spicy version. Add cayenne pepper to the flour mixture. Use about half a teaspoon for a gentle heat. If you want more spice, feel free to add more. You can also mix in some chopped jalapeños into the buttermilk. It adds a nice kick! Fry these just like the classic recipe. The heat pairs well with the tartness of the green tomatoes. If you want a healthier option, bake your green tomatoes instead of frying. Preheat your oven to 425°F. After coating the tomato slices, place them on a baking sheet lined with parchment paper. Lightly spray them with cooking oil for crispiness. Bake for about 20 minutes, flipping halfway through. You'll still get a nice crunch without all the oil. Serve these with your favorite dipping sauce for a guilt-free treat. Crispy fried green tomatoes are great on their own, but they shine with dips and sides. Serve them with ranch dressing or a spicy remoulade for dipping. A tangy yogurt sauce also works well. For sides, think coleslaw, cornbread, or a fresh salad. They balance the crispy texture and add freshness. You can even stack them on a sandwich with bacon and lettuce for a tasty twist. Explore these options to elevate your snack! After enjoying your crispy fried green tomatoes, let leftovers cool completely. Place them in an airtight container. Make sure to separate layers with parchment paper to keep them crisp. Store the container in the fridge. They will stay fresh for up to three days. To reheat and keep that crunchy texture, the oven works best. Preheat your oven to 375°F (190°C). Place the tomatoes on a baking sheet lined with foil. Heat them for about 10-15 minutes. You can also use an air fryer. Set it to 350°F (175°C) and cook for 5-7 minutes. This will bring back their crunch. If you have more than you can eat, freezing is an option. First, let the fried tomatoes cool. Then, arrange them in a single layer on a baking sheet. Freeze them for about two hours. Once frozen, transfer them to a freezer bag. Squeeze out any air before sealing. They can last up to three months in the freezer, but for best taste, eat them within a month. Green tomatoes are unripe tomatoes. They are firm and tart, unlike ripe tomatoes, which are soft and sweet. The main difference lies in their color and taste. Green tomatoes have a bright green hue. Ripe tomatoes range from red to yellow. You can use green tomatoes in many dishes. They add a unique flavor that brings excitement to your meals. Yes, you can! While cornmeal gives a great crunch, you can try other coatings. Panko breadcrumbs create a nice texture. You can also use crushed crackers or even seasoned flour. Each option brings a different flavor and crunch. Feel free to experiment and find your favorite! Making crispy fried green tomatoes gluten-free is easy. Simply swap all-purpose flour for a gluten-free flour blend. Brands like almond flour or chickpea flour work well too. Just ensure that all other ingredients, like cornmeal, are gluten-free. This way, everyone can enjoy this tasty treat! - Full Recipe Reference for Crispy Fried Green Tomatoes This blog post covered everything you need to know about crispy fried green tomatoes. We explored the essential ingredients, preparation steps, and cooking tips for a perfect dish. We also shared tasty variations and how to store leftovers properly. With this knowledge, you can now enjoy making this delicious Southern treat at home. Remember, practice makes perfect, and soon you'll impress everyone with your fried green tomatoes!

Crispy Fried Green Tomatoes Irresistible Southern Snack

Crispy Fried Green Tomatoes are a delightful Southern snack you can’t resist! In this post, I’ll show you how to

To make a tasty Honey Garlic Shrimp Stir Fry, gather these simple ingredients: - 1 pound large shrimp, peeled and deveined - 2 tablespoons honey - 3 tablespoons soy sauce - 3 cloves garlic, minced - 1 tablespoon fresh ginger, grated - 1 cup bell peppers, julienned - 1 cup snap peas, trimmed - 1 small onion, sliced - 2 tablespoons sesame oil - 1 tablespoon vegetable oil - Salt and pepper to taste - 2 green onions, chopped - Sesame seeds Using fresh ingredients makes a big difference in taste. The shrimp should be large and firm. Look for vibrant bell peppers for color. Fresh garlic and ginger add a nice kick. When you combine these flavors, you create a dish that bursts with taste. You can find the full recipe at the end of this section. This dish is quick and easy. You can prep the ingredients in just 10 minutes. The cooking time is about 10 minutes, making it a perfect option for busy nights. Enjoy the sweet and savory mix in every bite! - First, combine honey, soy sauce, minced garlic, and fresh ginger in a bowl. - Mix these ingredients well and set the bowl aside. - Next, heat vegetable oil in a large skillet over medium-high heat. - Once the oil is hot, add the shrimp. - Cook the shrimp for about 2 to 3 minutes. They should turn pink and opaque. - After cooking the shrimp, remove them from the skillet and set aside. - In the same skillet, add sesame oil. - Toss in sliced onions, bell peppers, and snap peas. - Stir-fry the vegetables for about 3 to 4 minutes. They should become tender but still crisp. - Now, return the cooked shrimp to the skillet with the veggies. - Pour the honey garlic sauce over everything. - Stir-fry for an additional 2 minutes until the sauce thickens slightly. - Finally, garnish with chopped green onions and sesame seeds. - Serve the dish hot, and enjoy the flavors! For more details, check the Full Recipe. - Use low-sodium soy sauce for health. It keeps the dish tasty without too much salt. - Experiment with fresh herbs like cilantro. They add a nice touch and brighten the dish. - For perfect stir-frying, make sure your skillet is hot. This helps cook the shrimp quickly and evenly. - Avoid overcooking shrimp. Cook them just until pink and opaque. This keeps them tender and juicy. - This dish is best served with rice or noodles. They soak up the sauce well and make a great meal. - For a beautiful presentation, garnish with chopped green onions and sesame seeds. They add color and crunch. You can find the full recipe in the main article. {{image_2}} You can easily swap ingredients in this dish. If you want, try chicken or tofu instead of shrimp. Both options work well and soak up flavor. For veggies, consider using broccoli or carrots. They add a nice crunch and color. Feel free to change the sweetener in the sauce. Maple syrup or agave syrup makes a great alternative to honey. If you like a kick, add some chili sauce for heat. This twist gives the dish a fun, spicy flair. If you need gluten-free options, look for alternative soy sauce. Many brands offer tasty choices that fit your diet. For a keto-friendly version, reduce sugar and use low-carb veggies. You can still enjoy great taste while sticking to your goals. To keep your Honey Garlic Shrimp Stir Fry fresh, store it in an airtight container. This helps prevent moisture loss and keeps the flavors intact. Place the container in your fridge within two hours of cooking. The dish lasts about three days in the fridge. Always check for any odd smells or changes in color before eating leftovers. You can freeze shrimp stir fry, but it’s best to do so without the sauce. Freeze in a freezer-safe bag or container. Make sure to remove as much air as possible. This keeps the shrimp and veggies from getting freezer burn. The stir fry will last up to three months in the freezer. When you're ready to eat, thaw it overnight in the fridge. Reheat in a skillet over medium heat. Add a splash of water or broth to help steam it. This will keep your meal moist and tasty. Enjoy this quick dish anytime with just a little prep! Can I use frozen shrimp for this recipe? Yes, you can use frozen shrimp. Just make sure to thaw them first. Place them in cold water for about 15 minutes. This will help them cook evenly. How can I make this dish spicier? To add heat, try adding red pepper flakes or sriracha. You can also use a spicy soy sauce. Start with a little, and taste as you go. What sides go well with Honey Garlic Shrimp Stir Fry? Serve this dish with steamed rice or noodles. You can also add a side of stir-fried veggies. A simple salad is a nice touch too. Why did my sauce not thicken? If your sauce is thin, you might not have cooked it long enough. Let it simmer for a bit longer. If it still doesn’t thicken, you can mix a little cornstarch with water and add it to the sauce. What to do if my shrimp are tough? Tough shrimp usually mean they were overcooked. Make sure to cook them just until they turn pink and opaque. Next time, keep a close eye on the cooking time. Can I make this dish in advance? You can prep the ingredients ahead of time. Chop the veggies and marinate the shrimp. Cook just before serving for the best taste. What variations can I try for different cuisines? For a Thai twist, add basil and lime juice. For a Mexican flair, use taco seasoning and serve with avocado. Each change can lead to a new taste adventure! This blog post covered a simple and tasty honey garlic shrimp stir fry. We explored the ingredients, step-by-step instructions, and helpful tips. You can easily swap proteins or veggies to fit your taste. Proper storage methods ensure your leftovers stay fresh. For any lingering questions, the FAQs section offers solutions. This dish is fun to make and delicious to eat. Enjoy experimenting with flavors and combinations in your own kitchen!

Honey Garlic Shrimp Stir Fry Simple and Quick Meal

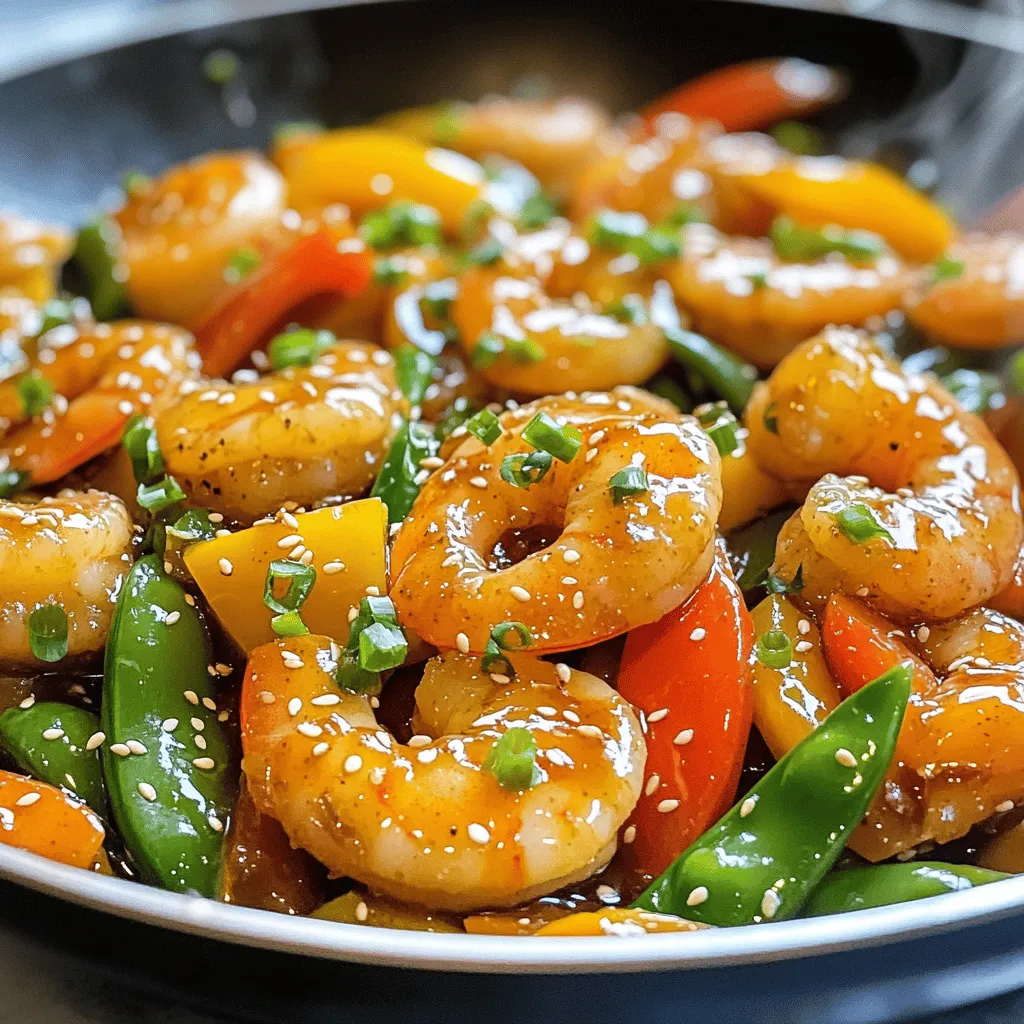
Looking for a quick and tasty dinner? Honey Garlic Shrimp Stir Fry is your answer! This colorful dish combines shrimp,

Newer posts
← Previous Page1 … Page83 Page84

dsad

© 2026 Home Cooking Style • Built with GeneratePress

Our Policies

  • Copyright Policy
  • Cookie Policy
  • GDPR Policy
  • Privacy Policy
  • Disclaimer
  • Terms Of Use

More Information

  • Home
  • About
  • Contact
  • Appetizers
  • Dessert
  • Dinner
  • Drinks
©2026, Home Cooking Style About Back To Top