Skip to content
DisclaimerTerms Of UseGDPR PolicyCookie Policy

Home Cooking Style

  • Home
  • Drinks
  • Appetizers
  • Dinner
  • Dessert
  • About
  • Contact
  • Privacy Policy
DisclaimerTerms Of UseGDPR PolicyCookie Policy

NO-ING-IMG

To make tasty chicken fajitas, you need fresh and vibrant ingredients. Here’s what you will need: - 1 pound boneless, skinless chicken breast, sliced into thin strips - 1 red bell pepper, sliced - 1 yellow bell pepper, sliced - 1 medium onion, sliced - 3 cloves garlic, minced - 2 tablespoons olive oil - 1 tablespoon chili powder - 1 teaspoon cumin - 1 teaspoon paprika - ½ teaspoon salt - ½ teaspoon black pepper - Juice of 1 lime - Flour or corn tortillas, for serving - Fresh cilantro, chopped, for garnish - Avocado slices and sour cream, for serving These ingredients create a colorful and flavorful dish. Each element adds to the overall taste, making your meal special. You can customize your chicken fajitas with some fun add-ins. Here are a few ideas: - Sliced jalapeños for heat - Black beans for extra protein - Corn for a sweet crunch - Shredded cheese for richness - Sour cream or guacamole for creaminess Feel free to mix and match these options. They can transform your dish and suit your taste. To cook your chicken fajitas, you will need a few basic tools: - A large bowl for marinating the chicken - A skillet or cast-iron pan for cooking - A spatula or wooden spoon for stirring - A cutting board and knife for slicing vegetables With these tools, you can easily prepare your meal. Make sure to have everything ready before you start cooking. This will help you enjoy the process and create a delicious dish. For the full recipe, refer to the earlier section. Start by gathering your chicken and spices. In a large bowl, mix sliced chicken, lime juice, olive oil, chili powder, cumin, paprika, salt, and black pepper. Make sure every piece of chicken is coated well. Cover the bowl and let it sit. I suggest waiting at least 15 minutes. If you have more time, let it marinate for up to 2 hours in the fridge. This step adds great flavor. Next, heat a large skillet over medium-high heat. Add the marinated chicken to the hot skillet in a single layer. Cook for about 5 to 7 minutes. Stir occasionally so that it cooks evenly. You want the chicken to be fully cooked and have a nice char. Once done, take the chicken out and keep it warm on a plate. In the same skillet, you can add a bit more olive oil if needed. Toss in the sliced onion and bell peppers. Sauté these for about 4 to 5 minutes. You want them to be tender and slightly caramelized. This brings out their natural sweetness and adds more flavor to your fajitas. Now, add the cooked chicken back into the skillet with the veggies. Mix everything well so the flavors combine. Cook together for an extra 1 to 2 minutes. This helps the chicken soak up the taste of the vegetables. You’ll love how it all comes together. To serve, warm the tortillas in a separate pan or microwave. Place the sizzling chicken and veggie mix on the tortillas. Top with chopped fresh cilantro, slices of avocado, and a dollop of sour cream. You can find the full recipe for more details. Make it a fun meal by letting everyone build their own fajitas! For juicy chicken, cut it into thin strips. This helps it cook fast. Marinate the chicken for at least 15 minutes. The longer you marinate, the more flavor it gets. When cooking, heat the skillet until it's hot. This gives the chicken a nice sear. Cook it in a single layer to avoid steaming. Stir only when needed to get a good char. I love using bell peppers and onions in my fajitas. They add color and sweetness. Red and yellow bell peppers taste great together. You can also add green bell peppers for a bit of crunch. If you want more flavor, try adding mushrooms or zucchini. These veggies cook well and soak up the spices. To boost flavor, add fresh herbs like cilantro. A pinch of lime juice brightens the dish. You can also sprinkle in some chili flakes for heat. If you like smoky flavors, try adding smoked paprika. For a sweeter touch, a bit of honey or agave works well. Mix and match these ideas to find your perfect taste. For the full recipe, check out the link above. {{image_2}} You can easily make vegetarian fajitas. Just swap the chicken for veggies. Use mushrooms, zucchini, or eggplant. These options give great flavor and texture. You can still use the same spices. Marinate your vegetables just like the chicken for a tasty result. This way, you get all the yum without meat! Chicken is not the only choice. You can use beef, shrimp, or even tofu. Each protein brings its own unique taste. Beef fajitas are rich and hearty, while shrimp is light and fresh. Just adjust cooking times. For shrimp, cook for only 3-4 minutes. Tofu can soak up the marinade well. Use firm tofu for the best results! If you love heat, make spicy chicken fajitas. Add jalapeños or cayenne pepper to the marinade. You can also use hot sauce in the mix. For more spice, serve with salsa or pickled peppers. Adjust the heat to your liking. If you want a kick, add some crushed red pepper to the veggies while cooking. You’ll have a sizzling dish that will wake up your taste buds! For more ideas, check out the Full Recipe. To store leftover fajitas, let them cool down first. Place the chicken and veggies in an airtight container. If you have extra tortillas, keep them in a separate bag. This keeps them fresh and prevents sogginess. Store the container in the fridge. Use the leftovers within three days for the best taste. When you're ready to eat the leftovers, reheat them on the stove for best results. Use a skillet over medium heat. Add a splash of oil and toss in the chicken and veggies. Heat for about five minutes, stirring until hot. You can also use the microwave. Place the fajitas in a microwave-safe dish, cover, and heat for one to two minutes. Stir halfway through for even heating. You can freeze the chicken fajitas for later use. First, make sure they are cool. Pack the chicken and veggies in freezer bags. Squeeze out as much air as possible. Label the bags with the date. They will keep well for up to three months. When you’re ready to use them, thaw in the fridge overnight. Then, reheat as mentioned above. Enjoy your quick and easy meal anytime! Yes, you can make Easy Chicken Fajitas in advance. Prepare the chicken and veggies, then store them separately in the fridge. You can marinate the chicken for up to two hours before cooking. This helps the flavors soak in better. When you are ready to eat, just sauté the veggies and heat the chicken. This method saves you time on busy days. To spice up your fajitas, add chopped jalapeños or a pinch of cayenne pepper to the marinade. You can also use hot salsa as a topping. If you enjoy heat, try a spicier chili powder or add crushed red pepper flakes. Adjust the heat level to suit your taste. Spice makes the dish exciting and full of flavor. Flour tortillas are soft and hold well, making them a popular choice. They are great for wrapping your fajitas. Corn tortillas are a good option if you prefer a gluten-free choice. They have a nice texture and flavor. Choose the size that fits your meal best, whether small or large. Each type adds its own touch to your dish. For the full recipe, check the detailed instructions above. You’ve learned about the main ingredients for easy chicken fajitas and how to cook them. We covered marinating, cooking, and serving. You now have tips for perfect chicken, vegetable choices, and flavor boosts. Don’t forget the variations for vegetarian or spicy options. With the right storage, your leftovers will stay fresh. Keep these tips in mind as you cook. I hope you enjoy making delicious fajitas at home. Trust me, they will be a hit!

Easy Chicken Fajitas Flavorful and Quick Recipe

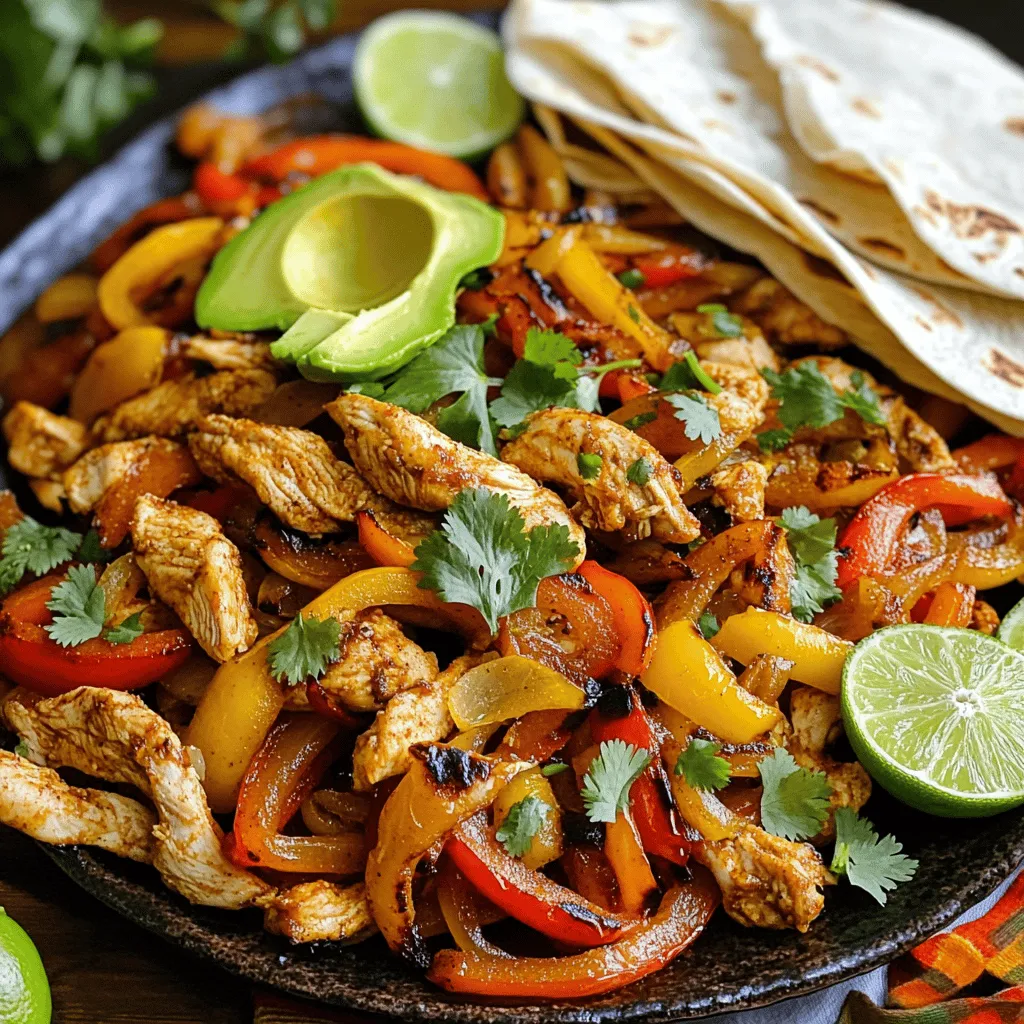
If you’re seeking a quick and tasty meal, look no further! My Easy Chicken Fajitas recipe combines tender chicken, vibrant

To make the peach salad with honey dressing, gather these items: - 3 ripe peaches, sliced - 2 cups arugula or mixed greens - 1/4 cup crumbled feta cheese - 1/4 cup walnuts, toasted and roughly chopped - 1 tablespoon fresh basil, finely chopped - 1 tablespoon fresh mint, finely chopped - 2 tablespoons honey - 1 tablespoon olive oil - 1 tablespoon apple cider vinegar - Salt and pepper to taste You can change the salad to fit your taste! Here are some ideas: - Use goat cheese instead of feta for a creamier texture. - Swap walnuts for pecans or almonds for a different crunch. - Add sliced strawberries or blueberries for extra sweetness. - Toss in some grilled chicken or shrimp for added protein. - Use spinach or kale instead of arugula for a heartier base. This peach salad is not just tasty; it's good for you too! Here’s a quick look at the nutrition: - Calories: Approximately 200 per serving - Protein: About 6 grams - Fat: Roughly 12 grams (healthy fats from olive oil and nuts) - Carbohydrates: Around 20 grams (mainly from fruit and greens) - Fiber: About 3 grams (great for digestion) The salad provides a refreshing mix of vitamins and minerals. The peaches offer vitamin C, while the greens add iron and calcium. The nuts give you healthy fats and protein. Enjoy a bowl of this salad for a light, healthy meal! For the full recipe, check out the Peach Paradise Salad section. To make the honey dressing, gather your ingredients. You need honey, olive oil, apple cider vinegar, salt, and pepper. In a small bowl, add two tablespoons of honey. Pour in one tablespoon of olive oil. Next, add one tablespoon of apple cider vinegar. Sprinkle in a pinch of salt and some pepper. Whisk the mix until it blends well. This dressing adds a sweet and tangy flavor to your salad. Now, let’s build our salad. Start with a large salad bowl. Place two cups of arugula or mixed greens at the bottom. This will be your fresh base. Next, take three ripe peaches and slice them. Arrange the peach slices on top of the greens. This adds color and sweetness. Then, add a quarter cup of crumbled feta cheese. This cheese gives a creamy taste. Sprinkle a quarter cup of toasted walnuts over everything. They add a nice crunch. For a fresh kick, sprinkle one tablespoon of finely chopped basil and one tablespoon of finely chopped mint. These herbs enhance the salad’s flavor. When it’s time to serve, drizzle the honey dressing over the salad. Do this just before serving to keep the greens crisp. Gently toss the salad to mix all the flavors. Take care not to bruise the peaches. Taste your salad and adjust the salt or pepper if needed. For a beautiful presentation, serve it in a large, shallow bowl. This lets the bright colors shine. You can also garnish with a few extra peach slices and a sprig of basil on top. This adds an extra touch of elegance. For the full recipe, check out the detailed instructions above. When picking peaches, look for ones that feel soft but not mushy. The color should be bright, with a hint of yellow or cream. If you smell a sweet peach aroma, you’ve found a good one! Avoid peaches with dark spots or wrinkles. These signs show that the fruit may be overripe. Fresh peaches are the star of this salad, so choose wisely. To make your peach salad even more tasty, try adding other fruits. Sliced strawberries or blueberries add a nice burst of sweetness. You can also mix in nuts like almonds or pecans for a crunchy texture. If you want a zesty twist, consider adding a squeeze of lemon juice. Fresh herbs like cilantro or dill can also brighten the flavors. Experiment to find your favorite mix! You can prep parts of this salad ahead of time. Make the honey dressing and store it in the fridge. Slice the peaches just before serving to keep them fresh. If you want to save time, wash and dry the greens in advance. When it’s time to eat, toss everything together. This keeps the salad crisp and delightful. Remember, fresh ingredients shine best in this dish. For the full recipe, check the previous section! {{image_2}} Adding protein to your peach salad makes it heartier. Grilled chicken or shrimp works well. You can also use chickpeas for a plant-based choice. Simply toss them in with the greens. If you like fish, try flaked salmon or tuna. They add a nice touch of flavor and texture. If you have food allergies or preferences, there are great substitutes. For dairy-free options, use a dairy-free cheese. Nutritional yeast can add a cheesy flavor without the dairy. If you are nut-free, replace walnuts with sunflower seeds. They add crunch without the risk of allergens. Use seasonal fruits to keep your salad fresh. In the fall, swap peaches for apples or pears. In winter, try citrus fruits like oranges or grapefruits. These fruits add bright flavors and colors. You can also change the greens. Use kale or spinach in cooler months for extra nutrients. Check the Full Recipe for all the tasty ideas. To keep your peach salad fresh, store it properly. Use an airtight container. This helps prevent air from making the salad soggy. If you have leftover dressing, store it in a separate jar. This way, you can dress the salad just before serving. Keep the salad in the fridge. The cold temperature helps maintain its crispness. If you know you will not eat it all at once, wait to add the dressing. Add the honey dressing right before serving. This keeps the greens bright and crunchy. If you have leftover salad, use it in other dishes. Try adding it to a wrap or sandwich. You can also mix it into a grain bowl. Just remember, salads do not reheat well. Enjoy them fresh for the best taste! For the full recipe, check out the Peach Paradise Salad. Yes, you can use canned peaches. Choose peaches packed in juice or water. Drain them well before using. Fresh peaches offer a better texture and flavor, but canned peaches work in a pinch. To make this salad vegan, skip the feta cheese. You can replace it with avocado for creaminess. Use maple syrup instead of honey for the dressing. This way, you keep the flavors bright and fresh. This salad pairs well with grilled chicken or fish. It also works great as a side to a light sandwich. A bowl of quinoa or couscous can add heartiness. For a complete meal, try serving it with a refreshing soup. You can find the full recipe in the main article. This blog post covered all you need to know about salad making. I shared ingredients, tips, and different ways to enjoy your salad. You learned how to prepare a honey dressing and assemble everything beautifully. Remember, fresh peaches and flavor combos make a big difference. Store leftovers properly to keep them fresh. Try different protein options or seasonal swaps to fit your needs. Enjoy creating your delicious salad. With these ideas, you’ll impress anyone who tries it. Happy cooking!

Peach Salad with Honey Dressing Fresh and Flavorful Delight

Get ready for a refreshing summer treat! This Peach Salad with Honey Dressing combines juicy peaches and sweet honey for

To make a delicious quinoa and black bean chili, gather these items: - 1 cup quinoa, rinsed - 2 cans (15 oz each) black beans, drained and rinsed - 1 can (14 oz) diced tomatoes (with juices) - 1 red bell pepper, diced - 1 green bell pepper, diced - 1 medium onion, chopped - 3 cloves garlic, minced - 2 cups vegetable broth - 1 tablespoon olive oil - 1 tablespoon chili powder - 1 teaspoon cumin - 1 teaspoon smoked paprika - Salt and pepper to taste - Optional toppings: avocado slices, fresh cilantro, lime wedges Using fresh ingredients makes a big difference in your dish. Fresh veggies add flavor and texture. They also boost the nutrition of your meal. Fresh herbs, like cilantro, bring bright notes and enhance the chili's taste. When you use fresh ingredients, you create a more vibrant and tasty dish. This can elevate your cooking and impress your family or guests. Do you need to swap some ingredients? No worries! Here are some easy substitutions: - For quinoa, you can use brown rice or barley if desired. - Canned beans can be replaced with cooked dried beans. Just soak and cook them first. - If you lack bell peppers, try zucchini or corn for a different texture. - Use chicken broth instead of vegetable broth for a non-vegan option. - If you're out of chili powder, mix paprika, cumin, and cayenne for a similar taste. Feel free to get creative with your choices. Cooking should be fun and personal! For the full recipe, check the section above. To make this quinoa and black bean chili, start by heating olive oil in a large pot over medium heat. Once hot, add chopped onion. Cook it for about five minutes. The onion should look soft and clear. Next, add minced garlic and stir for one minute. You want to smell the garlic now! Then, toss in the diced red and green bell peppers. Cook them for three to four minutes until they start to soften. The colors will brighten your dish. Now, it's time to add the star ingredients. Stir in rinsed quinoa, black beans, diced tomatoes with their juices, and vegetable broth. Also, add the chili powder, cumin, and smoked paprika. Mix everything well. Bring this mixture to a boil. Once boiling, reduce the heat to low. Cover the pot and let it simmer for about 20 to 25 minutes. This allows the quinoa to cook and soak up the flavors. When time is up, check that the quinoa is fluffy and most of the liquid is gone. Season with salt and pepper to taste. Timing is key in this recipe. If you cook the onion too long, it may burn. This can ruin the taste. You want it soft, not brown. Cooking the garlic for just one minute helps keep its flavor bright. If you add the peppers too soon, they may overcook and lose their crunch. When simmering, keep an eye on the pot. If it boils too hard, it can stick to the bottom. A gentle simmer allows the quinoa to cook well without burning. To get perfect quinoa, rinse it before using. This removes the bitter outer coating. Always use the correct ratio of liquid to quinoa. For every cup of quinoa, use two cups of broth. This will help it cook evenly and absorb flavors. Check the quinoa after 20 minutes of cooking. It should be fluffy and not mushy. If it looks dry, add a bit more broth. If you follow these tips, your quinoa will be just right! Try this full recipe for a tasty meal that is sure to please. When making quinoa and black bean chili, watch out for a few common issues. One pitfall is overcooking the quinoa. It should be fluffy, not mushy. Make sure to simmer it just until it absorbs the broth. Another mistake is not rinsing the black beans. Rinsing helps remove excess sodium and keeps your chili fresh. Finally, don’t skip the spices. They add depth and warmth. If you skip them, your chili may taste flat. To boost the flavor in your chili, try adding fresh herbs. Cilantro adds brightness, while lime gives a zesty kick. For spice lovers, consider adding fresh jalapeños or a dash of hot sauce. If you want a smoky flavor, increase the smoked paprika. Taste your chili as you cook. Adjust the spices to find the perfect balance for your taste buds. Using the right tools can save time and energy. A sharp knife makes chopping veggies easy and quick. A large pot is essential for combining all ingredients without spilling. If you have an immersion blender, use it to puree part of the chili for a creamier texture. It’s also handy for blending sauces. Lastly, a good measuring cup ensures you get the right amount of broth and spices. These tools will help you create a delicious dish with ease. For the full recipe, check out the complete guide for making this tasty quinoa and black bean chili. {{image_2}} You can easily add meat to your quinoa and black bean chili. Ground turkey or beef works great. Just cook the meat before adding the other ingredients. This adds more flavor and protein. You can also use chicken if you prefer. Make sure to drain any fat after cooking. This keeps the chili light and healthy. If you want a vegetarian or vegan chili, this recipe fits perfectly. It is already meat-free. To boost protein, add more beans or lentils. You can also use plant-based meat substitutes for a unique twist. This chili is filling enough to keep you satisfied without meat. Pair it with rice or serve it in a bowl for a hearty meal. Spices and herbs can change the flavor of your chili. You can add cayenne pepper for heat or oregano for earthiness. Fresh herbs like cilantro or parsley brighten the dish. Experiment with different spice blends to find your favorite. If you like a smokier taste, try adding more smoked paprika. Each variation makes the chili unique and exciting. Try the Full Recipe to enjoy this easy and delicious dish! After enjoying your quinoa and black bean chili, store any leftovers in an airtight container. Make sure the chili cools to room temperature before sealing it. This helps prevent condensation, which can make your dish watery. Store it in the fridge and eat it within three to five days for the best taste. When you’re ready to enjoy your leftovers, reheat the chili on the stovetop for the best flavor. Use medium heat and stir often. This helps heat it evenly. You can also microwave it in a bowl. Just cover it loosely and heat in short bursts, stirring in between. Add a splash of vegetable broth if it seems too thick. If you want to keep your chili longer, freezing is a great option. Pour the cooled chili into freezer-safe containers. Leave some space at the top since it will expand when frozen. It can last up to three months in the freezer. When you’re ready to eat it, thaw it overnight in the fridge before reheating. For the full recipe, check the earlier sections. Quinoa and black bean chili lasts about 5 to 7 days in the fridge. Store it in an airtight container. This helps keep the chili fresh and safe to eat. When you want to enjoy it again, just heat it up on the stove or in the microwave. Yes, you can prepare this recipe in advance. You can make the chili and store it for later. Just let it cool before putting it in the fridge. This makes it easy to have a healthy meal ready when you need it. You can even freeze it for up to 3 months. Quinoa and black beans are packed with nutrition. They both offer protein, fiber, and important vitamins and minerals. Quinoa is a complete protein, which means it has all nine essential amino acids. Black beans are rich in antioxidants and help with digestion. Together, they make a healthy and filling dish. If you want to learn more about making this dish, check out the Full Recipe. This blog post covers how to make Quinoa and Black Bean Chili. We looked at the must-have ingredients and their fresh alternatives. I shared a step-by-step process to ensure great flavor and texture. I also gave tips to avoid common mistakes while cooking. Lastly, we discussed how to store leftovers and even adapt the recipe for different diets. With these insights, you can cook a delicious chili that everyone will love. Enjoy making your meal and sharing it with others!

Quinoa and Black Bean Chili Flavorful Healthy Dish

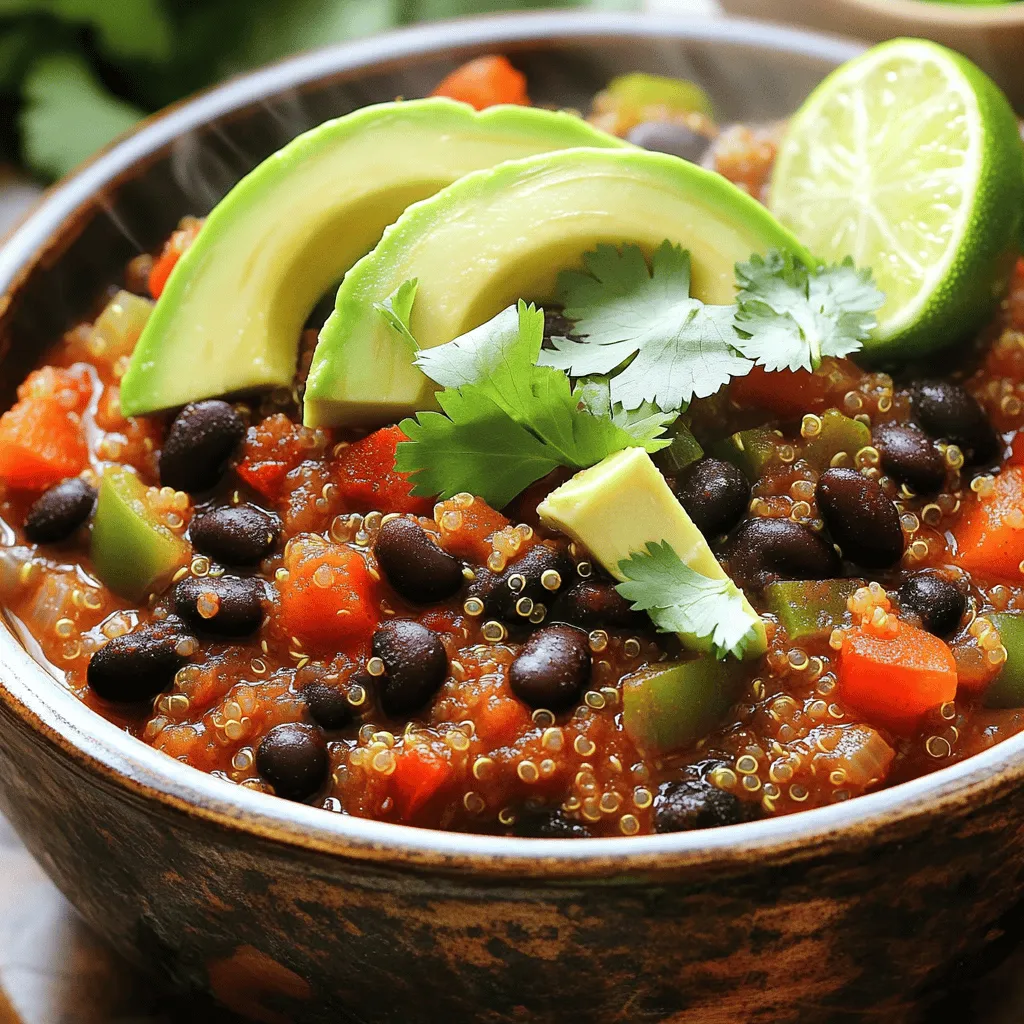
Looking for a hearty and healthy meal? My Quinoa and Black Bean Chili is the answer! Packed with rich flavors

To make a tasty Chicken Alfredo Bake, gather these simple ingredients: - 2 cups cooked rotini pasta - 2 cups cooked chicken breast, shredded - 1 cup broccoli florets, blanched - 1 cup Alfredo sauce (store-bought or homemade) - 1 cup mozzarella cheese, shredded - 1/2 cup parmesan cheese, grated - 1 teaspoon garlic powder - 1 teaspoon Italian seasoning - Salt and pepper to taste - Fresh parsley for garnish (optional) These ingredients create a creamy dish that is both filling and comforting. If you want to mix things up, you can change a few ingredients. Here are some ideas: - Pasta: Use penne or rotini for a different texture. - Chicken: Swap cooked chicken for turkey or cooked sausage. - Veggies: Add spinach, bell peppers, or mushrooms for extra flavor. - Sauce: Try using a cheese sauce instead of Alfredo for a twist. - Cheese: Substitute cheddar or gouda for a sharper taste. These substitutions can help you tailor the recipe to your taste or what you have at home. This Chicken Alfredo Bake is delicious but also packed with nutrients. Here’s a quick breakdown of what you get per serving: - Calories: Approximately 500 - Protein: 35g - Carbohydrates: 45g - Fat: 20g - Fiber: 3g This dish offers a good balance of protein and carbs, making it a well-rounded meal. Always check for specific dietary needs when preparing. First, gather your ingredients. You will need cooked rotini pasta, shredded chicken, and blanched broccoli. It helps to have everything ready before you start. Preheat your oven to 375°F (190°C). Grease a 9x13 inch baking dish with cooking spray or butter. This step makes for easy cleanup later. In a large bowl, add the cooked rotini, shredded chicken, and broccoli. Pour in the Alfredo sauce. Mix it all together until each piece is coated. This keeps every bite creamy and flavorful. Next, add garlic powder, Italian seasoning, salt, and pepper. Stir well to combine. Make sure the flavors spread evenly throughout the mixture. Now, transfer the mixture to your greased baking dish. Spread it out evenly. This helps it cook better. Sprinkle shredded mozzarella and grated parmesan cheese on top. Bake in the oven for about 25-30 minutes. You want the cheese to be bubbly and golden brown. Once it is done, take it out and let it cool for 5 minutes. Garnish with fresh parsley if you like. Enjoy your savory Chicken Alfredo Bake! For the complete recipe, check the Full Recipe. To get the creamiest Alfredo, always use a good-quality sauce. You can make your own for a fresh taste. If you choose store-bought, look for one with real cream. Add a splash of milk or cream to thin it out. This helps it coat the pasta better. Mix in some extra cheese for added creaminess. Parmesan and mozzarella work well together. To avoid soggy pasta, cook it al dente. This means it should be firm to the bite. Drain the pasta well and do not rinse it. Rinsing removes starch, which helps the sauce stick. Also, mix the pasta with sauce right before baking. This keeps it from soaking too much sauce during cooking. For perfectly baked cheese, use a mix of mozzarella and parmesan. Mozzarella melts beautifully, while parmesan gives a nice crust. Sprinkle a good amount on top to create that golden layer. For an extra touch, broil the dish for a minute at the end. Keep an eye on it to prevent burning. This trick adds a lovely crunch to your Chicken Alfredo Bake. You can find the Full Recipe at the beginning of this article. {{image_2}} You can add more color and nutrition to your Chicken Alfredo Bake. Try mixing in vegetables like spinach, bell peppers, or zucchini. They not only boost the health factor but also add a nice crunch and flavor. Just chop them up and toss them into the mixture with the chicken and pasta. Blanching the veggies first helps keep their bright color and crispness. If you need a gluten-free option, swap the pasta for gluten-free rotini or penne. Many brands offer gluten-free pasta that tastes great. For the sauce, check that your Alfredo sauce is gluten-free, or make your own using gluten-free ingredients. This way, everyone can enjoy this creamy dish. While rotini works well, you can experiment with other pasta shapes. Penne or fusilli can hold the sauce nicely. They also change the texture and taste of your bake. You could even try farfalle for a fun look. Each type of pasta brings its own unique flavor to the dish. Be bold and explore new combinations for a tasty twist on the classic recipe. For the full recipe, check out the detailed steps above. To keep your Chicken Alfredo Bake fresh, store it in an airtight container. Make sure it cools to room temperature first. Place it in the fridge if you plan to eat it within three days. If you want to keep it for longer, freezing is a great option. When you're ready to enjoy leftovers, reheat them gently. I suggest using the oven for the best texture. Preheat to 350°F (175°C). Place your Chicken Alfredo Bake in an oven-safe dish and cover it with foil to prevent drying out. Heat for about 20 minutes, or until it's warm all the way through. You can also use the microwave for convenience. Just heat in short bursts, stirring in between to ensure even warming. Freezing is a smart way to save your Chicken Alfredo Bake. First, let it cool completely. Then, wrap it tightly in plastic wrap and foil or place it in a freezer-safe container. Be sure to label it with the date. It can last up to three months in the freezer. When you’re ready to eat, thaw it in the fridge overnight before reheating. This method keeps it tasty and prevents freezer burn. For more details, check out the Full Recipe for Chicken Alfredo Bake. You can prepare the Chicken Alfredo Bake a day in advance. Cook the pasta and chicken as usual. Then, mix them with the broccoli and Alfredo sauce. Place this mixture in your baking dish, but don’t add the cheese yet. Cover the dish with plastic wrap and store it in the fridge. When you are ready to bake, just sprinkle the cheese on top. Bake it according to the recipe. This method saves time on busy days. Yes, you can use different cheeses! Cheddar cheese adds a nice sharp flavor. Gouda offers a smoky taste that many love. You might also enjoy using cream cheese for extra creaminess. Just remember to adjust the amounts to keep the right texture. Mixing cheeses can create a fun twist on the classic recipe. Several side dishes work well with Chicken Alfredo Bake. A fresh green salad adds a nice crunch. Garlic bread can soak up the creamy sauce. You could also serve steamed veggies for a healthy balance. For a fun touch, try a fruit salad to contrast the rich flavors. Each side enhances the meal and keeps it exciting. In this post, I covered how to make a Chicken Alfredo Bake, from ingredients to tips. I shared ingredient lists, options for substitutions, and the nutritional value. You learned step-by-step instructions and tips for creamy results and baked cheese. I also provided variations like adding vegetables and gluten-free options. Finally, I explained storage and reheating techniques. With this info, you can create a tasty dish that fits your needs perfectly. Enjoy your cooking adventure with Chicken Alfredo Bake!

Savory Chicken Alfredo Bake Quick and Easy Recipe

Are you craving a dish that’s creamy, cheesy, and full of flavor? You’re in the right place! My Savory Chicken

- 2 pounds Yukon Gold potatoes, peeled and cubed - 1 bulb of garlic - 1/2 cup unsalted butter (1 stick) - 1 cup heavy cream - Salt and pepper to taste - Fresh chives, for garnish Choosing the right potatoes matters. Yukon Gold potatoes are the best for mashing. They have a creamy texture and buttery flavor. This makes for rich, smooth mashed potatoes. Avoid using waxy potatoes like red potatoes. They can become gummy when mashed. Fresh garlic brings a strong flavor. Roasting garlic softens it and adds sweetness. Use a whole garlic bulb for this recipe. The process of roasting makes it easy to squeeze into the potatoes. It adds depth to the dish. Cheese is a great add-in. Try adding parmesan or cheddar for extra flavor. Cream cheese can also add a nice tang. Fresh herbs like rosemary or thyme can enhance the taste. Just chop them finely and mix them in. Spices like paprika or garlic powder can add warmth and depth. 1. First, preheat your oven to 400°F (200°C). This step is key for roasting garlic. 2. Take the garlic bulb and cut off the top. This will expose the cloves. 3. Drizzle olive oil over the garlic and wrap it in foil. 4. Place the wrapped garlic in the oven. Roast it for about 30-35 minutes until soft and golden. 5. While the garlic roasts, bring a large pot of salted water to a boil. 6. Add the cubed Yukon Gold potatoes to the boiling water. Cook them for about 15-20 minutes. They should be fork-tender. 1. Once the potatoes are cooked, drain them well and return them to the pot. 2. Squeeze the roasted garlic into the pot with the potatoes. The sweet flavor will shine here. 3. Add the butter and heavy cream to the pot. These ingredients bring creaminess. 4. Use a potato masher or hand mixer to mash everything together. You want a creamy and smooth texture here. 5. If the potatoes seem too thick, add more cream until you reach your desired consistency. 6. Season with salt and pepper to taste. Mix thoroughly to ensure even flavor. 1. Transfer the mashed potatoes to a serving dish. This will make it look nice. 2. Garnish with freshly chopped chives for a pop of color and flavor. 3. Pair these mashed potatoes with your favorite main dish. They go well with meats or veggies. For the detailed recipe, check out the Full Recipe. To achieve creaminess in your mashed potatoes, use Yukon Gold potatoes. They have a smooth texture. Cook them until fork-tender, but don’t overcook. This helps keep them fluffy. Once cooked, drain the potatoes well. Excess water will make them gluey. To avoid gluey potatoes, mash them gently. Use a potato masher or hand mixer, but don’t overdo it. Too much mixing can release starch. This makes your potatoes sticky instead of creamy. For a richer taste, use homemade chicken broth. It adds depth without overpowering the garlic. Simply replace some heavy cream with broth. You can also try adding fresh herbs like thyme or rosemary. They bring a fresh taste to the dish. Other seasonings can enhance the flavor, too. A pinch of nutmeg adds warmth. You might like to try smoked paprika for a hint of smokiness. Experiment to find your favorite blend. Meal prep can save you time. You can peel and cut the potatoes a day ahead. Store them in cold water in the fridge. This keeps them fresh and ready to cook. Cooking potatoes in advance is smart for busy days. You can boil them and store them in the fridge. When you’re ready, just reheat them with garlic and cream. They will still taste great! For the complete recipe, check out the Full Recipe. {{image_2}} You can mix things up with roasted garlic and herbs in your mashed potatoes. Adding herbs like rosemary or thyme gives a fresh taste. Just chop them finely and mix them in when you mash the potatoes. Cheese-infused mashed potatoes are another great option. You can use sharp cheddar, cream cheese, or even goat cheese. Just stir in your cheese of choice after mashing. This makes everything rich and creamy. If you're vegan, you can still enjoy this dish! Use plant-based butter and almond or coconut milk instead of cream. These swaps keep the flavor while making it vegan-friendly. For those needing gluten-free options, you’re in luck! This recipe is naturally gluten-free since all the ingredients are safe for a gluten-free diet. Just check your butter and cream for any hidden gluten. Roasted garlic mashed potatoes shine as a side dish. They pair well with roasted meats, stews, or grilled veggies. Each bite brings comfort and flavor to any meal. You can also use these mashed potatoes in other recipes. Try them as a topping for shepherd's pie. You can even use them in stuffed peppers for a fun twist! For the full recipe, check out the details above. To store leftovers, let the potatoes cool first. Place them in an airtight container. They should last up to four days in the fridge. When ready to eat, check for any bad smells or changes in texture. For freezing, use a freezer-safe container. Before freezing, let the mashed potatoes cool completely. They can be stored for up to three months. It’s best to freeze them in portions for easy use later. When ready to eat, thaw them overnight in the fridge. To reheat, use a microwave or stovetop. Add a splash of heavy cream or milk. This helps keep the potatoes creamy. Stir frequently to avoid hot spots. If using the oven, cover them with foil to keep moisture in. Enjoy your delicious, creamy roasted garlic mashed potatoes! For the full recipe, check out the previous sections. What potatoes are best for mashing? Yukon Gold potatoes work best for mashing. They are creamy and smooth. Their natural sweetness adds great flavor. Can I use pre-roasted garlic? Yes, you can use pre-roasted garlic. It saves time and still gives great flavor. Just make sure it is fresh. How can I make mashed potatoes ahead of time? You can make mashed potatoes ahead. Prepare them, and then cool them quickly. Store in the fridge for up to two days. How long should I boil potatoes? Boil the potatoes for 15-20 minutes. They should be fork-tender when done. Check them with a fork for doneness. Can I use a food processor for mashing? You can use a food processor, but be careful. Over-processing can make them gluey. Use it in short bursts for best results. What can I use instead of heavy cream? You can use half-and-half or milk. For a lighter option, try sour cream or Greek yogurt. Can I omit the butter? Yes, you can omit the butter. Use olive oil or a dairy-free substitute for richness. It will still be tasty. In this blog post, we explored the perfect mashed potatoes. We covered key ingredients, like Yukon Gold potatoes and fresh garlic. I shared preparation steps and the mashing process for creamy results. You learned tips for enhancing flavor and saving time. Variations, storage info, and common questions helped round out your knowledge. Remember, good mashed potatoes come from choosing the right ingredients and techniques. Experiment with flavors and enjoy the process. With these tips, your mashed potatoes will impress everyone at the table. Enjoy every bite!

Roasted Garlic Mashed Potatoes Creamy and Easy Recipe

If you crave a side dish that’s both rich and easy to make, you’re in the right place! My Roasted

For this dish, you need a few key ingredients to create the base. They are: - 400g firm tofu, pressed and cubed - 1 tablespoon vegetable oil - 2-3 tablespoons green curry paste (adjust to taste) - 1 can (400ml) coconut milk - 1 cup vegetable broth These ingredients give the curry its rich flavor and creamy texture. Firm tofu holds its shape well, making it perfect for this dish. The green curry paste adds that iconic spice and depth. Coconut milk makes it creamy, while vegetable broth enhances the taste. Adding fresh vegetables makes your curry vibrant and healthy. I recommend: - 1 cup bell peppers, sliced (mix of red, yellow, and green) - 1 cup zucchini, sliced - 1 cup baby spinach Bell peppers bring sweetness and color, while zucchini adds a nice texture. Baby spinach wilts down perfectly, adding freshness to the dish. Seasonings and garnishes elevate your Thai green curry. Use: - 1 tablespoon soy sauce - 1 tablespoon brown sugar - Fresh Thai basil leaves, for garnish Soy sauce adds umami, while brown sugar balances the heat. Fresh Thai basil leaves offer a fragrant finish. This combination makes each bite delicious. For the full recipe, check out the details provided above. To start, you need to press the tofu. This step helps remove extra moisture. Wrap the tofu in a clean kitchen towel. Place a heavy object on top, like a cast iron pan. Let it sit for about 15 minutes. After pressing, cut the tofu into small cubes. This size helps it cook evenly and soak up the flavors. Next, heat a tablespoon of vegetable oil in a big pan or wok. Set the heat to medium. Add one sliced onion and sauté it for about 3-4 minutes. You want the onion to become soft and translucent. This step builds the flavor foundation. Now, stir in 2-3 tablespoons of green curry paste. Cook it for another minute. You will smell a wonderful aroma as the paste warms up. Now, pour in one can of coconut milk and one cup of vegetable broth. Stir well to mix everything. Bring this mix to a gentle simmer. Add one cup each of sliced bell peppers and zucchini. Cook these for 5-7 minutes until they are tender. Next, gently add your cubed tofu to the pan. Then, stir in one tablespoon of soy sauce and one tablespoon of brown sugar. Mix everything well. Let it cook for another 3-4 minutes to warm the tofu through. Finally, fold in one cup of baby spinach. Let it wilt gently for about 2 minutes. If needed, taste the curry and adjust with more soy sauce. Serve this dish hot over jasmine rice. For a lovely touch, garnish with fresh Thai basil leaves. Enjoy your Thai green curry with tofu! For the full recipe, check out the details above. To get the best flavor, start with the right curry paste. Use 2-3 tablespoons of green curry paste. You can always add more if you want it spicier. Remember, a little goes a long way. For the perfect texture, coconut milk is key. Use a can of full-fat coconut milk for creaminess. If you like a thinner sauce, combine it with vegetable broth. This mix gives your curry a nice, rich consistency. When sautéing vegetables, make sure your pan is hot. Add a splash of oil and let the onions cook until they turn soft. This draws out their sweetness and builds a solid base for your curry. When adding tofu, do it gently. Cut your firm tofu into cubes. Use a spatula to lower it into the curry. This keeps the tofu from breaking apart. Stir carefully to coat it without mashing it up. Pair your Thai green curry with jasmine rice. This rice has the perfect texture and flavor to balance the curry's spices. Serve the curry over a bed of rice for a delightful meal. For presentation, use a large bowl. Ladle the curry in and sprinkle fresh Thai basil on top. This adds a pop of color and a fresh herbal note. You can also slice some lime wedges to brighten the dish. For the full recipe, check out the details above. Enjoy your cooking! {{image_2}} You can easily change the main protein in this dish. Try chicken or shrimp for a non-vegetarian option. If you prefer a plant-based choice, chickpeas work great too. Each option brings its own texture and flavor. For vegetables, feel free to get creative. Use what’s in season or what you have on hand. Carrots, green beans, or eggplant all add unique tastes. This flexibility lets you enjoy a new dish each time. To make this dish vegan, ensure you use plant-based options for any non-vegan ingredients. The recipe is already vegan-friendly, as it uses tofu and vegetable broth. If you need a gluten-free option, switch out regular soy sauce for a gluten-free brand. This small change keeps the flavors intact without the gluten. Want to boost freshness? Add lime juice or lime zest to your curry. The bright flavor really lifts the dish. For garnishing, consider using different herbs. Cilantro or mint can give a fresh twist. Experiment to find your favorite combination. For the full recipe, check out the detailed cooking steps and tips. After enjoying your Thai green curry with tofu, you may have some leftovers. To keep them fresh, let the dish cool down first. Place the curry in an airtight container. This helps keep the flavors intact. Store it in the refrigerator. It will last for about three to four days. Reheating your curry can be tricky. You want to avoid losing its creamy texture. The best method is to use a stovetop. Pour the curry into a pan and heat it slowly over medium-low heat. Stir gently to warm it up. This keeps the tofu and veggies from breaking apart. You can also add a splash of vegetable broth if it seems too thick. If you want to save your Thai green curry for later, freezing is a great option. Wait until the curry cools completely. Then, transfer it to a freezer-safe container. Make sure to leave some space at the top for expansion. Seal it tightly to prevent freezer burn. Your curry can stay good in the freezer for up to three months. When you're ready to eat, thaw it overnight in the fridge. Then reheat it using the stovetop method. Enjoy the tasty flavors again! For the complete cooking process, check the Full Recipe. For Thai green curry, use firm tofu. Firm tofu holds its shape well during cooking. It absorbs flavors nicely without falling apart. Soft tofu, while creamy, may not work as well in this dish. Choose firm tofu for a satisfying bite. You can press it to remove excess moisture, which makes it even better. To add heat, try these tips: - Increase the amount of green curry paste. - Add sliced fresh chili peppers. - Use chili flakes for a quick kick. These options let you control the spice level. Start small, then adjust to your taste. You can also pair the dish with a spicy chili sauce on the side. Yes, you can make this curry ahead of time. Prepare the curry, cool it, and store it in the fridge. The flavors will deepen overnight. When you are ready to eat, just reheat it on the stove. This dish is perfect for meal prep. It saves time on busy days. If you need an alternative to coconut milk, try these options: - Almond milk adds a nutty flavor. - Soy milk gives a creamy texture. - Cashew cream offers richness and depth. Each option changes the taste slightly. Coconut milk gives a unique flavor, so choose wisely based on your needs. This article showed you how to create a tasty Thai green curry with tofu. You learned about key ingredients, fresh vegetables, and spices to elevate your dish. Followed by step-by-step instructions, you can now prepare and build a delicious curry at home. Tips and variations help you tailor the meal to your taste and dietary needs. Remember, practice makes perfect, so adjust as needed for your own twist. Enjoy experimenting with your curry, and make it your own!

Thai Green Curry with Tofu Savory and Flavorful Dish

Are you ready to dive into a savory and flavorful dish? Thai green curry with tofu is a delightful blend

- 2 slices of whole-grain bread - 1 ripe avocado - 2 large eggs - 1 tablespoon lemon juice - Salt and pepper to taste - 1/4 teaspoon red pepper flakes (optional) - Fresh herbs (such as cilantro or chives) - Olive oil for drizzling Gathering the right ingredients is key to making this dish shine. Start with two slices of whole-grain bread. This bread adds fiber and a nutty taste. Next, you need one ripe avocado. Make sure it is soft but not brown. For a touch of brightness, grab a tablespoon of lemon juice. It enhances the flavor and keeps the avocado fresh. Now, let's talk about seasoning. You will need salt and pepper to taste. A pinch of red pepper flakes adds heat if you like spice. To finish, fresh herbs like cilantro or chives add color and flavor. Finally, a drizzle of olive oil gives richness and makes the dish look great. This list gives you everything you need for a delicious avocado toast with poached egg. For the full recipe, check out the details above. First, grab your whole-grain bread. Place it in a toaster or on a grill. Toast the bread until it’s golden brown and crispy. This step adds texture and flavor. You want that perfect crunch to hold the toppings. Now, let’s work on the avocado. Take a ripe avocado and cut it in half. Remove the pit and scoop the flesh into a bowl. Use a fork to mash the avocado. Add one tablespoon of lemon juice to keep it fresh. Season with salt and pepper to taste. Mix well and set this aside. Next, let’s poach the eggs. Fill a small saucepan with water. Heat it until it gently simmers. Do not let it boil. Crack each egg into a small bowl. This makes it easier to add to the water. Stir the water with a spoon to create a gentle whirlpool. Carefully slide one egg into the center of the whirlpool. Repeat with the second egg. Poach them for about 3-4 minutes for a soft yolk. If you like firmer yolks, leave them in a bit longer. Once done, remove the eggs with a slotted spoon. Place them on a paper towel to drain excess water. Now you are ready to assemble your delicious avocado toast. For the full recipe, check out the complete guide. To poach eggs well, avoid common mistakes. First, use fresh eggs. Old eggs spread too much in water. Next, don’t let the water boil. A gentle simmer works best. This keeps the egg whites together. Finally, create a whirlpool before adding the eggs. This helps them shape nicely. Want to boost the taste of your avocado? Here are some easy ideas. Mix in a pinch of garlic powder for a savory kick. You can also add diced tomatoes for freshness. For a zesty twist, consider stirring in lime juice. If you like heat, try adding minced jalapeños. Experiment and find your favorite mix! To make your avocado toast look great, start with even spreads. Use a knife to spread the avocado smoothly on the toast. Place the poached egg right in the center. For color, sprinkle fresh herbs on top. Add a drizzle of olive oil for shine. Serve on a nice plate to impress your guests. {{image_2}} You can make your avocado toast even better with tasty toppings. Here are some ideas: - Tomatoes: Sliced cherry tomatoes add sweetness and color. - Feta cheese: Crumbled feta gives a salty kick. - Smoked salmon: This adds a rich, savory flavor that pairs well with eggs. Try mixing and matching these toppings. They bring new tastes and textures to your dish. If you want a vegan version, skip the eggs. You can add nutritional yeast for a cheesy flavor. Use chickpeas or hemp seeds for protein. For a gluten-free option, choose gluten-free bread. Many brands offer great choices that taste amazing. The bread you use can change your meal. Here are some options: - Sourdough bread: This has a tangy taste and a chewy texture. - Rye bread: Offers a hearty flavor that complements avocado well. - Bagels: For a fun twist, use toasted bagels instead of bread. Explore these bread options to find your favorite base for avocado toast. Each choice brings its unique flavor and feel. To store leftover avocado toast, wrap it tightly in plastic wrap. This keeps it fresh. If you have leftover avocado, place it in an airtight container. Squeeze lemon juice on the surface to slow browning. Store poached eggs in a separate container. They will stay good for one day in the fridge. You can freeze avocado, but it changes the texture. Frozen avocado becomes mushy when thawed. If you want to freeze it, mash it first. Add lemon juice to help keep the color. Use frozen avocado in smoothies or dips, but not for toast. To reheat toast, use an oven or toaster. Preheat the oven to 350°F (175°C). Place the toast on a baking sheet. Heat for about 5 minutes. This keeps the bread crispy. Avoid using a microwave, as it makes the toast soggy. Enjoy your avocado toast fresh! For the full recipe, check out the Avocado Toast Delight with Poached Egg. To check if your eggs are done, look for a few signs. The whites should be set, and the yolk should still jiggle slightly. If you want a firmer yolk, let it cook a bit longer. You can also gently press the egg with a spoon. If it feels soft but firm, it’s ready. Cooking time generally ranges from 3 to 4 minutes for a soft yolk. Yes, you can use many types of bread for your avocado toast. Whole-grain bread is great for its nutty flavor and texture. Sourdough adds a nice tangy taste. Rye bread provides a unique flavor that pairs well with avocado. If you prefer a gluten-free diet, look for gluten-free bread options. Each type brings its own taste and texture. Avocados are packed with nutrients. They are rich in healthy fats, especially monounsaturated fats. These fats can help lower bad cholesterol levels. Avocados also provide fiber, which aids digestion. They contain vitamins like E, K, and C. Eggs also have many benefits, including high-quality protein and essential vitamins. Together, they make avocado toast a healthy meal choice. This avocado toast recipe blends simple ingredients and steps for a tasty meal. You learned about toasting bread, mashing avocado, and poaching eggs. Remember, tweaking toppings can enhance flavors. Feel free to try different breads or dietary swaps. With proper storage and reheating tips, your leftovers will stay fresh. I hope this guide inspires you to create delicious avocado toast at home. Enjoy experimenting and sharing your tasty creations!

Irresistible Avocado Toast with Poached Egg Recipe

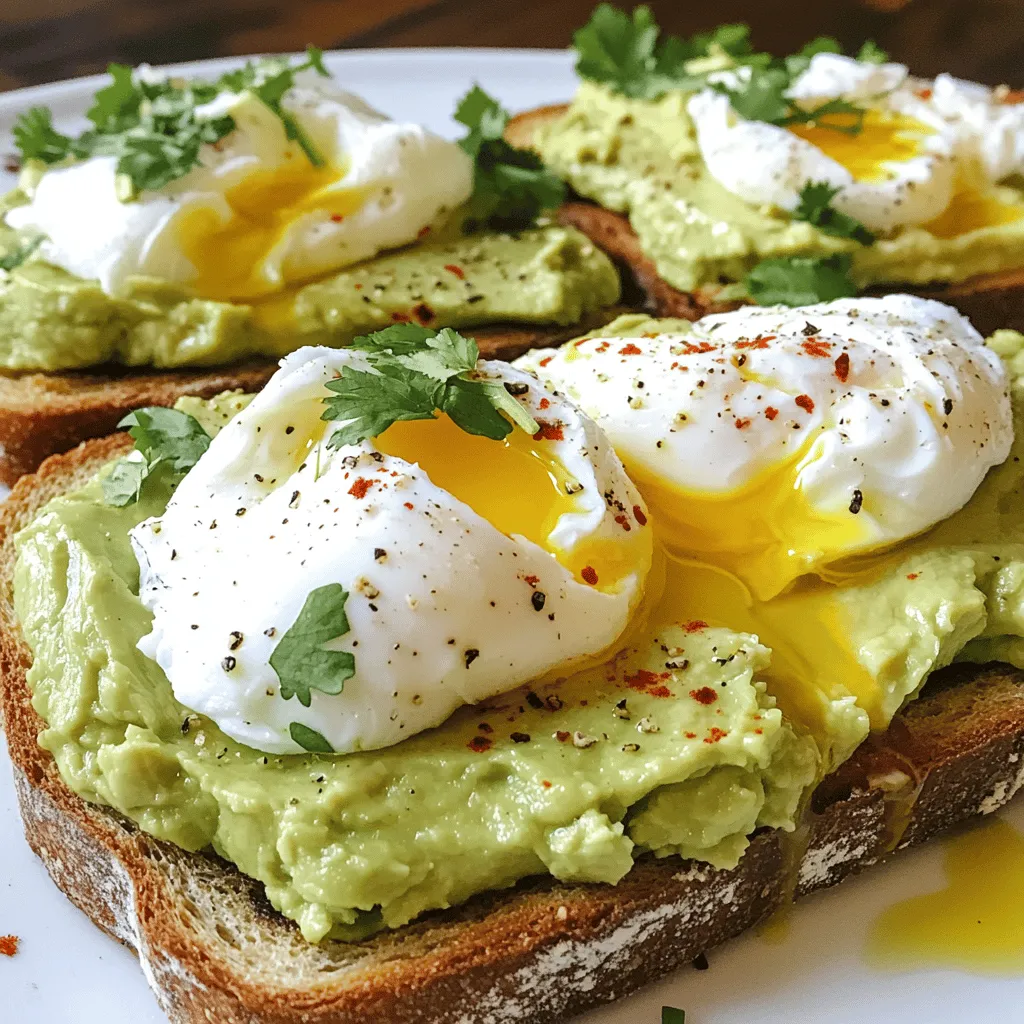
Looking for a quick, tasty breakfast? Look no further! This Irresistible Avocado Toast with Poached Egg recipe combines creamy avocado,

- 1 lb ground beef - 1 small onion, finely chopped - 2 cloves garlic, minced - 1 tablespoon chili powder - 1 teaspoon cumin - 1 teaspoon paprika - 1 teaspoon salt - 1/2 teaspoon black pepper - 1/2 cup beef broth - 8 small corn tortillas - 1 cup shredded lettuce - 1 cup diced tomatoes - 1 cup shredded cheddar cheese - 1/2 cup sour cream - Fresh cilantro, for garnish - Lime wedges, for serving Using fresh spices gives a bright flavor. Dried spices work, but fresh is best. For those with diets like vegan or gluten-free, you can swap ground beef for lentils or turkey. Use corn tortillas for gluten-free needs. You can also skip the cheese or sour cream for a lighter meal. Serve these tacos with rice or beans for a full meal. You might also try chips and salsa for a fun crunch. Adding a side of corn salad or guacamole can make this meal even better. Enjoy your classic beef tacos with friends and family! 1. Cooking the ground beef: Start by heating a large skillet over medium heat. Add 1 lb of ground beef. Cook until it's browned, breaking it apart with a spatula. If there's excess fat, drain it out. 2. Adding vegetables and spices: Next, add 1 small chopped onion and 2 minced garlic cloves to the skillet. Cook for about 3-4 minutes until the onion becomes soft and clear. Then, stir in 1 tablespoon of chili powder, 1 teaspoon of cumin, 1 teaspoon of paprika, 1 teaspoon of salt, and 1/2 teaspoon of black pepper. Cook for another minute to toast these spices. 3. Simmering the mixture: Pour in 1/2 cup of beef broth. Let it simmer for 5-7 minutes. This helps the beef soak up all those great flavors. 1. Heating tortillas: While the beef simmers, heat 8 small corn tortillas. You can do this in a separate skillet or wrap them in foil and warm them in the oven. 2. Layering ingredients: Once the tortillas are warm, place a scoop of the beef mixture on each tortilla. Top it with 1 cup of shredded lettuce, 1 cup of diced tomatoes, and 1 cup of shredded cheddar cheese. - Tips for serving and garnishing: Add a dollop of sour cream on top. Finish with fresh cilantro and a squeeze of lime juice. I like to arrange the tacos on a large platter. Garnish with lime wedges and cilantro for a colorful look. For extra flair, serve with side dishes like Mexican rice or black beans. Enjoy every bite of these classic beef tacos! For a complete guide, refer to the [Full Recipe]. - To avoid dry beef, use higher-fat ground beef. A blend of 80% lean and 20% fat keeps it juicy. - Always cook ground beef over medium heat. This helps it brown nicely without becoming tough. - Add beef broth to the skillet while cooking. It makes the meat tender and flavorful, a key for great tacos. - Customize toppings to suit your taste. Add avocado, jalapeños, or even pineapple for a twist. - For kids, keep it simple. Lettuce, cheese, and a bit of sour cream are usually a hit. - Let everyone build their own tacos. This makes dinner fun and lets everyone choose their favorites. - Prepare ingredients in advance. Chop onions and garlic the night before to save time. - Cook the beef mixture ahead of time. It warms up quickly when you're ready to eat. - Warm tortillas in bulk. Use a skillet or oven to heat several at once. This cuts down your serving time. By following these tips, you can enjoy a taco night that's both fun and stress-free! Check out the Full Recipe for step-by-step guidance. {{image_2}} You can switch the ground beef for other proteins. Ground turkey is a great choice. It has less fat but still tastes good. You can also use ground chicken. Both options are leaner but still tasty. For a different twist, try shredded beef or pork. These meats offer a rich flavor and work well in tacos. You can cook them slowly to make them tender. If you want a vegetarian option, use lentils or black beans. They add protein and fiber. You can also try crumbled tofu or tempeh. Season them the same way as the beef for that classic taco taste. Want to spice things up? Add jalapeños or hot sauce for heat. You can also mix in some chipotle peppers for a smoky flavor. Fresh herbs like cilantro can boost the taste, too. Different regions have unique taco styles. For example, fish tacos are popular in coastal areas. They use grilled or fried fish topped with fresh veggies. In the Yucatán, you might find tacos with pork and pineapple. Explore these styles to find your favorite. Eating gluten-free? Use corn tortillas. They are naturally gluten-free and work great for tacos. Check the labels on packaged tortillas to ensure they meet your needs. For a low-carb option, use lettuce wraps instead of tortillas. They are crisp and fresh. You can still add all your favorite taco toppings. This way, you get the flavor without extra carbs. If you want to dive deeper, check out the Full Recipe. It offers everything you need to create your classic beef tacos. To store leftover beef tacos, first, let them cool down. Place them in an airtight container. Keep the beef separate from the tortillas. This keeps the tortillas from getting soggy. You can store them in the fridge for up to three days. If you want to save the beef longer, put it in a freezer-safe bag. For reheating beef tacos, the best method is the stovetop. Heat a skillet on medium. Add a little water to the pan. This helps steam the tacos and keeps them moist. Heat the beef for about 5 minutes. If you prefer the microwave, place the tacos on a plate. Cover them with a damp paper towel. Heat for 30-60 seconds. Check if they are warm enough before serving. To freeze taco filling, first, let it cool completely. Then, scoop the filling into freezer-safe bags. Remove as much air as possible before sealing. Label the bags with the date. You can freeze the filling for up to three months. When ready to use, thaw it overnight in the fridge. Reheat it on the stovetop or in the microwave before serving. Enjoy your beefy fiesta tacos later! For the full recipe, check out the detailed steps above. To make classic beef tacos, follow these steps: 1. Cook the Beef: In a skillet, brown 1 pound of ground beef. Break it apart as it cooks. Drain any excess fat. 2. Add Veggies: Next, add one small chopped onion and two minced cloves of garlic. Cook until the onion is soft, about 3-4 minutes. 3. Spice It Up: Stir in one tablespoon of chili powder, one teaspoon of cumin, one teaspoon of paprika, one teaspoon of salt, and half a teaspoon of black pepper. Cook for another minute to let the spices bloom. 4. Simmer: Pour in half a cup of beef broth. Let the mixture simmer for 5-7 minutes until it thickens and the flavors meld. 5. Warm Tortillas: In a separate skillet, heat 8 small corn tortillas until warm. You can also wrap them in foil and heat them in the oven. 6. Assemble: Place a scoop of the beef mixture on each tortilla. Top with your favorite toppings, such as shredded lettuce, diced tomatoes, and cheese. 7. Finish Off: Add a dollop of sour cream, fresh cilantro, and a squeeze of lime juice. You can find the full recipe above for detailed steps. Here are some popular and unique toppings for beef tacos: - Classic Choices: - Shredded lettuce - Diced tomatoes - Shredded cheddar cheese - Sour cream - Unique Options: - Sliced jalapeños for heat - Avocado or guacamole for creaminess - Pickled red onions for tang - Fresh corn for sweetness - Crumbled queso fresco for a salty kick Mix and match these toppings to create your perfect taco! Yes, you can make beef tacos ahead of time. Here’s how: - Meal Prep: Cook the beef filling a day ahead. Store it in an airtight container in the fridge. Reheat it when you’re ready to serve. - Tortilla Storage: Keep the tortillas at room temperature in a sealed plastic bag. They will stay soft for a day. - Freezing: For longer storage, freeze the cooked beef filling. Place it in a freezer-safe container. It can last for up to three months. Thaw it in the fridge overnight before reheating. With these tips, you can enjoy tasty beef tacos anytime! Beef tacos are fun and easy to make. You learned about key ingredients, cooking steps, and storage tips. You can customize your tacos with different toppings and flavors. Try using various proteins or make them vegetarian. Keep your tacos fresh with smart storage methods. Enjoy making and sharing them with friends and family. Your taco game just got stronger!

Classic Beef Tacos Irresistible Flavor in Every Bite

Are you ready to bite into a dish that’s pure comfort? Classic Beef Tacos pack irresistible flavor in every bite.

- 1 medium cauliflower, cut into florets - 2 tablespoons olive oil - 1 teaspoon smoked paprika - 1 teaspoon ground cumin - 1/2 teaspoon garlic powder - Salt and pepper to taste - 8 small corn tortillas - 1 avocado, sliced - 1 cup red cabbage, shredded - 1/4 cup fresh cilantro, chopped - Lime wedges for serving - Optional: your favorite salsa or hot sauce Roasted cauliflower tacos are a delight. You need simple, fresh ingredients. Cauliflower is the star. It has a mild flavor that absorbs spices well. Olive oil helps the cauliflower crisp up in the oven. Smoked paprika adds a unique, smoky taste. Ground cumin gives the dish warmth. Garlic powder adds depth to the overall flavor. You can adjust salt and pepper to your liking. Corn tortillas are soft and add a nice texture. Avocado brings creaminess. Red cabbage adds crunch and color. Fresh cilantro gives a bright flavor. Lime wedges add a tangy kick. You can also add salsa or hot sauce for a spicy touch. This easy recipe makes a great meal for any day. Using fresh ingredients makes a big difference. You'll love the flavors and textures in each bite. Check out the Full Recipe for all the steps! - Preheat your oven to 425°F (220°C). - In a large bowl, place the cauliflower florets. - Drizzle with 2 tablespoons of olive oil. - Add 1 teaspoon of smoked paprika, 1 teaspoon of ground cumin, and 1/2 teaspoon of garlic powder. - Season with salt and pepper to taste. - Toss everything until the cauliflower is well coated. - Spread the cauliflower on a baking sheet in a single layer. - Roast in the preheated oven for 20-25 minutes. - Stir the cauliflower halfway through to ensure even cooking. - Warm the corn tortillas in a dry skillet over medium heat. - Heat for about 30 seconds on each side until soft. - Once the cauliflower is ready, let it cool slightly. - Take a warm tortilla and add some roasted cauliflower. - Top with sliced avocado, shredded red cabbage, and chopped cilantro. - Serve with lime wedges and your favorite salsa or hot sauce. For the full recipe, check the detailed section above. To get the best roasted cauliflower, you need the right time and heat. I suggest preheating your oven to 425°F (220°C). This high heat helps the cauliflower brown nicely. Roast it for 20 to 25 minutes. Stir the florets halfway through to ensure even cooking. This way, you get that perfect crispiness on all sides. Toppings can really boost your taco's flavor. I love adding fresh avocado slices and crunchy red cabbage. They add great texture. You can also sprinkle cilantro on top for a fresh taste. For drinks, try pairing your tacos with a light beer or a refreshing lime soda. These drinks complement the flavors well. Feel free to mix things up with toppings and flavors. If you want a spicy kick, add some jalapeños or hot sauce. You can also swap out the tortillas for lettuce wraps for a low-carb option. For a vegan or gluten-free twist, just use corn tortillas and leave out dairy. There are endless ways to make these tacos your own. Check out the Full Recipe for more ideas! {{image_2}} You can add beans or lentils to boost protein. Black beans work well and add flavor. Lentils offer a nice texture and are rich in nutrients. If you want meat, grilled chicken or shrimp makes a tasty choice. Both options add a savory touch to your tacos. Adjust the seasonings to fit your taste. For a mild flavor, use less smoked paprika and cumin. If you love heat, add more spices or choose a hot salsa. You can also try different hot sauces to find your favorite kick. A zesty salsa verde pairs nicely with roasted cauliflower. Try lettuce wraps instead of tortillas for a fresh twist. They add crunch and a light feel. You can also use different tortillas. Flour and whole-grain tortillas are great options. Each adds its own flavor and texture to your tacos. To keep your roasted cauliflower fresh, store it in an airtight container. This helps it stay tasty and safe to eat. Place it in the fridge for up to three days. For the tortillas, wrap them in foil or plastic wrap. This prevents them from drying out. Store them in a cool, dry place. They can last about a week in the fridge. When reheating, the oven works best. Preheat it to 350°F (175°C). Spread the cauliflower on a baking sheet and heat for about 10 minutes. This keeps the texture crunchy. If using a microwave, place the cauliflower in a bowl. Heat in 30-second bursts to avoid sogginess. Remember, quick bursts keep the cauliflower crisp. You can freeze roasted cauliflower for later meals. Spread it on a baking sheet and freeze until solid. Once frozen, transfer it to a freezer bag. It can last up to three months. To thaw, leave it in the fridge overnight. For reheating, use the oven to retain texture. This way, your delicious tacos are ready anytime! Check out the Full Recipe for more details. To make roasted cauliflower tacos, start by preheating your oven to 425°F (220°C). Then, cut a medium cauliflower into small florets. Toss the florets in a bowl with olive oil, smoked paprika, ground cumin, garlic powder, salt, and pepper. Spread the seasoned cauliflower on a baking sheet in a single layer. Roast it for 20-25 minutes, stirring halfway through to ensure even cooking. While the cauliflower roasts, warm small corn tortillas in a dry skillet for about 30 seconds on each side. Once the cauliflower is golden brown, assemble your tacos by placing the roasted cauliflower on the warm tortillas, adding avocado, shredded red cabbage, and chopped cilantro. Serve with lime wedges and your favorite salsa. Yes, you can use frozen cauliflower for this recipe. Frozen cauliflower works well and saves time. Just remember to thaw it first. After thawing, drain any excess water to avoid sogginess. Then, follow the same steps as with fresh cauliflower. Roast until golden brown for the best flavor. Many sides pair nicely with roasted cauliflower tacos. Consider serving them with black beans, Mexican rice, or a fresh salad. You can also add corn on the cob or pickled onions for extra flavor. These sides help create a complete meal that is both tasty and satisfying. Roasted cauliflower tacos are easy and fun to make. We covered the main ingredients needed, plus how to prepare and roast the cauliflower. I shared tips for achieving perfect texture and ideas for customizing your tacos. Storing leftovers and reheating them is simple too. These tacos offer a tasty, healthy meal for any occasion. Try different toppings and see what you love most! Enjoy this vibrant dish anytime you want a quick and delicious meal.

Roasted Cauliflower Tacos Flavorful and Easy Recipe

Looking for a delicious and simple meal? Roasted Cauliflower Tacos are your answer! Packed with flavor and easy to make,

When making a savory beef and broccoli stir-fry, it’s all about fresh ingredients. Here’s what you need for a delicious meal. - 1 pound beef sirloin, thinly sliced - 2 cups broccoli florets - 1 bell pepper, sliced (red or yellow for color) - 3 cloves garlic, minced - 1 inch ginger, grated These main ingredients bring great flavors and textures. The beef sirloin gives a tender bite, while broccoli adds crunch. Bell pepper adds color and sweetness, and garlic and ginger create a fragrant base. - 3 tablespoons soy sauce (low sodium if preferred) - 1 tablespoon oyster sauce (optional) - 1 tablespoon cornstarch - 2 tablespoons vegetable oil - 1 teaspoon sesame oil This sauce blends savory and umami flavors. Soy sauce and oyster sauce create depth. Cornstarch helps thicken the sauce, giving it a nice glaze. - Cooked jasmine rice - Quinoa Serve your stir-fry over jasmine rice or quinoa. Both options soak up the sauce well and add a nice touch. For the full recipe, check the details above and enjoy this easy dish! How to prepare the beef Start with 1 pound of beef sirloin. Use a sharp knife to slice it thinly against the grain. This helps the beef stay tender. If you freeze the beef for 15 minutes, it’s easier to cut. Place the sliced beef in a bowl. You can mix in a little soy sauce for added flavor. Let it sit while you prep the veggies. Prepping the vegetables Next, take 2 cups of broccoli florets. Wash them under cold water and cut them into bite-sized pieces. For color, slice one bell pepper. You can choose red or yellow. Peel and mince 3 cloves of garlic. Grate about an inch of ginger. Set these aside for cooking later. Stir-frying the beef Heat 1 tablespoon of vegetable oil in a large skillet or wok. Use medium-high heat for best results. Add the sliced beef to the pan. Stir-fry for about 2-3 minutes. Look for a nice brown color. Once done, remove the beef and place it on a plate. This keeps it juicy. Cooking the vegetables In the same skillet, add another tablespoon of oil. Toss in the minced garlic and grated ginger. Stir-fry for about 30 seconds until fragrant. Then, add the broccoli and bell pepper. Cook for 4-5 minutes. You want them tender but still crisp. Combining everything with the sauce Return the beef to the skillet. Now, pour in the sauce made of soy sauce, oyster sauce, and cornstarch. Stir everything together. Cook for an additional 2-3 minutes. The sauce should thicken and coat the beef and veggies evenly. Drizzling sesame oil After cooking, remove the skillet from heat. Drizzle 1 teaspoon of sesame oil over the stir-fry. This adds a nice flavor boost. Toss gently to mix it in. Serving suggestions Serve your delicious beef and broccoli stir-fry over cooked jasmine rice or quinoa. This makes a great meal for any day. For the full recipe, check the previous section! - Use medium-high heat for a good stir-fry. This keeps the beef juicy. - Stir quickly to avoid overcooked vegetables. They should stay bright and crisp. - Choose beef sirloin for its tenderness. Look for bright red color and good marbling. - Fresh broccoli tastes best. If you use frozen, thaw and drain it well first. - Prep ingredients in advance. Slice beef and chop veggies the night before. - Use a wok for faster cooking. It heats evenly and cooks food quickly. For the complete recipe, check out the Full Recipe link. {{image_2}} You can switch out the beef for chicken or tofu. Chicken gives a lighter taste, while tofu adds a nice texture. For veggies, try carrots, snap peas, or mushrooms. These choices mix well with the beef and broccoli. They add color and flavor to your dish. You can change the sauce to fit your taste. If you want a stronger flavor, add more soy sauce or oyster sauce. For spice, mix in some red pepper flakes or sriracha. Adjusting the sauce makes your stir-fry unique every time! Stir-frying is quick and keeps the food crisp. If you prefer, you can steam the vegetables for a softer bite. Another fun option is oven-baking your stir-fry. Spread it on a baking sheet and roast until cooked. Each method gives you a different texture and flavor. For the full recipe, check out Savory Beef and Broccoli Delight. To store leftovers, let the Beef and Broccoli Stir-Fry cool down first. Place it in an airtight container. This helps keep it fresh. I recommend using glass containers. They are safe for the microwave and easy to clean. For the best reheating, use a skillet or a microwave. If you use a skillet, heat it on medium. Add a splash of water to keep it moist. If using a microwave, cover the dish with a lid. This prevents splatters. Make sure to check the food every minute to avoid sogginess. Yes, you can freeze Beef and Broccoli Stir-Fry! Just place it in a freezer-safe container. Leave some space at the top because the food expands when frozen. To thaw, place it in the fridge overnight or use the microwave's defrost setting. This keeps the flavors and texture intact. For more tips, check out the Full Recipe. How do I make Beef and Broccoli Stir-Fry gluten-free? To make your beef and broccoli stir-fry gluten-free, simply replace soy sauce with tamari. Tamari is a gluten-free soy sauce. Ensure that your oyster sauce also states it is gluten-free, or skip it. The other ingredients in the recipe are naturally gluten-free. What can I pair with Beef and Broccoli for a complete meal? For a full meal, serve your stir-fry with cooked jasmine rice or quinoa. These grains soak up the sauce well and add texture. You can also add a side of spring rolls or a light salad for extra crunch and flavor. What can I substitute if I don’t have oyster sauce? If you lack oyster sauce, mix soy sauce with a bit of sugar and sesame oil. This blend gives a sweet and salty flavor similar to oyster sauce. You can also use hoisin sauce as a tasty alternative. Can I add more vegetables to the stir-fry? Yes, you can add more vegetables to your stir-fry. Snow peas, carrots, or mushrooms work great. Just chop them into bite-sized pieces. Add them to the skillet when you stir-fry the broccoli. What are the health benefits of broccoli in this recipe? Broccoli is rich in vitamins C and K. It also provides fiber, which aids digestion. Eating broccoli can boost your immune system and improve heart health. Its antioxidants help fight inflammation, making it a great choice. Is this recipe high in protein? Yes, this recipe is high in protein. The beef sirloin provides a good amount of protein per serving. Combined with broccoli, you get a balanced meal that helps build and repair tissues. Enjoy this delicious, protein-packed dish! Beef and Broccoli Stir-Fry is simple and satisfying. We covered the key ingredients, from fresh beef sirloin and vibrant veggies to delicious sauces. You now have the steps to prepare, cook, and serve this dish perfectly. Consider variations, cooking tips, and storage advice for the best results. Whether you enjoy the classic version or experiment with new flavors, this recipe is versatile. Now, gather your ingredients and enjoy a tasty meal that's easy to make!

Savory Beef and Broccoli Stir-Fry Simple and Quick

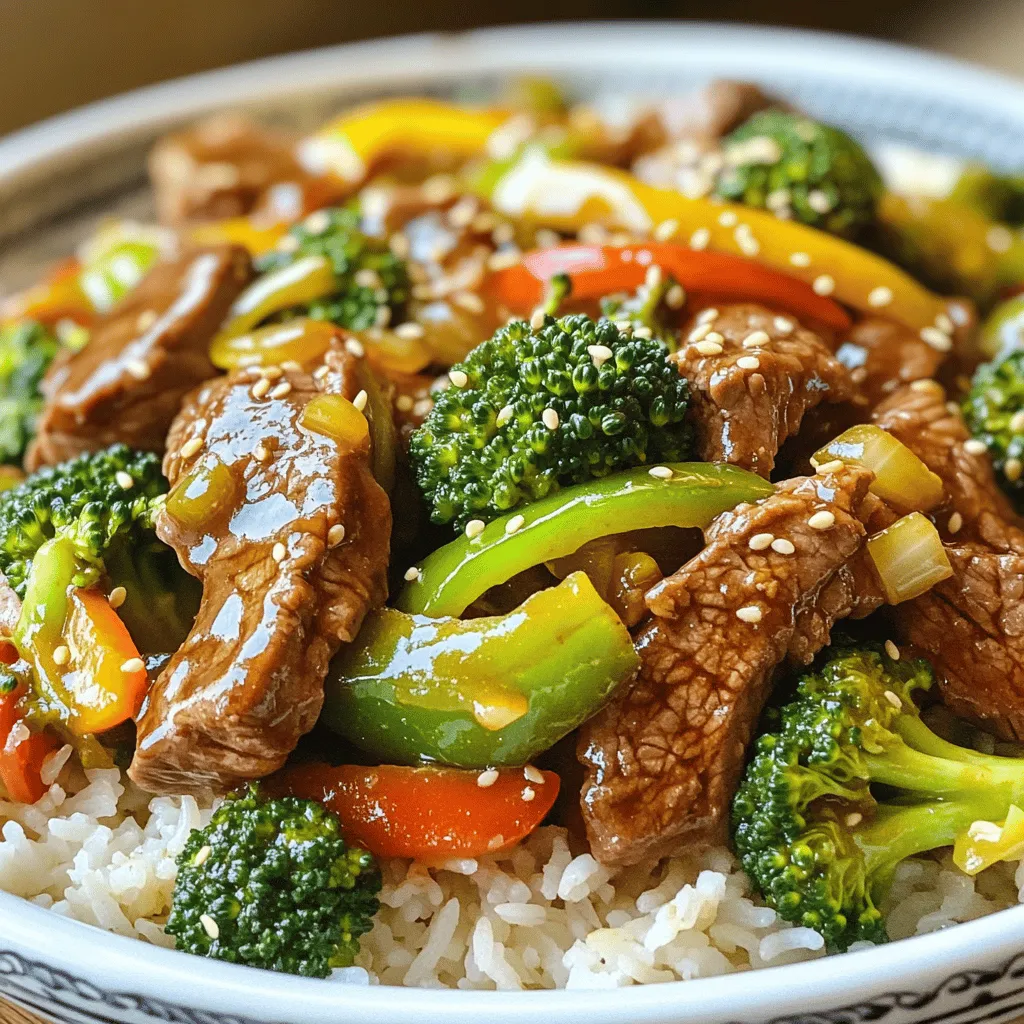
Are you ready for a quick and tasty meal that’s sure to impress? My Savory Beef and Broccoli Stir-Fry is

Older posts
Newer posts
← Previous Page1 … Page81 Page82 Page83 Page84 Next →

dsad

© 2026 Home Cooking Style • Built with GeneratePress

Our Policies

  • Copyright Policy
  • Cookie Policy
  • GDPR Policy
  • Privacy Policy
  • Disclaimer
  • Terms Of Use

More Information

  • Home
  • About
  • Contact
  • Appetizers
  • Dessert
  • Dinner
  • Drinks
©2026, Home Cooking Style About Back To Top