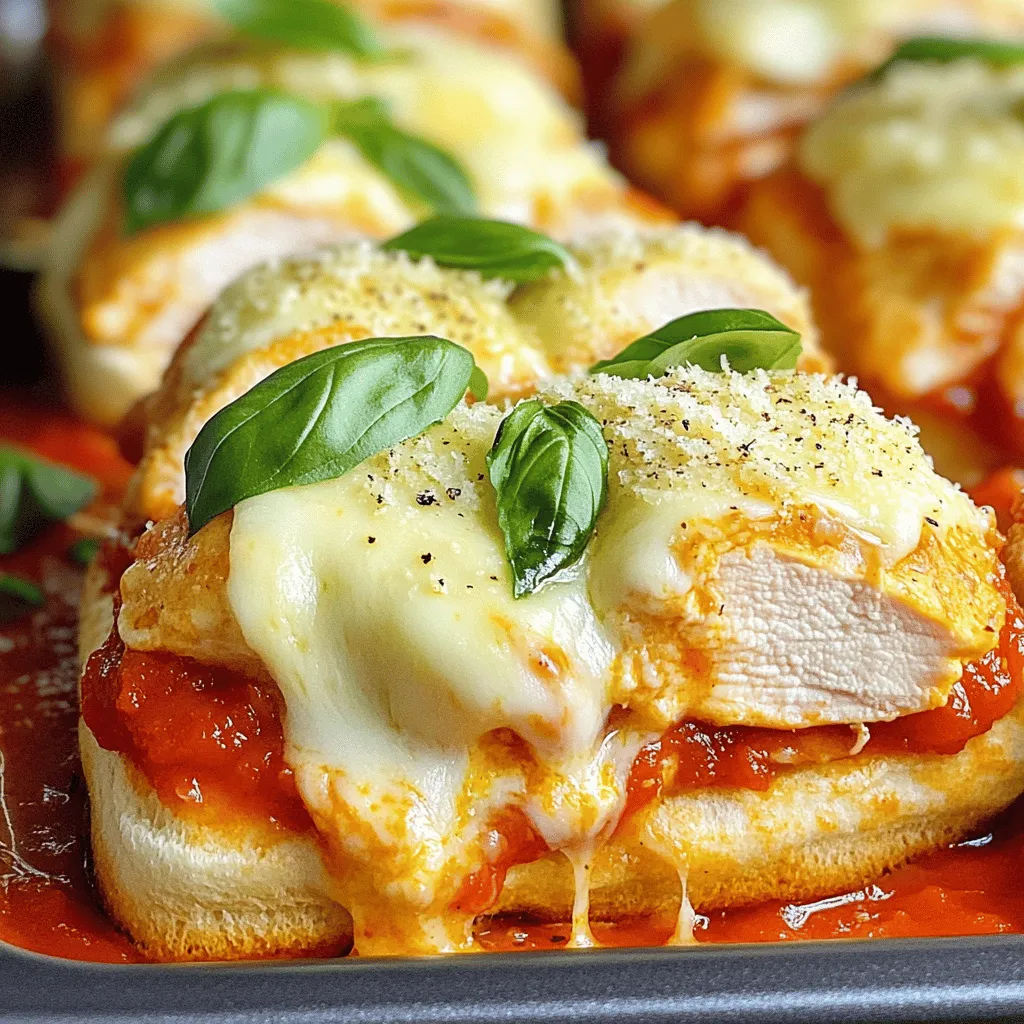
Easy Chicken Parmesan Sliders Tasty and Simple Snack
Looking for a quick and tasty snack? You’ve found it! These Easy Chicken Parmesan Sliders are not just simple to
Looking for a quick and tasty snack? You’ve found it! These Easy Chicken Parmesan Sliders are not just simple to
![To create Garlic Butter Shrimp Pasta, gather these items: - 300g spaghetti - 400g large shrimp, peeled and deveined - 4 tablespoons unsalted butter - 4 cloves garlic, minced - 1 teaspoon red pepper flakes (adjust to taste) - 1 lemon, juiced and zested - 1/4 cup fresh parsley, chopped - Salt and pepper to taste - Grated Parmesan cheese for serving (optional) Each ingredient plays a role in making this dish so tasty. The shrimp gives it a sweet flavor. The garlic adds a nice kick. The butter creates a rich sauce. You can swap some ingredients if needed. Use fettuccine instead of spaghetti for a different noodle shape. If shrimp is hard to find, chicken or scallops work well too. Don’t have fresh parsley? Use dried herbs instead. If you want a kick but lack red pepper flakes, try cayenne pepper. For a lighter option, you can use olive oil instead of butter. Each swap keeps the dish delicious. This dish offers a balance of protein and carbs. Here’s a quick look at the nutrition per serving: - Calories: 450 - Protein: 25g - Carbohydrates: 50g - Fat: 15g - Fiber: 2g Enjoy a hearty meal without feeling too heavy. It's a great choice for lunch or dinner. For the full recipe, don’t forget to check out the detailed steps! To cook the pasta, first, boil a large pot of salted water. Use about one tablespoon of salt for every four quarts of water. Once the water boils, add 300g of spaghetti. Cook it according to the package instructions until it is al dente. This usually takes around 8-10 minutes. Remember to reserve 1 cup of the pasta water before draining. Drain the spaghetti and set it aside for later. Next, grab a large skillet and place it over medium heat. Add 4 tablespoons of unsalted butter to the skillet. Let it melt, then add 4 minced garlic cloves and 1 teaspoon of red pepper flakes. Sauté this mix for about 1 minute. You want the garlic to be fragrant but not browned. Now, add 400g of large shrimp, peeled and deveined. Season them with salt and pepper. Cook for about 2-3 minutes. The shrimp should turn pink and opaque when they are done. Once the shrimp are ready, it's time to combine everything. Add the cooked spaghetti to the skillet with the shrimp. Pour in the reserved pasta water and the juice of 1 lemon. Toss everything together. You want to make sure the spaghetti is well coated in the garlic butter sauce. Stir in the lemon zest and 1/4 cup of chopped fresh parsley. Give it a taste and adjust the seasoning if needed. Now you have a delicious Garlic Butter Shrimp Pasta ready to serve! For the full recipe, check out the [Full Recipe]. To cook pasta well, start with a big pot. Fill it with water and add salt. The water should taste like the sea. Bring the water to a boil before adding your spaghetti. Cook it according to the package directions until it's al dente. This means it should still have a slight bite. Save one cup of the pasta water before draining. This water helps when mixing everything later. When cooking shrimp, keep it simple. Use large shrimp for the best taste. Make sure they are peeled and deveined. Heat your skillet over medium heat. Add butter and let it melt. Then, toss in minced garlic and red pepper flakes for a kick. Cook the shrimp for about 2-3 minutes. They are done when they turn pink. Don't overcook them; they will become tough. For serving, plate your Garlic Butter Shrimp Pasta with flair. Fresh parsley adds color and taste. You can also sprinkle grated Parmesan cheese on top. A slice of lemon on the side brightens the meal. Serve with a crisp salad or garlic bread for a full feast. Enjoy your dish with a glass of white wine for a lovely pairing. For the full recipe, check out the instructions above. {{image_2}} Want to add some heat? Try spicy garlic butter shrimp pasta. Just mix in extra red pepper flakes during cooking. You can also add chopped fresh chili peppers for more flavor. This gives the dish a nice kick. The spice pairs well with the buttery shrimp and pasta. If you love creaminess, go for creamy garlic butter shrimp pasta. To make this, add half a cup of heavy cream to your skillet after cooking the shrimp. Stir it in until well mixed. This creates a rich sauce that coats the pasta beautifully. You can also sprinkle in some grated cheese for extra flavor. Want to boost nutrition? Try adding vegetables to your garlic butter shrimp pasta. Great options include spinach, cherry tomatoes, or zucchini. Just sauté the veggies in the skillet before adding the shrimp. This adds color and texture, making the dish even better. You get a tasty meal that is also healthy. For the full recipe, check out the detailed instructions above. To keep your garlic butter shrimp pasta fresh, store it in an airtight container. Make sure to let it cool down before sealing. Place it in the fridge if you plan to eat it in 2-3 days. If you want to save it longer, consider freezing it. When you’re ready to enjoy leftovers, reheat them gently. You can use the microwave or a skillet. For the microwave, warm it for 1-2 minutes, stirring halfway. If using a skillet, add a splash of water or broth. Stir over medium heat until hot. To freeze, place the pasta in a freezer-safe container. It’s best to freeze it without shrimp, as they can become rubbery. You can add fresh shrimp when you reheat it. This way, you’ll keep that tender texture. Enjoy your delicious meal anytime! Check out the Full Recipe for more details. Yes, you can use frozen shrimp. Just thaw them first. Place shrimp in a bowl of cold water for about 15-20 minutes. If you're in a hurry, you can run them under cold water for a few minutes. This keeps the shrimp fresh. After thawing, pat them dry with a paper towel. This helps the shrimp sear nicely in the pan. Spaghetti is a great choice for this dish. It holds the sauce well and is easy to twirl. You can also use linguine or fettuccine if you prefer. These noodles add a nice texture. Make sure to cook the pasta until it's al dente. This gives it a perfect bite and prevents it from getting mushy. To make this dish dairy-free, swap butter for olive oil or a vegan butter. Both options work well and keep the flavor tasty. Use a dairy-free cheese if you want to add a cheesy touch. Nutritional yeast can also give a cheesy flavor. This way, you can enjoy garlic butter shrimp pasta without the dairy. For the full recipe, check the earlier sections. This blog post covered everything about cooking garlic butter shrimp pasta. We discussed key ingredients, substitutions, and nutrition facts. You learned step-by-step how to cook pasta and shrimp. I included helpful tips for perfect cooking and serving. You also saw tasty variations and how to store your meal. In making this dish, enjoy every bite and impress your friends. Cooking can be fun and easy!](https://homecookingstyle.com/wp-content/uploads/2025/06/1b2c410b-ecc8-410d-9ad8-1d1c2d9f7666.webp)
If you’re looking for a quick and tasty dinner, you’ve found it! Garlic Butter Shrimp Pasta is flavorful and easy
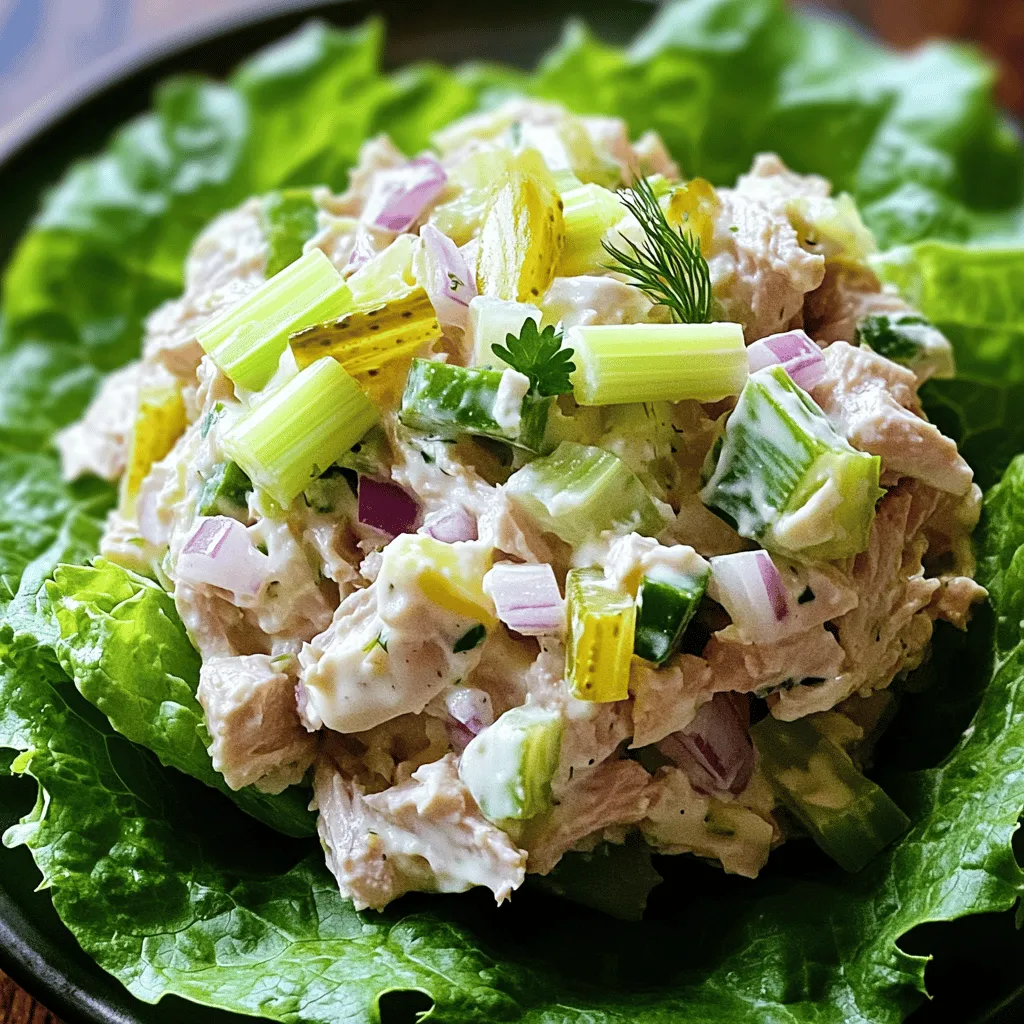
Are you ready to whip up a tasty meal in just minutes? This Quick and Easy Tuna Salad is the

Start your morning right with Nutella Banana Swirl Muffins! These delightful treats blend the sweet taste of ripe bananas with
. 1. First, preheat your oven to 350°F (175°C). Prepare a 9x5-inch loaf pan by greasing it and lining it with parchment paper. This helps the cake come out easily. 2. In a large mixing bowl, cream together 1 cup of softened unsalted butter and 2 cups of granulated sugar. Mix until the mixture is light and fluffy, about 3-4 minutes. 3. Next, add 4 large eggs, one at a time. Beat well after each addition. Then mix in the zest of 2 lemons, 1/4 cup of freshly squeezed lemon juice, and 1 teaspoon of vanilla extract until everything is combined well. 1. In a separate bowl, whisk together 3 cups of all-purpose flour, 1 teaspoon of baking powder, and 1/2 teaspoon of salt. 2. Gradually add the dry ingredients to the wet mixture, mixing until just combined. Be careful not to overmix; this helps keep the cake light. 3. Finally, gently fold in 1 cup of fresh raspberries. Be careful not to crush them too much while mixing. 1. Pour the batter into the prepared loaf pan. Smooth the top with a spatula to make it even. 2. Bake in the preheated oven for 60-70 minutes. Check for doneness by inserting a toothpick into the center. It should come out clean when the cake is done. 3. Once baked, let the cake cool in the pan for 10 minutes. Then transfer it to a wire rack to cool completely. You can dust the top with powdered sugar and garnish with extra raspberries when ready to serve. For the full recipe, check out the section above. To get a light and soft pound cake, avoid overmixing. Overmixing can make your cake dense and tough. Mix the batter just until you combine the ingredients. When creaming butter and sugar, use a mixer on medium speed. Cream them for about 3-4 minutes until the mix is light and fluffy. This step is key to a good rise. Adding citrus zest can boost the cake's flavor. Try using the zest of lemons or other citrus fruits. It gives a bright taste. You can also mix in different flavors. For example, swap lemon juice with orange juice. Or, add a splash of almond extract for a nutty twist. Dust your cooled cake with powdered sugar for a lovely finish. This adds sweetness and makes your cake look pretty. Garnish with fresh raspberries on top for color. It creates a nice contrast with the yellow cake. This simple touch makes your pound cake shine. For the full recipe, check out the details above. {{image_2}} If you need to change some ingredients, you can make this cake gluten-free. Use a gluten-free flour blend instead of all-purpose flour. This option works well and keeps the cake light. For a dairy-free version, swap out the butter with a plant-based alternative. You can use coconut oil or vegan butter. Both will give the cake a nice texture without dairy. You can add other fruits to your lemon raspberry pound cake. Blueberries or strawberries mix well and add great taste. Just fold them in gently like you do with raspberries. Infusions can also change the flavor. Try adding almond or coconut extract for a twist. This simple change gives the cake a whole new layer of flavor. Pair your cake with whipped cream or a scoop of ice cream. This adds a creamy touch and makes each bite more fun. For special occasions, serve this cake on a fancy plate. Add a few fresh raspberries on top. A dusting of powdered sugar also makes it look stunning. You can find the Full Recipe here for more ideas. To keep your lemon raspberry pound cake fresh, I suggest a few simple methods: - Room Temperature: Wrap the cake in plastic wrap. Place it in an airtight container. This works best if you eat it within three days. - Refrigeration: If you want it to last longer, store the cake in the fridge. Wrap it tightly to avoid drying out. It can stay fresh for up to one week. Freezing is a great option if you have extra cake. Here’s how to do it right: - Freezing: First, let the cake cool completely. Wrap it in plastic wrap, then foil. This keeps out air and moisture. You can freeze it for up to three months. - Thawing: To enjoy, take the cake out of the freezer. Leave it in the fridge overnight. For a quicker method, let it sit at room temperature for a few hours. This way, you keep the taste and texture just right. For the full recipe, check out the details above! Can I use frozen raspberries instead of fresh? Yes, you can use frozen raspberries. They work well in the cake. Just add them straight from the freezer. This helps keep the batter cool. How long does the lemon raspberry pound cake last? The cake lasts up to five days at room temperature. Keep it in an airtight container to stay fresh. You can also refrigerate it for about a week. What can I do if my cake is too dense? If your cake is dense, it may need more air. Ensure you cream the butter and sugar well. Also, check your oven temperature. An oven that is too hot can cause density issues. Can I make mini loaf cakes instead? Yes, mini loaf cakes are a great option! Just adjust the baking time. Start checking them after 25 minutes. They will bake faster than a full-sized loaf. What should I do if I don't have lemon juice? If you lack lemon juice, try using lime juice or vinegar. Both add a nice tang. You can also use lemon zest to boost the flavor. Can I use different types of sugar? You can use brown sugar instead of granulated sugar. This will add a richer flavor and moisture. Just keep the same amount. How do I adjust baking time for high-altitude cooking? At high altitudes, you may need to reduce baking time. Check the cake 5-10 minutes earlier than the recipe states. You might also need to add a little extra flour to help with the rise. For the full recipe, check out [Full Recipe]. This blog post covered the ingredients and steps to make a lemon raspberry pound cake. You learned how to mix ingredients, bake, and store it properly. Remember, the right texture comes from not overmixing. Feel free to explore flavor variations and serving ideas to make it your own. This cake is a delightful treat for any occasion. Enjoy every bite while making it your way!](https://homecookingstyle.com/wp-content/uploads/2025/06/e658e9c4-1836-470b-b9a4-75fe78916a6e.webp)
Are you ready to treat yourself to a slice of sunshine? My Lemon Raspberry Pound Cake combines zesty lemon and
![To create Vegan Pad Thai Noodles, you need some key ingredients. Here is what you will need: - 200g rice noodles - 2 tablespoons tamari (or soy sauce) - 1 tablespoon peanut butter - 1 tablespoon maple syrup - 2 tablespoons lime juice - 1 tablespoon sesame oil - 1 cup tofu, cubed - 2 cloves garlic, minced - 1 small red chili, thinly sliced (optional for heat) - 1 cup bean sprouts - 1 carrot, julienned - 1 bell pepper, thinly sliced - ¼ cup green onions, chopped - 2 tablespoons crushed peanuts (for garnish) - Fresh cilantro (for garnish) - Lime wedges (for serving) These ingredients give the dish its classic taste and texture. You can add optional ingredients for more flavor. Here are some ideas: - Sriracha or chili flakes for heat - Broccoli or snap peas for crunch - Fresh basil or mint for a herbaceous note - Sesame seeds for added texture Feel free to mix and match these extras to suit your taste. Vegan Pad Thai is not only tasty but also nutritious. Here’s a quick look at the nutritional benefits: - High in protein from tofu - Packed with vitamins from fresh vegetables - Healthy fats from peanut butter and sesame oil - Low in cholesterol since it's plant-based This dish can fit well into a balanced diet, making it a great choice for everyone. Enjoy the flavors and the health benefits of Vegan Pad Thai Noodles. For the full recipe, check the detailed instructions above. To start, boil water in a large pot. Add the rice noodles. Cook them according to the package instructions. You want them to be al dente. This means they should be soft but still have a slight bite. After cooking, drain them and rinse under cold water. This stops the cooking process and keeps them from sticking. Set the noodles aside while you prepare the sauce and other ingredients. In a bowl, whisk together the tamari, peanut butter, maple syrup, lime juice, and sesame oil. Keep whisking until the mixture is smooth. Taste it! You can adjust the flavors. If you want more tang, add more lime juice. If you prefer it sweeter, add a bit more maple syrup. This sauce gives the dish its rich flavor. Next, heat a non-stick skillet over medium-high heat. Add a little oil to the pan. Once hot, add the cubed tofu. Cook it until it is golden brown and crispy on all sides. This should take about 8 to 10 minutes. Once done, remove the tofu from the skillet and set it aside. In the same skillet, add the minced garlic and sliced chili. Sauté them for about 30 seconds until fragrant. Then, add the julienned carrots and sliced bell pepper. Stir and cook for about 3 to 5 minutes until they are slightly tender. Now it’s time to bring everything together! Add the cooked rice noodles and the prepared sauce to the skillet. Toss everything together until well combined and heated through. This should take about 2 to 3 minutes. Next, gently fold in the bean sprouts and the crispy tofu. Cook for another minute to warm everything through. Now, your Vegan Pad Thai Noodles are ready to be garnished and served! To make your Vegan Pad Thai taste authentic, use tamari or soy sauce. These add a salty, savory flavor. Fresh lime juice brightens the dish. Add it just before serving for the best taste. Peanut butter adds creaminess and depth. Maple syrup brings a hint of sweetness. Balance these flavors to suit your taste. For crispy tofu, start by pressing it to remove excess water. This helps it get crispy. Cut it into cubes and cook it in a non-stick skillet. Use medium-high heat and a little oil. Let the tofu brown on all sides. This takes about 8-10 minutes. A good texture makes your dish shine. Presentation matters. Serve your Vegan Pad Thai in bowls. Top it with green onions and crushed peanuts for crunch. Fresh cilantro adds color and flavor. Don’t forget lime wedges on the side. They add a fresh kick when squeezed on top. For the full recipe, check the details above. {{image_2}} You can change the protein in this dish. Instead of tofu, try tempeh or chickpeas. Both options add unique textures and flavors. Tempeh has a nutty taste, while chickpeas give a hearty bite. You can also add seitan for a chewy, meat-like feel. For a lighter option, use edamame or mushrooms. These choices keep your Vegan Pad Thai Noodles fresh and exciting. If you need a gluten-free dish, swap tamari for coconut aminos. This gives you a similar taste without gluten. Ensure you use gluten-free rice noodles, as most brands are safe. Check the label to confirm. You can also add more fresh veggies like zucchini or bell peppers for extra crunch. This way, you make a tasty meal that fits your needs. Want more heat? Add more sliced chili to your dish. You can also try a dash of sriracha in your sauce. If you prefer less spice, skip the chili altogether. You can add a pinch of brown sugar to balance flavors. Taste the sauce as you mix it to find the perfect heat level for you. Always feel free to tweak the flavors to suit your taste. You can store leftover Vegan Pad Thai noodles in an airtight container. Keep them in the fridge for up to three days. Make sure to let the noodles cool before sealing the container. This helps to avoid extra moisture, which can make the noodles soggy. For longer storage, you can freeze the noodles. Place the cooled Vegan Pad Thai in a freezer-safe container. It can last for up to three months in the freezer. When you want to eat it, thaw it in the fridge overnight before reheating. To reheat, use the microwave or a non-stick skillet. If using the microwave, heat in short bursts and stir often to avoid hot spots. For the skillet, add a splash of water or oil to keep the noodles moist. Heat over medium heat until warmed through. This way, your Vegan Pad Thai noodles stay tasty and fresh! For a full recipe, check out the instructions provided in the article. Yes, you can use rice vermicelli. It cooks faster than regular rice noodles. Just watch the cooking time. The flavor will still shine through. You might want to adjust the sauce a bit to match the thinner noodles. To make Pad Thai sauce without tamarind, mix tamari, peanut butter, maple syrup, and lime juice. This will give you a tasty, tangy sauce. You can also add a bit of vinegar for extra zing. Adjust the sweetness and acidity to your taste. The best vegetables are bell peppers, carrots, and bean sprouts. You can also add broccoli or snap peas for color and crunch. Feel free to use what you like. Just make sure they are cut thinly for even cooking. To make this dish nut-free, skip the peanut butter and crushed peanuts. You can use sunflower seed butter instead. This will keep the creaminess without the nuts. Always check labels to avoid hidden nut ingredients. For garnish, use seeds like sesame or pumpkin instead. For the full recipe, check out the [Full Recipe] section! Vegan Pad Thai offers a mix of flavors and textures. We explored the key ingredients, from noodles to sauce. You learned step-by-step instructions for cooking and combining. Tips for authentic flavors were shared, including tofu tips and serving ideas. Variations let you tweak this dish to your taste, while storage tips ensure freshness. By following this guide, you can create a tasty, plant-based meal that everyone will enjoy. Making this dish at home is easy and fun. Enjoy your cooking adventure!](https://homecookingstyle.com/wp-content/uploads/2025/06/b58f3a84-67b2-485e-ace3-cf52b1f440b7.webp)
If you’re craving a quick, tasty meal, look no further than Vegan Pad Thai Noodles. This dish is packed with
![- 2 cups mashed potatoes - 1 cup shredded sharp cheddar cheese - 1/2 cup grated Parmesan cheese - 2 large eggs - 1/2 cup breadcrumbs (plus extra for coating) - 1/4 cup green onions, finely chopped - 1 teaspoon garlic powder - Salt and pepper to taste - Oil spray for frying For these cheesy mashed potato puffs, I love using leftover mashed potatoes. They work best when chilled. The creamy texture blends well with the cheeses. Sharp cheddar gives a tasty kick, while Parmesan adds depth. You will need two large eggs to bind the mixture. This helps keep the puffs from falling apart. The breadcrumbs add a nice crunch. You can use regular or panko breadcrumbs, depending on what you have. Chopped green onions add a fresh flavor. Garlic powder gives a little zing. Don't forget salt and pepper to enhance all the tastes. Lastly, oil spray is important for that golden brown finish. This mix of ingredients makes these puffs so yummy and satisfying. You can find the full recipe above to guide you through making them! - Preheat your oven to 400°F (200°C) and line a baking sheet with parchment paper. This helps the puffs not stick and makes cleanup easy. - In a mixing bowl, combine 2 cups of chilled mashed potatoes, 1 cup of shredded sharp cheddar cheese, 1/2 cup of grated Parmesan cheese, 2 large eggs, 1/2 cup of breadcrumbs, 1/4 cup of finely chopped green onions, 1 teaspoon of garlic powder, and salt and pepper to taste. Stir until well mixed. The mixture should hold together well. - Scoop out a portion of the mixture, about the size of a golf ball. This helps the puffs cook evenly. - Shape the mixture into small balls or puffs. You can use your hands for this. It can be a fun task, and you can even get the kids involved! - Roll each puff in extra breadcrumbs to coat them. This gives them a crispy outside. - Place the coated puffs on the baking sheet, spaced out evenly. Make sure they aren’t touching each other. - Lightly spray the puffs with oil. This helps them brown nicely while baking. - Bake in the preheated oven for about 20-25 minutes. Look for a golden brown color and crispy texture. Enjoy making these cheesy mashed potato puffs! For the full recipe, be sure to check out the detailed steps and tips. Using chilled mashed potatoes is key. Cold potatoes help the puffs hold their shape. Room temperature or warm potatoes can make them too soft. This can lead to puffs that flatten when baked. So, always use leftover mashed potatoes that you kept in the fridge. To achieve a crispy outer layer, roll each puff in breadcrumbs twice. First, coat the puffs gently with breadcrumbs before baking. Then, give them a light spray of oil. This oil helps the breadcrumbs crisp up nicely. Do not skip this step if you want that perfect crunch! For dipping sauces, think about sour cream or spicy ketchup. These add great flavor and balance the cheese. You might also enjoy a zesty ranch or a chipotle mayo. Each sauce brings a new taste to the puffs. When serving, present them in a rustic basket lined with parchment paper. This adds a nice touch. It also makes the puffs easy to grab. For a fun twist, add fresh herbs or a sprinkle of paprika on the top before serving. This gives a pop of color and flavor. One common mistake is overmixing the ingredients. This makes the puffs dense and heavy. Mix just until everything is combined. This keeps them light and airy. Another mistake is underbaking or overbaking the puffs. Check them after 20 minutes. They should be golden brown and crispy. If they are still pale, give them a few more minutes. But don’t overbake! You want them crispy, not dry. {{image_2}} You can easily change the taste of your cheesy mashed potato puffs. Start by adding herbs like parsley or chives. These add fresh flavors and color. You can also spice it up with paprika or cayenne for heat. For cheese, try different types. Mozzarella gives a gooey texture. Feta brings a tangy bite. Mix two or more cheeses for a complex flavor. If you're gluten-free, swap regular breadcrumbs for gluten-free ones. This lets everyone enjoy this dish. You can also make it vegan. Use plant-based cheese and replace eggs with flaxseed meal. Just mix one tablespoon of flaxseed meal with three tablespoons of water. Let it sit until it thickens. These cheesy mashed potato puffs are perfect for many events. Serve them at parties for a fun snack. They are great on game days for your guests. You can even enjoy them at family meals. Everyone loves a tasty, cheesy treat! For the full recipe, check out the details above. To keep your cheesy mashed potato puffs fresh, wait for them to cool first. Then, place them in an airtight container. This helps them stay moist and tasty. Use a glass or plastic container with a tight lid. If you want to keep them longer, you can freeze them. Just make sure to separate them with parchment paper. This stops them from sticking together. When reheating, keep the texture in mind. The oven is best for this snack. Preheat your oven to 350°F (175°C). Place the puffs on a baking sheet for about 10-15 minutes. This method helps them stay crispy. If you use a microwave, they might get soggy. Heat at medium power for 1-2 minutes. Keep an eye on them to avoid overcooking. Enjoy your cheesy mashed potato puffs warm and crispy! Yes, you can use fresh mashed potatoes. However, I suggest chilling them first. Cold mashed potatoes work better in this recipe. They hold their shape and help the puffs stay firm. If you use warm potatoes, your puffs may turn out too soft and mushy. Check the color and texture of the puffs. They should be golden brown on the outside. The texture should be crispy. If they look pale or soft, give them a few more minutes in the oven. Remember, the perfect puff is crunchy outside and soft inside. Yes, you can freeze these puffs. First, let them cool completely. Place them in a single layer on a baking sheet and freeze for about an hour. Then, transfer them to a freezer bag. When you're ready to eat, thaw them in the fridge overnight. Bake them again at 400°F until heated through. Enjoy your tasty snack! For the complete recipe, check out the [Full Recipe]. Cheesy mashed potato puffs are simple and fun to make. We covered the key ingredients and steps, ensuring your puffs are tasty and crispy. Remember, using chilled potatoes helps a lot! Be creative with flavors and serving ideas for any occasion. Lastly, store them correctly to enjoy leftovers later. With these tips, you'll impress everyone with your delicious cheesy puffs. Enjoy your cooking journey and delight in the smiles you'll create!](https://homecookingstyle.com/wp-content/uploads/2025/06/b99d0e3c-1b6f-4efc-9b8f-6f23174b3ac0.webp)
Looking for a tasty snack that will impress everyone? Cheesy Mashed Potato Puffs are your answer! With gooey cheese and
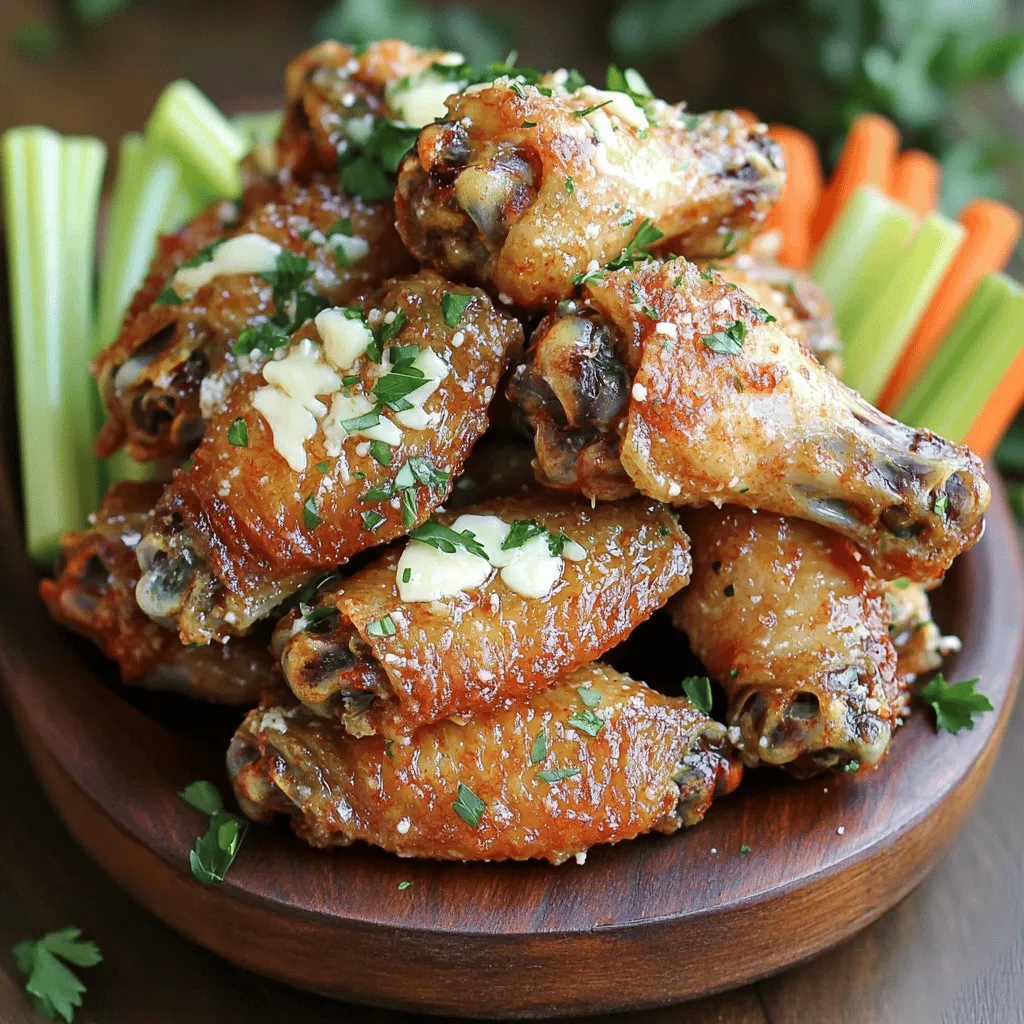
If you’re craving a delicious snack that’s easy to make, you’re in the right place! My Crispy Garlic Parmesan Wings
![- 1 cup black beans, drained and rinsed - 1 cup corn kernels (fresh or frozen) - 1 cup bell pepper, finely diced (mix of red and yellow for color) - 1 cup shredded cooked chicken (or plant-based alternative) These main ingredients give the egg rolls their hearty texture and rich taste. Black beans add protein and fiber. Corn brings sweetness and crunch. Bell peppers add color and freshness. You can use shredded chicken for a meaty bite or choose a plant-based option for a lighter meal. - 1 teaspoon cumin - 1 teaspoon chili powder - 1/2 teaspoon garlic powder - 1/2 teaspoon onion powder - 1/4 teaspoon salt - 1/4 teaspoon black pepper Spices are key to flavor. Cumin adds warmth. Chili powder gives a nice kick. Garlic and onion powders provide depth. Salt and black pepper enhance all the flavors. Mix these spices into the filling for a tasty punch. - 8 large tortillas - 1 cup shredded cheese (cheddar or Mexican blend) For the tortillas, choose large ones that can hold the filling well. Flour tortillas work best for this recipe. They roll up easily. Cheese is optional, but it adds creaminess. Cheddar brings sharpness, while a Mexican blend offers a melty texture. For the full recipe, check out the detailed steps to create these delightful snacks! First, we need to get the oven ready. Preheat your oven to 425°F (220°C). This helps the egg rolls cook evenly. Next, line a large baking sheet with parchment paper. This keeps the egg rolls from sticking and makes clean-up easy. Now, let’s mix the filling. In a mixing bowl, combine the following ingredients: - 1 cup black beans, drained and rinsed - 1 cup corn kernels (fresh or frozen) - 1 cup bell pepper, finely diced (mix of red and yellow for color) - 1 cup shredded cooked chicken (or plant-based alternative) - 1 teaspoon cumin - 1 teaspoon chili powder - 1/2 teaspoon garlic powder - 1/2 teaspoon onion powder - 1/4 teaspoon salt - 1/4 teaspoon black pepper - 1 cup shredded cheese (cheddar or Mexican blend) Mix these ingredients until everything is well combined. This filling is packed with flavor! Now it’s time to fill the tortillas. Place one tortilla on a clean surface. Spoon about 2-3 tablespoons of the filling mixture onto the center of the tortilla. Next, fold the sides of the tortilla inward. Then, roll it up tightly from the bottom to the top. This keeps all the tasty filling inside. Repeat this with the remaining tortillas and filling. Place the rolled egg rolls seam-side down on the prepared baking sheet. Lightly spray the tops with olive oil. This gives them a nice golden finish. Bake in the preheated oven for about 15-20 minutes. Flip the egg rolls halfway through for even cooking. You want them to be golden brown and crispy. Once done, remove them from the oven. Let them cool for a few minutes before serving. These egg rolls pair well with salsa, guacamole, or sour cream. Enjoy the flavors! For the full recipe, check out [Full Recipe]. To prevent the egg rolls from sticking, always use parchment paper. This simple step keeps them from sticking to the baking sheet. Lightly spray the parchment with olive oil too. It helps the egg rolls crisp up nicely. For even cooking, flip the egg rolls halfway through baking. This helps both sides brown and stay crispy. Make sure you place them seam-side down. This keeps the filling secure. These egg rolls taste great with dips. Pair them with salsa or guacamole for extra flavor. You can also serve them with sour cream. Each dip adds a unique twist. Garnishing with herbs makes them look fancy. Fresh cilantro or parsley works well. Just sprinkle some on top before serving. For a healthier option, use whole grain or low-carb tortillas. They add fiber and keep the dish light. Also, consider reducing the cheese. You can swap it for dairy-free cheese too. This keeps the flavor while making it lighter. These tips help you make the most of your Baked Southwest Egg Rolls. For the complete recipe, check out the Full Recipe section. {{image_2}} You can switch up the fillings to suit your taste. For a vegetarian option, skip the chicken. Try adding extra beans, like pinto or refried beans, for protein. You can also use quinoa or lentils. Mix in different veggies too. Spinach, zucchini, or mushrooms work well. Feel free to add spices like paprika or oregano for more flavor. If you love spice, add jalapeños to the filling. Dice them finely for a bit of heat. You can also drizzle hot sauce into the mix for a kick. For a spicy dipping sauce, mix sour cream with hot sauce. This combo gives a nice balance of cool and heat. These egg rolls pair well with many sides. A fresh salad with lime dressing adds a crisp touch. You can also make a grain bowl with rice or quinoa. Top it with diced avocado and salsa. This combination makes a filling meal. Enjoy your egg rolls with fresh sides for a perfect snack! To keep your baked Southwest egg rolls fresh, use airtight containers. Glass containers work best, as they do not absorb odors. If you use plastic, ensure it is BPA-free. For short-term storage, place the egg rolls in the fridge. They can last up to four days. For longer storage, freeze them. Wrap each egg roll in plastic wrap, then place them in a freezer bag. This helps prevent freezer burn. When reheating, the oven is your best friend. Preheat it to 375°F (190°C). Place the egg rolls on a baking sheet and heat for about 10-15 minutes. This keeps them crispy. If you use a microwave, place the egg rolls on a plate. Heat them in short bursts, 30 seconds at a time. This method can make them soft. To avoid sogginess, use a paper towel under the egg rolls in the microwave. Baked egg rolls last about four days in the fridge. If frozen, they stay good for about three months. Always label your containers with the date to keep track. Enjoy your tasty snack later with confidence! For the complete recipe, check out the Full Recipe section. Southwest Egg Rolls have roots in American Southwest cuisine. They combine flavors from Mexican and Tex-Mex cultures. This dish gained popularity in the 1980s and became a favorite in restaurants. They blend traditional ingredients like beans, corn, and spices into a crispy treat. This fusion shows how diverse cooking can be, bringing cultures together. Yes, you can make these egg rolls ahead of time. To prep in advance, follow these steps: - Prepare the filling: Mix all ingredients and store in the fridge for up to two days. - Assemble the egg rolls: You can roll them and keep them in the fridge. Just cover them tightly with plastic wrap. - Freeze for later: If you want to save them longer, freeze unbaked egg rolls in a single layer. Once frozen, place them in a freezer bag. When ready to cook, bake them straight from the fridge or freezer. Just add a few extra minutes to the baking time. To make these egg rolls gluten-free, use gluten-free tortillas. Many brands offer this option made from rice, corn, or almond flour. It is important to check the labels to ensure they meet your needs. You can also modify the filling: - Substitute: Use gluten-free sauces or seasonings. - Check cheese: Most cheese is gluten-free, but always verify. With these adjustments, you can enjoy a tasty and safe snack for everyone. For the full recipe, check out the details above. Southwest egg rolls offer a tasty blend of flavors and textures. We explored key ingredients like black beans and cheese, and shared easy steps for preparation and baking. You learned tips for serving and storage, along with fun variations. Remember, you can customize these rolls to fit your dietary needs or spice preferences. Whether you choose to enjoy them as a snack or a meal, these egg rolls will surely impress. Happy cooking, and enjoy this delightful dish!](https://homecookingstyle.com/wp-content/uploads/2025/06/d0004723-be60-498b-a630-018ec2e8bf63.webp)
Do you crave a savory snack bursting with flavor? These Baked Southwest Egg Rolls are the answer! Packed with black
![- 2 cups romaine lettuce, chopped - 1 cup cherry tomatoes, halved - 1 cucumber, diced - 1 bell pepper (red or yellow), diced - 1/2 red onion, finely chopped - Fresh basil leaves When making a Classic Italian Chopped Salad, fresh produce is key. Romaine lettuce gives a nice crunch. Cherry tomatoes add sweetness. Cucumbers bring a cool taste. A bell pepper adds color and flavor. Red onion gives a slight bite. Fresh basil leaves top it off with a fragrant finish. - 1 cup cooked chickpeas, drained and rinsed - 1/2 cup Kalamata olives, pitted and halved - 1/4 cup feta cheese, crumbled Don’t forget the canned and packaged items. Chickpeas add protein and heartiness. Kalamata olives bring a salty kick. Feta cheese adds creaminess and tang. Each of these ingredients makes the salad more filling and satisfying. - 3 tablespoons extra virgin olive oil - 2 tablespoons red wine vinegar - 1 teaspoon Dijon mustard - Salt and pepper to taste Condiments and seasonings are where the magic happens. Extra virgin olive oil gives richness. Red wine vinegar adds acidity and brightness. Dijon mustard brings a little spice. Salt and pepper enhance all the flavors. Together, they create a simple dressing that ties everything together perfectly. For the full recipe, check out the [Full Recipe]. First, we chop the vegetables. Start with the romaine lettuce. Use a sharp knife to cut it into small pieces. Then, halve the cherry tomatoes. Dice the cucumber and bell pepper into bite-sized pieces. Next, finely chop the red onion. It adds a nice crunch and flavor. Lastly, rinse the cooked chickpeas under cold water. Drain them well. For the olives, cut them in half. This step makes all the flavors blend nicely. Now, let’s make the dressing. In a small bowl, add the extra virgin olive oil, red wine vinegar, and Dijon mustard. Use a whisk to mix these together. Make sure they blend well. Add a pinch of salt and pepper. Whisk until the dressing is smooth and creamy. This dressing will bring our salad to life! Next, it’s time to combine everything. In a large bowl, add all the chopped vegetables, chickpeas, and olives. Pour the dressing over the salad. Toss gently, so everything gets coated. Be careful not to break the feta too much when you add it. Give it one last toss. Let the salad sit for about 5-10 minutes. This helps the flavors come together. Now, serve the salad in bowls or on a large platter. Don’t forget to add fresh basil leaves on top. They add color and a lovely aroma. You can find the Full Recipe to see all the details! To boost the flavor of your Classic Italian Chopped Salad, try marinating it. After you mix the salad, let it sit for 10 minutes. This helps the ingredients soak up the dressing. You can also swap ingredients for a new twist. Use arugula instead of romaine for a peppery kick. Substitute cherry tomatoes with sun-dried tomatoes for a deeper taste. If you want a creamier salad, try using goat cheese instead of feta. When serving, think about how it looks. For gatherings, use a large platter. Arrange the salad in layers for a colorful display. Garnish your salad with fresh basil leaves. You can also sprinkle some extra feta on top for a nice touch. Another great idea is to add a drizzle of olive oil just before serving. This adds shine and flavor. Prep your ingredients ahead of time. You can chop the veggies the night before. Store them in airtight containers in the fridge. This makes salad-making quick and easy. Consider using canned chickpeas instead of dried ones. Canned chickpeas save time because you don't need to soak them. Just rinse and drain before adding them to your salad. This keeps the cooking process simple and fast. For the full recipe, check out the Italian Rustic Chopped Salad. {{image_2}} You can boost your salad's texture with a few tasty add-ins. - Avocado: Adding creamy avocado makes your salad richer and smoother. It brings a nice balance to the crunch of the veggies. - Nuts or seeds: Toss in some nuts or seeds for a delightful crunch. Pine nuts, walnuts, or sunflower seeds work well. They add flavor and healthy fats. You have options when it comes to dressing your salad. - Homemade vs. store-bought options: I always recommend making your own dressing. It's simple and fresh. However, store-bought dressings can save time when you’re busy. Look for ones with clean ingredients. - Different vinegar choices: While red wine vinegar is classic, you can swap it for apple cider vinegar or balsamic vinegar. Each type gives the salad a unique taste. Change your ingredients to match the season for a fresh twist. - Summer versions: In warmer months, add sweet corn, ripe peaches, or fresh herbs. These bring bright flavors and colors. - Winter versions: For cold months, try adding roasted root vegetables or hearty greens like kale. These ingredients make the salad warm and satisfying. For the full recipe, check out the Italian Rustic Chopped Salad 🥗 section. To keep your Italian chopped salad fresh in the fridge, follow these tips. First, store the salad in an airtight container. This helps keep moisture out. Second, keep the dressing separate. Adding it right before eating keeps the salad crisp. Use the salad within three days for the best flavor and texture. Freezing this salad is not ideal, but you can freeze some ingredients. For example, cooked chickpeas freeze well. Just drain and rinse them, then place in a freezer bag. You can also freeze diced bell peppers. When you want to use them, thaw in the fridge overnight. To enjoy leftovers, I recommend serving them cold. If you want to warm any ingredients, heat them gently. Be careful not to overcook. Mix in fresh greens or add more dressing to brighten the flavor. Enjoy your meal! For the full recipe, check out the Italian Rustic Chopped Salad. A Classic Italian Chopped Salad is a fresh mix of flavors and textures. It usually includes: - Romaine lettuce - Cherry tomatoes - Cucumber - Bell pepper - Chickpeas - Red onion - Kalamata olives - Feta cheese This salad is colorful and packed with nutrients. You can enjoy it as a side dish or a light meal. To make this salad vegan, swap out the feta cheese. You can use: - Vegan cheese - A mix of nuts for creaminess Also, ensure that your chickpeas are canned and not packed with any animal products. This way, you keep all the great taste while making it plant-based. Yes, you can prepare this salad ahead of time. Here are some tips: - Chop the veggies and store them in the fridge. - Mix the dressing separately. - Combine everything just before serving. This keeps the salad fresh and crunchy. You can also let it sit for a bit to allow the flavors to mix, but avoid letting it sit too long. This blog post shared a clear path to making a classic Italian chopped salad. We covered fresh produce, canned goods, and flavorful dressings. You learned how to prepare, mix, and serve the salad with tips to enhance taste and save time. Feel free to make it your own with different ingredients or dressings. Salad is simple, healthy, and perfect for any meal. Enjoy creating your version and sharing it with others!](https://homecookingstyle.com/wp-content/uploads/2025/06/8d3963a7-42e7-47c4-9aa7-f0eed2c0de3e.webp)
Are you ready to elevate your salad game? The Classic Italian Chopped Salad is your answer! This dish bursts with
