Skip to content
DisclaimerTerms Of UseGDPR PolicyCookie Policy

Home Cooking Style

  • Home
  • Drinks
  • Appetizers
  • Dinner
  • Dessert
  • About
  • Contact
  • Privacy Policy
DisclaimerTerms Of UseGDPR PolicyCookie Policy

NO-ING-IMG

To make Caramel Apple Fudge, you need: - 2 cups granulated sugar - 1 cup heavy cream - 1/2 cup unsalted butter - 1 teaspoon vanilla extract - 1 1/2 cups chopped apples (preferably Granny Smith) - 2 teaspoons cinnamon - 1/2 cup chopped walnuts (optional) - 1 cup semi-sweet chocolate chips - 1/4 cup caramel sauce (for drizzling) These ingredients combine to create a sweet, creamy treat. Each one plays a key role in flavor and texture. If you don’t have certain ingredients, you can make swaps. Here are some easy ideas: - Granulated Sugar: You can use brown sugar for a deeper flavor. - Heavy Cream: Half-and-half works, but the fudge will be less rich. - Unsalted Butter: Margarine can replace butter if needed. - Chopped Apples: Any tart apple works well. Try Honeycrisp or Fuji for a twist. - Walnuts: Pecans or almonds can be used instead. These substitutions keep the fudge tasty and fun. Using different apples can change the fudge’s flavor. Here are some seasonal ideas: - Fall: Use Cortland apples for a sweet and tangy kick. - Winter: Try Fuji apples for a sweeter fudge. - Spring: Gala apples offer a soft texture and mild taste. - Summer: Mix in berries for a fruity twist. Experimenting with apples gives your fudge a new twist each season. First, grab an 8x8 inch baking dish. Line it with parchment paper. Let the paper hang over the edges. This makes it easy to lift the fudge out later. Set this aside while you cook the fudge. Now, take a heavy-bottomed saucepan. Add 2 cups of granulated sugar, 1 cup of heavy cream, and 1/2 cup of unsalted butter. Cook over medium heat. Stir constantly until it boils. This step is key for a smooth fudge. Once it boils, stop stirring. Let it boil for 5 minutes. Use a candy thermometer to check the temperature. Aim for 234°F (112°C). This is the soft ball stage. After boiling, remove the pan from heat. Stir in 1 teaspoon of vanilla extract. Next, add 1 1/2 cups of chopped Granny Smith apples. Sprinkle in 2 teaspoons of cinnamon. If you like nuts, toss in 1/2 cup of chopped walnuts. Mix everything well. Now, add 1 cup of semi-sweet chocolate chips. Stir until they melt and blend into the mixture. Quickly pour the fudge into your prepared dish. Spread it evenly across the bottom. Let it cool at room temperature for about 2 hours. Once set, lift it out with the parchment paper and cut it into squares. Drizzle with caramel sauce before serving. To make the best fudge, you need to focus on timing. Cook the mixture until it reaches the soft ball stage, which is 234°F. Use a candy thermometer for accuracy. Stir the fudge constantly until it boils, then stop stirring as it cooks. This step helps the fudge thicken properly. If it sets too soft, it won’t hold its shape. If it sets too hard, it will be tough to eat. One common mistake is not measuring the ingredients correctly. Use a kitchen scale or measuring cups for precision. Another mistake is stirring too much after boiling. Once the fudge reaches a boil, let it cook undisturbed. Lastly, don’t rush the cooling process. Allow it to set at room temperature instead of placing it in the fridge. This helps maintain a smooth texture. Serving your fudge nicely makes it even more enjoyable. Cut the fudge into neat squares using a sharp knife. Place the squares on a colorful platter. For a fun touch, drizzle caramel sauce on top right before serving. You can also sprinkle extra cinnamon or add apple slices around the fudge for a beautiful presentation. This makes your treat not just tasty but also visually appealing! {{image_2}} You can change up the fudge by adding different nuts or fruits. For a fun twist, try using pecans or almonds. These nuts add a nice crunch and flavor. You can also use dried fruits like cranberries or raisins. They give a sweet and chewy texture that pairs well with the creamy fudge. Want to make a vegan version of this fudge? You can use coconut cream instead of heavy cream. Replace the butter with a plant-based butter. Use dairy-free chocolate chips to keep it creamy. This way, everyone can enjoy the treat without dairy! Toppings can make your fudge even more fun. You can drizzle extra caramel sauce on top for more sweetness. Try adding a sprinkle of sea salt for a nice contrast. Crushed graham crackers or toffee bits can give an extra crunch. Get creative and make your fudge unique! To keep your caramel apple fudge fresh, store it in an airtight container. This helps to keep moisture out and preserves the flavor. Line the container with parchment paper for easy removal. Always place a piece of wax paper between layers of fudge to prevent sticking. When stored properly, caramel apple fudge can last up to two weeks at room temperature. If you keep it in the fridge, it may last a bit longer, up to three weeks. However, I recommend eating it within the first week for the best taste and texture. You can freeze caramel apple fudge for longer storage. Cut it into squares and wrap each piece in plastic wrap. Then, place them in a freezer-safe bag or container. This method helps to keep the fudge fresh for up to three months. When you're ready to enjoy it, let it thaw in the fridge overnight. Enjoy the sweet treat at your leisure! Yes, you can use dark chocolate or milk chocolate. Each will change the taste. Dark chocolate adds a rich flavor, while milk chocolate is sweeter. Just make sure to melt it well. I love using semi-sweet chocolate chips, but feel free to experiment based on your taste! To make caramel sauce, you will need sugar, butter, and cream. Start by heating sugar in a pan until it melts. Stir it until it turns golden brown. Then, add butter and cream slowly. Mix until it’s smooth. Let it cool before using. This sauce adds a lovely touch to many desserts. You can find caramel apple fudge at local candy shops or bakeries. Many grocery stores also sell fudge in their sweet sections. If you can't find it, consider making your own at home. It’s simple and fun! Plus, you can customize it to your liking. This blog covered all you need for making caramel apple fudge. You learned the ingredients, step-by-step instructions, and helpful tips. We explored variations and proper storage to keep your fudge fresh. Enjoy trying different flavors and toppings. With these tips, your fudge will impress friends and family. Dive into baking now, and have fun with your unique creations!

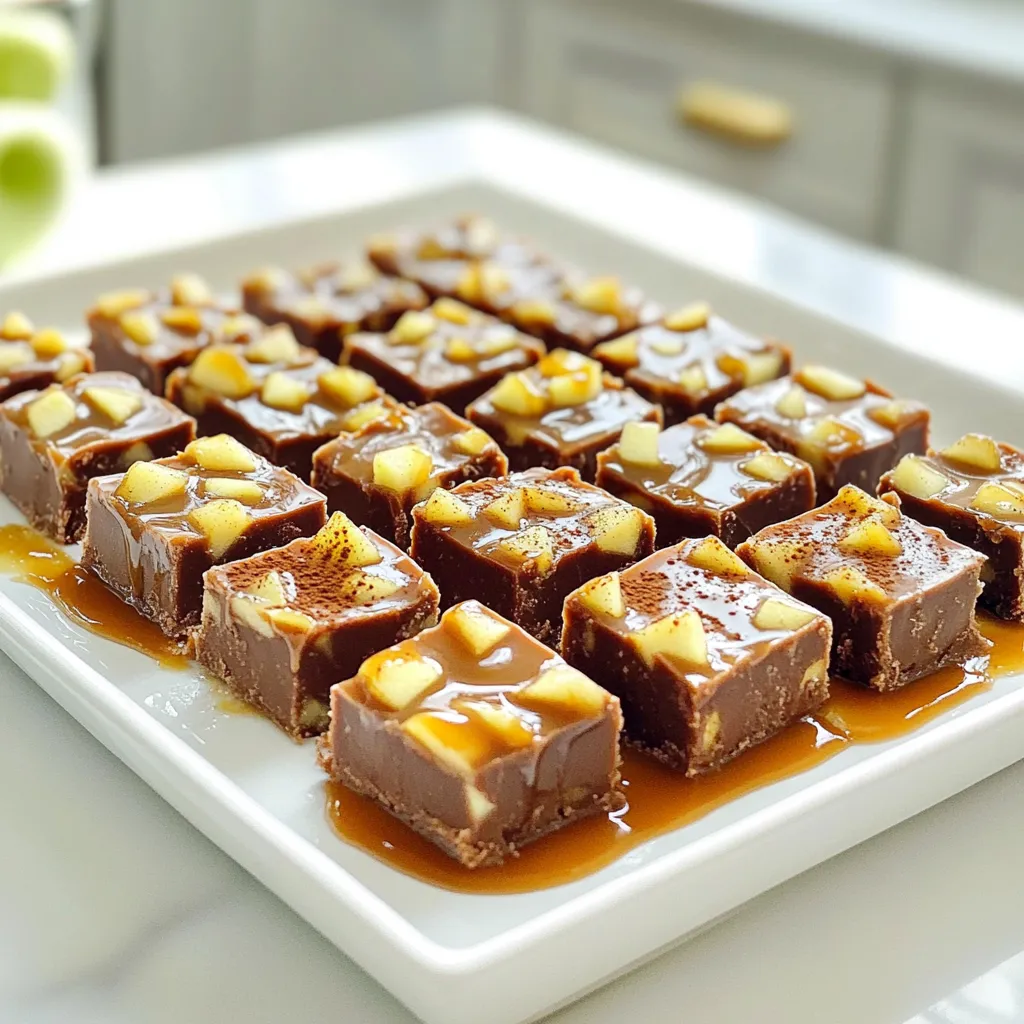
Caramel Apple Fudge Delightfully Sweet and Creamy Treat

Are you ready to savor a treat that’s both sweet and creamy? I’m excited to share my recipe for Caramel

- 2 cups apple cider - 1 cup granulated sugar - 1 cup light brown sugar, packed - 1 cup unsalted butter, softened - 4 large eggs - 3 cups all-purpose flour - 2 teaspoons baking powder - 1 teaspoon baking soda - 1 teaspoon cinnamon - 1/2 teaspoon nutmeg - 1/2 teaspoon salt - 1 teaspoon vanilla extract - 1 cup chopped apples, peeled and diced - 1/2 cup caramel sauce (store-bought or homemade) - Optional: powdered sugar for dusting Using quality spices like cinnamon and nutmeg makes a big difference. Fresh apple cider adds a rich flavor. Avoid packaged cider if you can; it often lacks depth. The taste of your cake depends on these details. Choose ripe apples for the best texture. Make sure your butter is soft to blend well with the sugars. This helps create a fluffy cake. 1. Preheat oven and prepare the bundt pan Set your oven to 350°F (175°C). Grease and flour a 10-inch bundt pan. This helps the cake come out easily. 2. Reduce apple cider In a small saucepan, boil 2 cups of apple cider over medium heat. Once it boils, lower the heat and let it simmer. Cook it for about 15-20 minutes until it reduces to 1 cup. Let it cool a bit before using. 1. Creaming butter and sugars In a large bowl, cream 1 cup of softened unsalted butter, 1 cup of granulated sugar, and 1 cup of light brown sugar. Mix until it becomes light and fluffy. This step adds air to the batter. 2. Adding eggs and vanilla Add 4 large eggs one at a time. Make sure to mix well after each egg. Stir in 1 teaspoon of vanilla extract. This gives the cake a nice flavor. 1. Mixing dry ingredients In a separate bowl, whisk together 3 cups of all-purpose flour, 2 teaspoons of baking powder, 1 teaspoon of baking soda, 1 teaspoon of cinnamon, 1/2 teaspoon of nutmeg, and 1/2 teaspoon of salt. This combination adds structure and flavor. 2. Incorporating the apple cider and folding in apples Gradually add the dry mixture to the wet mixture. Alternate between the dry mixture and the reduced apple cider. Start and end with dry ingredients. Once mixed, fold in 1 cup of chopped apples until they're evenly spread. 1. Adding layers of batter and caramel Pour half of the batter into the prepared bundt pan. Drizzle half of the 1/2 cup of caramel sauce over this layer. Then, add the remaining batter and finish with another drizzle of caramel on top. 2. Proper baking time and signs of doneness Bake in your preheated oven for 55-65 minutes. To check if it’s done, insert a toothpick into the center. If it comes out clean, your cake is ready. Let it cool in the pan for about 15 minutes before inverting it onto a wire rack. To prevent sticking, grease and flour your bundt pan well. I like to use a pastry brush to ensure every nook gets covered. This little step helps your cake slide out easily. For even baking, make sure your oven is preheated. Place the bundt pan in the center of the oven. This way, the heat gets to all sides. To make your cake moister, try adding an extra egg. You could also use a bit more apple cider. Apples add great texture too. If you want to try new flavors, think about adding a pinch of ginger or a splash of orange juice. Tossing in some chopped nuts can also give a nice crunch. This cake shines with a scoop of vanilla ice cream or a dollop of whipped cream. These toppings balance the sweetness of the caramel. For a lovely presentation, dust the top with powdered sugar. You can also drizzle more caramel sauce on each slice. This makes the cake look fancy for gatherings. {{image_2}} You can change the taste of your Apple Cider Caramel Bundt Cake by using different spices. Try adding pumpkin spice or even ginger for a unique twist. These spices bring warmth and depth to the cake, making it even more delightful. You can also mix in other fruits. Pears add a sweet, juicy flavor, while cranberries give a tart contrast. Both options will refresh your cake and surprise your guests with new tastes. If you need a gluten-free option, swap the all-purpose flour with a gluten-free flour blend. This will make it easier for those with gluten sensitivities to enjoy this tasty treat. Just be sure to choose a blend that works well in baking. For a dairy-free version, use a dairy-free butter substitute. You can also replace the eggs with flax eggs or applesauce. These swaps will keep the cake moist and delicious while meeting dietary needs. You have choices when it comes to frosting or glazing the cake. A caramel glaze gives a sweet finish and pairs well with the apple flavor. Simply drizzle it over the cake after it cools. Cream cheese frosting can add a creamy richness. To make it, mix softened cream cheese with powdered sugar and vanilla. This frosting will give a tangy balance to the sweetness of the cake. If you want to make homemade caramel sauce, melt sugar in a saucepan until it turns golden. Slowly stir in cream for a smooth finish. This sauce will elevate your dessert and impress your guests. To keep your Apple Cider Caramel Bundt Cake fresh, wrap it well. Use plastic wrap or aluminum foil. Store the cake at room temperature. This keeps it moist and tasty. Avoid placing it in the fridge unless it’s very hot. Cold air can dry it out. This cake lasts about 3 to 4 days at room temperature. For longer storage, you can freeze it. Wrap slices in plastic wrap, then place them in a freezer bag. This way, they stay fresh for up to three months. When you want a slice, just take it out and thaw it in the fridge overnight. To warm the cake for serving, preheat your oven to 350°F. Place the slice on a baking sheet and heat for about 10 minutes. This warms it nicely without drying it out. You can also use the microwave. Heat for about 15 seconds to keep the texture soft. Enjoy your cake warm, with a drizzle of caramel sauce! Can I use store-bought apple cider? Yes, you can use store-bought apple cider. Look for a brand without added sugars. Fresh cider makes a more vibrant flavor, but store-bought works well too. What can I substitute for brown sugar? You can use white sugar with a bit of molasses. Use one cup of white sugar with one tablespoon of molasses. Mix well for a similar taste. How do I know when the cake is fully baked? Insert a toothpick into the center of the cake. If it comes out clean, the cake is done. If it has wet batter, bake a few more minutes. Can I make this cake a day ahead? Yes, this cake stores well. Make it a day before serving. Just keep it covered at room temperature to maintain freshness. What’s the best way to decorate the bundt cake? Dusting with powdered sugar adds a nice touch. Drizzle extra caramel sauce on top for a sweet finish. Serve with whipped cream or ice cream for extra delight. You learned how to make a delicious Apple Cider Caramel Bundt Cake. We covered the ingredients needed, tips for baking, and ways to store your cake. Remember, using fresh apple cider and high-quality spices makes a big difference. You can try different fruits or spices to add your twist. Don't forget to pair it with ice cream or whipped cream for extra delight. With these steps, your cake will impress everyone. Now go bake, enjoy, and share your creation!

Apple Cider Caramel Bundt Cake Delightful Dessert Recipe

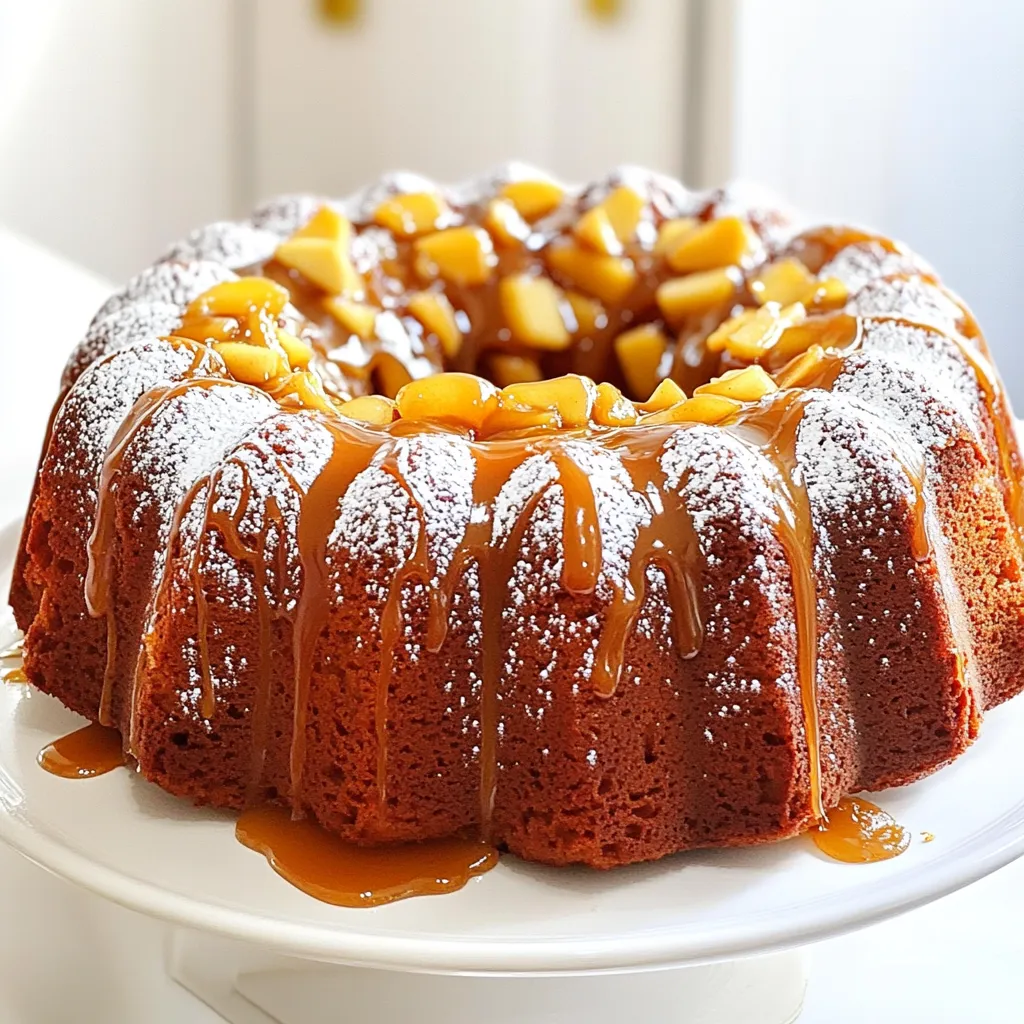
Get ready to fall in love with fall flavors! This Apple Cider Caramel Bundt Cake is a delightful dessert that

- 2 lbs beef chuck, cut into 1-inch cubes - 4 medium carrots, sliced - 3 potatoes, diced - 2 stalks celery, chopped - 1 large onion, chopped - 3 cloves garlic, minced - 4 cups beef broth - 1 can (14 oz) diced tomatoes, undrained - 1 cup green beans, trimmed and cut into 1-inch pieces - 2 teaspoons dried thyme - 1 teaspoon smoked paprika - 1 teaspoon salt - ½ teaspoon black pepper - 2 tablespoons olive oil - 1 tablespoon Worcestershire sauce - 1 bay leaf You can swap beef chuck for stew meat or brisket if needed. If you want a lighter stew, use chicken instead. For a vegetarian option, use mushrooms or lentils. Instead of carrots, try parsnips for a sweet twist. You can replace beef broth with vegetable broth for a lighter flavor. If you don’t have fresh herbs, dried herbs work too, just use less. When buying beef, look for bright red color and little fat. Choose firm and smooth potatoes. For carrots, pick ones that feel heavy and have a rich color. Celery should be crisp and green, while onions must be firm and dry. Choose garlic that is plump and free of spots. Fresh green beans should snap easily. Always check the expiry date on canned goods for freshness. Start with 2 lbs of beef chuck. Cut it into 1-inch cubes. This size helps the beef cook evenly. Heat 2 tablespoons of olive oil in a skillet over medium-high heat. Season the beef with 1 teaspoon of salt and ½ teaspoon of black pepper. Sear the beef cubes in batches until they are brown on all sides. This step adds great flavor. Use a slotted spoon to transfer the beef to your slow cooker. Now, it's time to layer the veggies. Add the seared beef to the slow cooker. Next, slice and add 4 medium carrots, dice 3 potatoes, and chop 2 stalks of celery. Then, chop 1 large onion and mince 3 cloves of garlic. Stir all these ingredients together in the slow cooker. Next, pour in 4 cups of beef broth and 1 can of diced tomatoes (14 oz), undrained. Ensure all the ingredients are covered. Add 1 tablespoon of Worcestershire sauce, 2 teaspoons of dried thyme, 1 teaspoon of smoked paprika, and 1 bay leaf. These spices enhance the stew's flavor. Cover your slow cooker and set it to cook. You can choose to cook on low for 8 hours or on high for 4 hours. The beef needs to be tender when done. In the last hour of cooking, add 1 cup of trimmed and cut green beans. This keeps them crisp and fresh. Once finished, taste the stew and adjust the seasoning with more salt or pepper as needed. Don’t forget to remove the bay leaf before serving. Enjoy your hearty stew! Searing beef is key for great flavor. Start with a hot skillet. Use medium-high heat and add olive oil. Make sure to season the beef with salt and pepper before you cook it. This step helps seal in the juices. Cook the beef in small batches, so it browns well. Don’t overcrowd the pan. Each piece needs space to sear properly. You want that nice brown crust on all sides. This will give your stew a rich taste. To make the stew even tastier, consider these tips. First, use fresh herbs if you can. They add a lively flavor. Next, add a splash of red wine before cooking. This gives depth to the dish. You can also try adding a tablespoon of tomato paste. This thickens the stew and boosts the tomato flavor. Finally, adjust the seasoning at the end of cooking. Taste the stew and add more salt or pepper if needed. This ensures every bite is delicious. If your stew is too thin, don’t worry. There are easy ways to thicken it. One method is to mix a tablespoon of cornstarch with cold water. Stir this mixture into the stew and let it cook for 15 more minutes. Another option is to mash some of the potatoes in the stew. This adds creaminess and body. You can also let the stew cook uncovered for the last hour. This helps some of the liquid evaporate, making it thicker. {{image_2}} You can make a tasty vegetarian stew by swapping out beef for hearty veggies. Use mushrooms for a meaty texture. Add lentils for protein and fiber. Replace beef broth with vegetable broth for a rich taste. Carrots, potatoes, and celery still work well. Toss in some peas for sweetness. This version is filling and healthy. Feel free to get creative with your veggie choices. You can add: - Zucchini, sliced into half-moons - Bell peppers, diced for color - Sweet corn, fresh or frozen - Butternut squash, cubed for sweetness - Spinach or kale, added at the end These veggies not only add flavor but also boost nutrients. Adjust cooking times for softer veggies. Spices can change the stew's whole vibe. Here are some ideas: - Add red pepper flakes for heat. - Stir in fresh herbs like rosemary or parsley. - Use curry powder for a warm twist. - Try a splash of red wine for depth. - Replace smoked paprika with regular paprika for a milder flavor. Experiment and find the mix you love best. Each change can create a new favorite dish! To store your beef vegetable stew, let it cool first. Use an airtight container. You can keep it in the fridge for about 3 to 4 days. Make sure to label the container with the date. This way, you know when to eat it. If you want to freeze the stew, pour it into a freezer-safe container. Leave some space at the top for expansion. The stew will stay good for about 3 months in the freezer. When you're ready to use it, just take it out and let it thaw in the fridge overnight. When reheating, use a pot on the stove over medium heat. Stir the stew often to heat it evenly. You can also use a microwave. Put it in a microwave-safe bowl and cover it with a lid. Heat in short bursts, stirring in between. Add a splash of broth if it seems too thick. You can store Slow Cooker Beef Vegetable Stew in the fridge for up to four days. Make sure to keep it in an airtight container. If you want to keep it longer, freeze it. In the freezer, it stays good for up to three months. Just thaw it in the fridge overnight before reheating. Yes, you can make this stew in an Instant Pot. Start by using the sauté function to sear the beef, just like in the slow cooker. Then, add all the other ingredients. Seal the lid and cook on high pressure for about 35 minutes. Let the pressure release naturally for best results. This method saves time and gives you a tasty stew. Beef Vegetable Stew goes well with many sides. Here are some great options: - Crusty bread for dipping - A fresh green salad - Mashed potatoes for a creamy touch - Rice or quinoa for a hearty base Each of these sides enhances the meal and makes it even more satisfying. Enjoy your hearty dish! This blog post covered how to make delicious slow cooker beef vegetable stew. We explored key ingredients, helpful tips for selecting fresh items, and how to prepare your beef. You learned step-by-step instructions for cooking, plus tips for enhancing flavor and adjusting the stew's thickness. We also discussed variations for veggie lovers and how to store leftovers. With these insights, you can create a satisfying meal that fits your taste. Enjoy making this stew and share it with friends and family!

Slow Cooker Beef Vegetable Stew Hearty Comfort Meal

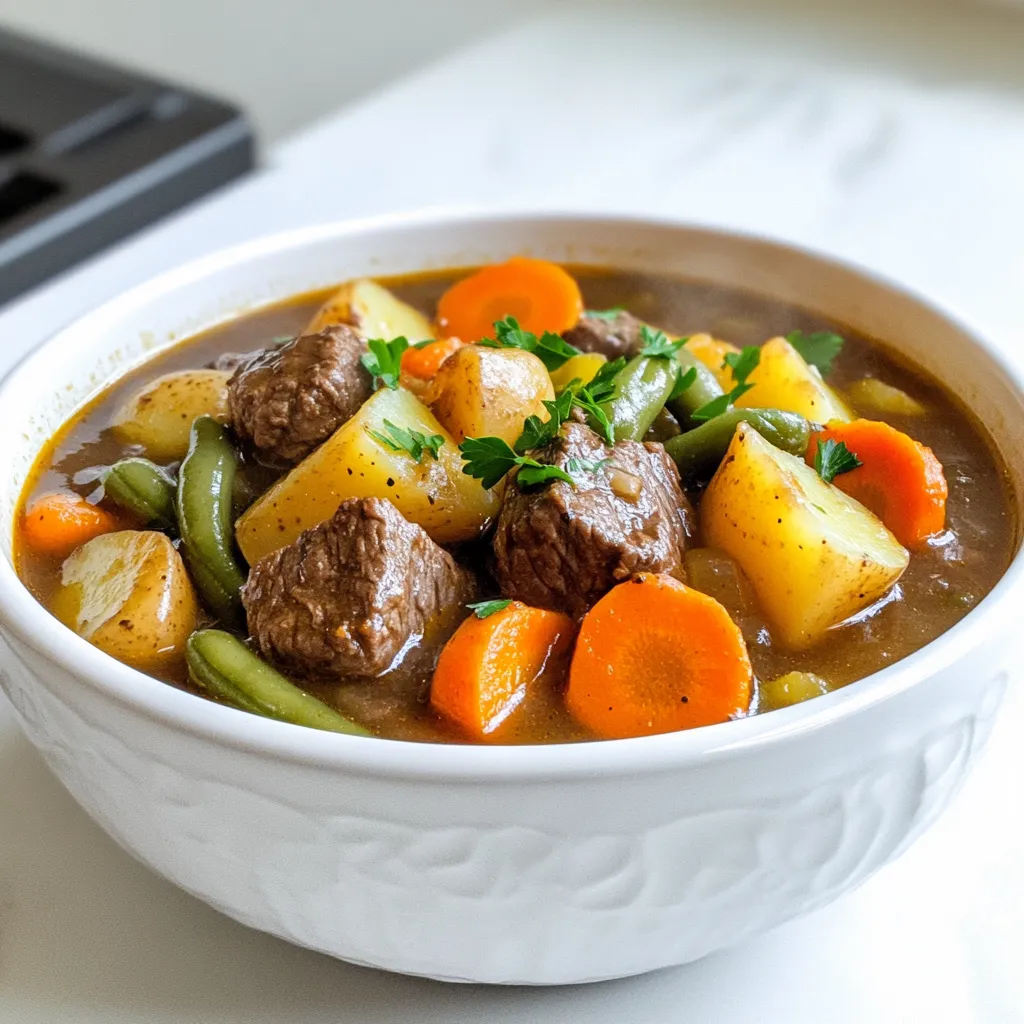
When you crave comfort food, nothing beats a hearty Slow Cooker Beef Vegetable Stew. This dish is warm, filling, and

You need 1 cup of fresh strawberries for this drink. Make sure they are ripe and sweet. Slice them after hulling. This gives the lemonade a bright, fruity flavor. Use 1/4 cup of fresh basil leaves. They add a nice herbal twist. You can add more for garnish too. Fresh basil makes the drink special and fresh. You need 1 cup of freshly squeezed lemon juice. This is about 4 to 6 lemons. The juice gives the drink its tangy zing. Fresh juice is best for flavor. Use 1 cup of granulated sugar. This sweetens the drink. You can adjust the amount based on your taste. If you like it sweeter, add more sugar. You will need 4 cups of cold water. This helps mix all the flavors. Use cold water for a refreshing drink. It makes the lemonade crisp and cool. For serving, have ice cubes ready. Lemon slices and extra basil leaves are great garnishes. They make the drink look pretty and add extra flavor. Enjoy your Strawberry Basil Lemonade! {{ingredient_image_1}} To start, gather 1 cup of fresh strawberries. Hull and slice them. In a blender, add the strawberries and 1/2 cup of cold water. Blend this mix until it becomes smooth. If you like some chunks, blend for a shorter time. This puree will add great flavor to your drink. Next, take 1/4 cup of fresh basil leaves and 1/2 cup of cold water. In a medium saucepan, mix these with 1 cup of granulated sugar. Heat the mixture on medium heat. Stir it until the sugar dissolves. Once it simmers, take it off the heat. Let the basil steep for about 10 minutes. This step infuses the syrup with basil flavor. Now, strain the basil syrup through a fine-mesh sieve into a large pitcher. Discard the basil leaves. Add 1 cup of freshly squeezed lemon juice to the pitcher. Now, pour in the strawberry puree you made earlier. Mix these well to combine all the flavors. Finally, add the remaining 3.5 cups of cold water. Taste it now and adjust the sweetness if needed by adding more sugar. Once everything is mixed, put the pitcher in the refrigerator. Let it chill for at least 1 hour. This helps the flavors blend together and makes the drink refreshing. To serve, fill your glasses with ice cubes. Pour the chilled strawberry basil lemonade over the ice. For a nice touch, garnish with lemon slices and extra basil leaves. This makes your drink look as good as it tastes! You can change the sweetness of your lemonade easily. Start with the 1 cup of sugar in the recipe. After mixing, taste it. If it needs more sweetness, add a little sugar at a time. Stir well after each addition. You want it to taste just right for you! Choose ripe, fresh strawberries for the best flavor. Look for berries that are bright red and firm. Avoid ones that have white spots or are mushy. If you can, buy strawberries from a local farmer's market. They often taste better and are fresher. Think about adding other flavors to make your drink special. You can mix in a little mint for a fresh twist. Try a splash of ginger for some spice. A hint of lime juice can brighten the flavor too. Experiment with what you like! Make your drink look as good as it tastes. Use clear glasses to show off the vibrant colors. Add lemon slices and basil leaves on top for a nice touch. You can also use fun straws or cute cocktail picks. This makes your drink more inviting and fun! Pro Tips Fresh Ingredients Matter: Using fresh strawberries and basil will elevate the flavor of your lemonade, making it taste vibrant and refreshing. Adjust the Sweetness: Taste your lemonade before serving and adjust the sugar to your preference. You can also substitute honey or agave syrup for a different flavor profile. Chill for Best Results: Letting the lemonade chill for at least an hour allows the flavors to meld together beautifully, resulting in a more harmonious drink. Garnish Creatively: Get creative with your garnishes! Add sliced strawberries or a sprig of basil on top for a beautiful presentation that will impress your guests. {{image_2}} You can make your strawberry basil lemonade bubbly! To do this, use sparkling water instead of regular water. This adds a fun fizz and a new texture. Start with the same base recipe, then swap the last 3.5 cups of cold water for sparkling water. Serve it immediately over ice to keep the bubbles fresh. Feel free to mix in other fruits for a twist! Peaches, raspberries, or watermelon work great. Just blend them with the strawberries. You can also slice them and add them to the pitcher. This gives your drink more flavor and color. Try using other herbs if you want a new taste. Mint pairs well with strawberries and adds a cool flavor. You can also use rosemary for a more earthy taste. Just like with basil, steep the herbs in sugar water first. This brings out their flavors before you mix them into the lemonade. To keep your strawberry basil lemonade fresh, store it in the fridge. Use a large pitcher or a glass jar with a tight lid. This helps keep the flavors bright. Chill it for up to three days. Always give it a good stir before serving. If you notice any separation, that's normal. Just mix it well! You can freeze strawberry basil lemonade for later use. Pour the lemonade into ice cube trays or freezer-safe containers. This method lets you enjoy it later as a cool treat. When you're ready, thaw the cubes in the fridge or let them sit at room temp. You can also blend them into a slushy drink! The shelf life of your lemonade depends on how you store it. In the fridge, it lasts for about three days. If frozen, it can last up to six months. However, for the best flavor and freshness, I recommend using it within the first month. Enjoy the taste of summer anytime! Yes, you can use frozen strawberries. They work well in a pinch. Just let them thaw before blending. This makes blending easier and helps you get a smooth puree. Keep in mind that frozen strawberries might make your drink a bit colder and thicker. To make your lemonade less sweet, reduce the sugar. Start with half a cup instead of a full cup. You can also add more lemon juice to balance the taste. Taste it as you go until you find your perfect mix. Store any leftover lemonade in a sealed pitcher. Keep it in the fridge for up to three days. If you want to keep it longer, consider freezing it in ice cube trays. This way, you can enjoy it later without losing flavor. Yes! You can use mint or thyme instead of basil. Each herb brings a unique flavor to the lemonade. Mint will add a refreshing twist, while thyme gives a more earthy taste. Try different herbs to find your favorite. Basil is rich in antioxidants and can help fight inflammation. It also supports digestion. Strawberries are high in vitamin C and fiber, which boost your immune system. Together, they make a tasty drink with added health perks. Enjoy this drink knowing it's good for you! This blog post covered how to make strawberry basil lemonade step-by-step, from ingredients to serving. You learned about fresh strawberries, basil, and lemon juice, ensuring a tasty drink. I shared tips to adjust sweetness and enhance flavor. You found variations like adding sparkling water or other fruits. Remember, this drink is easy to make and fun to customize. Enjoy creating your own version of this refreshing lemonade!

Strawberry Basil Lemonade Fresh and Refreshing Drink

Looking for a drink that’s both cool and delicious? Try my Strawberry Basil Lemonade! This refreshing blend combines sweet strawberries,

To make a comforting bowl of chicken noodle soup, gather these simple ingredients: - 1 tablespoon olive oil - 1 medium onion, diced - 2 cloves garlic, minced - 2 medium carrots, sliced - 2 celery stalks, sliced - 1 teaspoon dried thyme - 1 teaspoon dried rosemary - 6 cups chicken broth - 2 cups shredded cooked chicken - 1 cup egg noodles - Salt and pepper to taste - Fresh parsley for garnish Each ingredient plays a role in building flavor. Olive oil adds richness, while onion and garlic provide a strong base. Carrots and celery add sweetness and crunch. Dried thyme and rosemary bring a warm, earthy taste that makes the soup feel homey. Chicken broth serves as the heart of the soup. It gives depth and warmth. Shredded chicken adds protein and texture. Egg noodles soak up the flavors and make each bite satisfying. The salt and pepper enhance all these tastes, while fresh parsley gives a bright finish. With these ingredients ready, you can create a nourishing dish that warms both body and soul. {{ingredient_image_1}} To make classic chicken noodle soup, follow these steps: - Sauté the vegetables - Add in the seasonings - Incorporate chicken and noodles - Simmer for flavor 1. Heat 1 tablespoon of olive oil in a large pot over medium heat. 2. Add 1 medium diced onion and sauté for 3-4 minutes until it is soft. 3. Mix in 2 cloves of minced garlic, 2 sliced carrots, and 2 sliced celery stalks. Cook for another 5-6 minutes, until the veggies are tender. 4. Add 1 teaspoon of dried thyme and 1 teaspoon of dried rosemary to the pot. Stir for about 1 minute to release the nice smell of the herbs. 5. Pour in 6 cups of chicken broth and bring the mixture to a boil. 6. Once it boils, lower the heat. Now, add 2 cups of shredded cooked chicken and 1 cup of egg noodles. Simmer for about 10-12 minutes, until the noodles are cooked through. 7. Season the soup with salt and pepper to your taste. 8. Serve hot, and top it with freshly chopped parsley for a bright touch. To make your chicken noodle soup shine, start with good seasoning. Use salt and pepper early on to build flavor. I love adding fresh herbs like parsley right before serving. This makes the soup bright and fresh. For dried herbs, thyme and rosemary work well. They add warmth to the soup. A pinch of garlic powder can boost the savoriness, too. If you want a little kick, try adding a dash of red pepper flakes. For noodle texture, cook them separately if you plan to store the soup. This keeps them from soaking up all the broth. You can add them just before serving, ensuring they stay firm and chewy. Use a large pot, like a Dutch oven, for your soup. It helps heat evenly and holds all your ingredients. This pot is great for simmering and keeps the flavors rich. When cutting vegetables, aim for uniform pieces. This helps them cook at the same rate. Slice carrots and celery into similar thicknesses for even cooking. To avoid mushy noodles, don’t overcook them. Add them in the last 10 minutes of cooking. If you let them sit too long, they will turn soft. Always taste them to know when they're just right. Pro Tips Use Homemade Broth: For the best flavor, use homemade chicken broth instead of store-bought. It enhances the soup's richness and depth. Vegetable Variations: Feel free to add other vegetables like peas, corn, or green beans to customize your soup and add extra nutrition. Seasoning Adjustments: Taste your soup before serving and adjust the seasoning as needed. Every broth can vary in saltiness, so be mindful! Storage Tips: Store leftovers in an airtight container in the fridge for up to 3 days. Reheat gently on the stove to maintain flavor and texture. {{image_2}} - Gluten-free options: You can swap regular egg noodles for gluten-free noodles. Look for brands made from rice or corn flour. They cook well and keep the same comforting texture. - Vegetarian or vegan alternatives: Replace chicken with chickpeas or lentils. Use vegetable broth instead of chicken broth. You can also add mushrooms for extra flavor and texture. - Low-sodium broth suggestions: Choose low-sodium chicken broth or vegetable broth. This helps control salt levels while keeping the soup tasty. You can also make your own broth using water and fresh herbs. - Alternative proteins: If you do not have chicken, turkey works great. For a vegan version, tofu is an excellent choice. Make sure to press tofu to remove excess water before adding it to the soup. - Different vegetables to use: You can add peas, green beans, or bell peppers. These veggies add color and nutrients. Just chop them small so they cook quickly. - Homemade versus store-bought noodles: Homemade noodles bring a special touch. They are easy to make with flour and eggs. However, store-bought noodles save time and still taste good. If using, add them right before serving to keep them firm. To keep your chicken noodle soup fresh, use glass or plastic containers. These are great because they seal well. Leave some space at the top of the container. The soup can expand when it cools. Store the soup in the fridge if you plan to eat it soon. It will stay good for about 3 to 4 days. If you want to save some soup for later, freezing works well. First, let the soup cool down. Then, pour it into freezer-safe bags or containers. Make sure to leave some room for expansion. It can last for 2 to 3 months in the freezer. When you want to eat it, thaw the soup overnight in the fridge. You can also use the microwave for quick thawing. After thawing, heat it on the stove until it's warm. Enjoy your comforting meal at any time! How long can you store chicken noodle soup? You can store chicken noodle soup for about 3 to 4 days in the fridge. Use an airtight container to keep it fresh. For longer storage, freeze it for up to 3 months. Can I use raw chicken in this recipe? Yes, you can use raw chicken. Just add it to the pot with the broth and let it cook through. Shred it before adding the noodles. What can I add for more nutrition? To boost nutrition, add greens like spinach or kale. You can also include beans or peas for extra protein and fiber. Is there a way to make chicken noodle soup in a slow cooker? Yes, you can make chicken noodle soup in a slow cooker. Place all ingredients except the noodles in the cooker. Cook on low for 6 to 8 hours. Add noodles during the last 30 minutes. Can I make this soup ahead of time? Absolutely! You can make the soup a day in advance. Just store it in the fridge. Reheat it before serving. What are other soup recipes similar to chicken noodle? Some similar soups include turkey noodle soup, vegetable soup, and minestrone. Each offers warm comfort and tasty flavors. This blog covered all you need for great chicken noodle soup. We looked at key ingredients, step-by-step cooking, and useful tips. You learned about dietary swaps and how to store leftovers. As you try this recipe, remember to have fun. Cooking should be a joy! Enjoy your warm bowl of soup, and don’t hesitate to experiment with flavors. Happy cooking!

Classic Chicken Noodle Soup Comforting and Hearty Meal

Looking for the ultimate comfort food? Classic Chicken Noodle Soup is warm, hearty, and perfect for any day. This recipe

To make spicy Cajun sweet potato fries, gather the following ingredients: - 2 large sweet potatoes, peeled and cut into fries - 2 tablespoons olive oil - 1 tablespoon Cajun seasoning - 1 teaspoon garlic powder - 1 teaspoon paprika - ½ teaspoon salt - ¼ teaspoon black pepper - Optional: Fresh parsley for garnish and dipping sauce (like ranch or sriracha mayo) These ingredients create a delicious and spicy flavor. Sweet potatoes give a natural sweetness and a nice texture. The olive oil helps the seasoning stick and gives a crisp finish. Cajun seasoning adds that bold kick. Garlic powder and paprika deepen the taste. Salt and black pepper enhance all the flavors. You can customize this recipe with your favorite sauces. Try ranch for a cool dip or sriracha mayo for extra heat. Enjoy experimenting with these ingredients! To make great fries, start by soaking the sweet potatoes. Soak them in water for at least 30 minutes. This step helps to make them crispy. After soaking, drain the water and dry the fries with a towel. Next, cut the sweet potatoes into fries. Make sure the pieces are even. This helps them cook well. Aim for about ¼ to ½ inch thickness. Thicker fries will take longer to cook. Now, it’s time to cook! Preheat your air fryer to 400°F (200°C). This step ensures even cooking right from the start. In a large bowl, mix the fries with olive oil and spices. Use 2 tablespoons of olive oil, 1 tablespoon Cajun seasoning, 1 teaspoon garlic powder, 1 teaspoon paprika, ½ teaspoon salt, and ¼ teaspoon black pepper. Toss them well to coat each fry evenly. Place the fries in the air fryer basket in a single layer. Do not overcrowd them. Cook for 15-20 minutes. Shake the basket halfway through. This helps them crisp up nicely. Once they are golden brown, remove the fries from the air fryer. Let them cool slightly before serving. This will help them maintain their crispiness. Garnish with fresh parsley if you like. Serve them hot with your favorite dipping sauce, such as ranch or sriracha mayo. Enjoy your spicy Cajun sweet potato fries! To get the best crispiness, soak your sweet potato fries. Soak them in water for at least 30 minutes. This removes extra starch and helps them crisp up. After soaking, drain the fries and pat them dry. This step is key for a crunchy texture. When placing fries in the air fryer, avoid overcrowding. Spread them out in a single layer. This allows hot air to flow around each fry. You’ll get a nice, even cook this way. If you want more heat, adjust the spice levels. Add more Cajun seasoning for a bolder flavor. You could also mix in some cayenne pepper for an extra kick. For dipping sauces, ranch and sriracha mayo work well. They add coolness and a spicy touch. You can also try a garlic aioli for a rich flavor. These dips complement the fries perfectly. {{image_2}} You can switch up the flavor of your fries with different seasonings. Try taco seasoning for a zesty twist. You can also use a mix of cumin and chili powder for an earthy taste. For a sweeter touch, blend cinnamon with your spices. This works well with the natural sweetness of the potatoes. Mixing sweet and savory can create a unique flavor. A hint of brown sugar can balance the heat of your Cajun seasoning. You can even add a pinch of cayenne for extra spice. Experimenting with these blends keeps your fries exciting and delicious. The cut of your fries can change their texture and taste. Steak fries are thicker and have a soft inside. They hold the seasoning well and are great for dipping. Thin fries cook faster and become extra crispy. They are fun to snack on and perfect for sharing. Waffle fries add a fun twist to your meal. Their unique shape catches more seasoning. You can make them by cutting sweet potatoes with a crinkle cutter. This gives a beautiful look and crispy bites. Each cut offers a different experience, so feel free to try them all! To keep your spicy Cajun sweet potato fries fresh, store them properly. First, let the fries cool down. Place them in an airtight container. This helps prevent moisture from making them soggy. Use a glass or plastic container with a tight lid. You can also wrap them in foil or parchment paper before placing them in a container. This method keeps them crispy and flavorful. Reheating can be tricky, but I have some tips for you. Preheat your air fryer to 350°F (175°C). This lower heat helps the fries crisp up again. Spread the fries in a single layer in the basket. Heat them for about 5-7 minutes. Check them often to avoid overcooking. You can also use an oven if you prefer. Just place them on a baking sheet and heat at 350°F for a similar time. Enjoy those crispy fries again! Yes, you can use regular potatoes. However, sweet potatoes add a unique flavor. They are sweeter and have a creamy texture. Regular potatoes will give a crispier bite but less sweetness. If you want to try, use russet or Yukon gold potatoes. Just remember to adjust your cooking time. They may cook faster than sweet potatoes. Check for color and texture. The fries should be golden brown and crispy. You can also taste a fry to see if it’s cooked through. If it feels soft inside and crispy outside, it is ready. I recommend shaking the basket halfway through cooking. This ensures even cooking for all the fries. You can serve these fries as snacks or meals. Here are some ideas: - Snack options: - Pair with ranch dressing for cooling contrast. - Try sriracha mayo for added spice. - Serve with guacamole for a creamy dip. - Meal pairings: - Serve alongside grilled chicken or fish for a tasty meal. - Add to burgers for a fun twist. - Top with chili for a loaded fry dish. These fries are versatile and go great with many dishes! In this post, we explored how to make delicious Cajun sweet potato fries. We covered ingredients, step-by-step instructions, and expert tips to achieve perfect crispiness. You can enhance flavors and try different cuts. Proper storage and reheating methods ensure your fries stay great. These simple tricks can help you enjoy homemade fries anytime. Enjoy experimenting with the recipes and make them your own. With practice, you can make the best fries!

Spicy Cajun Sweet Potato Fries Air Fryer Delight

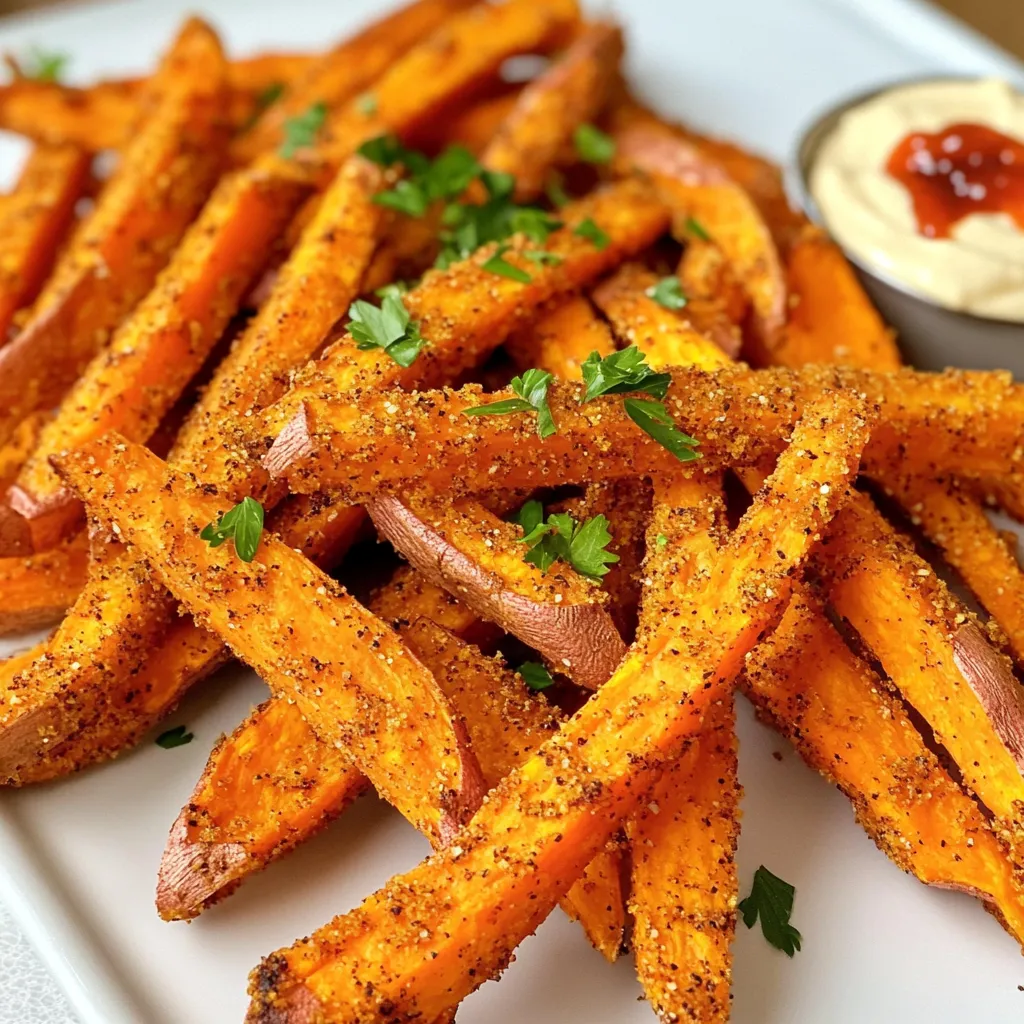
Craving something bold and tasty? Let’s dive into the world of Spicy Cajun Sweet Potato Fries made in the air

To make the No-Bake Chocolate Peanut Butter Oat Bars, you will need these simple ingredients: - 2 cups rolled oats - 1 cup natural peanut butter - 1/2 cup honey or maple syrup - 1/2 cup dark chocolate chips - 1/4 cup flax seeds (optional) - 1/4 teaspoon salt - 1 teaspoon vanilla extract - 1/4 cup chopped nuts (almonds or walnuts, optional) Each ingredient plays a key role in making these bars tasty and nutritious. The oats provide a hearty base, while the peanut butter adds creaminess and protein. Honey or maple syrup sweetens the mix, and dark chocolate chips bring a rich flavor. Flax seeds add a healthy touch, but you can skip them if you prefer. The salt and vanilla enhance all the flavors. Chopped nuts add crunch, making each bite more exciting. Gather these ingredients to get started on a delicious treat! 1. In a large bowl, combine 2 cups of rolled oats and 1/4 cup of flax seeds, if you choose to use them. Stir well to mix them evenly. 2. In another microwave-safe bowl, add 1 cup of natural peanut butter, 1/2 cup of honey or maple syrup, 1/2 cup of dark chocolate chips, 1/4 teaspoon of salt, and 1 teaspoon of vanilla extract. 3. Microwave this mix in 30-second intervals. Stir after each time. It should take about 1-2 minutes until it is melted and smooth. 1. Pour the melted mixture over the oats. Stir everything together until it is well combined. 2. If you like, fold in 1/4 cup of chopped nuts like almonds or walnuts for extra crunch. 1. Line an 8x8-inch baking dish with parchment paper. Make sure some paper hangs over the edges for easy removal later. 2. Pour the mixture into the dish. Press it down firmly and evenly using the back of a spatula or your hands. 3. Place the dish in the fridge for at least 2 hours. This time helps the bars set and become firm. - Drizzle melted chocolate on top for a fancy look. - Add extra chopped nuts for a crunchy texture. - Keep bars in an airtight container to stay fresh. - Use a glass or plastic container for best results. - Each bar has about 150 calories. - You get 6 grams of protein and 5 grams of fiber per bar. {{image_2}} You can switch up flavors in these bars easily. Try using different nut butters like almond or cashew. Each nut butter brings its own taste and texture. You can also add dried fruits, like raisins or cranberries. They add natural sweetness and chewiness. Seeds, like pumpkin or sunflower, add crunch and nutrition. Feel free to mix and match to find your favorite combo! Making these bars vegan is simple. Just swap honey with maple syrup or agave nectar. Both options work well and keep the sweetness. For gluten-free bars, use certified gluten-free oats. This way, everyone can enjoy these tasty treats without worry. These adjustments make the recipe more inclusive for different diets. You can adapt the size of the bars based on your needs. For larger gatherings, use a bigger baking dish. Just adjust the ingredient amounts to fit. If you want smaller snacks, cut the bars into bite-sized pieces. These mini versions are great for kids and parties. No matter the size, they will stay delicious and satisfying! Yes, you can use different sweeteners. Honey and maple syrup work well. You can try agave syrup or brown rice syrup too. Each sweetener will change the taste a bit. Adjust the amount based on how sweet you want your bars. Remember, some sweeteners are thicker than others. To make these bars nut-free, swap the peanut butter for sun butter or soy nut butter. These spreads offer a similar taste and texture. Check for allergies to ensure safety. You can also skip the nuts and still have a tasty treat. The bars will still hold together without nuts. If you don’t have dark chocolate chips, you can use milk chocolate or semi-sweet chocolate. You can even use cocoa powder for a different twist. Just mix it with a little coconut oil for melting. For a healthier option, try carob chips. They give a unique flavor while keeping it sweet. People love these no-bake bars! Many say they are easy to make. The taste is a big hit, too. Readers often comment on the rich chocolate and peanut butter flavor. Some suggest adding more nuts for crunch. They also recommend using maple syrup for a lighter sweetness. A few users have shared tips on how to cut the bars. They suggest using a hot knife for clean edges. This tip really helps to make the bars look nice. You can find many user uploads on Instagram and Pinterest. Search for hashtags like #NoBakeBars or #ChocolatePeanutButterOatBars. Many people share their own twists on the recipe. Some even add fun toppings like sprinkles or coconut. Tagging ideas include @YourCookingPage to show off your creation. These posts inspire others to try the recipe too! You can also join the conversation by sharing your own photos. It’s a fun way to connect with fellow food lovers. These no-bake bars are simple and fun to make. You mix oats, peanut butter, and chocolate, then chill. You can add nuts or make them vegan or gluten-free. Remember to store them well for freshness. Overall, they fit many tastes and diets. With this guide, you can create tasty treats everyone will enjoy. Dive in and enjoy your healthy snack!

No-Bake Chocolate Peanut Butter Oat Bars Recipe

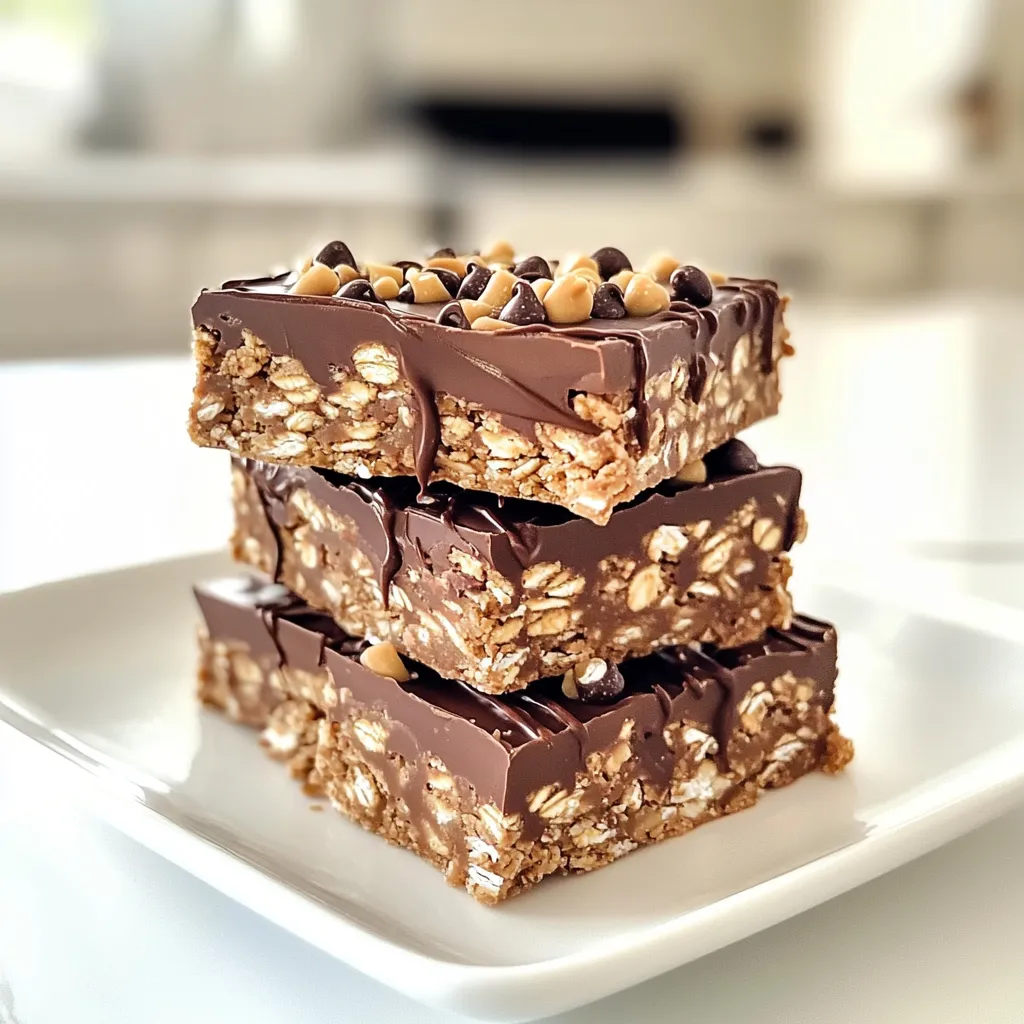
Craving a sweet treat that’s both easy and healthy? You’re in the right place! My No-Bake Chocolate Peanut Butter Oat

- 2 cups rolled oats - 1 teaspoon baking powder - 1 teaspoon ground cinnamon - 1/2 teaspoon salt The base of our cinnamon roll oatmeal bake starts with rolled oats. They provide a hearty texture. Baking powder helps it rise and gives a light fluff. Ground cinnamon adds warmth and spice, while salt enhances all the flavors. - 1/2 cup chopped pecans or walnuts - 1/2 cup raisins or chocolate chips You can boost flavor with chopped pecans or walnuts. They add a nice crunch. Raisins or chocolate chips bring sweetness and fun. You can mix and match these as you like. - 2 cups milk (dairy or non-dairy) - 1/2 cup Greek yogurt or applesauce for vegan option For the liquid, you can choose milk. Use either dairy or non-dairy milk based on your needs. Greek yogurt adds creaminess, while applesauce is a great vegan swap. Both help keep the bake moist and tasty. - Preheat oven to 350°F (175°C). - Grease an 8x8-inch baking dish with butter or coconut oil. Start by heating your oven. This step makes sure everything cooks evenly. Greasing the baking dish helps keep the oatmeal bake from sticking. I like to use butter for a rich flavor, but coconut oil works too. - Combine rolled oats, baking powder, cinnamon, and salt in a bowl. In a large bowl, mix the rolled oats, baking powder, cinnamon, and salt. Stir these ingredients well. This step is key for even flavor throughout the bake. The cinnamon adds a warm sweetness that makes this dish special. - Whisk together milk, maple syrup, vanilla extract, and eggs in a separate bowl. In another bowl, whisk the milk, maple syrup, vanilla extract, and eggs. Make sure everything blends well. This mixture adds creaminess and sweetness to the bake. If you prefer a vegan option, you can use almond milk and a flax egg instead. - Blend wet mixture with dry ingredients and bake for 35-40 minutes. Pour the wet mix into the dry ingredients. Stir until just combined. You can also fold in nuts or chocolate chips at this point for extra flavor. Transfer the mixture to your baking dish. Bake for 35-40 minutes. You want the top to be golden brown and a toothpick to come out clean. Let it cool for about 10 minutes before slicing. Enjoy your warm cinnamon roll oatmeal bake! - Allow the bake to cool before slicing. This helps it set. - Bake until golden brown for best results. This ensures a warm, soft center. - Drizzle with maple syrup for a sweet finish. It adds a nice touch. - Optionally, add fresh sliced bananas or a dollop of yogurt. This boosts flavor and looks great. - Not mixing dry and wet ingredients thoroughly can lead to uneven texture. Make sure to blend well. - Overbaking leads to dryness. Keep an eye on your bake as it cooks. {{image_2}} You can change the flavor of your Cinnamon Roll Oatmeal Bake easily. For a fall twist, add pumpkin spice. This will give your bake a warm, cozy taste. Just mix in one tablespoon of pumpkin spice with your dry ingredients. Another fun option is to use cocoa powder for a chocolate flavor. Add 1/4 cup of cocoa powder to the dry mix. This makes a rich, sweet treat that kids will love. If you want to make this dish healthier, swap regular maple syrup for low-sugar or sugar-free maple syrup. This keeps the sweetness but cuts down on calories. You can also replace Greek yogurt with nut butter. Using almond or peanut butter adds protein and healthy fats. This change will make your bake creamy and rich. Toppings can take your oatmeal bake to the next level. Fresh berries like strawberries or blueberries add a pop of color and freshness. They also bring a nice tartness that pairs well with sweet flavors. For a crunchy finish, sprinkle nut granola on top. This adds texture and extra flavor. You can even mix in some nuts or seeds for added crunch. To keep your Cinnamon Roll Oatmeal Bake fresh, place it in an airtight container. Make sure it cools completely first. Store it in the fridge for up to five days. This way, you can enjoy it later without losing flavor or texture. When you're ready to eat leftovers, reheating is key. You can use the microwave for quick warming. Heat one serving for about 30 to 60 seconds. If you prefer the oven, preheat it to 350°F (175°C). Place the oatmeal bake in an oven-safe dish and cover it with foil. Heat for about 10-15 minutes until warmed through. This will help keep it moist and tasty. If you want to save some for later, freezing is great. Cut the oatmeal bake into squares and place them in a freezer-safe container. You can also wrap each piece in plastic wrap first. This helps prevent freezer burn. When you want to eat it, thaw it overnight in the fridge. Then, reheat using one of the methods above. Enjoy your delicious treat anytime! Yes! Making this recipe vegan is easy. You can replace the eggs with flaxseed meal or chia seeds. For each egg, mix 1 tablespoon of flaxseed meal or chia seeds with 2.5 tablespoons of water. Let it sit for a few minutes to thicken. Use non-dairy milk like almond or oat milk instead of regular milk. For yogurt, applesauce works well. It keeps the bake moist and adds sweetness. If you want to make a bigger batch, you can use a larger pan. A 9x13-inch baking dish works great for doubling the recipe. Just keep an eye on the baking time. It may take a little longer, about 5 to 10 minutes. You can check for doneness by inserting a toothpick in the center. If it comes out clean, it’s ready. You can get creative with mix-ins! Try adding fresh fruit like blueberries or sliced bananas. Nuts add a nice crunch, so consider walnuts or pecans. For a sweeter touch, chocolate chips or dried fruit like cranberries work well. You can also sprinkle some coconut flakes on top for extra flavor. No, you don’t have to use Greek yogurt. You can swap it for applesauce, which keeps the bake moist. Using regular yogurt is fine, too. Greek yogurt gives a thicker texture and a bit of tang. If you prefer a lighter taste, regular yogurt or applesauce is a great choice. This blog post covered how to create a delicious oatmeal bake. You saw key ingredients, step-by-step instructions, and helpful tips. Remember to mix wet and dry ingredients well for the best taste. You learned about flavor variations and how to store leftovers. Now you have the tools needed to make this dish your own. Try different toppings and flavors to make it special. Enjoy your cooking journey!

Cinnamon Roll Oatmeal Bake Tasty and Simple Recipe

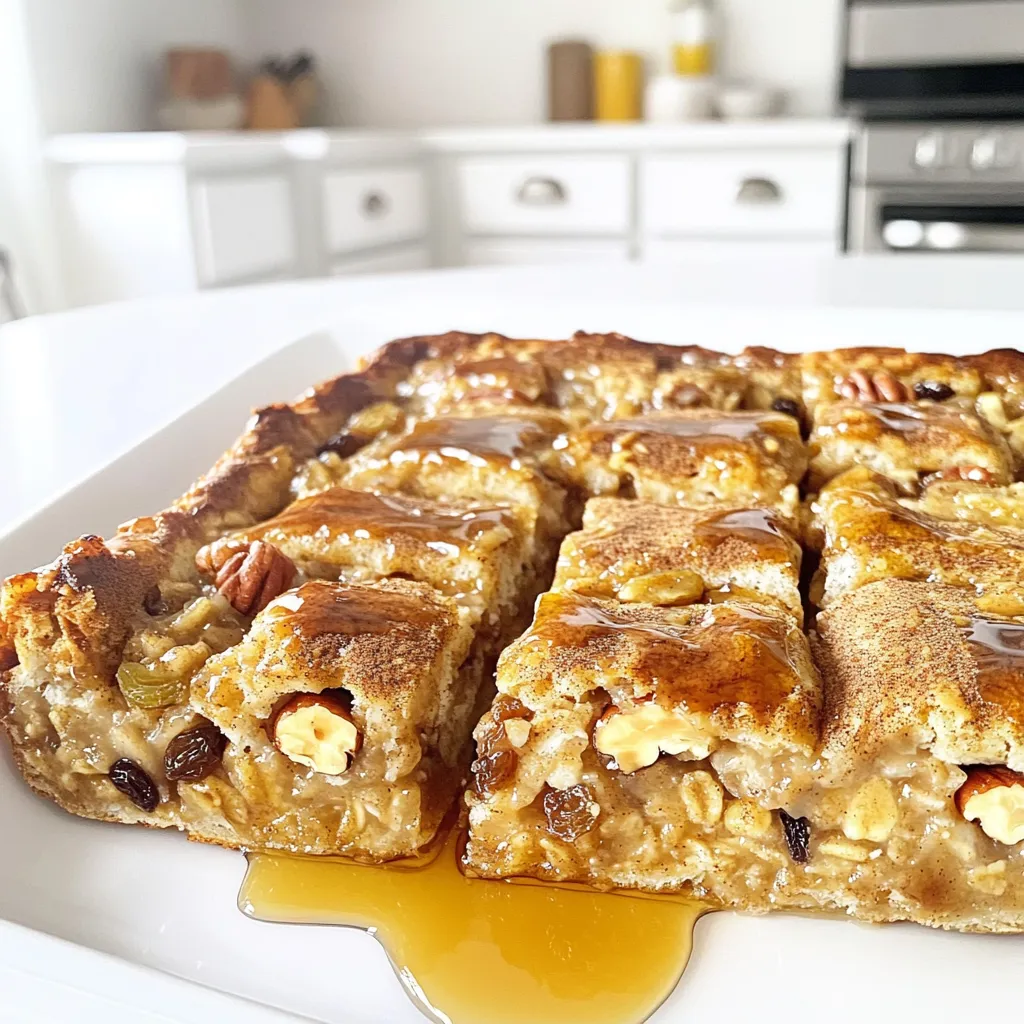
Are you ready to enjoy a warm, gooey treat that’s both tasty and healthy? My Cinnamon Roll Oatmeal Bake is

- 4 salmon fillets (6 oz each) - 2 cups bok choy, chopped - 3 tablespoons soy sauce (or tamari for gluten-free) - 2 tablespoons sesame oil - 1 tablespoon fresh ginger, minced - 1 tablespoon honey - 1 teaspoon garlic, minced - Salt and pepper to taste - 2 tablespoons sesame seeds, toasted - Green onions, chopped for garnish The main ingredients focus on fresh flavors. Salmon gives a rich taste, while bok choy adds crunch. The marinade combines soy sauce, sesame oil, ginger, honey, and garlic. This mix makes each bite burst with flavor. - Tamari for gluten-free - Extra sesame seeds and green onions for garnish Using tamari instead of soy sauce keeps the dish gluten-free. Adding more sesame seeds and green onions enhances both taste and look. These optional items bring more texture and freshness to your meal. - Baking sheet - Parchment paper - Mixing bowls You need a baking sheet for roasting. Parchment paper helps with easy cleanup. Mixing bowls are great for whisking the marinade. Having these tools ready makes cooking smoother. Each ingredient plays a vital role in this dish. The right tools make the process easier and more enjoyable. 1. Preheat your oven to 400°F (200°C). This high heat helps cook the salmon and bok choy quickly. 2. Line a large baking sheet with parchment paper. This step makes cleanup a breeze. 3. In a small bowl, whisk together the soy sauce, sesame oil, minced ginger, honey, garlic, salt, and pepper. This marinade adds great flavor to the salmon. 1. Place the salmon fillets on one side of the prepared baking sheet. Each fillet should have space to cook evenly. 2. Brush the marinade over the salmon. Make sure to coat each piece well to enhance the flavor. 3. In a separate bowl, toss the chopped bok choy with a drizzle of olive oil, salt, and pepper. This adds flavor and helps it crisp up. 4. Arrange the bok choy on the other side of the baking sheet. 1. Bake the salmon and bok choy in the preheated oven. Set your timer for 15-20 minutes. 2. Check for doneness by using a fork. The salmon should flake easily. The bok choy should be tender with crispy edges. 3. Once done, take it out and sprinkle toasted sesame seeds over the salmon and bok choy. 4. For a finishing touch, garnish with chopped green onions before serving. - Best practices for salmon doneness: Salmon is done when it flakes easily with a fork. At 400°F, cook for 15-20 minutes. Use a meat thermometer; aim for 145°F in the thickest part. This gives you moist, tender fish. If you prefer a crispy top, broil it for the last 2 minutes. - How to achieve crispy bok choy: For crispy bok choy, space it well on the pan. Avoid overcrowding. Toss it lightly with olive oil, salt, and pepper. Bake until the edges are golden brown. This keeps the texture crunchy and fresh. - Additional marinade variations: You can spice it up! Try adding sriracha for heat or orange juice for a citrus twist. A splash of rice vinegar adds brightness too. Mix and match for your favorite flavor. - Recommended sides to complement the dish: Serve this dish with jasmine rice or quinoa for a hearty meal. Steamed edamame or a simple cucumber salad can add freshness. These sides balance the rich salmon and bok choy flavors. - Plating ideas and garnishing tips: For a stunning plate, use a large white platter. Arrange salmon and bok choy in a colorful way. Drizzle any leftover marinade over the top. Finish with extra sesame seeds and chopped green onions for a pop of color. {{image_2}} You can easily change the fish in this recipe. Trout or tilapia works great instead of salmon. Each fish brings its own flavor and texture. If you want a vegan or vegetarian option, try marinated tofu or tempeh. Both soak up the flavors well and add protein. If you want to avoid soy sauce, use coconut aminos. It has a similar taste but is lighter. You can also try using herbs like cilantro or basil. Fresh herbs add bright notes to the dish. Spices like chili flakes or cumin can give it a different twist. Just remember to adjust based on your taste. Grilling is a fun option if you want a smoky flavor. You can grill the salmon and bok choy on a barbecue instead of using the oven. If you prefer a mix of veggies, try bell peppers or asparagus on the sheet pan. They also roast well and add color to your meal. To store leftovers properly, let the salmon and bok choy cool down first. Place them in an airtight container. This helps to keep them fresh. You can keep them in the fridge for up to three days. Make sure to label the container with the date. For freezing, wrap each salmon fillet in plastic wrap. Place them in a freezer bag, removing as much air as possible. Bok choy can also be frozen. Chop it and place it in a freezer bag. For best results, use within three months. When thawing, move the salmon and bok choy to the fridge overnight. This method helps keep their texture nice. You can also use a microwave for quick thawing, but be careful not to cook them. Reheat the salmon and bok choy in the oven for the best results. Preheat your oven to 350°F (175°C). Place them on a baking sheet for about 10 minutes. This keeps them moist and tasty. You can also use a microwave. Heat in short bursts of 30 seconds until warm. Remember to cover them with a damp paper towel to keep moisture in. It takes about 15 to 20 minutes to cook salmon at 400°F. For thick fillets, aim for the longer time. For thin fillets, check for doneness at around 15 minutes. Salmon is done when it flakes easily with a fork. Remember, you want it moist but fully cooked. Yes, you can use frozen salmon. Just thaw it before cooking. If the salmon is still a bit frozen in the middle, add a few extra minutes to the cooking time. Be sure to check that it's cooked through. The same marinade works well, and it adds great flavor. You can serve this dish with rice or quinoa for a full meal. Steamed jasmine rice pairs well and soaks up the sauce. You might also add a simple cucumber salad for freshness. Try to keep the sides light to balance the rich flavors of the salmon. This blog post detailed how to make a delicious sheet-pan sesame ginger salmon. We covered ingredients, preparation steps, cooking tips, and variations to suit your taste. Remember, you can swap ingredients and adjust cooking methods to fit your needs. With a few simple techniques, you can create a meal that's both easy and flavorful. Enjoy cooking, and don’t hesitate to experiment!

Sheet-Pan Sesame Ginger Salmon and Bok Choy Delight

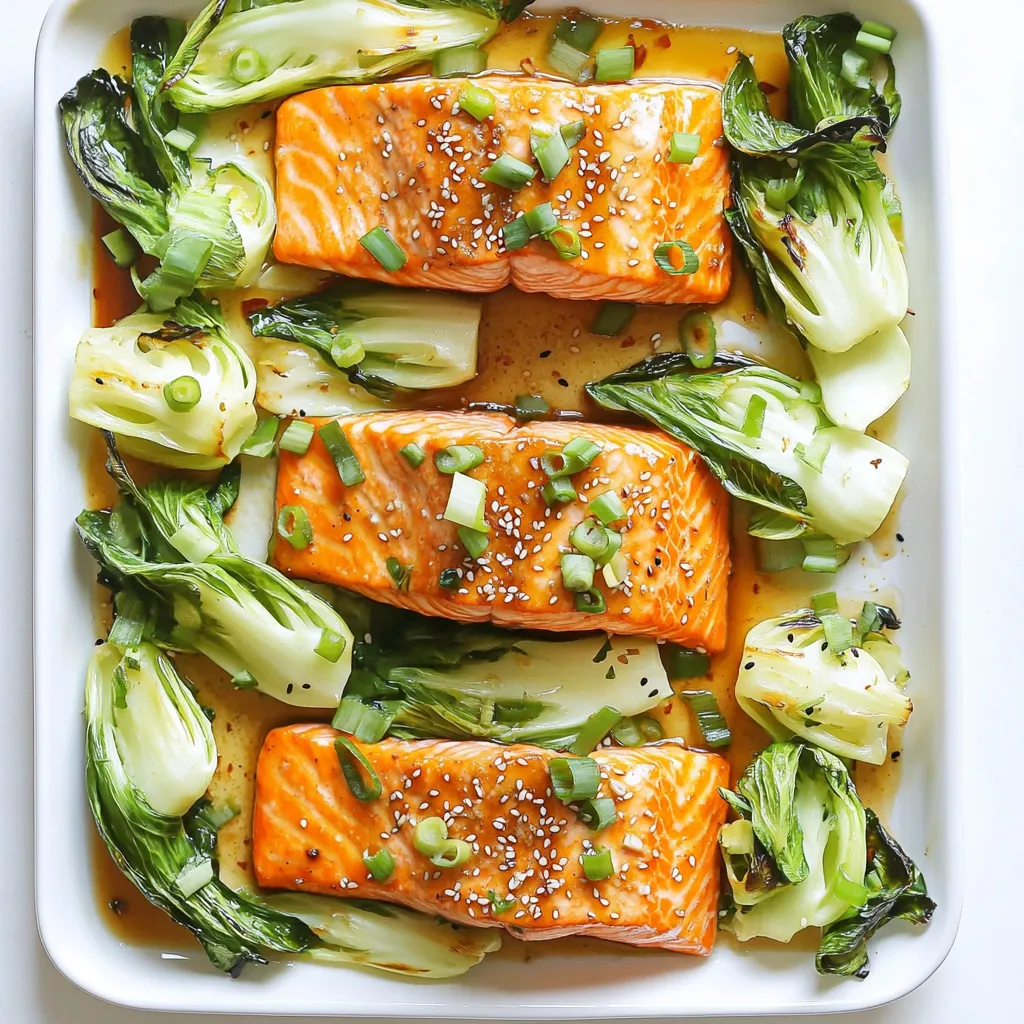
If you’re ready to whip up a meal that’s quick, tasty, and healthy, you’re in the right place! My Sheet-Pan

- 2 cups pumpkin puree (canned or homemade) - 1 head garlic - 1 medium onion, chopped - 2 tablespoons olive oil Pumpkin puree gives the soup its rich orange color. You can use canned for ease, or make your own. Roasting garlic makes it sweet and soft, adding great flavor. The onion adds depth and a nice base for our soup. Olive oil helps sauté the onion and adds healthy fat. - 4 cups vegetable broth - 1 cup coconut milk - 1 teaspoon ground ginger - 1 teaspoon nutmeg - Salt and pepper to taste Vegetable broth makes the soup light but flavorful. Coconut milk adds creaminess and a touch of sweetness. Ground ginger and nutmeg warm the soup with their spice. Salt and pepper help bring all the flavors together. - Fresh parsley - Pumpkin seeds Fresh parsley brightens the dish and adds color. Pumpkin seeds offer a nice crunch and fun texture. Both make your soup look great and taste better. 1. Preheating the oven Start by preheating your oven to 400°F (200°C). This step is key for roasting the garlic. 2. Roasting garlic Cut the top off the head of garlic to show the cloves. Drizzle a teaspoon of olive oil on top. Wrap the garlic in aluminum foil. Place it in the oven for about 30 minutes. The garlic will become soft and fragrant. 1. Sautéing onions While the garlic roasts, heat the remaining olive oil in a large pot over medium heat. Add the chopped onion. Sauté for about 5-7 minutes, until the onion turns translucent. Stir it often to avoid burning. 2. Combining ingredients Once the onion is ready, add the pumpkin puree. Squeeze the roasted garlic from its skin into the pot. Stir everything together until well mixed. Then, pour in the vegetable broth and bring it to a simmer. Add ground ginger and nutmeg. Let it simmer for 15 minutes to blend the flavors. 1. Pureeing soup After simmering, remove the pot from the heat. Stir in the coconut milk. Use an immersion blender to puree the soup until smooth. If you don’t have one, carefully transfer the soup to a blender in batches. 2. Final seasoning and garnishing Taste the soup and add salt and pepper as needed. If the soup is too thick, add a bit more vegetable broth. Serve it warm, garnished with fresh parsley or a sprinkle of pumpkin seeds. Enjoy your creamy roasted garlic pumpkin soup! Tips for selecting pumpkin When choosing pumpkin, look for firm, heavy ones. A deep orange color shows ripeness. If possible, pick a sugar pumpkin. It has a sweet taste and a smooth texture. Avoid pumpkins with soft spots or blemishes. Fresh pumpkin makes a big difference in flavor. Adjusting spice levels For a mild soup, stick to the recipe’s spices. If you want more warmth, add extra ginger or nutmeg. A pinch of cayenne pepper can boost heat. Always taste as you go. This way, you can find the perfect balance for your palate. Fixing too thick soup If your soup is too thick, don’t worry. Just add more vegetable broth a little at a time. Stir well after each addition. This helps you control the soup’s texture. You want it creamy but not paste-like. Balancing flavors If your soup tastes flat, it might need salt or pepper. Start with a small amount and mix well. A squeeze of lemon juice can brighten flavors too. Taste again to ensure it’s just right. Serving styles Serve the soup in warm bowls. This keeps the soup hot longer. A ladle adds a nice touch when serving. You can also use small cups for a fun appetizer. Garnish ideas Garnishing is key to a beautiful dish. Sprinkle fresh parsley on top for color. Pumpkin seeds add crunch and texture. A drizzle of coconut milk can create a lovely swirl. These little touches make your soup look gourmet! {{image_2}} You can change the broth to fit your taste. Use chicken broth for a richer flavor. For a lighter soup, try low-sodium broth. You can also use water, but it may lack depth. If you want a dairy-free option, replace coconut milk with almond or oat milk. These milks add creaminess without dairy. You can also use cashew cream for a richer texture. Adding herbs can elevate your soup. Fresh thyme or basil pairs well with pumpkin. You can also try adding a pinch of cayenne for some heat. For extra veggies, consider adding carrots or sweet potatoes. They blend well with pumpkin and add sweetness. Just chop them small and add them while sautéing the onion. This soup shines with crusty bread or crunchy crackers. Serve it with a warm baguette for dipping. You can also top it with croutons for a fun crunch. On chilly days, enjoy the soup as a main meal. Pair it with a simple salad for balance. A side of roasted vegetables also works well to warm you up. To store leftovers, let the soup cool first. Transfer it to an airtight container. This will keep it fresh and tasty. In the fridge, the soup lasts about 3 to 5 days. Make sure to label your container with the date. For freezing, use a freezer-safe container. Leave some space at the top, as the soup will expand when frozen. It’s best to freeze it within 2 days of cooking for the best taste. When you want to eat it, thaw in the fridge overnight. You can reheat the soup in the microwave or on the stovetop. If using the microwave, place it in a safe bowl and cover it. Heat in intervals, stirring in between. For the stovetop, pour the soup into a pot and heat over medium. Stir often. To keep the texture creamy, avoid boiling the soup. Can I use fresh pumpkin instead of puree? Yes, you can use fresh pumpkin. Start by peeling and cutting the pumpkin into cubes. Roast the cubes at 400°F (200°C) until soft, about 25-30 minutes. Then, blend the roasted pumpkin to make your puree. This method gives a fresh taste to the soup. How do I make this soup spicier? To add spice, try adding cayenne pepper or crushed red pepper flakes. Start with a pinch, taste, and add more if you like. You can also use spicy vegetable broth for an extra kick. Another option is adding fresh ginger for heat. Health benefits of pumpkin Pumpkin is low in calories and high in fiber. It is rich in vitamins A and C, which help your immune system. The antioxidants in pumpkin can support eye health and may reduce the risk of chronic diseases. Caloric content of the soup One serving of this creamy roasted garlic pumpkin soup has about 200 calories. This can vary based on the ingredients you use. Coconut milk adds creaminess but also calories, so adjust as you prefer. Can I double or halve the recipe? Yes, you can easily double or halve this recipe. Just adjust the quantity of each ingredient accordingly. This makes it fun to cook for a crowd or just for a small meal. Adjusting cooking times for larger batches If you double the recipe, the cooking times stay the same. However, if you triple it, you may need a larger pot. Keep an eye on the soup while it simmers and stir more often. This ensures even cooking and prevents burning. This blog post covered key ingredients and steps for making delicious pumpkin soup. You learned how to blend flavors, select the right ingredients, and enhance your dish’s presentation. Remember, you can adjust spice levels and use various garnishes to personalize the soup. Try experimenting with different ingredients or serving styles. Enjoy the warmth and comfort of homemade pumpkin soup, especially on chilly days. It’s a fun dish that brings joy to your kitchen. Happy cooking!

Creamy Roasted Garlic Pumpkin Soup Delightful Recipe

Welcome to the cozy world of creamy roasted garlic pumpkin soup! If you’re looking for a warm and delightful recipe,

Older posts
Newer posts
← Previous Page1 … Page5 Page6 Page7 … Page84 Next →

dsad

© 2026 Home Cooking Style • Built with GeneratePress

Our Policies

  • Copyright Policy
  • Cookie Policy
  • GDPR Policy
  • Privacy Policy
  • Disclaimer
  • Terms Of Use

More Information

  • Home
  • About
  • Contact
  • Appetizers
  • Dessert
  • Dinner
  • Drinks
©2026, Home Cooking Style About Back To Top