Skip to content
DisclaimerTerms Of UseGDPR PolicyCookie Policy

Home Cooking Style

  • Home
  • Drinks
  • Appetizers
  • Dinner
  • Dessert
  • About
  • Contact
  • Privacy Policy
DisclaimerTerms Of UseGDPR PolicyCookie Policy

NO-ING-IMG

To make the Chili Lime Shrimp Tostadas, you need fresh and simple ingredients. Each one adds a burst of flavor to this dish. Here’s what you will need: - 1 lb shrimp, peeled and deveined - 2 tablespoons olive oil - 1 teaspoon chili powder - 1/2 teaspoon cumin - 1/2 teaspoon garlic powder - Zest and juice of 2 limes - Salt and pepper to taste - 6 corn tostada shells - 1 avocado, sliced - 1 cup shredded red cabbage - 1/4 cup fresh cilantro, chopped - 1/2 cup crumbled queso fresco - Lime wedges, for serving The shrimp is the star here. Choose shrimp that are fresh for the best taste. The spices, like chili powder and cumin, bring warmth and depth. Lime juice and zest add a bright zing. The toppings, especially avocado and queso fresco, offer a creamy balance. Don't skip the cabbage; its crunch adds texture. Each ingredient plays a role in making these tostadas a flavorful delight. To start, I mix the shrimp with olive oil in a medium bowl. I add chili powder, cumin, garlic powder, lime zest, and lime juice. I season with salt and pepper. Toss everything together until the shrimp are well coated. I let them marinate for about 15 minutes. This step helps the shrimp soak up all the tasty flavors. Next, I heat a skillet over medium-high heat. It’s important to let the skillet get hot before adding the shrimp. Once the skillet is hot, I add the marinated shrimp. I cook them for about 2-3 minutes on each side. I know they are done when they turn pink and opaque. Then, I take them off the heat. This quick cooking keeps the shrimp juicy and tender. While the shrimp cook, I prepare the tostada shells. Sometimes, I lightly toast them in the oven or on a griddle. This adds extra crunch. To assemble, I start with a layer of shredded red cabbage on each tostada shell. Then, I add a generous amount of the chili lime shrimp. Next, I top it with slices of avocado. Finally, I sprinkle on crumbled queso fresco and chopped cilantro. I serve lime wedges on the side for an extra burst of flavor. To make sure your shrimp are perfect, look for a bright pink color. Cook them just until they turn opaque. This usually takes 2-3 minutes on each side. Overcooking shrimp makes them tough, so watch them closely. You can also try different cooking methods. Grilling adds a nice smoky flavor. Simply place the shrimp on skewers and grill them for about 2-3 minutes per side. Baking is another option. Preheat your oven to 400°F (200°C) and bake the shrimp for 8-10 minutes. Both methods work well with this recipe. For ideal accompaniments, serve your tostadas with lime wedges and a fresh salsa. A side of black beans adds great flavor and nutrition. You can also pair them with a light salad for a complete meal. When it comes to presentation, arrange the tostadas on a large platter. Garnish with extra cilantro and lime wedges for a bright look. You can also serve them in a taco holder for a fun twist at gatherings. Choosing fresh shrimp is key to a great dish. Look for shrimp that smell like the sea, not fishy. Fresh shrimp should have a firm texture and a shiny appearance. If you buy frozen shrimp, thaw them in the fridge overnight for the best results. Selecting ripe avocados is simple. Gently squeeze the avocado; it should yield slightly. If it feels hard, it’s not ripe yet. If it’s too soft, it might be overripe. Use ripe avocados for a creamy topping that balances the spice of the shrimp. {{image_2}} You can switch up the protein in this dish. Try fish like tilapia or salmon. Chicken works well too. For a veggie option, use black beans or grilled veggies. Each choice gives a unique twist. For toppings, get creative! Add shredded cheese like cheddar or Monterey Jack. You can also drizzle sauces, like creamy cilantro or spicy chipotle. These add depth and richness to each bite. Want more heat? Add sliced jalapeños or a splash of your favorite hot sauce. This brings a nice kick to the shrimp. Garnishing can elevate your tostadas. Try fresh lime slices or extra cilantro. You can even add radishes for crunch and color. These small touches make a big difference in presentation and taste. To keep your chili lime shrimp tostadas fresh, store each component separately. Place the shrimp in an airtight container. This helps to avoid sogginess. For the tostada shells, keep them in a dry, cool place. A zip-top bag works well to keep them crisp. For toppings, store avocado slices in a little lime juice. This prevents browning. Wrap shredded cabbage and cilantro tightly in plastic wrap. Avoid mixing everything together. This keeps each item fresh for up to three days in the fridge. To reheat shrimp, use a skillet. Warm it over medium heat. Add a splash of olive oil for moisture. Cook for about 2-3 minutes until heated through. Avoid overcooking, or the shrimp will become tough. To crisp tostada shells again, bake them in the oven. Set the oven to 350°F (175°C). Place the shells on a baking sheet for about 5-7 minutes. Keep an eye on them to prevent burning. This method restores their crunchiness. Enjoy your leftovers just as much as the first time! When choosing shrimp, you can pick fresh or frozen. Fresh shrimp has a sweet, clean taste. Look for shrimp that smell like the ocean, not fishy. The shells should be shiny and firm. If you go for frozen shrimp, check for flash-frozen options. These are often fresher than previously thawed shrimp. Always buy shrimp that is peeled and deveined for ease. Yes, you can make parts of this recipe ahead. Cook the shrimp up to a day before. Store them in an airtight container in the fridge. Keep the tostada shells separate until you are ready to serve. This helps keep them crispy. You can also prepare your toppings ahead of time. Slice the avocado and chop the cilantro, but add them just before serving. This keeps everything fresh and tasty. Chili lime shrimp tostadas pair well with many sides. A fresh salad with lime vinaigrette works great. You can also serve black beans or corn salad for a hearty touch. For drinks, try iced tea or a light beer. A tropical cocktail also complements the flavors nicely. These options add to the fun and flavor of your meal. Chili lime shrimp tostadas are tasty and easy to make. We covered the key ingredients, steps, useful tips, and variations. You learned how to choose the best shrimp and how to store leftovers. For great flavor, feel free to mix ingredients to fit your taste. Whether for dinner or a festive gathering, these tostadas are sure to impress. Enjoy making your own delicious version!

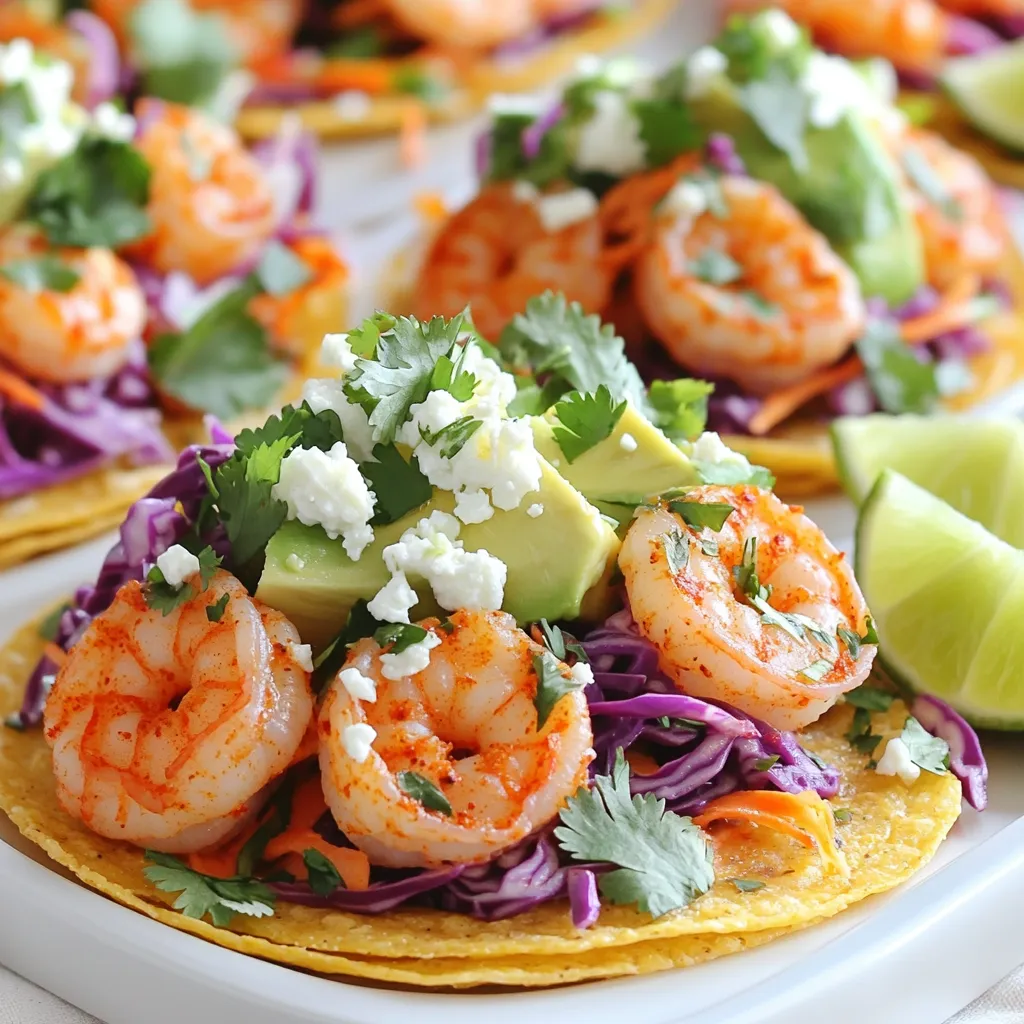
Chili Lime Shrimp Tostadas Flavorful Fresh Delight

Are you ready to spice up your dinner routine? Chili Lime Shrimp Tostadas are the perfect blend of fresh flavors

- 1 cup all-purpose flour - 1/2 teaspoon baking powder - 1/4 teaspoon baking soda - 1/4 teaspoon salt - 1/2 teaspoon ground cinnamon - 1/4 teaspoon ground nutmeg - 1/4 teaspoon ground ginger - 2 large eggs - 1/2 cup granulated sugar - 1/2 cup pumpkin puree - 1/4 cup unsalted butter, melted - 1 teaspoon vanilla extract - 1 cup semi-sweet chocolate chips - 1 teaspoon coconut oil The dry ingredients create the base of the madeleines. Use all-purpose flour for the best texture. Baking powder and baking soda give them lift. Salt balances the flavors. The spices—cinnamon, nutmeg, and ginger—add warmth and depth. Next, we have the wet ingredients. Eggs and sugar create a light and fluffy mix. Pumpkin puree adds moisture and flavor. Melted unsalted butter brings richness, and vanilla extract adds a sweet aroma. Finally, the chocolate coating. Semi-sweet chocolate chips bring sweetness and depth. Coconut oil helps the chocolate melt smoothly, making it easy to dip the madeleines. These ingredients come together to create a delightful treat. Each bite bursts with fall flavors and chocolatey goodness. 1. Preheat your oven to 375°F (190°C). This helps the madeleines bake evenly. Grease a madeleine pan with cooking spray or butter, then dust it with flour. This step is key to prevent sticking. 2. In a large bowl, whisk together the dry ingredients. Combine 1 cup of flour, 1/2 teaspoon baking powder, 1/4 teaspoon baking soda, 1/4 teaspoon salt, 1/2 teaspoon ground cinnamon, 1/4 teaspoon ground nutmeg, and 1/4 teaspoon ground ginger. Set this mix aside. 3. In another large bowl, beat 2 large eggs and 1/2 cup of granulated sugar using an electric mixer. Mix until the color turns pale and fluffy, which takes about 5 minutes. This creates a light batter. 1. Gently fold in 1/2 cup of pumpkin puree, 1/4 cup of melted unsalted butter, and 1 teaspoon of vanilla extract into the egg mixture. Mix until everything is just combined. This gives the madeleines their rich flavor. 2. Gradually add the dry ingredients to the wet mix, folding gently. Be careful not to overmix; this keeps your madeleines light and airy. 1. Using a spoon, fill each madeleine mold about 3/4 full with the batter. This allows room for rising. 2. Bake in the preheated oven for 10-12 minutes. The edges should turn golden brown, and the centers should spring back when touched. 3. Remove the pan from the oven. Let the madeleines cool in the pan for a few minutes. Then, transfer them to a wire rack to cool completely. 1. For the chocolate dip, melt 1 cup of semi-sweet chocolate chips and 1 teaspoon of coconut oil together. Use a microwave-safe bowl and heat in 20-second intervals. Stir between each interval until smooth. 2. Dip the cooled madeleine tops into the melted chocolate. Allow the excess chocolate to drip off gently. This creates a nice coating. 3. Place the dipped madeleines back on the wire rack to set. To speed up the hardening process, put them in the fridge for about 15 minutes. Enjoy your tasty treats! To make great madeleines, avoid overmixing the batter. When you fold in the dry ingredients, stop as soon as you see no more flour. This keeps your madeleines light and fluffy. To test for doneness, gently press the center. If it springs back, they are ready. You can also look for golden edges. This means your madeleines are baked just right. When melting chocolate for dipping, use coconut oil. This helps create a smooth coating. Stir the chocolate every 20 seconds in the microwave until it is smooth. This way, your dip will look perfect. Enhancing flavors is easy with chocolate. You can add a pinch of sea salt to the melted chocolate. This adds a nice contrast to the sweetness. You might also try adding a splash of vanilla for depth. For a stunning display, arrange your madeleines on a pretty platter. Dust them lightly with powdered sugar. This adds a nice touch and makes them look fancy. Pair your madeleines with a warm drink. A pumpkin spice latte works well. The flavors complement each other perfectly. Enjoy these treats with friends or family for a cozy vibe. {{image_2}} You can boost the flavor of your madeleines in fun ways. Adding spices like allspice or cloves can give them a new twist. You might even try a hint of orange zest for a bright taste. If you enjoy crunch, consider mixing in chopped nuts or chocolate chunks. Walnuts or pecans add a nice texture. Dark chocolate chunks can make the madeleines more decadent. If you need a gluten-free option, swap the all-purpose flour for a gluten-free blend. Many brands work well in this recipe. For a vegan twist, replace the eggs with flax eggs. Mix one tablespoon of ground flaxseed with three tablespoons of water. Let it sit until it thickens. Use a plant-based butter for richness, too. These changes keep the madeleines tasty and inclusive. You can switch up the squash in this recipe easily. Butternut squash or even sweet potato could work nicely. For special occasions, try adding festive spices, like nutmeg for Thanksgiving. During Christmas, a hint of peppermint extract can brighten the flavor. Change the shape of your madeleines with a different pan, too, to match the season! To keep your chocolate dipped pumpkin madeleines fresh, use airtight containers. Glass jars work great. Plastic containers with tight lids are also good. Place parchment paper between layers to avoid sticking. Store them in a cool, dry place, away from direct sunlight. This helps maintain their soft texture and rich taste. Freezing madeleines is easy and keeps them tasty. First, let them cool completely. Then, place them in a single layer on a baking sheet. Freeze for about one hour. After freezing, transfer them to airtight bags. Remove as much air as possible before sealing. For thawing, take them out and leave them at room temperature for about 30 minutes. Enjoy them fresh! At room temperature, madeleines last about three days. Keep them sealed to avoid drying out. If you refrigerate them, they can last up to one week. Just make sure to wrap them tightly. This helps keep their flavor and moisture intact. You can tell the madeleines are done when the edges turn golden brown. Press the center lightly; it should spring back. If it leaves an indentation, they need more time. Check them at the 10-minute mark to avoid overbaking. Yes, you can use fresh pumpkin. Just cook and mash it first. Make sure to remove any excess moisture. Too much water can change the texture of your madeleines. Fresh pumpkin adds a lovely taste. You can use white chocolate or dark chocolate for a different flavor. If you want a healthier option, try yogurt-covered coating. Chopped nuts or crushed candy can also be fun for a crunchy topping. Store leftover madeleines in an airtight container. This keeps them fresh and soft. You can also place parchment paper between layers. This will prevent them from sticking together. Yes, you can make the batter ahead of time. Cover it with plastic wrap and store it in the fridge. Just remember to use it within two days for the best results. Before using, allow the batter to sit at room temperature for a bit. This helps with even baking. In this post, we covered how to make delightful madeleines. You learned about each ingredient, from flour to chocolate. We explored step-by-step instructions for batter, baking, and chocolate dipping. I shared tips for perfecting your madeleines and offered variations for flavor and diet. Finally, we discussed storage to keep them fresh. Creating madeleines can be fun and rewarding. With these tips, you can impress friends and family. Enjoy making them your own!

Chocolate Dipped Pumpkin Madeleines Delightful Treat

Are you ready to elevate your dessert game? These Chocolate Dipped Pumpkin Madeleines are a delightful treat that combines warm

To make Greek Lemon Orzo Soup, gather these ingredients: - 1 tablespoon olive oil - 1 medium onion, diced - 2 cloves garlic, minced - 3 medium carrots, diced - 2 celery stalks, diced - 6 cups vegetable broth - 1 cup orzo pasta - 1 cup cooked chickpeas (canned or boiled) - Zest of 1 lemon - ¼ cup freshly squeezed lemon juice - 1 teaspoon dried oregano - Salt and pepper to taste - Fresh parsley, chopped (for garnish) - Optional: Feta cheese, crumbled (for serving) These simple items create a warm and tasty soup. The lemon brightens the flavors and makes it refreshing. You can swap some ingredients if you need to. Here are some ideas: - Olive oil can change to avocado oil or butter. - Chickpeas can be replaced with white beans or lentils. - Orzo pasta can switch to rice or another small pasta. - Vegetable broth can be replaced with chicken broth for added flavor. - Fresh parsley can be swapped with cilantro or basil for a different taste. These swaps can still give you a great soup. Adjust according to your taste and what you have. Using fresh ingredients often gives a better flavor. Fresh herbs, vegetables, and lemons will add a bright touch. However, canned ingredients can save time. Canned chickpeas are quick and easy, and they work well in this soup. If you can, choose fresh garlic and onions. They boost the soup's taste. Fresh lemon juice enhances the soup's flavor more than bottled juice. But if you only have canned items, don't worry! Your soup will still be delicious. To start making Greek Lemon Orzo Soup, gather all your ingredients. This soup is quick and easy. First, chop one medium onion into small pieces. Then, mince two cloves of garlic. Next, dice three medium carrots and two celery stalks. You want them all to be about the same size for even cooking. Now, let's cook! In a large pot, heat one tablespoon of olive oil over medium heat. Add the diced onion and cook until it looks clear, about five minutes. Next, stir in the minced garlic, diced carrots, and celery. Cook these for another five minutes until they soften a bit. After that, pour in six cups of vegetable broth and bring it to a boil. Once boiling, add one cup of orzo pasta. Cook it for about eight to ten minutes or until it feels firm but soft. Then, stir in one cup of cooked chickpeas, the zest of one lemon, and a quarter cup of freshly squeezed lemon juice. Add one teaspoon of dried oregano for flavor. Reduce the heat and let it simmer for five more minutes. Before serving, taste the soup. Add salt and pepper to make it perfect. If you want a tangier flavor, you can adjust the lemon juice. Ladle the soup into warm bowls. For a lovely presentation, garnish with chopped fresh parsley. If you like, add some crumbled feta cheese on top. Enjoy this comforting bowl of Greek Lemon Orzo Soup! To enhance the soup's flavor, focus on fresh ingredients. Use fresh lemon juice for a bright taste. Lemon zest adds a fragrant touch that lifts the dish. For a richer flavor, sauté the onions until golden. This deepens their sweetness and adds depth. A pinch of salt helps to balance the zest. Adjust the seasoning as you go. Taste often to find your perfect balance. Don't skip the sauté step. This builds a great base for flavor. Avoid overcooking the orzo; it should stay firm. If you add it too early, it may become mushy. Be careful with the lemon juice; too much can overpower. Start with less and add more if needed. Lastly, don’t forget to garnish with parsley and feta. This adds freshness and visual appeal. For this soup, you need a large pot. A sturdy spoon helps mix the ingredients well. A cutting board and knife make chopping easy. Use measuring cups for precise amounts. A ladle is handy for serving. If you have an immersion blender, you can blend the soup for a smooth texture. These tools make the process simpler and more efficient. {{image_2}} You can make Greek Lemon Orzo Soup vegetarian or vegan quite easily. Just swap out the chicken broth for vegetable broth. This soup is already packed with vegetables, so you have a great base. To keep it vegan, skip the feta cheese or use a plant-based version. You can also add more chickpeas or beans for extra protein. This keeps the soup hearty and filling. If you want to add protein, chicken is a great choice. Cook diced chicken in the pot before adding the onions. This gives a nice flavor. If you prefer a plant-based option, add tofu. Cut firm tofu into cubes and sauté it with the onions. Tofu absorbs flavors well and adds a nice texture. You can also use shrimp if you want a seafood twist. Just add them in the last few minutes of cooking. Seasonal veggies can enhance your soup's flavor. In spring, try adding fresh peas or asparagus. In fall, you might like to add diced butternut squash. These veggies not only taste great but also add color. Just remember to chop them into small pieces for even cooking. You can add them with the carrots and celery for the best results. This way, your soup will be fresh, colorful, and full of life. To store your Greek Lemon Orzo Soup, let it cool first. Then, pour it into an airtight container. Keep it in the fridge for up to three days. Make sure to label the container so you know what it is. If you want to enjoy it later, consider freezing it. You can freeze Greek Lemon Orzo Soup for up to three months. Use freezer-safe containers or bags. Leave some space in the container for the soup to expand. It helps to divide the soup into smaller portions. This way, you can thaw only what you need. When reheating, do it slowly. You can use the stovetop or microwave. If using the stove, add a bit of water or broth to keep it from drying out. Stir often to heat evenly. If using a microwave, cover the bowl but leave a small gap for steam. Heat in short bursts, stirring in between. Enjoy your soup warm and fresh! You can use any small pasta shape. Try ditalini or acini di pepe. Rice makes a good option too. Quinoa or couscous can work well for a gluten-free choice. Just keep cooking times in mind. Each type of pasta may need different cooking times. This soup lasts about 3 to 5 days in the fridge. Store it in an airtight container. Make sure to let it cool before you seal it. If you see any change in smell or appearance, it's best to toss it. Absolutely! Adding more veggies boosts flavor and nutrition. Spinach, kale, or zucchini work great. You can also use frozen peas or corn. Just chop them small, so they cook evenly. Add them in with the broth for best results. This blog post covered the essential ingredients and preparation steps for Greek Lemon Orzo Soup. I shared tips for perfecting flavors and avoiding common mistakes. We also explored variations to suit different diets and discussed storage methods for leftovers. For a delicious soup, stick to quality ingredients and follow the steps closely. This dish is easy to tweak for your taste. Enjoy making it your own and savor every bite!

Greek Lemon Orzo Soup Comforting and Flavorful Delight

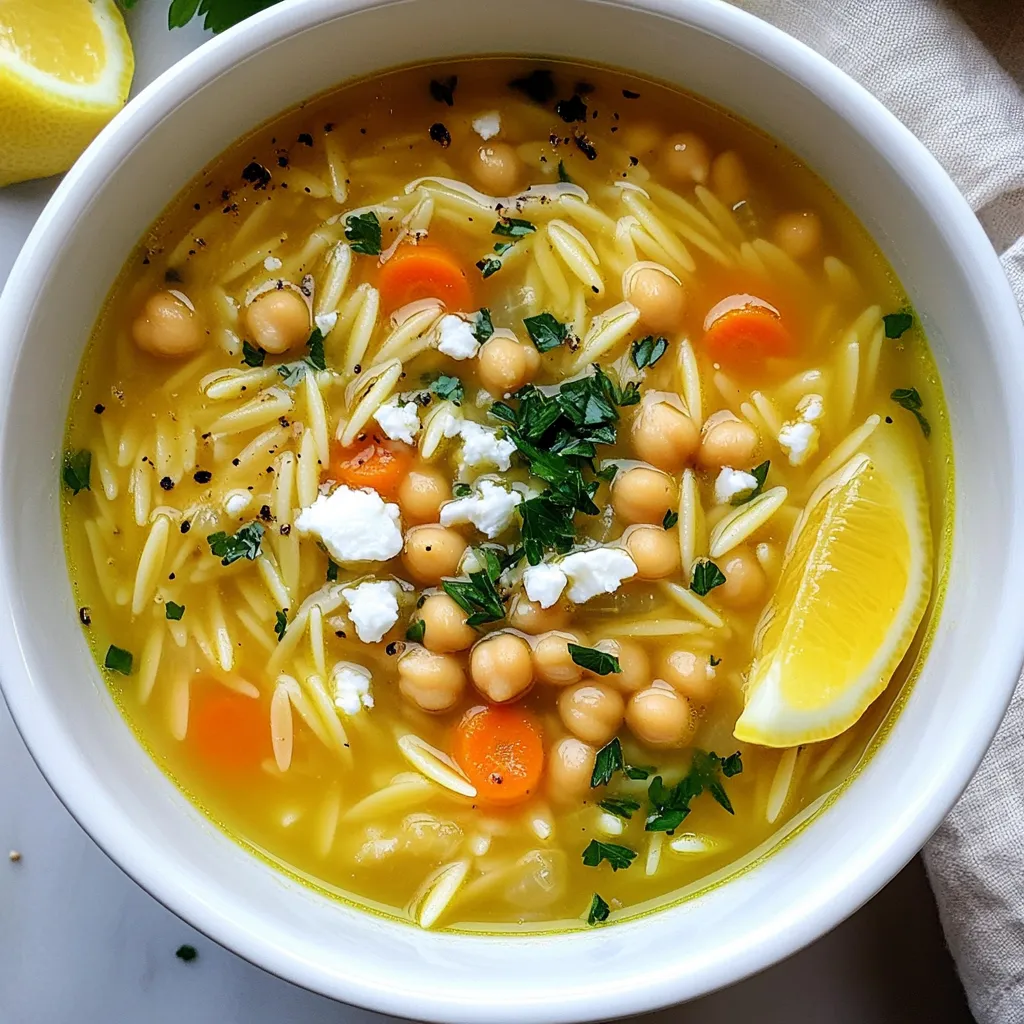
If you’re looking for a warm bowl of comfort, Greek Lemon Orzo Soup is your answer. This dish blends bright

To make Caramel Pumpkin Mousse Parfaits, gather these simple ingredients: - 1 cup pumpkin puree - 1 cup heavy cream - 1/2 cup granulated sugar - 1/2 teaspoon vanilla extract - 1/2 teaspoon ground cinnamon - 1/4 teaspoon ground nutmeg - 1/4 teaspoon salt - 1/2 cup caramel sauce (store-bought or homemade) - 1/2 cup crushed graham crackers - Whipped cream (for topping) - Optional: chopped pecans for garnish If you have dietary needs, here are some swaps: - Pumpkin Puree: Use sweet potato puree for a different flavor. - Heavy Cream: Substitute with coconut cream for a dairy-free option. - Granulated Sugar: Use maple syrup or honey for a natural sweetener. - Graham Crackers: Try gluten-free crackers if you need a gluten-free option. To make your parfaits shine, keep these tips in mind: - Pumpkin Puree: Choose pure pumpkin puree, not the spiced pie filling. This gives the best taste. - Spices: Freshly ground spices can boost flavor. Use whole spices when possible. - Whipped Cream: Whip until soft peaks form. This keeps the mousse light and airy. - Caramel Sauce: A high-quality sauce adds richness. Homemade sauce can elevate the dessert. Using these ingredients and tips ensures a delightful treat that everyone will enjoy! To make the pumpkin mousse, start with a mixing bowl. Add 1 cup of pumpkin puree, 1/2 cup of granulated sugar, 1/2 teaspoon of vanilla extract, 1/2 teaspoon of ground cinnamon, 1/4 teaspoon of ground nutmeg, and 1/4 teaspoon of salt. Use an electric mixer to blend these ingredients until the mixture is smooth and creamy. This step is key for a rich flavor. Now, let’s whip the heavy cream. In a separate large bowl, pour in 1 cup of heavy cream. Use the electric mixer again. Mix until you see soft peaks form. Be careful not to overwhip. Overwhipping can ruin the cream's texture. You want it to be fluffy and light for the mousse. Next, it’s time to layer the parfaits. Grab your serving glasses or jars. Start with a layer of the pumpkin mousse at the bottom. Then, drizzle some caramel sauce over it. After that, add a layer of crushed graham crackers. Repeat these layers until you fill the glass. This creates a beautiful and tasty treat. After you layer the parfaits, cover them with plastic wrap. Place them in the fridge for at least 2 hours. This helps the flavors mix well and the mousse set perfectly. For best results, don’t skip this step. The wait will be worth it when you take that first bite! When making caramel pumpkin mousse parfaits, avoid overmixing the cream. Overwhipping can make it grainy. Always blend until soft peaks form. Don't rush the chilling step. Letting the parfaits sit in the fridge for at least two hours helps the flavors blend well. Also, use fresh pumpkin puree for the best taste, as the canned version can be watery. To boost the flavor, try adding a pinch of clove or ginger to the mousse. These spices add warmth and depth. You can also switch up the caramel sauce. A sea salt caramel adds a nice contrast to the sweetness. For a nutty flavor, mix in finely chopped pecans or walnuts into the mousse. Use clear glasses to show off those lovely layers. Start with pumpkin mousse, then caramel, and finish with graham crackers. Top with a dollop of whipped cream and drizzle more caramel on top. For a charming touch, sprinkle a little cinnamon or add a mini pumpkin spice cookie on the rim. This adds a festive look and makes your parfaits pop! {{image_2}} You can easily swap some ingredients in this recipe. If you want a lighter dessert, use Greek yogurt instead of heavy cream. It adds creaminess without all the fat. For a healthier sweetener, try maple syrup or honey in place of granulated sugar. Each option brings a new taste to the mousse. To make your parfaits even more special, add seasonal spices. Try ginger or allspice for a warm kick. You can also mix in flavors like orange zest for a fresh twist. This small change can make your dessert feel unique and festive. If you prefer a vegan option, replace heavy cream with coconut cream. It whips up light and fluffy. Use a plant-based sweetener like agave syrup instead of granulated sugar. For the caramel sauce, look for vegan brands or make your own using coconut milk. These swaps keep the flavor while catering to dietary needs. Store any leftover parfaits in the fridge. Use airtight containers to keep them fresh. If you used clear glasses, cover them with plastic wrap. This way, they stay safe from air and odors. These parfaits taste best within three days. After three days, the layers may start to blend. The mousse can lose its lightness after a while. If you plan to eat them later, store them right away. You can freeze the parfaits, but the texture may change. If you choose to freeze, use freezer-safe containers. Layer the parfaits with whipped cream and caramel just before serving for the best taste. They can last up to a month in the freezer. When ready to eat, thaw them in the fridge overnight. Yes, you can make these parfaits a day ahead. Just layer and chill them. The flavors will blend nicely overnight. This saves time for your gathering or dinner. You can use coconut cream or whipped coconut milk. Both options will still give a nice texture. If you want a lighter mousse, try using Greek yogurt. To make caramel sauce at home, use sugar and water. Heat 1 cup of sugar with 1/4 cup of water in a pot. Cook until it turns amber. Remove from heat and add 1/2 cup of cream slowly. Stir until smooth. You can use pumpkin pie filling, but it has added spices and sugar. This might change the taste of your mousse. If you prefer a more controlled flavor, stick with pumpkin puree. These parfaits last about 3 days in the fridge. Make sure to cover them well. This keeps them fresh and tasty for you to enjoy later. In this post, we explored how to make delicious pumpkin mousse parfaits. We covered ingredient choices, preparation steps, and tips for better flavor. I shared ways to avoid common mistakes and how to present your parfaits beautifully. Plus, we discussed variations and storage options for leftovers. Pumpkin mousse parfaits are fun to make and taste amazing. Try these ideas and enjoy your time in the kitchen!

Caramel Pumpkin Mousse Parfaits Easy Fall Delight

Fall is here, and it’s time to treat yourself with a sweet dessert that warms the soul. My Caramel Pumpkin

To make tasty apple cinnamon pancake bites, you need a few key items: - 1 cup all-purpose flour - 1 tablespoon baking powder - 1 tablespoon sugar - 1/2 teaspoon ground cinnamon - 1/4 teaspoon salt - 1 cup milk (dairy or non-dairy) - 1 large egg - 2 tablespoons melted butter (or coconut oil) - 1 medium apple, peeled and diced (preferably Granny Smith) These ingredients blend together to create a fluffy and flavorful base. The apples add sweetness and texture, making each bite delightful. You can take your pancake bites to the next level with these optional ingredients: - 1/4 cup chopped walnuts Adding walnuts gives a nice crunch and a nutty taste. If you want a bit more sweetness, you can serve them with maple syrup. It pairs perfectly with the apple and cinnamon. To make these pancake bites, you will need a few simple tools: - Mini muffin tin - Mixing bowls - Whisk - Spoon or cookie scoop Using a mini muffin tin helps create perfectly sized bites. Mixing bowls are essential for combining your ingredients. A whisk ensures that your dry and wet ingredients mix well. A spoon or cookie scoop makes filling the muffin cups easy and neat. Start by preheating your oven to 350°F (175°C). This helps the pancake bites cook evenly. While the oven heats, grab a mini muffin tin. Lightly grease each muffin cup so the bites pop out easily later. You can use butter or a non-stick spray. This step is key to making sure your pancake bites don’t stick. In a large mixing bowl, combine the dry ingredients. Add 1 cup of all-purpose flour, 1 tablespoon of baking powder, 1 tablespoon of sugar, 1/2 teaspoon of ground cinnamon, and 1/4 teaspoon of salt. Use a whisk to mix them well. Make sure there are no lumps. This ensures that every bite has the same great flavor. In another bowl, mix the wet ingredients. Pour in 1 cup of milk, crack in 1 large egg, and add 2 tablespoons of melted butter. Stir these until they blend well. Now, pour the wet mix into the dry ingredients. Gently stir until just combined. A few lumps are okay; don't overmix. Finally, fold in 1 medium apple, peeled and diced, and add 1/4 cup of chopped walnuts if you like. This adds a lovely crunch and flavor. For soft and fluffy pancake bites, do not overmix the batter. Mix until just combined. A few lumps help keep them light. Use fresh apples for the best flavor. Granny Smith apples add a nice tartness that balances the sweetness. Avoid using cold ingredients. Cold milk and eggs can make the batter heavy. Always use room temperature items for the best rise. Don’t skip greasing the muffin tin. This keeps the pancake bites from sticking. Fill each muffin cup about three-quarters full. This allows space for the bites to rise. Rotate the tin halfway through baking. This ensures even cooking and browning. Keep an eye on the time and do the toothpick test. If it comes out clean, your bites are ready! {{image_2}} You can switch up the apples for other fruits. Bananas add a nice sweetness. Blueberries make each bite burst with flavor. Peaches can give a juicy twist. Just remember, softer fruits may change the texture a bit. If you have allergies, there are easy swaps. Use gluten-free flour instead of regular flour. For dairy-free, choose almond milk or oat milk. If you can’t have eggs, a flax egg works well. Mix one tablespoon of flaxseed meal with three tablespoons of water. Let it sit for five minutes, then add it to your mix. I love adding more spices to my pancake bites. A pinch of nutmeg gives warmth. A splash of vanilla can brighten the flavor. You could even add a bit of pumpkin spice for a fun twist. Experimenting can lead to new favorites! To keep your pancake bites fresh, store them in an airtight container. This helps prevent them from drying out. Let them cool completely before placing them in the container. You can keep these bites at room temperature for up to two days. If you want them for longer, refrigeration is best. Reheating your pancake bites is easy. You can use the microwave or oven. For the microwave, heat them for about 20-30 seconds. Check if they are warm enough. If you use the oven, preheat it to 350°F (175°C). Place them on a baking sheet and heat for about 5-7 minutes. This keeps them soft and tasty. Freezing is a great way to save extra pancake bites. First, let them cool down. Then, place them in a single layer on a baking sheet. Freeze until firm, about an hour. Once frozen, transfer them to a freezer bag or container. Label it and store in the freezer for up to three months. When you want some, simply reheat them as mentioned above. You can tell the pancake bites are done when they turn golden brown. Insert a toothpick into the center of a bite. If it comes out clean, they are ready. For best results, keep an eye on them after 12 minutes in the oven. They bake for about 12 to 15 minutes total. Yes, you can prepare these pancake bites ahead of time. Make the batter and store it in the fridge overnight. Just remember to stir it gently before you bake. You can also bake them in advance and keep them in an airtight container. They stay fresh for a few days. These bites go great with maple syrup for drizzling. You can also add fresh fruit, like sliced bananas or berries. A dollop of yogurt makes a tasty side too. For a fun twist, try serving them with a sprinkle of powdered sugar or a scoop of ice cream for dessert. You now have a full guide to making delicious Apple Cinnamon Pancake Bites. We covered the key ingredients you need, both essential and optional, to make these bites pop. I shared easy step-by-step instructions and helpful tips to ensure perfect texture and even cooking. We also explored tasty variations and storage tips to keep them fresh. Now, get cooking and enjoy these tasty treats anytime!

Apple Cinnamon Pancake Bites Tasty Breakfast Treat

If you’re looking for a tasty breakfast treat that’s easy to make, you’re in the right place! These Apple Cinnamon

To make this savory chicken gnocchi soup, gather these simple ingredients: - 1 lb boneless, skinless chicken thighs or breasts, diced - 1 tablespoon olive oil - 1 medium onion, diced - 3 cloves garlic, minced - 2 medium carrots, diced - 2 celery stalks, diced - 4 cups low-sodium chicken broth - 1 cup heavy cream - 1 pound fresh or frozen gnocchi - 2 cups fresh spinach - 1 teaspoon dried thyme - 1 teaspoon dried oregano - Salt and pepper to taste For a delightful finish, consider these optional garnishes: - ½ cup grated Parmesan cheese - Chopped fresh parsley These add flavor and make your soup look even better. You will need a few tools to make this soup: - A large skillet for sautéing - A slow cooker for cooking the soup - A cutting board and knife for chopping - A wooden spoon for stirring Having these tools ready will help the process go smoothly. To start, I heat one tablespoon of olive oil in a skillet. I add diced onion, diced carrots, and diced celery. I sauté these for about 5 to 7 minutes. This softens the veggies and brings out their flavors. I then add three cloves of minced garlic. I cook this mixture for another 1 to 2 minutes until it smells amazing. Next, I transfer the sautéed aromatics to the slow cooker. I add 1 pound of diced chicken thighs or breasts to the mix. Then, I pour in 4 cups of low-sodium chicken broth. I like to sprinkle in 1 teaspoon of dried thyme and 1 teaspoon of dried oregano. I finish this step by adding salt and pepper to taste. It's important to stir everything well to combine all the flavors. Now it’s time to cook. I cover the slow cooker and set it on low for 6 to 7 hours. If I’m in a rush, I can set it on high for 3 to 4 hours. The chicken should be fully cooked and tender by this point. Cooking it low and slow gives the best taste. About 30 minutes before I plan to serve, I add 1 pound of gnocchi. If I use fresh gnocchi, they cook faster than frozen, so I keep an eye on them. To make the soup creamy, I stir in 1 cup of heavy cream. I also add 2 cups of fresh spinach. This adds color and nutrition to the soup. Once everything is cooked through, I serve the soup hot. I like to garnish each bowl with ½ cup of grated Parmesan cheese and chopped fresh parsley. This adds a nice touch and boosts the flavor. Enjoy your deliciously comforting chicken gnocchi soup! To get the best taste in your chicken gnocchi soup, start with fresh ingredients. Fresh chicken thighs or breasts add a rich flavor. Use low-sodium chicken broth for a balanced taste. Sauté the onion, carrots, and celery first. This step wakes up the flavors. Don't skip the garlic! It adds a wonderful aroma and taste. Add dried thyme and oregano for depth. If you have fresh herbs, like parsley, use them at the end. They brighten the flavor. One common mistake is overcooking the gnocchi. If you add them too early, they may turn mushy. Follow the timing in the recipe. Another mistake is not seasoning enough. Always taste your soup before serving. Adjust salt and pepper as needed. Lastly, don’t rush the cooking time. Slow cooking lets all the flavors blend well. If you cook on high, watch the chicken closely. It should be tender, not dry. If your soup is too thick, add more chicken broth. You can also stir in a bit of water. For creaminess, add more heavy cream. If you want it richer, use half-and-half. If you prefer a lighter soup, skip the cream. Adding more spinach can help keep the texture nice. Always mix well before serving. This way, you ensure every bowl has the right consistency. {{image_2}} To make this soup vegetarian, swap the chicken for chickpeas or white beans. These options give you protein without meat. Use vegetable broth instead of chicken broth for richer flavor. Adding mushrooms can give a nice umami taste. You can also toss in some tofu for extra texture. Feel free to boost nutrition by adding more veggies. Zucchini, bell peppers, or peas all work well. You can also use kale or Swiss chard instead of spinach for a different twist. Just chop them up and add them to the slow cooker along with the other ingredients. This adds color and makes the soup even heartier. You can switch up the protein in this soup, too. Try using turkey or even shredded pork for a different flavor. If you like seafood, shrimp can be a fun addition. Just add the shrimp in the last 20 minutes of cooking to keep them tender. This gives your soup a fresh twist no matter the protein you choose! To store your leftover soup, let it cool first. Once it cools, transfer it to an airtight container. You can keep it in the fridge for up to three days. Make sure to label the container with the date. This way, you’ll know when to use it. If you want to save the soup for later, freezing is a great option. Pour the cooled soup into freezer-safe bags or containers. Leave some space at the top, as soup expands when frozen. You can freeze it for up to three months. Don't forget to label with the date! When you're ready to enjoy your soup again, you can reheat it on the stove or in the microwave. If using the stove, heat it over low heat and stir often. If microwaving, use a microwave-safe bowl and cover it loosely. Heat in short bursts, stirring in between, until warm. If the soup is too thick after reheating, add a splash of chicken broth or water to thin it out. Yes, you can use frozen chicken. Just add the frozen chicken directly into the slow cooker. Adjust the cooking time to about 7-8 hours on low or 4-5 hours on high. This ensures the chicken cooks through and stays tender. To thicken the soup, try adding more gnocchi. You can also mix 1 tablespoon of cornstarch with water and stir it in. Another option is to blend a small amount of the soup and mix it back in for a creamy texture. This soup pairs well with crusty bread or a side salad. A fresh green salad adds a nice crunch. You can also serve it with garlic bread for extra flavor and comfort. Yes, you can make this soup dairy-free. Substitute the heavy cream with coconut milk or almond milk. Use dairy-free cheese if you want a cheesy taste. These swaps keep the soup rich and tasty without dairy. To sum up, we explored the key ingredients for chicken gnocchi soup, including required and optional items. I shared step-by-step instructions and tips to enhance flavor and avoid common mistakes. Variations allow you to customize it to your taste, while the storage tips ensure your leftovers stay fresh. Remember, cooking is about having fun and experimenting. You can make this dish yours and enjoy it any time. Happy cooking!

Savory Slow Cooker Chicken Gnocchi Soup Recipe

Looking for a warm, comforting meal that’s easy to make? This Savory Slow Cooker Chicken Gnocchi Soup Recipe is perfect

- Large shrimp (1 lb, peeled and deveined) - Olive oil (3 tablespoons) - Garlic (4 cloves, minced) - Chili paste (2 tablespoons, such as sambal oelek) - Honey or agave syrup (1 tablespoon) - Spices (smoked paprika, salt, black pepper) - Bell peppers (red and yellow, sliced) - Red onion (sliced) - Cooked quinoa or rice (2 cups) - Fresh cilantro - Lime wedges I love using fresh, quality ingredients. Large shrimp are my go-to for this dish. Make sure they are peeled and deveined. This saves prep time and makes cooking easier. Olive oil adds richness and helps the spices stick. Minced garlic brings a punch of flavor, while chili paste adds heat. Honey or agave balances the spice with sweetness. I use a mix of spices to enhance the shrimp. Smoked paprika gives a warm, smoky taste. Salt and black pepper bring out the natural flavors of the shrimp and veggies. For the veggies, I recommend bright bell peppers and red onions. They roast beautifully and add color. For the base, cooked quinoa or rice works well. It absorbs the sauce and adds a nice texture. Finally, garnishing with fresh cilantro and lime wedges adds freshness and zest. These bright flavors make every bite exciting! - Preheat your oven to 425°F (220°C) and prepare a baking sheet with parchment paper. - In a large bowl, whisk together 3 tablespoons of olive oil, 4 cloves of minced garlic, 2 tablespoons of chili paste, 1 tablespoon of honey, 1 teaspoon of smoked paprika, 1 teaspoon of salt, and 1 teaspoon of black pepper until mixed well. - Add 1 pound of peeled and deveined shrimp to the bowl. Toss them gently to coat each shrimp in the marinade. - On the prepared baking sheet, place the marinated shrimp in the center. Scatter 1 sliced red bell pepper, 1 sliced yellow bell pepper, and 1 sliced red onion around the shrimp. - Roast everything in the oven for 10-12 minutes. The shrimp should turn pink and opaque, while the veggies become tender. - While the shrimp and veggies roast, cook 2 cups of quinoa or rice according to the package directions. - Once cooked, divide the quinoa or rice among four bowls. - Top each bowl with the roasted chili garlic shrimp and vegetables. - Finally, garnish with fresh cilantro and a squeeze of lime juice for added flavor. For the best shrimp, cook them for 10-12 minutes. They turn pink and opaque when done. If they curl tightly, they are overcooked. Marinate shrimp for at least 15 minutes. This helps the flavors soak in well. You can marinate them for up to an hour if you have time. This makes them even tastier. Roasting red and yellow bell peppers with red onion works well. These veggies add color and sweetness to your dish. Cut them into even pieces to ensure they cook at the same rate. Avoid overcooking by checking them often. They should be tender but still crisp. If they start to brown too quickly, take them out early. Garnish your bowls with fresh cilantro. This adds a bright flavor that complements the shrimp. Lime wedges add a zesty kick. You can also add sliced avocado for creaminess. For sides, try serving with a simple green salad or tortilla chips. Pair your meal with a cold drink like iced tea or a light beer. This makes the dish feel more festive. {{image_2}} You can change up the proteins in this dish. Instead of shrimp, try chicken or tofu. Both absorb flavors well and cook nicely. If you choose chicken, cut it into bite-sized pieces. For tofu, use firm tofu and press it to remove excess moisture. You can also swap out the vegetables. Zucchini and asparagus work great if you want a twist. Just slice them thinly like the bell peppers. They will roast well and add new flavors to your bowl. Adjust the spice levels to fit your taste. If you like it mild, cut back on the chili paste. For more heat, add extra chili paste or even some red pepper flakes. You can also mix in fresh chopped chili for a fresh kick. Try different sauces for a new flavor. You can use teriyaki sauce, soy sauce, or even a sweet chili sauce. Each will give your shrimp bowls a unique taste that you will love. Instead of bowls, you can serve this dish in lettuce wraps. Use large leaves of romaine or butter lettuce. Fill the leaves with shrimp and veggies for a fun and fresh meal. If you want to meal prep, this dish stores well. You can keep the cooked shrimp and veggies in the fridge for up to 3 days. Just reheat everything in a pan before serving. You can also store the quinoa or rice separately to keep it fresh. To store your shrimp bowls, place them in an airtight container. Make sure to separate the shrimp from the vegetables and quinoa or rice. This keeps everything fresh and tasty. Leftovers will stay good in the fridge for up to three days. Enjoy the flavors while they last! If you want to save shrimp bowls for later, freezing is a great option. Place the shrimp and veggies in a freezer-safe container. You can also freeze the quinoa or rice. They will last in the freezer for up to three months. To reheat, thaw overnight in the fridge. Then, heat in a pan or microwave until warm. This keeps the shrimp juicy and the veggies tender. Store quinoa or rice in a separate container. This helps maintain texture and flavor. Keep vegetables in a different bag or container. This ensures they stay fresh and crunchy. When ready to eat, combine all components for a tasty meal. You should cook shrimp on a sheet pan for about 10 to 12 minutes at 425°F (220°C). The shrimp will turn pink and opaque when done. Make sure to check that the shrimp is not overcooked. Overcooked shrimp can become tough. Yes, you can use frozen shrimp! Just make sure to thaw them first. Place the shrimp in cold water for about 15-20 minutes. After thawing, pat them dry with a paper towel. This helps the marinade stick better. Frozen shrimp can save you time! I love to serve my chili garlic shrimp bowls with cooked quinoa or rice. These grains soak up the flavors well. You can also add a side of steamed broccoli or a fresh salad. Lime wedges and fresh cilantro make great toppings too! This blog post covers how to make delicious chili garlic shrimp bowls. You learned about the main ingredients, steps to prepare, and cooking methods. I also shared tips for perfecting the shrimp and suggested variations to suit your taste. Remember, you can easily adjust flavors and change up veggies and proteins. With simple storage methods, you can enjoy these bowls for days. Get ready to impress your family with this tasty meal that’s easy to make and fun to share!

Sheet Pan Chili Garlic Shrimp Bowls Flavorful Delight

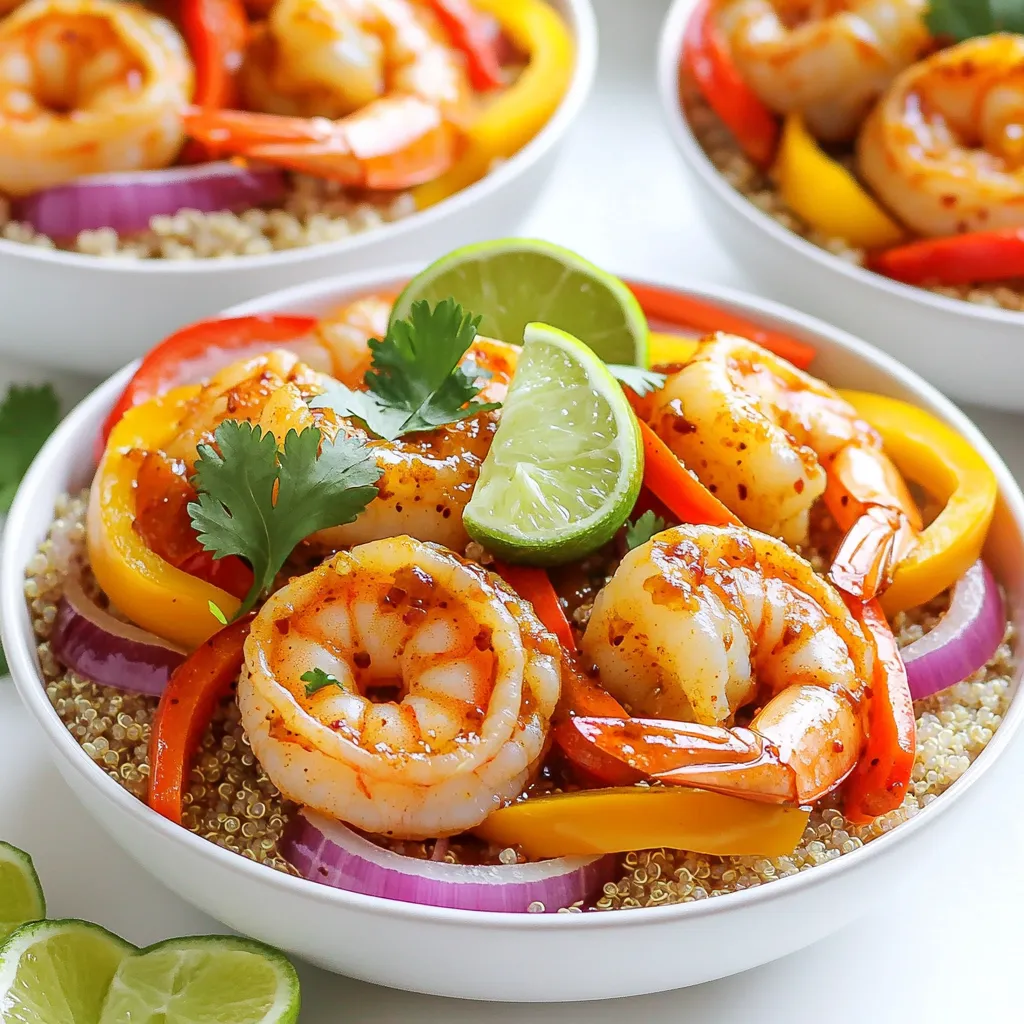
Get ready to delight your taste buds with my Sheet Pan Chili Garlic Shrimp Bowls! This easy, one-pan meal combines

- 1 cup orzo pasta - 2 cups fresh spinach, chopped - 1 can (14 oz) artichoke hearts, drained and chopped - 1 cup cream cheese, softened - 1/2 cup Greek yogurt - 1 cup vegetable broth - 1 cup shredded mozzarella cheese - 1/4 cup grated Parmesan cheese - 2 tablespoons olive oil - 2 cloves garlic, minced - Salt and pepper to taste - Red pepper flakes (optional) for heat I often use Barilla or Ronzoni for orzo pasta. Both brands cook well and taste great. For cream cheese, Philadelphia is my go-to. It blends nicely with the other flavors. When looking for mozzarella, I prefer fresh mozzarella for a creamy texture. For Greek yogurt, Fage is a high-quality choice. It adds a nice tang while keeping the dish creamy. Choose a good vegetable broth for the best flavor. If you want a gluten-free option, use gluten-free orzo or another pasta type. You can swap cream cheese with a dairy-free cream cheese for a vegan choice. To lower fat, use low-fat Greek yogurt. If you are lactose intolerant, choose lactose-free cheese. For extra protein, add cooked chicken or chickpeas. If you dislike artichokes, you can leave them out or use mushrooms instead. These swaps keep the dish tasty, no matter your diet. 1. Start by heating 2 tablespoons of olive oil in a large pot over medium heat. 2. Add 2 cloves of minced garlic. Sauté for 1 minute until it smells great. 3. Next, stir in 1 cup of orzo pasta. Toast it for about 1 minute. 4. Pour in 1 cup of vegetable broth and bring it to a boil. 5. Lower the heat, cover the pot, and simmer for 7-10 minutes. Stir often to keep the orzo from sticking. 6. When the orzo is tender, reduce the heat to low. 7. Add 1 cup of softened cream cheese and 1/2 cup of Greek yogurt. Stir until it becomes creamy. 8. Now, fold in 2 cups of chopped spinach and 1 can of drained and chopped artichoke hearts. The spinach will wilt nicely. 9. Mix in 1 cup of shredded mozzarella cheese and 1/4 cup of grated Parmesan cheese. Stir until everything is blended well. 10. Season with salt, pepper, and optional red pepper flakes to taste. 11. Take the pot off the heat and let it sit for a few minutes before serving. To make this dish a success, focus on these key techniques: - Sautéing Garlic: This step builds flavor. Cooking garlic until fragrant brings out its natural sweetness. - Toasting Orzo: Toasting the orzo adds a nutty flavor. It creates a deeper taste in the final dish. - Stirring Often: Stir the orzo while it cooks. This keeps it from sticking to the pot and ensures even cooking. - Adding Cheese: Mix the cream cheese and Greek yogurt when the orzo is warm. This helps them melt smoothly into the dish. Look for these signs to know you're on the right track: - Garlic: It should be golden and fragrant, not burnt. - Orzo: When it's done, it should be soft but still hold its shape. - Creamy Sauce: The sauce should be thick and smooth when you add the cheeses. - Spinach: It should wilt but still have a vibrant green color. - Final Dish: Rich and creamy, with melted cheese mixed throughout. Serve it hot, and enjoy! When making creamy spinach artichoke orzo, avoid overcooking the pasta. If you cook it too long, it turns mushy. Stir the orzo often while it simmers. This keeps it from sticking to the pot. Do not skip the step of allowing the cream cheese to soften. If it is cold, it won’t mix well. Lastly, be careful with salt. The cheeses add salt, so taste before adding more. To boost the flavor, use fresh garlic. Fresh garlic adds a nice kick. You can also add lemon juice for brightness. A squeeze of lemon right before serving makes the dish pop. Try adding chopped herbs like basil or parsley for freshness. If you like spice, include more red pepper flakes. This adds warmth without being overwhelming. For this recipe, use a large pot to cook the orzo. A sturdy wooden spoon helps stir without scratching the pot. A good chef's knife makes chopping the spinach and artichokes easy. I recommend a cutting board for safety and ease. If you have it, a ladle can help serve the creamy orzo. Lastly, a grater is useful for the cheeses and any garnishes you plan to add. {{image_2}} You can easily make this dish vegan. Replace cream cheese and Greek yogurt with cashew cream or coconut yogurt. Use nutritional yeast instead of Parmesan for a cheesy flavor. You can also add extra veggies, like bell peppers or mushrooms. This adds color and nutrients while keeping it plant-based. To make this dish gluten-free, swap orzo pasta for gluten-free orzo or rice. Ensure your vegetable broth is gluten-free. The rest of the ingredients, like fresh spinach and artichokes, are naturally gluten-free. This way, everyone can enjoy a creamy, flavorful meal without worry. You can easily customize the flavors to your taste. For a spicy kick, add red pepper flakes or diced jalapeños. If you want a cheesier dish, increase the mozzarella and Parmesan. You can even mix in some cream cheese with herbs for extra depth. Try adding lemon zest for a fresh, bright taste. Each twist will make your creamy spinach artichoke orzo unique and exciting. Store your creamy spinach artichoke orzo in an airtight container. Let it cool down first. Place it in the fridge, where it will stay fresh for up to three days. If you need to use a glass container, make sure it is safe for hot food. This helps keep the flavors intact. To reheat, scoop out the amount you want. Place it in a microwave-safe bowl. Add a splash of broth or water to keep it moist. Cover the bowl with a damp paper towel. Heat for about one to two minutes on high. Stir halfway through for even heating. If you want to keep it longer, you can freeze it. Use a freezer-safe container. Portion out the orzo to make thawing easier. Leave some space at the top of the container. The orzo may expand when frozen. It can last up to three months in the freezer. When you're ready to eat, thaw it in the fridge overnight before reheating. Yes, you can use other pasta types. Try penne or rotini for a fun twist. These shapes hold sauce well, making every bite tasty. Just remember to adjust the cooking time based on the pasta you choose. Smaller shapes cook faster, while larger ones may take longer. Always taste as you go! To add heat, sprinkle in red pepper flakes. Start with a pinch and taste. You can always add more if you want extra spice. Another option is to use spicy cheese instead of regular mozzarella. You could also add chopped jalapeños for a fresh kick. Enjoy crafting your perfect heat level! This dish pairs well with a simple salad. A light green salad with lemon vinaigrette works great. You could also serve it with garlic bread for a fun crunch. Roasted vegetables make a healthy side, too. Feel free to mix and match sides based on your preferences! In this blog post, we covered key ingredients and substitutions for your recipe. I shared step-by-step cooking instructions, highlighting techniques and important visual cues. We explored tips to avoid common mistakes and enhance flavors. You also learned about variations, including vegan and gluten-free options. Lastly, I provided storage info and answered common questions. Embrace these insights to elevate your cooking game. Enjoy your delicious dish while impressing friends and family!

Creamy Spinach Artichoke Orzo Rich and Flavorful Dish

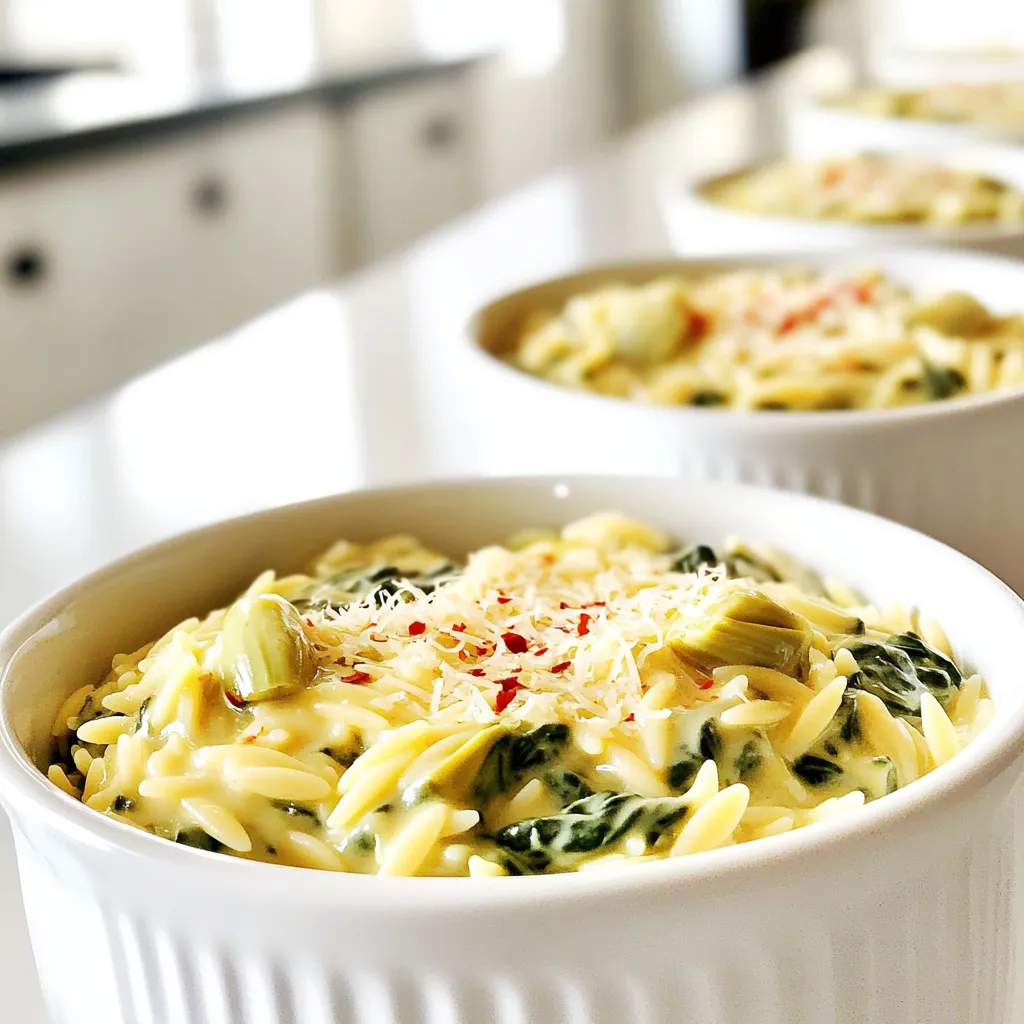
Welcome to a creamy delight: Creamy Spinach Artichoke Orzo! This rich and flavorful dish is a game-changer for your dinner

- 1 ½ cups graham cracker crumbs - ½ cup unsalted butter, melted - ¼ cup brown sugar - 1 teaspoon cinnamon - 16 oz cream cheese, softened - 1 cup canned pumpkin puree - 1 cup sugar - 2 large eggs - 1 tablespoon vanilla extract - 2 teaspoons pumpkin pie spice - 1 tablespoon brewed coffee, cooled - ½ teaspoon salt - ½ cup whipped cream - 1 teaspoon cocoa powder - Dark chocolate shavings (optional) The crust gives the bars a nice crunch. It uses graham cracker crumbs, melted butter, brown sugar, and cinnamon. This mix binds together and forms a great base. For the cheesecake filling, we use cream cheese and pumpkin puree. They create a rich and creamy texture. Sugar, eggs, vanilla, and pumpkin pie spice add sweetness and warmth. The brewed coffee brings out the pumpkin flavor. Finally, we top the bars with whipped cream for a fluffy finish. A sprinkle of cocoa powder adds a nice touch. Dark chocolate shavings are a fun option if you like a little extra chocolate. With these ingredients, you can create a tasty fall treat. - Preheat the oven to 350°F (175°C). - In a bowl, mix 1 ½ cups of graham cracker crumbs, ½ cup of melted butter, ¼ cup of brown sugar, and 1 teaspoon of cinnamon. - Press the mixture firmly into the base of a 9x9-inch baking pan. - In a large bowl, beat 16 oz of softened cream cheese until it is smooth. - Add 1 cup of canned pumpkin puree, 1 cup of sugar, 2 large eggs, 1 tablespoon of vanilla extract, 2 teaspoons of pumpkin pie spice, 1 tablespoon of cooled brewed coffee, and ½ teaspoon of salt. - Mix all the ingredients until you have a smooth filling. - Pour the creamy filling over the cooled crust. - Bake in the oven for 30-35 minutes. The edges should be set, and the center should jiggle slightly. - Let the bars cool completely in the pan on a wire rack. After that, refrigerate for at least 4 hours. Cooling and chilling are key for this dessert. After baking, let the bars cool completely in the pan. This helps the texture set well. I recommend chilling them in the fridge for at least four hours. If you can wait overnight, do it! The longer they chill, the creamier they become. When mixing the cheesecake filling, keep your mixer on low speed. This way, you avoid too much air in the batter. Air bubbles can make the bars too puffy and less smooth. If you need a gluten-free option, use gluten-free graham crackers for the crust. They work just as well and keep the yummy flavor. For a healthier choice, consider using alternative sweeteners like honey or maple syrup. Both will add a unique twist to the taste. These bars pair perfectly with a warm cup of coffee or tea. The spicy notes in the bars complement your drink well. You can also add toppings to enhance the flavor. Try a dollop of whipped cream, a sprinkle of cocoa powder, or dark chocolate shavings. Each adds a delightful touch to your dessert. {{image_2}} You can make your Pumpkin Latte Cheesecake Bars even more fun. Try adding a drizzle of chocolate or caramel on top. This will give a sweet touch that pairs well with the creamy filling. You can also sprinkle some nuts for a crunch. If you want to change the spices, consider adding nutmeg or ginger. These spices can bring new warmth to your bars. They add a cozy vibe that makes these treats perfect for fall. Need a vegan option? You can swap the cream cheese with a dairy-free cream cheese. There are many good brands available that taste great. For the eggs, use flaxseed meal or chia seeds mixed with water. This keeps your bars creamy and delicious without any animal products. You can also reduce sugar by using a natural sweetener like maple syrup. This keeps the bars sweet without the extra calories. Incorporating seasonal flavors can make your bars even more special. For fall, try adding bits of apple or pecans. These flavors blend well with pumpkin and add a nice texture. For winter, think about topping with peppermint or even eggnog flavors. You can sprinkle crushed peppermint candies on top for a festive touch. This keeps your dessert fresh and exciting throughout the year. To keep your leftover bars fresh, store them in the refrigerator. Place them in an airtight container. This keeps them moist and tasty. If you want to save them for longer, freezing is a great option. Wrap each bar in plastic wrap. Then, put them in a freezer-safe bag. They will stay good for up to three months in the freezer. In the fridge, these cheesecake bars last about five days. Always check for signs that they may have gone bad. If you see any mold or if they smell funny, it’s best to throw them out. Fresh bars should smell sweet and pumpkin-spiced. If you want to enjoy your chilled bars warm, there are easy ways to soften them. Let them sit at room temperature for about 15 minutes. This helps them become creamy again. When reheating, use the microwave. Heat them for just a few seconds, checking often. Avoid sogginess by not using high heat. Enjoy them warm or cold, both are delightful! These bars stay fresh for about five days in the refrigerator. Store them in an airtight container to keep them moist. If you notice any changes in smell or texture, it’s best to toss them out. Yes, you can make these bars a day or two ahead of your event. They taste even better after chilling overnight. Just make sure to cover them well to keep them fresh. This way, you can enjoy your time with guests instead of being stuck in the kitchen. If you don’t have pumpkin puree, you can use butternut squash puree or sweet potato puree. Both options add a rich, sweet flavor. Just ensure they are smooth and unsweetened for the best results. You can also combine these with a bit of cinnamon for extra spice. In this blog post, I shared how to make delicious Pumpkin Latte Cheesecake Bars. We covered all the ingredients for the crust, filling, and toppings. I explained each step for creating these tasty treats, along with tips for perfect texture and variations to try. Remember, cooling is key for the best outcome. Don’t hesitate to get creative with flavors or substitutes. Enjoy making these bars at home—they’re sure to impress!

Pumpkin Latte Cheesecake Bars Irresistible Fall Treat

Fall is here, and that means it’s time for warm, cozy flavors! If you love pumpkin spice lattes, wait until

- 2 boneless, skinless chicken breasts - 1 cup breadcrumbs (preferably panko) - ½ cup grated Parmesan cheese - 1 teaspoon dried Italian herbs (oregano, basil, thyme) - 1 teaspoon garlic powder - Salt and pepper to taste - ½ cup marinara sauce - 1 cup shredded mozzarella cheese - Olive oil spray - Air fryer - Shallow bowls for breading - Meat mallet for pounding chicken - Whisk for egg mixing The main stars of this dish are the chicken breasts. They need to be boneless and skinless for the best results. This keeps the dish lean and easy to eat. The breadcrumbs give the chicken its crunch. I suggest using panko breadcrumbs. They are crispier than regular ones and add great texture. Adding grated Parmesan cheese to the breadcrumbs gives extra flavor. For seasonings, dried Italian herbs and garlic powder are perfect. They enhance the taste without overpowering the chicken. Salt and pepper are key, too. They bring out the natural flavors of the chicken. You can't forget the marinara sauce and mozzarella cheese. The sauce adds moisture and flavor, while the cheese melts beautifully on top. Make sure to have olive oil spray handy. It helps keep the chicken from sticking in the air fryer. Also, gather your kitchen tools. A meat mallet, shallow bowls, and a whisk will help you prepare the chicken easily. These ingredients come together to create a tasty and crunchy chicken parmesan that you'll love. Start by preheating your air fryer to 380°F (193°C). This step is key for a crispy finish. While it heats, take your chicken breasts. Use a meat mallet to pound them to about ½ inch thick. This helps them cook evenly. Sprinkle salt and pepper on both sides for flavor. Next, set up your breading station. In one shallow bowl, whisk one large egg until it's smooth. In another bowl, mix 1 cup of breadcrumbs, ½ cup of grated Parmesan cheese, 1 teaspoon of dried Italian herbs, and 1 teaspoon of garlic powder. Dip each chicken breast in the egg first. Make sure it's coated well. Then, dredge the chicken in the breadcrumb mix. Press gently to make the crumbs stick. Now it's time to cook! Lightly spray the air fryer basket with olive oil to stop sticking. Place the breaded chicken breasts in a single layer. Do not let them touch. Air fry for 10 minutes. After that, flip each piece and cook for another 5 minutes. Check to see if the chicken is golden brown and cooked through. The inside should reach 165°F (75°C). Once done, add a tablespoon of marinara sauce to each piece. Top with shredded mozzarella cheese. Air fry for an extra 2-3 minutes. This melts the cheese nicely. After cooking, let the chicken rest for a couple of minutes. Enjoy your crunchy and flavorful dish! To get that perfect crunch, use panko breadcrumbs. Panko adds a light and airy texture. They fry up crispier than regular breadcrumbs. The air fryer cooks food by circulating hot air. This method helps your chicken stay juicy while the outside gets crunchy. Make sure to coat the chicken well with breadcrumbs. Press them on firmly so they stick during cooking. A light spray of olive oil also helps achieve that golden brown finish. Season your chicken well to enhance its flavor. Use dried Italian herbs like oregano, basil, and thyme. These herbs add depth to your dish. A teaspoon of garlic powder boosts the taste too. Feel free to mix in some salt and pepper. You can even add a pinch of red pepper flakes if you like heat. This simple seasoning blend makes every bite flavorful. When it's time to serve, think about pairings. I love serving this chicken over a bed of spaghetti or zucchini noodles. This adds a nice base and makes the dish feel complete. Don’t forget the marinara sauce on top! Garnish with fresh basil leaves and extra grated Parmesan for a pop of color. This not only looks nice but also adds more flavor. Enjoy your meal with a side salad or some steamed veggies for a well-rounded dinner. {{image_2}} You can cook chicken parmesan in different ways. If you want a crispy oven-baked version, preheat your oven to 400°F (204°C). Place the breaded chicken on a baking sheet. Bake for 20-25 minutes, flipping halfway through. This gives a nice crunch. You can also pan-fry the chicken. Heat a bit of oil in a skillet over medium heat. Cook the chicken for about 6-7 minutes on each side until golden brown. This method adds extra flavor from the oil. Need a change? Use gluten-free breadcrumbs for a tasty, gluten-free meal. They still give that great crunch. For a dairy-free option, try dairy-free cheese. It melts well and keeps the dish creamy. You can also use almond flour or crushed nuts if you want something different. These swaps keep the dish delicious while catering to dietary needs. Want to make it even better? Add veggies like spinach or mushrooms. Just sauté them first and layer them on your chicken before adding sauce and cheese. For a twist, try different sauces. A pesto or Alfredo sauce gives a new flavor profile. You can also sprinkle red pepper flakes for a spicy kick. These small changes can make your air fryer chicken parmesan unique and flavorful. To keep your leftover chicken parmesan fresh, follow these tips: - Wait for the chicken to cool down before storing. - Place the chicken in an airtight container. - Store in the fridge for up to three days. - For longer storage, freeze the chicken. - Wrap each piece in plastic wrap before placing in a freezer bag. - Chicken can last in the freezer for up to three months. When reheating, you want to keep the crunch. Here’s how: - Use the air fryer for best results. - Preheat the air fryer to 350°F (175°C). - Place the chicken in the basket without stacking. - Heat for 5-7 minutes until warm and crispy. - If using a microwave, place a paper towel under the chicken to absorb moisture. - This helps keep the chicken from getting soggy. Prepare your chicken parmesan ahead for quick meals: - Bread the chicken and store it in the fridge. - Cook the chicken when you are ready to eat. - You can also freeze the breaded chicken. - Just thaw it in the fridge overnight before cooking. - Pair with cooked pasta or a salad for easy meals. - This makes lunch or dinner prep simple and quick. Cooking time depends on the chicken's thickness and the air fryer model. For a standard ½ inch thick chicken breast, it takes about 15 minutes total. Start with 10 minutes on one side, then flip and cook for another 5. Always check that the internal temperature reaches 165°F (75°C) for safety. Yes, you can use frozen chicken breasts. However, they will need extra time. Cook them for about 25-30 minutes. Start at the same 380°F (193°C). Flip them halfway to ensure even cooking. Check the temperature again to be sure they reach 165°F (75°C). Chicken Parmesan pairs well with many sides. Here are some great options: - Spaghetti or zucchini noodles - Garlic bread - A fresh green salad - Steamed vegetables like broccoli or asparagus - A simple side of marinara sauce for dipping These sides help round out your meal and add color to your plate. Enjoy! This post covered a simple way to make Chicken Parmesan in an air fryer. You learned about key ingredients like chicken, breadcrumbs, and seasonings. I shared steps for preparing, breading, and cooking the chicken. Tips helped you achieve that perfect crispy texture. You can also explore variations and storage tips to keep meals fresh. Enjoy this tasty dish and try different flavors to make it your own. Your kitchen adventures can be fun and rewarding with this easy recipe!

Air Fryer Chicken Parmesan Crunchy and Flavorful Dish

Looking for a tasty, crunchy meal that’s quick to make? Let me introduce you to Air Fryer Chicken Parmesan! This

Older posts
Newer posts
← Previous Page1 … Page4 Page5 Page6 … Page84 Next →

dsad

© 2026 Home Cooking Style • Built with GeneratePress

Our Policies

  • Copyright Policy
  • Cookie Policy
  • GDPR Policy
  • Privacy Policy
  • Disclaimer
  • Terms Of Use

More Information

  • Home
  • About
  • Contact
  • Appetizers
  • Dessert
  • Dinner
  • Drinks
©2026, Home Cooking Style About Back To Top