Skip to content
DisclaimerTerms Of UseGDPR PolicyCookie Policy

Home Cooking Style

  • Home
  • Drinks
  • Appetizers
  • Dinner
  • Dessert
  • About
  • Contact
  • Privacy Policy
DisclaimerTerms Of UseGDPR PolicyCookie Policy

NO-ING-IMG

To make teriyaki glazed turkey meatballs, you need a few key items. Here’s what you’ll need: - 1 lb ground turkey - 1/4 cup breadcrumbs (preferably panko) - 1/4 cup green onions, finely chopped - 1 egg, lightly beaten - 2 cloves garlic, minced - 1 tablespoon fresh ginger, minced - 1 tablespoon soy sauce (low sodium) - 1 teaspoon sesame oil - Salt and pepper to taste - 1/2 cup teriyaki sauce (store-bought or homemade) These ingredients work together to create a juicy and flavorful meatball that shines. The ground turkey is lean and absorbs flavors well, while the breadcrumbs add a nice texture. Garnishes can elevate your dish. Here are some great options: - Sesame seeds for garnish - Additional green onions for garnish A sprinkle of sesame seeds adds a nice crunch. Chopped green onions bring fresh taste and color. You may need alternatives for some ingredients. Here are my suggestions: - Ground turkey: Use ground chicken or lean beef if you prefer. - Panko breadcrumbs: Regular breadcrumbs work too, but panko gives a better crunch. - Soy sauce: Coconut aminos can replace soy sauce for a gluten-free option. - Sesame oil: Olive oil or avocado oil can work if you don’t have sesame oil. These swaps keep the recipe flexible while still making tasty meatballs. Enjoy cooking! {{ingredient_image_1}} First, gather your ingredients. You need: - 1 lb ground turkey - 1/4 cup breadcrumbs (preferably panko) - 1/4 cup green onions, finely chopped - 1 egg, lightly beaten - 2 cloves garlic, minced - 1 tablespoon fresh ginger, minced - 1 tablespoon soy sauce (low sodium) - 1 teaspoon sesame oil - Salt and pepper to taste Start by preheating your oven to 400°F (200°C). This makes sure your meatballs cook well. Line a baking sheet with parchment paper or grease it lightly. In a large bowl, mix the ground turkey, breadcrumbs, green onions, beaten egg, garlic, ginger, soy sauce, sesame oil, salt, and pepper. Use your hands or a spoon to combine everything gently. Don’t overmix; it makes the meatballs tough. Next, shape the mixture into meatballs. Aim for about 1 inch in diameter. Place each meatball on the prepared baking sheet, leaving space between them. Now, it’s time to bake! Put the baking sheet in the oven. Bake the meatballs for 15 to 20 minutes. They should turn golden brown and be fully cooked. The internal temperature must reach 165°F (75°C) to be safe. While the meatballs bake, let’s make the sauce. In a small saucepan, heat 1/2 cup teriyaki sauce over medium heat. Stir it until it simmers. This takes about 3 to 5 minutes. If you want a thicker sauce, mix a teaspoon of cornstarch with a tablespoon of water. Add it to the sauce and stir until it thickens. Once the meatballs are ready, carefully transfer them to a large bowl. Pour the warm teriyaki sauce over the meatballs. Toss them gently in the sauce until fully coated. The sauce adds flavor and makes the meatballs shine! Finally, serve your teriyaki glazed turkey meatballs warm. You can garnish with sesame seeds and more chopped green onions for a nice touch. Enjoy! To get the best meatball texture, start with ground turkey. It is lean, so it needs some help to stay moist. Always mix the meat gently. Too much mixing makes them tough. Use breadcrumbs to help hold them together. Panko breadcrumbs work best. They add a nice crunch. Don't forget the egg; it binds everything well. Aim for meatballs that are about one inch wide. This size cooks evenly and stays juicy. Marinades boost the flavor of your meatballs. Use soy sauce, ginger, and sesame oil in the mix. They add depth and richness. You can marinate the meat mixture for a bit before cooking. Even thirty minutes can make a difference. If you want to add more flavor, try a splash of teriyaki sauce in the meat mixture. This step really amps up the taste. Sauce consistency is key for great teriyaki meatballs. You want it thick enough to coat the meatballs well. Start with store-bought or homemade teriyaki sauce. Heat it in a pan until it simmers. If it’s too thin, add cornstarch mixed with water. Just a teaspoon should do. Let it cook for a few minutes to thicken. The sauce should cling to the meatballs, making every bite flavorful. Pro Tips Use Panko for Extra Crunch: Panko breadcrumbs provide a lighter, crispier texture compared to regular breadcrumbs, making your meatballs even more delicious. Don’t Overmix: When combining ingredients, mix until just combined to keep your meatballs tender. Overworking the meat can lead to a tough texture. Check Internal Temperature: Ensure your meatballs reach an internal temperature of 165°F (75°C) for safety and optimal juiciness. Customize the Sauce: Feel free to add your favorite spices or a splash of rice vinegar to the teriyaki sauce for a personalized flavor boost. {{image_2}} You can swap the ground turkey for other meats. Ground chicken works well. Lean beef or pork is also a great choice. Each option brings a unique taste. Adjust cooking times if needed. For a vegetarian twist, use plant-based meat. These products mimic ground meat's flavor and texture. Just follow the same steps in the recipe. This option is tasty and suitable for everyone. You can change the flavor of your teriyaki meatballs. To make them sweeter, add more teriyaki sauce. For a spicy kick, mix in some chili paste or red pepper flakes. Experimenting with flavors makes cooking fun! To keep your teriyaki glazed turkey meatballs fresh, place them in an airtight container. Make sure they cool to room temperature first. You can store them in the fridge for up to three days. This way, they stay tasty and safe to eat. If you want to keep the meatballs longer, freezing is a great option. Place the cooled meatballs in a freezer-safe bag or container. Separate layers with parchment paper to prevent sticking. They can last up to three months in the freezer. When you’re ready, just thaw them in the fridge overnight. Reheating is simple. You can use the microwave for quick warmth. Place the meatballs on a plate, cover them with a damp paper towel, and heat for 1-2 minutes. If you prefer, you can reheat them in the oven. Set the oven to 350°F (175°C) and heat for about 10-15 minutes. This way, they stay juicy and delicious. Yes, you can prepare the meatballs ahead. Make the meatballs, then store them in the fridge. Keep them in an airtight container. You can also freeze them for later use. Just thaw them overnight in the fridge before cooking. This way, you save time and enjoy them fresh. Teriyaki glazed turkey meatballs pair well with many sides. Here are some ideas: - Steamed rice - Quinoa - Stir-fried vegetables - Noodles - A fresh salad These sides add color and texture to your meal, making it more enjoyable. To check if the meatballs are done, use a meat thermometer. The internal temperature should reach 165°F (75°C). If you don’t have a thermometer, cut one open. The meat should be no longer pink inside. This ensures your meatballs are safe to eat and fully cooked. You now know how to make teriyaki glazed turkey meatballs. We covered the main ingredients, options for garnishes, and substitutions too. I shared steps to prepare, bake, and combine the meatballs with sauce. You learned tips to get the right texture and flavor. We also explored fun variations, storage tips, and answered common questions. Try these meatballs for dinner. They're tasty, easy, and sure to impress!

Teriyaki Glazed Turkey Meatballs Flavorful and Easy Recipe

If you’re looking for a dish that’s both savory and simple, you’ve found it! My Teriyaki Glazed Turkey Meatballs are

- 1 package (15.25 oz) Oreo cookies - 8 oz cream cheese, softened - 1/2 teaspoon mint extract - 8 oz dark chocolate, chopped - 1/2 cup crushed mint chocolate candies - Sea salt (optional, for garnish) To make these Chocolate Mint Oreo Truffles, gather all your ingredients first. The Oreo cookies are the star here, giving a rich, sweet base. Next, you need softened cream cheese, which adds creaminess and binds everything together. The mint extract gives a fresh burst of flavor that pairs perfectly with chocolate. You will also need dark chocolate for coating. I love using good-quality dark chocolate to get a smooth finish. Lastly, crushed mint chocolate candies add a fun crunch and extra minty flavor. If you want a touch of saltiness, sea salt makes a lovely garnish. Having everything ready helps you work faster and keeps things neat. Trust me, these truffles are so easy to make, and you’ll love how they come together! {{ingredient_image_1}} First, we begin by crushing the Oreo cookies. You can use a food processor for this. Just pulse the cookies until they turn into fine crumbs. If you don’t have a processor, you can place the cookies in a bag and crush them with a rolling pin. Next, we mix the crushed cookies with softened cream cheese and mint extract. In a large bowl, add the Oreo crumbs, cream cheese, and mint extract. Use a spatula or your hands to blend everything together. The goal is to make a thick, moldable mixture. Once your mixture is ready, it’s time to form the truffles. Scoop out tablespoon-sized portions. Roll each portion into a ball shape using your hands. Place the rolled truffles on a baking sheet lined with parchment paper. This keeps them from sticking. Now, we move on to coating the truffles. First, we need to melt the dark chocolate. Use a microwave-safe bowl and heat the chocolate in 30-second intervals. Stir the chocolate between each interval until it is smooth. After the chocolate melts, take the truffles out of the freezer. Using a fork or dipping tool, dip each truffle into the melted chocolate. Shake off any extra chocolate to avoid a thick coating. Before the chocolate hardens, sprinkle the tops with crushed mint chocolate candies. This adds a nice crunch and extra minty flavor. Finally, let the truffles set on the baking sheet until the chocolate hardens. For a quicker set, place them in the fridge for about 10-15 minutes. If you like, you can sprinkle a pinch of sea salt on top for a sweet and salty taste. To make sure the mixture is moldable, use softened cream cheese. It blends better with Oreo crumbs. You want a thick, smooth texture that holds its shape. If it feels too dry, add a tiny bit more cream cheese. If it’s too wet, add more Oreo crumbs. Melting chocolate can be tricky. Heat your chocolate in short bursts, about 30 seconds at a time. Stir it after each interval. This helps avoid burning. When it’s smooth, it’s ready for dipping. For a flavor boost, try using different chocolate types. Milk chocolate gives a sweet twist, while white chocolate adds creaminess. You can even mix dark and milk chocolate for a balanced taste. Toppings can elevate your truffles. Consider adding crushed nuts or sprinkles for crunch. You could also use a drizzle of colored chocolate for a fun look. If you want more mint, add mint extract to the melted chocolate. Pro Tips Use room temperature cream cheese: This will ensure that the mixture combines smoothly without lumps, making it easier to roll into truffles. Experiment with chocolate types: While dark chocolate gives a rich flavor, you can try milk or white chocolate for a different taste profile. Chill the truffles properly: Freezing the truffles before dipping helps them hold their shape and prevents them from melting in the warm chocolate. Store in the fridge: Keep the truffles in an airtight container in the refrigerator to maintain their freshness and flavor for longer. {{image_2}} You can make these truffles even more fun by using flavored Oreos. Try a peanut butter or birthday cake Oreo for a tasty twist. The flavor can change the whole vibe of your truffles. You can also experiment with extracts. For example, add vanilla or almond extract to boost the taste. A little goes a long way, so start with just a few drops. This small change can create a whole new flavor experience. If you need a gluten-free option, use gluten-free Oreos. They taste just as great and will keep your truffles safe for those with gluten allergies. Always check labels to ensure all ingredients meet your needs. For a vegan version, swap the cream cheese for a plant-based cream cheese. You can also use dairy-free chocolate. This way, everyone can enjoy these sweet treats without worry. To keep your Chocolate Mint Oreo Truffles fresh, store them in an airtight container. You can place the container in the fridge or freezer. The fridge is great for short-term storage. Truffles last about one week when kept in the fridge. If you want them to last longer, freeze them. In the freezer, they stay good for up to three months. If your truffles are too hard after freezing, let them sit at room temperature. This makes them easier to eat. It may take about 15 minutes for them to soften. To keep the chocolate coating nice, avoid using a microwave to reheat them. Instead, gently warm them by leaving them out or using a warm water bath. This method helps maintain their beautiful look while making them soft and tasty. Can I use milk chocolate instead of dark? Yes, you can use milk chocolate. It will give the truffles a sweeter taste. Dark chocolate adds a richer flavor, but milk chocolate pairs well too. How long do Chocolate Mint Oreo Truffles last? These truffles last about one week in the fridge. Keep them in an airtight container. They stay fresh longer if you freeze them. Can I freeze these truffles for later use? Absolutely! You can freeze the truffles for up to three months. Just make sure they are in a sealed container. Let them thaw in the fridge before serving. What can I substitute for cream cheese in this recipe? You can use Greek yogurt or vegan cream cheese. Both options will change the flavor slightly but still work well. In this article, we covered how to make delicious Chocolate Mint Oreo Truffles. You learned about the key ingredients, from Oreo cookies to mint extract, and followed the simple steps to create these treats. I shared tips for perfect texture and flavor enhancements, as well as dietary modifications. Remember, these truffles can be customized based on your taste. Store them properly to keep them fresh. With a few easy changes, you can enjoy a tasty dessert anytime. Now, get in the kitchen and have fun making your own truffles!

Chocolate Mint Oreo Truffles Irresistible No-Bake Treat

Are you ready to delight your taste buds with a simple, no-bake treat? These Chocolate Mint Oreo Truffles are perfect

To make Pineapple Cilantro Lime Rice, you will need: - 1 cup jasmine rice - 2 cups vegetable broth (or water) - 1 cup fresh pineapple, diced - 1/4 cup fresh cilantro, chopped - Zest and juice of 2 limes - 1 tablespoon coconut oil (or any oil) - 1/2 teaspoon salt (adjust to taste) - 1/4 teaspoon black pepper - 1/4 teaspoon red pepper flakes (optional, for a bit of heat) Each ingredient plays a key role in making this dish bright and tasty. The jasmine rice gives a nice, soft texture. The pineapple adds sweetness, while cilantro gives a fresh taste. Lime juice and zest bring a zesty kick. You can add a few optional ingredients to enhance the flavor: - 1/4 cup chopped green onions - 1/4 cup diced red bell pepper - 1/2 teaspoon garlic powder These ingredients can add more color and depth to your rice. Green onions provide a mild onion flavor. Diced red bell pepper adds sweetness and crunch. Garlic powder brings a nice, savory note. If you need to substitute some ingredients, here are a few ideas: - Use brown rice instead of jasmine rice for more fiber. - Swap vegetable broth with chicken broth for a non-vegetarian option. - Use lime juice from a bottle if fresh limes are not available. These substitutions can keep the dish delicious while fitting your pantry. You can mix and match based on what you have at home. This flexibility makes the dish easier to prepare. {{ingredient_image_1}} First, you need to rinse the jasmine rice. This removes extra starch that can make the rice sticky. Place the rice in a fine mesh strainer and run cold water over it until the water runs clear. After rinsing, let the rice drain well. Next, heat a medium saucepan over medium heat. Add 1 tablespoon of coconut oil to the pan. Once the oil is warm, add the rinsed rice. Toast the rice for about 2-3 minutes. Stir often until you smell a nice nutty scent. Now, pour in 2 cups of vegetable broth or water and add 1/2 teaspoon of salt. Bring this mixture to a boil. When it boils, reduce the heat to low. Cover the pan and let it cook for 15 minutes. After that time, the rice should be tender, and all the liquid will be gone. Once done, take the pan off the heat. Keep it covered for 5 more minutes. Fluff the rice gently with a fork. Now for the fun part! In a large bowl, combine the fluffed rice with 1 cup of diced pineapple, 1/4 cup of chopped cilantro, and the zest and juice of 2 limes. Add 1/4 teaspoon of black pepper and, if you like some spice, 1/4 teaspoon of red pepper flakes. Mix everything gently until well combined. Taste the rice and see if it needs more lime juice or salt. Adjust to your liking. Enjoy the fresh flavors! Toasting rice brings out its best flavor. Start by rinsing the jasmine rice well. This removes excess starch. After rinsing, heat coconut oil in a pan. Add the rice to the hot oil. Stir it for 2-3 minutes until it smells great. This step makes the rice nutty and aromatic. You will love the depth of flavor this adds. If you want a little kick, add red pepper flakes. Start with just a pinch. This spice can enhance the dish without overpowering it. If you like it spicy, add more to your taste. Remember, the goal is to balance flavors. The heat pairs well with sweet pineapple and fresh lime. Fluffing rice is key to a perfect texture. After cooking, let it sit covered for 5 minutes. This allows the moisture to settle. Then, use a fork to fluff the rice gently. Avoid using a spoon, as it can make the rice mushy. Fluffing helps separate the grains, making the rice light and fluffy. Enjoy this simple trick for a better dish! Pro Tips Rinse the Rice: Rinsing the rice removes excess starch, which helps prevent it from becoming sticky during cooking. Toasting the Rice: Toasting the rice in oil before adding the liquid enhances its flavor and adds a delightful nuttiness. Fresh Ingredients: Use fresh pineapple and cilantro for the best flavor. Canned pineapple can be used, but fresh adds a bright and vibrant taste. Adjusting Heat: If you prefer a spicier dish, feel free to increase the amount of red pepper flakes or even add diced jalapeños. {{image_2}} You can make this dish even more vibrant by adding fruits. Try mango or papaya. Both fruits pair perfectly with the pineapple. Their sweetness adds a nice contrast to the lime. Simply chop them up and mix them in with the rice. You can use 1 cup of diced fruit for a fruity twist. This recipe is already vegan and gluten-free. To keep it that way, use vegetable broth or water. Check labels on the broth to ensure no gluten sneaks in. If you want to add protein, consider adding black beans or chickpeas. They add texture and keep the dish filling. Pineapple cilantro lime rice is great for many meals. Serve it as a side dish with grilled chicken or fish. It also works well at summer picnics or barbecues. For a fun twist, use it as a filling in tacos or burritos. Garnish with extra cilantro and lime wedges for a fresh touch. To store leftover rice, let it cool down first. Place it in an airtight container. Make sure to keep it in the fridge. It will last for up to 4 days. For best taste, eat it within 2 days. If you notice any odd smells or colors, throw it away. Freezing this rice is easy. First, let it cool completely. Then, scoop it into freezer-safe bags. Flatten the bags to save space. Label each bag with the date. You can freeze it for up to 3 months. When you’re ready to eat, just thaw it in the fridge overnight. To reheat the rice, use the microwave or a pan. If using a microwave, add a splash of water. Cover the bowl to keep moisture in. Heat for 1-2 minutes, stirring halfway. In a pan, use low heat and stir often. This helps keep the rice fluffy and tasty. Yes, you can use other rice types. Brown rice or basmati rice would work well. Just remember, they cook differently. For brown rice, use more water and a longer cooking time. Basmati rice needs less water and cooks faster. Rinse all rice types before cooking to remove excess starch. To add heat, use red pepper flakes. Start with half a teaspoon and taste. You can also add fresh jalapeños or diced serrano peppers. If you want a smoky flavor, try adding chipotle powder. Mix these spicy ingredients in with the pineapple and cilantro for even flavor. This rice goes well with many meals. It pairs great with grilled chicken, shrimp, or fish. You can serve it with tacos or burritos too. For a vegetarian option, try it with black beans or roasted veggies. Adding this rice to your plate brings a refreshing twist. This post covered the key aspects of making Pineapple Cilantro Lime Rice. We went over ingredients, step-by-step cooking instructions, and useful tips. You learned about flavor variations and how to store leftovers. Cooking doesn't have to be hard. With these steps, you can create a tasty dish. Enjoy trying new flavors and don't be afraid to experiment. Happy cooking!

Pineapple Cilantro Lime Rice Flavorful and Easy Recipe

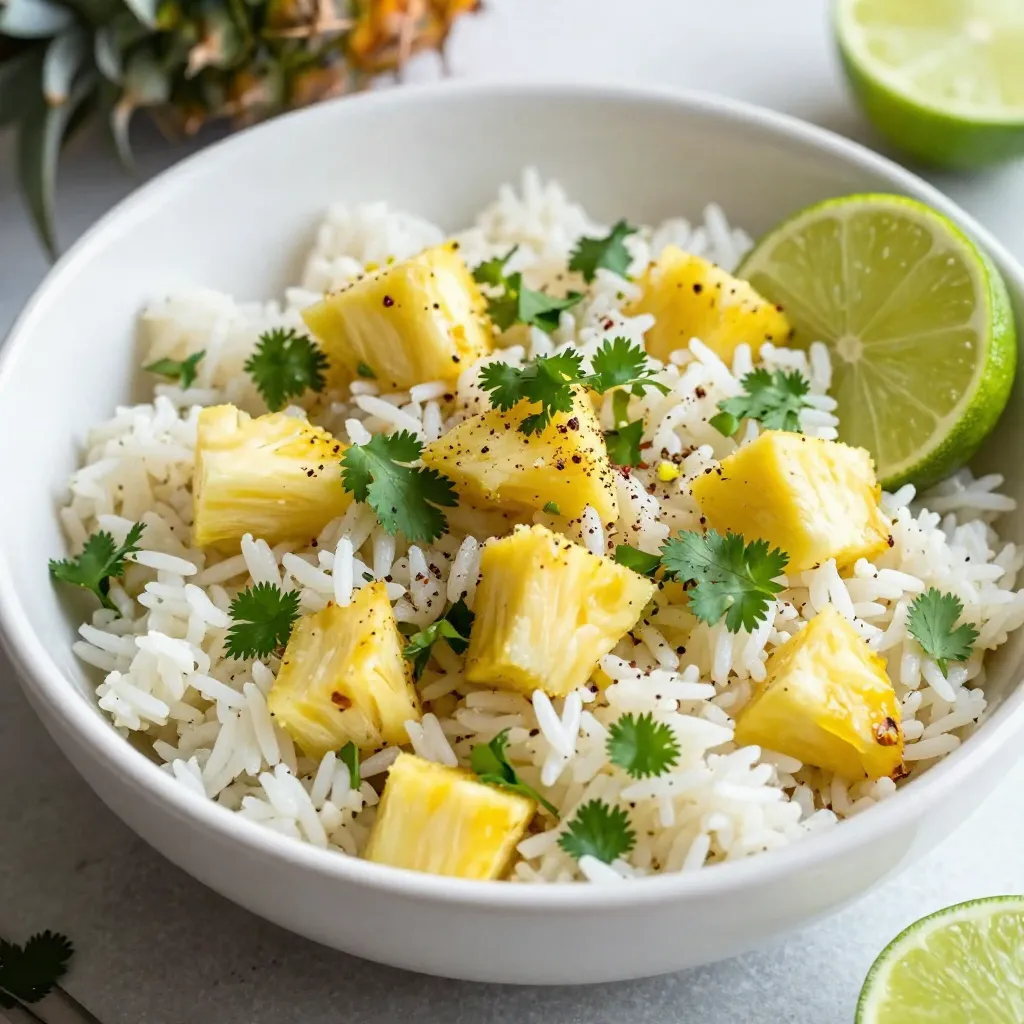
Want a quick and tasty side dish? Pineapple Cilantro Lime Rice is the answer. This flavor-packed recipe is perfect for

- 2 cups fresh strawberries, hulled and chopped - 1/4 cup honey or maple syrup - 1/4 cup coconut milk - 3 tablespoons chia seeds - 1 teaspoon vanilla extract - A pinch of salt You can adjust the sweetness by using more or less honey or maple syrup. If you prefer a less sweet jam, start with 2 tablespoons of sweetener and taste as you go. This flexibility helps you find your perfect balance. {{ingredient_image_1}} Start with fresh strawberries. Hull and chop them into small pieces. In a medium saucepan, add the strawberries and your choice of sweetener—honey or maple syrup. Cook this mixture over medium heat. Stir it occasionally for about 5 to 7 minutes. The strawberries will soften and break down. You will start to smell a sweet aroma as they cook. After cooking, remove the saucepan from the heat. Let the strawberry mix cool for about 5 minutes. Now it’s time to mash! You can use a fork or a potato masher for this. Mash until you reach your desired texture. You can keep it chunky or make it smooth, depending on your taste. Once mashed, stir in the coconut milk. Next, add the chia seeds, vanilla extract, and a pinch of salt. Mix everything together well. The chia seeds are key as they will help thicken the jam. The coconut milk adds a creamy flavor that pairs well with strawberries. Now, transfer the mixture to a glass jar or container with a lid. Let it set! You can leave it at room temperature for about 1 to 2 hours. If you prefer, refrigerate it for about 30 minutes. The chia seeds will expand and thicken the jam during this time. When ready, stir the jam again. You can adjust the sweetness if needed by adding more honey or syrup. You can easily change the sweetness of your jam. Start with 1/4 cup of honey or maple syrup. After cooking, taste the jam. If it’s not sweet enough, add more. You can mix in a little at a time. This way, you find the right level for you. Remember, natural sweetness from strawberries also plays a role. So, adjust based on your taste. Getting the right texture is key for a great chia jam. If you like chunks, mash the strawberries lightly. Use a fork or potato masher to break them down. For a smooth jam, mash them more. Stir in the chia seeds after mashing. They will thicken your jam as it sets. Let it rest to reach your preferred consistency. Serving your jam nicely makes it even more fun. Use a small glass jar to show off your creation. Add a sprig of mint on top for color. Place a few whole strawberries beside the jar. This makes it look fresh and inviting. It’s perfect for breakfast or snacks. Enjoy it on toast or yogurt for a tasty treat. Pro Tips Freshness Matters: Use ripe strawberries for the best flavor. The sweeter and more fragrant the strawberries, the better your jam will taste. Adjusting Sweetness: Taste the mixture before setting it. You can always add more honey or maple syrup to achieve your desired sweetness level. Chia Seed Magic: Let the jam sit for at least 1-2 hours to allow the chia seeds to absorb moisture and thicken the mixture effectively. Creative Variations: Experiment with adding other fruits like blueberries or raspberries for a mixed berry jam variation that’s equally delicious. {{image_2}} You can make this jam even more fun by adding other fruits or spices. Try mixing in some ripe bananas or diced mango for a tropical twist. If you like a bit of spice, add a dash of cinnamon or a hint of ginger. These flavors all blend well with strawberries and coconut. Experiment to find your favorite mix! If you want a sugar-free version, you can use natural sweeteners like stevia or erythritol. These options keep the jam sweet without the added sugar. Adjust the amount based on your taste. Just remember that some sweeteners can be much sweeter than regular sugar, so start small. This jam is easy to make vegan. Just use maple syrup instead of honey. For a creamy touch, you can swap coconut milk for almond milk or oat milk. Both options will still give you a tasty treat. This way, everyone can enjoy your Strawberry Coconut Chia Jam! To keep your Strawberry Coconut Chia Jam fresh, store it in a clean glass jar. Use a jar with a tight lid to seal in flavor. Place the jar in the fridge right after making it. This will help maintain its taste and texture. Make sure to use a clean spoon each time you scoop out some jam. This keeps the jam free from germs and bacteria. Your jam will last about one week in the fridge. After that, it may lose flavor and texture. If you notice any off smells or changes in color, it’s best to toss it out. Always check your jam before using it. It's good to remember that chia seeds can change the texture as they absorb moisture. You can freeze Strawberry Coconut Chia Jam for longer storage. Use an airtight container or freezer-safe bag. Leave some space at the top of the container. This allows for expansion as the jam freezes. To thaw, move it to the fridge overnight. You can also leave it at room temperature for a few hours. Once thawed, give it a good stir before using. Strawberry Coconut Chia Jam lasts about one week in the fridge. Store it in a clean glass jar with a lid. Make sure to keep it cool and sealed. This way, you can enjoy its fresh taste for days. Yes, you can use frozen strawberries! Just thaw them first and drain any excess juice. This helps keep the jam from being too watery. Frozen fruit can be just as tasty as fresh, so don’t worry! Chia seeds are tiny powerhouses! They are rich in fiber, protein, and omega-3 fatty acids. Eating chia seeds can help with digestion and heart health. They also keep you feeling full longer, which is great for snacking. You can serve this jam in many ways! Spread it on toast or mix it into yogurt. It also works well as a topping for pancakes or waffles. For a fun twist, try it with cheese on a cracker. Enjoy your tasty creations! In this blog post, we explored the simple process of making Strawberry Coconut Chia Jam. We covered the key ingredients, from strawberries to coconut milk, and discussed how to prepare and mix them. You learned tips for customizing sweetness and achieving your desired texture. We also shared how to store your jam for the best flavor. Remember, this jam is versatile and can fit many diets. Enjoy making your own fresh jam, and have fun adding your favorite flavors along the way.

Strawberry Coconut Chia Jam Tasty and Healthy Spread

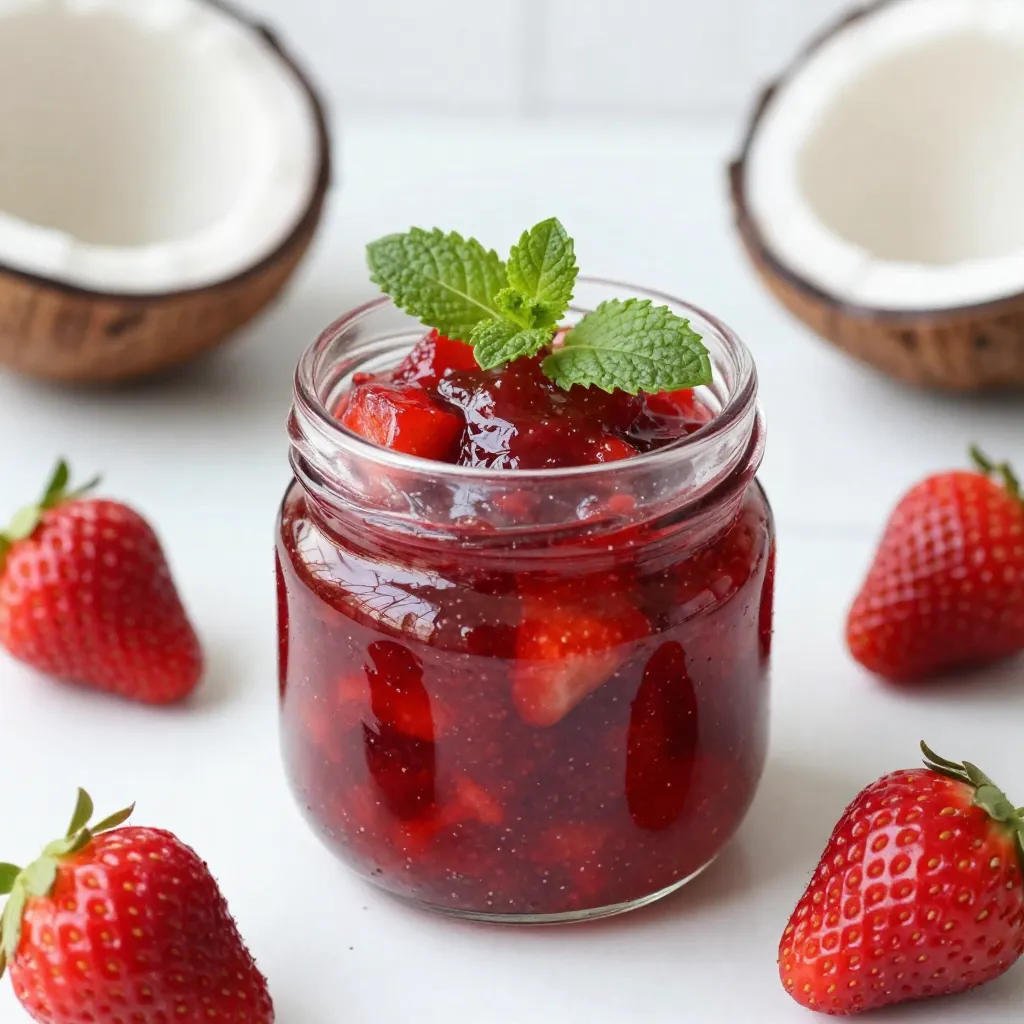
Are you looking for a delicious and healthy spread? Strawberry Coconut Chia Jam is the perfect choice! With fresh strawberries,

To make Strawberry Basil Water, gather these fresh and simple ingredients: - 2 cups fresh strawberries, hulled and sliced - 1 cup fresh basil leaves, gently torn - 4 cups filtered water - 1 tablespoon honey or agave syrup (optional) - Ice cubes Each ingredient plays a key role. Strawberries add a sweet and fruity flavor. Basil brings a fresh herbal note that pairs beautifully with the fruit. The filtered water helps blend all these tastes. If you want extra sweetness, honey or agave syrup works well. Ice cubes keep the drink chilly and refreshing. When selecting strawberries, pick ones that are bright red and firm. For basil, look for vibrant green leaves. Fresh ingredients ensure your drink tastes its best. These simple choices elevate your summer drink, making it a delight to sip on hot days. {{ingredient_image_1}} - First, take 2 cups of fresh strawberries. Hull and slice them. - Next, use 1 cup of fresh basil leaves. Tear them gently to release oils. - In a large pitcher, combine the strawberries and basil. - Using a wooden spoon, muddle the ingredients. This helps to release the flavors. - Now, add 4 cups of filtered water to the pitcher. Mix well to combine. - If you want, add 1 tablespoon of honey or agave syrup. Stir again to blend. - Cover the pitcher with a lid or plastic wrap. - Place it in the refrigerator. This helps the flavors mix well. - Let it infuse for at least 1 to 2 hours. The longer it sits, the better it tastes. - When ready to serve, fill a glass with ice cubes. - Pour the chilled Strawberry Basil Water over the ice. - For a nice touch, garnish with extra strawberry slices and torn basil leaves. For the best flavor, aim for 1-2 hours of infusion time. This lets the strawberries and basil mix well. If you want a stronger taste, you can infuse for up to 4 hours. But don’t go over that. The flavors may become too strong. To release the best flavors, use a wooden spoon. Press gently on the strawberries and basil. Twist the spoon lightly to mix the ingredients. This method helps blend the oils from the basil with the juices from the strawberries. Avoid crushing them too much; you want the pieces to stay intact. If you do not like honey or agave syrup, try these sweeteners: - Maple syrup - Stevia - Coconut sugar - Simple syrup Each adds a different taste. Adjust the amount based on your sweetness preference. Start small and taste as you go. Pro Tips Choose Ripe Strawberries: Look for strawberries that are bright red and firm to ensure the best flavor and sweetness. Fresh Basil is Key: Use fresh basil leaves rather than dried for a more vibrant and aromatic infusion. Infusion Time: Allow the mixture to infuse for at least 2 hours, but overnight in the refrigerator will intensify the flavors. Adjust Sweetness: Taste the water before serving; you can always add more honey or agave syrup to customize the sweetness to your liking. {{image_2}} You can add other fruits to your strawberry basil water. Try fresh oranges or lemons for a bright twist. You can also mix in some juicy peaches or tart raspberries. These fruits make great flavor pairs. Citrus fruits like lime and grapefruit give a nice zing. Each fruit brings its unique taste and boosts the drink's freshness. If you want to switch things up, try using different herbs. Mint gives a cool twist, while rosemary adds a bold flavor. You can also use thyme for a savory note. Each herb brings a new vibe to your drink. Experiment to find your favorite mix! You can change this drink for different seasons. In winter, add warm spices like cinnamon or ginger for a cozy drink. In spring, try adding fresh herbs like cilantro for a fresh kick. Summer calls for vibrant fruits like watermelon. In fall, mix in apples for a crisp taste. Adjust the recipe to fit your mood and the weather! To store infused water, use a clean pitcher. Cover it tightly with a lid or plastic wrap. This keeps the flavors fresh and prevents other smells from getting in. Always keep it in the fridge. It’s best to serve it cold. Strawberry basil water stays fresh for about 2 to 3 days. After that, the flavors start to fade. If you notice the water looking cloudy, it’s time to toss it. Always check for any signs of spoilage before drinking. You can reuse strawberries and basil, but the flavor weakens. If you want a mild taste, feel free to use them again. Just remember, they won’t be as strong or fresh as the first batch. If you want the best flavor, use fresh ingredients every time. I recommend infusing Strawberry Basil Water for at least 1-2 hours. This time lets the flavors blend well. You can go longer if you want a stronger taste. Just remember, too long may make it bitter. Yes, you can use frozen strawberries. They work well in this drink. However, using fresh strawberries gives a brighter flavor. Frozen ones may also make the water colder faster. Just be sure to thaw them a bit before using. You can find pre-made Strawberry Basil Water in some grocery stores. Check the beverage aisle or the health section. Many health food stores also sell it. If you don't find it, consider making your own. It's easy and fun! In this blog post, I shared how to make delicious Strawberry Basil Water. We covered the ingredients needed, easy preparation steps, and infusion tips. You learned about variations, storage, and the best practices to keep your drink fresh. Now you can enjoy a refreshing drink at home. Mix fresh flavors and stay hydrated. Experiment with fruits and herbs for fun twists. Enjoy your tasty creation!

Strawberry Basil Water Refreshing Summer Drink Recipe

Looking for a refreshing drink to beat the summer heat? Look no further! My Strawberry Basil Water recipe combines sweet

- 2 large chicken breasts - 1 cup crushed pretzel nuggets or sticks - 1/2 cup all-purpose flour - 1 tablespoon Dijon mustard - 1 teaspoon garlic powder - 1 teaspoon paprika - 1/2 teaspoon black pepper - Salt to taste - 1 tablespoon olive oil - 1 tablespoon honey (for drizzling) - Fresh parsley, chopped (for garnish) Gathering the right ingredients makes all the difference. Start with two large chicken breasts. These will serve as our protein base. Next, we need one cup of crushed pretzel nuggets or sticks. They give our chicken that delightfully crunchy crust. Then, grab half a cup of all-purpose flour. This helps the coating stick. We can’t forget the seasonings! We’ll use one tablespoon of Dijon mustard. This adds a nice tang. One teaspoon of garlic powder gives it depth. Paprika adds warmth and rich color. You’ll also need half a teaspoon of black pepper and some salt to taste. For optional garnishes, have olive oil on hand. It helps with browning. A drizzle of honey brings out the flavors. Finally, fresh parsley adds a pop of color on top. Now you're ready to create a crispy meal everyone will love! {{ingredient_image_1}} 1. Preheat the oven and prepare the baking sheet Set your oven to 400°F (200°C). Line a baking sheet with parchment paper. This makes cleanup easy. 2. Tenderizing the chicken breasts Take the large chicken breasts and gently pound them with a meat mallet. This helps cook them evenly and keeps them juicy. 1. Dredging in flour mixture In a shallow dish, mix flour, garlic powder, paprika, black pepper, and salt. Take one chicken breast and coat it in this flour mixture. Make sure to cover all sides well. 2. Dipping in egg mixture In another dish, whisk two eggs with Dijon mustard. Dip the floured chicken in this mixture. Let any extra egg drip off. 3. Pressing into pretzel crumbs Place crushed pretzel nuggets or sticks in a third shallow dish. Roll the chicken in the pretzel crumbs until fully coated. Press gently to make them stick. 1. Baking time and temperature Place the coated chicken on the prepared baking sheet. Drizzle olive oil over the top. Bake in the oven for about 25-30 minutes. The chicken should be cooked through and the crust golden brown. 2. Tips for achieving crispiness Drizzle a little olive oil to help with browning. For extra crispiness, turn on the broiler for the last few minutes. Just watch closely to avoid burning! To make sure your chicken cooks evenly, tenderize it first. Use a meat mallet to pound the chicken breasts gently. This step helps them cook well and stay juicy. For a crispy crust, here are some tips. First, coat the chicken well with the flour before the egg. Then, press it firmly into the crushed pretzels. This helps the crust stick better. Drizzle olive oil on top before baking. It adds flavor and promotes crispiness. Want to boost the taste? Try adding more seasonings. You can mix in some onion powder or smoked paprika for a twist. Another great idea is to add some cayenne pepper for heat. For sauces, consider honey mustard or a tangy barbecue sauce. You can serve these on the side or drizzle them on top. They add a nice touch to the dish. When handling raw chicken, keep safety in mind. Always wash your hands and tools after touching it. Use separate cutting boards for chicken and other foods to avoid cross-contamination. After cooking, let the chicken cool down for a bit. Store leftovers in an airtight container in the fridge. It stays fresh for about three days. If you want to keep it longer, freeze it for up to three months. Pro Tips Use Fresh Ingredients: Always opt for fresh chicken and high-quality pretzels for the best flavor and texture. Perfecting the Coating: Make sure to press the chicken into the crushed pretzels firmly to ensure an even and thick coating. Resting Time: Allow the chicken to rest after baking; this helps the juices redistribute, keeping the meat tender and juicy. Experiment with Flavors: Feel free to add herbs or spices to the pretzel coating for an extra burst of flavor, such as dried thyme or cayenne pepper. {{image_2}} You can switch up the protein in this recipe. Turkey or pork can work well. Just make sure they are cut to a similar size as chicken breasts. This keeps your cooking time the same. For a vegetarian option, try using eggplant or tofu. Slice them thick enough to hold up to the crust. Both options give a great texture and flavor. Get creative with spices! You can add cayenne for heat or Italian herbs for a twist. Try mixing in some onion powder or smoked paprika for deeper flavor. Another fun idea is to add cheese to the crust. Grated Parmesan or cheddar can give a rich taste. Just mix the cheese in with the crushed pretzels before coating the chicken. This chicken pairs well with many side dishes. Crispy roasted potatoes or a fresh salad work nicely. You can also serve it with steamed veggies for a healthy touch. For plating, slice the chicken and arrange it on a colorful plate. Drizzle some honey on top and sprinkle parsley for a pop of color. This makes the dish look as good as it tastes! After enjoying your pretzel crusted chicken, store any leftovers. Use airtight containers. Glass or plastic containers work well. Make sure they seal tightly to keep the chicken fresh. Refrigeration is the best option for short-term storage. You can keep the chicken in the fridge for up to three days. If you want to store it longer, freezing is a good choice. Wrap the chicken tightly in plastic wrap and then place it in a freezer bag. This way, it can last up to three months. To enjoy your chicken again, reheating properly is key. For oven reheating, preheat your oven to 375°F (190°C). Place the chicken on a baking sheet. Bake for about 15-20 minutes until heated through. This method keeps the coating crispy. If you need a quicker option, use the microwave. Place the chicken on a microwave-safe plate. Heat it for 1-2 minutes. Check that the chicken is hot in the middle. Note that the crust may not stay as crispy in the microwave. How long can you store this chicken? In the refrigerator, it lasts for three days. In the freezer, it can stay fresh for three months. Watch for signs of spoilage. If the chicken has an off smell or changes color, it’s best to throw it away. Always prioritize food safety. To make the chicken extra crispy, follow these tips: - Use olive oil. Drizzle it over the chicken before baking. - Preheat your oven to 400°F (200°C). This helps the crust become crunchy. - Bake on parchment paper or a silicone mat. This prevents sticking and helps with even cooking. - Avoid overcrowding the baking sheet. Leave space around each piece for good air flow. Baking at a high temperature helps the crust turn golden. If you want an even crispier result, you can broil the chicken for the last few minutes. This adds more crunch without overcooking the meat. Yes, you can! Here are some fun options: - Use pretzel sticks, nuggets, or even pretzel chips. Each brings a different crunch. - Try flavored pretzels, like cheese or spicy varieties. This adds a new taste to your chicken. - If you want a gluten-free option, use gluten-free pretzels. They work well too. Feel free to mix and match pretzel types for added texture and flavor! Here are some great side dishes to pair with your pretzel crusted chicken: - French fries: A classic choice that kids love. - Coleslaw: The crunch and creaminess balance the chicken's texture. - Steamed vegetables: Broccoli or green beans add color and nutrients. - Mac and cheese: Creamy and cheesy, this satisfies any comfort food craving. - Potato salad: A nice cold side that works well for gatherings. These sides complement the flavors of the chicken and make your meal complete! In this blog post, we explored the steps to make pretzel-crusted chicken. We covered the key ingredients, essential seasonings, and optional garnishes. I shared clear cooking instructions, tips for a crispy finish, and even some flavorful variations. Remember, you can use different proteins or add your own spices. Don't forget to store leftovers properly and reheat them to keep that crunch. With these tips, you can create a tasty dish that your family will love. Enjoy your cooking adventure and impress everyone with your new skills!

Pretzel Crusted Chicken Delightfully Crispy Meal

Are you ready to take your dinner game up a notch? I’m excited to share my recipe for Pretzel Crusted

- 2 medium acorn squashes - 1 cup quinoa, rinsed - 1 large apple, diced (preferably tart like Granny Smith) Acorn squash serves as a cozy bowl for our filling. The sweet, nutty taste pairs well with the quinoa. I like using tart apples for a bright flavor that balances the dish. - 1/2 cup dried cranberries - 1/2 cup walnuts, chopped - 1 teaspoon cinnamon - 1/2 teaspoon nutmeg Dried cranberries add a tangy sweetness that brings joy to each bite. Walnuts add a nice crunch and rich flavor. Cinnamon and nutmeg warm up the dish, giving it a homey feel. - 2 cups vegetable broth - 1 tablespoon maple syrup - Fresh parsley for garnish Vegetable broth cooks the quinoa to fluffy perfection. Maple syrup adds a touch of sweetness that ties the flavors together. Fresh parsley brightens the dish and adds a pop of color. {{ingredient_image_1}} First, preheat your oven to 400°F (200°C). This step is key for even cooking. While it heats up, grab your acorn squashes. Cut each squash in half lengthwise and scoop out the seeds. This makes room for your tasty filling. Place the halves cut-side up on a baking sheet. Drizzle them lightly with olive oil. Sprinkle salt and pepper on top for flavor. Next, let's cook the quinoa. In a medium pot, bring 2 cups of vegetable broth to a boil. Once boiling, add 1 cup of rinsed quinoa. Cover the pot and reduce the heat to a simmer. Cook for about 15 minutes. The quinoa is done when it’s fluffy, and all the broth is absorbed. In a large bowl, mix your stuffing ingredients. Combine the cooked quinoa, diced apple, dried cranberries, and chopped walnuts. Add 1 teaspoon of cinnamon and 1/2 teaspoon of nutmeg for warmth. A tablespoon of maple syrup adds sweetness. Season with salt and pepper. Mix well until all ingredients are coated. After roasting the acorn squash for 30-35 minutes, it will be tender. Remove it from the oven. Fill each squash half generously with the quinoa stuffing mixture. Return the stuffed squash to the oven. Bake for an additional 10-15 minutes. This helps meld the flavors and brown the tops slightly. When done, garnish with fresh parsley. Serve warm and enjoy your flavorful delight! - Alternatives for quinoa: If you need a substitute, try couscous or brown rice. Both grains provide a similar texture and absorb flavors well. You can also use farro or bulgur for a nutty taste. - Different nuts or fruits: Swap walnuts for pecans or almonds for a new crunch. For fruits, try dried cherries or apricots. They add a sweet twist and pair nicely with the squash. - Tips on roasting acorn squash perfectly: Always cut the acorn squash in half lengthwise. This helps the heat reach the flesh evenly. Drizzle olive oil and add salt for flavor. Roast until tender, about 30 to 35 minutes. You want it soft enough to pierce easily with a fork. - Ensuring quinoa is fluffy: Rinse the quinoa well before cooking. This removes a bitter coating. Use two parts broth to one part quinoa. Bring it to a boil, then cover and reduce heat. Cook until all the broth is absorbed, about 15 minutes. Fluff it with a fork before mixing in other ingredients. - Plating suggestions: Serve the stuffed acorn squash on a large platter for an eye-catching display. For a fun touch, drizzle extra maple syrup over the tops. This adds a glossy finish and extra sweetness. - Garnishing tips: Fresh parsley brightens the dish. Sprinkle it on just before serving for color and flavor. You can also add extra walnuts on top for crunch and a nice contrast to the soft squash. Pro Tips Choose the Right Squash: Opt for medium-sized acorn squashes that feel heavy for their size; this indicates they are fresh and full of flavor. Prep Ahead: You can prepare the quinoa stuffing a day in advance and store it in the refrigerator. Just fill the squash before baking for a quick meal. Adjust Sweetness: Taste the quinoa mixture before stuffing to adjust the sweetness. If you prefer a sweeter dish, add more maple syrup or some brown sugar. Experiment with Nuts: Substitute walnuts with pecans or almonds for a different flavor profile and crunch in your stuffing. {{image_2}} To make this dish vegan, swap out the maple syrup for agave nectar. You can also replace any non-vegan broth with vegetable broth. For a gluten-free option, quinoa is already a great choice. If you prefer, you can use rice or millet instead. Both grains work well and bring a nice texture to the dish. You can change the flavor by adding spices. Try ginger or allspice for something different. Fresh herbs like thyme or rosemary add a nice twist too. If you want to mix up the fruits, consider pears or dried figs. Both will add sweetness and texture. You can also use pecans instead of walnuts for a new crunch. Use seasonal produce to elevate your dish. In the fall, add roasted pumpkin seeds for crunch. In winter, try adding pomegranate seeds for a burst of color. You can adjust the recipe for holidays by using festive spices like cloves or cardamom. This gives your acorn squash a seasonal flair that everyone will enjoy. To keep your stuffed acorn squash fresh, store it in the fridge. Use an airtight container for best results. Place the squash in the container and cover it well. This keeps the flavor in and moisture out. You can store it for up to 4 days. If you want to freeze it, let it cool first. Wrap each half tightly in plastic wrap. Then place them in a freezer bag. This way, you can enjoy this dish later. It can last up to 3 months in the freezer. When it’s time to eat leftovers, reheat them gently. You can use an oven or a microwave. If using an oven, set it to 350°F (175°C). Place the squash on a baking sheet and cover it with foil. Heat for about 15-20 minutes. This keeps the squash soft and warm. For the microwave, place the squash on a plate. Cover it with a damp paper towel. Heat in 1-minute bursts until warm. This helps avoid losing texture. Stuffed acorn squash stays good for about 4 days in the fridge. After that, it may lose flavor. Look for signs that it’s no longer good. If you see mold or an off smell, it’s best to toss it. Always trust your senses when it comes to food safety. You can use several alternative grains. Try brown rice for a hearty texture. Bulgur wheat also works well and cooks fast. If you're looking for gluten-free options, consider using millet or amaranth. These grains absorb flavors nicely and add a different twist to the dish. Yes, you can prep this dish in advance. Cook the quinoa and prepare the stuffing a day prior. Store it in the fridge. You can also roast the acorn squash ahead of time. Just warm it up before filling. This will save you time on busy days. Absolutely! Acorn squashes are low in calories and high in fiber. They are rich in vitamins A and C, which boost your immune system. Their natural sweetness makes them a great addition to meals. Eating acorn squash can support heart health and improve digestion as well. To check doneness, pierce the flesh with a fork. It should feel tender but not mushy. If the fork goes in easily, it's ready. You can also look for a golden-brown color on the skin. This indicates that the squash has cooked well and is full of flavor. The stuffed acorn squash recipe combines hearty ingredients, rich flavors, and easy steps. You learned about main ingredients like acorn squash and quinoa. Flavor enhancers such as cranberries and walnuts bring depth. You discovered tips for presentation and storage, plus variations for dietary needs. In the end, this dish is not just tasty; it's versatile and healthy. Enjoy making this cozy meal for yourself or loved ones!

Cranberry Apple Stuffed Acorn Squash Flavorful Delight

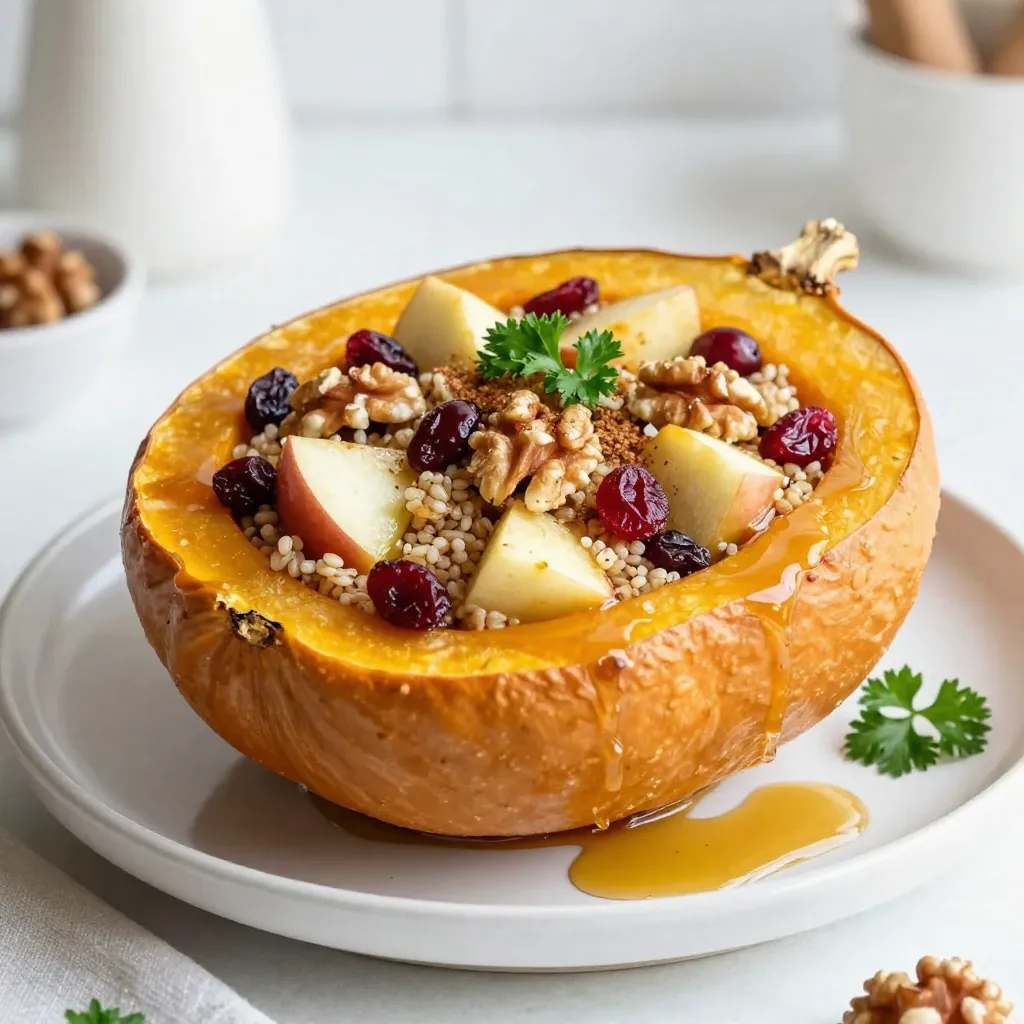
Looking for a healthy, tasty dish that’s easy to make? Try my Cranberry Apple Stuffed Acorn Squash. This delightful meal

To make a tasty Honey Lime Fruit Salad, gather these fresh fruits: - 1 cup strawberries, hulled and sliced - 1 cup blueberries - 1 cup pineapple, diced - 1 cup kiwi, peeled and sliced - 1 banana, sliced These fruits add color and flavor. Strawberries bring sweetness, while blueberries add a burst of juicy goodness. Pineapple gives a tropical feel. Kiwi adds a fun twist. Bananas add creaminess and balance the mix. The dressing is simple yet bright. You will need: - 1/4 cup honey - 2 tablespoons fresh lime juice - 1 tablespoon lime zest The honey adds sweetness. Lime juice gives tanginess. Lime zest boosts the citrus aroma. Together, they create a refreshing dressing that brings all the fruits to life. For a finishing touch, consider these garnishes: - Fresh mint leaves Mint adds a lovely green color and a fresh taste. It makes the salad look pretty and inviting. You can also serve the salad in small bowls or on a large platter for a festive feel. {{ingredient_image_1}} First, gather all your fresh fruit. You will need strawberries, blueberries, pineapple, kiwi, and banana. Start by hulling and slicing the strawberries. Next, wash the blueberries and dice the pineapple into small pieces. Peel the kiwi and cut it into slices. Finally, slice the banana. Place all the fruit into a large mixing bowl. In a separate small bowl, take out your honey. Add the fresh lime juice and lime zest. Whisk these ingredients together until they blend well. The honey will add sweetness, while the lime gives a nice zing. This dressing will enhance the fruit's natural flavors. Now, drizzle the honey-lime dressing over the fruit in the large bowl. Use a spatula or a large spoon to gently toss the fruit. Make sure all the pieces get coated in that delicious dressing. Let the salad sit for about 10 minutes. This waiting time helps the flavors mix together. After that, you can serve the fruit salad in bowls or on a large platter. Don’t forget to garnish with fresh mint leaves for a pop of color! When making honey lime fruit salad, pick ripe and fresh fruits. Look for bright colors and good texture. For strawberries, choose ones that are red and firm. Blueberries should be plump and shiny. Pineapple needs to smell sweet and be slightly soft. Kiwi should feel a bit soft but not mushy. Bananas should be yellow with some spots. Mixing different fruits adds great taste and color. You can make this salad ahead of time. Just prepare the fruit and dressing separately. Store the fruit in an airtight container in the fridge. Keep the honey lime dressing in a small jar. When you are ready to serve, mix them together. This way, the fruit stays fresh and the flavors blend well. You can make it up to a day in advance. Serve the salad in fun bowls or on a big platter. For a special touch, add fresh mint leaves on top. You can also sprinkle some nuts for crunch. This salad is great at parties or for a snack. Pair it with yogurt or granola for a tasty breakfast. Everyone will love this sweet and refreshing treat! Pro Tips Choose Ripe Fruits: Selecting ripe, fresh fruits will enhance the flavor of your salad. Look for vibrant colors and a slight give when gently squeezed. Chill Before Serving: For a refreshing experience, chill the fruit salad in the refrigerator for about 30 minutes before serving. Experiment with Variations: Feel free to mix in other fruits like mango, grapes, or even citrus segments for added flavor and texture. Use Fresh Lime Juice: Freshly squeezed lime juice will provide a brighter and more vibrant flavor compared to bottled juice. {{image_2}} You can easily change up the Honey Lime Fruit Salad. Try a tropical twist! Use fruits like mango, papaya, and coconut. These fruits add a sweet and creamy taste. The honey-lime dressing still works great with these flavors. Just keep the same steps to mix it all together. You will get a refreshing bowl that takes you straight to the beach. If you love berries, this version is for you. Use only strawberries, blueberries, and raspberries. You can skip the other fruits. The honey-lime dressing makes the berries shine. This mix is great for a simple snack or dessert. Serve it chilled for a tasty treat that feels light and fresh. Want some crunch? Add nuts or seeds to your fruit salad. Chopped almonds or walnuts work well. You can also use sunflower seeds or pumpkin seeds. These additions give your salad more texture. They also add healthy fats and protein. Just sprinkle them on top right before serving. This makes your dish even more filling and delightful. To keep your honey lime fruit salad fresh, store it in the fridge. Place the fruit salad in an airtight container. This helps prevent the salad from getting soggy and keeps it tasty. If you use mint leaves for garnish, add them just before serving to keep them bright. Your fruit salad will stay fresh for about three days in the fridge. After that, the fruits may lose their crunch and flavor. Always check for any signs of spoilage, like browning or an off smell, before you dig in. Use glass or plastic containers with tight-fitting lids. These containers seal well and help maintain the salad's freshness. Avoid using metal containers, as they can react with the lime juice and affect the taste. Yes, you can use different fruits! Feel free to swap in fruits you love. Mango, grapes, or peaches work great. The key is to keep the total at about five cups of fruit. This keeps the flavors fresh and bright. You can mix sweet and tart fruits for fun taste combos. Just remember to keep the honey and lime dressing. It ties everything together! To store leftovers, place the salad in an airtight container. This keeps the fruit fresh longer. Make sure to seal it tightly. You can keep it in the fridge for up to two days. After that, the fruit may get mushy. Always check for freshness before eating. If the salad looks dull, it’s time to toss it. Yes, you can make this salad vegan! Simply replace honey with agave syrup or maple syrup. Both options provide a nice sweetness. The lime juice and zest add a bright flavor. This way, you keep it light and refreshing. You won’t lose any taste, and it stays delicious! This blog post covered how to make a fresh fruit salad. We looked at the fruits needed, dressing options, and how to serve it. I shared tips on choosing fruits, storing leftovers, and making the salad ahead. You can even try fun variations! In the end, this bright dish is easy, tasty, and perfect for any time. Enjoy your fruit salad!

Honey Lime Fruit Salad Refreshing and Sweet Treat

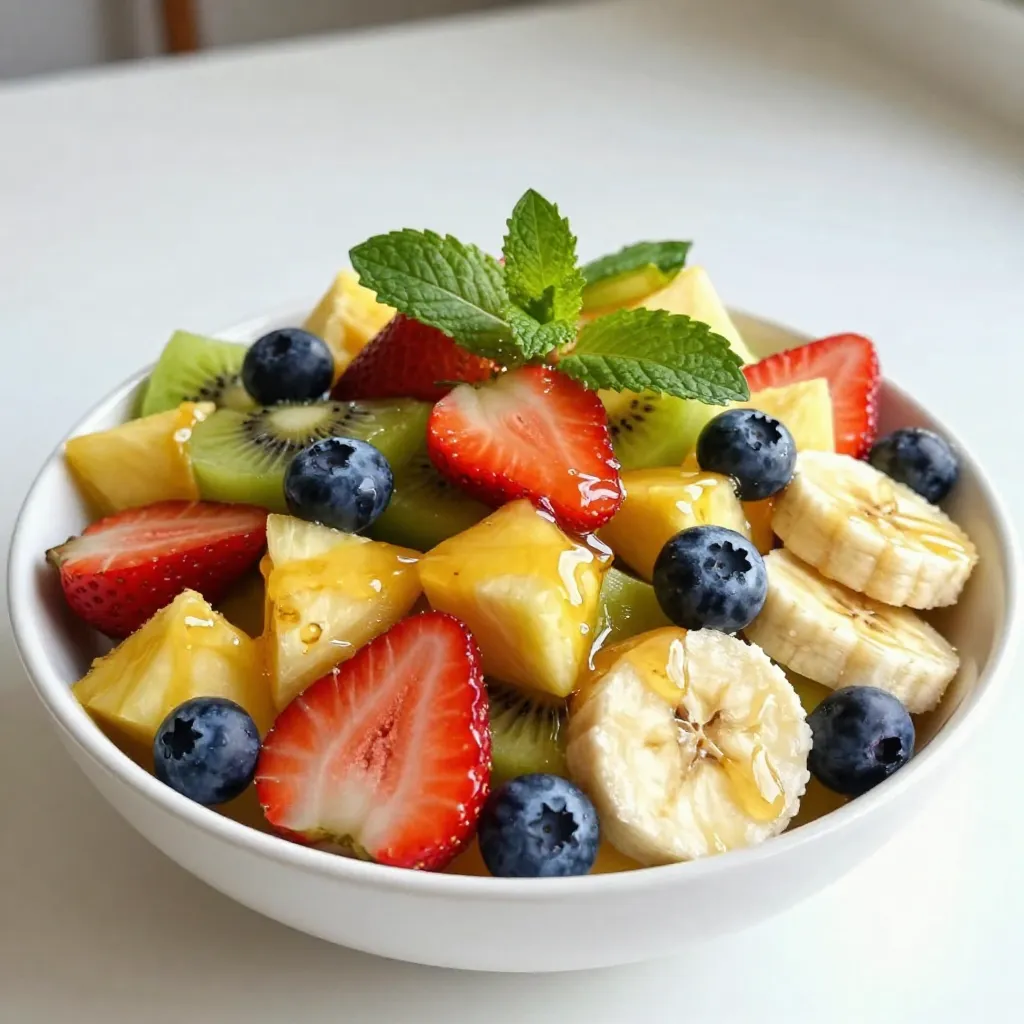
Looking for a light and tasty treat? My Honey Lime Fruit Salad is just what you need! Packed with fresh

To make a tasty Cheesy Broccoli Rice Casserole, gather these key ingredients: - 1 cup uncooked long-grain white rice - 2 cups vegetable broth - 3 cups fresh broccoli florets, blanched - 1 cup shredded cheddar cheese - 1 cup cream of mushroom soup - 1/2 cup sour cream - 1 small onion, finely chopped - 2 cloves garlic, minced - 1 teaspoon onion powder - 1 teaspoon garlic powder - 1/2 teaspoon black pepper - 1/4 teaspoon salt - 1/2 cup breadcrumbs (optional for topping) - 2 tablespoons olive oil Each ingredient plays a big role. The rice is the base, soaking up all the flavors. Broccoli adds a fresh crunch and bright color. Cheddar cheese makes it cheesy and creamy. Cream of mushroom soup brings richness. Sour cream adds a tangy twist. Onion and garlic give depth. Spices enhance the taste, making each bite special. Use breadcrumbs if you want a crispy topping. This mix makes for a great dish that everyone will love! - Preheat your oven to 350°F (175°C). - Blanch the broccoli florets in boiling water for two minutes. This keeps them bright and crisp. - In a medium pot, combine 1 cup of uncooked long-grain white rice with 2 cups of vegetable broth. - Bring to a boil, then cover and reduce the heat. Let it simmer for 18-20 minutes, until the rice absorbs all the broth. - Heat 2 tablespoons of olive oil in a skillet over medium heat. - Add 1 small chopped onion and 2 minced garlic cloves. Sauté for 3-4 minutes until the onion is clear. - In a large bowl, mix the cooked rice, 3 cups of blanched broccoli, sautéed onion and garlic, 1 cup of shredded cheddar cheese, 1 cup of cream of mushroom soup, and ½ cup of sour cream. - Add 1 teaspoon of onion powder, 1 teaspoon of garlic powder, ½ teaspoon of black pepper, and ¼ teaspoon of salt. Stir until everything is well combined. - Transfer the mixture to a greased 9x13 inch baking dish. Spread it evenly. - If you want a crunchy topping, sprinkle ½ cup of breadcrumbs over the top. - Bake in your preheated oven for 25-30 minutes, or until the casserole bubbles and the top turns golden brown. - Let the casserole cool for 5-10 minutes before serving. This helps it set. - Serve hot. For a nice touch, garnish with more cheese or some chopped parsley. Enjoy your Cheesy Broccoli Rice Casserole! - Best type of rice to use: Long-grain white rice works best. It cooks evenly and stays fluffy. - How to avoid mushy rice: Use the right amount of broth. Follow the cooking time closely. Let the rice rest before mixing it with other ingredients. - Alternative cheeses: You can use Monterey Jack or Gouda for a different flavor. Both melt well and add creaminess. - Cream of mushroom soup options: If you want a lighter option, use cream of celery soup. You can also make your own using fresh mushrooms. - Getting a crispy breadcrumb topping: Mix breadcrumbs with olive oil before adding them. This helps them brown nicely in the oven. - Adjusting seasoning for personal taste: Taste your mixture before baking. Add more salt or pepper as needed to suit your flavor. {{image_2}} You can easily adapt this Cheesy Broccoli Rice Casserole for different diets. For vegetarian or vegan options, skip the cream of mushroom soup and sour cream. Use a vegan cheese blend instead of cheddar. You can also try coconut milk for creaminess. This keeps the dish rich and tasty without dairy. If you need a gluten-free option, use gluten-free breadcrumbs. Check your cream of mushroom soup to ensure it is gluten-free. You can also make your own soup using gluten-free ingredients. These changes keep the dish delicious for everyone. Want to add protein? You can mix in cooked chicken or turkey. Shred the meat and stir it into the casserole. This gives your meal a healthy boost and makes it more filling. If you prefer plant-based protein, add beans. Canned black beans or chickpeas are great choices. Rinse them first and then fold them into the mixture. This adds texture and flavor while keeping the dish hearty. To enhance flavor, think about mixing in spices or herbs. A dash of cayenne pepper can add heat. Fresh herbs like thyme or parsley can brighten the dish. Try adding garlic powder or onion powder for an extra kick. You can also add different vegetables. Carrots, bell peppers, or spinach work well. Just chop them up and mix them in with the other ingredients. These additions make your casserole colorful and packed with nutrients. To store leftovers, let the casserole cool down at room temperature. Once it cools, place it in an airtight container. This keeps the flavors fresh. You can store it in the fridge for about 3 to 4 days. If you want to enjoy it later, use a clean spoon to scoop out servings. This helps avoid germs. For longer storage, freezing works great. Cut the casserole into portions before freezing. Wrap each piece in plastic wrap and then in aluminum foil. This helps prevent freezer burn. Cheesy Broccoli Rice Casserole can last for up to 3 months in the freezer. When ready to eat, thaw it overnight in the fridge. Reheat in the oven at 350°F (175°C) until it’s hot all the way through. You can also microwave it for a quicker option. Just cover it to keep moisture in. Enjoy your tasty dish again! Can I make this casserole ahead of time? Yes, you can prepare this casserole a day in advance. Just mix all the ingredients and store them in the fridge. When ready, bake it as directed. This saves time and makes dinner easy. Is it possible to make it without cheese? Yes, you can skip the cheese. Use more cream of mushroom soup or add a vegan cheese alternative. The casserole will still taste good, but the cheese adds creaminess and flavor. Caloric content per serving Each serving of Cheesy Broccoli Rice Casserole has about 350 calories. This can vary based on the specific brands and amounts of ingredients used. Nutritional benefits of each ingredient - Broccoli: Rich in vitamins C and K, boosts immunity. - Rice: Provides energy and is a good source of carbs. - Cheddar Cheese: Offers calcium for strong bones. - Sour Cream: Adds creaminess and contains some calcium. - Onion and Garlic: Full of antioxidants, they can help fight illness. Why is my casserole too dry? If your casserole turns out dry, it may need more liquid. Try adding extra cream of mushroom soup or some vegetable broth before baking. This keeps it moist. What to do if it’s too runny? If your casserole is too runny, you can add more breadcrumbs on top. They help soak up extra moisture. You can also bake it a bit longer to help thicken it up. You learned how to make a tasty cheesy broccoli rice casserole. We covered each step, from gathering ingredients to serving suggestions. Remember to adjust flavors and try different toppings to make it yours. This dish is simple and can fit many diets. Whether you store it or freeze it, it stays delicious. Enjoy your cooking and share it with loved ones! You now have the tools to create a great meal.

Cheesy Broccoli Rice Casserole Quick and Tasty Dish

If you’re looking for a dish that’s quick, tasty, and packed with flavor, you’ve found it! My Cheesy Broccoli Rice

- 4 salmon fillets (6 oz each) - 1/4 cup pure maple syrup - 2 tablespoons soy sauce (low sodium) - 1 tablespoon Dijon mustard - 1 teaspoon minced garlic - 1 teaspoon fresh ginger, grated - 1 tablespoon olive oil - Salt and pepper to taste - Lemon wedges for serving - Fresh parsley for garnish The star of this dish is the salmon. Choose fresh salmon fillets for the best flavor. Each fillet should weigh about 6 ounces. The next key ingredient is pure maple syrup. This sweet element brings a delightful glaze to your fish. You will also need low-sodium soy sauce for a touch of saltiness. Dijon mustard adds a nice tang. Minced garlic and grated ginger give the glaze depth. Olive oil helps sear the salmon perfectly. Don’t forget salt and pepper for seasoning. For serving, lemon wedges brighten the dish. Fresh parsley makes a lovely garnish. These simple ingredients come together to create a tasty meal. To start, you need to mix the glaze. Grab a small bowl and add: - 1/4 cup pure maple syrup - 2 tablespoons low-sodium soy sauce - 1 tablespoon Dijon mustard - 1 teaspoon minced garlic - 1 teaspoon grated fresh ginger Whisk these ingredients together until smooth. This mix gives your salmon a sweet and tangy flavor. Next, it’s time to marinate the salmon. Place 4 salmon fillets in a shallow dish. Pour half of the glaze over the fillets. Make sure they are well coated. Cover the dish and put it in the fridge. Let it marinate for at least 30 minutes. If you have time, let it sit for up to 2 hours. This step helps the salmon soak in all the flavors. Now, let’s cook the salmon. Start by preheating your oven to 400°F (200°C). Line a baking sheet with parchment paper for easy cleanup. After marinating, take the salmon out of the fridge. Let any extra marinade drip off. Sprinkle salt and pepper on both sides of each fillet. Heat 1 tablespoon of olive oil in a skillet over medium-high heat. Once the oil is hot, add the salmon fillets skin-side down. Sear them for about 3-4 minutes. Don’t move them during this time. You want them to form a nice crust. Carefully flip the fillets. Brush the reserved maple glaze on top. Then, transfer the salmon to the prepared baking sheet. Bake the salmon in the oven for about 10-12 minutes. It should flake easily with a fork when done. Once the salmon is cooked, take it out of the oven. Let it rest for a couple of minutes. This helps keep it juicy. For serving, place the salmon on plates. Add lemon wedges on the side for a fresh touch. Garnish with fresh parsley for added color. This dish looks great and tastes even better! Pair it with simple sides like rice or steamed veggies. Enjoy your delightful maple glazed salmon! Marinating your salmon is key to great flavor. I recommend marinating for at least 30 minutes. For even better taste, let it sit for up to 2 hours. This gives the flavors time to soak in. Use the full mix of ingredients: maple syrup, soy sauce, Dijon mustard, garlic, and ginger. Each adds its own magic. To sear salmon perfectly, heat olive oil in your skillet first. Make sure it’s hot before adding the salmon. Place the fillets skin-side down and don’t move them for about 3-4 minutes. This helps form a nice crust. To check for doneness, look for flakiness. When the fish flakes easily with a fork, it’s ready. Garnishing makes your dish pop. Use fresh parsley for color and freshness. A squeeze of lemon adds brightness too. For sides, consider sweet potatoes or steamed broccoli. They balance the rich flavors of the salmon and complete your meal. {{image_2}} You can swap maple syrup with honey or agave nectar. These options give a sweet flavor but change the taste a bit. If you lack soy sauce, try coconut aminos or tamari for a gluten-free choice. For the herbs and spices, fresh dill or thyme can replace ginger. You can also use chili flakes for a spicy kick. You can grill or bake your salmon. Grilling gives a smoky taste and nice grill marks. Preheat your grill to medium heat. Cook for about 4-5 minutes per side. Baking is easy and requires less attention. Just follow the oven method in the recipe. A slow cooker is also a great option. Just set it on low for 2-3 hours. This method keeps the salmon very moist. Pair your salmon with roasted or steamed vegetables. Broccoli, asparagus, or green beans work well. You can also serve it over a bed of rice or quinoa for a hearty meal. Try a simple salad as a side to add freshness. For a twist, serve with a fruit salsa. Mango or pineapple salsa can brighten the dish. To keep your maple glazed salmon fresh, place any leftovers in an airtight container. This helps seal in flavor and moisture. Make sure the salmon is cool before sealing. Store it in the fridge for up to three days. If you want to keep it longer, consider freezing it. Wrapped tightly in foil or freezer bags, it can last up to three months. When reheating, avoid drying out the salmon. Preheat your oven to 350°F (175°C). Place the salmon on a baking sheet. Cover it with foil to lock in moisture. Heat for about 10-15 minutes until warmed through. You can also use a microwave. Place the salmon on a microwave-safe plate, cover it with a damp paper towel, and heat in short bursts. This keeps it juicy while warming. To keep the flavor vibrant, consider adding a squeeze of fresh lemon juice before serving again. You can tell if the salmon is done by checking its color and texture. Cooked salmon turns from a bright red to a light pink. It should also flake easily when you poke it with a fork. If the salmon is still raw in the middle, it needs more time. Aim for an internal temperature of 145°F (63°C) for safe eating. Yes, you can prep the salmon ahead of time. Marinate the salmon in the glaze for up to 2 hours. This rest time helps the flavors soak in. If you want to cook it later, store the marinated salmon in the fridge. Just remember to keep it covered. Maple glazed salmon goes well with many sides. Here are some great options: - Steamed broccoli - Roasted sweet potatoes - Quinoa or rice - Fresh green salad - Garlic mashed potatoes These sides balance the sweetness of the glaze and add color to your plate. You can create a delicious maple-glazed salmon with the right ingredients and techniques. I shared how to prepare the glaze, marinate the salmon, and cook it to perfection. You learned tips for presentation, alternative cooking methods, and how to store leftovers. By following these steps, you can impress your family and friends. Enjoy this tasty dish that offers flexibility and flavor. Now, go ahead and make this recipe your own. Happy cooking!

Maple Glazed Salmon Delightful and Easy Recipe

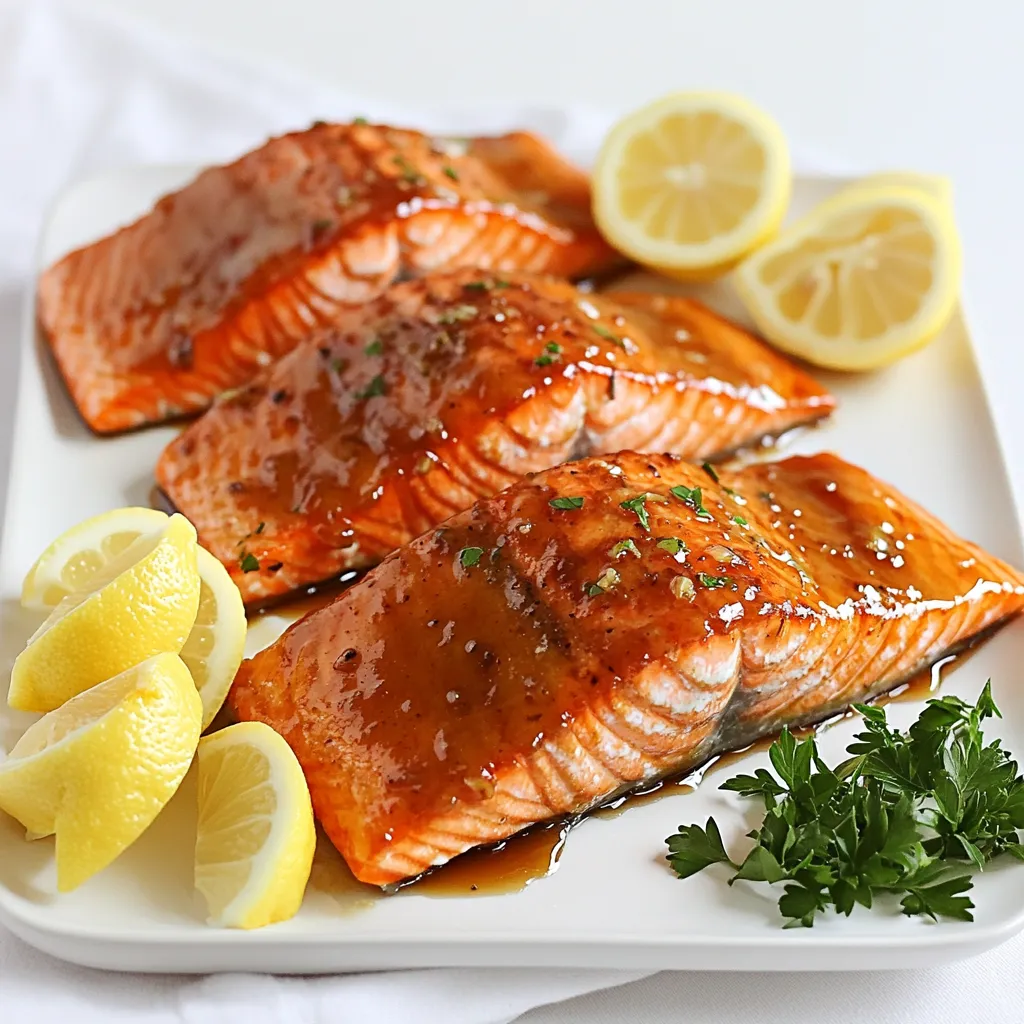
Looking for a delicious and simple meal? My Maple Glazed Salmon recipe is just what you need! This dish combines

Older posts
Newer posts
← Previous Page1 Page2 Page3 … Page84 Next →

dsad

© 2026 Home Cooking Style • Built with GeneratePress

Our Policies

  • Copyright Policy
  • Cookie Policy
  • GDPR Policy
  • Privacy Policy
  • Disclaimer
  • Terms Of Use

More Information

  • Home
  • About
  • Contact
  • Appetizers
  • Dessert
  • Dinner
  • Drinks
©2026, Home Cooking Style About Back To Top