Skip to content
DisclaimerTerms Of UseGDPR PolicyCookie Policy

Home Cooking Style

  • Home
  • Drinks
  • Appetizers
  • Dinner
  • Dessert
  • About
  • Contact
  • Privacy Policy
DisclaimerTerms Of UseGDPR PolicyCookie Policy

NO-ING-IMG

To make rainbow sprinkle sugar cookies, you need the following: - 2 ¾ cups all-purpose flour - 1 teaspoon baking soda - ½ teaspoon baking powder - 1 cup unsalted butter, softened - 1 ½ cups white sugar - 1 egg - 1 teaspoon vanilla extract - ½ teaspoon almond extract - ½ teaspoon salt - ¾ cup colorful rainbow sprinkles Each ingredient plays a key role in the cookie's taste and texture. The flour gives structure. The butter makes them soft and rich. The sugar adds sweetness and helps them spread. You can add fun flavors or textures with these options: - ½ cup chopped nuts like walnuts or pecans - ½ cup mini chocolate chips for a sweet twist - Zest from one lemon or orange for a citrus kick These additions make the cookies unique and exciting. Feel free to mix and match! If you have allergies, here are some swaps: - Use gluten-free all-purpose flour for a gluten-free version. - Replace butter with coconut oil for a dairy-free cookie. - Use a flax egg (1 tablespoon ground flaxseed + 2.5 tablespoons water) instead of a regular egg for a vegan option. These substitutions allow everyone to enjoy these cookies. Always read labels to ensure safety. {{ingredient_image_1}} Start by preheating your oven to 375°F (190°C). This step is key to baking perfect cookies. While the oven heats, line two baking sheets with parchment paper. This helps prevent the cookies from sticking and makes cleanup easy. In a medium bowl, whisk together 2 ¾ cups of all-purpose flour, 1 teaspoon of baking soda, ½ teaspoon of baking powder, and ½ teaspoon of salt. Set this bowl aside. In a large bowl, cream together 1 cup of softened unsalted butter and 1 ½ cups of white sugar. Mix until it’s smooth and fluffy. This will take about 2-3 minutes. Then, beat in 1 egg, 1 teaspoon of vanilla extract, and ½ teaspoon of almond extract. Make sure everything is well combined. Gradually add your dry mixture into the wet mixture. Mix until just combined; don’t overmix. Gently fold in ¾ cup of colorful rainbow sprinkles. This adds fun and color! Use a cookie scoop or a tablespoon to drop rounded balls of dough onto your prepared baking sheets. Space them about 2 inches apart to allow for spreading. Bake in your preheated oven for 8-10 minutes. The edges should be lightly golden, and the centers will look soft. This softness is perfect for chewy cookies! After baking, let the cookies cool on the baking sheets for 5 minutes. Then, transfer them to wire racks to cool completely. Enjoy your colorful treats! To get the best cookie texture, cream the butter and sugar well. Mix until it’s light and fluffy. This step adds air, making cookies soft and chewy. Do not overmix once you add the flour. Stir until just combined. This keeps the cookies tender. Bake until the edges are golden, but the centers are soft. This ensures a chewy bite that melts in your mouth. Decorating your cookies can be fun! Try stacking the cookies in a colorful jar. You can also place them on a rainbow-themed platter. For a touch of sparkle, add more sprinkles on top before baking. Dust with powdered sugar after cooling for a snowy look. You can even pipe colorful icing for extra flair. Let your creativity shine! If you want to save cookie dough, scoop it into balls and freeze. Place them on a baking sheet until frozen solid. Then, transfer to a freezer bag. You can keep them for up to three months. When you’re ready to bake, no need to thaw! Just bake for a minute or two longer. This way, you can enjoy fresh cookies anytime! Pro Tips Chill the Dough: For thicker cookies, chill the dough for at least 30 minutes before baking. This helps prevent spreading and creates a nice chewy texture. Use Fresh Ingredients: Ensure your baking soda and baking powder are fresh for the best rise and texture in your cookies. Don't Overbake: Remove the cookies from the oven when the edges are golden, but the centers look slightly underbaked. They will continue to firm up while cooling. Customize Your Sprinkles: Feel free to use chocolate chips or other types of sprinkles to change up the flavor and look of your cookies! {{image_2}} You can mix up your cookies with different sprinkles! Try using chocolate sprinkles for a rich taste. You can also use large confetti sprinkles for a fun look. If you want a twist, try using nonpareils. They add a delightful crunch. Choose sprinkles based on your mood or the season. Holiday-themed sprinkles can make these cookies festive. Want to make your cookies even more special? Consider adding zest from an orange or lemon. It gives a bright flavor that pairs well with the sweet cookie. You can also mix in mini chocolate chips or chopped nuts. These additions create new textures and tastes. For a touch of spice, try adding a pinch of cinnamon or nutmeg. The options are endless! You can make these cookies gluten-free by using a gluten-free flour blend. Just replace the all-purpose flour with it. For a vegan version, swap the butter with coconut oil or vegan butter. Use flaxseed meal mixed with water instead of the egg. This makes a great egg substitute. With these simple changes, everyone can enjoy these fun cookies! To keep your rainbow sprinkle sugar cookies fresh, use an airtight container. This keeps them soft and tasty. If you stack them, place parchment paper between layers. This prevents sticking. Store the cookies at room temperature for the best flavor. Avoid direct sunlight, as it can dry them out. Freezing is a great way to save cookies for later. Let the cookies cool completely first. Then, place them in a freezer bag or container. You can freeze the dough too! Just scoop the dough into balls and freeze them on a baking sheet. Once firm, transfer them to a bag. This makes it easy to bake fresh cookies whenever you want. Rainbow sprinkle sugar cookies last about one week at room temperature. If you freeze them, they can last up to three months. Just remember to thaw them in the fridge before serving. This keeps their texture and taste just right. Enjoy your colorful cookies anytime! To make your rainbow sprinkle sugar cookies chewy, follow a few key steps. First, use softened butter, not melted. This keeps the dough thick. Next, do not overmix the dough. Mix just until combined. Baking the cookies for a shorter time also helps. Aim for 8-10 minutes, so the centers stay soft. Let the cookies cool on the baking sheet for a bit. This helps them stay chewy. Yes, you can use different flavors of extracts. Vanilla is classic, but almond adds a nice twist. You can also try coconut or lemon extracts for fun flavor changes. Just keep the amount the same, usually one teaspoon. Be careful with strong flavors. A little goes a long way! Rainbow sprinkle sugar cookies have a fun history. They likely started in the United States in the 20th century. The colorful sprinkles make them popular at parties and celebrations. These cookies bring joy to both kids and adults. Their bright colors and sweet taste make them a favorite for many! In this blog post, we explored how to make rainbow sprinkle sugar cookies. We covered key ingredients, optional additions, and allergy substitutions. You learned step-by-step methods for mixing, baking, and achieving the right texture. We shared helpful tips on storage and decorating. Finally, we discussed variations like gluten-free options. Whether you want a classic cookie or a fun twist, you now have the tools to impress. Enjoy baking and sharing these delicious treats!

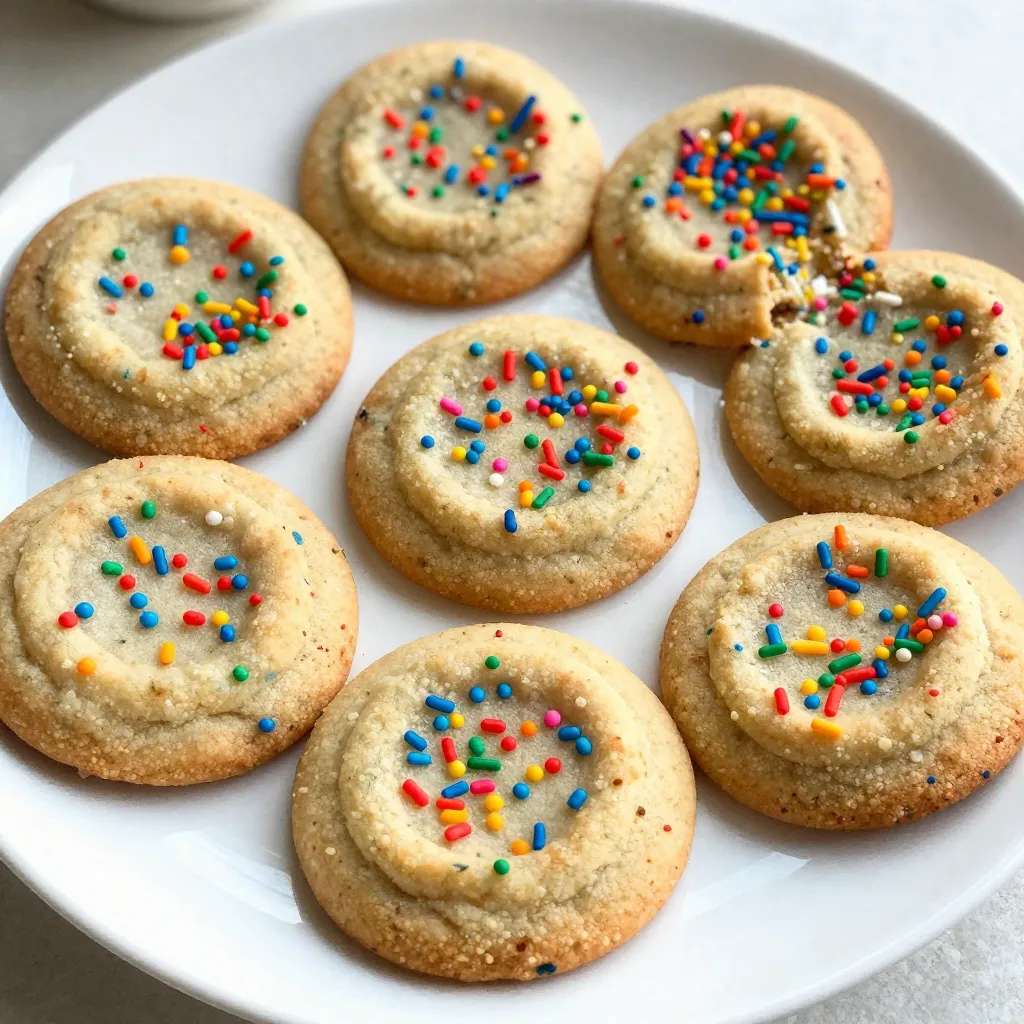
Rainbow Sprinkle Sugar Cookies Simple and Fun Treat

Looking for a fun and simple treat? You’re in the right place! Rainbow Sprinkle Sugar Cookies are colorful, tasty, and

- 2 large artichokes - 1/4 cup olive oil - 3 cloves garlic, minced - Zest of 1 lemon - 2 tablespoons lemon juice - 1 teaspoon sea salt - 1/2 teaspoon black pepper - 1 teaspoon smoked paprika - Fresh parsley, chopped (for garnish) - Baking dish - Aluminum foil - Small bowl for mixing - Whisk or fork for blending - Knife and cutting board for prep You can try different oils like avocado or grapeseed oil. If you don’t have smoked paprika, regular paprika works too. For a lighter flavor, skip the garlic or use garlic powder. You can also swap fresh parsley with fresh basil or cilantro. If you want a kick, add some chili flakes. These swaps keep the dish tasty and fun. {{ingredient_image_1}} Start by preheating your oven to 400°F (200°C). This will help the artichokes cook evenly. Next, take your two large artichokes. Cut off the top third of each artichoke with a sharp knife. This removes the tough part. Trim the stem down to about 1 inch. Remove the tough outer leaves. Use a spoon to scoop out any fuzzy choke in the center. This way, you ensure a better texture. In a small bowl, combine the olive oil, minced garlic, lemon zest, and lemon juice. Add in the sea salt, black pepper, and smoked paprika. Whisk everything together until it is well mixed. This mixture brings bright and bold flavors to the artichokes. You want to ensure that every bite is packed with taste. Arrange the prepared artichokes in a baking dish. Drizzle the lemon garlic mixture generously over them. Make sure to get it into the crevices of the leaves. This ensures that every part of the artichoke is flavorful. Next, pour about half an inch of water into the bottom of the baking dish. This creates steam while roasting. Cover the dish tightly with aluminum foil. Place it in your preheated oven and roast for 30 minutes. After 30 minutes, remove the foil. Roast for an additional 15 to 20 minutes. You want the artichokes to be tender, and the leaves should pull away easily. They should turn a nice golden color. Once done, take them out of the oven. Let them cool slightly before serving. Top with fresh chopped parsley for a pop of color. When you pick artichokes, look for ones with tight, green leaves. The leaves should feel firm and not dry. Fresh artichokes have a nice weight to them. Give them a gentle squeeze; they should feel solid. Avoid any brown spots or shriveled leaves. You want artichokes that look alive. To cook artichokes evenly, cut them properly. Trim the top third and the stem to about one inch. This helps them fit in the dish. Make sure to scoop out the fuzzy choke inside. The garlic and lemon mixture should coat all the leaves. This way, every bite is full of flavor. Cover the dish with foil to trap steam while roasting. Remove the foil near the end to let them brown. Serve your roasted artichokes warm. They taste great on their own or with a dip. Try pairing them with a lemon aioli or a simple garlic sauce. Sprinkle fresh parsley on top for color. You can even serve them as a side dish or a light main. They add a fun touch to any meal. Pro Tips Choose Fresh Artichokes: Look for artichokes that are firm to the touch with tightly packed leaves. Avoid those that feel soft or have browning tips. Enhance Flavor by Marinating: If time allows, marinate the artichokes in the olive oil mixture for 30 minutes before roasting to deepen the flavors. Check for Doneness: To test if the artichokes are done, pull a leaf from the center; it should come off easily. If not, roast for a bit longer. Serve with Dipping Sauce: Pair the roasted artichokes with a garlic aioli or lemon butter sauce for an extra layer of flavor. {{image_2}} You can change the flavor of your lemon garlic roasted artichokes by adding herbs. Fresh thyme and rosemary work well. Both herbs add a lovely aroma. You can also try dill for a fresh twist. Just chop the herbs finely and mix them in the olive oil mixture. This way, your artichokes will have extra depth and flavor. If you like heat, chili flakes are a great addition. They can bring a nice kick to your dish. Just sprinkle a pinch of chili flakes into the olive oil mixture. You can adjust the amount to suit your taste. This simple change makes your roasted artichokes lively and exciting. This recipe is already vegan and gluten-free. The ingredients do not contain any animal products or gluten. You can enjoy it worry-free. If you want to enhance the vegan aspect, add nutritional yeast. This will give a cheesy flavor without using dairy. It’s a tasty and creative way to make your dish even better. After you make lemon garlic roasted artichokes, let them cool. Place leftovers in an airtight container. Store them in the fridge. They will stay fresh for about 3 days. Be sure to keep the artichokes covered to prevent drying out. To reheat the artichokes, you can use the oven or a microwave. If you use the oven, set it to 350°F (175°C). Place the artichokes on a baking sheet. Cover them with foil to keep them moist. Heat for about 10-15 minutes. If using a microwave, place them on a microwave-safe plate. Heat for 2-3 minutes, checking them often to avoid overcooking. You can freeze roasted artichokes if you want to save some for later. First, let them cool completely. Wrap each artichoke in plastic wrap. Place the wrapped artichokes in a freezer bag. They can last up to 3 months in the freezer. When you want to eat them, thaw in the fridge overnight before reheating. Roasted artichokes can last up to three days in the fridge. Store them in an airtight container. To keep them fresh, avoid adding any sauce or garnish before storing. You can prepare the artichokes a day ahead. Just follow the steps to clean and season them. Store the artichokes in the fridge until you are ready to roast them. When you're ready, roast them as directed. Lemon garlic roasted artichokes pair well with many dishes. You can serve them with grilled chicken or fish. They also go great with pasta or a fresh salad. For a simple meal, enjoy them with crusty bread and a dip. To sum up, we explored the ingredients and the equipment needed for roasting artichokes. I provided easy steps for preparing them and shared tips for choosing fresh artichokes and storing leftovers. You can also customize the recipe with herbs or spices to suit your taste. These roasted artichokes make a tasty dish for any meal. Now that you have the knowledge, it’s time to enjoy this delicious treat!

Lemon Garlic Roasted Artichokes Flavorful and Simple Dish

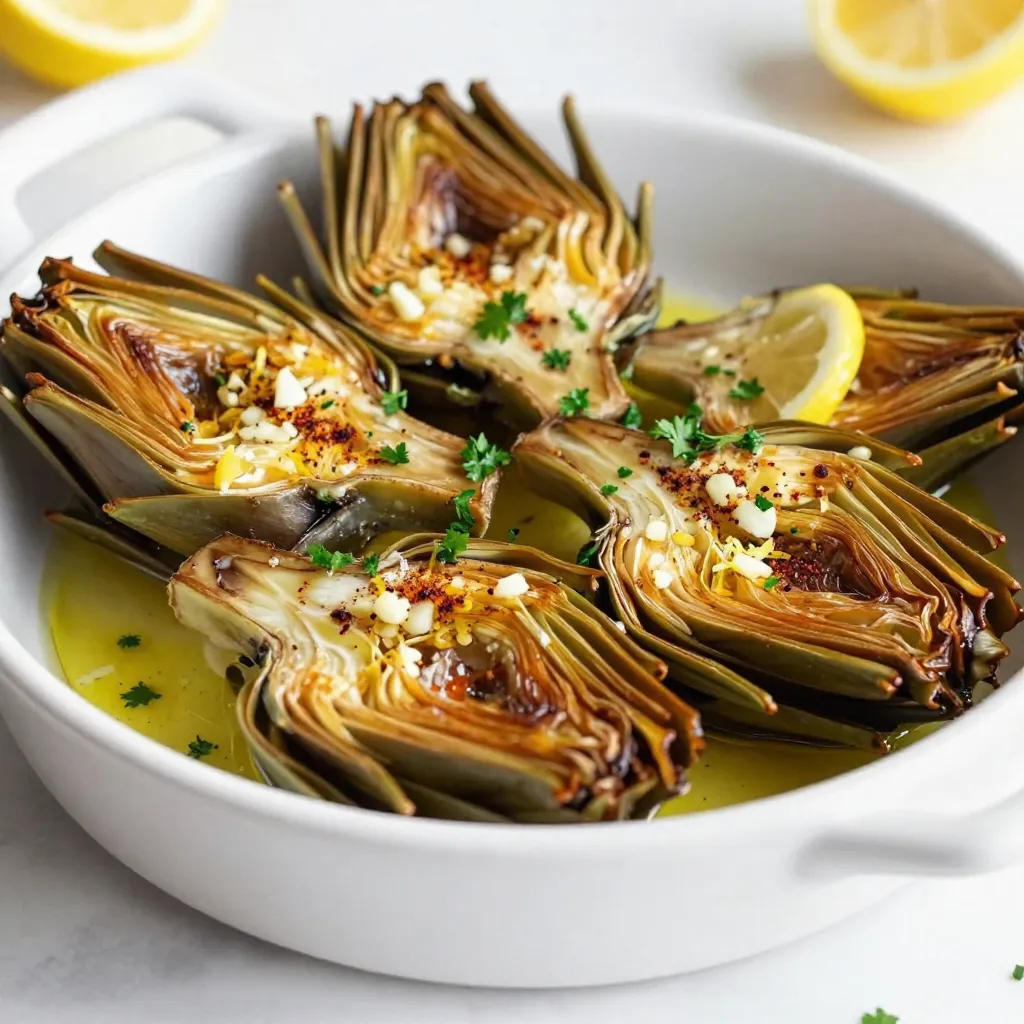
Looking to impress your friends with a simple yet delicious dish? Try my Lemon Garlic Roasted Artichokes! This easy recipe

For these tasty skewers, you will need: - 1 lb boneless chicken breasts, cut into 1-inch cubes - 1 red bell pepper, cut into 1-inch squares - 1 green bell pepper, cut into 1-inch squares - 1 medium red onion, cut into wedges These main ingredients give the skewers their protein and colorful veggies. The chicken provides a nice base, while the peppers and onion add crunch and flavor. The marinade is where the magic happens. It combines: - 1/4 cup honey - 1/4 cup fresh lime juice - 2 tablespoons olive oil - 2 cloves garlic, minced - 1 teaspoon ground cumin - 1 teaspoon paprika - Salt and pepper to taste This mixture adds sweetness, tang, and depth. Honey and lime juice work together to create a perfect balance. The garlic and spices bring warmth and richness, making every bite delicious. To elevate your skewers, consider these optional garnishes: - Fresh cilantro, chopped Adding fresh cilantro gives the dish a bright, fresh taste. You can even serve the skewers with lime wedges for extra zing. These touches make your meal look great and taste even better! {{ingredient_image_1}} To marinate the chicken, start by mixing honey, lime juice, olive oil, minced garlic, cumin, paprika, salt, and pepper in a bowl. This mix gives the chicken a sweet and tangy flavor. Cut your chicken breasts into 1-inch cubes. Add these cubes to the marinade. Make sure each piece is well coated. Cover the bowl and put it in the fridge. Let it chill for at least 30 minutes. For a stronger flavor, you can marinate it for up to 2 hours. If you are using wooden skewers, soak them in water for at least 20 minutes. This helps prevent burning while cooking. If you prefer metal skewers, there’s no need to soak them. Soaking wooden skewers keeps your chicken skewers safe and tasty. This step is key to making sure your meal turns out great. Once the chicken has marinated, take the skewers. Thread the chicken cubes onto the soaked skewers. Alternate with pieces of red bell pepper, green bell pepper, and red onion. This adds color and a crunchy texture. Fill each skewer, but do not overcrowd them. Make sure there is space between each piece. This allows even cooking and helps the flavors blend well. Grilling is my favorite way to cook these skewers. It gives a great char and flavor. You can also use a grill pan on the stove for a similar effect. If you don’t have a grill or pan, baking works too. Just place the skewers on a lined baking sheet and cook at 400°F for 15-20 minutes. To keep your chicken moist, marinate it well. The honey and lime juice in the marinade help break down the meat. Make sure you don’t overcook the chicken. Aim for an internal temperature of 165°F. This keeps the chicken juicy and tender. The marinade is key for great taste. Use fresh lime juice for the best flavor. Let the chicken sit in the marinade for at least 30 minutes, but up to 2 hours is even better. You can also add other spices or herbs, like chili powder or cilantro, for extra kick. This makes the chicken even more delicious. Pro Tips Marinate Longer for More Flavor: If time allows, marinate the chicken for up to 2 hours. This enhances the flavors and makes the chicken more tender. Use Fresh Herbs: For an extra burst of flavor, consider adding fresh herbs like oregano or thyme to the marinade. Check for Doneness: Ensure chicken is fully cooked by checking that it reaches an internal temperature of 165°F (75°C). Serve with Dipping Sauce: Enhance your skewers by serving them with a side of honey-lime dipping sauce made from leftover marinade (boil to ensure safety). {{image_2}} You can swap out the red and green bell peppers for other veggies. Try zucchini, mushrooms, or cherry tomatoes. These veggies add different textures and flavors. Cut them into similar sizes for even cooking. Eggplant also works well; just make sure to soak it in salt water first. This helps to remove bitterness. The goal is to make your skewers colorful and tasty. While chicken is popular, you can use other meats. Shrimp is a great choice. It cooks fast and soaks up flavors well. You could also try pork or beef. Cut them into 1-inch cubes, just like the chicken. If you pick a different meat, adjust the cooking time. Shrimp needs just 5-7 minutes on the grill. For beef, aim for 10-15 minutes, depending on your preference. You can change the marinade to create new tastes. Add fresh herbs like cilantro, basil, or mint for a fresh twist. You may also try adding lime zest for extra zing. If you like heat, incorporate red pepper flakes or chili powder. These spices will spice up the dish. For a sweet touch, mix in some orange juice or ginger. Experimenting with flavors keeps this dish exciting! If you have leftover honey lime chicken skewers, store them in an airtight container. They will stay fresh in the fridge for up to three days. Make sure they cool down first. I like to separate the chicken and veggies to keep them from getting soggy. You can freeze these skewers for easy meals later. Wrap each skewer tightly in plastic wrap. Place them in a freezer-safe bag or container. They can last up to three months in the freezer. When you’re ready to eat, just thaw them overnight in the fridge. To reheat the skewers, you can use an oven, grill, or microwave. If using an oven, preheat it to 350°F. Place the skewers on a baking sheet and heat for about 10 minutes or until warm. On the grill, heat for about five minutes, turning them occasionally. If you use a microwave, heat in 30-second intervals until warm. Enjoy them hot for the best taste! You should marinate the chicken for at least 30 minutes. This allows the flavors to soak in. For the best taste, I recommend marinating for up to 2 hours. This extra time helps the honey and lime juice really shine through in each bite. Yes, you can make honey lime chicken skewers in the oven. Preheat your oven to 400°F (200°C). Place the skewers on a baking sheet lined with foil. Bake for about 15-20 minutes. Turn them halfway for even cooking. This method gives you juicy chicken and tender veggies without a grill. You can serve honey lime chicken skewers with many sides. Here are some ideas: - Rice: Cilantro-lime rice pairs well. - Salad: A fresh green salad adds crunch. - Veggies: Grilled or roasted veggies make great sides. - Dips: Try a yogurt sauce or salsa for extra flavor. These sides will balance the sweet and tangy taste of the skewers. In this article, I covered how to make tasty honey lime chicken skewers. We looked at the main ingredients, marinade tips, and cooking methods. You learned how to prepare and store skewers, plus some fun variations. Remember, you can use different meats and veggies to mix it up. Keep experimenting with flavors and cooking styles. Enjoy every bite and make this dish your own!

Honey Lime Chicken Skewers Flavorful and Easy Recipe

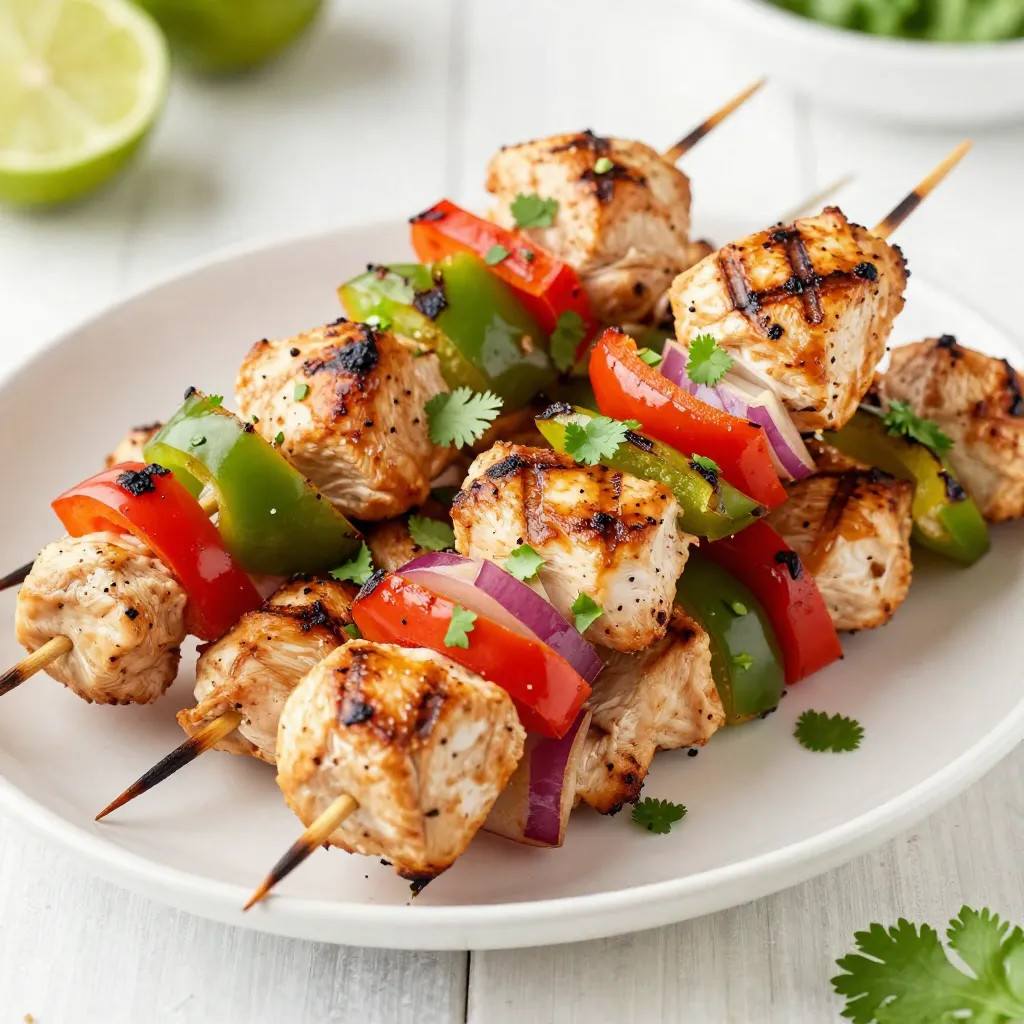
If you’re craving a fresh and tasty meal, honey lime chicken skewers are the way to go. This easy, flavorful

- 1 pound Brussels sprouts, trimmed and halved - 3 tablespoons olive oil - 2 tablespoons pure maple syrup - 1 tablespoon Dijon mustard - 1 teaspoon garlic powder - Salt and pepper, to taste - 1/4 cup pecans, roughly chopped (optional) - 1/4 cup dried cranberries (optional) Brussels sprouts are the star of this dish. They are small, green, and packed with flavor. When roasted, they get a nice caramelized taste. The olive oil adds richness, while the maple syrup brings sweetness. Dijon mustard gives a nice tang that balances the dish. If you want to add more texture and flavor, consider the optional add-ins. Pecans add a crunchy bite that contrasts well with the soft sprouts. Dried cranberries offer a pop of sweetness, making each bite exciting. You can mix and match these add-ins based on your taste. When picking Brussels sprouts, look for firm, small ones. They should be bright green with no yellow leaves. This ensures you get the best flavor. With these ingredients, you can create a dish that is both savory and simple! {{ingredient_image_1}} 1. Preheat your oven. Set it to 400°F (200°C). This helps the Brussels sprouts cook right. 2. Mix the ingredients. In a large bowl, add these items: - 1 pound Brussels sprouts, trimmed and halved - 3 tablespoons olive oil - 2 tablespoons pure maple syrup - 1 tablespoon Dijon mustard - 1 teaspoon garlic powder - Salt and pepper, to taste Toss all the ingredients until the Brussels sprouts are well-coated. This step makes sure every bite is full of flavor. 3. Spread and roast. Line a baking sheet with parchment paper. Spread the Brussels sprouts in a single layer. Place it in the oven. Roast for about 20-25 minutes. Stir them halfway through. This helps them caramelize and become tender. 4. Optional toppings. If you want, sprinkle 1/4 cup chopped pecans and 1/4 cup dried cranberries over the sprouts during the last 5 minutes. This adds a nice crunch and sweetness. 5. Cool and serve. Once done, take the baking sheet out. Let it cool for a few minutes before serving. Enjoy your tasty dish! - Achieving perfect caramelization: To get that golden-brown look, make sure to spread the Brussels sprouts in a single layer. Crowding them will steam instead of roast. Stir them halfway through for even browning. - Ensuring even roasting: Use a baking sheet lined with parchment paper. This helps the sprouts cook evenly and prevents sticking. If you notice some pieces are browning faster, move them around a bit. - Adjusting flavors to taste: Taste the mix of olive oil, maple syrup, and Dijon mustard before you bake. If you like it sweeter, add a bit more maple syrup. Prefer it tangier? A touch more mustard can enhance the flavor. Always season with salt and pepper to your liking. These tips will help you create a dish that shines with flavor and looks great on your table. Enjoy experimenting! Pro Tips Fresh Brussels Sprouts: Always choose bright green Brussels sprouts that are firm to the touch for the best flavor and texture. Even Coating: Make sure to coat the Brussels sprouts evenly with the oil and seasonings to ensure consistent caramelization. Storage Tips: If you have leftovers, store them in an airtight container in the fridge for up to 3 days. Reheat in the oven for the best texture. Serving Suggestions: These Brussels sprouts pair beautifully with roasted meats or as a topping for grain bowls for a nutritious meal. {{image_2}} You can change the flavors of Maple Dijon Brussels Sprouts to fit your taste. Here are some easy ideas: - Adding different nuts or seeds: Try walnuts or almonds instead of pecans. You can also add sunflower seeds for a nice crunch. - Incorporating spices: A pinch of cayenne pepper adds heat. You can also use smoked paprika for a deeper flavor. - Using alternative sweeteners: If you want less sugar, use honey or agave syrup. These work well with Dijon mustard. These variations let you make this dish your own. Get creative and find what you love! Refrigerating To keep leftover Maple Dijon Brussels sprouts fresh, place them in an airtight container. They will last for about 3 to 5 days in the fridge. Make sure they cool down to room temperature before sealing the container. This helps preserve their texture and flavor. Freezing options If you want to store them longer, freezing is a good choice. Spread the cooled Brussels sprouts on a baking sheet in a single layer. Freeze them for a few hours until firm, then transfer them to a freezer-safe bag. They can last for up to 3 months. To make sure they taste great when thawed, try to remove as much air as possible from the bag. Reheating tips When you are ready to enjoy your leftovers, reheat them in the oven for the best results. Preheat your oven to 350°F (175°C). Spread the Brussels sprouts on a baking sheet and heat for 10 to 15 minutes. This method keeps them crispy. You can also use the microwave if you are short on time. Just heat them for 1 to 2 minutes, stirring halfway through. Yes, you can make this recipe vegan. The key is to swap ingredients. Use agave syrup instead of maple syrup. You can also find vegan Dijon mustard. This way, you keep all the great flavors without any animal products. Maple Dijon Brussels sprouts pair well with many dishes. They go great with roasted chicken or turkey. You can also serve them with quinoa or brown rice for a tasty vegan meal. Add a salad for extra crunch and freshness. When choosing Brussels sprouts, look for firm, bright green sprouts. They should feel heavy for their size. Avoid any that are yellow or wilted. A good sprout has tightly packed leaves and no black spots. Freshness makes a big difference in flavor and texture. In this blog post, we explored key ingredients and preparation steps for Maple Dijon Brussels Sprouts. I shared tips for perfect caramelization and ways to vary flavors to suit your taste. Storing leftovers is easy, too, with simple refrigeration and freezing methods. Remember, these sprouts can fit different diets and pair well with many dishes. Embrace your kitchen skills, enjoy the process, and create a dish that's both tasty and healthy!

Maple Dijon Brussels Sprouts Savory and Simple Dish

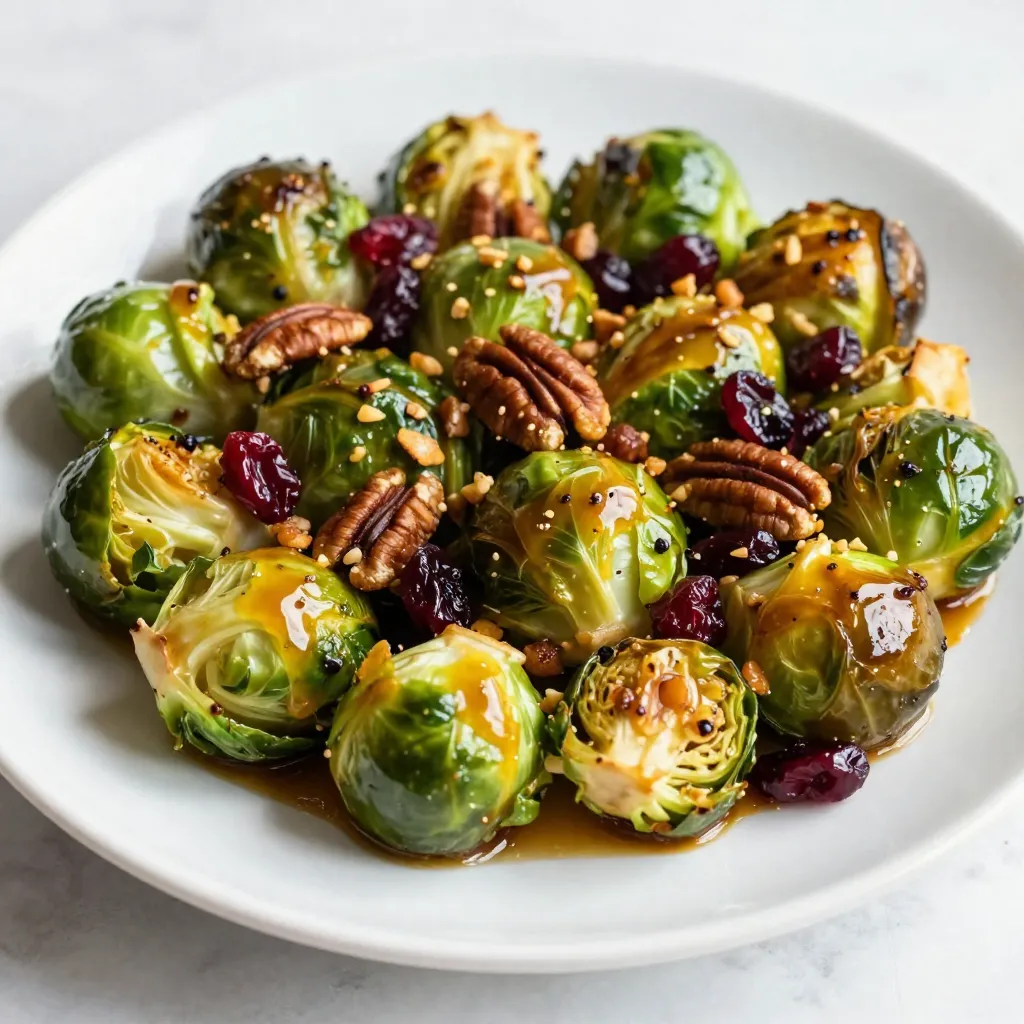
Are you ready to elevate your vegetable game? Maple Dijon Brussels Sprouts combine rich flavors with a simple recipe. This

- 4 large bell peppers (red, yellow, or green) - 1 cup quinoa, rinsed - 2 cups vegetable broth - 1 cup cherry tomatoes, halved - 1 cup cucumber, diced - 1/2 cup red onion, finely chopped - 1 cup Kalamata olives, pitted and sliced - 1 cup feta cheese, crumbled - 2 tablespoons olive oil - 2 tablespoons lemon juice - 1 teaspoon dried oregano - Salt and pepper to taste - Fresh parsley, chopped (for garnish) When making Greek stuffed peppers, you need quality ingredients. Bell peppers are the stars. Choose large ones in red, yellow, or green. The colors add a fun touch to your dish. Quinoa is your healthy base. Rinse it well to remove any bitter taste. Vegetable broth gives the quinoa flavor. The fresh vegetables—cherry tomatoes, cucumber, and red onion—add crunch and brightness. Kalamata olives and feta cheese bring that classic Greek taste. Their saltiness balances the sweetness of the peppers. Olive oil and lemon juice help mix everything together. They add healthy fats and a zesty kick. Oregano, salt, and pepper season the dish. You can adjust these to fit your taste. Finally, don’t forget fresh parsley for a pop of green on top. With these ingredients, your Greek stuffed peppers will shine on the plate and in your mouth! {{ingredient_image_1}} 1. Start by preheating your oven to 375°F (190°C). This step gets the oven ready for cooking the peppers. 2. Next, cook the quinoa. In a medium saucepan, mix 1 cup of rinsed quinoa with 2 cups of vegetable broth. Bring it to a boil. Once boiling, lower the heat, cover, and let it simmer for 15 minutes. The quinoa should be fluffy when done. 3. While the quinoa cooks, prepare the bell peppers. Take 4 large peppers and slice off the tops. Remove the seeds and membranes, then stand them upright in a baking dish. 1. In a large bowl, combine the cooked quinoa with the following ingredients: - 1 cup cherry tomatoes, halved - 1 cup cucumber, diced - 1/2 cup red onion, finely chopped - 1 cup Kalamata olives, pitted and sliced - 1 cup crumbled feta cheese - 2 tablespoons olive oil - 2 tablespoons lemon juice - 1 teaspoon dried oregano - Salt and pepper to taste 2. Mix well until all ingredients are evenly distributed. This ensures every bite has great flavor. 1. Carefully fill each prepared bell pepper with the quinoa mixture. Press down gently to pack the filling. 2. Cover the baking dish with aluminum foil. Bake for 25 minutes to let the flavors meld. 3. After 25 minutes, remove the foil and bake for another 10-15 minutes. This step helps the peppers become tender and slightly caramelized. 4. Once done, take them out of the oven and let them cool for a few minutes. Garnish with chopped fresh parsley before serving. Enjoy your delicious Greek stuffed peppers! To achieve the perfect quinoa texture, rinse it well before cooking. This removes the bitter coating called saponin. Use vegetable broth for added flavor. Bring the broth to a boil, then lower the heat and cover. Cook it for about 15 minutes. Fluff it with a fork once done. This makes it light and airy. When it comes to seasoning, taste as you go. Start with salt and pepper. You can always add more later. If you like a zing, add more lemon juice. For a bolder flavor, increase the oregano. Adjusting these will help you find the taste you enjoy most. Packing the filling properly is key. Once your quinoa mixture is ready, spoon it into each bell pepper. Press it down gently but don’t squish it too hard. You want it full but not overflowing. To prevent overflow during baking, leave a little space at the top. This allows the filling to puff up without spilling out. Cover the dish with foil to keep moisture in. This helps cook the peppers evenly and keeps them tender. For garnishes, fresh parsley adds a pop of color. It brightens the dish and enhances its look. Sprinkle it right before serving for a fresh touch. You can also add a little extra feta on top for richness. Pair your stuffed peppers with a simple side salad. A cucumber and tomato salad fits well. The freshness balances the warm peppers. You might also try serving with Greek yogurt for creaminess. This adds a nice contrast to the flavors. Pro Tips Roasting the Peppers: For an extra depth of flavor, roast the bell peppers in the oven for 10 minutes before filling them. This enhances their sweetness. Quinoa Cooking Tip: To add more flavor to the quinoa, consider cooking it in vegetable broth instead of water, as suggested in the recipe. Feta Cheese: Use a high-quality feta cheese for a creamier and more flavorful filling. Crumble it just before adding it to the mixture. Serving Suggestions: These stuffed peppers are delicious served with a side of tzatziki sauce for added creaminess and flavor. {{image_2}} You can change the protein in your Greek stuffed peppers. Ground chicken or beef works well. Just cook the meat before mixing it with the quinoa and veggies. This adds rich flavor and protein. If you prefer a vegetarian option, try lentils or chickpeas. They offer great taste and nutrition. For a vegan twist, swap feta cheese with vegan feta. You can also use cashew cheese or nutritional yeast. Both give a nice creamy texture and a cheesy taste. Feel free to add other vegetables to your stuffed peppers. Zucchini, spinach, or mushrooms can bring new flavors. You can even use shredded carrots for sweetness. Think about the season too. In summer, add fresh corn or diced squash. In winter, consider using roasted root vegetables. Adjusting the filling based on what you have makes it fun. It lets you use fresh, seasonal ingredients. This way, your stuffed peppers stay unique and exciting. If you like heat, add chili flakes or diced jalapeños. This will spice up your dish. Adjust the amount based on your taste. You can also try different herbs for a fresh twist. Basil, parsley, or thyme can change the flavor profile. Mixing in some smoked paprika can add depth. Don't be afraid to experiment. Customizing spices makes your Greek stuffed peppers truly yours. To store leftover Greek stuffed peppers, let them cool first. Place them in an airtight container. Keep them in the fridge for up to three days. This helps maintain their flavor and texture. Before eating, check for any signs of spoilage. To freeze, wrap each stuffed pepper in plastic wrap. Then, place them in a freezer-safe bag or container. They will last up to three months in the freezer. To thaw, move them to the fridge overnight. This slow thaw helps keep them moist and tasty. For the best texture and flavor, reheat stuffed peppers in the oven. Preheat the oven to 350°F (175°C). Place the peppers in a baking dish with a splash of water. Cover with foil to prevent drying out. Heat for about 20 minutes. You can also microwave them, but the oven gives better results. For Greek stuffed peppers, I recommend using large bell peppers. You can choose red, yellow, or green. Each color brings a unique flavor. Red bell peppers taste sweet and rich. Yellow peppers are mild and fruity. Green peppers have a bit more bite. All types have a nice texture that holds the filling well. Look for peppers that are firm and shiny. They should feel heavy for their size, indicating freshness. Yes, you can make Greek stuffed peppers ahead of time. Prepare the filling and stuff the peppers. Then, cover them and store in the fridge for up to 24 hours. When ready to cook, bake them straight from the fridge. This makes meal prep easy for busy days. You can also freeze them for up to three months. Just thaw overnight in the fridge before baking. Greek stuffed peppers pair well with many sides. A simple Greek salad adds freshness. You can also serve it with tzatziki sauce for a cool dip. Another great option is roasted potatoes with herbs. They add a nice crunch. Grilled vegetables also complement the dish well. Choose sides that balance the flavors and make the meal more filling. This blog covered Greek stuffed peppers, from key ingredients to cooking and serving tips. You learned how to prepare, mix, and bake the dish, along with helpful advice for perfect results. Remember, you can customize the filling and adjust flavors to suit your taste. With proper storage, you can enjoy this delicious meal later. I hope you feel inspired to make these tasty stuffed peppers for your next meal! Enjoy your cooking adventure!

Greek Stuffed Peppers Flavorful and Healthy Dish

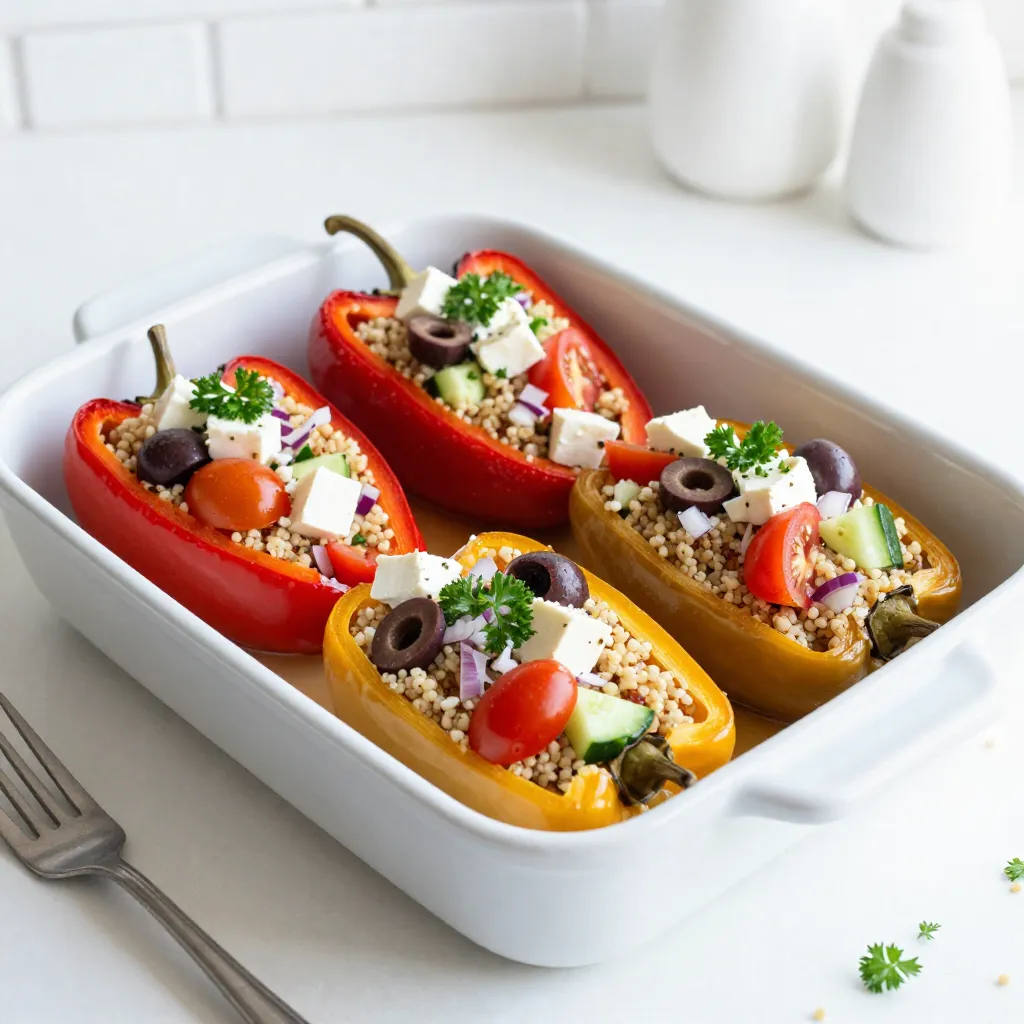
If you’re looking for a dish that’s both flavorful and healthy, Greek stuffed peppers are a perfect choice. These vibrant

- 2 medium apples (Granny Smith or Honeycrisp), peeled and diced - 1 cup all-purpose flour - 1/2 cup granulated sugar - 1 teaspoon baking powder - 1/2 teaspoon baking soda - 1/4 teaspoon salt - 1/2 teaspoon cinnamon - 1/4 teaspoon nutmeg - 1/2 cup milk - 1 large egg - 1 teaspoon vanilla extract - 1/4 cup maple syrup (for glazing) - Oil for frying (vegetable or canola) Gather these ingredients before you start. The apples give a nice crunch and sweetness. I love using Granny Smith for a tart bite, or Honeycrisp for a sweet touch. The flour is the base, giving structure. Sugar adds sweetness, while baking powder and soda help the fritters puff up. Spices like cinnamon and nutmeg add warmth and depth. Next, we need milk and an egg to bind everything. Vanilla extract brings a lovely aroma. The maple syrup is for glazing, giving that irresistible shine and flavor. Lastly, oil is key for frying and achieving that golden crust. These ingredients come together to create a treat that is not just delicious, but also a joy to make. {{ingredient_image_1}} Start by whisking together the dry ingredients. In a medium bowl, combine: - 1 cup all-purpose flour - 1/2 cup granulated sugar - 1 teaspoon baking powder - 1/2 teaspoon baking soda - 1/4 teaspoon salt - 1/2 teaspoon cinnamon - 1/4 teaspoon nutmeg Mix these well until they are fully blended. The spices will add warmth to the fritters. Next, let’s focus on the wet ingredients. In another bowl, mix together: - 1/2 cup milk - 1 large egg - 1 teaspoon vanilla extract Stir this mixture until smooth. The egg helps bind everything together, while vanilla adds flavor. Now, it’s time to combine the wet and dry ingredients. Pour the wet mix into the dry mix. Stir gently until just combined. Be careful not to overmix. A few lumps are okay. Then, fold in: - 2 medium apples, peeled and diced Make sure the apple pieces are spread evenly. For frying, heat about 2 inches of vegetable or canola oil in a deep skillet. Aim for 350°F (175°C). Once hot, use a spoon or an ice cream scoop to drop tablespoon-sized portions of batter into the oil. Fry in batches to avoid crowding the pan. Cook for about 2-3 minutes on each side until golden brown. Use a slotted spoon to remove them and place on paper towels to drain. To prepare the maple glaze, take: - 1/4 cup maple syrup Mix it in a small bowl until smooth. You can warm it slightly to make it thinner if needed. Once the fritters cool a bit, drizzle or dip them into the warm maple glaze. Make sure they are well coated for that sweet finish. - Avoiding overmixing: Mix the wet and dry ingredients gently. You want some lumps. Overmixing makes the fritters tough. - Frying temperature control: Heat the oil to 350°F (175°C). Use a thermometer for accuracy. If the oil is too cool, the fritters will soak up oil. Too hot, and they'll burn. - Presentation ideas for serving: Serve warm fritters on a rustic wooden board. Add a sprinkle of powdered sugar on top. Garnish with fresh apple slices for color. - Accompaniments like powdered sugar or extra maple syrup: Place a small bowl of extra maple syrup beside the fritters. This gives guests a chance to dip as they like. - Overcrowding the frying pan: Fry fritters in small batches. This helps keep oil temperature steady. Overcrowding cools the oil and leads to soggy fritters. - Incorrect oil temperature: Always check the oil temperature before frying. If it's too low, the fritters will absorb too much oil. If too high, they'll burn on the outside and stay raw inside. Pro Tips Use Fresh Apples: For the best flavor and texture, choose fresh, crisp apples like Granny Smith or Honeycrisp. Temperature Control: Ensure your oil is at the right temperature (350°F) before frying to achieve a perfectly golden brown fritter. Don't Overmix: Mix the batter gently to avoid tough fritters; a few lumps in the batter are perfectly fine. Maple Syrup Consistency: Warm the maple syrup slightly if it’s too thick for drizzling; it should be smooth and easy to coat the fritters. {{image_2}} You can change the taste of your fritters by using different types of apples. Granny Smith apples give a tart flavor, while Honeycrisp apples add sweetness. You can also mix apples for more depth. Adding nuts or raisins can bring a nice crunch or chewiness. Chopped walnuts or pecans work well. Dried raisins add sweetness and texture. Experiment with what you like best! If you want to make these fritters gluten-free, you can use almond flour or a gluten-free blend. Just make sure the mix includes a binding agent. This keeps the fritters light and fluffy. For dairy-free options, try almond milk or oat milk. You can also use a flax egg instead of a regular egg. This makes the fritters vegan-friendly too. You can turn fritters into a breakfast dish by serving them with a side of fresh fruit. A dollop of yogurt can add creaminess. They taste great with a drizzle of maple syrup on top. For dessert, serve fritters warm with a scoop of ice cream. The cold ice cream pairs perfectly with the warm fritters. Don’t forget to add extra maple syrup for dipping! To keep your apple fritters fresh, use proper storage methods. Refrigeration works best for short-term storage. Place the fritters in an airtight container. This keeps them from drying out. If you want to store them longer, freezing is a good choice. Wrap each fritter in plastic wrap, then place them in a freezer bag. This helps avoid freezer burn. To maintain texture, let them cool first before storing. This prevents moisture buildup. If you’re freezing, reheat them in the oven to restore crispness. To enjoy your fritters again, reheating is key. The best way is to use the oven. Preheat your oven to 350°F (175°C). Place fritters on a baking sheet. Heat for about 10 minutes until warm and crispy. You can also use the microwave for a quick reheating. However, this may make the fritters soft. Heat for 15-20 seconds, checking often to avoid overheating. How long do fritters last in the fridge? In the fridge, fritters last about 2-3 days. After that, they may start to lose flavor and texture. If you notice any signs of spoilage, it’s best to toss them. Always remember to check for freshness before eating. Yes, you can prepare fritters ahead of time. To do this, follow these steps: - Make the batter and store it in the fridge for up to 2 hours. - Cook the fritters just before serving for the best taste and texture. - If you have leftovers, cool and store them in an airtight container. They can last up to two days in the fridge. When you’re ready to eat them, reheat in a hot oven to regain crispness. I recommend using Granny Smith or Honeycrisp apples. They add great flavor and texture. - Granny Smith apples are tart and firm, which helps them hold their shape. - Honeycrisp apples are sweet and juicy, adding a nice balance to the fritters. Both types add a delicious crunch to each bite. You can bake fritters, but they will be different. Here are some tips: - Preheat your oven to 375°F (190°C). - Place the fritter batter on a baking sheet lined with parchment paper. - Bake for about 15-20 minutes or until golden brown. Keep in mind, baked fritters will be less crispy. You may want to brush them with a bit of melted butter for added flavor. This blog covered how to make tasty apple fritters. We discussed key ingredients and steps, from mixing the dry and wet components to frying. I shared tips to perfect your fritters and avoid common mistakes. You can also explore fun variations and how to store leftovers. Remember, with a few tweaks, you can make these fritters fit any meal or diet. Enjoy making this delicious treat and let your creativity shine!

Maple Glazed Apple Fritters Irresistibly Delicious Treat

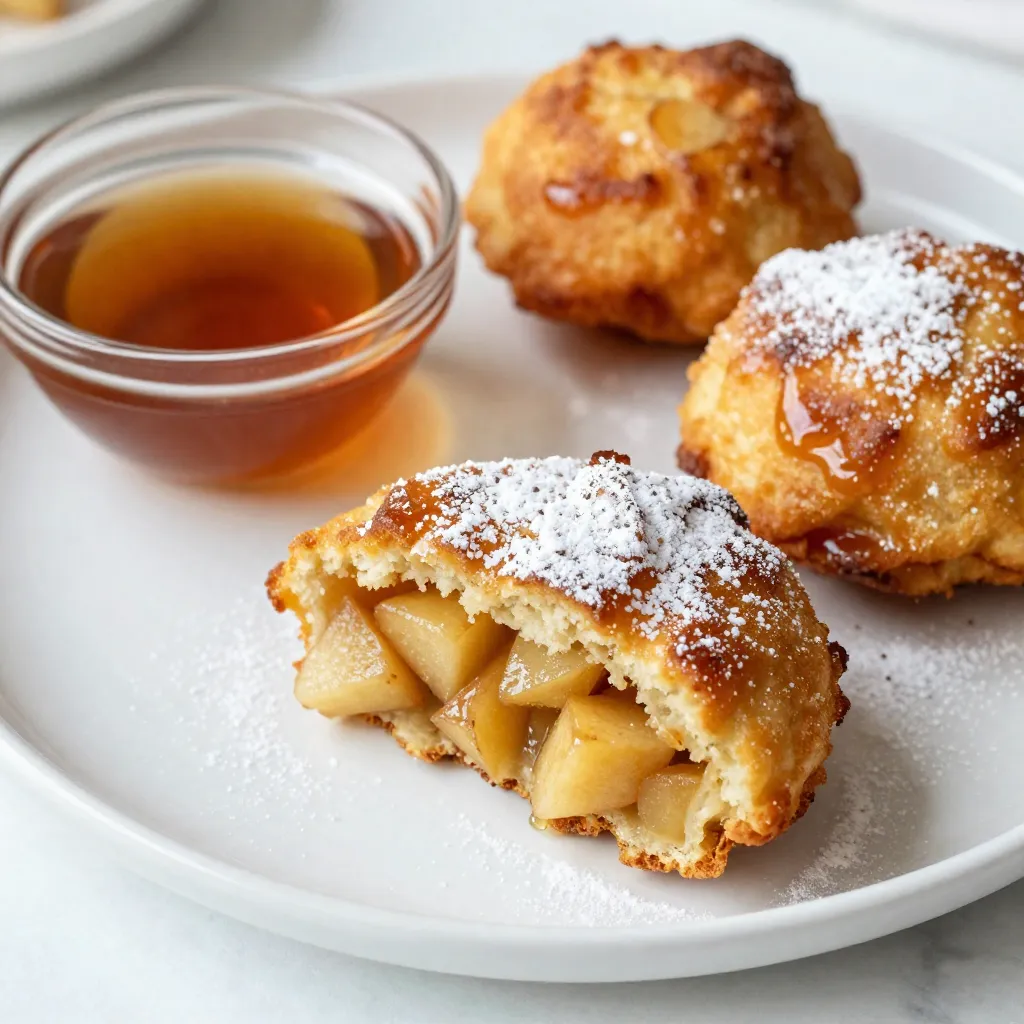
If you crave a treat that combines sweet apples and a rich maple glaze, you’re in the right place! These

For a delightful Coconut Pineapple Smoothie Bowl, gather these fresh items: - 1 cup frozen pineapple chunks - 1 medium ripe banana - 1/2 cup coconut milk (or any plant-based milk) - 1/4 cup Greek yogurt (or plant-based yogurt) - 1 tablespoon honey or agave syrup (optional) - 1/4 cup granola (for topping) - 1 tablespoon shredded coconut (toasted, for topping) - Fresh pineapple slices for garnish - Fresh mint leaves for garnish (optional) These ingredients work together to create a creamy and tasty smoothie bowl. The frozen pineapple gives a nice chill. The banana adds sweetness and creaminess. Coconut milk brings a rich flavor, while Greek yogurt adds protein. If you like it sweeter, add honey or agave syrup. Top it all with crunchy granola, toasted coconut, and fresh fruit. The mint leaves add a lovely touch and aroma. {{ingredient_image_1}} - Combining Ingredients Start by adding the frozen pineapple chunks, ripe banana, coconut milk, Greek yogurt, and honey into your blender. Make sure the fruits are frozen, as this helps to create a thick and creamy texture. - Blending Techniques Blend the mixture on high until it is smooth and creamy. Stop the blender to scrape down the sides. This ensures all ingredients mix well. If your smoothie is too thick, just add a splash more coconut milk. - Adjusting Consistency Check the texture. You want it thick but pourable. If it feels too thick, add small amounts of coconut milk until you reach the right consistency. - Pouring the Smoothie Once blended, pour the smoothie mixture into a bowl. Use a spatula to get every drop out of the blender. - Adding Toppings Now for the fun part! Top your smoothie with granola, toasted shredded coconut, and fresh pineapple slices. Add a few coconut flakes for extra crunch. To make your bowl look pretty, add fresh mint leaves on top. They add color and a fresh taste. You can also use a drizzle of honey on top for a touch of sweetness. Enjoy your creation right away for the best flavor! How to Blend Smoothly To get a smooth blend, start with your frozen pineapple and banana. Place them in the blender first. Then, add coconut milk and yogurt. This order helps the blades work better. Blend on high until creamy. If needed, pause to scrape the sides. This ensures everything mixes well. Troubleshooting Thickness If your smoothie is too thick, don’t worry. Just add more coconut milk. A little at a time helps. Blend again until you reach your perfect texture. The goal is a creamy, inviting mix. Natural Sweeteners Options You can adjust sweetness based on your taste. If you like it sweeter, add honey or agave syrup. These natural sweeteners blend well. Start with a small amount and taste. Remember, ripe bananas add natural sweetness, too. This makes your smoothie bowl tasty without too much sugar. Presentation Ideas For a great look, pour the smoothie into a bowl. Then, add your toppings. Use granola and toasted coconut for crunch. Fresh pineapple slices and coconut flakes add color. Place a few mint leaves on top for a fresh touch. This makes your smoothie bowl fun and beautiful. Pairing With Other Dishes You can serve this smoothie bowl with a light breakfast or snack. It pairs well with toast or oatmeal. It’s also a great treat after a workout. Enjoy it anytime you want a tropical lift! Pro Tips Use Frozen Fruits: Using frozen pineapple chunks not only makes the smoothie cold and refreshing but also gives it a thicker, creamier texture. Customize Your Milk: Feel free to swap coconut milk with almond, oat, or soy milk to suit your dietary preferences or to enhance the flavor. Add More Toppings: Get creative with your toppings! Try adding chia seeds, sliced bananas, or even nuts for a nutritious crunch. Sweetness Adjustment: Taste the smoothie before serving; adjust the sweetness by adding more honey or agave if desired, especially if your fruits are not very ripe. {{image_2}} For a fun twist, try these ingredient swaps: - Dairy-Free Options: Use plant-based yogurt instead of Greek yogurt. Almond or soy yogurt works well. You can also swap coconut milk for almond milk or oat milk. Both add a nice creaminess. - Alternative Fruit Choices: If you want to mix things up, use mango or strawberries. These fruits blend well and still give that tropical vibe. You can also try adding spinach for extra nutrients without changing the taste. Get creative with flavors to make your bowl unique: - Tropical Add-ins: Add a scoop of passion fruit or a bit of lime juice. These flavors enhance the tropical taste. You might also add a few slices of kiwi for a zesty kick. - Superfood Boosts: Consider adding chia seeds or flaxseeds. These tiny seeds are full of fiber and healthy fats. They are a great way to add nutrition without changing the flavor much. Change your smoothie bowl with the seasons: - In summer, use fresh berries like blueberries or raspberries. They are juicy and sweet, perfect for warm days. - In winter, try adding spices like cinnamon or nutmeg. These warm spices can give your bowl a cozy feel. You could also top with pomegranate seeds for a festive touch. Each of these variations helps you enjoy your Coconut Pineapple Smoothie Bowl in new ways! To keep your smoothie bowl fresh, use an airtight container. Glass or plastic containers work well. Store it in the fridge for up to two days. After that, the flavors may fade, and the texture can change. You can freeze your smoothie bowl for later use. Pour the mixture into a freezer-safe container. Leave some space at the top, as the smoothie may expand when frozen. It can last up to three months in the freezer. To enjoy your frozen smoothie bowl, place it in the fridge overnight. This method helps it thaw slowly. If you're in a hurry, you can use the microwave. Heat it in short bursts, stirring in between. Once thawed, stir well. Adjust the consistency with a little coconut milk if needed. Enjoy your tasty treat anytime! Yes, you can make this smoothie bowl ahead of time. Best Practices for Preparation To prepare it, blend your ingredients as usual. Then, store it in an airtight container. Keep it in the fridge for up to 24 hours. When you are ready to eat, stir it well. If it thickens, add a splash of coconut milk. This keeps it fresh and tasty. Yes, this smoothie bowl can be vegan-friendly. Ingredient Considerations To make it vegan, use plant-based yogurt and coconut milk. Instead of honey, choose agave syrup. Check that your granola is also vegan. With these swaps, you enjoy a great vegan treat without losing flavor. You can easily make your smoothie bowl more filling. Protein and Fiber Additions Add a scoop of protein powder or nut butter for protein. Chia seeds or ground flaxseed boost fiber. These additions help keep you full longer. You can also top it with more granola for extra crunch and energy. Enjoy your smoothie bowl as a satisfying meal! This blog post covered how to make a tasty smoothie bowl with simple ingredients. I shared easy steps for blending, assembling, and garnishing. You can customize the bowl with different fruits and flavors. Remember to store any leftovers properly for future enjoyment. Smoothie bowls are fun and boost your health. Try these ideas in your kitchen. Enjoy your journey to creating delicious, fresh meals!

Coconut Pineapple Smoothie Bowl Fresh and Tasty Treat

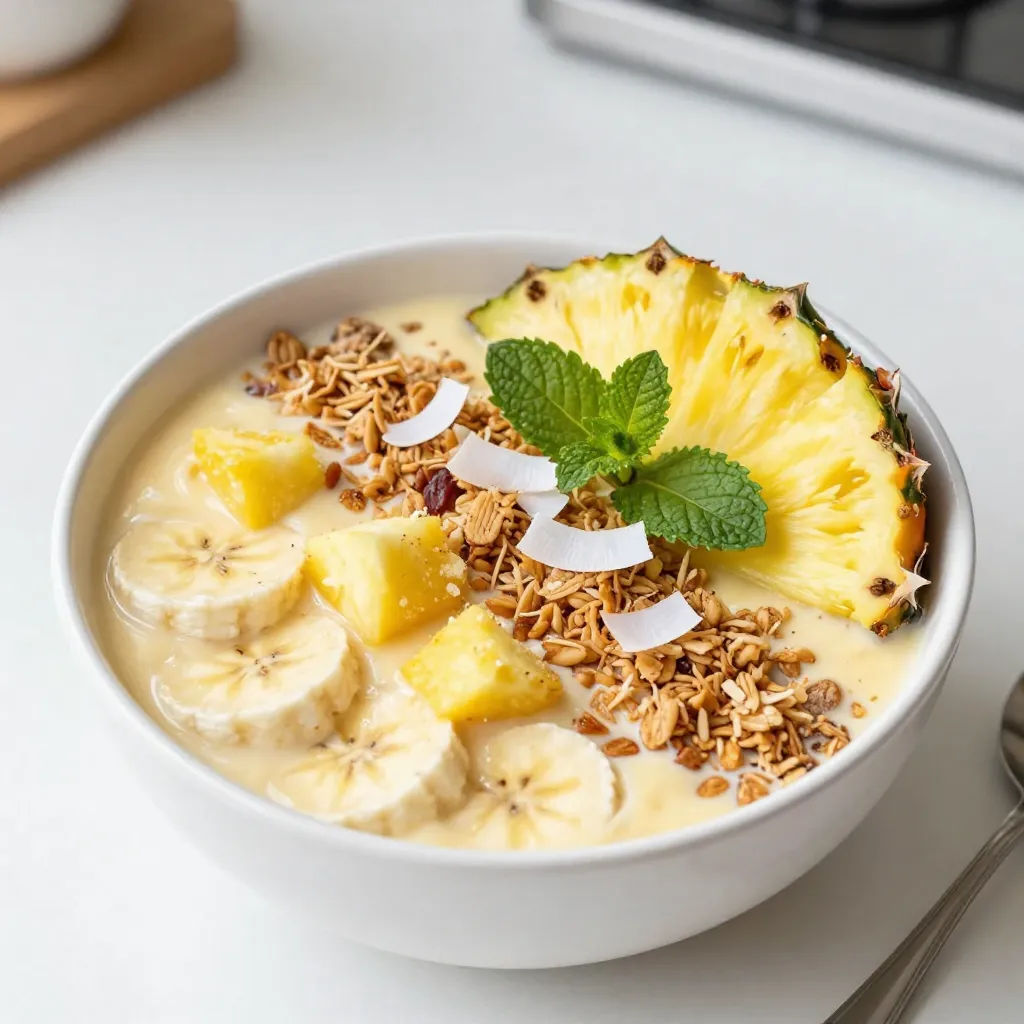
Are you ready to cool down with a delicious Coconut Pineapple Smoothie Bowl? This fresh and tasty treat is packed

For this dish, you will need: - 4 salmon fillets (about 6 oz each) - 4 tablespoons unsalted butter, melted - 1 cup grated Parmesan cheese - 4 cloves garlic, minced - 1 teaspoon lemon zest - 1 teaspoon dried parsley - ½ teaspoon salt - ¼ teaspoon black pepper - 2 tablespoons fresh lemon juice These ingredients create a tasty crust that enhances the salmon's flavor. The butter helps the crust stick and adds richness. Parmesan gives a nice salty bite, while garlic brings warmth. The lemon zest brightens the dish with its fresh flavor. You can add a few ingredients to make this dish even better: - Fresh herbs like dill or thyme - A pinch of red pepper flakes for heat - Chopped sun-dried tomatoes for a sweet touch - A squeeze of fresh lime for zest These add-ins can change the taste and make it your own. Try different combinations to see what you like best. Each serving of Garlic Parmesan Crusted Salmon has: - Calories: 400 - Protein: 36g - Fat: 25g - Carbohydrates: 2g - Fiber: 0g - Sugar: 0g This dish is a great way to enjoy healthy fats and protein. Salmon is rich in omega-3 fatty acids, which are good for your heart. With low carbs, it fits well in many diets. Enjoying this dish can be both delicious and nutritious. {{ingredient_image_1}} First, you need to set the oven to 400°F (200°C). This temperature is key for a crispy crust. Next, take a baking sheet and line it with parchment paper. If you prefer, lightly grease it with cooking spray. This step makes cleanup easy and helps the salmon cook evenly. In a medium bowl, mix together the melted butter, grated Parmesan cheese, minced garlic, lemon zest, dried parsley, salt, and black pepper. Use a spoon to combine these ingredients well. You want the mix to be thick and spreadable. This mixture gives the salmon a rich flavor and a crunchy top. Now, place the salmon fillets skin-side down on the baking sheet. Drizzle fresh lemon juice over each fillet. This adds brightness to the dish. Then, take your garlic Parmesan mix and spread it generously on top of each fillet. Press down slightly to help it stick. Bake the salmon for about 12-15 minutes. Look for a golden, bubbly crust and cooked-through salmon. For an extra crispy finish, switch to broil for 2-3 minutes, but watch closely to avoid burning. To cook salmon just right, aim for a pink center. The fish should flake easily with a fork. I recommend using a meat thermometer. The ideal internal temperature is 145°F (63°C). This ensures it is safe to eat while still moist. A little practice helps you know when it’s done. Salmon fillets vary in thickness. For thinner fillets, cook for 10-12 minutes. Thicker fillets may need 15-18 minutes. Always check on your salmon as it cooks. If the fillet is over one inch thick, add a few extra minutes. This keeps it tender and juicy. If you have leftover salmon, cool it down quickly. Place it in an airtight container. It will stay fresh in the fridge for up to three days. To reheat, use a low oven or microwave. Add a splash of lemon juice for extra flavor. You can also flake it into salads or pasta dishes for a tasty meal. Pro Tips Use Fresh Ingredients: Always opt for fresh salmon and freshly minced garlic for the best flavor and texture in your dish. Check Salmon for Doneness: To ensure perfect cooking, use a fork to gently flake the salmon. If it flakes easily and the flesh is opaque, it’s done. Customize the Seasoning: Feel free to experiment with additional herbs or spices like thyme or paprika to tailor the flavor to your liking. Pair with Sides: Serve with a fresh salad or roasted vegetables to complement the rich flavors of the garlic Parmesan crust. {{image_2}} You can swap salmon for other fish. Try using trout, cod, or tilapia. Each fish has a unique taste and texture. They will all work well with the garlic Parmesan crust. Adjust the baking time if needed. Thinner fish cooks faster, while thicker fish takes longer. You can get creative with the crust. Instead of Parmesan, use feta or cheddar. Add crushed nuts like almonds or walnuts for crunch. Spices like paprika or cayenne can add a nice kick. Fresh herbs like basil or dill can also enhance the flavor. Mix and match to find what you love. To make this dish gluten-free, check your cheese for gluten. Use gluten-free breadcrumbs if you want a crunchy crust. For a dairy-free option, use vegan cheese or nutritional yeast. You can also use olive oil instead of butter. This way, everyone can enjoy this tasty meal. To store cooked salmon, let it cool down first. Once cool, wrap it tightly in plastic wrap or foil. Place it in an airtight container. This way, it stays fresh for about 3 days in the fridge. To reheat your salmon, preheat your oven to 275°F (135°C). Place the salmon on a baking sheet. Cover it loosely with foil to keep it moist. Heat for about 10-15 minutes. This method keeps the crust crispy while warming the fish evenly. If you want to freeze your salmon, wrap it tightly in plastic wrap or foil. Then, place it in a freezer-safe bag. You can freeze it for up to 3 months. When you’re ready to eat, thaw it in the fridge overnight. Reheat it gently, and your meal will taste fresh! Bake the Garlic Parmesan Crusted Salmon for 12 to 15 minutes at 400°F (200°C). The salmon cooks quickly. You want it to be flaky and tender. If you like a crispy crust, broil it for the last 2 to 3 minutes. Yes, you can use frozen salmon. However, it’s best to thaw it first. Thaw the salmon overnight in the fridge or under cold water. This ensures even cooking and a better texture. Several sides go well with this dish. Try serving it with: - Steamed broccoli - Roasted asparagus - Garlic mashed potatoes - A fresh green salad These sides balance the flavors and create a complete meal. Check the salmon for doneness by using a fork. It should easily flake apart. The inside should be opaque and no longer translucent. If you have a food thermometer, the internal temperature should reach 145°F (63°C). This post covered how to make Garlic Parmesan Crusted Salmon. You learned about the main ingredients, optional add-ins, and nutrition facts. I shared step-by-step instructions for prepping, crusting, and cooking. Tips ensured your salmon cooks perfectly, while variations offered ways to suit your taste. I included storage info and answered common questions. Now you can enjoy a tasty meal and impress friends. Cooking doesn’t have to be hard. With these tips, you'll be a salmon pro in no time. Enjoy your delicious dish!

Garlic Parmesan Crusted Salmon Simple and Healthy Dish

Are you ready to spice up your dinner routine? Garlic Parmesan Crusted Salmon is a simple, healthy dish bursting with

To make classic vanilla sugar cookies, gather these items: - 2 ¾ cups all-purpose flour - 1 teaspoon baking soda - ½ teaspoon baking powder - 1 cup unsalted butter, softened - 1 ½ cups white sugar - 1 egg - 1 teaspoon vanilla extract - ½ teaspoon almond extract - 3 tablespoons granulated sugar (for rolling) - Pinch of salt Measuring is key for great cookies. Use dry measuring cups for flour. Spoon the flour into the cup, then level it off with a knife. For baking soda and baking powder, use measuring spoons. Always pack brown sugar firmly if you use it. This helps your cookies turn out just right. Want to add more flavor? Try these options: - A pinch of cinnamon for warmth - Lemon zest for a fresh twist - A splash of coconut extract for a tropical touch These ingredients can make your classic cookies even more special. Experiment to find your favorite mix! {{ingredient_image_1}} First, you need to preheat your oven to 375°F (190°C). This step is key for even baking. While the oven warms up, grab a baking sheet and line it with parchment paper. This will help the cookies not stick. In a medium bowl, whisk together 2 ¾ cups of all-purpose flour, 1 teaspoon of baking soda, ½ teaspoon of baking powder, and a pinch of salt. Mixing these dry ingredients well ensures your cookies rise perfectly. Set this bowl aside for now. In a large mixing bowl, take 1 cup of softened unsalted butter and 1 ½ cups of white sugar. Use a mixer to cream them together until the mix is smooth and fluffy. This can take about 2-3 minutes. The air you whip in is what makes the cookies light. Next, beat in 1 egg, 1 teaspoon of vanilla extract, and ½ teaspoon of almond extract into the butter mix. Make sure everything blends well. Now, gradually add in the dry mixture you set aside earlier. Stir gently until just combined. Avoid overmixing to keep the dough tender. Scoop out about 1 tablespoon of dough and roll it into a ball. Roll each ball in 3 tablespoons of granulated sugar to coat it lightly. Place the sugar-coated balls on the baking sheet, spacing them about 2 inches apart. This gives them room to spread. Flatten each ball gently with the bottom of a glass or your palm until it’s about ½ inch thick. Bake them in your preheated oven for 8-10 minutes. Look for golden edges. The centers may seem a bit underbaked, but they will firm up as they cool. Let the cookies sit on the baking sheet for 5 minutes before moving them to a cooling rack. This keeps them soft and delicious. To get the best texture for your sugar cookies, follow a few key steps. First, use soft, room-temperature butter. This helps the butter mix well with sugar, creating a light, fluffy dough. Avoid overmixing the dough; mix until just combined. This keeps your cookies tender. Bake them until the edges turn golden. The centers may look soft, but they will firm up as they cool. One common mistake is using cold butter. Cold butter won't mix well, leading to dense cookies. Another mistake is overbaking. If cookies look too brown, they can become hard. Always check them a minute or two before the timer goes off. Lastly, don’t skip the rolling in sugar step. This adds a nice sweetness and a slight crunch to each bite. To keep your cookies fresh, store them in an airtight container. This protects them from air and moisture. Place parchment paper between layers to prevent sticking. For longer storage, freeze them. Just wrap each cookie tightly in plastic wrap and place them in a freezer bag. When you want to enjoy them, let them thaw at room temperature. Pro Tips Chill the Dough: For a firmer dough and enhanced flavor, chill the cookie dough for at least 30 minutes before baking. Use Fresh Ingredients: Always use fresh baking powder and baking soda for the best rise and texture in your cookies. Watch the Baking Time: Keep an eye on your cookies while baking; they can go from perfect to overdone quickly, especially since they continue to bake on the sheet. Experiment with Flavors: Feel free to add chocolate chips, nuts, or dried fruits to the dough for added texture and flavor variations! {{image_2}} You can change the flavor of vanilla sugar cookies to suit your taste. To make chocolate chip cookies, add one cup of chocolate chips to the dough. Mix them in after combining the wet and dry ingredients. For a lemon twist, add the zest of one lemon and a tablespoon of lemon juice. This will brighten the flavor and give your cookies a fresh, zesty taste. If you need gluten-free cookies, switch to gluten-free flour. Many brands work well. Just be sure to check the package for a good blend. For vegan cookies, replace the egg with a flax egg. To make this, mix one tablespoon of ground flaxseed with three tablespoons of water. Let it sit for a few minutes until it thickens. You can also use vegan butter instead of regular butter. Decorating cookies can be fun and easy! Use royal icing for a smooth finish. You can color it with food dye and pipe it onto the cooled cookies. Another idea is to sprinkle colored sugar on top before baking. This adds a nice crunch and sparkle. You can also use edible glitter for a festive touch. Get creative with sprinkles or chocolate drizzle to make your cookies pop! To keep your classic vanilla sugar cookies fresh, start with an airtight container. Place a layer of parchment paper at the bottom. Then, add the cookies in a single layer. If you have more cookies, add another layer of parchment and place more cookies on top. This helps avoid sticking. Store the container in a cool, dry place. If stored this way, your cookies can last about one week. Freezing cookies is a great way to extend their life. First, let the cookies cool completely. Once cooled, place them in a single layer on a baking sheet. Freeze them for about one hour. After they are frozen solid, transfer them to a freezer-safe bag. Squeeze out as much air as you can before sealing. You can freeze them for up to three months. When you're ready to eat, just thaw them at room temperature. If your cookies go stale, you can bring them back to life! Preheat your oven to 300°F (150°C). Place the cookies on a baking sheet. Heat them for about 5 minutes. This will make them soft again. Another option is to place a slice of bread in the container with the cookies. The bread adds moisture and can help freshen them up. Sugar cookies are done when the edges turn golden brown. The centers may look soft. They will firm up as they cool. A good rule is to bake them for 8-10 minutes. Keep an eye on them near the end of baking. Yes, you can use other extracts. Almond or lemon extracts work great. These options can add a unique twist to your cookies. Just remember to use the same amount as the vanilla. Sugar cookies can be soft or slightly crunchy. This depends on how long you bake them. For softer cookies, take them out when the edges are golden. For crunchier cookies, bake them a bit longer. You can use royal icing or simple glaze to decorate. Sprinkles are also a fun option. For a classic look, just dust them with powdered sugar. Let your creativity shine! Classic vanilla sugar cookies last about one week at room temperature. Store them in an airtight container to keep them fresh. You can also freeze them for up to three months. Just make sure to wrap them well! In this article, we covered the key steps to baking perfect sugar cookies. We discussed ingredients, measuring tips, and optional flavors. I shared an easy recipe that includes mixing and baking instructions and offered tips for achieving the right texture. We also explored exciting variations and smart ways to store your cookies. Remember, the best cookies come from practice and fun. Enjoy making your delicious treats, exploring flavors, and sharing them with others. Happy baking!

Classic Vanilla Sugar Cookies Simple and Tasty Treat

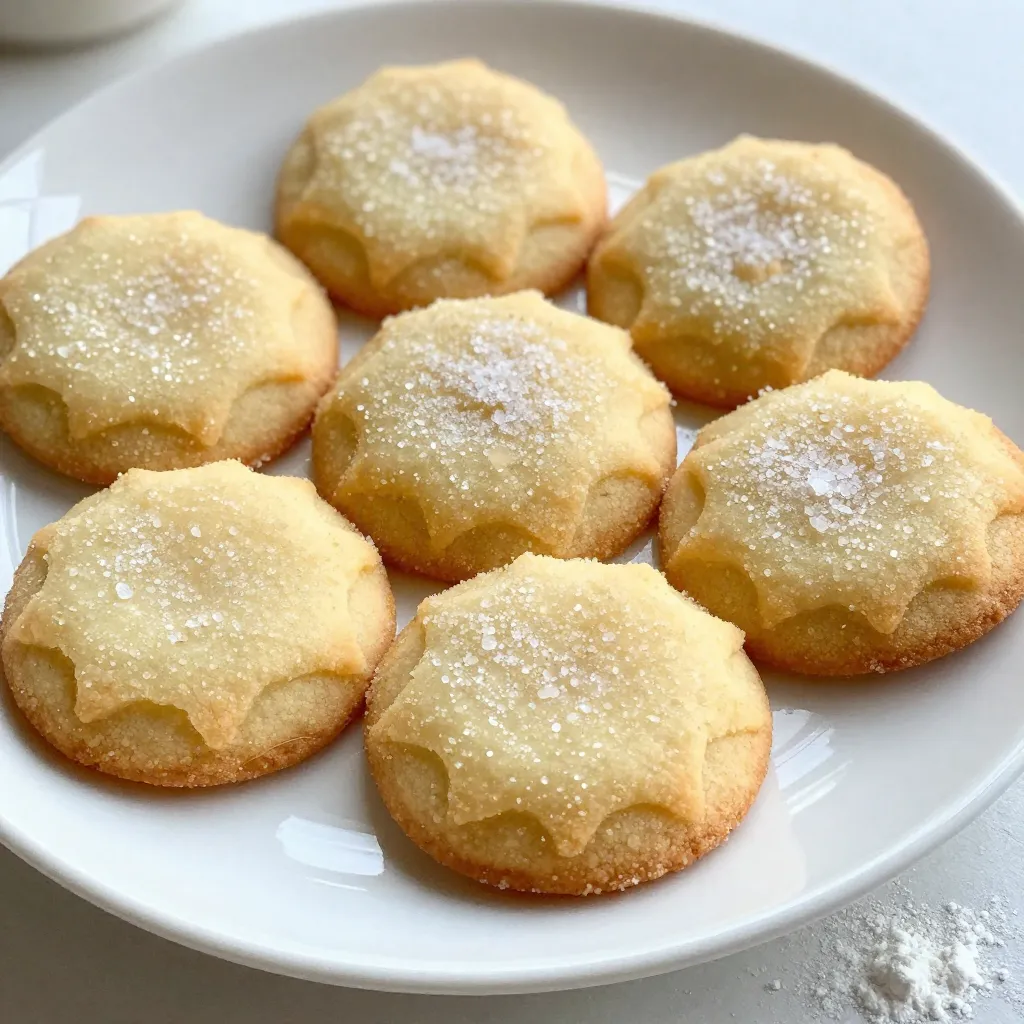
If you’re craving a simple yet tasty treat, classic vanilla sugar cookies are the answer! These cookies are soft, sweet,

To make this tasty Cajun shrimp pasta, gather these key ingredients: - 8 oz fettuccine pasta - 1 lb shrimp, peeled and deveined - 2 tablespoons Cajun seasoning - 2 tablespoons olive oil - 3 cloves garlic, minced - 1 red bell pepper, diced - 1 green bell pepper, diced - 1 cup heavy cream - ½ cup chicken broth - 1 tablespoon lemon juice - Salt and pepper to taste - Fresh parsley, chopped (for garnish) You can add a few extra ingredients for more flavor: - 1 teaspoon smoked paprika for a smoky taste - ½ cup grated Parmesan cheese for creaminess - A pinch of red pepper flakes for more heat If you need to switch some ingredients, here are some ideas: - Use penne or spaghetti if you can't find fettuccine. - Swap shrimp for chicken or tofu for a different protein. - Use vegetable broth instead of chicken broth for a vegetarian option. - Coconut milk can replace heavy cream for a dairy-free choice. These ingredient choices help you customize your dish and suit your taste! {{ingredient_image_1}} First, fill a large pot with water and add salt. Bring the water to a boil. Add the fettuccine to the pot. Cook it according to the package directions until it’s al dente. This usually takes about 8 to 10 minutes. Once done, drain the pasta and set it aside. In a medium bowl, toss the peeled and deveined shrimp with Cajun seasoning. Make sure each shrimp is well coated with the spice. Next, heat olive oil in a large skillet over medium-high heat. Once hot, add the shrimp to the skillet. Cook them for about 2 to 3 minutes on each side. Look for them to turn pink and opaque. Once cooked, remove the shrimp and set them aside. In the same skillet, add minced garlic and diced bell peppers. Sauté these for about 3 to 4 minutes. You want the peppers to soften. Next, pour in heavy cream and chicken broth. Stir to combine and let the mixture simmer gently. Add the cooked fettuccine and the shrimp back into the skillet. Toss everything together so it gets coated in the sauce. Finally, stir in lemon juice and season with salt and pepper to taste. Cook for an additional 2 to 3 minutes to heat everything. Serve hot and garnish with fresh parsley. To make the best Cajun shrimp, start with fresh shrimp. Look for shrimp that are pink and firm. Toss the shrimp in Cajun seasoning. This adds great flavor. Let the shrimp sit for a few minutes. This helps the spice soak in. When cooking, use high heat. This cooks the shrimp quickly and gives a nice sear. Cook them just until they turn pink. Overcooked shrimp can become tough. When cooking fettuccine, always salt the water. This adds flavor to the pasta. Follow the package instructions for timing. Aim for al dente, which means firm but cooked. After draining, do not rinse the pasta. Rinsing washes away the starch, which helps the sauce stick. Keep a little pasta water aside. It can help thin the sauce if needed. Serve your Cajun shrimp pasta hot. A sprinkle of fresh parsley adds color. You can also add grated Parmesan for extra flavor. Pair this dish with a crisp salad or garlic bread. The fresh flavors balance the creamy sauce. A glass of white wine, like Sauvignon Blanc, goes well too. Enjoy your meal with friends or family for a fun dinner. Pro Tips Perfectly Cooked Shrimp: Cook shrimp just until they turn pink and opaque. Overcooking can make them rubbery, so keep an eye on them! Customize Your Spice Level: Adjust the amount of Cajun seasoning to match your desired spice level. You can also add a pinch of cayenne for extra heat! Add Freshness: For a burst of freshness, consider adding a handful of spinach or arugula just before serving. It wilts beautifully and adds color. Make It Creamy: For an even creamier sauce, you can add a bit of grated Parmesan cheese to the heavy cream mixture before tossing with pasta. {{image_2}} You can make a tasty vegetarian version of Cajun shrimp pasta. Start by swapping shrimp with mushrooms or zucchini. Use the same Cajun seasonings for flavor. You can also add a mix of your favorite veggies like spinach or asparagus. This keeps the dish vibrant and healthy. Want more heat? Increase the Cajun seasoning to three tablespoons. You can also add crushed red pepper flakes while cooking. This will give your pasta a nice kick. If you like it really hot, add diced jalapeños. Just be careful to balance the spice with the cream. Adding veggies boosts both flavor and nutrition. Consider bell peppers, broccoli, or cherry tomatoes. Sauté them with the garlic to enhance their taste. You can even toss in some peas or corn for sweetness. This not only makes the dish colorful but also packs in more vitamins. To store leftovers, first let the pasta cool down. Place it in an airtight container. Make sure to cover it tightly. It can stay in the fridge for about three days. If you want to keep it longer, consider freezing. When you’re ready to eat, reheat the pasta gently. Use a skillet over low heat. Add a splash of chicken broth or cream to keep it moist. Stir often until it's heated through. You can also microwave it. Cover it with a damp paper towel to avoid drying out. To freeze Cajun shrimp pasta, first, let it cool completely. Portion it into freezer-safe bags. Press out as much air as you can before sealing. It can last in the freezer for up to three months. When you're ready to enjoy, thaw it in the fridge overnight before reheating. Cajun shrimp pasta is a creamy and spicy dish. It features shrimp cooked with Cajun spices. You combine it with fettuccine pasta and colorful bell peppers. The heavy cream makes it rich and smooth. This dish is a great mix of flavors and textures. To make Cajun shrimp pasta spicier, add more Cajun seasoning. You can also include diced jalapeños or red pepper flakes. Another option is to use hot sauce in the sauce. Taste as you go to find the right heat for you. Yes, you can use frozen shrimp for this recipe. Just make sure to thaw the shrimp first. You can do this by leaving them in the fridge overnight or running them under cold water. This way, they cook evenly and taste great. Great sides for Cajun shrimp pasta include garlic bread and a fresh salad. You can also serve it with steamed veggies or coleslaw. These sides balance the rich flavors of the pasta and add freshness. This blog gave you the full scoop on Cajun shrimp pasta. We covered all the key ingredients and tasty options for extra flavor. You learned step-by-step how to cook the dish, plus tips for perfecting your shrimp and pasta. I also shared great variations, storage tips, and answers to common questions. Now, it's time to whip up this spicy, creamy dish. Enjoy each bite, and share your tasty results!

Cajun Shrimp Pasta Delightful and Easy Recipe

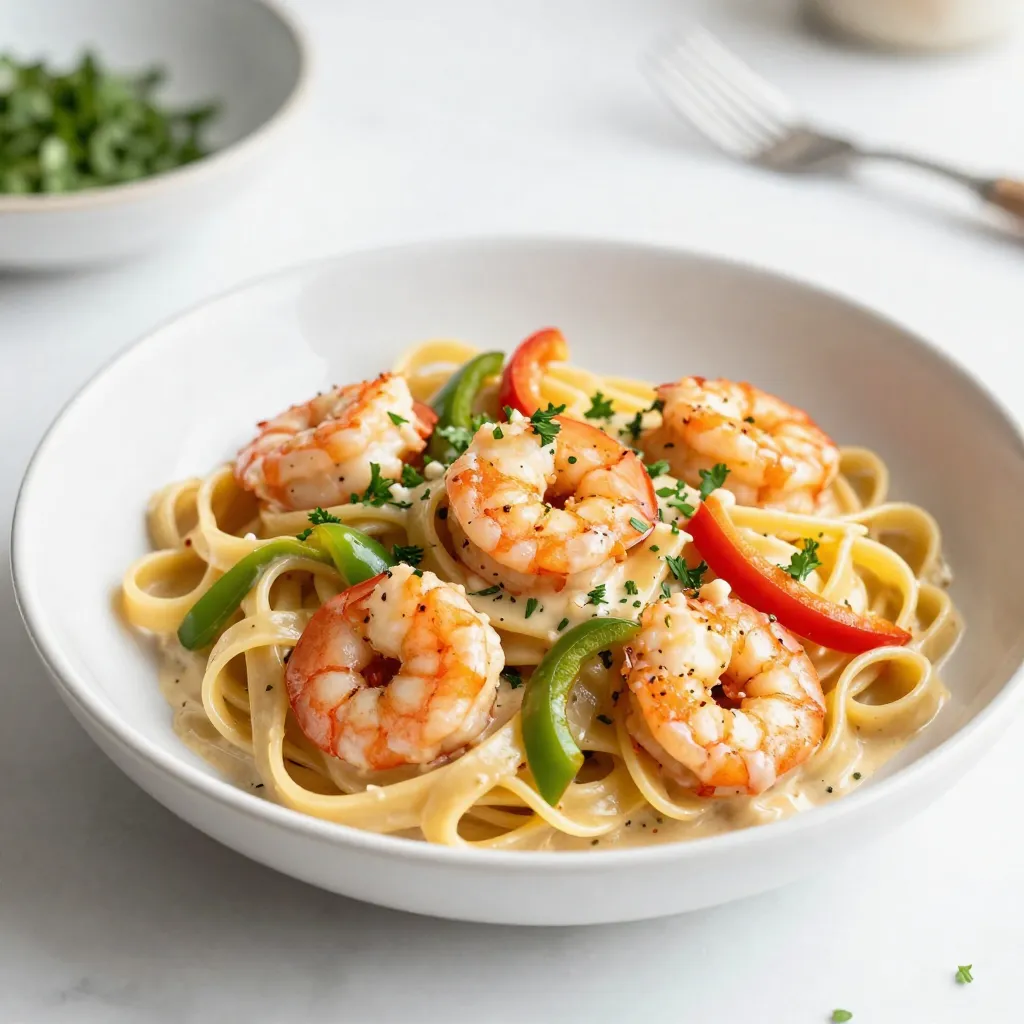
Welcome to your next favorite meal! Cajun Shrimp Pasta is a quick dish that bursts with flavor. You can whip

Older posts
Page1 Page2 … Page84 Next →

dsad

© 2026 Home Cooking Style • Built with GeneratePress

Our Policies

  • Copyright Policy
  • Cookie Policy
  • GDPR Policy
  • Privacy Policy
  • Disclaimer
  • Terms Of Use

More Information

  • Home
  • About
  • Contact
  • Appetizers
  • Dessert
  • Dinner
  • Drinks
©2026, Home Cooking Style About Back To Top