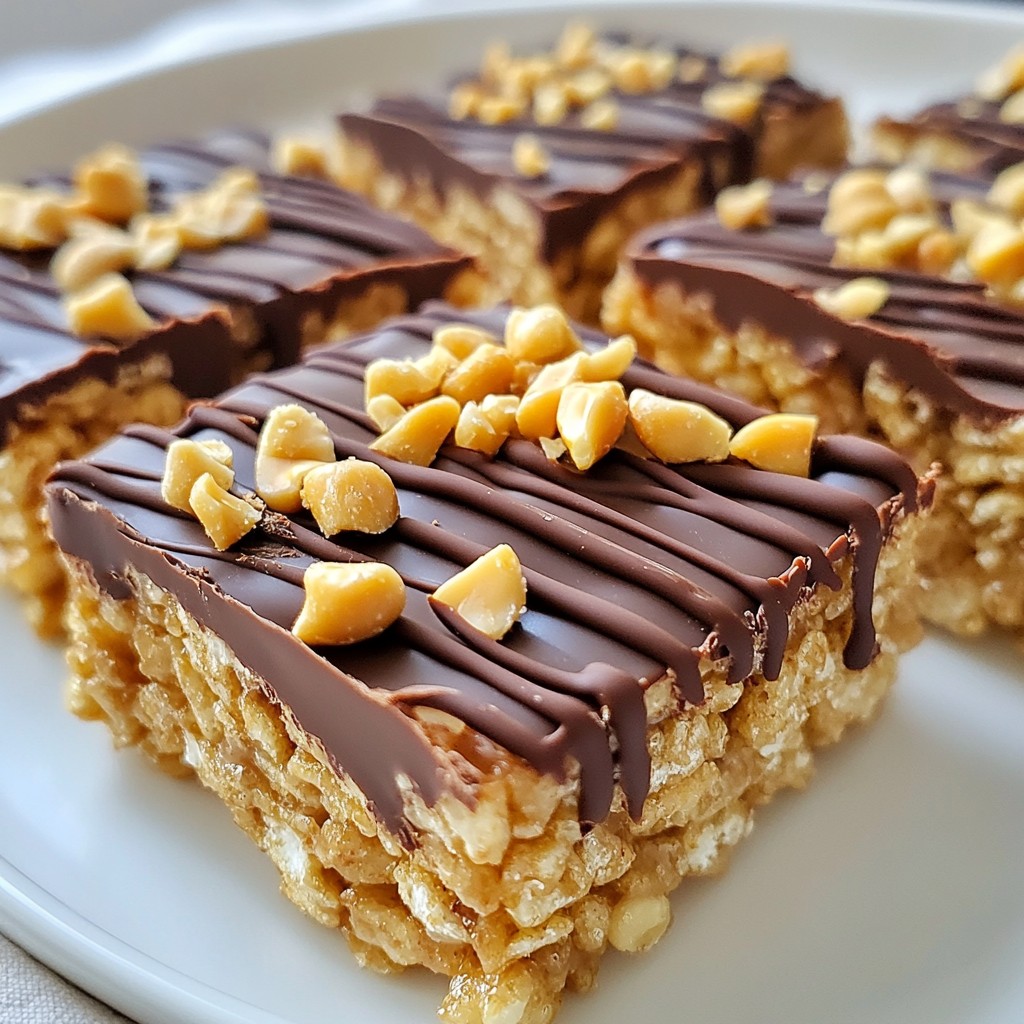
Are you ready for a delicious snack? Peanut Butter Chocolate Rice Krispie Bars are easy and fun to make. With just a few simple ingredients, you can whip up a treat that thrills the taste buds. This recipe packs a punch with creamy peanut butter and rich chocolate. Perfect for kids and adults alike! Let’s dive into crafting these delightful bars that are sure to impress.
Why I Love This Recipe
- Quick and Easy: This recipe requires minimal ingredients and can be made in just 15 minutes, making it a perfect treat for busy days.
- No-Bake Delight: These bars don’t require an oven, so you can enjoy a delicious dessert without heating up your kitchen.
- Kid-Friendly: With its sweet and crunchy flavor, this recipe is a hit with kids and adults alike, making it a great family snack.
- Customizable: You can easily add your favorite mix-ins or toppings, like crushed nuts or dried fruit, to make these bars your own.
Ingredients
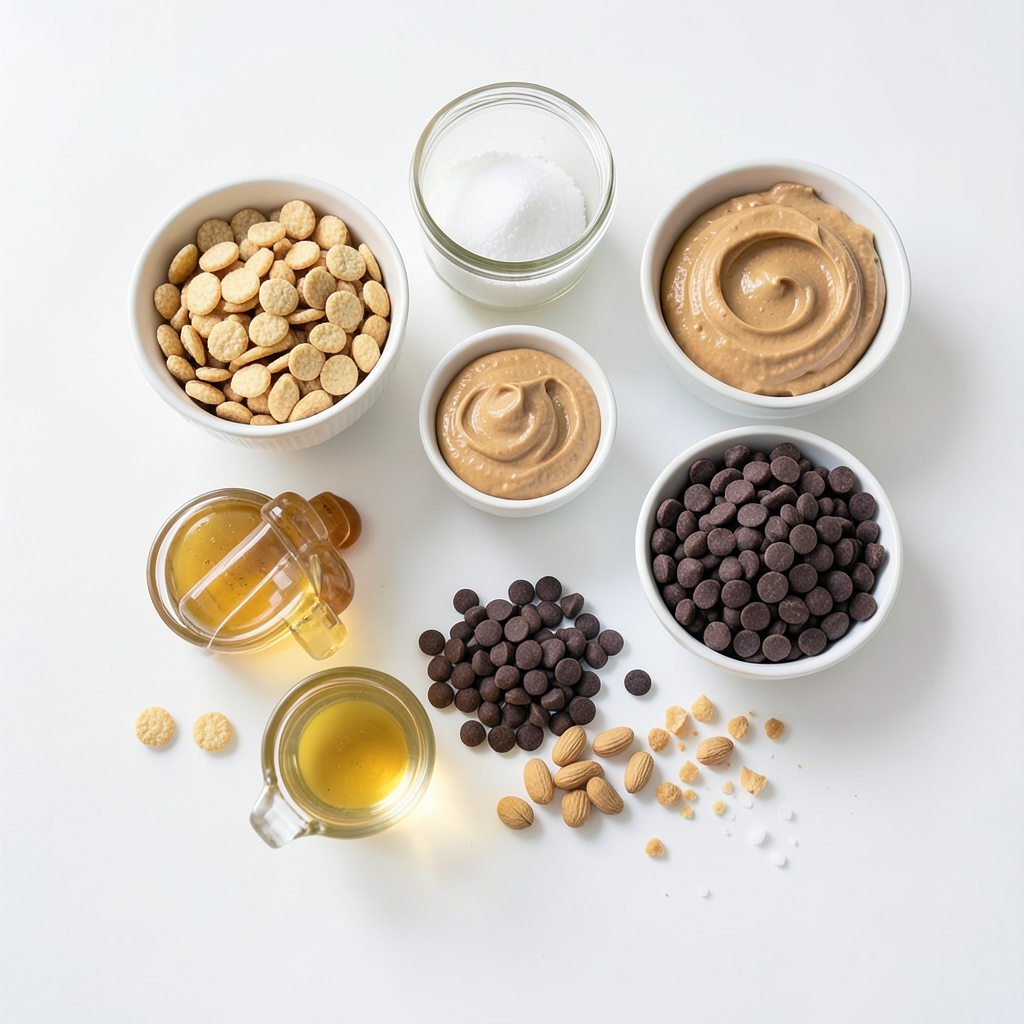
To make Peanut Butter Chocolate Rice Krispie Bars, gather these simple ingredients:
- 3 cups Rice Krispies cereal
- 1 cup creamy peanut butter
- 1 cup semi-sweet chocolate chips
- 1/2 cup honey or maple syrup
- 1 teaspoon vanilla extract
- 1/4 teaspoon sea salt
- Optional: 1/4 cup crushed peanuts for topping
Each ingredient plays a key role in building flavor and texture. The Rice Krispies provide a nice crunch, while the creamy peanut butter adds richness. Honey or maple syrup sweetens the bars and helps bind everything together. Semi-sweet chocolate chips give a delightful chocolate layer on top. The vanilla extract adds a warm note, and sea salt balances the sweetness. If you want more crunch, add crushed peanuts on top for a tasty garnish. These ingredients are easy to find and make this treat a fun project for any home cook.
Step-by-Step Instructions
Preparation of Peanut Butter Mixture
First, get a medium saucepan. Set it on low heat. Add 1 cup of creamy peanut butter, 1/2 cup of honey, and 1/4 teaspoon of sea salt. Stir these together for about 2-3 minutes. You want the mix to be smooth and well blended. Once mixed, take it off the heat. Now, add 1 teaspoon of vanilla extract. This gives the bars a nice flavor boost.
Mixing with Rice Krispies
Next, grab a large mixing bowl. Pour in 3 cups of Rice Krispies cereal. Now, take the warm peanut butter mixture and pour it over the cereal. Use a spatula to mix it well. Make sure every piece of cereal is coated evenly. This step is key for a tasty treat.
Setting the Bars
Now, line an 8x8 inch baking dish with parchment paper. Let some paper hang over the sides. This helps you lift the bars out later. Pour the cereal and peanut butter mix into the dish. Use a spatula to press it down firmly and evenly.
For the chocolate layer, get a microwave-safe bowl. Add 1 cup of semi-sweet chocolate chips. Melt the chocolate in the microwave. Do it in 30-second intervals. Stir after each interval until the chocolate is smooth.
Once melted, pour the chocolate over the pressed cereal mixture. Spread it out evenly with your spatula. If you want, sprinkle 1/4 cup of crushed peanuts on top for some extra crunch.
Let the bars cool at room temperature for about 30 minutes. After that, place them in the fridge for at least 1 hour to set the chocolate. When they’re set, lift the bars out using the parchment paper. Cut them into squares or rectangles. Enjoy your delicious Peanut Butter Chocolate Rice Krispie Bars!
Tips & Tricks
Success Tips for Perfect Bars
For great bars, mix your ingredients well. This keeps the texture nice and even. If you skip this step, some bites may feel dry. After mixing, press your mixture down firmly in the pan. This helps the bars hold their shape after cutting. Use a spatula to spread the mixture evenly. Make sure to apply even pressure to all parts.
Chocolate Melting Tips
To melt chocolate, use a microwave-safe bowl. Heat the chocolate chips in 30-second bursts. Stir after each burst until smooth. This method helps avoid burning the chocolate. A smooth chocolate layer makes your bars look and taste amazing.
Serving Suggestions
For a fun presentation, use a nice plate to serve your bars. Drizzle extra melted chocolate on top for style. A sprinkle of sea salt adds a nice touch too. If you want, add crushed peanuts for crunch. This way, your Peanut Butter Chocolate Rice Krispie Bars will look and taste delightful!
Pro Tips
- Tip for Melting Chocolate: Melt chocolate chips in short, 30-second intervals to prevent burning and ensure smooth consistency.
- Tip for Perfect Texture: Press the cereal mixture firmly into the baking dish to create denser bars that hold together well.
- Tip for Flavor Boost: Add a pinch of cinnamon or a splash of almond extract to the peanut butter mixture for an extra layer of flavor.
- Tip for Easy Slicing: Refrigerate the bars for at least 1 hour to set the chocolate, making them easier to cut into clean squares.
Variations
Flavor Customizations
You can change the taste of your bars easily. Consider using different nut butters. Almond butter or cashew butter add a nice twist. Each nut butter brings its own flavor and texture.
You can also try using various chocolate types. Dark chocolate gives a rich taste. White chocolate adds sweetness. Mixing chocolates can create unique flavors too.
Dietary Adjustments
Want to make your bars gluten-free? Use gluten-free Rice Krispies. This simple swap keeps the fun without gluten.
To make these bars vegan, choose maple syrup instead of honey. Use dairy-free chocolate chips. These swaps keep your treat plant-based and tasty.
Topping Options
Toppings add fun and crunch. You can sprinkle chopped nuts on top for extra texture. Walnuts or almonds work well. Seeds like pumpkin or sunflower seeds give a healthy touch.
Want a pop of color? Add fun sprinkles for a festive look. These options let you customize each batch to your taste.
Storage Info
Best Ways to Store Bars
For the best taste, store your peanut butter chocolate rice Krispie bars at room temperature. They stay fresh and soft in a cool, dry place. If your home is warm or humid, store them in the fridge. This keeps them firm and tasty.
Use an airtight container to hold the bars. This helps keep them fresh and prevents them from drying out. If you use a plate, cover it with plastic wrap. This works too!
Shelf Life
These bars are best when fresh. At room temperature, they last about a week. If you store them in the fridge, they can last up to two weeks. Just check for any changes in smell or feel before you eat them.
Freezing Instructions
To freeze the bars, first cut them into squares. Then wrap each piece in plastic wrap. Place the wrapped bars in a freezer-safe bag or container. This keeps them safe from freezer burn.
To thaw, just take out what you need. Let them sit at room temperature for about 30 minutes. You can also put them in the fridge overnight for a slower thaw. They will taste just as good as fresh!
FAQs
Common Questions About Peanut Butter Chocolate Rice Krispie Bars
Can I use crunchy peanut butter instead? Yes, you can use crunchy peanut butter. It adds a nice texture. The bars will still taste great. Just stir it well with the honey and salt to mix.
How can I make these bars vegan? To make vegan bars, swap honey for maple syrup. Use dairy-free chocolate chips. This keeps the bars plant-based and delicious.
What can I substitute for Rice Krispies? If you need a substitute, try puffed rice or cornflakes. They work well and give a similar crunch. Gluten-free options are also available for those who need them.
These Peanut Butter Chocolate Rice Krispie Bars are easy to make and fun to enjoy. We covered the key ingredients, step-by-step instructions, and expert tips for success. You learned how to customize flavors, adjust for dietary needs, and store your bars for freshness. With these insights, you can create a tasty treat everyone will love. I hope you feel inspired to make your own delicious bars. Enjoy the process and share your creations!