
Latest & Greatest

Taco Meatball Ring Flavorful Twist on Dinner
Looking to spice up your dinner game? The Taco Meatball Ring is a fun, flavorful twist that everyone will love!
Read more…
Air Fryer Lasagna Fritta Crispy and Tasty Delight
Craving a crispy and tasty treat? Let me introduce you to Air Fryer Lasagna Fritta! This delightful dish combines all
Read more…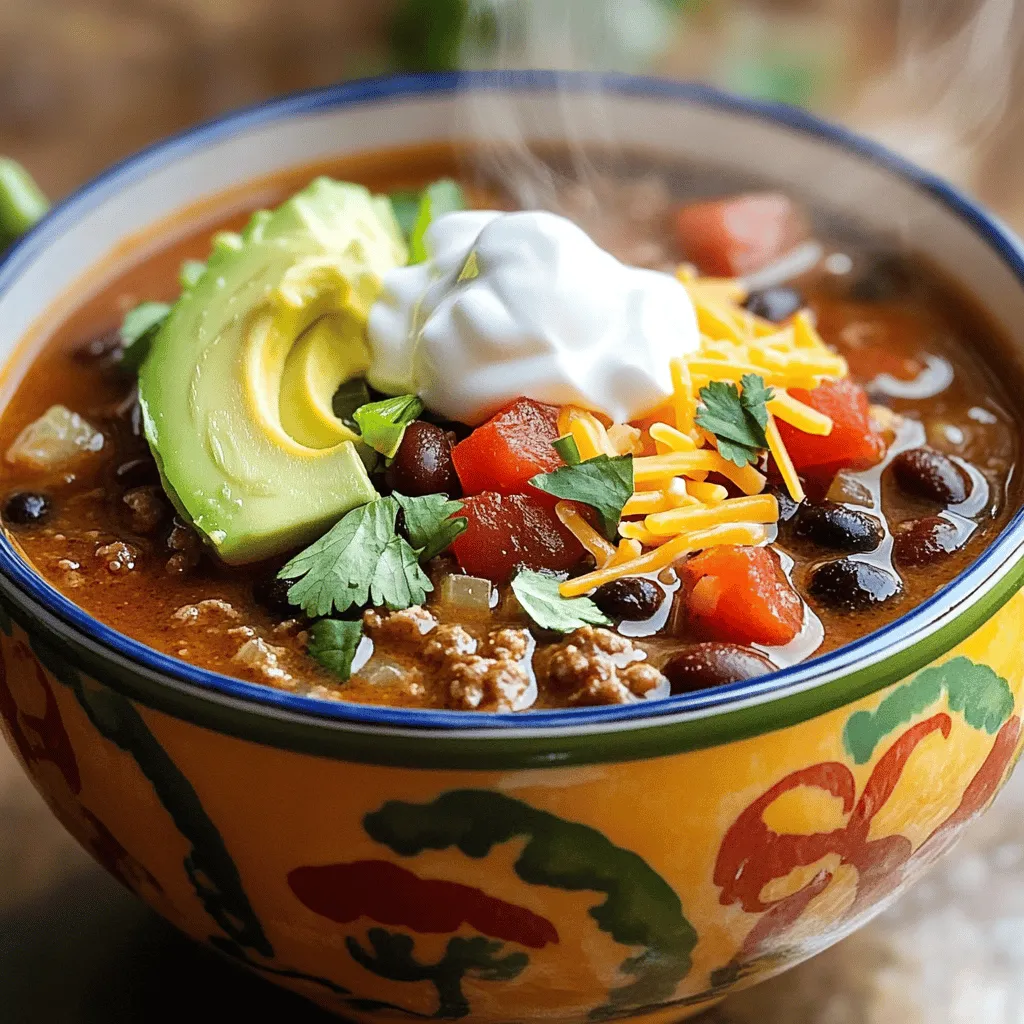
Quick & Easy Taco Soup Flavorful and Comforting Meal
Craving a warm bowl of something delicious? Let me introduce you to my Quick & Easy Taco Soup. It’s packed
Read more…
Savory Spinach Artichoke Dip Bites for Parties
Looking for a crowd-pleaser for your next party? These Savory Spinach Artichoke Dip Bites will wow your guests. Packed with
Read more…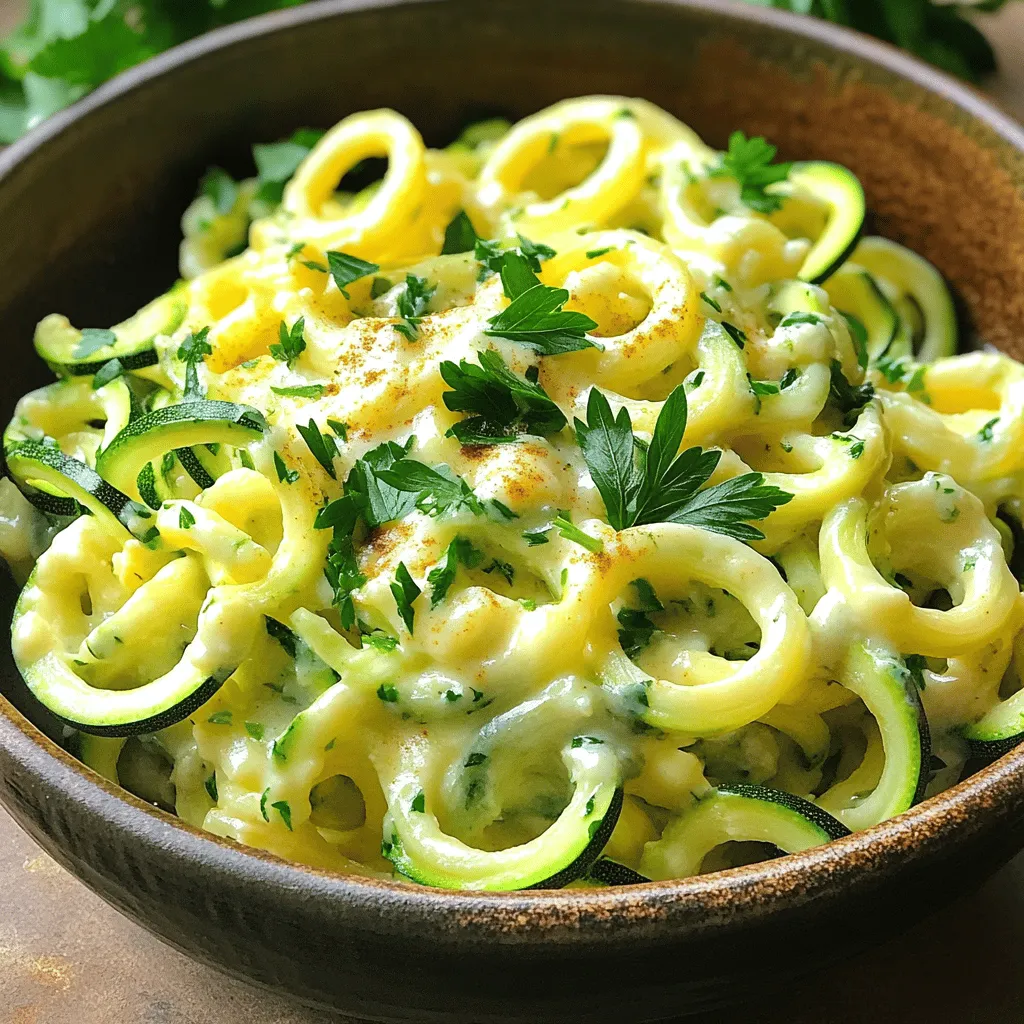
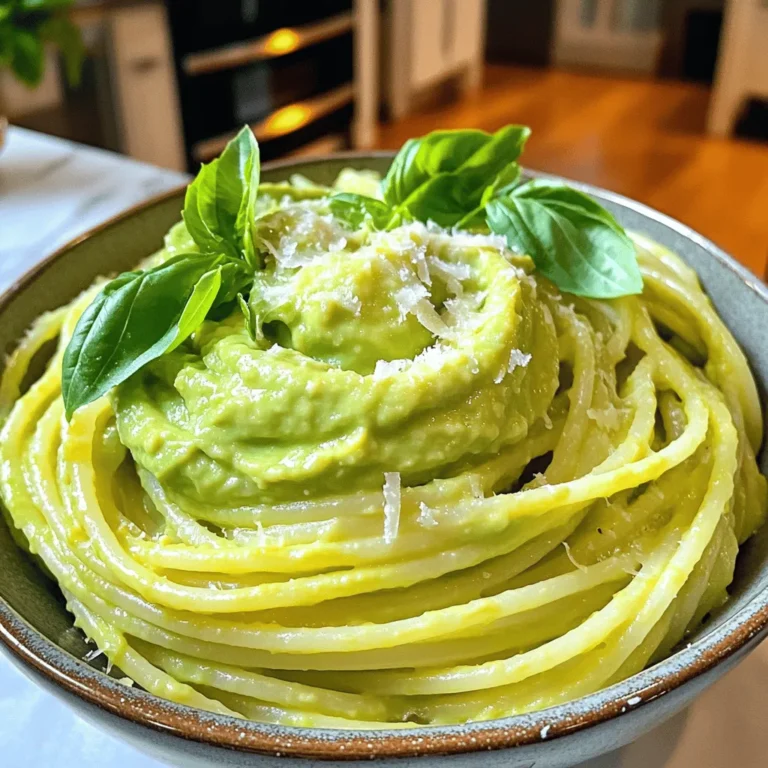
Zucchini Noodle Alfredo Creamy and Simple Dish
Looking for a light and tasty meal? Zucchini Noodle Alfredo is creamy, simple, and perfect for any night. With just
Read more…
Creamy Mushroom Risotto Savory and Comforting Dish
Looking for a warm, hearty dish that’s easy to make? Creamy Mushroom Risotto is your answer! This delightful recipe will
Read more…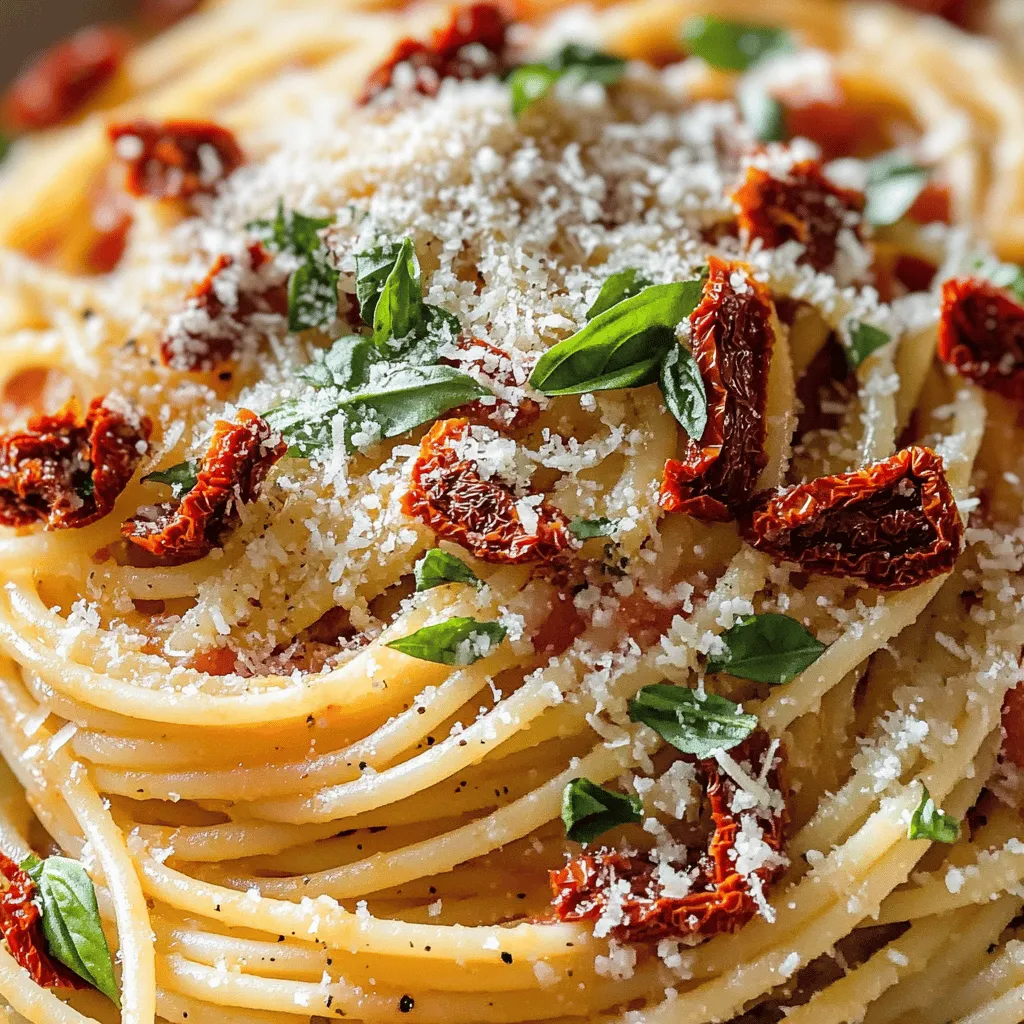
Homemade Spaghetti Sauce Rich and Flavorful Delight
If you crave a rich and flavorful spaghetti sauce, look no further! Making your own sauce at home is both
Read more…
One-Pan Lemon Garlic Chicken Easy Family Meal
Looking for a quick and tasty family meal? This One-Pan Lemon Garlic Chicken recipe is just what you need. It
Read more…browse recipes


![To make these vegan cauliflower buffalo wings, you need a few fresh items: - 1 large head of cauliflower, cut into florets - Fresh celery sticks for serving You will also need some pantry staples to create the crispy coating and sauce: - 1 cup all-purpose flour (or gluten-free flour) - 1 cup unsweetened plant-based milk (almond, oat, or soy) - 1 teaspoon garlic powder - 1 teaspoon onion powder - 1 teaspoon smoked paprika - 1/2 teaspoon salt - 1/2 teaspoon black pepper - 1 cup hot sauce (like Frank's RedHot) - 2 tablespoons vegan butter, melted These ingredients blend well to give the wings their unique flavor and crisp texture. To enhance your dish, consider these optional garnishes: - Fresh celery sticks - Vegan ranch dressing These garnishes add crunch and a creamy dip, making your meal even better. For the complete recipe, check out the Full Recipe. Enjoy creating this tasty dish! First, set your oven to 450°F (230°C). This high heat makes the wings crispy. Next, line a baking sheet with parchment paper. This step helps with cleanup and keeps the wings from sticking. In a large bowl, mix together the following: - 1 cup all-purpose flour (or gluten-free flour) - 1 cup unsweetened plant-based milk (almond, oat, or soy) - 1 teaspoon garlic powder - 1 teaspoon onion powder - 1 teaspoon smoked paprika - 1/2 teaspoon salt - 1/2 teaspoon black pepper Whisk these ingredients until smooth. This batter gives the cauliflower a tasty coating. Take the cauliflower head and cut it into florets. Dip each floret into the batter, letting the extra batter drip off. Spread the coated florets evenly on the baking sheet. Make sure they have space between them. This helps them cook evenly. Bake the cauliflower for 25-30 minutes. Halfway through, flip them for even cooking. They should turn golden brown and crispy. While the cauliflower bakes, mix the hot sauce with melted vegan butter in a bowl. This gives the wings their spicy kick. Once the cauliflower is crispy, take it out of the oven. Toss the baked florets in the buffalo sauce until they are well-coated. Return the sauced cauliflower to the oven for another 10-15 minutes. This final bake makes them even crispier and caramelized. Serve your wings hot with fresh celery sticks and vegan ranch dressing. For the full recipe, check the instructions above! To get your cauliflower wings crispy, follow a few key steps. First, make sure to coat each floret evenly. This helps the batter stick well. Use a good amount of flour in the batter. The thicker the batter, the crunchier the wings will be. Bake at a high temperature. This allows for a nice crisp on the outside. Flip the florets halfway through baking for even cooking. For extra crunch, you can double bake the wings. Bake them once, coat them in sauce, and bake again. You can easily swap ingredients to fit your needs. If you have a gluten allergy, use gluten-free flour. Unsweetened almond milk, oat milk, or soy milk works well. For nut-free options, stick with oat or soy milk. If you need a low-sodium version, choose a low-sodium hot sauce. You can also use a mix of spices instead of hot sauce for a milder taste. Dipping sauces make the wings even better. Vegan ranch dressing is a classic choice. You can also try a spicy tahini sauce for a unique twist. Another option is a zesty avocado dip, which adds creaminess. If you like it hot, serve with extra buffalo sauce on the side. Each sauce adds a new flavor that pairs perfectly with the wings. {{image_2}} You can change up the sauce for your buffalo wings. Try a sweet chili sauce for a kick of sweetness. A lemon garlic sauce adds a zesty twist. You can also use a teriyaki glaze for a unique flavor. Each sauce gives the wings a new taste and feel. Mixing hot sauce with maple syrup can make a great sweet heat combo. Experiment until you find your favorite! If you prefer a quicker way to enjoy your wings, the air fryer is perfect. Just coat the cauliflower florets as usual. Place them in the air fryer basket in a single layer. Cook at 400°F (200°C) for about 15-20 minutes. Shake the basket halfway through for even cooking. This method gives you crispy wings with less oil. To make gluten-free wings, swap regular flour for a gluten-free blend. Almond flour works well too! For a low-carb option, use crushed pork rinds or coconut flour instead of regular flour. Both options keep the crispiness you love without the carbs. Always check your ingredients to ensure they fit your diet. You can enjoy these wings while sticking to your dietary needs. To explore the full recipe, check out the [Full Recipe]. To store your leftover vegan cauliflower buffalo wings, let them cool down first. Place the wings in an airtight container. You can keep them in the fridge for up to three days. This way, they stay fresh and tasty. When you’re ready to enjoy your leftovers, preheat your oven to 375°F (190°C). Spread the wings on a baking sheet. Heat them for about 10-15 minutes until they get crispy again. You can also use an air fryer for a quicker option. Just heat them at 350°F (175°C) for about 5-7 minutes. If you want to store them for longer, freezing is a great option. Place the cooled wings in a single layer on a baking sheet. Freeze them for about an hour until firm. Then, transfer them to a freezer-safe bag or container. They can last for up to three months in the freezer. When you’re ready to eat, thaw them overnight in the fridge before reheating. Enjoy your crispy and flavorful vegan buffalo wings again! For the full recipe, check out the main article. Yes, you can use frozen cauliflower. Just thaw it first. Make sure to pat it dry. This helps the batter stick better. Frozen cauliflower may not get as crispy, but it still tastes great. To add more heat, use extra hot sauce. You can mix in cayenne pepper too. Another option is to add diced jalapeños to the batter. Taste as you go to find your perfect spice level. I love serving these wings with fresh celery sticks. Carrot sticks also add a nice crunch. A vegan ranch dressing is perfect for dipping. You can also serve them with a simple salad or sweet potato fries. Leftovers last about 3 to 4 days in the fridge. Store them in an airtight container. For the best taste, reheat them in the oven to keep them crispy. This post covered how to make delicious buffalo cauliflower. We looked at fresh and pantry ingredients, plus optional garnishes. I shared step-by-step baking instructions and tips for the perfect crispiness. You learned about fun variations, like air frying methods and low-carb options. I also explained how to store leftovers and answered common questions. Now, it's time to get cooking. Enjoy your tasty buffalo cauliflower and impress your friends!](https://homecookingstyle.com/wp-content/uploads/2025/05/ca181f91-2266-47f8-9f24-2900b3fb0eef.webp)
Vegan Cauliflower Buffalo Wings Crispy and Flavorful
If you’re craving a spicy treat that’s both crisp and plant-based, you’ve come to the right place! My Vegan Cauliflower Buffalo Wings are packed…
My Latest Desserts
-

Coconut Cream Pie Bars Delightfully Creamy Treat
If you’re craving something sweet and creamy, Coconut Cream Pie Bars are your answer. These bars combine rich coconut flavor Read Full Recipe -
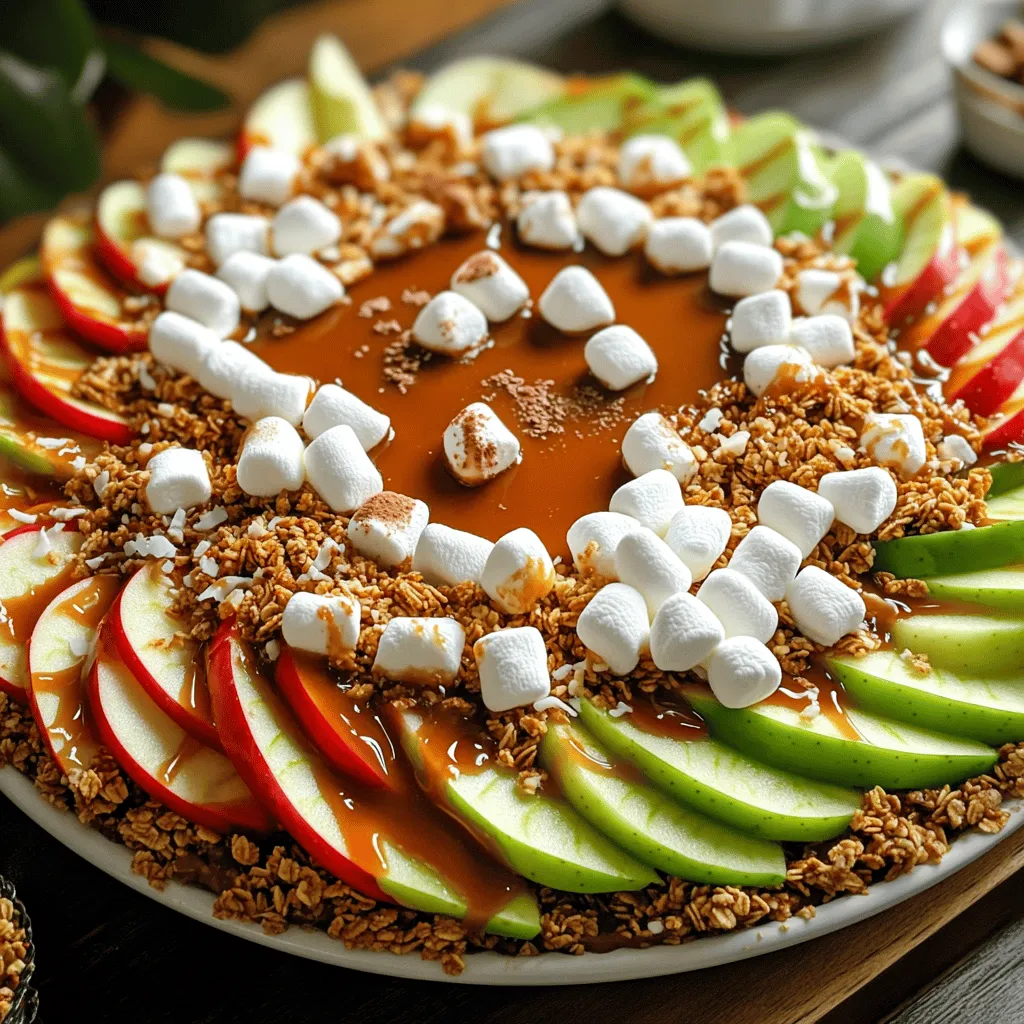
Caramel Apple Nachos Delightful Sweet Snack Idea
Get ready to indulge in a sweet twist with Caramel Apple Nachos! This fun snack combines crisp apples, gooey caramel, Read Full Recipe -
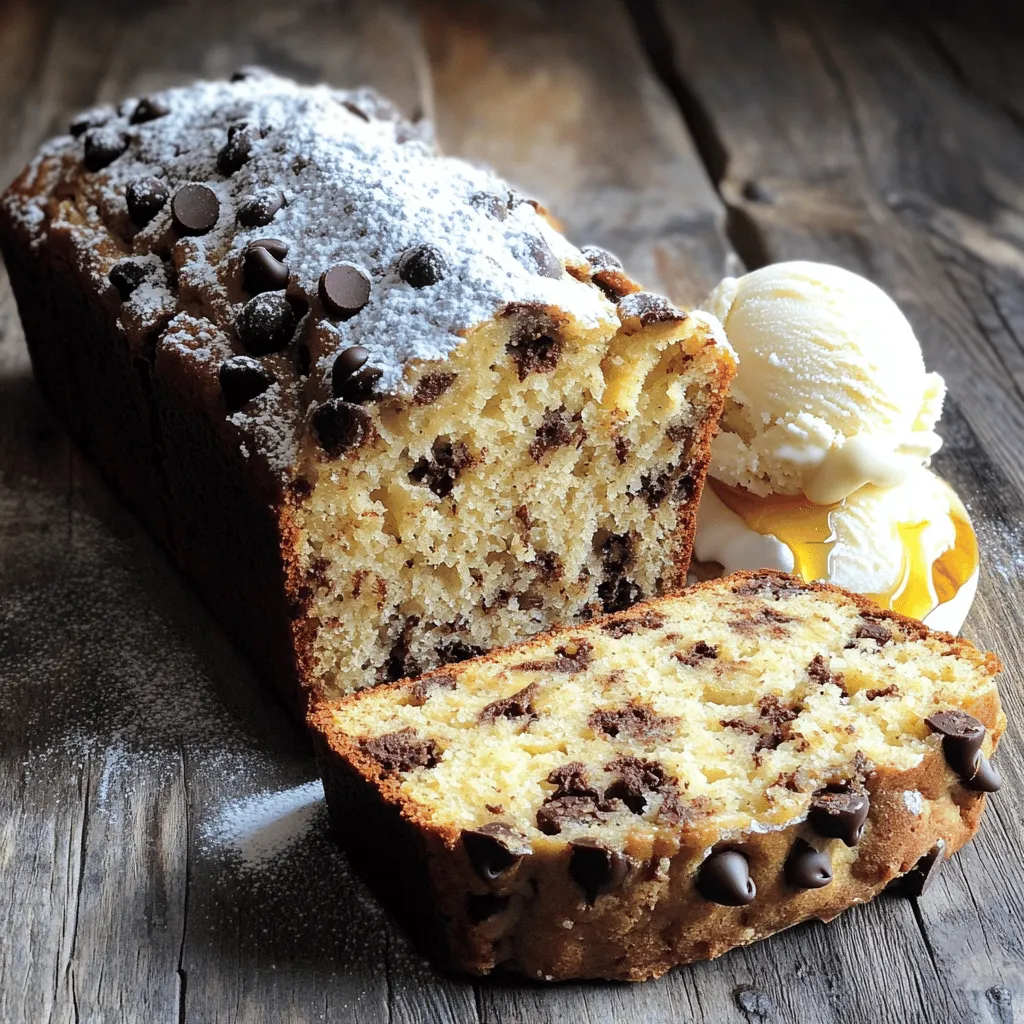
Chocolate Chip Banana Bread Simple and Tasty Recipe
Do you love warm, sweet treats? If so, you’ll adore this simple and tasty Chocolate Chip Banana Bread recipe! With Read Full Recipe -

Cinnamon Sugar Donut Muffins Soft and Tasty Treat
Get ready to satisfy your sweet tooth with these Cinnamon Sugar Donut Muffins! They’re soft, tasty, and perfect for any Read Full Recipe -

Chocolate Chip Cookie Dough Brownies Delightful Treat
Do you love brownies and cookie dough? Then, you’ll adore Chocolate Chip Cookie Dough Brownies! This delightful treat combines rich, Read Full Recipe -
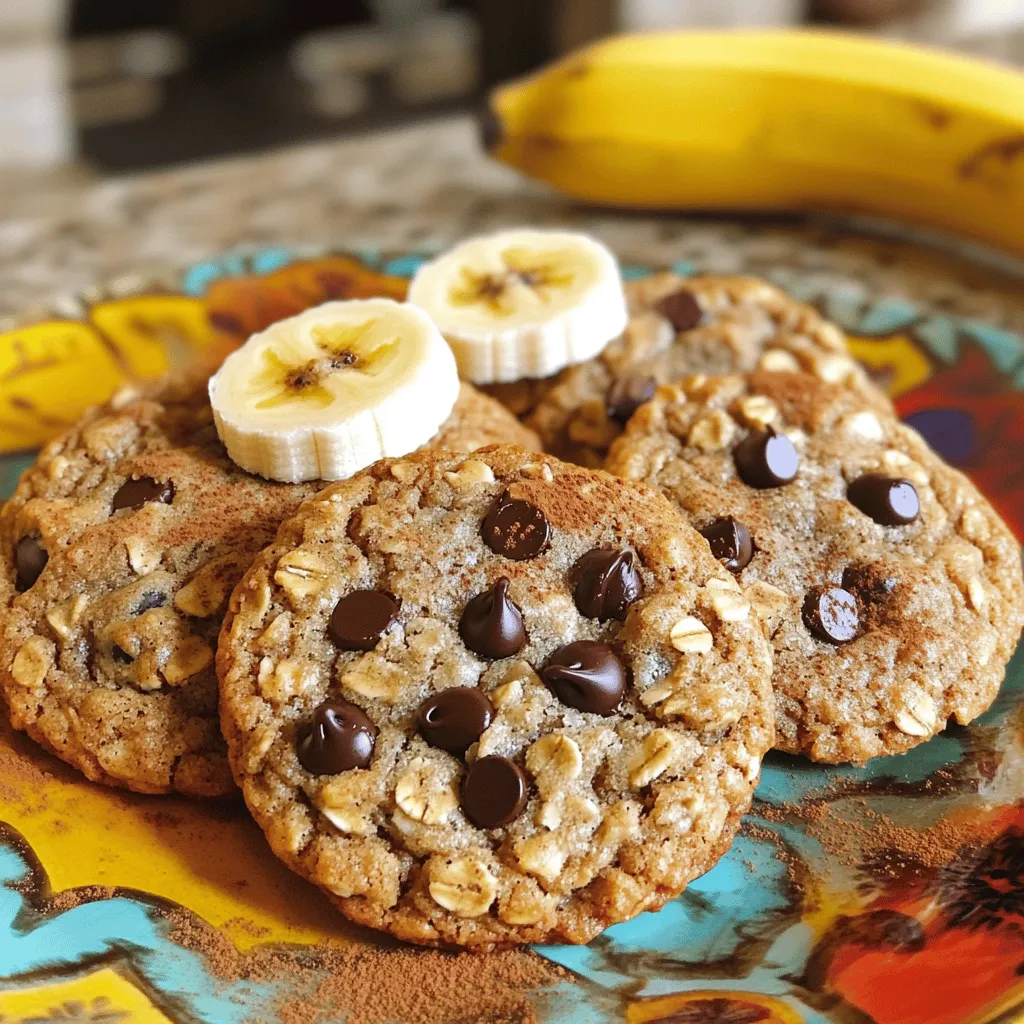
Banana Oatmeal Cookies Simple and Tasty Recipe
Looking for a quick and delicious treat? These Banana Oatmeal Cookies are the answer! With just a few simple ingredients, Read Full Recipe -

Pumpkin Spice Energy Balls Simple and Tasty Snack
Fall is here, and what better way to celebrate than with delicious Pumpkin Spice Energy Balls? These tasty snacks are Read Full Recipe -

Lemon Blueberry Muffins Delightful and Easy Recipe
Are you ready to enjoy the perfect treat that blends sweet and tangy? My Lemon Blueberry Muffins are simple to Read Full Recipe -
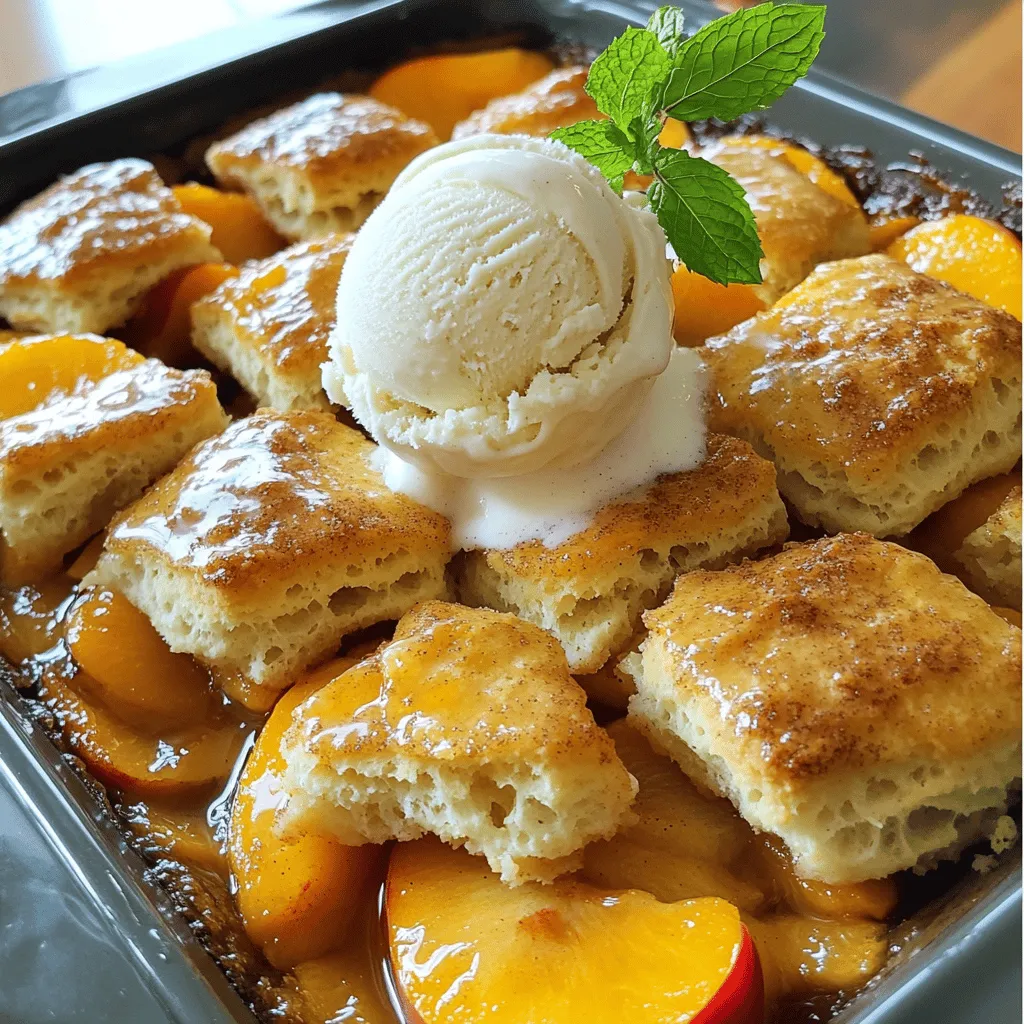
Peach Cobbler with Biscuit Topping Simple Delight
If you crave a warm, sweet dessert, you’ll love my Peach Cobbler with Biscuit Topping. This simple delight combines juicy Read Full Recipe -

Vegan Chocolate Mug Cake Simple and Delicious Treat
Craving something sweet and easy? You’re in the right place! My vegan chocolate mug cake is quick to make and Read Full Recipe
My Latest Recipes

hey,
i’m !
I’m so happy you’re here!
From my kitchen to your table, each dish is a labor of love. May they delight your palate and warm your heart. Let’s savor the beauty of cooking together.


![To make Garlic Parmesan Roasted Broccoli, you need fresh and simple ingredients. Here’s what you'll need: - 1 pound broccoli florets - 4 cloves garlic, minced - 3 tablespoons olive oil - 1/2 cup grated Parmesan cheese - 1 teaspoon salt - 1/2 teaspoon black pepper - 1/2 teaspoon red pepper flakes (optional) - Juice of 1 lemon - Fresh parsley, chopped (for garnish) Each ingredient plays a key role. The broccoli gives a nice crunch. Garlic adds a rich flavor. Olive oil helps the broccoli roast evenly. Parmesan cheese brings a creamy, salty taste. Salt and pepper enhance all these flavors. Red pepper flakes add a little heat, but it’s optional. A squeeze of lemon at the end brightens the dish. Fresh parsley makes it look pretty too. When you gather these items, you set the stage for a tasty side dish. Check the full recipe for more detailed steps and tips. First, you need to preheat your oven to 425°F (220°C). This high heat helps the broccoli roast well. A hot oven gives the broccoli a nice crispy edge and keeps it tender inside. You want the broccoli to have that perfect blend of flavors. Next, grab a large bowl. Add 1 pound of broccoli florets and 4 minced garlic cloves. Now, drizzle 3 tablespoons of olive oil over the mixture. Stir well to coat the broccoli and garlic evenly. This step is key! Then, add 1/2 cup of grated Parmesan cheese, 1 teaspoon of salt, 1/2 teaspoon of black pepper, and 1/2 teaspoon of red pepper flakes if you want a little heat. Toss everything together until the broccoli is well coated. Now it’s time to roast! Spread the broccoli mixture evenly on a baking sheet lined with parchment paper. Place it in the preheated oven and roast for 20-25 minutes. Keep an eye on it. You want the edges to turn slightly crispy and the broccoli to become tender. Once it’s done, take it out of the oven. Drizzle juice from 1 lemon over the broccoli for a fresh taste. Finally, garnish with chopped parsley before serving. For the full recipe, check out my notes above! To get great flavor, mix all the ingredients well. Start with broccoli and garlic in a big bowl. Pour olive oil over them. Stir until every piece is coated. Add the Parmesan cheese and spices next. Toss again until you see the cheese stick to the broccoli. This step makes sure every bite is tasty! Roasting broccoli takes about 20 to 25 minutes. To see if it’s done, look for a bright green color and crispy edges. You can poke a piece with a fork. If it feels tender but not mushy, it’s ready! Keep an eye on it to avoid burning. Serving your Garlic Parmesan Roasted Broccoli nicely makes a big difference. Use a big platter to show off the broccoli. Sprinkle some extra Parmesan on top for a nice touch. Add lemon wedges around the edges for a pop of color. A sprinkle of fresh parsley adds a nice green look, too. This makes your dish look as good as it tastes! {{image_2}} You can easily mix other vegetables with your broccoli. Try adding carrots, bell peppers, or Brussels sprouts. Chop them into similar sizes for even roasting. This way, all the veggies cook well together. The flavors blend nicely, and you get more colors on your plate. You can use the same garlic and Parmesan mix. It will still taste amazing! If you want a change from Parmesan, go for other cheeses. Feta cheese adds a tangy touch. Cheddar brings a rich flavor. For a nutty twist, try using Asiago. If you're dairy-free, nutritional yeast is a great option. It gives a cheesy taste without the dairy. You can even mix different cheeses for a unique flavor. Add some heat to your Garlic Parmesan Roasted Broccoli! Use more red pepper flakes if you like it spicy. You can also add a pinch of cayenne pepper for extra kick. If you prefer herbs, try thyme or oregano. These bring a nice aroma and flavor. Experiment with different spices to fit your taste. Each time you make it, you can create a new dish! Store leftover Garlic Parmesan Roasted Broccoli in an airtight container. Keep it in the fridge. It will stay fresh for up to three days. Make sure to let it cool before sealing. This keeps it from getting soggy. To reheat, place the broccoli on a baking sheet. Preheat your oven to 350°F (175°C). Heat for about 10-15 minutes. This helps restore the crispiness. You can also microwave it for 1-2 minutes. Just remember, microwaving may make it soft. You can freeze Garlic Parmesan Roasted Broccoli for later use. First, let it cool completely. Then, place it in a freezer-safe bag. Remove as much air as possible. It can stay in the freezer for up to three months. When ready to use, thaw in the fridge overnight before reheating. For best taste, I recommend eating it fresh. Try out the [Full Recipe] when you're ready to enjoy this delicious side dish! Garlic Parmesan Roasted Broccoli lasts about 3 to 4 days in the fridge. Keep it in an airtight container to keep it fresh. If you want to keep it longer, consider freezing it. Broccoli can stay good for up to 3 months when frozen. Just make sure to cool it first before you freeze. Yes, you can make this recipe dairy-free. Simply swap the Parmesan cheese with a dairy-free alternative. Nutritional yeast is a great choice. It gives a cheesy flavor without any dairy. You can also use a nut-based cheese if you prefer. These options still keep the dish tasty and healthy. Garlic Parmesan Roasted Broccoli pairs well with many dishes. You can serve it with grilled chicken or fish. It also goes great with pasta or rice. If you want a vegetarian option, try it with quinoa or a hearty salad. This versatile side dish adds color and flavor to any meal. For the full recipe, check out the previous section. You learned how to make Garlic Parmesan Roasted Broccoli. We covered ingredients, steps, and tips. Remember to coat the broccoli evenly for the best flavor. You can try different veggies or spices to mix it up. Store leftovers easily and reheat for quick meals. This dish is tasty and healthy. Enjoy making it your way!](https://homecookingstyle.com/wp-content/uploads/2025/05/d73d6f29-a505-4fdf-9716-aec4f7f3cc5e-300x300.webp)

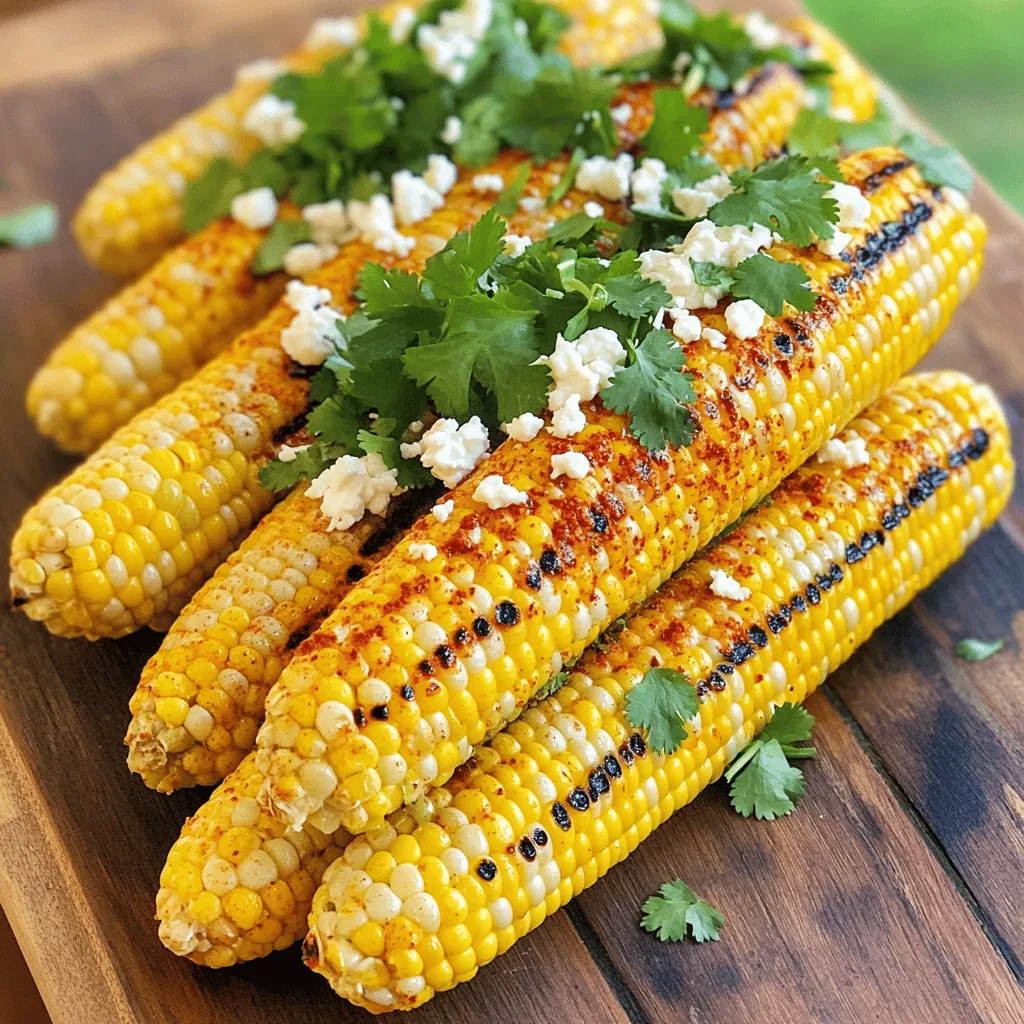
Chili Lime Grilled Corn Flavorful Summer Delight
Are you ready to elevate your summer barbecues? Chili Lime Grilled Corn is a vibrant dish that bursts with flavor and is super easy…