Latest & Greatest
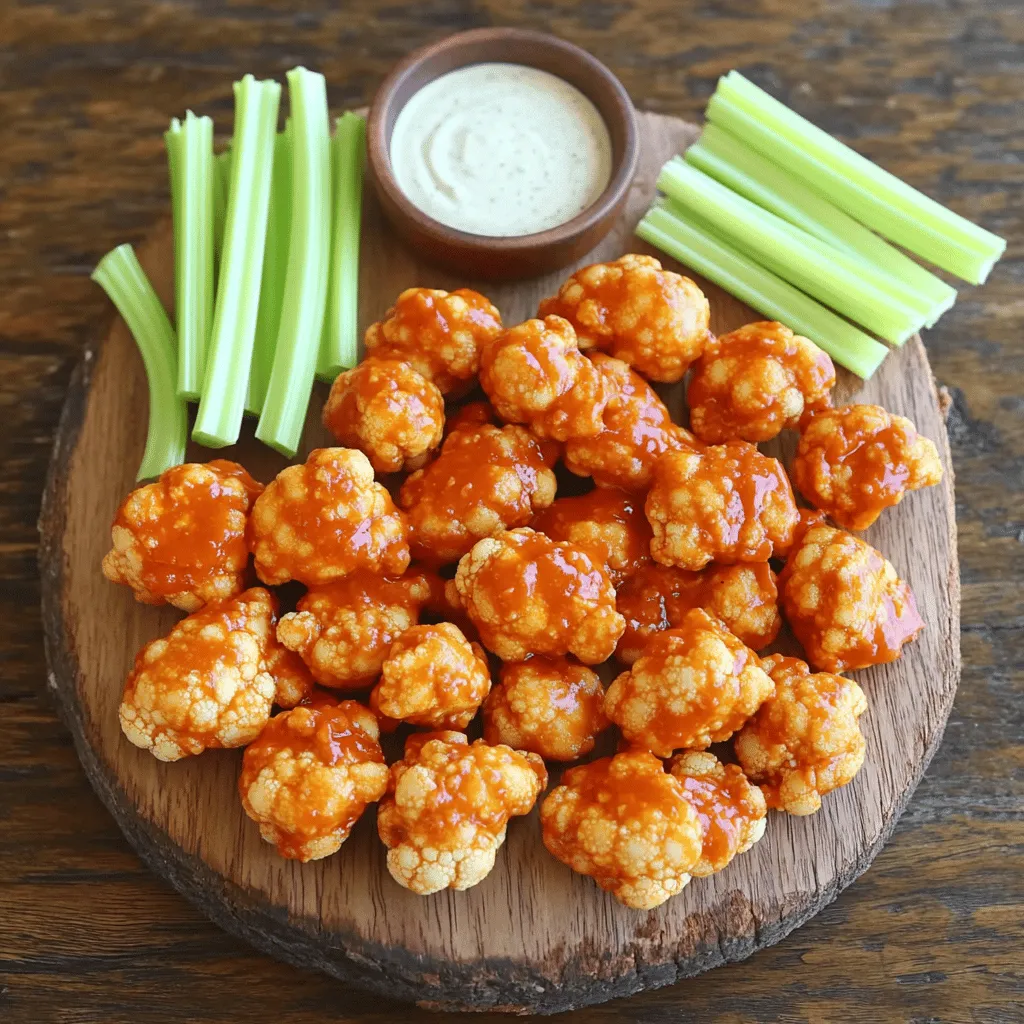
Vegan Cauliflower Buffalo Wings Crispy and Flavorful
If you’re craving a spicy treat that’s both crisp and plant-based, you’ve come to the right place! My Vegan Cauliflower
Read more…
Strawberry Shortcake Trifle Delightful Layered Dessert
Looking for a delicious dessert that impresses and satisfies? This Strawberry Shortcake Trifle is the perfect treat! With fresh strawberries,
Read more…
Savory Spinach and Feta Puff Pastry Quick Treat
Are you ready to impress with a delightful treat? This Savory Spinach and Feta Puff Pastry is quick, easy, and
Read more…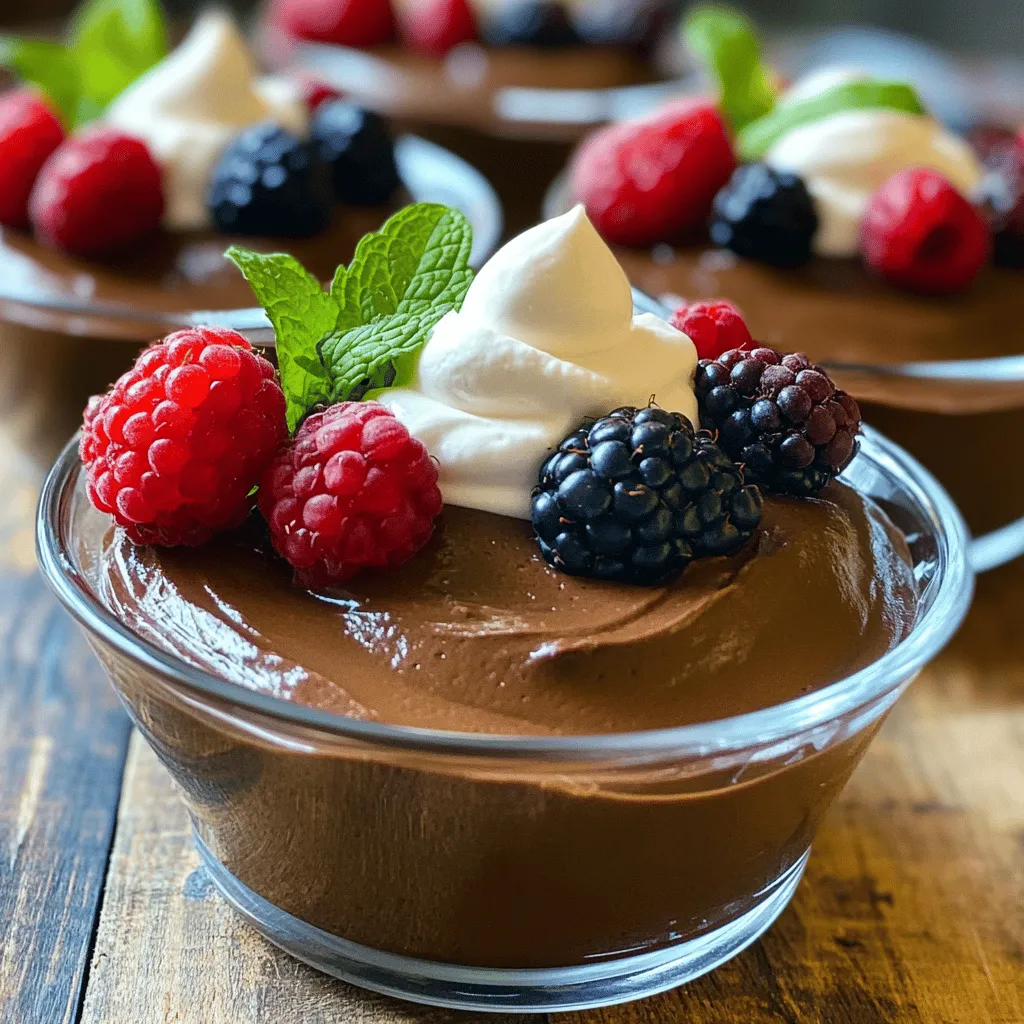
Dairy-Free Chocolate Avocado Mousse Rich and Creamy Delight
Get ready to indulge in a rich and creamy treat that’s also dairy-free! This Dairy-Free Chocolate Avocado Mousse is not
Read more…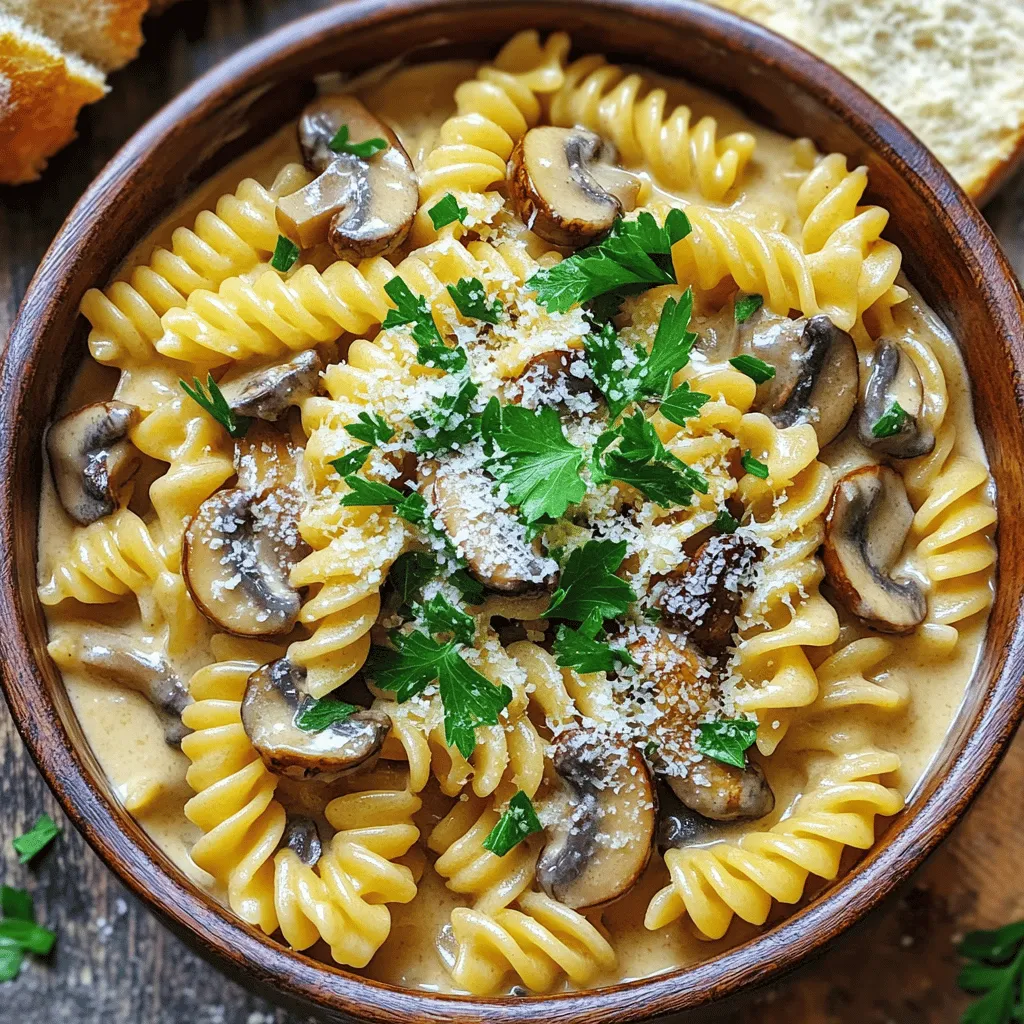
One-Pot Creamy Mushroom Pasta Quick and Flavorful Dish
If you’re craving something rich and tasty, you’ll love my One-Pot Creamy Mushroom Pasta recipe! This quick and easy dish
Read more…
Zucchini Noodles with Pesto Flavorful and Simple Meal
Looking for a quick and tasty meal? Zucchini noodles with pesto serve up bold flavor in no time! This dish
Read more…
Peanut Butter Chocolate Chip Blondies Delightful Treat
Craving a sweet treat that’s both rich and satisfying? These Peanut Butter Chocolate Chip Blondies are just the ticket! With
Read more…
Eggnog Cake Delightful Festive Flavor to Savor
Eggnog cake is the perfect treat for the holidays! This delightful dessert blends rich flavors of nutmeg, cinnamon, and creamy
Read more…browse recipes


![- 8 ounces fettuccine or spaghetti - 4 tablespoons unsalted butter - 4 cloves garlic, minced - 1 cup heavy cream - 1 cup grated Parmesan cheese (plus more for serving) - 1/2 teaspoon salt (or to taste) - 1/4 teaspoon black pepper - 1/4 teaspoon red pepper flakes (optional) - 2 tablespoons fresh parsley, chopped (for garnish) - Large pot for boiling pasta - Large skillet for the sauce - Whisk and spatula for mixing Gathering the right ingredients is key to making creamy garlic Parmesan pasta a hit. You need good pasta, fresh garlic, and rich cheese. I always prefer fettuccine or spaghetti for this dish. They hold the sauce well and make each bite creamy. The butter gives the sauce a smooth base. Fresh minced garlic adds a bold flavor that complements the cheese. Heavy cream is a must for that rich, creamy texture. I love using grated Parmesan cheese; it melts nicely and adds a salty punch. For seasoning, salt and black pepper are essential. They enhance the overall taste. If you like a little heat, add red pepper flakes. Finally, fresh parsley adds color and a fresh taste. Make sure you have the right tools. A large pot helps cook the pasta evenly. A skillet is best for making the sauce. Use a whisk to blend the cream and cheese smoothly. A spatula is great for mixing the pasta and sauce together. You can find the full recipe in the sections above. Enjoy making this simple yet delicious meal! To start, cook the pasta according to the package instructions. I often choose fettuccine or spaghetti for this dish. While the pasta cooks, save 1 cup of pasta water before draining. This water helps adjust the sauce later. Next, let's make the sauce. In a large pot or skillet, melt the butter over medium heat. Once it melts, add the minced garlic. Sauté it for 1-2 minutes until it smells great. Be careful not to burn it! After that, pour in the heavy cream. Stir it well and let it simmer for 2-3 minutes. This step thickens the sauce nicely. Now, it's time to bring it all together. Gradually whisk in the grated Parmesan cheese, salt, black pepper, and red pepper flakes if you like some spice. Keep stirring until the cheese melts and the sauce is smooth. Add the drained pasta to the creamy sauce. Toss to coat it well. If the sauce seems too thick, add some of the reserved pasta water until you reach your desired texture. You can find the full recipe for more details. To make your creamy garlic parmesan pasta even better, try adding grated lemon zest. This small touch gives the dish a fresh and bright flavor. You can also add sautéed vegetables to boost nutrition. Spinach, cherry tomatoes, or even bell peppers work well. They add color and nutrients without changing the taste too much. When making the sauce, keep the heat moderate. This helps prevent the garlic from burning. Burnt garlic can ruin your sauce. Add the cheese gradually. This way, it melts smoothly into the sauce. If you add it all at once, you might end up with clumps. Serve your creamy garlic parmesan pasta with a side salad. A fresh salad balances the rich pasta. You can also pair it with garlic bread. This combo makes for a complete and satisfying meal. For the best look, serve the pasta in deep bowls. Top with extra Parmesan and parsley for a beautiful finish. For the full recipe, check out the [Full Recipe]. {{image_2}} When you want to mix things up, try these fun variations with creamy garlic Parmesan pasta. Each twist keeps the dish exciting and tasty. - Include grilled chicken or shrimp: Adding grilled chicken or shrimp boosts the protein. This makes the dish heartier and gives it a nice texture. - Stir in cooked bacon for extra flavor: Crumbled bacon adds a smoky crunch. Just mix it in before serving for a delightful surprise. - Substitute pasta with zucchini noodles: Zucchini noodles are fresh and light. They soak up the creamy sauce well. This option is perfect for a low-carb meal. - Use nutritional yeast instead of cheese for a vegan version: Nutritional yeast gives a cheesy flavor without dairy. It’s great for those who want a vegan meal. - Increase red pepper flakes for more heat: If you love spice, add more red pepper flakes. This kick can elevate the dish. - Add a splash of hot sauce before serving: A little hot sauce can make a big difference. Just a splash will give it a delightful zing. Feel free to explore these variations to make each meal unique. The creamy garlic Parmesan pasta adapts well, so you can enjoy it your way! For the complete guide, check out the Full Recipe. To store leftovers, place the creamy garlic parmesan pasta in an airtight container. This keeps the flavors fresh and prevents it from drying out. When you're ready to reheat, use a skillet over medium heat. Add a splash of milk or cream to help it rehydrate. Stir often until warmed through. You can freeze creamy garlic parmesan pasta for longer storage. To do this, let the pasta cool completely. Then, divide it into portions and place them in freezer-safe bags. Squeeze out the air to avoid freezer burn. When you're ready to eat, thaw it overnight in the fridge. Reheat gently on the stove to keep the sauce smooth. Creamy garlic parmesan pasta lasts about 3 to 5 days in the fridge. Check for signs that it has gone bad. If you see mold or it has a sour smell, it's time to toss it out. Always trust your senses when checking for food safety. Yes, you can! This dish works great with various pasta types. Here are a few options: - Penne - Rigatoni - Farfalle - Whole wheat pasta Each type adds a unique twist to the creamy sauce. Choose your favorite! To make this dish gluten-free, pick a pasta that fits your needs. Some great options include: - Gluten-free penne - Brown rice spaghetti - Chickpea pasta These choices keep the flavors while being easy on your tummy. Absolutely! You can make this dish vegan with simple swaps. Try these tips: - Use coconut cream instead of heavy cream. - Replace Parmesan cheese with nutritional yeast. - Choose a vegan butter or oil for sautéing. These changes keep the rich taste while making it plant-based. Pair this creamy pasta with tasty sides and beverages. Here are some ideas: - A fresh green salad with lemon vinaigrette - Garlic bread for extra flavor - Roasted vegetables for a healthy touch - A crisp white wine, like Sauvignon Blanc These options enhance your meal and make it more enjoyable. This blog post presented a simple recipe for creamy garlic parmesan pasta. We covered the essential ingredients, step-by-step instructions, and helpful tips to enhance flavor. You also learned about easy variations and storage practices. Experimenting with this dish can lead to many delicious meals. Remember, cooking is about having fun and enjoying the process. So grab your tools and get started in the kitchen!](https://homecookingstyle.com/wp-content/uploads/2025/05/7399dce7-4db6-4d61-95e1-6d3f7570d3bf.webp)
Creamy Garlic Parmesan Pasta Irresistible Delight
If you crave comfort food that’s quick and easy, you’ll love this creamy garlic Parmesan pasta. With rich flavors and a silky sauce, it’s…
My Latest Desserts
-
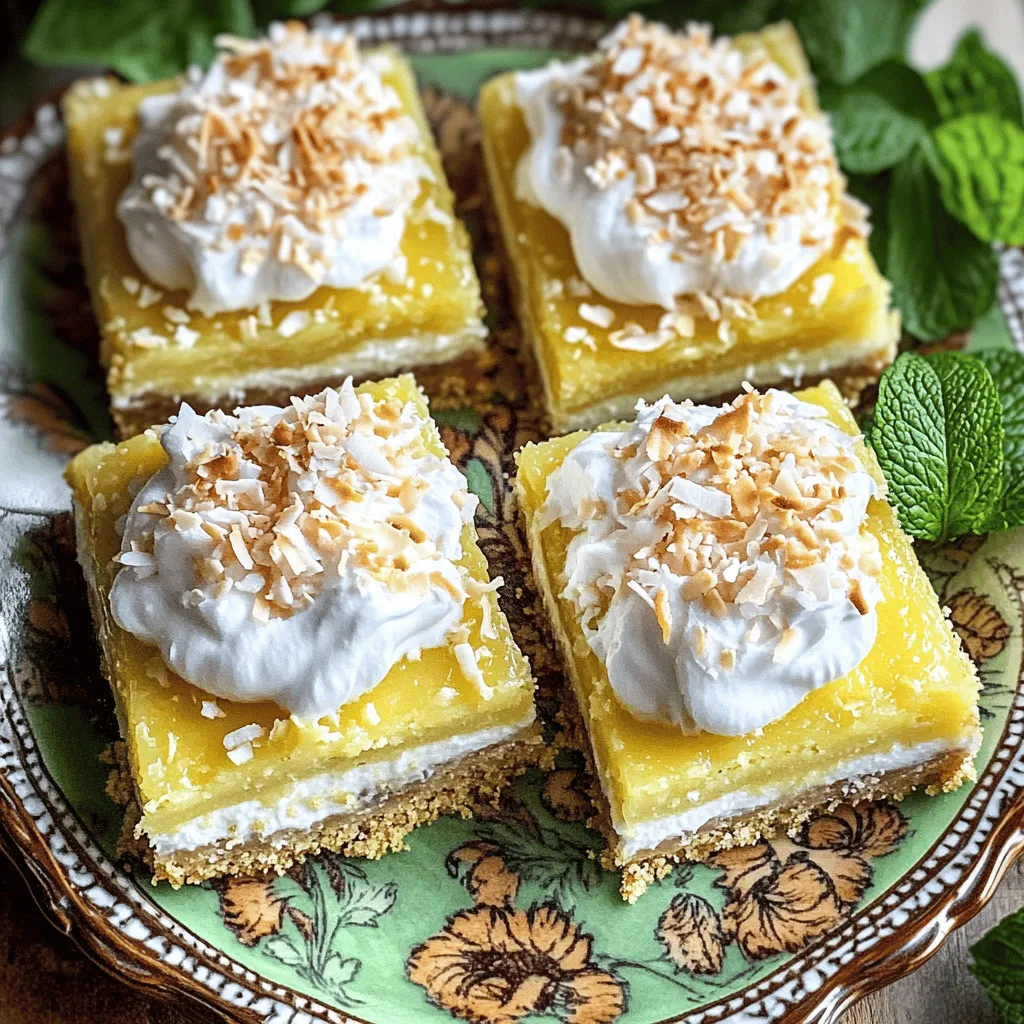
Coconut Cream Pie Bars Delightfully Creamy Treat
If you’re craving something sweet and creamy, Coconut Cream Pie Bars are your answer. These bars combine rich coconut flavor Read Full Recipe -
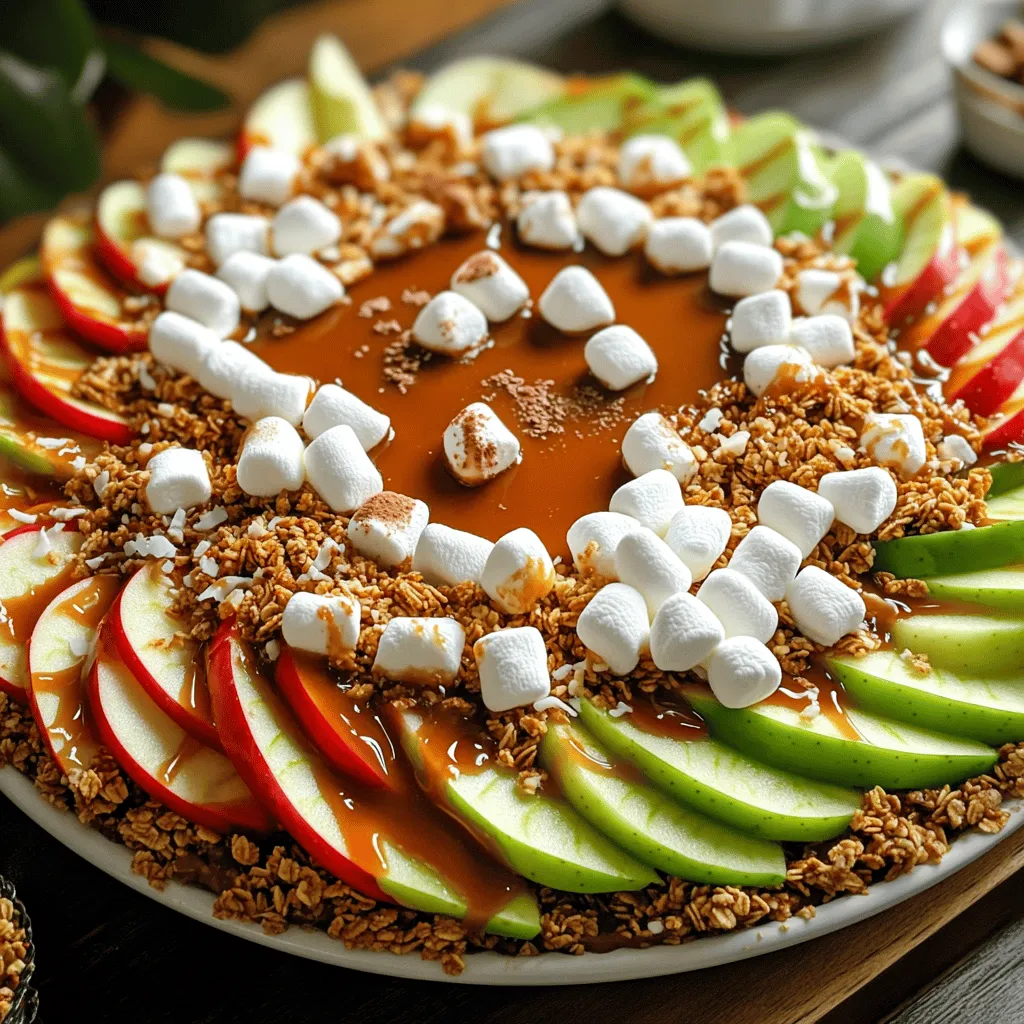
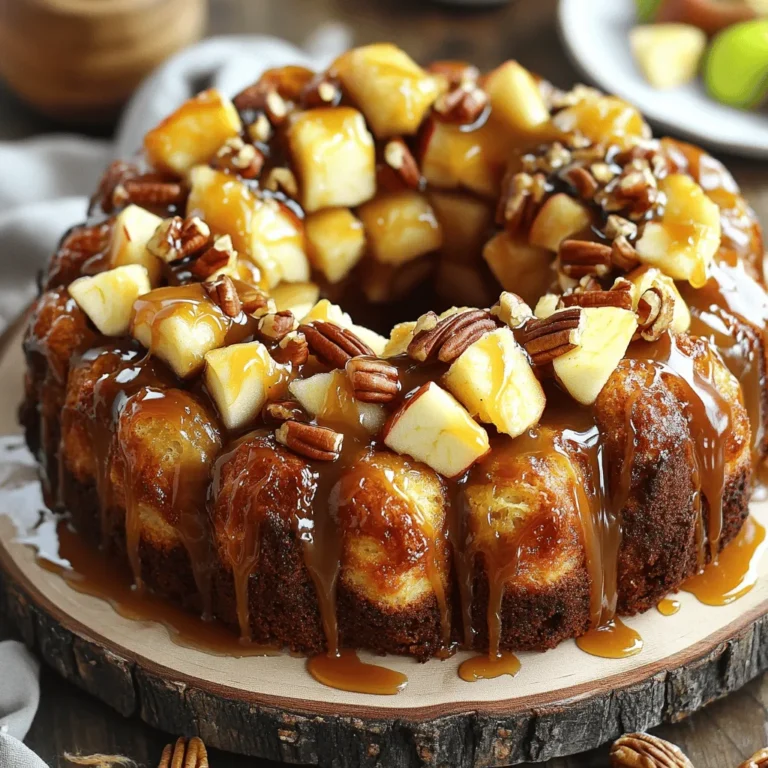
Caramel Apple Nachos Delightful Sweet Snack Idea
Get ready to indulge in a sweet twist with Caramel Apple Nachos! This fun snack combines crisp apples, gooey caramel, Read Full Recipe -
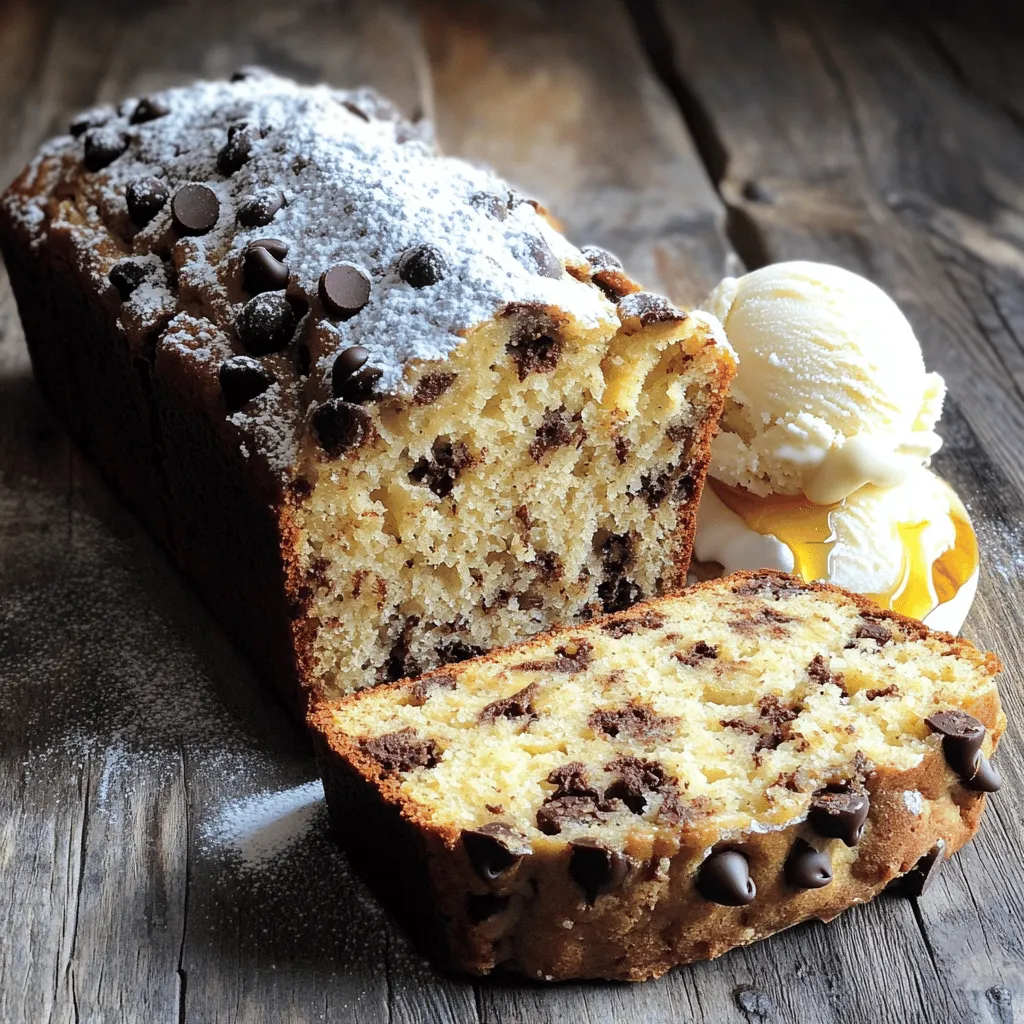
Chocolate Chip Banana Bread Simple and Tasty Recipe
Do you love warm, sweet treats? If so, you’ll adore this simple and tasty Chocolate Chip Banana Bread recipe! With Read Full Recipe -

Cinnamon Sugar Donut Muffins Soft and Tasty Treat
Get ready to satisfy your sweet tooth with these Cinnamon Sugar Donut Muffins! They’re soft, tasty, and perfect for any Read Full Recipe -

Chocolate Chip Cookie Dough Brownies Delightful Treat
Do you love brownies and cookie dough? Then, you’ll adore Chocolate Chip Cookie Dough Brownies! This delightful treat combines rich, Read Full Recipe -
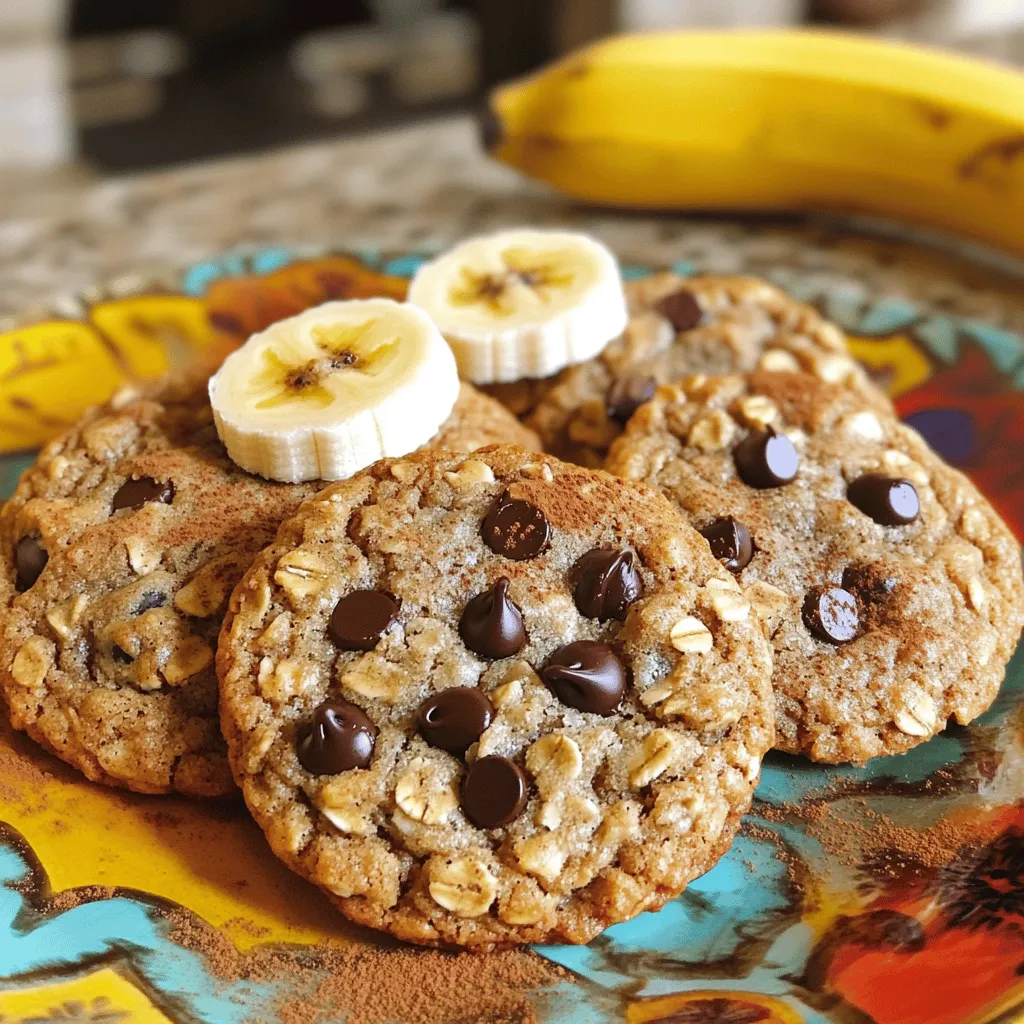
Banana Oatmeal Cookies Simple and Tasty Recipe
Looking for a quick and delicious treat? These Banana Oatmeal Cookies are the answer! With just a few simple ingredients, Read Full Recipe -

Pumpkin Spice Energy Balls Simple and Tasty Snack
Fall is here, and what better way to celebrate than with delicious Pumpkin Spice Energy Balls? These tasty snacks are Read Full Recipe -

Lemon Blueberry Muffins Delightful and Easy Recipe
Are you ready to enjoy the perfect treat that blends sweet and tangy? My Lemon Blueberry Muffins are simple to Read Full Recipe -
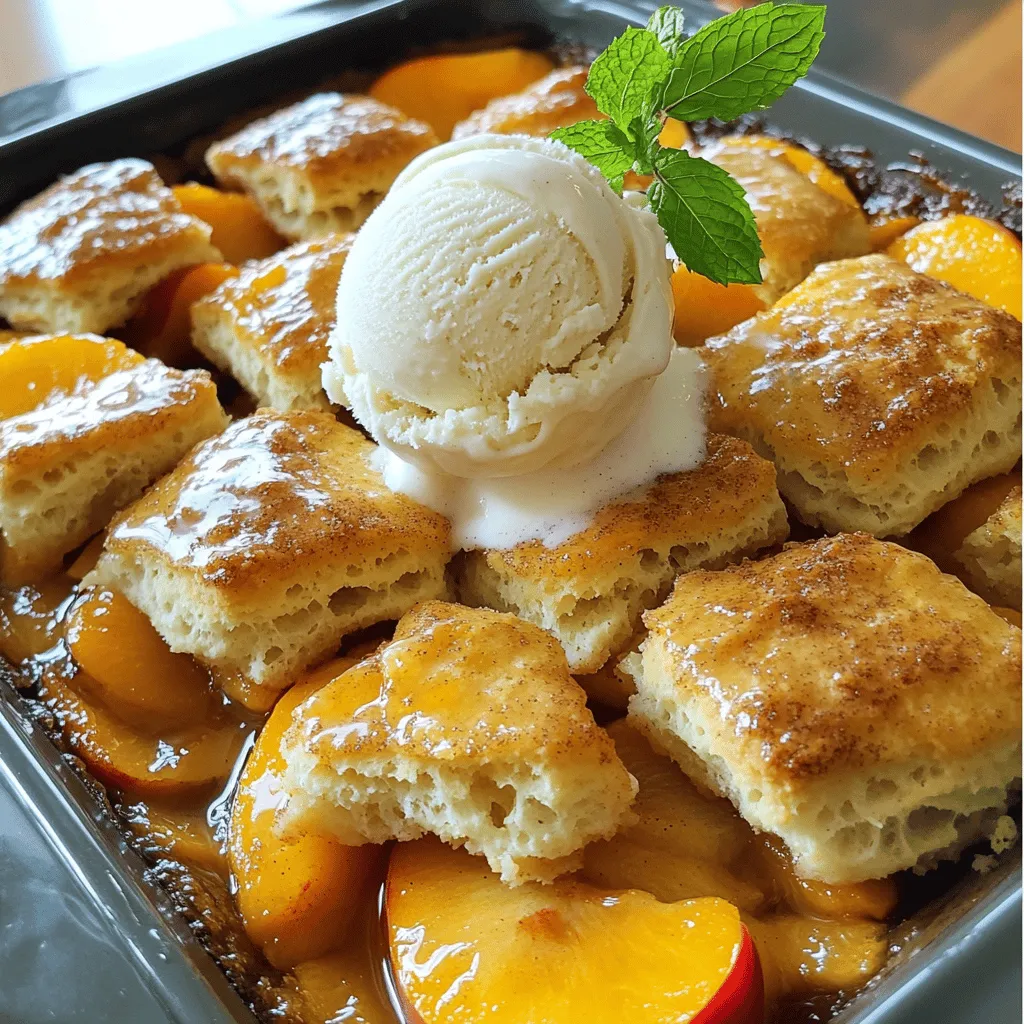
Peach Cobbler with Biscuit Topping Simple Delight
If you crave a warm, sweet dessert, you’ll love my Peach Cobbler with Biscuit Topping. This simple delight combines juicy Read Full Recipe -

Vegan Chocolate Mug Cake Simple and Delicious Treat
Craving something sweet and easy? You’re in the right place! My vegan chocolate mug cake is quick to make and Read Full Recipe
My Latest Recipes

hey,
i’m !
I’m so happy you’re here!
From my kitchen to your table, each dish is a labor of love. May they delight your palate and warm your heart. Let’s savor the beauty of cooking together.
. Serve your chili hot, garnished with fresh cilantro and optional avocado slices on top. Enjoy your meal! To make your sweet potato black bean chili shine, start with sautéing. Use medium heat and add olive oil to your pot. When the oil is hot, toss in chopped onion, bell pepper, and garlic. This mix builds a solid flavor base. Sauté for about five minutes until the veggies soften. To avoid mushy sweet potatoes, cut them into even pieces. Smaller pieces cook faster and can turn mushy. Aim for about a half-inch dice. Stir the sweet potatoes with the spices for a minute before adding the liquid. This step helps to keep their texture while cooking. To kick up the flavor, consider adding more spices. Try a pinch of oregano or a dash of cinnamon for warmth. If you like it spicy, add more cayenne pepper. Using homemade broth can make a big difference. It adds depth and richness. If you don’t have homemade broth, store-bought works fine. Just check for low sodium options to control the salt level. This chili pairs well with simple side dishes. Serve it with crusty bread or a green salad. Cornbread also makes a great match and adds sweetness. When it comes to drinks, try serving it with iced tea or a light beer. A fruity soda can be refreshing too. For something special, enjoy it with a margarita for a fun twist. {{image_2}} You can switch up the beans in your chili. Try kidney beans or pinto beans instead of black beans. These options add different flavors and textures. You can also add more veggies. Corn or zucchini works great. These veggies add sweet flavors and are fun to use. Making this chili vegan is simple. Just ensure you use vegetable broth. If you want to add protein, chicken or turkey will work well. Cook the meat first, then add it in with the other ingredients. This adds heartiness to your dish. If you like spice, adjust the chili powder and cayenne pepper. You can make it milder or hotter based on your taste. Also, don’t be afraid to play with herbs. Add fresh basil or oregano for a twist. Each herb gives a new flavor to your chili. For the full recipe, check the section above. To store leftover chili, let it cool first. Then, pour it into an airtight container. Seal it tightly to keep air out. The chili stays fresh in the fridge for up to five days. For freezing, use a freezer-safe container. Leave some space at the top; the chili will expand when frozen. It’s best to freeze it in single servings. This way, you can thaw just what you need later. To thaw, move it to the fridge overnight or use the microwave. Reheat on low heat until hot. To keep the texture and flavor, reheat slowly. Stir often to avoid sticking. The microwave is quick but may dry it out. The stovetop is better for even heating. Add a splash of vegetable broth if it seems thick. Enjoy your chili just like the first time! You can add more spice easily. Try using extra cayenne pepper. You can also mix in hot sauce. A splash of your favorite sauce can boost the heat. Adjust to your taste, and don't be shy with the spices. Yes, you can use a slow cooker. First, sauté the onion, bell pepper, and garlic in a pan. Then, add all ingredients to the slow cooker. Cook on low for 6-8 hours or on high for 3-4 hours. This method makes the flavors even richer. This chili pairs well with cornbread or rice. You can also enjoy it with tortilla chips. A dollop of sour cream adds creaminess. For a fresh touch, serve with a side salad. These options make the meal more filling. Yes, you can easily double the recipe. Just use twice the amount of each ingredient. You may need a larger pot. Make sure to adjust cooking time if needed. Double-check seasoning as flavors can change with more ingredients. You can prep this chili a day in advance. Store it in the fridge after cooking. Just reheat it when you're ready to eat. The flavors will deepen overnight. You can also freeze it for longer storage. Just thaw before reheating. For the full recipe, check out the earlier section. In this blog post, we explored how to make a delicious Sweet Potato Black Bean Chili. We discussed key ingredients, cooking steps, and useful tips. You can enhance flavors and try variations to suit your taste. Proper storage and reheating tips ensure your chili lasts longer. Feel free to experiment with spices and enjoy this dish with your favorite sides. With these steps, you can create a tasty meal that's both satisfying and healthy. Dive into your cooking adventure and enjoy every bite!](https://homecookingstyle.com/wp-content/uploads/2025/05/31a7c7e8-c0e5-4a4b-94f8-6efedb8855b7-300x300.webp)

![To make zesty shrimp and grits, gather these key ingredients: - 1 cup grits (stone-ground preferred) - 4 cups water or low-sodium chicken broth - 1 pound large shrimp, peeled and deveined - 1 tablespoon olive oil - 1 tablespoon unsalted butter - 2 cloves garlic, minced - 1 small red bell pepper, diced - 1 small jalapeño, minced (remove seeds for less heat) - Zest of 1 lime - 2 tablespoons lime juice - 1 teaspoon smoked paprika - 1 teaspoon cumin - Salt and pepper to taste - 2 green onions, sliced (for garnish) - Fresh parsley, chopped (for garnish) These ingredients bring out the rich and zesty flavors in the dish. The grits provide a creamy base, while the shrimp adds a protein punch. The lime and spices give it a fresh kick. You will need a few essential tools to make this dish: - Medium saucepan - Large skillet - Stirring spoon - Measuring cups and spoons - Knife and cutting board Using the right cookware helps you cook evenly. A medium saucepan works well for the grits. The large skillet is perfect for sautéing the shrimp and veggies. If you don’t have an ingredient, here are some swaps: - If you can’t find stone-ground grits, use quick-cooking grits. - For shrimp, you can use chicken or tofu for a different taste. - Use vegetable broth if you want a vegetarian option. - If you dislike spice, skip the jalapeño or use bell pepper instead. These substitutions help you tailor the dish to your taste. Feel free to experiment and make it your own! For the full recipe, check the section above. Start with a medium saucepan. Bring 4 cups of water or low-sodium chicken broth to a boil. Once boiling, add 1 cup of grits and stir well. Lower the heat to low. Cook the grits for about 20 to 25 minutes. Stir occasionally. They should thicken nicely. When they are ready, add salt and pepper to taste. While the grits cook, grab a large skillet. Heat 1 tablespoon of olive oil and 1 tablespoon of unsalted butter over medium heat. Add 2 cloves of minced garlic, 1 small diced red bell pepper, and 1 minced jalapeño. Sauté these for about 3 to 4 minutes. You want the veggies soft and fragrant. Season the shrimp with 1 teaspoon of smoked paprika, 1 teaspoon of cumin, lime zest, and 2 tablespoons of lime juice. Add the shrimp to the skillet. Cook them until they turn pink and opaque, about 3 to 5 minutes. Season with salt and pepper to taste. Once the grits are ready, stir them to make sure they are smooth. Serve the grits in bowls. Top each bowl with the zesty shrimp mixture. For a pop of color, garnish with sliced green onions and chopped parsley. This dish is all about comfort and flavor. You can find the full recipe [here]. Enjoy every bite! To get creamy grits, use stone-ground grits. They cook slower but taste better. Start by boiling four cups of water or low-sodium chicken broth. Slowly add one cup of grits while you stir. This keeps the grits from clumping. Lower the heat once they boil. Cook for 20-25 minutes, stirring often. For a silkier texture, stir in a bit of butter at the end. Adjust the salt and pepper to your liking. Seasoning is key to great shrimp and grits. I love using smoked paprika and cumin for depth. Mix them in with lime zest and juice for a zesty kick. Adding minced garlic and diced peppers while cooking the shrimp boosts flavor. Don’t forget to taste as you go. A little salt and pepper can make a big difference. Always season in layers for the best flavor. Serving shrimp and grits can be fun! Use deep bowls to hold the grits nicely. Top them with the shrimp mixture, letting the sauce flow over the grits. For a pop of color, add sliced green onions and chopped parsley. A lime wedge on the side adds freshness and looks nice too. You can even sprinkle some crushed red pepper for an extra touch. For the full recipe, check the detailed instructions. {{image_2}} To add more heat, you can use more jalapeño. If you want it even spicier, try adding crushed red pepper flakes. You can also swap regular paprika for hot paprika. This change will give your dish a nice kick. Remember to taste as you go. Adjust to your liking, and enjoy! Adding veggies boosts the nutrition of your dish. You can mix in spinach or kale for greens. Both add color and flavor. You can also try corn for sweetness and texture. Just sauté them with garlic before adding the shrimp. This makes your meal more filling and healthy. If shrimp isn’t your thing, you have many choices. Chicken or tofu work well as substitutes. For chicken, use bite-sized pieces and cook until golden. If you prefer tofu, use firm tofu and sauté it until crispy. Both options will still taste great with the zesty sauce. You can find the full recipe below to help with these alternatives. [Full Recipe] To keep your leftover shrimp and grits fresh, store them in an airtight container. Make sure to let the dish cool first. Place it in the fridge within two hours of cooking. This way, your meal stays tasty for up to three days. When reheating, I suggest using a skillet over medium heat. Add a splash of water or broth to keep the grits creamy. Stir gently until everything heats through. This method helps the flavors blend back together nicely. You can also microwave them in short bursts, stirring in between. To freeze shrimp and grits, place the dish in a freezer-safe container. Separate the shrimp from the grits if you can. Freeze for up to three months. When ready to enjoy, thaw it in the fridge overnight. Reheat using the skillet method for best results. You’ll love how well it holds up! For full details, check out the Full Recipe. The best grits for shrimp and grits are stone-ground grits. They have a richer taste and creamy texture. Look for grits labeled as "stone-ground" at your store. Instant grits are faster to cook but lack the depth of flavor. Stone-ground grits cook more slowly but are worth the wait. Yes, you can make shrimp and grits in advance. Cook the grits and shrimp separately, then store them in airtight containers. Keep the grits in the fridge for up to three days. Reheat them with a bit of water to restore creaminess. Cook the shrimp fresh before serving for the best taste. To make shrimp and grits gluten-free, use gluten-free broth. Most chicken broth is gluten-free, but always check the label. The grits themselves are gluten-free, so no need to worry there. This way, you can enjoy the full flavor of zesty shrimp and grits without gluten. For more details, see the Full Recipe. Zesty shrimp and grits are easy to make with the right ingredients and steps. I shared how to cook creamy grits and flavorful shrimp. You learned tips for great texture and taste. Plus, I covered fun variations and storage tips. Now, you have all you need to create this tasty dish. With practice, you can impress family and friends with your skills. Enjoy making and sharing your shrimp and grits masterpiece!](https://homecookingstyle.com/wp-content/uploads/2025/05/cb1168a9-8606-4cd2-8057-c6a1384a05e1-300x300.webp)
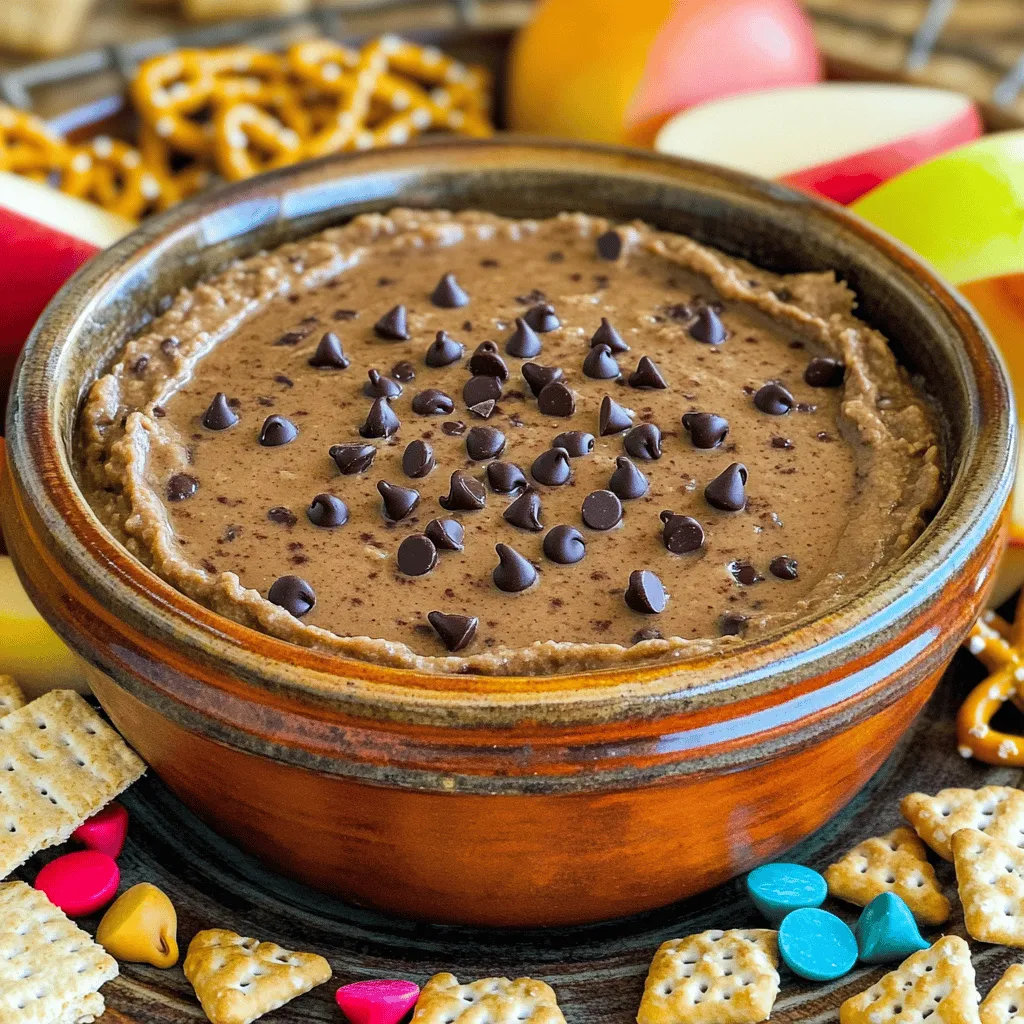
Chocolate Chip Cookie Dough Dip Delightful and Easy
Get ready for an easy, tasty treat that will wow your friends! In this post, I’ll show you how to make Chocolate Chip Cookie…