


Latest & Greatest

Creamy Avocado Pasta Simple and Quick Recipe
If you’re craving a simple and quick meal that bursts with flavor, you’ve found it! My Creamy Avocado Pasta recipe
Read more…
Vegan Cauliflower Buffalo Wings Crispy and Flavorful
If you’re craving a spicy treat that’s both crisp and plant-based, you’ve come to the right place! My Vegan Cauliflower
Read more…
Strawberry Shortcake Trifle Delightful Layered Dessert
Looking for a delicious dessert that impresses and satisfies? This Strawberry Shortcake Trifle is the perfect treat! With fresh strawberries,
Read more…
Savory Spinach and Feta Puff Pastry Quick Treat
Are you ready to impress with a delightful treat? This Savory Spinach and Feta Puff Pastry is quick, easy, and
Read more…
Dairy-Free Chocolate Avocado Mousse Rich and Creamy Delight
Get ready to indulge in a rich and creamy treat that’s also dairy-free! This Dairy-Free Chocolate Avocado Mousse is not
Read more…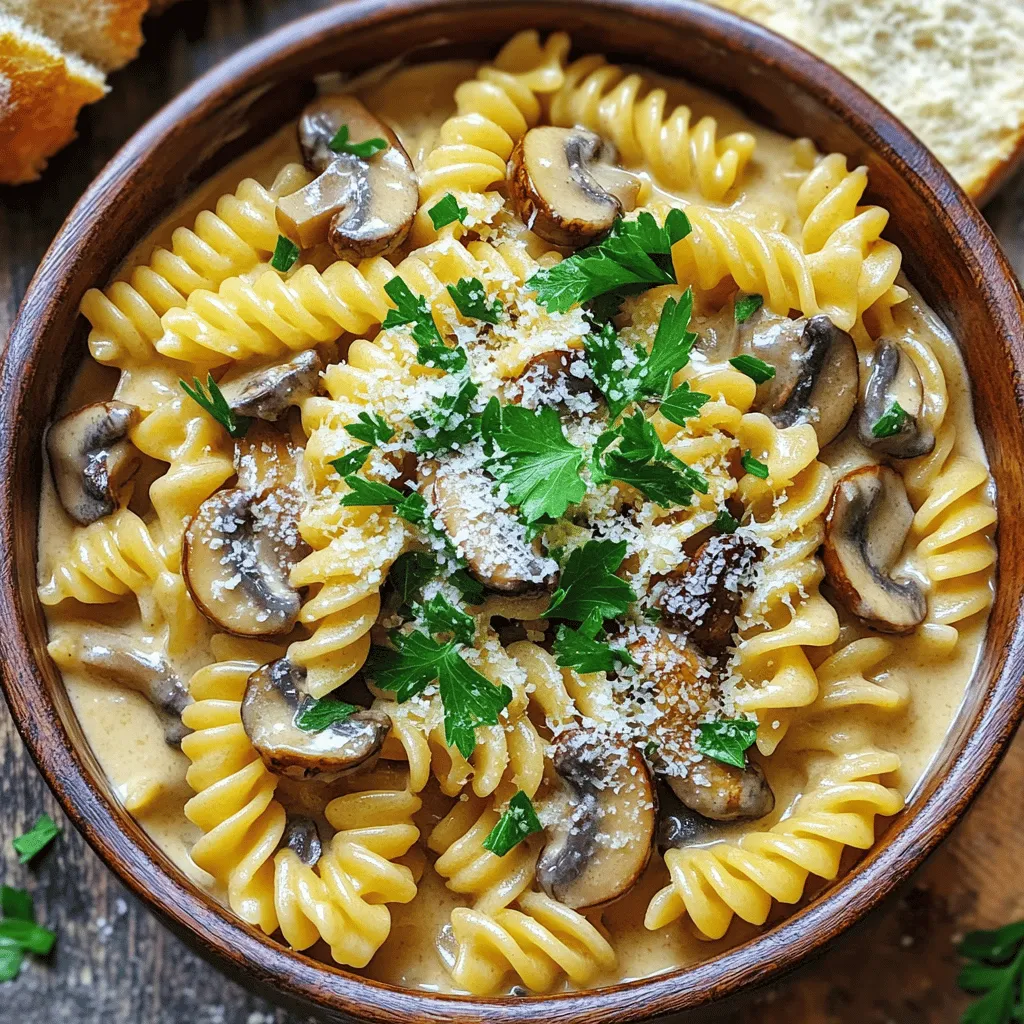
One-Pot Creamy Mushroom Pasta Quick and Flavorful Dish
If you’re craving something rich and tasty, you’ll love my One-Pot Creamy Mushroom Pasta recipe! This quick and easy dish
Read more…
Zucchini Noodles with Pesto Flavorful and Simple Meal
Looking for a quick and tasty meal? Zucchini noodles with pesto serve up bold flavor in no time! This dish
Read more…
Peanut Butter Chocolate Chip Blondies Delightful Treat
Craving a sweet treat that’s both rich and satisfying? These Peanut Butter Chocolate Chip Blondies are just the ticket! With
Read more…browse recipes


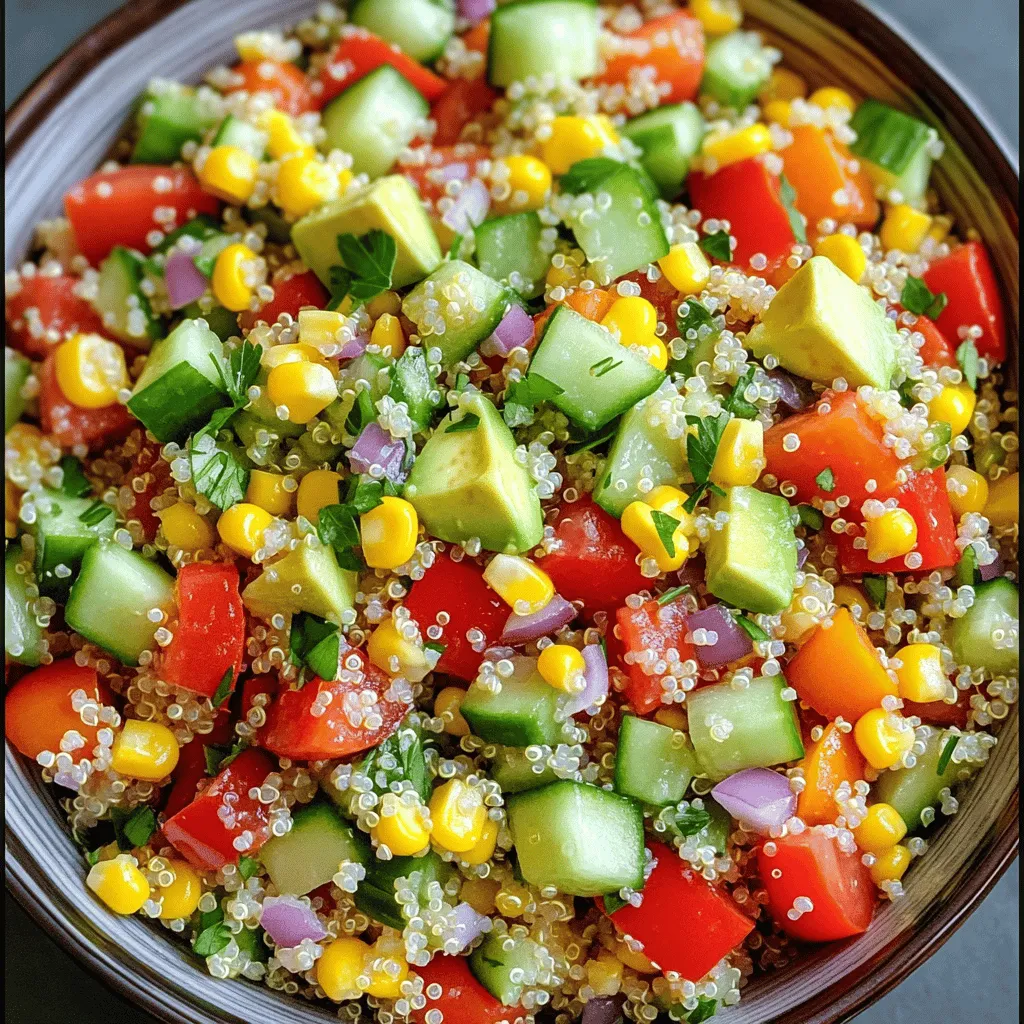
Vegetable Quinoa Salad Fresh and Flavorful Delight
Are you ready to enjoy a fresh and flavorful delight? This Vegetable Quinoa Salad is not only colorful but also packed with nutrients. It’s…
My Latest Desserts
-
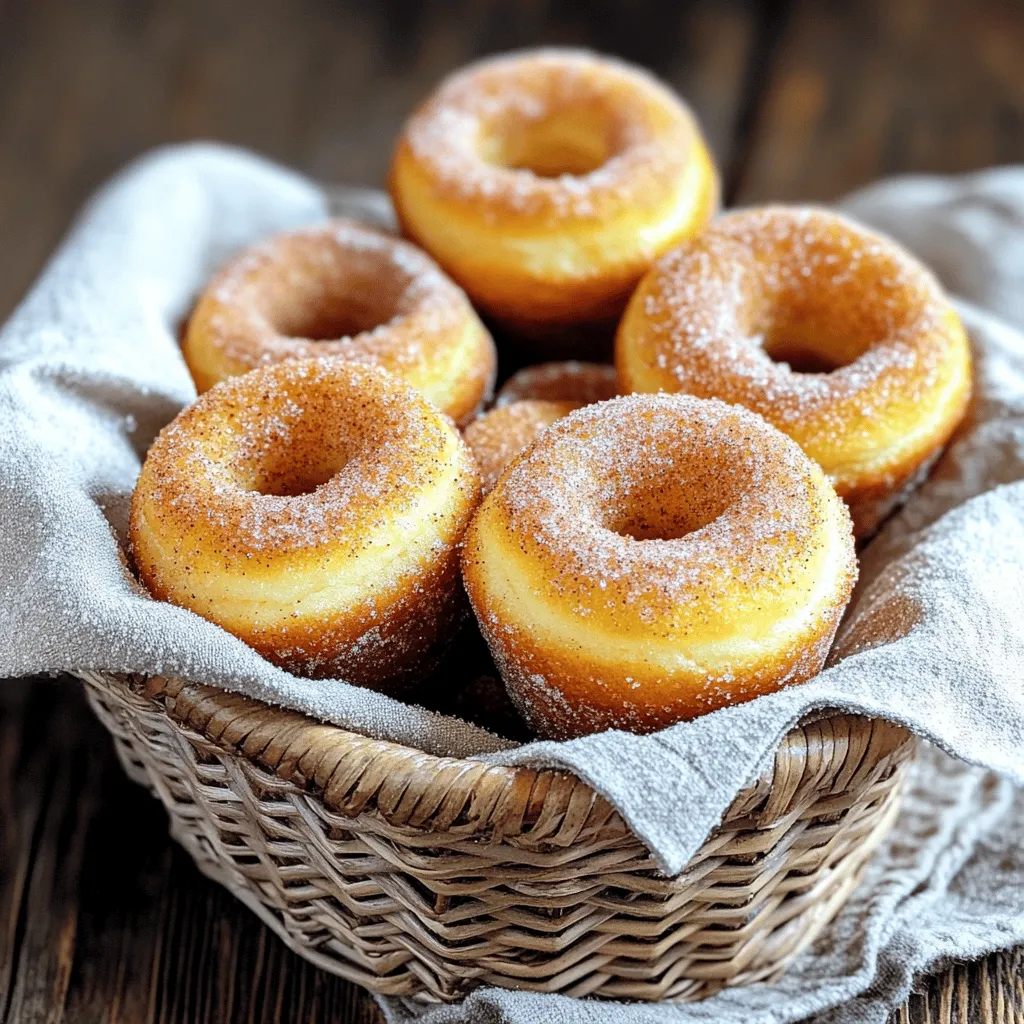
Cinnamon Sugar Donut Muffins Soft and Tasty Treat
Get ready to satisfy your sweet tooth with these Cinnamon Sugar Donut Muffins! They’re soft, tasty, and perfect for any Read Full Recipe -
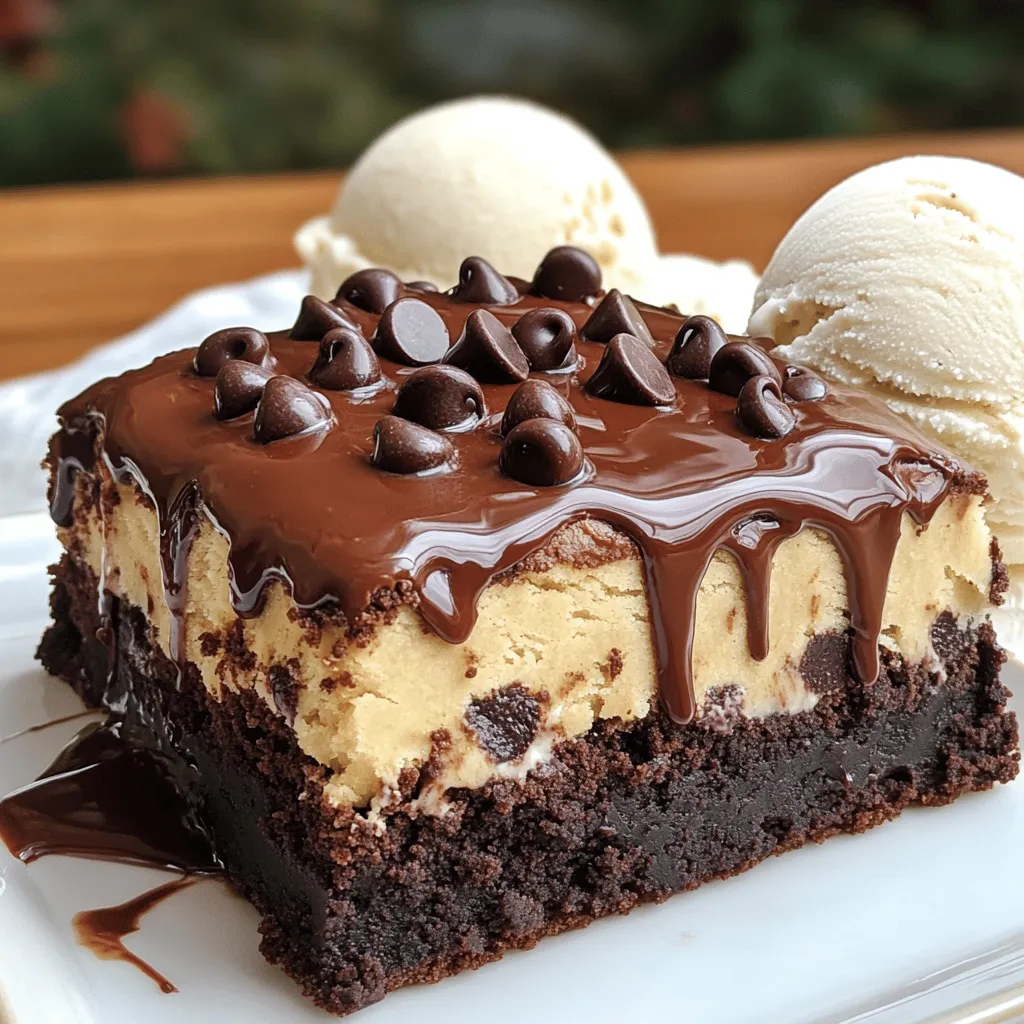
Chocolate Chip Cookie Dough Brownies Delightful Treat
Do you love brownies and cookie dough? Then, you’ll adore Chocolate Chip Cookie Dough Brownies! This delightful treat combines rich, Read Full Recipe -
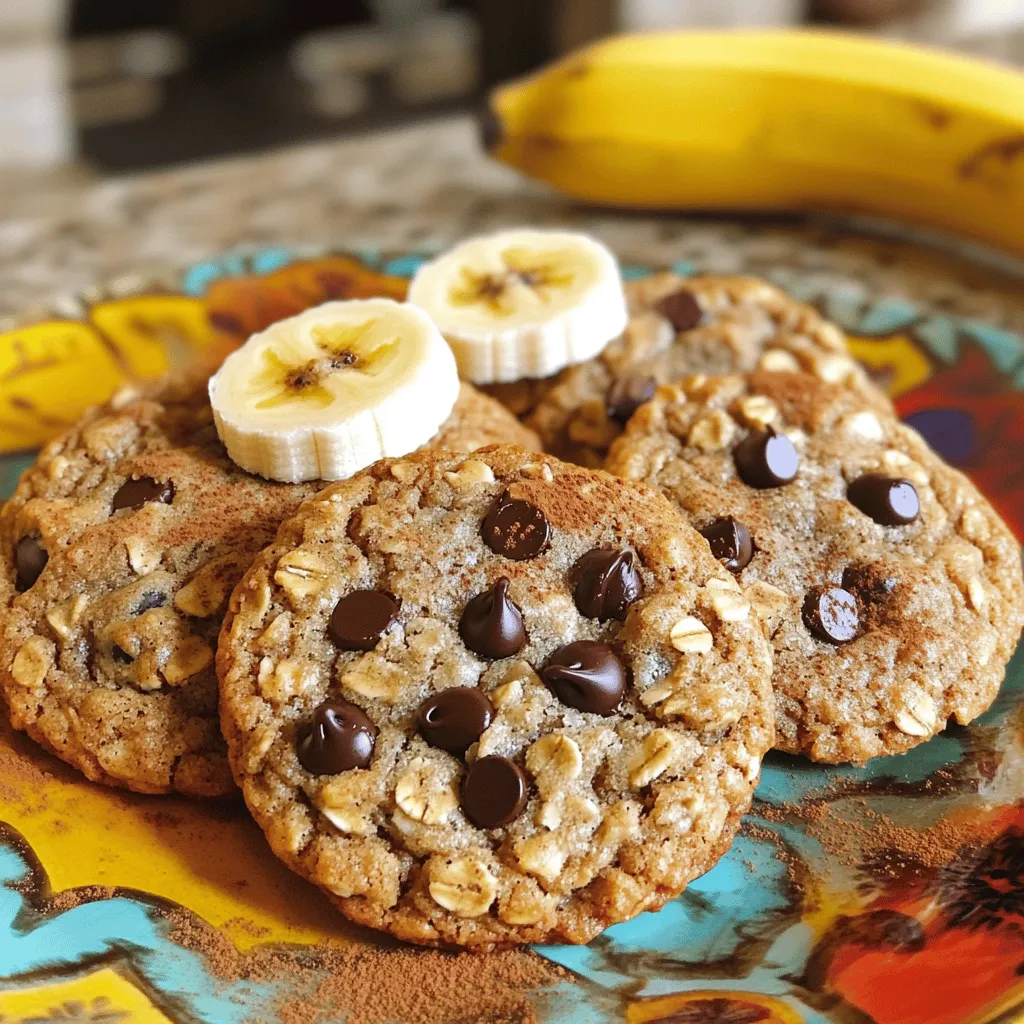
Banana Oatmeal Cookies Simple and Tasty Recipe
Looking for a quick and delicious treat? These Banana Oatmeal Cookies are the answer! With just a few simple ingredients, Read Full Recipe -
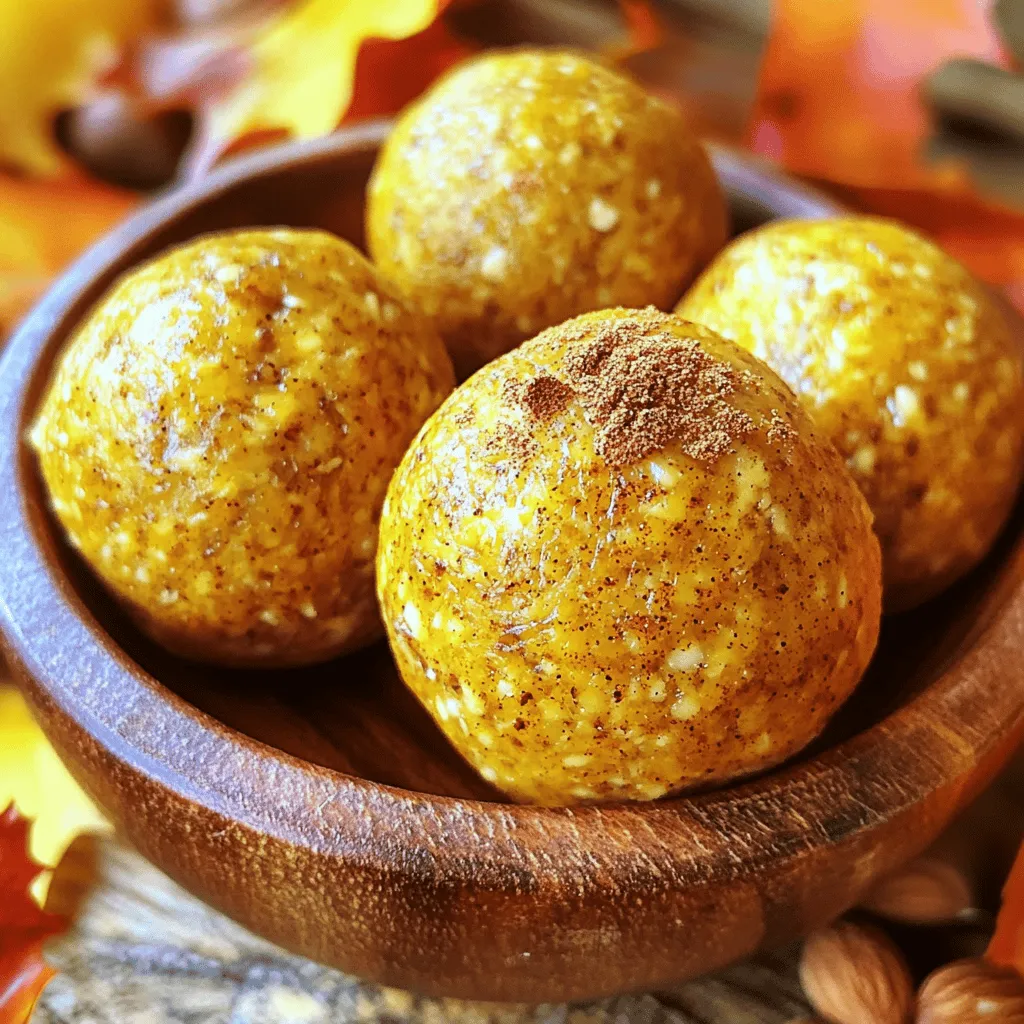
Pumpkin Spice Energy Balls Simple and Tasty Snack
Fall is here, and what better way to celebrate than with delicious Pumpkin Spice Energy Balls? These tasty snacks are Read Full Recipe -
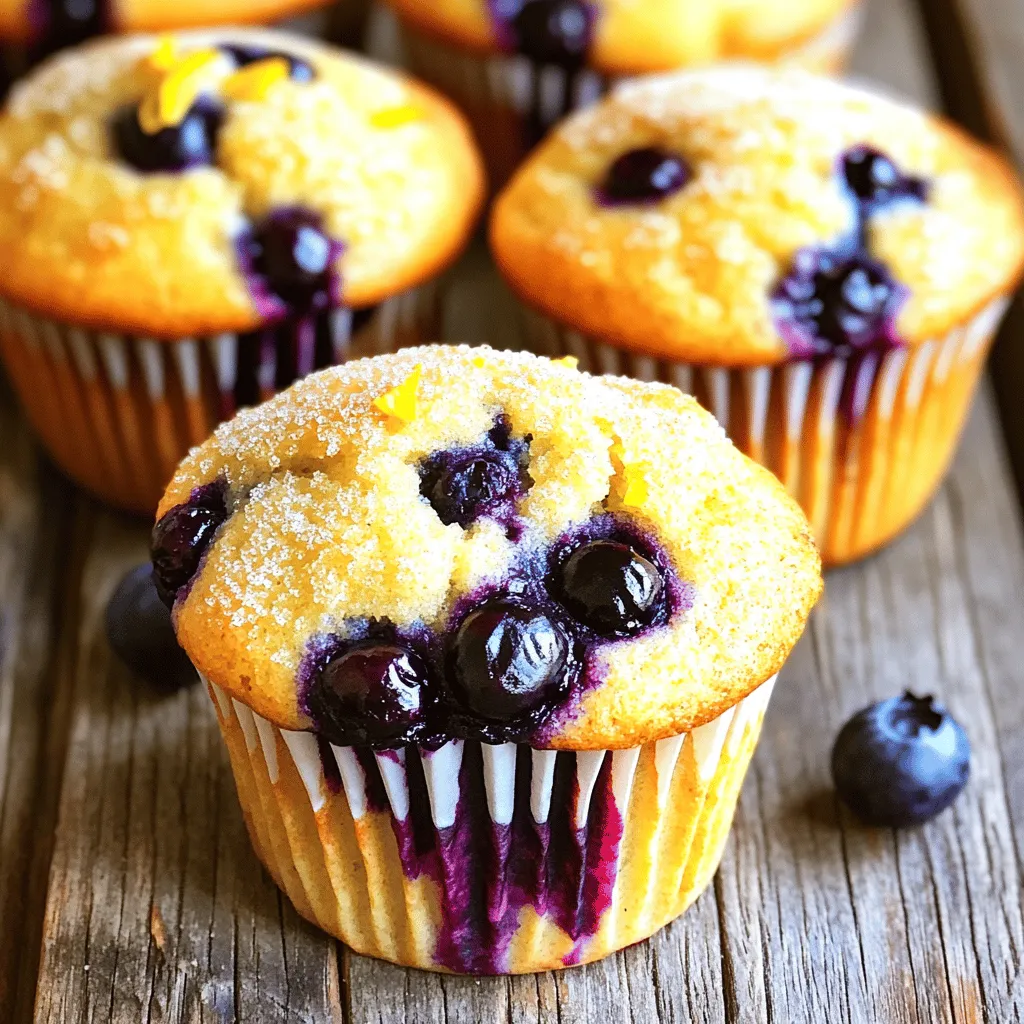
Lemon Blueberry Muffins Delightful and Easy Recipe
Are you ready to enjoy the perfect treat that blends sweet and tangy? My Lemon Blueberry Muffins are simple to Read Full Recipe -
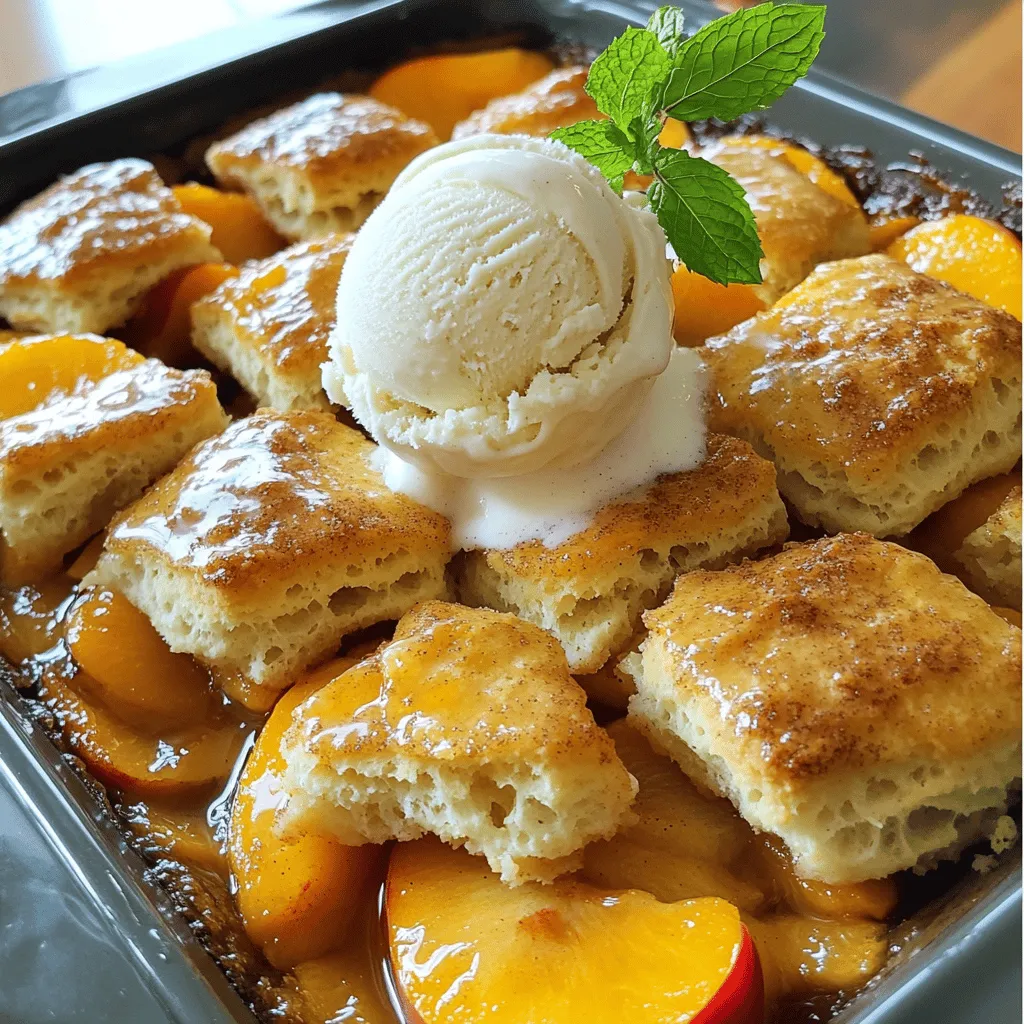
Peach Cobbler with Biscuit Topping Simple Delight
If you crave a warm, sweet dessert, you’ll love my Peach Cobbler with Biscuit Topping. This simple delight combines juicy Read Full Recipe -

Vegan Chocolate Mug Cake Simple and Delicious Treat
Craving something sweet and easy? You’re in the right place! My vegan chocolate mug cake is quick to make and Read Full Recipe -

Chocolate Hazelnut Spread Pancakes Irresistible Treat
Get ready to indulge in a sweet breakfast treat! Imagine fluffy pancakes, warm from the skillet, drizzled with rich chocolate Read Full Recipe -

Peach Galette with Almond Crust Delightful Recipe
Are you ready to impress your friends with a stunning dessert? Try this Peach Galette with Almond Crust! This treat Read Full Recipe -
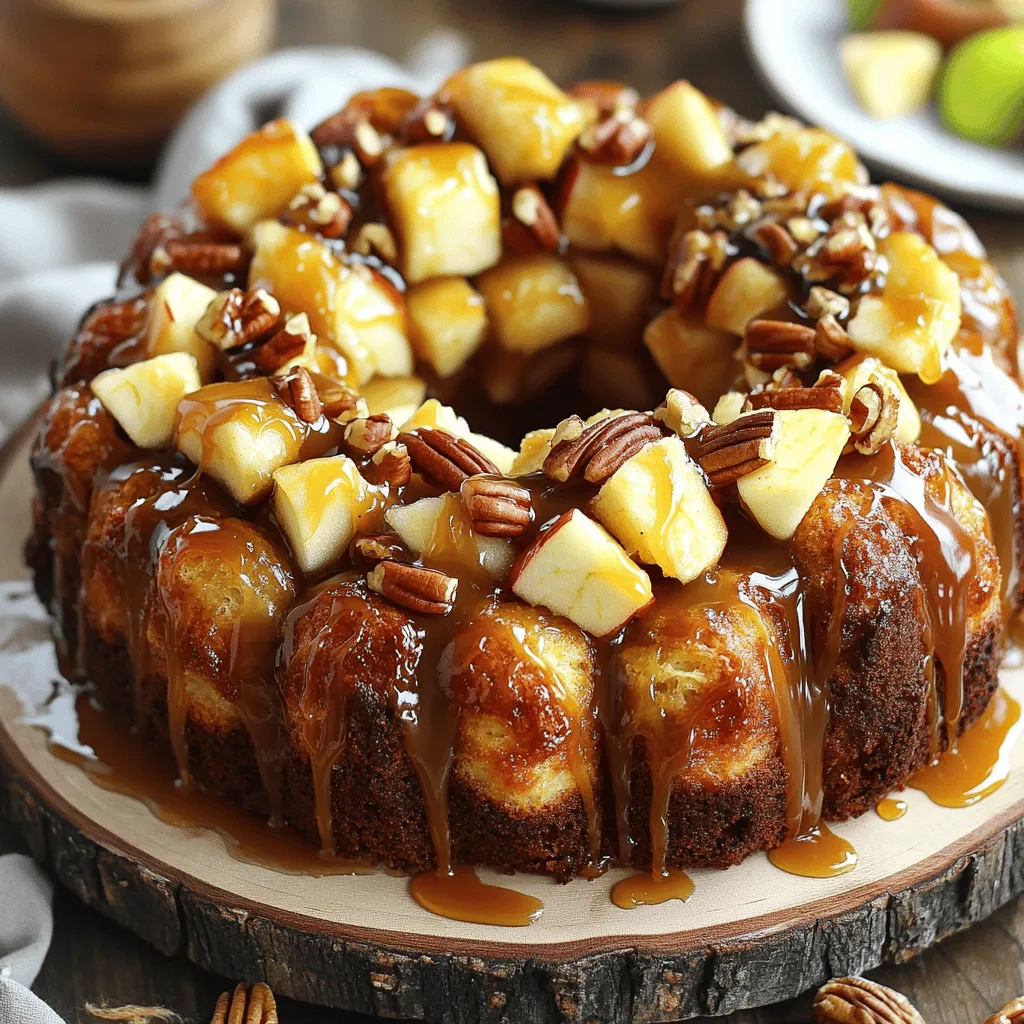
Caramel Apple Monkey Bread Irresistible Sweet Delight
Get ready to indulge in a mouthwatering treat with my Caramel Apple Monkey Bread! This sweet delight is packed with Read Full Recipe
My Latest Recipes

hey,
i’m !
I’m so happy you’re here!
From my kitchen to your table, each dish is a labor of love. May they delight your palate and warm your heart. Let’s savor the beauty of cooking together.


. Serve your chili hot, garnished with fresh cilantro and optional avocado slices on top. Enjoy your meal! To make your sweet potato black bean chili shine, start with sautéing. Use medium heat and add olive oil to your pot. When the oil is hot, toss in chopped onion, bell pepper, and garlic. This mix builds a solid flavor base. Sauté for about five minutes until the veggies soften. To avoid mushy sweet potatoes, cut them into even pieces. Smaller pieces cook faster and can turn mushy. Aim for about a half-inch dice. Stir the sweet potatoes with the spices for a minute before adding the liquid. This step helps to keep their texture while cooking. To kick up the flavor, consider adding more spices. Try a pinch of oregano or a dash of cinnamon for warmth. If you like it spicy, add more cayenne pepper. Using homemade broth can make a big difference. It adds depth and richness. If you don’t have homemade broth, store-bought works fine. Just check for low sodium options to control the salt level. This chili pairs well with simple side dishes. Serve it with crusty bread or a green salad. Cornbread also makes a great match and adds sweetness. When it comes to drinks, try serving it with iced tea or a light beer. A fruity soda can be refreshing too. For something special, enjoy it with a margarita for a fun twist. {{image_2}} You can switch up the beans in your chili. Try kidney beans or pinto beans instead of black beans. These options add different flavors and textures. You can also add more veggies. Corn or zucchini works great. These veggies add sweet flavors and are fun to use. Making this chili vegan is simple. Just ensure you use vegetable broth. If you want to add protein, chicken or turkey will work well. Cook the meat first, then add it in with the other ingredients. This adds heartiness to your dish. If you like spice, adjust the chili powder and cayenne pepper. You can make it milder or hotter based on your taste. Also, don’t be afraid to play with herbs. Add fresh basil or oregano for a twist. Each herb gives a new flavor to your chili. For the full recipe, check the section above. To store leftover chili, let it cool first. Then, pour it into an airtight container. Seal it tightly to keep air out. The chili stays fresh in the fridge for up to five days. For freezing, use a freezer-safe container. Leave some space at the top; the chili will expand when frozen. It’s best to freeze it in single servings. This way, you can thaw just what you need later. To thaw, move it to the fridge overnight or use the microwave. Reheat on low heat until hot. To keep the texture and flavor, reheat slowly. Stir often to avoid sticking. The microwave is quick but may dry it out. The stovetop is better for even heating. Add a splash of vegetable broth if it seems thick. Enjoy your chili just like the first time! You can add more spice easily. Try using extra cayenne pepper. You can also mix in hot sauce. A splash of your favorite sauce can boost the heat. Adjust to your taste, and don't be shy with the spices. Yes, you can use a slow cooker. First, sauté the onion, bell pepper, and garlic in a pan. Then, add all ingredients to the slow cooker. Cook on low for 6-8 hours or on high for 3-4 hours. This method makes the flavors even richer. This chili pairs well with cornbread or rice. You can also enjoy it with tortilla chips. A dollop of sour cream adds creaminess. For a fresh touch, serve with a side salad. These options make the meal more filling. Yes, you can easily double the recipe. Just use twice the amount of each ingredient. You may need a larger pot. Make sure to adjust cooking time if needed. Double-check seasoning as flavors can change with more ingredients. You can prep this chili a day in advance. Store it in the fridge after cooking. Just reheat it when you're ready to eat. The flavors will deepen overnight. You can also freeze it for longer storage. Just thaw before reheating. For the full recipe, check out the earlier section. In this blog post, we explored how to make a delicious Sweet Potato Black Bean Chili. We discussed key ingredients, cooking steps, and useful tips. You can enhance flavors and try variations to suit your taste. Proper storage and reheating tips ensure your chili lasts longer. Feel free to experiment with spices and enjoy this dish with your favorite sides. With these steps, you can create a tasty meal that's both satisfying and healthy. Dive into your cooking adventure and enjoy every bite!](https://homecookingstyle.com/wp-content/uploads/2025/05/31a7c7e8-c0e5-4a4b-94f8-6efedb8855b7-300x300.webp)
Pumpkin Pie Dump Cake Simple and Tasty Dessert
Looking for a simple and tasty dessert? Pumpkin Pie Dump Cake is the answer! This easy recipe combines all the warm flavors of pumpkin…
![To make this easy and tasty dessert, you need these main ingredients: - 1 can (15 oz) pumpkin puree - 1 can (12 oz) evaporated milk - 3 large eggs - 1 cup granulated sugar - 1 tablespoon pumpkin pie spice - 1 teaspoon vanilla extract - 1 box (15.25 oz) yellow cake mix - 1 cup unsalted butter, melted These ingredients blend to create a rich and creamy filling with a crunchy topping. The pumpkin puree gives it that classic fall flavor. The evaporated milk makes it smooth, while the eggs help it set just right. You can add some fun twists with these optional ingredients: - 1 cup chopped pecans - Whipped cream or vanilla ice cream for serving Adding pecans gives a nice crunch and extra flavor. Serving with whipped cream or ice cream makes it even better. This dessert serves about 9-12 people. Each serving has around: - Calories: 300 - Total Fat: 16g - Saturated Fat: 10g - Cholesterol: 90mg - Sodium: 200mg - Total Carbohydrates: 37g - Dietary Fiber: 2g - Sugars: 20g - Protein: 4g This dessert is rich, so enjoy it in moderation. You can find the full recipe [Full Recipe] to see all the details. To start, gather your ingredients. You will need: - 1 can (15 oz) pumpkin puree - 1 can (12 oz) evaporated milk - 3 large eggs - 1 cup granulated sugar - 1 tablespoon pumpkin pie spice - 1 teaspoon vanilla extract - 1 box (15.25 oz) yellow cake mix - 1 cup unsalted butter, melted - 1 cup chopped pecans (optional) First, preheat your oven to 350°F (175°C). This helps bake your cake evenly. In a large bowl, mix the pumpkin puree, evaporated milk, eggs, sugar, pumpkin pie spice, and vanilla extract. Use a whisk to blend until smooth. This mixture is the base of your cake. Once combined, pour it into a greased 9x13-inch baking dish. Spread it evenly across the bottom. Next, sprinkle the dry yellow cake mix over the pumpkin layer. Make sure there are no large clumps. Now, drizzle the melted butter over the top. Do not mix it in; this will create a crumbly topping while baking. If you want extra crunch, sprinkle the chopped pecans on top. Place the baking dish in your preheated oven. Bake for 50-60 minutes. The top should turn golden brown and set. To check if it's done, insert a toothpick in the center. If it comes out with a few moist crumbs, it’s ready. When your cake is done, take it out of the oven. Let it cool for about 15-20 minutes. This cooling time helps it set up nicely. Serve it warm, topped with whipped cream or a scoop of vanilla ice cream. For extra fun, drizzle caramel sauce over the top. Enjoy your delicious Pumpkin Pie Dump Cake! To get the best texture, mix your ingredients well. Make sure the pumpkin puree and eggs blend smoothly. This helps create a creamy base. When you sprinkle the cake mix, do not mix it into the pumpkin layer. The dry mix sits on top and forms a nice crust as it bakes. One big mistake is overmixing the pumpkin mixture. This can make the final cake dense. Another mistake is using cold butter. Always melt your butter first. Cold butter can lead to uneven baking. Lastly, don’t skip the cooling step. Letting it cool helps the cake set better. Use unsalted butter for a balanced flavor. Melt it until it’s just liquid. This helps create that crunchy top layer. For the cake mix, opt for a standard yellow mix. It gives a light, sweet flavor that pairs well with pumpkin. Be sure to spread the cake mix evenly to avoid clumping. You want a nice, even topping for the perfect bite. Follow these tips for a Pumpkin Pie Dump Cake that is both simple and tasty. Check out the Full Recipe for all the details! {{image_2}} You can make this dish gluten-free easily. Just swap the yellow cake mix for a gluten-free blend. Many brands offer great mixes that work well. Check the label to ensure it’s truly gluten-free. This change keeps the flavor, while making it safe for those with gluten issues. Want to kick up the flavor? Add more spices! You could use cinnamon or nutmeg to give it warmth. A splash of maple extract can add a sweet twist. You can even try adding a bit of ginger for a spicy kick. These little changes make a big difference in taste. Toppings are a fun way to change your cake. You can use whipped cream or vanilla ice cream for a classic touch. Try adding caramel sauce for extra sweetness and flavor. If you want a crunch, sprinkle some chopped pecans or walnuts on top. Each topping changes the cake's flavor and texture, making it unique. After enjoying your pumpkin pie dump cake, let it cool completely. Cover the dish tightly with plastic wrap or aluminum foil. You can also transfer leftovers to an airtight container. Store it in the fridge for up to 4 days. This keeps it fresh and tasty. When you're ready to enjoy leftovers, preheat your oven to 350°F (175°C). Place the cake in an oven-safe dish. Cover it with foil to keep it moist. Heat for about 15-20 minutes. You can also microwave individual servings for 30-60 seconds. Just make sure to check that it's warm all the way through. If you want to save some for later, this cake freezes well. Cut it into portions and wrap each one in plastic wrap. Then, place the wrapped slices in a freezer bag. You can freeze it for up to 3 months. When you're ready to eat, just thaw it in the fridge overnight before reheating or enjoying it cold. For more details on making this delicious dessert, check out the Full Recipe. Yes, you can make Pumpkin Pie Dump Cake ahead of time. After baking, let it cool. Cover it tightly with foil or plastic wrap. Store it in the fridge for up to three days. This cake tastes great cold or warmed up. Just reheat it in the oven for a few minutes. Pumpkin Pie Dump Cake lasts about three to four days in the fridge. If you want to keep it longer, freeze it. Wrap it well in plastic wrap and foil. It can last up to three months in the freezer. Just thaw it in the fridge before serving. Yes, fresh pumpkin works great in this recipe. Start by roasting a fresh pumpkin. Cut it in half, scoop out the seeds, and roast it cut-side down. Bake it until soft. Then, mash or puree the pumpkin. Use this fresh pumpkin puree just like the canned one. It may have a slightly different taste, but it will be just as good. For the full recipe, check out the Pumpkin Spice Delight Dump Cake. In this post, we explored how to make a delicious Pumpkin Pie Dump Cake. We covered the main and optional ingredients, gave step-by-step baking instructions, and shared tips for a great texture. Variations included gluten-free options and tasty toppings. We also discussed how to store leftovers and answered common questions. Embrace the ease of this recipe and impress your guests. Enjoy every bite!](https://homecookingstyle.com/wp-content/uploads/2025/04/d07489e8-dc7c-4e1c-b009-0606cedebe8c.webp)
