Craving a sweet treat without the fuss of baking? You’re in the right place! My No Bake Chocolate Chip Cookie Dough Bars are easy to make and taste incredible. These bars combine the joy of cookie dough and chocolate in one delicious bite. Follow my simple steps, and you’ll have a tasty treat ready to impress your friends or enjoy solo. Let’s get started on this delightful journey!
Ingredients
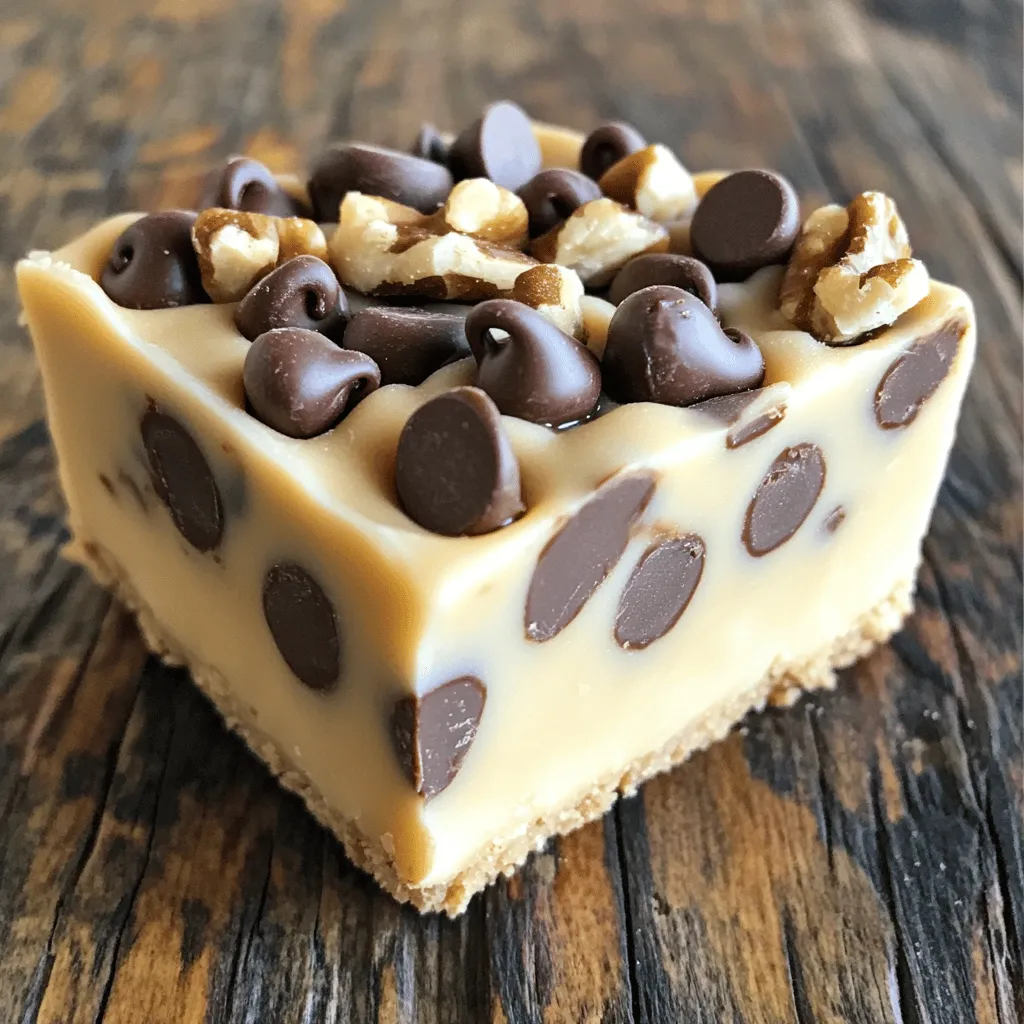
List of Ingredients
To make No Bake Chocolate Chip Cookie Dough Bars, you will need the following items:
– 1 cup unsalted butter, softened
– 1 cup brown sugar, packed
– 2 teaspoons vanilla extract
– 2 cups all-purpose flour
– 1 can sweetened condensed milk (14 oz)
– 1 cup semi-sweet chocolate chips
– 1/2 cup walnuts, chopped (optional)
– A pinch of salt
Recommended Brands
When I make these bars, I like to use specific brands for the best taste and texture. Here are my top picks:
– Butter: Land O’Lakes or Kerrygold for rich flavor.
– Brown Sugar: Domino for consistent sweetness.
– Vanilla Extract: Nielsen-Massey for high quality.
– Chocolate Chips: Ghirardelli or Nestlé for smooth melting.
– Flour: King Arthur Flour for perfect baking results.
These brands help ensure you get a tasty treat each time.
Ingredient Substitutions
If you need to swap ingredients, here are some easy options:
– Butter: Use coconut oil or margarine for a dairy-free option.
– Brown Sugar: You can use white sugar with a touch of molasses.
– All-Purpose Flour: Almond flour works for a gluten-free version.
– Sweetened Condensed Milk: Try homemade versions or coconut cream for dairy-free.
– Chocolate Chips: Use dark or white chocolate if you prefer.
– Walnuts: Leave them out, or use pecans for a different crunch.
These substitutions allow you to customize the bars to fit your dietary needs or taste preferences.
Step-by-Step Instructions
Mixing the Dough
Start by gathering your ingredients. You need butter, brown sugar, vanilla, flour, sweetened condensed milk, chocolate chips, walnuts, and salt. In a large bowl, beat the softened butter and brown sugar. Mix until it is creamy and smooth. Then, add the vanilla extract and stir until well combined. Gradually mix in the flour and sweetened condensed milk. Keep stirring until a smooth dough forms. Finally, fold in the chocolate chips and walnuts if you choose to use them. Make sure they are evenly spread in the dough.
Preparing the Baking Dish
Next, take an 8×8-inch baking dish. Line it with parchment paper. Make sure to leave some paper hanging over the sides. This helps to lift the bars out later. Once the dish is ready, press the cookie dough mixture firmly into the bottom. Use a spatula to smooth the top. Make it even and nice. This step helps the bars look great after they set.
Freezing and Cutting the Bars
Now it’s time to freeze the bars. Place the baking dish in the freezer for at least 30 minutes. This helps the dough harden and makes cutting easier. After 30 minutes, check if the dough has set. Once firm, lift the bars out using the parchment paper. Place them on a cutting board and cut them into squares. You can store any leftovers in an airtight container in the fridge or freezer.Enjoy these tasty treats!
Tips & Tricks
Achieving the Perfect Consistency
To get the best texture, use softened butter. Cold butter can make the dough too hard. Mix the butter and sugar until creamy and smooth. This step helps air get into the dough. Next, add the flour and sweetened condensed milk slowly. This way, you avoid lumps. The dough should be thick but still easy to press into the pan. If it feels too dry, add a bit more condensed milk.
Serving Suggestions
These bars are great for any occasion. You can serve them cold straight from the fridge. Cut them into squares for easy sharing. For a fun twist, drizzle some melted chocolate on top. You can also sprinkle sea salt for a sweet-salty combo. Pair them with ice cream for a tasty dessert. They work well for parties, picnics, or just a treat at home.
Common Mistakes to Avoid
One common mistake is not measuring the flour correctly. Too much flour can make your bars dry. Always use a spoon to scoop the flour into your measuring cup and level it off. Another mistake is not letting the bars freeze long enough. If you cut them too soon, they may fall apart. Lastly, remember to line your baking dish with parchment paper. This small step makes it easy to lift out your bars later.

Variations
Add-Ins and Flavor Twists
You can make these no bake chocolate chip cookie dough bars your own. Want a hint of salt? Add a sprinkle of sea salt on top. Like nuts? Toss in some chopped almonds or pecans. Want a fun twist? Try mixing in mini marshmallows or crushed graham crackers. You can even swap half the chocolate chips for peanut butter chips. Each change gives a new taste.
Gluten-Free Options
If you need gluten-free bars, it’s easy to adapt. Just use gluten-free all-purpose flour instead of regular flour. Most brands work well and give a good texture. Check if your chocolate chips are gluten-free too. This makes the bars safe for those with gluten allergies, while still tasting great.
Vegan Adaptations
You can also make these bars vegan. Replace the butter with coconut oil or a vegan butter. For sweetened condensed milk, use a coconut or almond milk version. Look for vegan chocolate chips as well. These swaps keep the bars tasty and friendly for a plant-based diet. Enjoy a slice of cookie dough bliss without animal products!
Storage Info
Best Storage Practices
To keep your No Bake Chocolate Chip Cookie Dough Bars fresh, use an airtight container. This will prevent them from drying out. Make sure to layer parchment paper between the bars. This helps keep them from sticking together. Store them in a cool place or the refrigerator for best results.
Shelf Life in the Refrigerator
These bars last about one week in the refrigerator. If you keep them stored properly, they will stay tasty and moist. Just remember to check for any signs of spoilage before eating. If you see any changes in color or smell, it’s best to toss them out.
Freezing Instructions
You can freeze these cookie dough bars for longer storage. Cut them into squares first, then place them in a freezer-safe container. You can also wrap each square in plastic wrap before putting them in the container. They will stay good for up to three months in the freezer. When you’re ready to enjoy, just thaw them in the fridge or at room temperature.
FAQs
Can I use different types of chocolate?
Yes, you can use other types of chocolate. Dark chocolate or white chocolate both work well. You can also mix different chocolates for a fun twist. I love using milk chocolate for a sweeter flavor. Just remember to adjust the amount to fit your taste.
How long can these bars be stored?
You can store these bars for about one week in the fridge. If you want them to last longer, freeze them. They can keep for up to three months in the freezer. Just make sure to wrap them well to prevent freezer burn.
What can I use instead of sweetened condensed milk?
If you need a substitute for sweetened condensed milk, try using coconut cream. It has a similar texture and sweetness. You can also mix milk with sugar. Just simmer milk and sugar until it thickens. This gives you a nice alternative without losing flavor. For a vegan option, use a plant-based milk with sugar.
This blog post shared the best ingredients and taught you how to make tasty bars. You learned about mixing, baking, and storing them right. I offered tips to avoid mistakes and suggested fun variations. As you explore, remember to make it your own. Enjoy testing flavors and sharing your treats. Now, you can create delicious bars easily. Your kitchen adventures await!