Winter is the perfect time to enjoy hot chocolate bombs! These fun treats are not just delicious, but also a treat to make. Imagine watching a chocolate shell burst, releasing cocoa and marshmallows into steaming milk. In this guide, I’ll share step-by-step instructions, tips, and creative variations. Get ready to warm your heart and delight your taste buds with these irresistible winter sweets!
Why I Love This Recipe
- Decadent Flavor: This recipe creates a rich and indulgent hot chocolate experience that is perfect for any chocolate lover.
- Customizable: You can easily tailor the ingredients to your taste, adding different types of chocolate or toppings.
- Fun to Make: Assembling the hot chocolate bombs is a delightful activity that can be enjoyed with friends and family.
- Perfect for Gifting: These bombs make a charming gift for any occasion, beautifully packaged and ready to impress.
Ingredients
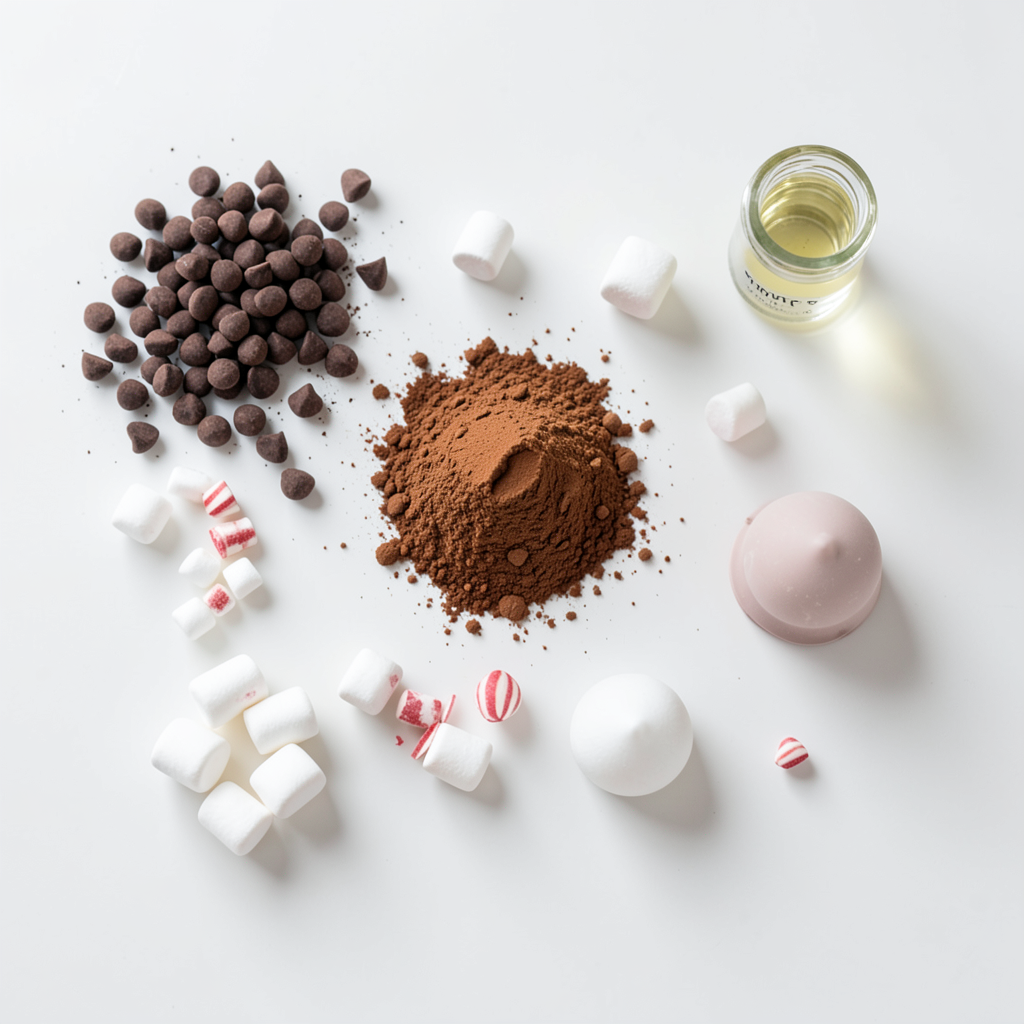
Hot chocolate bombs are fun and tasty. Here’s what you need to make them:
- 2 cups chocolate chips (dark or milk chocolate)
- 1 cup cocoa powder
- 1 cup mini marshmallows
- ½ cup crushed peppermint candies (optional)
- Silicone sphere molds
- 1 teaspoon vanilla extract (optional)
I love using dark chocolate for a rich taste. Milk chocolate works great too, especially for kids. Cocoa powder adds an extra chocolate kick. The mini marshmallows create a fluffy surprise inside.
Crushed peppermint candies can give a refreshing twist. If you want it, feel free to add it. Silicone molds are easy to use and clean, making them perfect for this recipe. Vanilla extract adds a nice touch, but it’s not a must.
Gather these ingredients, and you’ll be ready to make something special. Each element plays a part in creating the perfect hot chocolate bomb. Enjoy making these with your friends or family!
Step-by-Step Instructions
Melting the Chocolate
To start, melt the chocolate chips in a microwave-safe bowl. Heat them in 30-second bursts. Stir between each interval. This stirring helps avoid burning and keeps the chocolate smooth. You want it to be fully melted without lumps.
Preparing the Molds
Next, coat the inside of your silicone sphere molds with the melted chocolate. Use a spoon or a small brush for even coverage. Aim for about ⅛ inch thickness. Place the molds in the fridge for 10-15 minutes to set. This helps the chocolate harden and hold its shape.
Assembling the Hot Chocolate Bombs
Now, it’s time to fill the molds. Carefully pop the chocolate shells out. You will have two halves for each bomb. On one half, add two tablespoons of cocoa powder, a handful of mini marshmallows, and crushed peppermint candies if you like.
To seal the bomb, warm a plate in the microwave for a few seconds. Place the empty half on the plate. Let the edge melt slightly. Quickly press it onto the filled half until they stick together. Repeat this for all your bombs.
When you're ready to enjoy, drop a hot chocolate bomb in a mug. Pour hot milk over it, stir, and savor your rich, creamy hot chocolate!
Tips & Tricks
Ensuring Smooth Chocolate Shells
To avoid cracks in your chocolate bombs, use high-quality chocolate chips. Dark or milk chocolate works well. Melt them slowly, stirring often. This helps keep the chocolate smooth and shiny. A thick layer, about ⅛ inch, prevents uneven surfaces. Make sure to coat the molds evenly. Chill them in the fridge to set the chocolate. A cold mold helps create a strong shell.
Achieving the Perfect Seal
To seal your hot chocolate bombs, warm a plate in the microwave for a few seconds. Place the empty half of the bomb on the plate. The edge melts slightly, making it easier to seal. Quickly press it onto the filled half. This method ensures a tight fit. For decoration, drizzle melted chocolate on top. Add sprinkles or crushed candies for a fun look.
Serving Suggestions
To serve your hot chocolate bombs, place one in a mug. Pour hot milk over it, and watch the magic happen! Stir after it melts to mix the flavors. For a special touch, pair them with whipped cream or a sprinkle of cocoa. A side of peppermint tea or coffee enhances the experience. Enjoy your cozy treat!
Pro Tips
- Choose Quality Chocolate: The better the chocolate, the richer your hot chocolate bombs will taste. Opt for high-quality chocolate chips for the best results.
- Layering Chocolate: Make sure to apply a thick enough layer of chocolate in the molds to prevent breakage when popping them out. Two layers are ideal for sturdiness.
- Customize Fillings: Feel free to experiment with different fillings like caramel, flavored syrups, or different types of candy to create your unique hot chocolate bomb.
- Serve with Style: For an extra touch, add whipped cream, chocolate shavings, or a drizzle of caramel on top of your hot chocolate after melting the bomb.
Variations
Different Flavors
You can create many flavors of hot chocolate bombs. Start with white chocolate for a sweet twist. You can also mix in flavored extracts. Think mint, orange, or almond. For a fun surprise, add peanut butter or caramel inside the bomb. These flavors will make your hot chocolate special.
Seasonal Recipes
Seasonal recipes can bring joy to your winter treats. For the holidays, try gingerbread flavored bombs. You can also make eggnog hot chocolate bombs for festive cheer. Add fun toppings like whipped cream, sprinkles, or crushed cookies. These will make your drinks even more exciting.
Dietary Substitutions
You can easily adapt hot chocolate bombs for different diets. To make vegan or dairy-free bombs, use dark chocolate and plant-based milk. Look for gluten-free cocoa powder to ensure everyone can enjoy them. These substitutions keep the treat tasty for all diets.
Storage Info
How to Store
To keep your hot chocolate bombs fresh, follow these tips:
- Store in an airtight container.
- Place parchment paper between layers to prevent sticking.
- Keep them in a cool, dry place.
- Avoid sunlight and heat sources.
- Do not refrigerate unless it's very warm in your home.
For containers, use glass jars or plastic containers with tight lids. These options keep moisture out and maintain flavor.
Shelf Life
Hot chocolate bombs can last up to two weeks if stored properly. Watch for signs of spoilage. If you see white spots on the chocolate, it may be old. If the bombs smell off or feel sticky, it’s best to toss them. Always check before using.
FAQs
Can I make hot chocolate bombs in advance?
Yes, you can make hot chocolate bombs ahead of time. Here are some tips:
- Prepare and fill the bombs.
- Store them in an airtight container.
- Keep them in a cool, dry place.
- For best flavor, use them within two weeks.
What types of molds can I use?
You can use different molds. Here are my recommendations:
- Silicone sphere molds are great for easy release.
- Plastic molds can work, but may require more care.
- Choose molds that are at least 2.5 inches in diameter for a good size.
How do I know when the chocolate is properly melted?
Look for these signs of perfect melted chocolate:
- It should be smooth and glossy.
- Stir it often to avoid burning.
- If you see lumps, heat it a bit longer.
Troubleshooting common melting issues:
- If chocolate is grainy, it may be overheated.
- Try starting over with lower heat.
- Always use a microwave-safe bowl for best results.
This blog post showed you how to make hot chocolate bombs using simple ingredients. I covered melting chocolate, preparing molds, and assembling the bombs. You now have tips for smooth shells and perfect seals. You learned about flavor variations and dietary options to try. Finally, I shared storage advice and answers to common questions. Hot chocolate bombs are fun and tasty treats. With these steps, you can impress friends and family. So grab your ingredients and start creating your own delightful hot chocolate bombs today!