Are you ready for a cool treat that’s simple to make? This Cookies and Cream Icebox Pie is your answer! It's a delightful, no-bake dessert perfect for warm days or any gathering. With just a few easy steps, you can whip up a creamy filling and a tasty Oreo crust that will wow your friends and family. Let’s dive into the sweet world of this easy dessert that everyone will love!
Why I Love This Recipe
- Decadent Flavor: This pie combines the rich taste of Oreos with the creamy texture of the filling, making it a chocolate lover's dream.
- No-Bake Convenience: Perfect for warm days, this icebox pie requires no baking, saving you time and keeping your kitchen cool.
- Customizable: Add your favorite toppings or mix-ins like mini chocolate chips for a personalized touch that suits your taste.
- Impressive Presentation: With its beautiful layers and whipped cream topping, this pie is sure to wow guests at any gathering.
Ingredients
Main Ingredients for Cookies and Cream Icebox Pie
To make a delicious Cookies and Cream Icebox Pie, you need a few key ingredients:
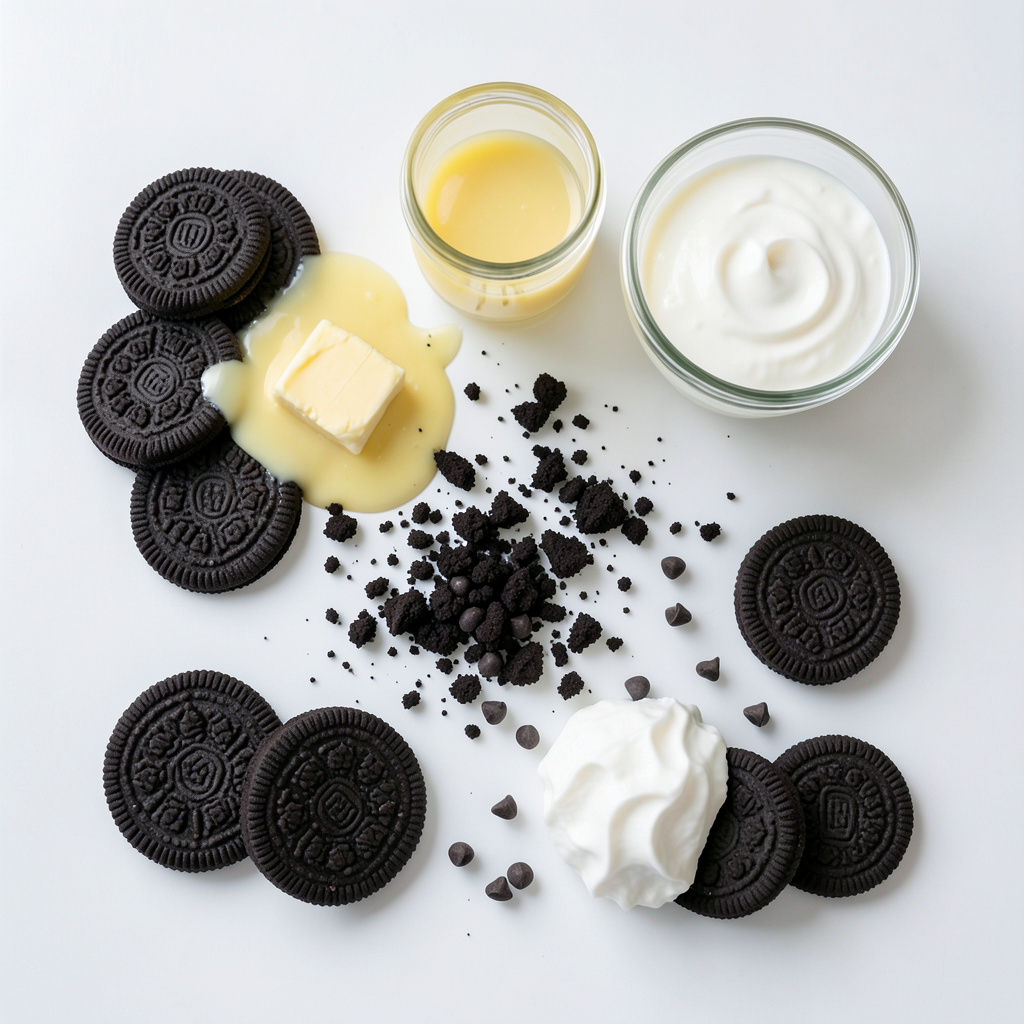
- 24 Oreo cookies, crushed
- ½ cup unsalted butter, melted
- 1 cup heavy cream
- 1 cup sweetened condensed milk
- 1 teaspoon vanilla extract
- 1 cup crushed Oreo cookies (for filling)
- ½ cup mini chocolate chips (optional)
- Whipped cream (for topping)
- Extra Oreo cookies for garnish
These ingredients come together to create a rich and creamy pie that everyone will love.
Essential Equipment Needed
You will need some basic tools to create this pie:
- A large mixing bowl
- A 9-inch pie dish
- An electric mixer
- A spatula
- Plastic wrap for covering
Having the right equipment makes the process smooth and easy.
Possible Ingredient Substitutions
If you need to make changes, here are some ideas:
- Use gluten-free cookies if you want a gluten-free version.
- Swap heavy cream with whipped topping for a lighter option.
- You can replace sweetened condensed milk with a homemade version using milk and sugar.
These substitutions can help tailor the pie to your needs while keeping the flavor intact.
Step-by-Step Instructions
How to Prepare the Oreo Crust
To start, gather the ingredients for the crust. You will need 24 Oreo cookies and ½ cup of melted butter. Crush the Oreo cookies in a large bowl until they become fine crumbs. This takes a bit of time. You can use a food processor or place them in a bag and crush them with a rolling pin. Next, pour the melted butter into the crushed cookies. Stir well until the mix feels like wet sand.
Now, press this mixture firmly into the bottom of a 9-inch pie dish. Make sure it is even and packed tightly. This step is key for a sturdy crust. Once you finish, place the crust in the freezer for about 10 minutes to set.
Making the Creamy Filling
While the crust chills, let’s make the filling. In another bowl, pour in 1 cup of heavy cream. Use an electric mixer to whip it until stiff peaks form. This means you should be able to hold the whisk upside down, and the cream stays in place.
Next, slowly add 1 cup of sweetened condensed milk and 1 teaspoon of vanilla extract to the whipped cream. Fold these in gently. This keeps the mix light and fluffy. Now, add 1 cup of crushed Oreo cookies to the bowl. If you love chocolate, toss in ½ cup of mini chocolate chips too. Fold everything together carefully until fully mixed.
Freezing and Serving the Pie
Now, take the crust out of the freezer. Pour the creamy filling into the crust. Use a spatula to spread it evenly. Cover the pie with plastic wrap and put it back in the freezer. It needs at least 4 hours to set, but overnight is best.
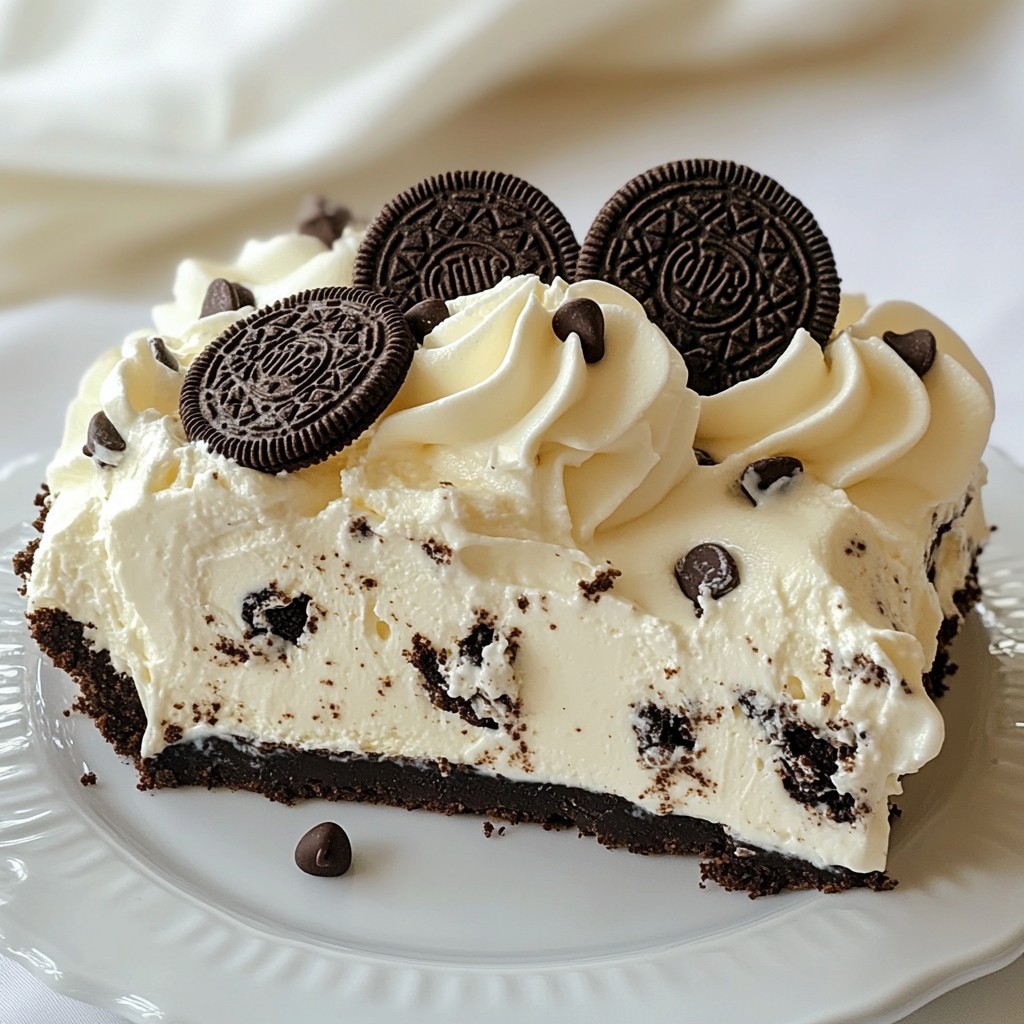
When you are ready to serve, take the pie out and let it sit for 10 to 15 minutes. This helps soften it just enough to slice easily. Top with whipped cream and sprinkle some extra Oreo cookies on top for a fun touch. Now you can cut it into slices and enjoy this no-bake delight!
Tips & Tricks
Common Mistakes to Avoid
One common mistake is not crushing the Oreo cookies finely. If the pieces are too big, your crust may fall apart. Make sure to crush them until they are like sand. Another mistake is overmixing the filling. This can make the whipped cream lose its fluffiness. Gently fold in the sweetened condensed milk and crushed cookies to keep it light and airy. Lastly, don’t skip the freezer time. If the pie doesn’t freeze long enough, it will be too soft to serve.
How to Achieve the Perfect Whipped Cream
To make the best whipped cream, start with cold heavy cream. This helps it whip up faster. Use a clean bowl and beaters to avoid any leftover fats. Mix on medium speed until you see soft peaks. Then, slowly add in the vanilla extract. Stop mixing when you see stiff peaks. This means your whipped cream is ready. If you overwhip, it may turn into butter, so watch closely!
Serving Suggestions for Immediate Enjoyment
When you are ready to serve, take the pie out of the freezer. Let it sit for about 10-15 minutes. This makes slicing easier. Top the pie with a generous layer of whipped cream. Add extra Oreo cookies on top for a nice touch. You can also sprinkle mini chocolate chips for added fun. Serve it with a smile and watch everyone enjoy this delightful treat!
Pro Tips
- Crust Consistency: Make sure to press the Oreo crust mixture firmly into the pie dish to prevent it from crumbling when sliced.
- Chilling Time: For the best texture, allow the pie to set in the freezer overnight. This will ensure it slices beautifully and holds its shape.
- Whipping Cream: Whip the heavy cream until stiff peaks form to create a light and airy filling that balances the richness of the condensed milk.
- Serving Tip: Let the pie sit at room temperature for 10-15 minutes before serving to make slicing easier and to enhance the flavor.
Variations
Different Flavor Additions
You can change up the flavor of your Cookies and Cream Icebox Pie easily. Here are some fun options to explore:
- Mint Chocolate: Add a few drops of mint extract to the filling. This gives a refreshing twist.
- Peanut Butter: Mix in 1/2 cup of creamy peanut butter for a nutty flavor. It pairs well with the Oreo.
- Coffee: Add a tablespoon of instant coffee granules for a mocha vibe. It makes the pie richer.
- Fruit: Fold in crushed strawberries or raspberries for a fruity kick. Use fresh or frozen fruit as you like.
These simple changes can make your pie unique and exciting!
Healthier Alternatives to Ingredients
If you want a lighter version of this pie, try these swaps:
- Greek Yogurt: Substitute half of the sweetened condensed milk with plain Greek yogurt. This adds protein and cuts sugar.
- Reduced-Fat Cream: Use reduced-fat heavy cream for a lighter filling. It still whips well.
- Nut Butter: Replace some butter in the crust with almond or coconut oil. This adds healthy fats.
- Whole Grain Cookies: Use whole grain Oreos or another whole grain cookie. This adds fiber to the crust.
These swaps help make the pie healthier without losing much flavor.
Creative Garnishing Ideas
Garnishing your pie can make it look great. Here are some ideas:
- Chocolate Drizzle: Melt some chocolate and drizzle it over the top. This adds a nice touch.
- Sprinkles: Use colorful sprinkles for fun. It’s perfect for parties or kids.
- Oreo Crumbs: Press extra Oreo crumbs on top for crunch. It adds texture and looks nice.
- Fresh Berries: Add fresh berries on top for color and flavor. Strawberries or raspberries work best.
These garnishes not only enhance the look but also boost the taste of your pie!
Storage Info
Best Practices for Freezing
To freeze your Cookies and Cream Icebox Pie, first let it set well. After it freezes for at least four hours, wrap the pie tightly in plastic wrap. This keeps it fresh and prevents freezer burn. You can also use aluminum foil for extra protection. If you plan to freeze individual slices, cut them first, then wrap each slice. Place them in an airtight container. This way, you can enjoy a slice anytime!
How to Store Leftovers
If you have leftovers, store them in the fridge. Cover the pie with plastic wrap or a lid. This helps keep the pie fresh for a longer time. If you have cut slices, place them in a container and seal it well. Always check for any signs of spoilage before eating.
Shelf Life of Cookies and Cream Icebox Pie
The Cookies and Cream Icebox Pie lasts about three to four days in the fridge. If you freeze it, it can last up to two months. Just make sure to thaw it in the fridge, not at room temperature. This keeps the texture smooth and creamy. Enjoy your pie while it’s fresh for the best taste!
FAQs
How do I soften the pie before serving?
To soften the pie, take it out of the freezer. Let it sit at room temperature for 10 to 15 minutes. This helps the filling become creamy and easy to slice. If it’s still too hard, wait a few more minutes. You want it soft but not melting.
Can I use other types of cookies for the crust?
Yes, you can use different cookies for the crust. Try chocolate wafers or graham crackers. Each cookie type gives a unique flavor. Just crush them well and mix with melted butter, like you would with Oreos.
What are the best toppings for Cookies and Cream Icebox Pie?
The best toppings include whipped cream and extra Oreo cookies. You can also add mini chocolate chips for extra fun. Fresh berries or chocolate shavings make great additions too. Get creative with your toppings!
Cookies and Cream Icebox Pie is easy and fun to make. We covered the key ingredients and equipment you need. You learned how to create a tasty Oreo crust and a creamy filling, plus tips to boost your pie game. Don’t forget the storage info and variations for extra flavor!
Now you're ready to impress everyone with your cooking skills. Enjoy your pie-making journey and keep experimenting!