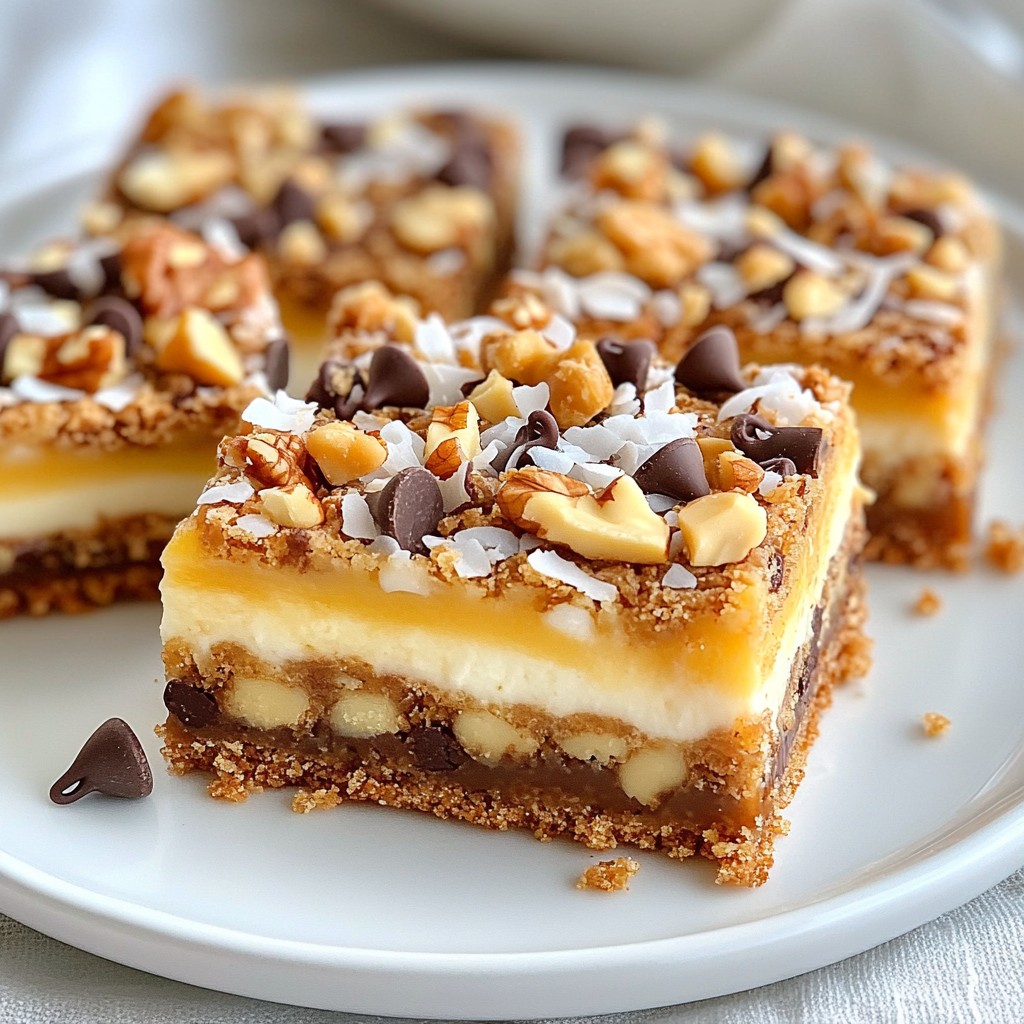
If you're looking for a sweet treat that’s both easy to make and hard to resist, you’ll love my Coconut Caramel Magic Bars! These layers of gooey caramel, rich chocolate, and crunchy coconut come together to create a dessert that pleases everyone. In this post, I’ll walk you through the ingredients, simple steps, and helpful tips to make your magic bars a hit. Let's get baking!
Why I Love This Recipe
- Delicious Flavor Combination: The blend of chocolate, butterscotch, and coconut creates an irresistible sweet treat that satisfies all cravings.
- Easy to Make: This recipe involves simple steps and minimal preparation time, making it perfect for bakers of all skill levels.
- Perfect for Sharing: With 24 bars, these treats are ideal for parties, potlucks, or any gathering where you want to impress guests.
- Versatile Ingredients: You can easily customize this recipe by swapping out nuts or adding different types of chocolate to suit your taste.
Ingredients
Detailed list of ingredients
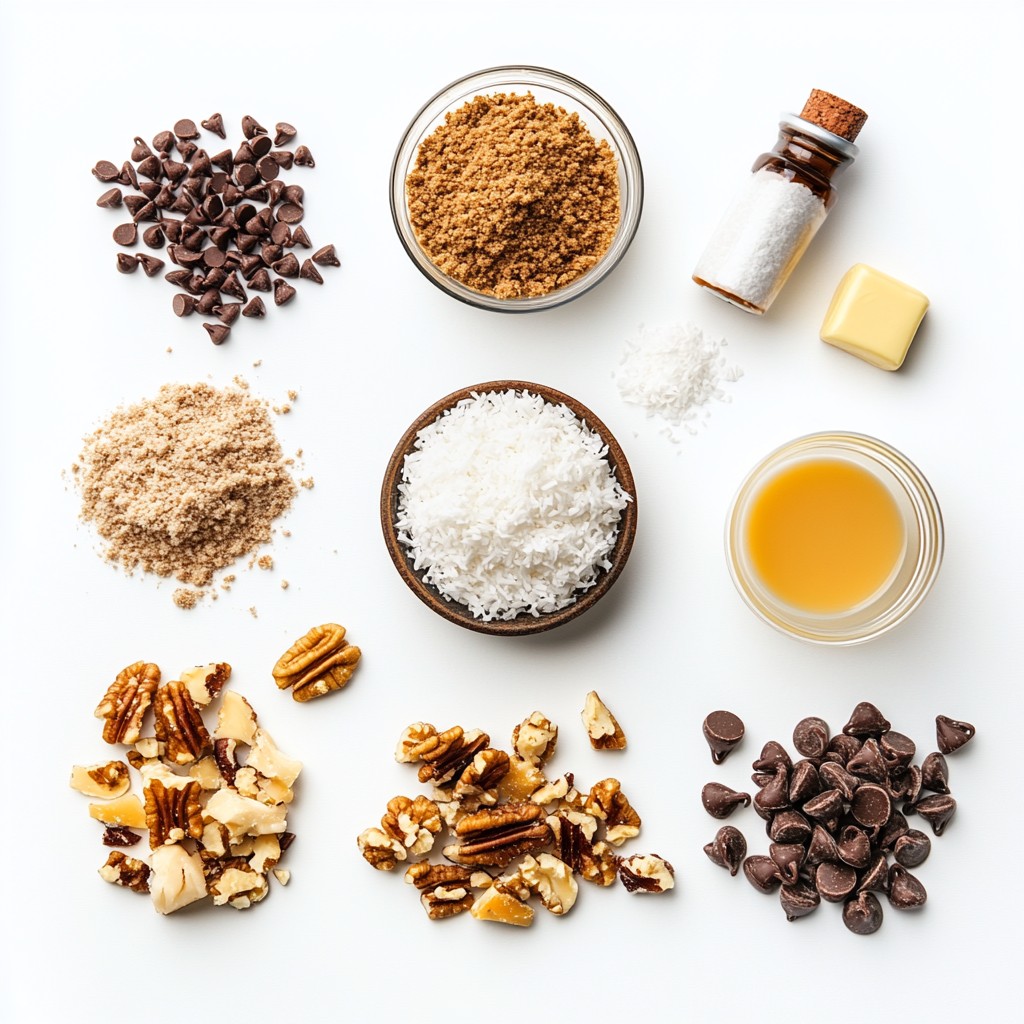
For Coconut Caramel Magic Bars, you will need:
- 1 ½ cups graham cracker crumbs
- ½ cup unsweetened shredded coconut
- ½ cup unsalted butter, melted
- 1 can (14 oz) sweetened condensed milk
- 1 cup semisweet chocolate chips
- 1 cup butterscotch chips
- 1 cup chopped nuts (walnuts or pecans)
- ½ teaspoon sea salt
- ½ teaspoon vanilla extract
Explanation of ingredient substitutions
If you want to switch things up, you can make easy swaps. Use digestive biscuits instead of graham crackers for a different flavor. You can also use sweetened coconut if you like it sweeter. For butter, you can use coconut oil to add more coconut taste. If you need a dairy-free option, use a non-dairy condensed milk. For nuts, feel free to use almonds or leave them out if you prefer.
Importance of ingredient quality
Using high-quality ingredients makes a big difference. Fresh chocolate chips and pure vanilla extract will enhance the taste of your bars. Try to use real butter for a rich flavor. Good nuts add crunch and depth. Always check for freshness, especially with coconut and nuts, to ensure the best flavor and texture. Quality ingredients lead to magic bars that are truly irresistible!
Step-by-Step Instructions
Prepping the baking pan
Start by preheating your oven to 350°F (175°C). This step ensures even baking. Take a 9x13-inch baking pan. You can grease it with butter or cooking spray. Another option is to line it with parchment paper. This helps with easy removal later.
Making the crust
In a mixing bowl, combine 1 ½ cups of graham cracker crumbs, ½ cup of unsweetened shredded coconut, and ½ cup of melted unsalted butter. Mix until it looks like wet sand. Then, press this mixture firmly into the bottom of your pan. Make sure it is even and compact. This crust will hold all the tasty layers above it.
Layering the filling and baking
Next, pour 1 can (14 oz) of sweetened condensed milk over the crust. Spread it evenly, covering every inch. Now, sprinkle 1 cup of semisweet chocolate chips, 1 cup of butterscotch chips, and 1 cup of chopped nuts over the milk. Distribute them well for the best flavor. Finally, drizzle ½ teaspoon of sea salt and ½ teaspoon of vanilla extract on top. Bake in the oven for 25-30 minutes. Look for golden edges and a bubbling center. When done, take it out and let it cool completely. Use the parchment paper to lift the bars out. Cut into squares or rectangles for serving.
Tips & Tricks
How to achieve the perfect texture
To get the best texture, press the crumb mix firmly. This step makes a strong base. Use a flat object, like a measuring cup, to press it down evenly. The crust needs to hold together well. When you pour the sweetened condensed milk, it should soak in without making the crust soggy. Also, bake until the edges turn golden brown. This gives the bars a nice crunch.
Storing and reheating tips
Store these magic bars in an airtight container. This keeps them fresh and moist. If you stack them, place parchment paper between layers to prevent sticking. For reheating, warm them in the oven at 300°F for about 10 minutes. This helps restore their gooey goodness without making them dry.
Common mistakes to avoid
One common mistake is not pressing the crust enough. If it's loose, the bars will fall apart. Another mistake is overbaking, which can make them dry. Always check for that golden edge. Lastly, don’t skip the sea salt! It enhances the flavors and balances the sweetness.
Pro Tips
- Chill Before Cutting: For cleaner cuts, chill the bars in the refrigerator for an hour before slicing. This helps them hold their shape better.
- Nut Alternatives: If you're allergic to nuts or prefer a different flavor, try using sunflower seeds or pumpkin seeds instead of chopped nuts.
- Customize Your Chips: Feel free to mix and match your chocolate and butterscotch chips. White chocolate or peanut butter chips also make great alternatives!
- Storage Tips: Store the bars in an airtight container at room temperature for up to a week, or freeze for longer storage. Just make sure to separate layers with parchment paper.
Variations
Alternative flavors for magic bars
You can mix up the flavors in your magic bars. Instead of chocolate chips, try peanut butter chips. They add a rich, nutty taste. You can also use white chocolate for a sweet twist. For fruit lovers, consider adding dried cherries or cranberries. These fruits pair well with coconut and caramel. Don't shy away from spices either. A pinch of cinnamon or nutmeg can boost flavor.
Nut-free versions
If you need a nut-free option, simply skip the nuts. The bars will still be tasty with just the chocolate and butterscotch chips. You can also add extra coconut for crunch. Another option is to use seeds like pumpkin or sunflower seeds. They give a nice texture without nuts. Just be sure to check for any nut traces in your ingredients.
Adding seasonal ingredients
Seasonal ingredients can make your magic bars special. For fall, add chopped apples or pumpkin puree. They create a cozy flavor perfect for autumn. In winter, consider using peppermint extract or crushed candy canes. These add a festive touch. In summer, fresh berries like blueberries or strawberries can brighten your bars. They add a fresh taste that works well with the sweet caramel.
Storage Info
Best practices for storage
To keep your Coconut Caramel Magic Bars fresh, store them in an airtight container. Place parchment paper between layers to prevent sticking. This helps keep the bars moist and tasty. You can store them at room temperature for a few days or in the fridge for longer freshness.
Freezing instructions
If you want to save some bars, freezing is a great option. Wrap each bar in plastic wrap tightly. Then, place them in a freezer-safe bag. This way, they stay fresh for up to three months. When you're ready to enjoy, just thaw them in the fridge overnight.
How long do they last?
Coconut Caramel Magic Bars last about 5 days at room temperature. In the fridge, they can last up to two weeks. If frozen, they stay good for about three months. Enjoy them anytime, knowing they stay fresh for quite a while!
FAQs
What are Coconut Caramel Magic Bars?
Coconut Caramel Magic Bars are sweet, layered treats. They have a buttery base and a mix of chocolate, butterscotch, and nuts. The top layer is rich, creamy, and sweet. You get a burst of coconut flavor, too. These bars are perfect for any occasion and easy to share.
Can I use different types of chocolate?
Yes, you can use different types of chocolate! Dark chocolate, milk chocolate, or even white chocolate will work well. Each type adds a unique taste. Try mixing them for a fun twist. If you love chocolate, use more chips. The bars will still be delicious.
How do I make them ahead of time?
You can make Coconut Caramel Magic Bars ahead of time with ease. Bake them and let them cool completely. Then, store them in an airtight container. Keep them in the fridge for up to a week. You can also freeze them for longer storage. Just thaw them before serving.
In this post, we explored how to make Coconut Caramel Magic Bars. We covered each ingredient's role, possible substitutions, and why quality matters. Our step-by-step guide simplified the baking process, from prepping the pan to layering the filling. We discussed tips to get the perfect texture and avoid common mistakes. You learned about fun variations, storage methods, and how long they last. Use this knowledge to create your own delicious treats. Happy baking!