Chocolate Peanut Butter Fudge Pops Irresistible Delight

WANT TO SAVE THIS RECIPE?

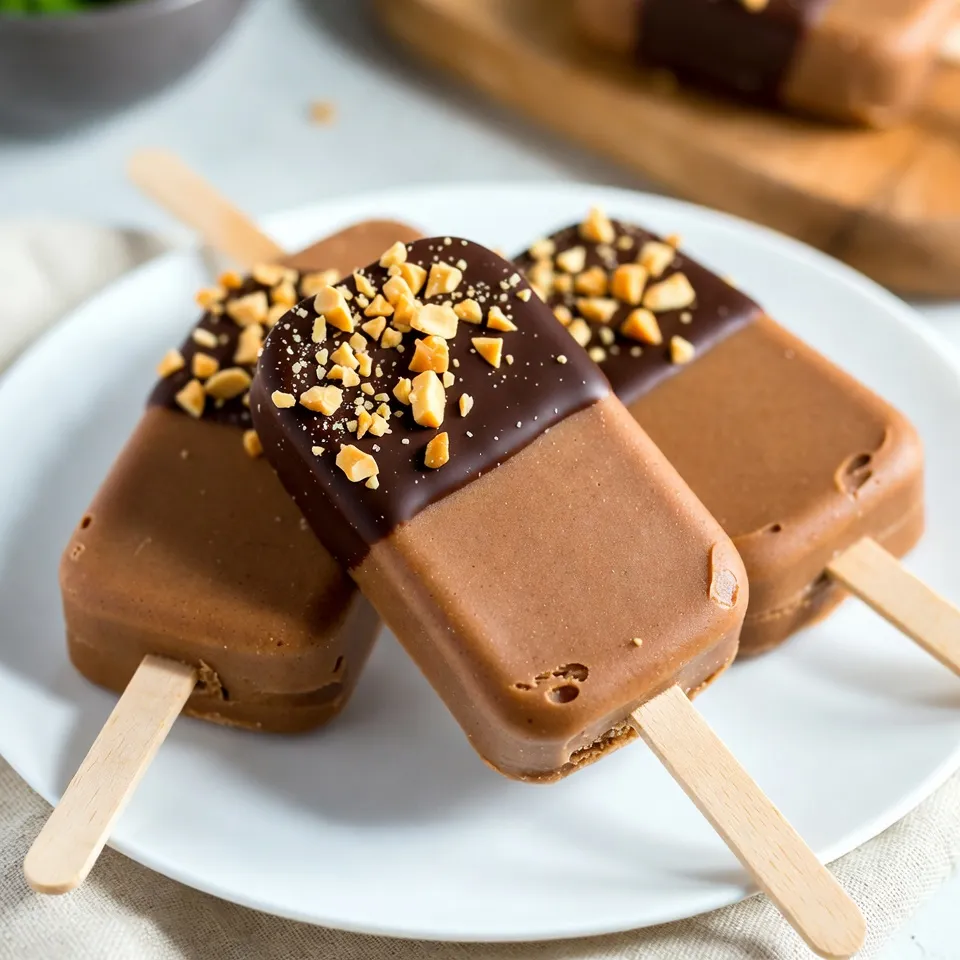
Chocolate and peanut butter are a match made in heaven. If you crave a cool and creamy treat, you’re in the right place! In this post, I’ll guide you through making Chocolate Peanut Butter Fudge Pops—an easy-to-follow recipe that’s sure to please. With simple ingredients and a few steps, you’ll enjoy a delightful dessert that’s ready to impress family and friends. Let’s dive in and satisfy your sweet tooth!

Why I Love This Recipe

  1. Decadent Flavor: This recipe combines rich chocolate with creamy peanut butter, creating a delightful treat that satisfies sweet cravings.
  2. Easy to Make: With simple ingredients and straightforward steps, these pops can be whipped up in no time.
  3. Healthy Indulgence: Using natural sweeteners and wholesome ingredients makes these fudge pops a guilt-free dessert option.
  4. Perfect for Summer: These frozen treats are a great way to cool down on a hot day while still enjoying a delicious dessert.

Ingredients

Here, I will break down the key ingredients for making Chocolate Peanut Butter Fudge Pops. Each item plays a role in creating a rich and creamy treat.

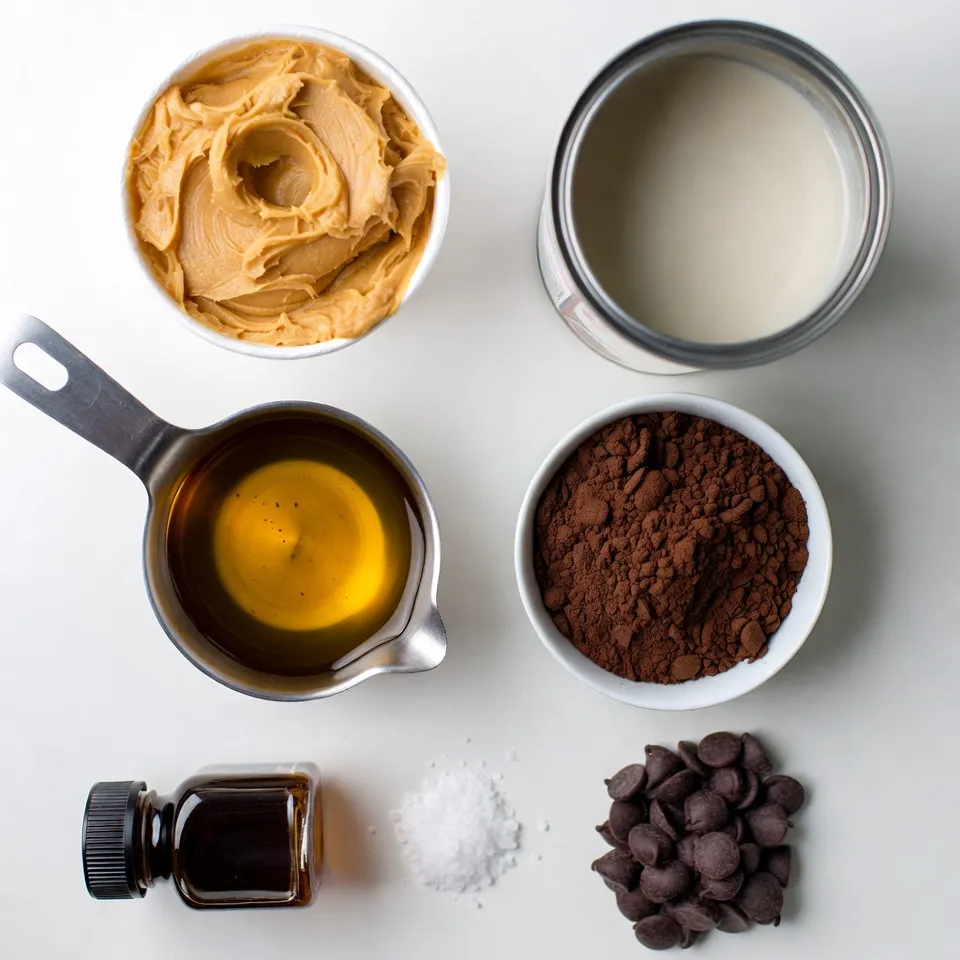
Detailed List of Ingredients

Peanut Butter: Use 1 cup of creamy peanut butter. It gives a smooth texture and rich flavor.

Coconut Milk: You need 1 cup of coconut milk or any milk you prefer. This adds creaminess.

Sweeteners: Use 1/2 cup of maple syrup or honey. This sweetens the pops and balances the cocoa.

Cocoa Powder: Include 1/2 cup of cocoa powder. This adds the deep chocolate flavor we love.

Flavorings and Salt: You will need 1 teaspoon of vanilla extract and 1/4 teaspoon of salt. The vanilla enhances the taste, while salt brings out the sweetness.

Optional Add-ins: If you want, add 1/2 cup of dark chocolate chips. They melt into the mix, adding extra richness and chocolate joy.

These ingredients combine to create a delicious treat that is hard to resist. Each one plays a part in making these fudge pops a perfect dessert.

Step-by-Step Instructions

Preparation of the Mixture

Heating the Peanut Butter and Coconut Milk

Start by taking a medium saucepan. Add 1 cup of creamy peanut butter and 1 cup of coconut milk. Heat this over low-medium heat. Stir constantly. You want it to become smooth and creamy. Take your time; this step is key for a great texture.

Incorporating Sweeteners and Cocoa

Once the mixture is smooth, remove it from the heat. Stir in 1/2 cup of maple syrup. Add 1/2 cup of cocoa powder as well. Next, add 1 teaspoon of vanilla extract and 1/4 teaspoon of salt. Mix well until everything is combined. This adds sweetness and depth of flavor.

Adding Flavorings and Optional Chocolate Chips

If you like extra chocolate, fold in 1/2 cup of dark chocolate chips. Make sure they melt into the mixture. This step is optional, but it makes the fudge pops richer and more decadent.

Molding and Freezing

Transferring Mixture to Molds

Let the mixture cool slightly. After that, pour it into your popsicle molds. Leave some space at the top of each mold. This space allows for expansion when freezing.

Inserting Sticks

Carefully insert sticks into the molds. Make sure they stand straight. This will help you enjoy the pops later.

Freezing Time and Tips

Place the molds in the freezer. Freeze for at least 4-6 hours. Wait until they are completely solid. If you want them to freeze faster, place them toward the back of the freezer.

Releasing the Fudge Pops

Techniques to Remove Pops from Molds

To release the fudge pops, run warm water over the outside of the molds. This helps loosen them. You can also gently wiggle the sticks. This can help pop them out without breaking.

Presentation Tips for Serving

Serve the fudge pops on a nice plate. Drizzle melted chocolate over them for a fancy touch. You can also sprinkle crushed peanuts on top for added crunch. This makes them look even more delicious!

Tips & Tricks

Common Mistakes to Avoid

Overheating Ingredients

Heating the peanut butter and coconut milk too fast can ruin the mix. Keep the heat low and stir often. This way, you’ll keep the texture smooth and creamy.

Not Allowing Enough Freezing Time

If you pull the pops too soon, they may be mushy. Freeze them for at least 4-6 hours. This ensures they are solid and ready to enjoy.

Enhancing Flavor and Texture

Adding Nuts or Toppings

You can make your fudge pops even better by adding nuts. Chopped peanuts or almonds give a nice crunch. You can also sprinkle toppings like crushed cookies or sea salt.

Adjusting Sweetness to Taste

Everyone has different sweetness levels. Taste the mix before freezing. If you want it sweeter, add a bit more maple syrup or honey.

Equipment Recommendations

Best Popsicle Molds to Use

Silicone molds work great for easy removal. They let you pop the fudge out with ease. Look for molds with fun shapes to make them even more exciting.

Tools for Mixing and Heating

Use a medium saucepan for heating. A whisk helps mix the ingredients smoothly. A rubber spatula is great for scraping every bit into the molds.

Pro Tips

  1. Use Room Temperature Ingredients: Let your peanut butter and coconut milk come to room temperature before mixing. This helps them blend more smoothly and evenly.
  2. Experiment with Sweeteners: Feel free to adjust the sweetness to your liking by adding more or less maple syrup or honey, depending on your taste preference.
  3. Customize with Mix-ins: Add your favorite nuts, dried fruits, or even a pinch of sea salt to the mixture before freezing for a unique twist.
  4. Store Properly: To keep your fudge pops fresh, wrap them individually in plastic wrap or store them in an airtight container in the freezer.

Variations

Different Milk Alternatives

Dairy-Free Options

You can easily make this treat dairy-free. Use coconut milk as I suggest, or try almond milk. Both options keep the fudge pops creamy and rich. They add nice flavors too.

Nut Milk Suggestions

If you prefer nut milk, cashew or hazelnut milk works well. These milks add a unique taste to the fudge. Remember, always check for allergies when using nut milks.

Flavor Variations

Adding Mint Extract

For a refreshing twist, add a few drops of mint extract. It brings a cool flavor that pairs great with chocolate. Just a little goes a long way, so start small.

Swapping Cocoa for Flavored Powders

Try using flavored powders instead of cocoa. You can swap in matcha or chai powder for a fun change. This gives your fudge pops a new look and taste.

Dietary Adjustments

Vegan and Low-Sugar Options

To make these fudge pops vegan, stick with maple syrup. It’s a great sweetener that keeps everything plant-based. You can also cut back on the syrup for a low-sugar version.

Nut-Free Alternatives

If you need nut-free options, replace peanut butter with sunbutter. This will still give you that creamy texture. It’s safe for schools and nut-free zones too.

Storage Info

How to Store Fudge Pops

To keep your fudge pops fresh, follow these simple steps:

Best Practices for Freezing:

Make sure your pops are fully frozen before storage. This helps prevent ice crystals. Store them in the back of the freezer where it’s coldest.

Container Recommendations:

Use airtight containers or freezer bags. Label each bag with the date. This helps you track freshness. If using containers, choose ones that fit the pops well to save space.

Shelf Life of Frozen Treats

Understanding how long your fudge pops last is key.

How Long Do They Last?

Frozen fudge pops can last up to three months. After this, they may lose flavor or texture.

Signs of Spoilage:

Look for ice crystals on the surface or a change in color. If the texture feels grainy, it’s best to toss them. Always trust your senses; if something seems off, it likely is.

FAQs

Can I Use a Different Sweetener?

Yes, you can use different sweeteners. Agave syrup or stevia are great options. They add sweetness without using sugar. Adjust the amount based on your taste. For example, use less stevia since it is sweeter than sugar. Maple syrup is also a good choice if you want a natural flavor. Just remember, each sweetener may change the taste a bit.

What if I Don’t Have Popsicle Molds?

No worries if you lack popsicle molds! You can use small cups instead. Just fill them with the mixture and insert a stick. Ice cube trays work well too. Each cube will be a mini pop! You can also use muffin tins for larger pops. Just be sure to cover them with plastic wrap to hold the sticks in place.

Can I Make These Ahead of Time?

Absolutely! You can make these fudge pops in advance. They freeze well for up to two weeks. Just store them in an airtight container. Take them out when you want a treat. This makes them perfect for parties or hot days. Prepare them ahead, and enjoy a cool delight whenever you want!

Making fudge pops is fun and easy. We covered ingredients, steps, tips, and variations. Start with peanut butter, coconut milk, and cocoa. Heat and mix them, then freeze for tasty treats. Avoid common mistakes and try different flavors.

These fudge pops fit many diets and preferences. With the right storage, they last a long time. Enjoy creating your own version, and share it with friends and family for a delightful snac

Here, I will break down the key ingredients for making Chocolate Peanut Butter Fudge Pops. Each item plays a role in creating a rich and creamy treat. - Peanut Butter: Use 1 cup of creamy peanut butter. It gives a smooth texture and rich flavor. - Coconut Milk: You need 1 cup of coconut milk or any milk you prefer. This adds creaminess. - Sweeteners: Use 1/2 cup of maple syrup or honey. This sweetens the pops and balances the cocoa. - Cocoa Powder: Include 1/2 cup of cocoa powder. This adds the deep chocolate flavor we love. - Flavorings and Salt: You will need 1 teaspoon of vanilla extract and 1/4 teaspoon of salt. The vanilla enhances the taste, while salt brings out the sweetness. - Optional Add-ins: If you want, add 1/2 cup of dark chocolate chips. They melt into the mix, adding extra richness and chocolate joy. These ingredients combine to create a delicious treat that is hard to resist. Each one plays a part in making these fudge pops a perfect dessert. {{ingredient_image_1}} - Heating the Peanut Butter and Coconut Milk Start by taking a medium saucepan. Add 1 cup of creamy peanut butter and 1 cup of coconut milk. Heat this over low-medium heat. Stir constantly. You want it to become smooth and creamy. Take your time; this step is key for a great texture. - Incorporating Sweeteners and Cocoa Once the mixture is smooth, remove it from the heat. Stir in 1/2 cup of maple syrup. Add 1/2 cup of cocoa powder as well. Next, add 1 teaspoon of vanilla extract and 1/4 teaspoon of salt. Mix well until everything is combined. This adds sweetness and depth of flavor. - Adding Flavorings and Optional Chocolate Chips If you like extra chocolate, fold in 1/2 cup of dark chocolate chips. Make sure they melt into the mixture. This step is optional, but it makes the fudge pops richer and more decadent. - Transferring Mixture to Molds Let the mixture cool slightly. After that, pour it into your popsicle molds. Leave some space at the top of each mold. This space allows for expansion when freezing. - Inserting Sticks Carefully insert sticks into the molds. Make sure they stand straight. This will help you enjoy the pops later. - Freezing Time and Tips Place the molds in the freezer. Freeze for at least 4-6 hours. Wait until they are completely solid. If you want them to freeze faster, place them toward the back of the freezer. - Techniques to Remove Pops from Molds To release the fudge pops, run warm water over the outside of the molds. This helps loosen them. You can also gently wiggle the sticks. This can help pop them out without breaking. - Presentation Tips for Serving Serve the fudge pops on a nice plate. Drizzle melted chocolate over them for a fancy touch. You can also sprinkle crushed peanuts on top for added crunch. This makes them look even more delicious! - Overheating Ingredients Heating the peanut butter and coconut milk too fast can ruin the mix. Keep the heat low and stir often. This way, you’ll keep the texture smooth and creamy. - Not Allowing Enough Freezing Time If you pull the pops too soon, they may be mushy. Freeze them for at least 4-6 hours. This ensures they are solid and ready to enjoy. - Adding Nuts or Toppings You can make your fudge pops even better by adding nuts. Chopped peanuts or almonds give a nice crunch. You can also sprinkle toppings like crushed cookies or sea salt. - Adjusting Sweetness to Taste Everyone has different sweetness levels. Taste the mix before freezing. If you want it sweeter, add a bit more maple syrup or honey. - Best Popsicle Molds to Use Silicone molds work great for easy removal. They let you pop the fudge out with ease. Look for molds with fun shapes to make them even more exciting. - Tools for Mixing and Heating Use a medium saucepan for heating. A whisk helps mix the ingredients smoothly. A rubber spatula is great for scraping every bit into the molds. Pro Tips Use Room Temperature Ingredients: Let your peanut butter and coconut milk come to room temperature before mixing. This helps them blend more smoothly and evenly. Experiment with Sweeteners: Feel free to adjust the sweetness to your liking by adding more or less maple syrup or honey, depending on your taste preference. Customize with Mix-ins: Add your favorite nuts, dried fruits, or even a pinch of sea salt to the mixture before freezing for a unique twist. Store Properly: To keep your fudge pops fresh, wrap them individually in plastic wrap or store them in an airtight container in the freezer. {{image_2}} Dairy-Free Options You can easily make this treat dairy-free. Use coconut milk as I suggest, or try almond milk. Both options keep the fudge pops creamy and rich. They add nice flavors too. Nut Milk Suggestions If you prefer nut milk, cashew or hazelnut milk works well. These milks add a unique taste to the fudge. Remember, always check for allergies when using nut milks. Adding Mint Extract For a refreshing twist, add a few drops of mint extract. It brings a cool flavor that pairs great with chocolate. Just a little goes a long way, so start small. Swapping Cocoa for Flavored Powders Try using flavored powders instead of cocoa. You can swap in matcha or chai powder for a fun change. This gives your fudge pops a new look and taste. Vegan and Low-Sugar Options To make these fudge pops vegan, stick with maple syrup. It’s a great sweetener that keeps everything plant-based. You can also cut back on the syrup for a low-sugar version. Nut-Free Alternatives If you need nut-free options, replace peanut butter with sunbutter. This will still give you that creamy texture. It’s safe for schools and nut-free zones too. To keep your fudge pops fresh, follow these simple steps: - Best Practices for Freezing: Make sure your pops are fully frozen before storage. This helps prevent ice crystals. Store them in the back of the freezer where it's coldest. - Container Recommendations: Use airtight containers or freezer bags. Label each bag with the date. This helps you track freshness. If using containers, choose ones that fit the pops well to save space. Understanding how long your fudge pops last is key. - How Long Do They Last? Frozen fudge pops can last up to three months. After this, they may lose flavor or texture. - Signs of Spoilage: Look for ice crystals on the surface or a change in color. If the texture feels grainy, it's best to toss them. Always trust your senses; if something seems off, it likely is. Yes, you can use different sweeteners. Agave syrup or stevia are great options. They add sweetness without using sugar. Adjust the amount based on your taste. For example, use less stevia since it is sweeter than sugar. Maple syrup is also a good choice if you want a natural flavor. Just remember, each sweetener may change the taste a bit. No worries if you lack popsicle molds! You can use small cups instead. Just fill them with the mixture and insert a stick. Ice cube trays work well too. Each cube will be a mini pop! You can also use muffin tins for larger pops. Just be sure to cover them with plastic wrap to hold the sticks in place. Absolutely! You can make these fudge pops in advance. They freeze well for up to two weeks. Just store them in an airtight container. Take them out when you want a treat. This makes them perfect for parties or hot days. Prepare them ahead, and enjoy a cool delight whenever you want! Making fudge pops is fun and easy. We covered ingredients, steps, tips, and variations. Start with peanut butter, coconut milk, and cocoa. Heat and mix them, then freeze for tasty treats. Avoid common mistakes and try different flavors. These fudge pops fit many diets and preferences. With the right storage, they last a long time. Enjoy creating your own version, and share it with friends and family for a delightful snack.

Chocolate Peanut Butter Fudge Pops

Deliciously creamy fudge pops made with peanut butter, cocoa powder, and maple syrup, perfect for a sweet treat.
Prep Time 15 minutes
Cook Time 10 minutes
Total Time 6 hours

Ingredients
  

  • 1 cup creamy peanut butter
  • 1 cup coconut milk
  • 1 2 maple syrup
  • 1 2 cocoa powder
  • 1 teaspoon vanilla extract
  • 1 4 teaspoon salt
  • 1 2 dark chocolate chips

Instructions
 

  • In a medium saucepan, combine the peanut butter and coconut milk. Heat over low-medium heat, stirring continuously until the mixture is smooth and creamy.
  • Once combined, remove from heat and stir in the maple syrup, cocoa powder, vanilla extract, and salt until fully incorporated.
  • If using, fold in the dark chocolate chips until melted and integrated into the mixture for an extra layer of chocolate flavor.
  • Allow the mixture to cool slightly before transferring it into popsicle molds. Leave a little space at the top of each mold for expansion.
  • Insert sticks into the molds and place them in the freezer. Freeze for at least 4-6 hours or until completely solid.
  • To release the pops, run warm water over the outside of the molds or gently wiggle the sticks until the pops come out.

Notes

Serve the fudge pops on a decorative plate, drizzled with extra melted chocolate or sprinkled with crushed peanuts for added texture and visual appeal.
Keyword chocolate, dessert, frozen treat, fudge pops, peanut butter

WANT TO SAVE THIS RECIPE?

Leave a Comment

Recipe Rating