Get ready to impress your guests with a stunning Chocolate Hazelnut Crepe Cake! This layered delight combines soft crepes with a rich hazelnut cream filling. Perfect for birthdays or special occasions, it’s a treat that looks fancy but is easy to make. In this post, I’ll walk you through every step, from gathering fresh ingredients to tips for a flawless finish. Let’s dive into this delicious journey together!
Why I Love This Recipe
- Decadent Flavor: This crepe cake is a delightful combination of rich chocolate and creamy hazelnut that tantalizes your taste buds with every bite.
- Impressive Presentation: Stacking the delicate crepes creates a stunning dessert that looks as amazing as it tastes, perfect for special occasions.
- Customizable Layers: You can easily adjust the filling by adding fruits or different spreads, allowing for endless variations to suit your taste.
- Make-Ahead Dessert: This cake can be prepared in advance and chilled, making it a convenient choice for entertaining guests without last-minute stress.
Ingredients
List of Ingredients
– 2 cups all-purpose flour
– 4 large eggs
– 3 cups milk
– 1/2 cup unsweetened cocoa powder
– 1/4 cup granulated sugar
– 1/4 teaspoon salt
– 1/4 cup melted butter
– 1 cup heavy cream
– 1 cup chocolate hazelnut spread (like Nutella)
– 1/2 cup toasted hazelnuts, chopped (for garnish)
– Powdered sugar, for dusting (optional)
Substitutions for Ingredients
You can swap all-purpose flour with gluten-free flour for a gluten-free option. Use almond milk or oat milk instead of regular milk if you want a dairy-free version. If you don’t have cocoa powder, try using carob powder for a unique flavor twist. In place of heavy cream, coconut cream works well for a dairy-free whipped topping. For the chocolate hazelnut spread, homemade versions can be made using blended hazelnuts and cocoa.
Tips for Freshness and Quality
Always check that your flour is fresh. Old flour can change the texture of your crepes. When choosing eggs, look for ones that are free-range or organic for better flavor. Use full-fat milk for creamier crepes. Store your ingredients in a cool, dry place to maintain freshness. After making the crepes, stack them with parchment paper in between to prevent sticking. This will keep them fresh until you’re ready to assemble the cake.

Step-by-Step Instructions
How to Make the Crepe Batter
To start, gather your ingredients. In a large bowl, whisk together:
– 2 cups all-purpose flour
– 1/2 cup unsweetened cocoa powder
– 1/4 cup granulated sugar
– 1/4 teaspoon salt
Next, add 4 large eggs. Gradually pour in 3 cups of milk while mixing. Stir until smooth. This step is key for a creamy batter. Finally, mix in 1/4 cup of melted butter. Let this batter rest for 30 minutes. Resting helps the crepes cook better.
Cooking Perfect Crepes
Heat a non-stick skillet over medium heat. If needed, lightly grease it with butter. Pour about 1/4 cup of the batter into the pan. Swirl the pan to spread the batter evenly. Cook for 1-2 minutes. You’ll see the edges lift when it’s ready. Flip the crepe and cook for another 30 seconds. Stack the cooked crepes on a plate, and keep repeating until all the batter is gone.
Preparing the Whipped Hazelnut Cream
In a large bowl, pour in 1 cup of heavy cream. Use a mixer to whip it until soft peaks form. This gives the cream a light texture. Then, gently fold in 1/2 cup of chocolate hazelnut spread. Mix until smooth and well combined. This cream will add a rich flavor to your cake.
Assembling the Chocolate Hazelnut Crepe Cake
Layering the Crepes
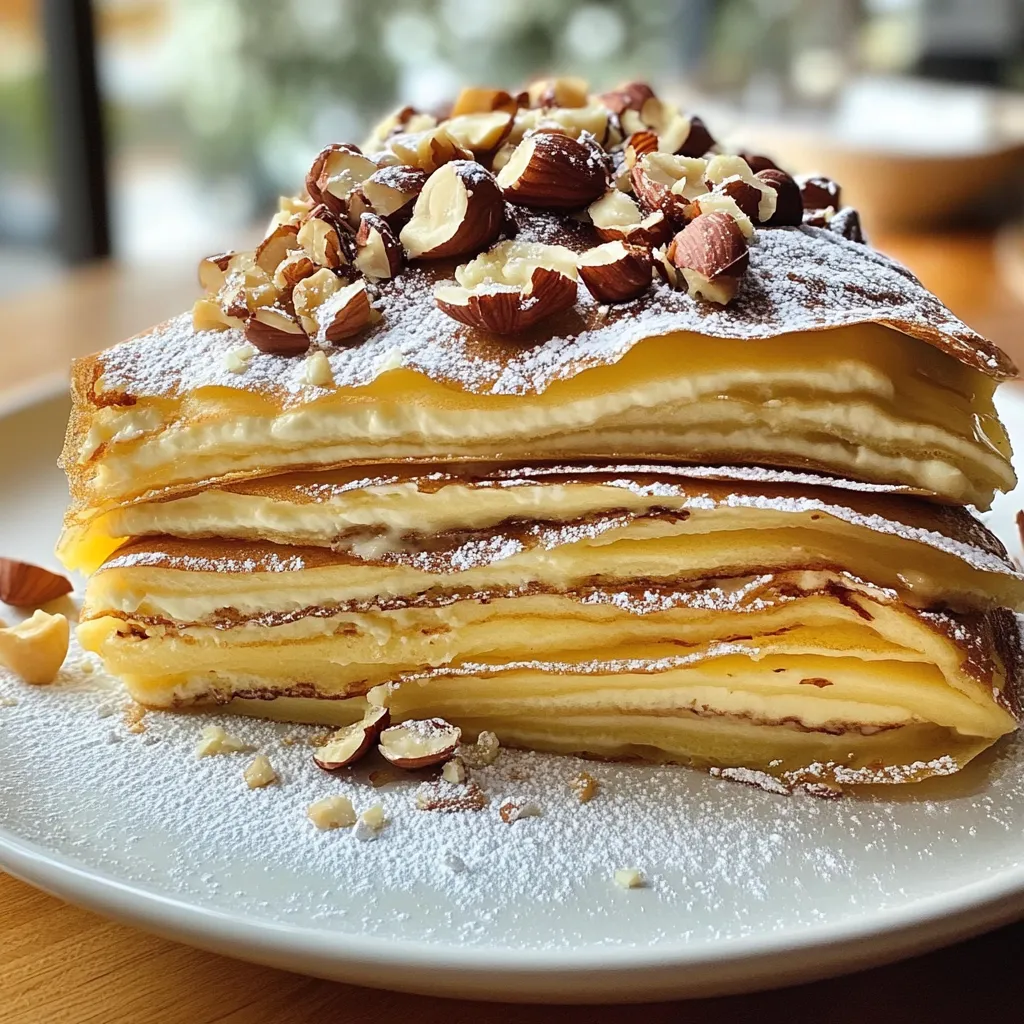
Start with a crepe on your serving plate. Spread a thin layer of the hazelnut cream mixture on top. This cream is made from whipped cream and chocolate hazelnut spread. Place another crepe on top and repeat the process. Keep stacking crepes and cream until you run out. Finish with a plain crepe on the top. This creates a beautiful layered effect.
Chilling Instructions for Best Results
Once you have layered all the crepes, cover the cake with plastic wrap. This keeps the cake fresh and moist. Refrigerate it for at least 2 hours. If you can, chill it overnight. This lets the flavors blend perfectly. The longer it chills, the better it tastes!
Finishing Touches Before Serving
Just before serving, sprinkle the top with chopped hazelnuts. This adds a lovely crunch. You can also dust the cake with powdered sugar for a sweet touch. Slice the cake into wedges and serve it cold. Enjoy this rich, layered delight!
Pro Tips
- Rest the Batter: Allowing the crepe batter to rest for at least 30 minutes helps improve the texture of the crepes, making them more tender and easier to handle.
- Use a Non-Stick Pan: A high-quality non-stick skillet is essential for cooking crepes evenly without sticking. This will give you perfectly formed crepes every time.
- Layer Wisely: When assembling the cake, spread the hazelnut cream mixture evenly to prevent bulging. This ensures a balanced texture and flavor in each slice.
- Chill Before Serving: Refrigerating the cake for a few hours allows the flavors to meld beautifully and makes it easier to slice when serving.
Tips & Tricks
Achieving the Perfect Crepe Texture
To get the best crepes, your batter must be smooth and thin. Start by whisking the flour, cocoa powder, sugar, and salt well. Then, mix in the eggs and milk slowly. This helps avoid lumps. Let the batter rest for 30 minutes. This step makes a big difference in texture. If you want even thinner crepes, add a little extra milk.
Common Mistakes to Avoid
A few common errors can ruin your crepe experience. First, don’t skip resting the batter. It needs time to develop the right texture. Second, make sure your skillet is hot but not too hot. If it is too hot, the crepes will burn. If it’s too cool, they won’t cook well. Lastly, avoid using too much batter. A 1/4 cup is just right for one crepe.
Enhancing Flavor Profile Suggestions
To boost the flavor of your crepe cake, consider adding a pinch of cinnamon or vanilla to the batter. This adds warmth and depth. You can also mix in some finely chopped chocolate into the hazelnut cream for extra richness. Garnishing with fresh berries or a drizzle of caramel sauce can elevate your dessert, making it even more delightful.
Variations
Alternative Fillings and Toppings
You can change up the filling for your crepe cake. Instead of chocolate hazelnut spread, try using:
– Cream cheese frosting
– Fruit preserves like raspberry or strawberry
– Marshmallow fluff for a fun twist
Top your cake with fresh fruit or chocolate shavings. These options add color and flavor. You might even sprinkle some sea salt for a salty-sweet combo!
Gluten-Free and Dairy-Free Options
To make a gluten-free version, swap the all-purpose flour with a gluten-free blend. Ensure it has a good binding agent. For dairy-free, use almond milk or coconut milk instead of regular milk. You can use a dairy-free cream for the whipped layer too. There are many great options on the market today.
Seasonal Flavors to Consider
Seasonal flavors can make your crepe cake extra special. For instance:
– In fall, add some pumpkin spice to the crepe batter.
– In winter, use peppermint extract in the whipped cream.
– In summer, fresh berries mixed into the hazelnut spread create a refreshing taste.
These touches will make your cake feel festive and vibrant. Feel free to experiment and have fun with flavors!
FAQs
How do I store leftover Crepe Cake?
Store leftover crepe cake in the fridge. Use an airtight container to keep it fresh. It will last up to three days. If you want to enjoy it later, consider wrapping slices tightly in plastic wrap before placing them in the container.
Can I make the crepes ahead of time?
Yes, you can easily make the crepes ahead of time. Cook and cool them, then stack them between sheets of parchment paper. Place the stack in the fridge for up to two days. This saves time when you are ready to assemble your cake.
What other desserts can I make with a similar technique?
You can use the crepe layering method for other desserts. Try using whipped cream and berries for a fruit-filled crepe cake. You can also make a savory version with cheese and spinach. The possibilities are endless with this fun technique.
How do I make my own chocolate hazelnut spread?
To make your own chocolate hazelnut spread, blend roasted hazelnuts in a food processor until smooth. Add cocoa powder, a bit of sugar, and a pinch of salt. For creaminess, mix in some vegetable oil. Blend until it reaches your desired consistency.
Is it possible to freeze the Crepe Cake?
Yes, you can freeze the crepe cake. Wrap it tightly in plastic wrap and then in foil. Freeze it for up to a month. To serve, thaw in the fridge overnight. Enjoy the layers of flavor, just like when fresh.
By exploring the ingredients, step-by-step instructions, and tips, you learned to make a delicious Chocolate Hazelnut Crepe Cake. Keep in mind the key tips for freshness and avoid common mistakes. You can personalize your cake with different fillings or dietary options. With practice, you’ll master this dessert and impress friends and family. Enjoy the process and have fun creatin