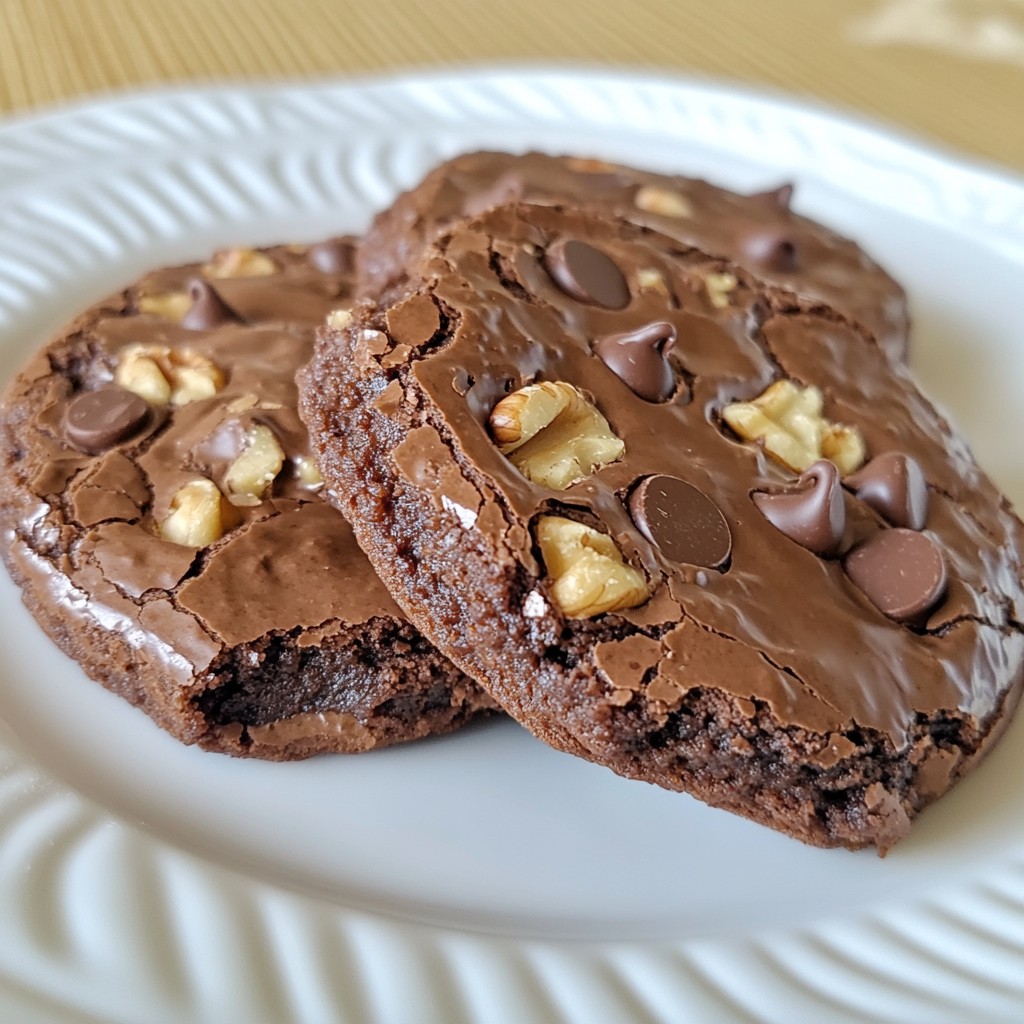
Are you ready to indulge in a rich and decadent treat? These Chocolate Fudge Brownie Cookies will satisfy your sweetest cravings. With their fudgy texture and deep chocolate flavor, you’ll be hooked from the first bite. In this post, I’ll guide you through the ingredients, baking steps, and tips to make these cookies a success. Let's dive into the world of chocolate bliss together!
Error: Connection error.
Ingredients
Detailed Ingredient List
To make rich chocolate fudge brownie cookies, you will need:
- 1 cup unsalted butter, melted
- 1 1/4 cups brown sugar, packed
- 1/2 cup granulated sugar
- 2 large eggs
- 2 teaspoons vanilla extract
- 1 cup all-purpose flour
- 1/2 cup unsweetened cocoa powder
- 1/2 teaspoon baking powder
- 1/4 teaspoon salt
- 1 cup semi-sweet chocolate chips
- 1/2 cup walnuts, chopped (optional)
Each ingredient plays a vital role in creating that deep flavor and soft texture. The butter adds richness. The sugars give sweetness and a chewy bite. Eggs bind everything together.
Special Ingredients Breakdown
- Cocoa powder: This gives the cookies their deep chocolate flavor. It also adds a nice color.
- Semi-sweet chocolate chips: They melt slightly during baking, creating gooey pockets of chocolate.
- Walnuts: They add crunch and a nutty flavor, but they are optional.
Substitutions for Common Allergens
- Butter: You can use coconut oil or a vegan butter for a dairy-free option.
- Eggs: Replace each egg with 1/4 cup of unsweetened applesauce or a flax egg (1 tablespoon ground flaxseed mixed with 3 tablespoons water).
- Flour: For gluten-free cookies, use a 1:1 gluten-free flour blend.
These substitutions keep the cookies tasty while fitting different dietary needs. Enjoy baking!

Step-by-Step Instructions
Prepping the Oven and Baking Sheet
Start by setting your oven to 350°F (175°C). This heat makes the cookies soft and gooey. Line your baking sheet with parchment paper. This helps the cookies not stick.
Mixing Wet Ingredients
In a large bowl, melt your butter. Then, mix in the brown sugar and granulated sugar. Whisk them until smooth. Now, add the eggs one at a time. Mix well after each egg. Finally, stir in the vanilla extract for flavor.
Combining Dry Ingredients
In another bowl, sift together the flour, cocoa powder, baking powder, and salt. This step helps make sure there are no lumps. Gradually add this dry mix to your wet mix. Stir gently until just combined. Avoid overmixing; this keeps the cookies soft.
Forming and Baking the Cookies
Now it’s time to form the cookies! Use a cookie scoop or tablespoon to drop rounded balls of dough onto the baking sheet. Space them about 2 inches apart to allow for spreading. Bake for 10-12 minutes. The edges should be set, but the centers must look soft. Remember, don’t overbake! This keeps that fudgy texture. Let the cookies cool on the baking sheet for 5 minutes. Then transfer them to a wire rack to cool completely.
Tips & Tricks
Achieving the Perfect Fudgy Texture
To get that rich, fudgy texture, you need to watch your mixing. Mix the wet ingredients until smooth, but don’t overmix. Overmixing can add air and change the texture. When you combine the dry ingredients, mix until just combined. The batter should be thick and a bit sticky. Bake just until the edges set. The centers should look soft and underbaked. This helps keep that fudgy center.
Tips for Cookie Storage
Storing your cookies right keeps them fresh. Let the cookies cool completely before storing. Place them in an airtight container. You can stack them with parchment paper between layers. This helps prevent sticking. Store them at room temperature for up to a week. For longer storage, freeze them. They freeze well for up to three months.
Ideas for Enhancing Flavor
You can add more flavors to your cookies. Try a pinch of espresso powder in the batter. It brings out the chocolate flavor. You can also use flavored extracts, like almond or mint. If you want a crunch, add in more chopped nuts. Sea salt on top before baking gives a nice contrast to the sweet chocolate. Experiment and find your perfect mix!
Error: Connection error.
Variations
Add-Ins for Different Flavors
You can change the taste of your chocolate fudge brownie cookies with fun add-ins. Here are some ideas to try:
- Peanut Butter Chips: They bring a nutty flavor that pairs well with chocolate.
- Mint Chocolate Chips: These give a fresh twist to your cookies.
- Dried Fruit: Chopped cherries or cranberries add a sweet and tart taste.
- Toffee Bits: They add a crunchy texture and rich flavor.
Mix and match these add-ins to create your perfect cookie.
Gluten-Free Adaptations
You can make these cookies gluten-free with just a few swaps. Here’s how:
- Gluten-Free Flour: Use a blend that includes xanthan gum for the best results.
- Oats: Ground oats can replace flour in a pinch. Just ensure they are certified gluten-free.
These swaps keep the cookies soft and delicious without gluten.
Vegan Cookie Options
Making vegan chocolate fudge brownie cookies is simple. Here’s what you can do:
- Butter: Replace it with coconut oil or vegan butter.
- Eggs: Use flaxseed meal or applesauce as an egg substitute. Mix 1 tablespoon of flaxseed with 3 tablespoons of water for each egg.
- Chocolate Chips: Look for dairy-free chocolate chips to keep it vegan.
These options let everyone enjoy a rich, fudgy treat!
Storage Info
Best Practices for Storing Cookies
To keep your chocolate fudge brownie cookies fresh, store them in an airtight container. This helps prevent them from drying out. You can also layer them with parchment paper. This will keep the cookies from sticking together. If you want to keep them soft, add a slice of bread in the container. The bread helps maintain moisture. Store them at room temperature for the best taste.
Freezing and Reheating Instructions
If you want to freeze your cookies, place them in a single layer on a baking sheet. This keeps them from sticking. Once frozen, transfer them to a freezer-safe container. They can last up to three months in the freezer. To reheat, simply pop them in the microwave for 10 to 15 seconds. You can also warm them in an oven set to 350°F (175°C) for about 5 minutes. This will help restore that fresh-baked taste.
Shelf Life of Chocolate Fudge Brownie Cookies
Chocolate fudge brownie cookies can last about one week when stored properly at room temperature. If you freeze them, they can last much longer. The taste and texture remain delightful even after freezing. Always check for signs of spoilage, like an off smell or change in texture, before enjoying them.
FAQs
What is the secret to fudgy cookies?
The secret to fudgy cookies lies in the ratio of wet to dry ingredients. Using more fat, like butter, makes cookies soft and rich. I also use brown sugar for moisture. This sugar adds a deep flavor and keeps the cookies chewy. Remember, do not overmix the dough. This ensures they stay fudgy and not cakey.
Can I use other types of chocolate?
Yes, you can use other types of chocolate! Dark chocolate or milk chocolate can work well. They will change the taste and sweetness. If you love nuts, try adding white chocolate chips or peanut butter chips for a twist. Mix and match until you find your favorite combination!
How do I know when the cookies are done baking?
Check the edges of the cookies. They should look set, while the center remains soft. If they are shiny and soft in the middle, they need more time. Bake them for 10 to 12 minutes. Remember, they will continue to firm up as they cool.
What can I serve with chocolate fudge brownie cookies?
These cookies go great with a scoop of vanilla ice cream. The cold ice cream balances the warm cookie perfectly. You can also serve them with a drizzle of chocolate sauce or fresh berries. For a fun touch, add whipped cream on top!
We covered everything you need to make perfect chocolate fudge brownie cookies. We explored the right ingredients and steps, plus tips for the best taste. Remember the importance of texture and storage to keep them fresh. With easy variations, you can customize for diet needs. Baking cookies can be fun and rewarding. Now, it’s time to bake and enjoy every bite!