Want a sweet treat that's super easy to make? You’re in the right place! Chocolate-covered peanut clusters combine creamy chocolate with crunchy peanuts for a delightful snack. In this article, I'll guide you through making this tasty treat from scratch. You'll learn step-by-step how to melt chocolate, form clusters, and add fun variations. Let's dive in and create your new favorite snack together!
Why I Love This Recipe
- Quick and Easy: This recipe takes only 15 minutes of prep time, making it a perfect last-minute treat for any occasion.
- Decadent Flavor: The combination of milk and dark chocolate creates a rich, satisfying flavor that chocolate lovers will adore.
- Customizable: You can easily adjust the recipe by adding your favorite nuts or even dried fruits for variety.
- Perfect for Sharing: These clusters make an excellent gift or party favor, beautifully packaged in a decorative box or bowl.
Ingredients
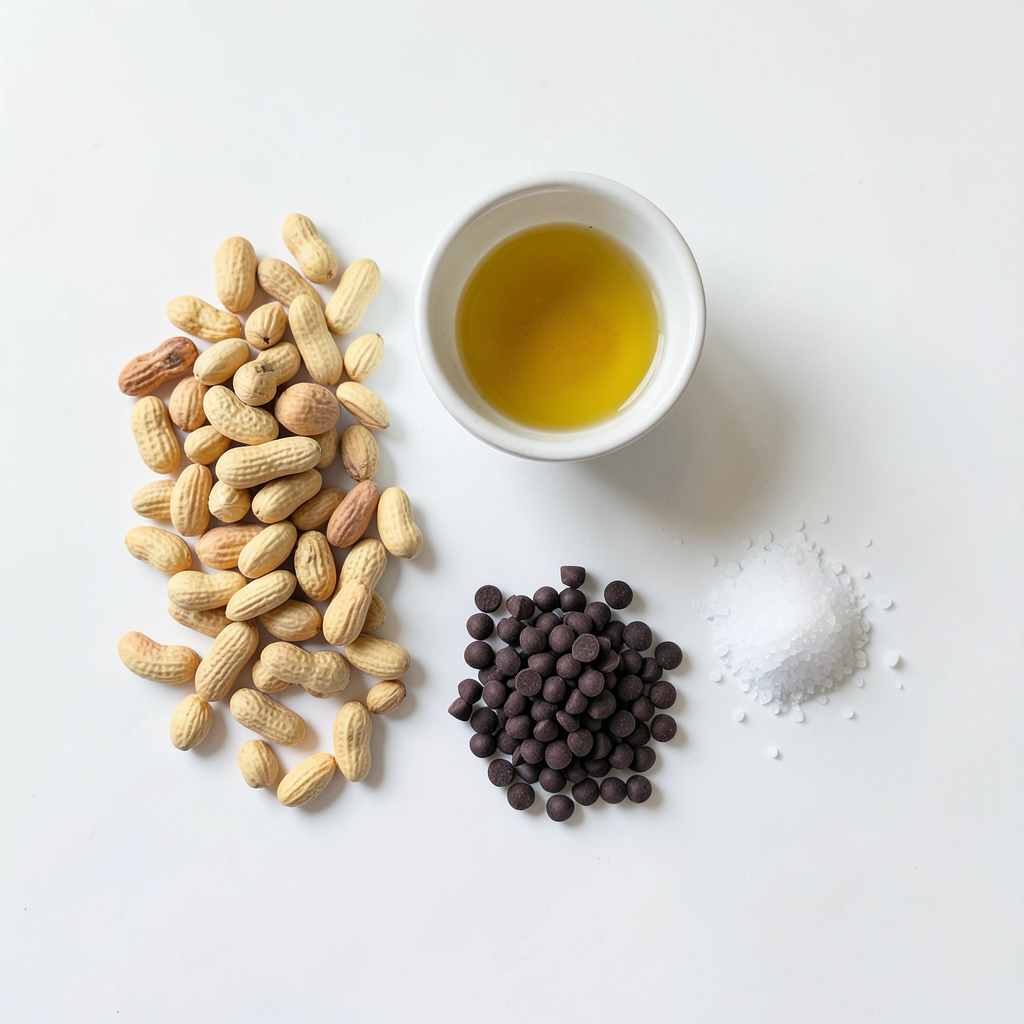
List of Ingredients
- 2 cups unsalted roasted peanuts
- 12 oz milk chocolate chips
- 2 oz dark chocolate chips
- 1 teaspoon coconut oil (optional)
- Sea salt for sprinkling
To make chocolate covered peanut clusters, you need a few simple ingredients. First, get 2 cups of unsalted roasted peanuts. These peanuts add a nice crunch and flavor. Next, you will need 12 ounces of milk chocolate chips. The milk chocolate gives these clusters a sweet taste. For a rich touch, include 2 ounces of dark chocolate chips. This will create a nice balance in flavor.
If you want your chocolate to be smoother, add 1 teaspoon of coconut oil. This is optional but helps with texture. Finally, grab some sea salt for sprinkling on top. The salt boosts the sweetness of the chocolate and adds a delightful contrast.
These ingredients work together to create a treat that is both easy and delightful. You can find them at any grocery store. Enjoy making these tasty bites!
Step-by-Step Instructions
Preparation of the Baking Sheet
Start by lining a baking sheet with parchment paper or a silicone mat. This step is key because it prevents the clusters from sticking. If you skip this, you might find your tasty treats hard to remove later. Make sure the paper or mat lies flat against the sheet. This will help the clusters hold their shape.
Melting the Chocolate
To melt the chocolate, use a microwave-safe bowl. Place the 12 oz of milk chocolate chips and the 2 oz of dark chocolate chips in the bowl. If you want a smoother texture, add 1 teaspoon of coconut oil. Heat the chocolate in 30-second intervals. Stir after each interval. This helps to avoid burning. It usually takes about 1.5 to 2 minutes for the chocolate to melt completely.
Combining Peanuts and Chocolate
Once your chocolate is melted, take it out of the microwave. Quickly add the 2 cups of unsalted roasted peanuts into the bowl. Stir gently to coat the peanuts evenly. It's important to mix right away, as this helps the chocolate stick better. If you wait too long, the chocolate may start to harden.
Forming the Clusters
For shaping the clusters, you can use a tablespoon or a small cookie scoop. Drop spoonfuls of the chocolate-covered peanuts onto your prepared baking sheet. Make sure to leave some space between each cluster. This spacing allows for easy removal once they set.
Adding Final Touches
While the chocolate is still warm, sprinkle a pinch of sea salt over each cluster. This small touch adds great flavor. Timing is important here; do this right after forming the clusters. If you wait too long, the chocolate will harden, and the salt won’t stick.
Chilling and Serving
To chill the clusters, place the baking sheet in the refrigerator. Leave them there for about 30 minutes. This helps the chocolate set and harden. For serving, once they are set, remove the clusters gently from the parchment paper. You can serve them in a decorative bowl or package them for a sweet snack on the go.
Tips & Tricks
Choosing the Right Chocolate
Milk chocolate is sweeter and creamier. It melts well and coats peanuts easily. Dark chocolate has a richer taste. It is less sweet and often has more health benefits. For the best flavor, I suggest using high-quality brands. Look for brands like Guittard or Ghirardelli. They both offer great taste and smooth melting.
Making Clusters Smooth
Adding coconut oil to your chocolate helps it melt smoothly. It gives the clusters a nice shine too. If you don’t have coconut oil, try butter or shortening. Both can work well to improve the texture. Just remember to melt them together with the chocolate for the best results.
Time-Saving Tips
If you want the clusters to set fast, use the freezer instead of the fridge. They will harden in just 10 minutes. If you prefer to chill them slowly, the fridge takes about 30 minutes. Also, you can make larger batches ahead of time. Store them in an airtight container. They will stay fresh for up to two weeks!
Pro Tips
- Use Quality Chocolate: For the best flavor, choose high-quality chocolate chips. This will elevate the taste of your clusters significantly.
- Experiment with Nuts: While peanuts are delicious, feel free to mix in other nuts like almonds or cashews for a unique twist on your clusters.
- Storage Tips: Keep your chocolate clusters in an airtight container at room temperature for up to a week. Refrigeration can cause them to lose their texture.
- Serving Suggestions: These clusters make great gifts! Package them in decorative bags or boxes to share with friends and family.
Variations
Different Types of Chocolate
You can change the type of chocolate to suit your taste. If you like sweet, try using white chocolate. Just swap the milk chocolate for 12 oz of white chocolate chips. This will give your clusters a creamy and sweet twist.
If you prefer a richer flavor, go for dark chocolate only. Use 12 oz of dark chocolate chips instead of mixing. This option adds a bold taste and pairs well with the peanuts.
Nut Alternatives
You don’t have to stick to just peanuts. You can mix in different nuts to make clusters unique. Try using almonds, cashews, or pecans. Each nut brings its own flavor and crunch.
You can even create a nut mix. Use equal parts of your favorite nuts. This will give your clusters a fun and varied texture. If you want to be bold, add some salty nuts for a sweet and salty combo.
Sweeteners and Add-ins
Do you want to change the sweetness? You can replace sugar with honey or maple syrup. This makes the clusters a bit chewy and adds a new flavor. Just use the same amount as the chocolate chips.
For extra fun, add dried fruits or sprinkles. Try raisins, cranberries, or even mini chocolate chips. These add bursts of flavor and color, making your treats even more exciting.
Storage Info
Best Storage Practices
Store your chocolate covered peanut clusters in an airtight container. Glass or plastic containers work well. If you have a lot, separate layers with parchment paper. This keeps them from sticking together.
To keep the clusters fresh, place them in a cool, dry place. Avoid areas with heat or sunlight. A pantry shelf is often perfect. If you live in a warm climate, consider refrigerating them. This helps maintain their texture and taste.
Shelf Life of Chocolate Covered Peanut Clusters
When stored properly, chocolate covered peanut clusters last about two weeks at room temperature. If you refrigerate them, they can last up to a month. Always check for signs of spoilage. Look for changes like a dull appearance or strange smells. If you notice these signs, it’s best to throw them away.
Freezing Clusters
You can freeze chocolate covered peanut clusters for longer storage. To freeze, place them in a single layer on a baking sheet. Once frozen, transfer them to a freezer-safe bag or container. Be sure to remove as much air as possible. This will prevent freezer burn.
When you're ready to enjoy them, thaw the clusters in the fridge overnight. Avoid using the microwave for thawing, as it can melt the chocolate. Enjoy your sweet treat once they are back to room temperature!
FAQs
How can I make chocolate-covered peanut clusters healthier?
To make chocolate-covered peanut clusters healthier, you can try a few simple swaps.
- Use dark chocolate instead of milk chocolate. Dark chocolate has less sugar and more antioxidants.
- Reduce the amount of chocolate you use. You can coat the peanuts lightly for a less sweet treat.
- Add a pinch of cinnamon or nutmeg for flavor without extra sugar.
- Consider using raw or lightly salted peanuts. This lowers fat and adds crunch.
Can I make these clusters ahead of time?
Yes, you can make these clusters ahead of time. Here are some tips to help:
- Prepare them up to a week in advance. Store them in an airtight container.
- Keep them in a cool, dry place. The fridge works well too, especially in warm weather.
- For longer storage, you can freeze them. Just layer them with parchment paper in a freezer-safe container.
Where can I buy pre-made chocolate covered peanut clusters?
You can find pre-made chocolate-covered peanut clusters at various places:
- Local candy shops often carry them. These are usually fresh and tasty.
- Grocery stores have them in the snack aisle. Look for brands you trust.
- Online retailers like Amazon or specialty candy sites offer many options. Check reviews for quality.
What can I serve with chocolate covered peanut clusters?
Pairing your chocolate-covered peanut clusters can enhance the treat. Here are some ideas:
- Serve them with fresh fruit. Apples or bananas add a nice balance.
- Pair with a scoop of ice cream for a dessert treat. Vanilla or chocolate ice cream works well.
- Add them to a charcuterie board. They give a sweet touch to savory snacks.
- Enjoy with a cup of coffee or tea for a cozy moment. The flavors of chocolate and nuts blend well with warm beverages.
In this article, I guided you through making chocolate-covered peanut clusters. We covered the ingredients, preparation steps, tips for smooth clusters, and storage methods. You can customize these treats with different chocolates and nuts. Remember to sprinkle sea salt for that perfect finish. These clusters are fun to make and share, and with proper storage, they stay fresh longer. Enjoy your sweet creations, and don’t hesitate to experiment with new flavors. Happy snacking!