Get ready to indulge in pure decadence with my Caramel Pecan Turtle Brownies! This recipe combines rich chocolate, crunchy pecans, and gooey caramel to create a treat that’s hard to resist. Perfect for gatherings or a cozy night in, I’ll guide you through effortless steps to make these mouthwatering brownies. Let’s dive into the ingredients, tips, and variations that will make your baking experience a success!
Ingredients
List of Ingredients
To make Caramel Pecan Turtle Brownies, you need the following ingredients:
– 1 cup unsalted butter (two sticks)
– 2 cups granulated sugar
– 4 large eggs
– 1 tablespoon vanilla extract
– 1 cup all-purpose flour
– 1 cup cocoa powder
– 1 teaspoon baking powder
– 1/2 teaspoon salt
– 1 cup pecans, chopped
– 1 cup caramel sauce (store-bought or homemade)
– Sea salt flakes for garnish
Recommended Quality and Brands of Ingredients
Choosing the right ingredients can make a big difference. I recommend using high-quality unsalted butter like Kerrygold for a rich flavor. Use pure vanilla extract, not imitation, for the best taste. For the sugar, regular granulated sugar works well. For cocoa powder, I prefer Dutch-processed cocoa like Ghirardelli for a deep chocolate taste. Select fresh pecans, as they add crunch and flavor. If you make your own caramel sauce, ensure it’s thick enough to hold its shape when swirled into the brownies.
Possible Ingredient Substitutions
You can swap some ingredients if you need to. If you want a dairy-free version, use a vegan butter substitute. You can replace granulated sugar with coconut sugar for a lower glycemic index. If you don’t have eggs, consider using flaxseed meal mixed with water as a binder. For the flour, gluten-free all-purpose flour can work, but check that it has a binding agent. If you don’t like pecans, walnuts or almonds can be great substitutes.
Step-by-Step Instructions
Preparation Steps Overview
Start by gathering all your ingredients. This makes cooking easier and faster. You will need butter, sugar, eggs, vanilla, flour, cocoa powder, baking powder, salt, chopped pecans, caramel sauce, and sea salt flakes. Preheat your oven to 350°F (175°C). Grease a 9×13 inch baking pan and line it with parchment paper. This helps the brownies come out easily.
Baking Process Details
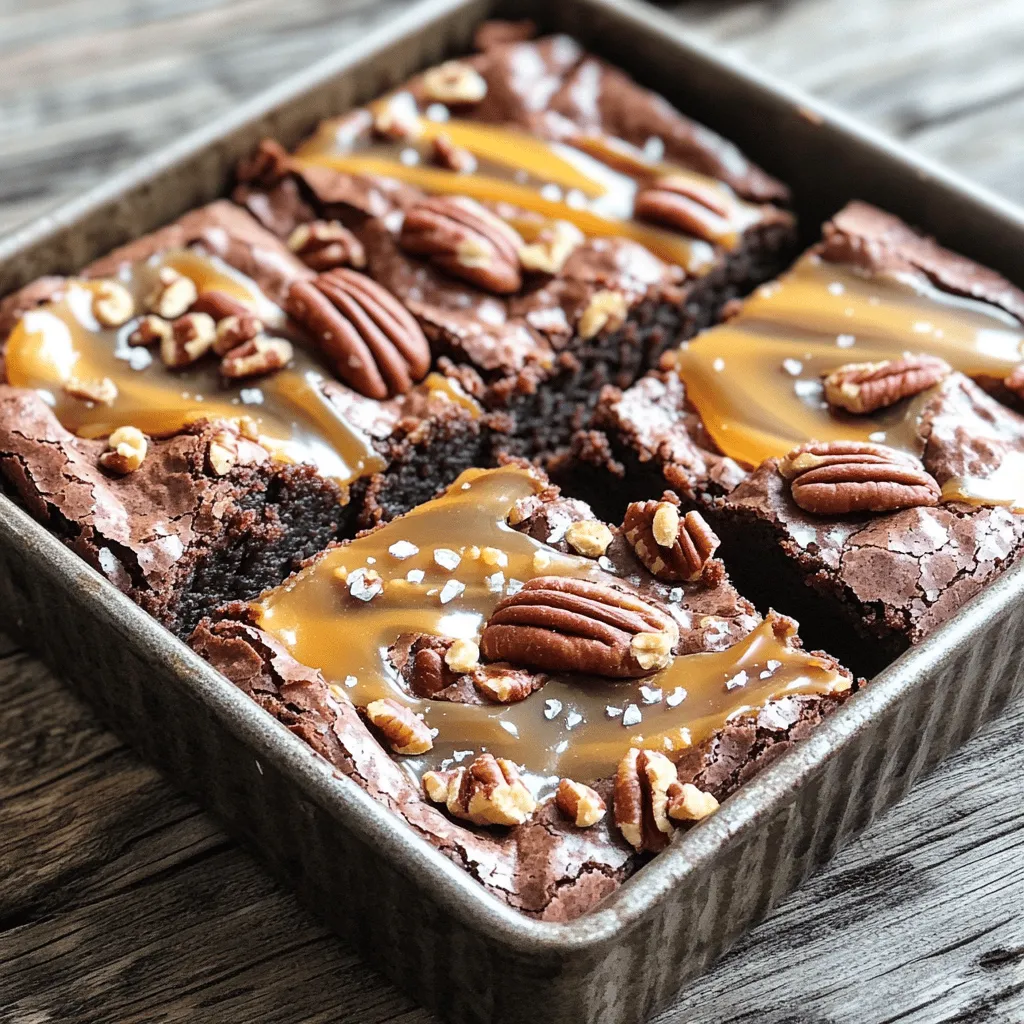
Melt the butter in a pan over medium heat. When it is melted, mix in the granulated sugar. Stir well until you combine them fully. Next, add the eggs one by one. Mix well after each egg. Then, add the vanilla extract to the batter. In another bowl, mix the flour, cocoa powder, baking powder, and salt. Gradually add these dry ingredients to the wet mix. Be careful not to overmix. Once combined, fold in the chopped pecans. Pour half of this batter into the prepared pan. Spread it evenly. Drizzle half of the caramel sauce over this layer. Then, add the rest of the batter on top. Use a knife to swirl in the remaining caramel sauce for a fun look. Bake for 30 to 35 minutes. Use a toothpick to check for doneness. It should come out with a few moist crumbs.
Tips for Achieving the Perfect Texture
For chewy brownies, avoid overmixing your batter. This helps keep them soft. Make sure to let the brownies cool before cutting. This helps them set and makes cutting easier. If you like a little crunch, toast the pecans before adding them to the batter. This adds a nice flavor. For added flavor, sprinkle sea salt flakes on top before serving.
Tips & Tricks
Enhancing Flavor Variations
You can boost the flavor of your caramel pecan turtle brownies in simple ways. Try adding a bit of espresso powder to the batter. This will deepen the chocolate taste. You can also mix in some dark chocolate chips for a richer flavor. If you love salt, sprinkle a bit more sea salt on top before baking. This adds a nice contrast to the sweetness.
Common Mistakes to Avoid
Watch out for overmixing the batter. This can make your brownies tough. You want them soft and chewy, not dry. Another mistake is baking for too long. Keep an eye on them. A toothpick should come out with a few moist crumbs, not clean. Finally, make sure you let them cool before cutting. This helps them set and makes them easier to slice.
Tools and Equipment for Best Results
Using the right tools helps ensure your brownies turn out great. A good quality 9×13 inch baking pan is key. It helps the brownies bake evenly. Use parchment paper to line your pan. This makes removing the brownies easy. A mixing bowl, whisk, and rubber spatula make mixing the batter simple. Lastly, a toothpick is handy to test for doneness.
Variations
Alternative Nut Options
If you want to switch things up, consider using different nuts. Walnuts add a nice crunch. Almonds give a sweet flavor. Pecans are classic, but you can experiment. Each nut will offer a unique twist to your brownies. Just chop them coarsely and mix them into the batter.
Dietary Modifications (Gluten-Free, Vegan)
You can easily make these brownies gluten-free. Use a 1:1 gluten-free flour mix instead of all-purpose flour. For a vegan version, replace eggs with flax eggs. Use 1 tablespoon of flaxseed meal mixed with 2.5 tablespoons of water for each egg. Also, choose a vegan caramel sauce. It’s simple and just as tasty!
Flavor Profile Changes (Adding Chocolate Chips, etc.)
Want more chocolate? Add chocolate chips to the batter. Dark chocolate chips give a rich taste, while milk chocolate adds sweetness. You can also mix in peanut butter chips for a fun twist. Just fold them in with the pecans. This will create a delightful blend of flavors in every bite.
Storage Info
Proper Storage Methods
To keep your Caramel Pecan Turtle Brownies fresh, store them in an airtight container. This helps prevent them from drying out. You can layer the brownies with parchment paper to avoid sticking. If you want to keep them longer, consider wrapping them tightly in plastic wrap before placing them in the container.
Shelf Life of Caramel Pecan Turtle Brownies
When stored properly, these brownies can last for about a week at room temperature. If you place them in the fridge, they can stay good for up to two weeks. For even longer storage, you can freeze them for up to three months. Just make sure to thaw them in the fridge before enjoying.
Reheating Instructions
If you prefer warm brownies, reheat them in the microwave. Place a brownie on a plate and heat for about 15-20 seconds. This brings back the gooey texture. You can also warm them in the oven. Set the oven to 350°F (175°C) and heat them for about 5-10 minutes. This works well if you want to serve them with ice cream.
FAQs
Can I make these brownies ahead of time?
Yes, you can make these brownies ahead of time. Let them cool completely first. Once cooled, wrap them tightly in plastic wrap. You can store them at room temperature for up to three days. For longer storage, keep them in the fridge for up to one week. You can also freeze them for up to three months. Just thaw them in the fridge overnight before serving.
What is the best way to cut brownies for neat squares?
To cut brownies neatly, first, let them cool completely. Use a sharp knife for cutting. For the best results, run the knife under hot water and dry it before each cut. This helps create clean edges. You can also use a ruler to measure equal squares if you want them to look perfect.
How do I know when the brownies are done baking?
You can tell if your brownies are done by using a toothpick. Insert it into the center of the brownies. If it comes out with a few moist crumbs, they are done. If it has wet batter on it, they need more time. Keep an eye on them, as baking times may vary based on your oven. For this recipe, aim for 30-35 minutes in the oven.
We covered the key ingredients and steps for making tasty brownies. I shared tips for texture and flavor, plus suggested substitutes. We also explored fun variations, like gluten-free or vegan options. Finally, I explained how to store brownies and answered common questions.
Baking can be fun and rewarding. I hope this guide helps you create the best brownies ever! Enjoy the process and share your treats with friends. Happy baking!