![- 1 block of firm tofu (14 oz), pressed and drained - 1/4 cup cornstarch - 3 tablespoons vegetable oil (for frying) - 1/4 cup honey (or maple syrup for a vegan option) - 4 cloves garlic, minced - 2 tablespoons soy sauce - 1 tablespoon rice vinegar - 1 teaspoon grated ginger - 1/4 teaspoon red pepper flakes (optional, for heat) - Chopped green onions - Sesame seeds The main ingredients set the stage for this dish. Firm tofu gives a hearty bite. Cornstarch creates a golden crunch. Vegetable oil allows for frying without sticking. Next, the sauce ingredients bring flavor. Honey or maple syrup adds sweetness. Minced garlic gives a strong aroma. Soy sauce adds depth and saltiness. You can enhance the dish with optional add-ins. Rice vinegar adds a tangy kick. Grated ginger brings warmth. Red pepper flakes can spice things up. Garnishing with green onions and sesame seeds adds color and crunch. For the full recipe, see below. Enjoy crafting this tasty Crispy Honey Garlic Tofu! How to press and drain tofu Start by pressing the tofu. Wrap the block in a clean kitchen towel. Place a heavy object on top, like a cast iron skillet. Let it sit for about 15 to 30 minutes. This helps remove excess water. Cutting tofu into cubes Once pressed, take the tofu and slice it into 1-inch cubes. Use a sharp knife to ensure clean cuts. This size helps the tofu cook evenly and become crispy. Coating tofu with cornstarch Next, take the tofu cubes and place them in a bowl. Sprinkle 1/4 cup of cornstarch over them. Gently toss the cubes until each piece is well-coated. This step is key for that crispy texture later. Heating vegetable oil Grab a large skillet or frying pan. Pour in 3 tablespoons of vegetable oil. Heat the oil over medium-high heat. Wait until it shimmers before adding the tofu. Frying the tofu cubes Carefully add the coated tofu cubes in a single layer. Fry for about 2-3 minutes on each side. Look for a golden brown color. Avoid overcrowding the pan; cook in batches if needed. Achieving the perfect crispy texture Once crispy, use a slotted spoon to take the tofu out. Place the tofu on a plate lined with paper towels. This absorbs extra oil and keeps it crispy. Mixing sauce ingredients In a small bowl, mix together the honey, minced garlic, soy sauce, rice vinegar, grated ginger, and red pepper flakes. Stir well until everything is blended. This sauce adds amazing flavor. Simmering for thickness In the same skillet, lower the heat to medium-low. Pour the honey garlic sauce into the pan. Let it simmer for about 2 minutes. This helps the sauce thicken and develop flavor. Glazing tofu with the sauce Add the crispy tofu back into the pan. Gently stir to coat each piece with the sauce. Cook for an additional 2-3 minutes. This will make each bite delicious and sticky. For the full recipe, check out the details above! To get the best crunch, always use firm tofu. Firm tofu holds its shape and gives a great texture. When coating it, sprinkle cornstarch evenly over each piece. Use just enough to cover but not too much. This coating will help to create that crispy outer layer. Fry the tofu in small batches. If you overcrowd the pan, it will steam instead of fry. This can ruin your crispy goal. The type of soy sauce you use matters. I recommend using low-sodium soy sauce. It packs a punch without being too salty. You can also add spices like garlic powder or smoked paprika to boost flavor. If you like heat, try adding more red pepper flakes. Adjust the sweetness by adding more honey or maple syrup if you prefer it sweeter. Crispy Honey Garlic Tofu pairs well with rice or noodles. Serve it over a bed of fluffy rice for a filling meal. You can also sprinkle chopped green onions on top for color and taste. For a fun twist, add sesame seeds as a garnish. This dish works great as a side or a main course. You can even make a tofu bowl with veggies and sauce for a complete meal. For the full recipe, check out the [Full Recipe]. {{image_2}} You can make this dish fit your diet with simple swaps. For a vegan option, replace honey with maple syrup. This keeps the sweetness but makes it plant-based. You can also use gluten-free soy sauce. Brands like Tamari offer a great taste without gluten. Feel free to get creative with flavors! You can add herbs or spices to change the taste. For a fresh twist, try adding basil or cilantro. If you like heat, add more red pepper flakes or a dash of chili oil. You can also choose between sweet and spicy versions. Adjust the honey or syrup to your taste. Don't hesitate to swap out ingredients. You can use different proteins, like tempeh or seitan, for varied texture. If you want to add more nutrition, substitute vegetables for tofu. Broccoli or bell peppers work well and soak up the sauce nicely. For the full recipe, check out the detailed instructions above! To store your crispy honey garlic tofu, let it cool first. Place it in an airtight container. This keeps it fresh for you. It will last up to three days in the fridge. For the best storage, use glass containers. They seal well and do not stain. Avoid plastic containers if you can. They can absorb odors. To reheat crispy tofu, use a skillet if possible. Heat it over medium heat. This helps keep the tofu crispy. If you want to use the microwave, place a paper towel under the tofu. This will soak up extra moisture. Heat in short bursts to avoid sogginess. You can freeze crispy tofu, but it will change texture. To freeze it, place pieces in a single layer on a baking sheet. Freeze for about an hour, then transfer to a freezer bag. When you want to use it, thaw it in the fridge overnight. For best results, reheat it in a skillet to regain some crispiness. For the full recipe, check out the details above. Tofu gets crispy by using firm tofu and cornstarch. Press the tofu to remove water. Slice it into cubes. Coat each piece in cornstarch. This helps create a crunchy layer when frying. Heat oil in a pan and add the coated tofu. Fry until golden brown on all sides. Yes, you can use maple syrup instead of honey. It gives a similar sweetness. Other options include agave syrup or date syrup. These substitutes work well in the sauce, making it tasty for all diets. Crispy Honey Garlic Tofu pairs well with rice or noodles. You can serve it with steamed veggies or a fresh salad. It also works great in wraps or as a topping for grain bowls. Each option adds different flavors and textures. Leftover tofu lasts about 3 to 5 days in the fridge. Store it in an airtight container to keep it fresh. Make sure it is cooled before placing it in the fridge. Yes, you can make this dish in advance. Prepare the tofu and sauce separately. Store them in the fridge. When ready to eat, reheat the tofu and mix it with the sauce. This keeps everything crispy and flavorful. For the full recipe, check out the Crispy Honey Garlic Tofu recipe section. This article covered how to make Crispy Honey Garlic Tofu. We discussed ingredients like firm tofu, cornstarch, and a tasty sauce. You learned easy steps for preparing and cooking the tofu until crispy. I shared tips for improving flavor and serving suggestions. In closing, this dish is simple and full of flavor. Experiment with ingredients to suit your taste. Enjoy crafting your perfect tofu meal!](https://homecookingstyle.com/wp-content/uploads/2025/06/94e6c6ac-ea5b-4182-82bb-618a1f5938a4.webp)
Crispy Honey Garlic Tofu Easy and Flavorful Recipe
If you crave a dish that’s both easy to make and packed with flavor, you’re in for a treat! This
If you crave a dish that’s both easy to make and packed with flavor, you’re in for a treat! This
![- 1 ripe avocado, mashed - 1 cup unsweetened cocoa powder - 1 cup maple syrup - 1/2 cup almond butter (or any nut butter) - 1 teaspoon vanilla extract - 1/2 teaspoon baking soda - 1/4 teaspoon salt - 1/2 cup dark chocolate chips (dairy-free if desired) - 1/4 cup chopped walnuts Avocado adds healthy fats and fiber. It makes these brownies creamy and rich. Cocoa powder gives a deep chocolate flavor. It is low in sugar and high in antioxidants. Maple syrup acts as a natural sweetener. It offers minerals like manganese and zinc. Almond butter provides protein and healthy fats. It also adds a nutty taste. Dark chocolate chips bring sweetness and richness. Choose dairy-free chips for a vegan option. Walnuts add crunch and omega-3 fatty acids. They boost heart health and flavor. For full details, check the Full Recipe. To start, gather your ingredients. You will need: - 1 ripe avocado, mashed - 1 cup unsweetened cocoa powder - 1 cup maple syrup - 1/2 cup almond butter - 1 teaspoon vanilla extract - 1/2 teaspoon baking soda - 1/4 teaspoon salt - 1/2 cup dark chocolate chips - 1/4 cup chopped walnuts (optional) Next, preheat your oven to 350°F (175°C). Grease an 8x8-inch baking dish or line it with parchment paper. This helps with easy removal later. In a large bowl, combine the mashed avocado, cocoa powder, maple syrup, almond butter, and vanilla extract. Use a whisk or fork to blend until smooth. It should look creamy and rich. Now, add the baking soda and salt. Stir until everything is mixed well. Make sure there are no lumps from the cocoa powder. At this point, fold in the dark chocolate chips and walnuts, if you choose to add them. This adds texture and flavor. Pour your brownie batter into the prepared dish. Spread it evenly with a spatula. This helps them bake uniformly. Bake in the preheated oven for 20 to 25 minutes. To check if they are done, insert a toothpick in the center. It should come out clean or with a few moist crumbs. If you see wet batter, they need more time. After baking, let the brownies cool in the pan for at least 10 minutes. This step is key to making them fudgy. Then, transfer them to a wire rack to cool completely. Once cool, cut them into squares. You can serve them as is or with a scoop of ice cream on the side. Enjoy your fudgy avocado brownies! You can find the full recipe for more details. To get super fudgy brownies, use ripe avocados. They give moisture and richness. Mash the avocado well until it is smooth. Mix it with the cocoa powder and maple syrup. This combo creates a thick batter. Do not overbake your brownies; check them at 20 minutes. A toothpick should come out with a few crumbs, not clean. This keeps them moist and soft. One common mistake is not mashing the avocado enough. If there are lumps, the brownies will not be smooth. Another mistake is using too much cocoa powder. Stick to one cup for the best texture. Avoid opening the oven too often while baking. This can let heat out and affect the bake time. Lastly, don't skip the salt. It enhances the flavors and balances the sweetness. These brownies pair well with vanilla ice cream. The cold ice cream contrasts nicely with the warm brownies. You can also serve them with fresh berries. The tartness of the berries adds a nice touch. For a more decadent treat, drizzle melted chocolate on top. A sprinkle of sea salt can elevate the flavor too. Enjoy these brownies with a cup of coffee or tea for a cozy snack. For the complete recipe, check out the [Full Recipe]. {{image_2}} You can switch up the nut butter in these fudgy avocado brownies. Almond butter works great, but peanut butter adds a nice twist. Cashew butter gives a creamy texture. Sunflower seed butter is a good choice for nut-free diets. Each nut butter changes the flavor just a bit. Choose one based on what you like best! These brownies can easily be made dairy-free and vegan. Use dairy-free chocolate chips for that rich taste. You can also swap maple syrup for agave syrup if you prefer. This keeps your brownies sweet and vegan-friendly. With these swaps, everyone can enjoy a slice. Adding spices or other ingredients can make your brownies unique. A pinch of cinnamon adds warmth and depth. For a fun twist, try a splash of espresso for a mocha flavor. You can also mix in nuts or dried fruit for added texture. Make it your own to suit your taste! For the full recipe, check out the details above. To keep your fudgy avocado brownies fresh, store them in an airtight container. Place parchment paper between layers to avoid sticking. You can leave them at room temperature for up to three days. If you want them to last longer, refrigeration is a great option. Just make sure they are well-sealed to prevent drying out. You can freeze these brownies for later enjoyment. First, cut them into squares. Wrap each square tightly in plastic wrap. Then, place the wrapped brownies in a freezer bag or container. They can stay frozen for up to three months. When you’re ready to eat them, simply thaw them in the fridge overnight. For the best taste, reheat your brownies. Preheat your oven to 350°F (175°C). Place the brownies on a baking sheet. Heat them for about 5-10 minutes, or until warm. You can also microwave them for 10-15 seconds for a quick warm-up. This will make the chocolate chips gooey again, enhancing their fudgy texture. Enjoy your brownies fresh and warm! For the full recipe, just refer to the section above. Yes, you can use a different type of avocado if needed. The key is to pick a ripe avocado. A ripe avocado gives the best texture and flavor. You can also use Hass avocados, but any variety will work. Just make sure it is soft and easy to mash. This will help your brownies stay fudgy and moist. Yes, these brownies are gluten-free! The recipe does not use any flour. Instead, we rely on cocoa powder and nut butter for texture. This makes them perfect for gluten-free eaters. Always check the nut butter label to ensure it is gluten-free. This way, everyone can enjoy these tasty brownies. Fudgy brownies can last up to one week when stored well. Keep them in an airtight container at room temperature. If you want to keep them fresh longer, store them in the fridge. You can also freeze brownies for up to three months. Just wrap them tightly in plastic wrap and then in foil. When you're ready to eat them, let them thaw at room temperature. For more tips, check the Full Recipe above. This blog post covered everything you need for fudgy avocado brownies. We explored key ingredients and their nutrition. You learned step-by-step how to prepare, bake, and serve them. I shared tips for best results and common mistakes to avoid. We also discussed fun variations and storage tips. These brownies bring joy and healthy ingredients together. Enjoy baking your next batch and impress everyone with your skills!](https://homecookingstyle.com/wp-content/uploads/2025/06/d7ece4a8-6c05-4553-8bc5-a0b5eb72571f.webp)
Get ready to indulge in the rich, creamy goodness of fudgy avocado brownies! You might think adding avocado is strange,
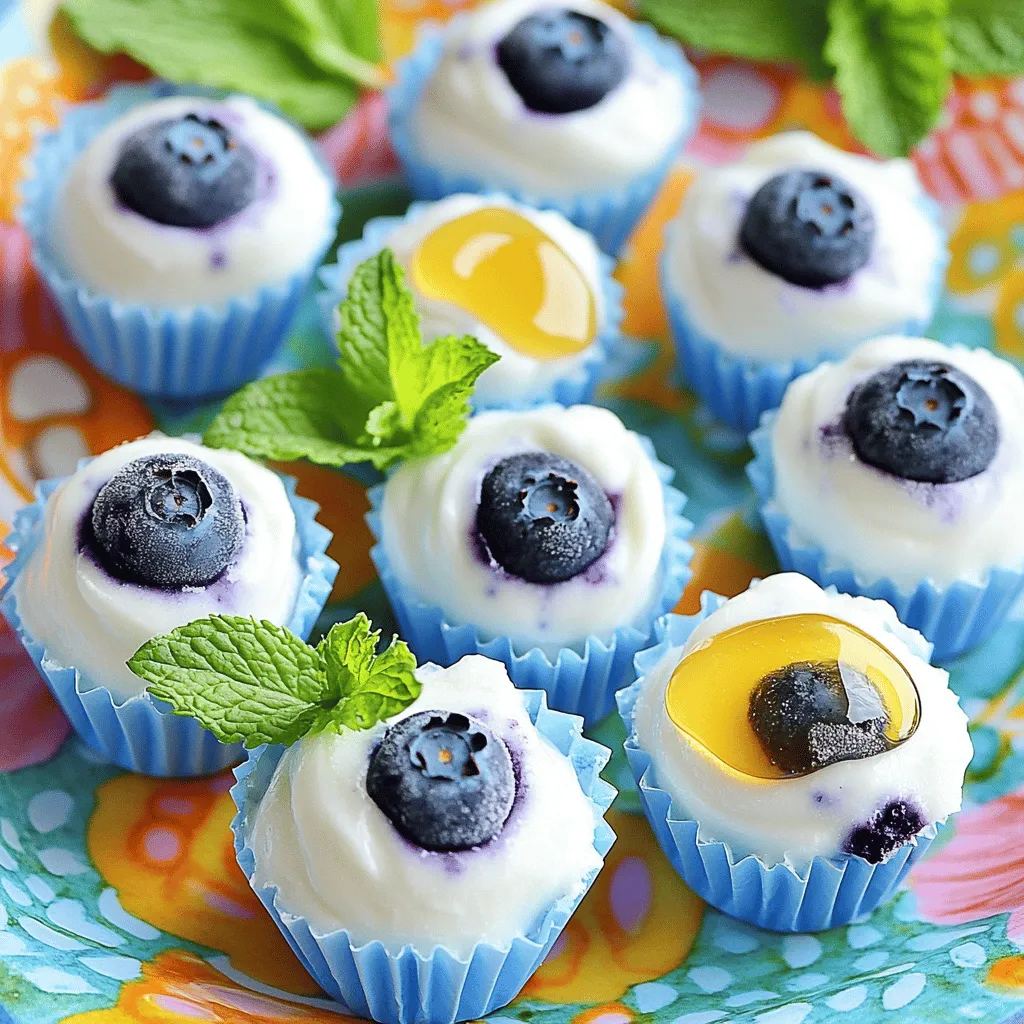
Craving a tasty snack that’s also healthy? You’re in the right place! Frozen Blueberry Yogurt Bites are a quick and

Ready to roll? Making Easy Veggie Sushi Rolls is quick, fun, and perfect for any meal. With fresh veggies like
![- 1 medium head of cauliflower, grated or riced - 2 tablespoons olive oil - 1 clove garlic, minced Cilantro lime cauliflower rice starts with fresh cauliflower. I love using a medium head, as it provides just the right amount. You can either grate it or use a food processor to get that perfect rice-like texture. The olive oil adds a nice richness, while minced garlic brings a punch of flavor. - Zest and juice of 1 lime - 1/4 cup fresh cilantro, chopped - Salt and pepper to taste Lime is the star here. The zest and juice brighten up the dish. Fresh cilantro adds a vibrant touch and balances the flavors. Don't forget to season with salt and pepper to bring everything together. - 1/4 teaspoon cumin - 1/4 teaspoon chili flakes If you want a bit more depth, consider adding cumin. It gives a warm, earthy note. Chili flakes can add some heat if you like spice. These additions are optional, but they can elevate the dish even further. For the full recipe, check out the details above. - Remove leaves and stem - Grate or rice the cauliflower Start by taking a medium head of cauliflower. Carefully remove the green leaves and tough stem. Cut the cauliflower into quarters. Now, you can use a box grater or a food processor. Grate or pulse until it looks like rice. This is your base for the dish. - Heat olive oil in a skillet - Sauté minced garlic Next, grab a large skillet and pour in two tablespoons of olive oil. Heat it over medium heat. Once hot, add one clove of minced garlic. Cook it for about 30 seconds. Watch it closely so it doesn’t burn. You want it fragrant and golden, not brown. - Add riced cauliflower to the skillet - Stir in lime juice and cilantro After the garlic is ready, toss in the riced cauliflower. Stir it well and let it cook for 5 to 7 minutes. You want the cauliflower tender but still crunchy. Once done, take the skillet off the heat. Now, add the zest and juice of one lime, along with 1/4 cup of chopped cilantro. Mix everything until well combined. Add salt and pepper to taste. Enjoy this fresh and zesty side dish! For the full recipe, check out the details. To get the best flavor from your cilantro lime cauliflower rice, always use fresh ingredients. Fresh cauliflower, cilantro, and lime juice make a big difference. If you want a stronger taste, adjust the seasonings based on your preference. You can add more lime juice or salt to create a bolder flavor. To ensure a perfect texture, cook the cauliflower just right. Aim for a slight crunch in each bite. This keeps the dish vibrant and fresh. Also, be careful when cooking garlic. Burning it can ruin the taste. Sauté it for about 30 seconds until fragrant, then add the cauliflower. Cilantro lime cauliflower rice pairs well with proteins. Try it with grilled chicken, shrimp, or tofu for a complete meal. You can also serve it as a healthy side dish. It complements tacos, burritos, or any dish needing a fresh touch. For the full recipe, check out the details above. {{image_2}} You can make cilantro lime cauliflower rice even more exciting. Try adding different herbs like parsley or basil. These herbs add fresh notes that brighten the dish. You can also incorporate spices like smoked paprika. This spice brings a warm, smoky flavor that pairs well with the lime. Experimenting with flavor can lead to new favorites. Cilantro lime cauliflower rice is not just a side dish; it can be a meal. You can use it as a base with various proteins. Grilled chicken, shrimp, or tofu all work great. You can also top it with green onions or a dollop of yogurt. This adds creaminess and a nice crunch. Mixing in your favorite toppings makes it a fun and filling dish. This recipe is already a low-carb option, but you can enhance it further. Try using other vegetables like broccoli instead of cauliflower. Broccoli provides a different taste and texture. You can also combine it with quinoa for added texture. Quinoa is packed with protein and makes the meal heartier. These variations keep your meals interesting and nutritious. For the complete recipe, check out the [Full Recipe]. To keep your cilantro lime cauliflower rice fresh, refrigerate leftovers right away. Place the rice in an airtight container. This will help keep out moisture and odors. You can store it for up to three days in the fridge. If you see any signs of spoilage, like a weird smell or color, toss it out. You can also freeze cilantro lime cauliflower rice for later use. To freeze, let it cool completely. Then, scoop it into freezer bags or containers. Flatten the bags to save space. For best quality, use it within two months. When it's time to eat, you can reheat your rice easily. Use the microwave for quick heating. Heat it in short bursts, stirring between, so it warms evenly. You can also reheat it on the stovetop. Add a splash of water or oil to keep it moist. This way, it stays fluffy and tasty. Cilantro lime cauliflower rice is a fresh, zesty side dish. It uses riced cauliflower instead of traditional rice. The flavors come from lime juice and fresh cilantro, giving it a bright taste. This dish is low-carb and full of nutrients. It makes a great base for many meals. Yes, you can use frozen cauliflower. Just make sure to thaw it first. Drain any excess moisture before cooking. This helps keep the dish from becoming soggy. Frozen riced cauliflower is quick and easy. It’s a great time-saver for busy days. In the fridge, this dish lasts about 3 to 5 days. Store it in an airtight container for the best results. If you want to keep it longer, freeze it. It can stay fresh in the freezer for up to 2 months. Just remember to label the container. Absolutely! Making it ahead is a smart meal prep idea. Cook the dish, let it cool, and store it in the fridge. You can also freeze it for later. When you’re ready to eat, just reheat it gently. This way, you always have a fresh side ready to go. For the full recipe, check out the details above. Cilantro lime cauliflower rice is easy and tasty. You learned about the main ingredients, flavor enhancers, and tips for cooking and storing. Using fresh produce boosts the flavor, while optional spices add fun variety. You can enjoy this dish as a side or main course. Remember, it's not just healthy but also versatile. Get creative with your recipes and enjoy your cooking!](https://homecookingstyle.com/wp-content/uploads/2025/06/a4685a26-03d6-4438-9c85-90c5c75ccb7e.webp)
Looking for a fresh and tasty side dish? Cilantro Lime Cauliflower Rice is your answer! This dish is light, flavorful,

Greek Chicken Souvlaki Skewers are a tasty grilled delight you can’t miss! This simple recipe brings the smoky flavor of

Are you ready to whip up a healthy breakfast that packs a flavor punch? My Veggie Packed Egg Muffins are
. In this post, we covered how to make a delicious Strawberry Spinach Goat Cheese Salad. We explored fresh ingredients and pantry essentials, plus how to mix and dress the salad. I shared tips for perfecting your dish and offered variations to fit your taste. This salad is simple, fresh, and satisfying. You can enjoy it any time of year. Plus, you can adjust it to meet your needs. With the right storage, leftovers stay tasty too. Enjoy creating this tasty meal!](https://homecookingstyle.com/wp-content/uploads/2025/06/5221613e-ae86-40a1-aa57-7f7bac32f2fd.webp)
Looking for a fresh, tasty salad that wakes up your taste buds? You’re in the right place! Our Savory Strawberry
![To make No Bake Almond Joy Bars, you need simple and tasty ingredients. Here’s what you'll need: - 1 cup almond flour - 1 cup shredded unsweetened coconut - 1/2 cup creamy almond butter - 1/4 cup maple syrup - 1 teaspoon vanilla extract - 1/2 teaspoon sea salt - 1 cup dark chocolate chips - 1/4 cup whole almonds These ingredients come together to create a delightful treat. Almond flour gives the bars a nice texture. The shredded coconut adds a sweet, chewy bite. Creamy almond butter binds everything and brings flavor. Maple syrup sweetens the mix naturally. Vanilla extract enhances the taste, while sea salt balances the sweetness. Dark chocolate chips top the bars, creating a rich layer. Whole almonds add crunch and a nutty flavor. This combination forms a delicious snack that is easy to make. You can find the complete recipe in the Full Recipe section. Enjoy mixing these ingredients for a fun kitchen experience! Start by gathering all your dry ingredients. In a large mixing bowl, combine: - 1 cup almond flour - 1 cup shredded unsweetened coconut - 1/2 cup creamy almond butter - 1/4 cup maple syrup - 1 teaspoon vanilla extract - 1/2 teaspoon sea salt Mix them together. You want to form a sticky dough. This dough will be the base of your bars. Once mixed, line an 8x8 inch baking dish with parchment paper. Make sure you leave some paper hanging over the sides for easy removal later. Press the dough evenly into the bottom of the dish. This step is key for a firm base. Next, it's time for the chocolate layer. In a small microwave-safe bowl, melt the dark chocolate chips. Do this in 20-second intervals. Stir after each interval until the chocolate is smooth. When it's ready, pour the melted chocolate over the pressed base. Use a spatula to spread it evenly. This layer makes the bars rich and sweet. Now we need to finish the bars. Gently press whole almonds into the chocolate layer. Spread them out evenly. This adds a nice crunch and looks great. Now, refrigerate the bars for at least 2 hours. This allows the chocolate to harden and the bars to set. Once set, lift the bars out using the parchment paper. Cut them into squares or rectangles for serving. You now have delicious No Bake Almond Joy Bars! Check out the Full Recipe for more details. To make these bars even better, try different nut butters. Cashew or peanut butter can add a new twist. Also, consider using homemade chocolate. It gives a richer taste and adds a personal touch. One common mistake is not chilling the bars long enough. This step is key for a good set. If they are too soft, they won't hold their shape. Another mistake is over-mixing the dough. Mix just until combined to keep it from being tough. When serving the bars, arrange them on a nice platter. You can sprinkle extra shredded coconut on top for a pretty look. For drinks, pair them with almond milk or a hot cup of coffee. These options enhance the flavor and make for a delightful treat. {{image_2}} You can easily switch up the ingredients in No Bake Almond Joy Bars. For a nut-free option, use sunbutter instead of almond butter. Sunbutter adds a rich, nutty flavor without any tree nuts. This works great for those with nut allergies. If you want a vegan version, choose vegan chocolate chips. Many brands offer dairy-free options that taste just as good. This small change keeps the bars plant-based and delicious. Do you want to adjust the sweetness? You can use honey or agave syrup instead of maple syrup. Both options add a nice touch of sweetness. If you prefer less sweetness, you can reduce the amount of chocolate. This makes the bars less rich while still tasty. For extra flavor, get creative with add-ins. You can mix in dried fruits like cranberries or raisins. They add a nice chewiness and a burst of sweetness. You can also try adding other nuts, like walnuts or pecans, for a crunchy texture. Finally, sprinkle a little sea salt on top before serving. It enhances the flavors and adds a nice contrast to the sweet chocolate. Enjoy these fun variations to make the bars your own! For the full recipe, check here: [Full Recipe]. To keep your No Bake Almond Joy Bars fresh, store them in an airtight container. Glass or plastic containers work well. You can also wrap each bar in parchment paper and place them in a bag. This helps keep the bars from sticking together. Make sure to store them in the fridge. This keeps the chocolate layer firm and the bars tasty. If you want to enjoy these bars later, freezing is a great option. Place the bars in a single layer on a tray. Freeze them for about 1 hour until they are solid. After that, you can stack them in a container or bag. To serve, remove a bar from the freezer and let it thaw in the fridge. This helps keep the texture smooth and yummy. In the fridge, your No Bake Almond Joy Bars can last about one week. If they start to smell off or look dry, it’s time to toss them. Always check for any signs of spoilage before eating. Fresh bars taste best, so enjoy them while they are still at their peak! No Bake Almond Joy Bars are made of simple, wholesome ingredients. Here’s what you need: - 1 cup almond flour - 1 cup shredded unsweetened coconut - 1/2 cup creamy almond butter - 1/4 cup maple syrup - 1 teaspoon vanilla extract - 1/2 teaspoon sea salt - 1 cup dark chocolate chips - 1/4 cup whole almonds These ingredients work together to create a tasty, chewy treat. The almond flour gives a nice base, while coconut adds texture and flavor. Almond butter brings creaminess, and maple syrup adds sweetness. Dark chocolate on top enriches every bite. Whole almonds add crunch and make the bars look pretty. Yes, you can make these bars ahead of time! They last well in the fridge. I suggest making them up to a week in advance. Simply store them in an airtight container. If you want to keep them longer, freeze them. They can last for a couple of months in the freezer. Just thaw them overnight in the fridge before serving. Yes, No Bake Almond Joy Bars are gluten-free! Each ingredient is naturally free from gluten. Almond flour is a great alternative to wheat flour. Shredded coconut, almond butter, and dark chocolate chips are also gluten-free. This makes the bars a perfect treat for anyone avoiding gluten in their diet. Enjoy them without worry! No Bake Almond Joy Bars are easy to make and fun to enjoy. We covered ingredients, step-by-step instructions, and tips for best results. You can use nut butters, change sweeteners, or add extra flavors. Storing the bars correctly helps keep them fresh. You can also freeze them for longer use. With just a little time, you can create a tasty treat that fits your needs. Enjoy these bars as a satisfying snack or dessert anytime!](https://homecookingstyle.com/wp-content/uploads/2025/06/26377292-b4a8-4365-9bef-3f82684a968e.webp)
Are you ready for a sweet treat that’s both easy and delicious? No Bake Almond Joy Bars are the perfect
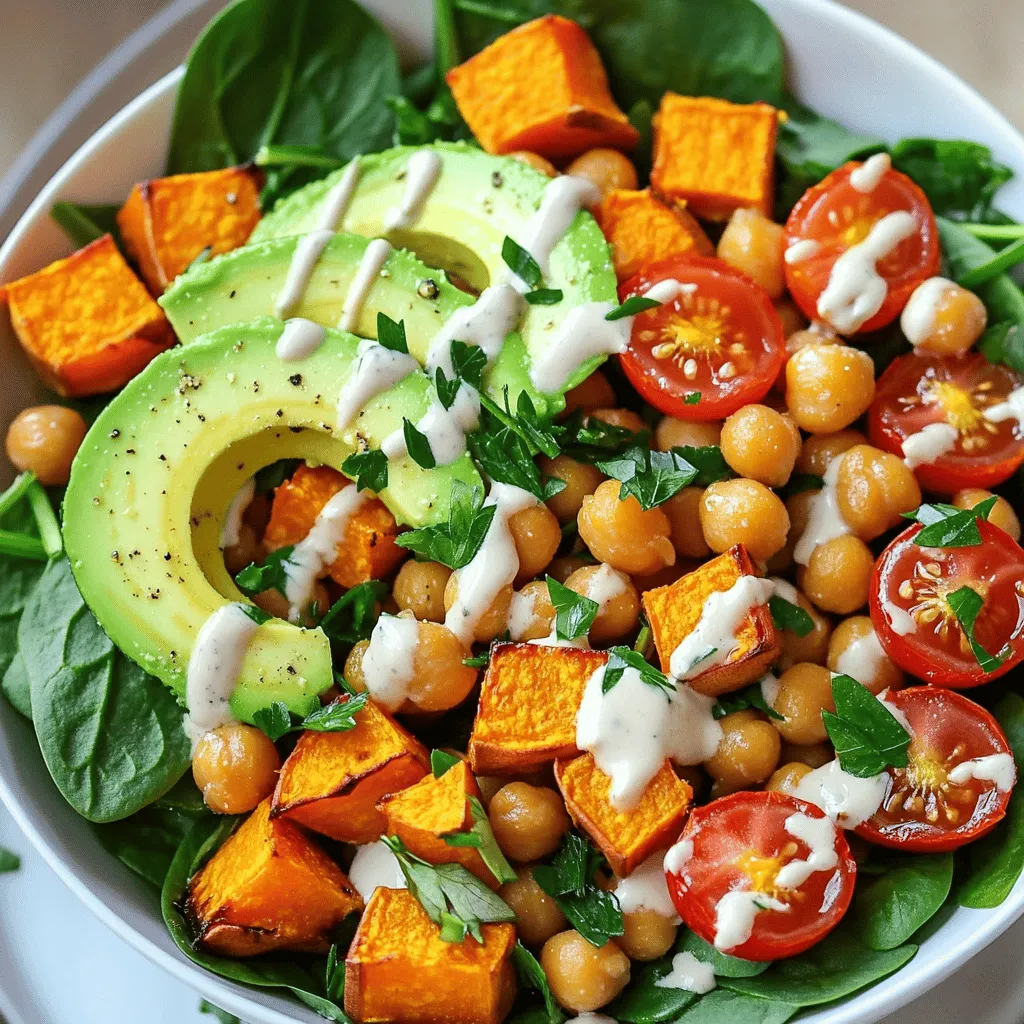
Looking for a quick and tasty meal? You’ve come to the right place! The Sweet Potato Chickpea Buddha Bowl combines
