Skip to content
DisclaimerTerms Of UseGDPR PolicyCookie Policy

Home Cooking Style

  • Home
  • Drinks
  • Appetizers
  • Dinner
  • Dessert
  • About
  • Contact
  • Privacy Policy
DisclaimerTerms Of UseGDPR PolicyCookie Policy

Amelia

- 2 cups cooked brown rice - 1 lb boneless, skinless chicken breast, diced - 1 tablespoon olive oil - 1 teaspoon chili powder - 1 teaspoon cumin - ½ teaspoon smoked paprika - Salt and pepper to taste - 1 can (15 oz) black beans, rinsed and drained - 1 cup corn kernels - 1 red bell pepper, diced - 1 cup cherry tomatoes, halved - 1 avocado, diced - ½ cup fresh cilantro, chopped - Juice of 1 lime - ½ cup shredded cheese These ingredients come together to create a tasty and colorful dish. The chicken breast gives protein and flavor, while the spices add a warm kick. I love the mix of beans and corn for a hearty base. Fresh veggies like bell pepper and tomatoes bring crunch and color. Don’t forget the avocado; it adds creaminess that ties everything together. Finally, the lime juice brightens up the bowl. Use this list to gather what you need. I recommend preparing everything before you start cooking. It makes the process smooth and fun. For the full recipe, check out the Fiesta Chicken Burrito Bowls. - Heat 1 tablespoon of olive oil in a skillet over medium heat. - Add 1 pound of diced chicken breast to the skillet. - Season the chicken with 1 teaspoon of chili powder, 1 teaspoon of cumin, ½ teaspoon of smoked paprika, salt, and pepper to taste. - Cook the chicken for 6-8 minutes, stirring often. It should turn golden brown and be fully cooked. - Once done, remove the chicken from heat and set it aside. - In a separate bowl, combine 1 can of black beans, 1 cup of corn, 1 diced red bell pepper, and 1 cup of halved cherry tomatoes. - Add ½ cup of chopped cilantro and juice from 1 lime to the mixture. - Stir well to combine all the ingredients. This mix adds freshness and flavor to your bowl. - Start with 2 cups of cooked brown rice as the base in your serving bowls. - Layer the cooked chicken on top of the brown rice. - Next, add the vegetable mixture you prepared. - Finish your bowl with 1 diced avocado and ½ cup of shredded cheese. - You can drizzle more lime juice on top if you like. This recipe makes the perfect Chicken Burrito Bowl. You can find the full recipe above to follow along! To cook chicken just right, start with diced pieces. This helps them cook evenly. Season the chicken well with chili powder, cumin, and smoked paprika. These spices give a punch of flavor. You can adjust the seasoning to your taste. If you like it spicy, add more chili powder. If you prefer mild, cut back on the spices. Always taste as you go. Layering makes your burrito bowl look appealing. Start with a base of brown rice. Add the chicken on top. Next, spoon the black bean and corn mix over the chicken. Top it off with diced avocado and shredded cheese. For a bright touch, garnish with fresh cilantro and a squeeze of lime juice. This adds color and freshness to your dish. Cooking is fun for everyone! Let the kids help with the assembly. They can layer their own bowls. This makes mealtime more exciting for them. You can also customize the bowls to fit picky eaters. Offer options like extra veggies or different proteins. Everyone can build their perfect burrito bowl. This way, everyone enjoys their meal. For the full recipe, check out the link provided. {{image_2}} You can easily make a vegetarian version of chicken burrito bowls. Try swapping chicken for tofu or tempeh. Both options absorb flavors well. This gives you a hearty, protein-rich meal. Add extra vegetables for more flavor and texture. Consider using zucchini, mushrooms, or spinach. These veggies boost nutrients and make your bowl colorful and fun. If you want a low-carb meal, replace brown rice with cauliflower rice. You can make cauliflower rice by grating fresh cauliflower or buying it pre-riced. It has a light texture and absorbs flavors nicely. For toppings, choose carb-friendly options. Try salsa, guacamole, or cheese. These add flavor without the extra carbs. You can also use leafy greens as a base for a fresh twist. To make your burrito bowls pop, try using different spices or sauces. Add smoked chipotle for a spicy kick or lime zest for brightness. These small changes can transform your dish. If you want to switch proteins, consider shrimp or beef. Both add unique flavors and pair well with the other ingredients. You can still follow the Full Recipe for guidance, but feel free to experiment and make it your own! To keep your chicken burrito bowls fresh, refrigerate them in airtight containers. Make sure the containers are clean and dry. If you have leftover components, like chicken or veggies, store them separately. This method helps maintain their flavors and textures. Cooked rice can also dry out, so store it tightly covered. For reheating chicken and rice, the best method is using a microwave. Place the chicken and rice in a microwave-safe bowl. Add a splash of water to keep it moist. Cover with a lid or a damp paper towel. Heat for 1-2 minutes or until hot. Stir halfway to ensure even heating. If you prefer the oven, preheat it to 350°F. Heat for about 15-20 minutes. Check often to avoid drying out the food. You can freeze individual portions of chicken burrito bowls. Use freezer-safe containers or bags for best results. Label each bag with the date. When ready to eat, thaw them overnight in the fridge. For quick thawing, place the bag in cold water. After thawing, reheat using the methods above. This way, your meal stays tasty and safe to eat. To make Chicken Burrito Bowls vegetarian, swap the chicken for tofu or tempeh. These protein-rich options work well in this dish. You can also add extra veggies for flavor. Use bell peppers, zucchini, or mushrooms to boost taste and texture. Another great option is to add lentils or chickpeas for added protein. To enhance flavor, consider adding spices like oregano or cayenne pepper. These spices can give your dish a kick. You can also drizzle hot sauce or salsa over the top for an extra layer of taste. Fresh herbs like cilantro or lime juice can brighten up the flavors too. Yes, you can prep Chicken Burrito Bowls in advance. Cook your chicken and rice, and store them separately. You can keep the components in airtight containers. This will help the ingredients stay fresh. When ready to eat, just assemble your bowl. It makes for a quick and easy meal during busy weeks. This recipe is highly customizable. For gluten-free options, use rice and check your beans for gluten. If you're dairy-free, simply skip the cheese or use a dairy-free alternative. You can also reduce sodium by using low-sodium beans and avoiding added salt. This way, everyone can enjoy their own tasty bowl! Feel free to explore the Full Recipe for more details on creating your perfect Chicken Burrito Bowl! Chicken burrito bowls are easy to make and fun to share. We covered all the essentials, from choosing the best ingredients to perfecting the cooking method. I shared tips for making these bowls family-friendly and how to customize them for dietary needs. Remember, you can switch up ingredients for different flavors. With a bit of prep, you can enjoy delicious bowls at home anytime. Get creative and make it your own!

Chicken Burrito Bowls Flavorful and Simple Recipe

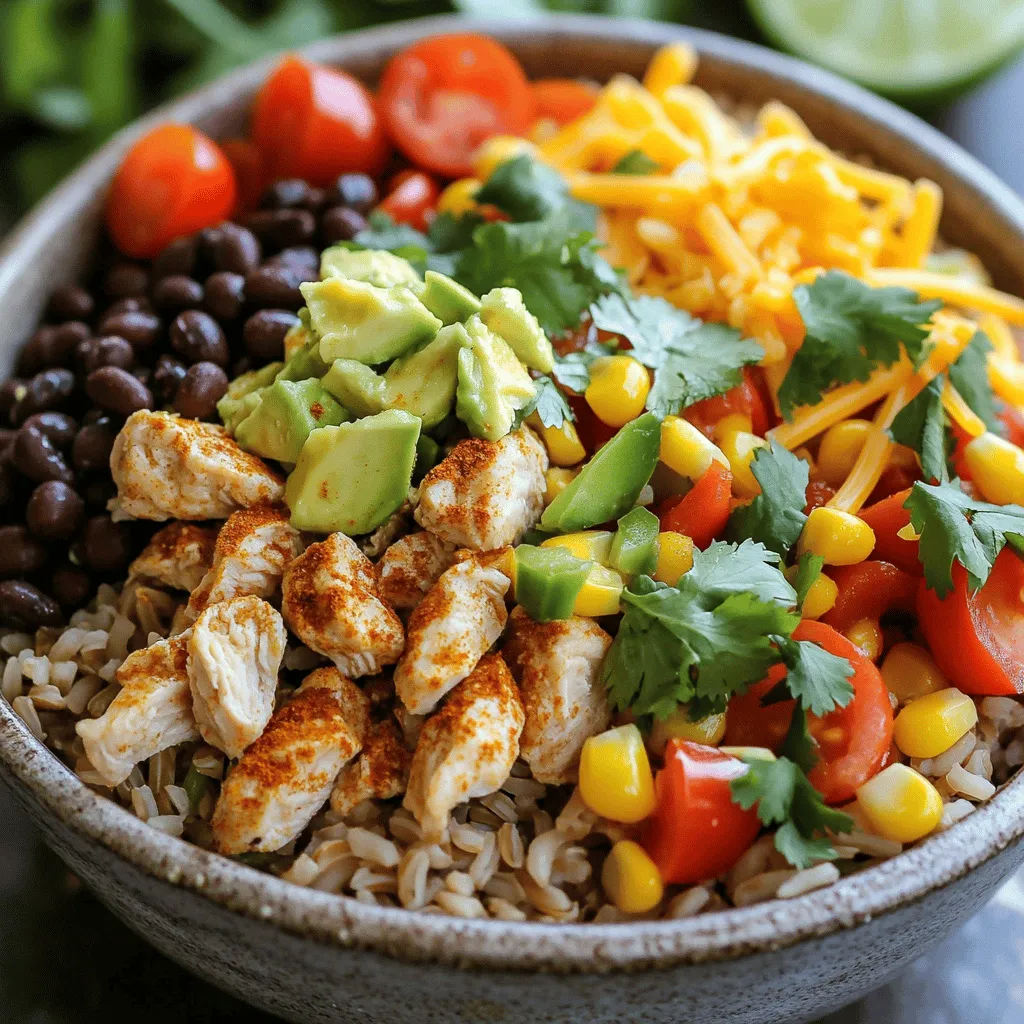
Are you ready to whip up a meal that’s both tasty and easy? Chicken Burrito Bowls are your answer! This

- 4 cups green cabbage, finely shredded - 1 cup purple cabbage, finely shredded - 1 cup carrots, grated - 1 cup red bell pepper, thinly sliced - 1/2 cup green onions, chopped - 1/4 cup fresh cilantro, chopped - 1/2 cup chopped peanuts or cashews - 1/4 cup sesame seeds - 1/4 cup rice vinegar - 2 tablespoons soy sauce (or tamari for gluten-free) - 1 tablespoon sesame oil - 1 tablespoon honey or agave syrup - 1 teaspoon grated ginger - 1 teaspoon garlic powder - Salt and pepper to taste To make the Crunchy Asian Slaw, gather all your fresh vegetables first. You want bright colors and crisp textures. The green and purple cabbages add crunch and a pop of color. Grated carrots bring sweetness, while red bell pepper adds a nice bite. Green onions and cilantro give it that fresh taste. Next, don't forget the crunchy add-ins. You need peanuts or cashews for texture. They will give your slaw a delightful crunch. Sesame seeds are a must as well; they add a nutty flavor. Now, let’s talk about the dressing. This is where the magic happens. Rice vinegar gives it tang, while soy sauce adds saltiness. Sesame oil brings a warm, rich taste. Honey or agave syrup balances the flavors with a touch of sweetness. Grated ginger and garlic powder add depth. Finally, season with salt and pepper to taste. Mixing all these elements creates a fresh and flavorful side dish. You will love how easy it is to make this dish from the [Full Recipe]. - Combine green cabbage, purple cabbage, grated carrots, red bell pepper, green onions, and cilantro. - Toss well to mix all the vegetables evenly. Start by shredding the cabbage into thin strips. Use a sharp knife or a food processor for speed. Next, grate the carrots or buy pre-grated ones to save time. Slice the red bell pepper into thin strips. Chop the green onions and cilantro finely. Mixing various colors makes the slaw eye-catching and tasty. - In a smaller bowl, whisk together rice vinegar, soy sauce, sesame oil, honey, grated ginger, and garlic powder. - Add salt and pepper to taste. For the dressing, grab a small bowl. Add rice vinegar, soy sauce, sesame oil, honey, grated ginger, and garlic powder. Whisk these together until they blend well. Taste and add salt and pepper to make it just right. This dressing brings a burst of flavor to your slaw. - Pour the dressing over the vegetable mixture and toss gently. - Let the slaw sit for 10-15 minutes before serving. Now, pour the dressing over your colorful vegetable mix. Toss gently so that every piece gets coated. Let the slaw sit for 10-15 minutes. This helps the flavors blend and softens the veggies slightly. For added crunch, top with chopped peanuts or cashews and sesame seeds. You can find the full recipe above to guide you through! To make your slaw prep easy, start with the cabbage. Use a sharp knife to slice the cabbage into quarters. Cut out the core first. Then, lay each quarter flat. Slice thin strips for a nice shred. For the carrots, use a box grater or a food processor. This saves time and gives even shreds. When chopping bell peppers, cut off the top and bottom first. Use a knife to slice down the side and open it up. Remove the seeds and white parts. Then, cut into thin strips. For onions, slice off the ends, peel the skin, and cut them in half. Lay each half flat and slice thinly for great texture. To add a punch to your slaw, try spices like chili flakes or crushed garlic. Fresh herbs like mint or basil can also brighten the dish. You can mix in a little sesame seed oil for depth. Remember, balance is key! Taste your dressing before pouring it on. Adjust with more vinegar or honey if needed. This keeps the flavors in harmony. You can change the crunch by adding more nuts or seeds. Peanuts or cashews give a nice bite, while sesame seeds add a delicate crunch. If you want more veggies, try adding radishes or jicama. These add extra crunch and a fresh taste. Just chop them finely to mix well into your slaw. Try these tips to make your Crunchy Asian Slaw shine. For the full recipe, check the link. {{image_2}} You can add protein to your slaw. Chicken, tofu, or shrimp work great. This makes it more filling. You can also try other veggies. Cucumber, snap peas, or radishes add nice crunch. Each of these choices brings new flavors. Feel free to mix and match! Want a little heat? Add sriracha or chili flakes for a spicy kick. It gives the slaw a whole new vibe. For a creamy version, you can mix in mayonnaise or yogurt. This will add a rich texture that some people love. Both options change the taste and feel of the dish. This recipe is easy to adapt. For a gluten-free option, use tamari instead of soy sauce. You can make it vegan by skipping honey and using agave syrup. If you have nut allergies, just leave out the peanuts or cashews. The slaw will still taste great without them. Enjoy customizing it to fit your needs! To keep your crunchy Asian slaw fresh, store it in the fridge. Use an airtight container. This will help keep the veggies crispy and the flavors bright. If you have extra dressing, store it separately. This way, your slaw won’t get soggy. When stored properly, your slaw lasts about three days in the fridge. After that, the veggies may start to lose their crunch. Signs that your slaw has spoiled include a sour smell or a slimy texture. If you see these signs, it’s best to toss it. You can freeze the crunchy slaw if you want to keep it longer. Start by placing it in a freezer bag. Remove as much air as you can before sealing. To thaw, place the bag in the fridge overnight. After thawing, you may want to add fresh dressing to revive the flavor. Crunchy Asian slaw is a fresh salad made with crisp vegetables. It often includes: - 4 cups green cabbage, finely shredded - 1 cup purple cabbage, finely shredded - 1 cup carrots, grated - 1 cup red bell pepper, thinly sliced - 1/2 cup green onions, chopped - 1/4 cup fresh cilantro, chopped - 1/2 cup chopped peanuts or cashews - 1/4 cup sesame seeds The flavor profile is bright and tangy. The rice vinegar and soy sauce add a nice zing. Yes, you can make this slaw a day ahead. For meal prep: - Mix the vegetables and store them in a container. - Keep the dressing separate to maintain crunch. - Combine before serving for the best texture. This slaw pairs well with many dishes. Consider serving it with: - Grilled chicken or fish - Asian-inspired tacos - Stir-fried noodles - BBQ pork or tofu These main dishes balance the slaw's flavors and textures. To tone down the tanginess, adjust the dressing. Try these tips: - Use less rice vinegar, about 2 tablespoons. - Add a bit more honey or agave syrup. - Increase the sesame oil slightly for richness. These changes will create a milder flavor that many enjoy. You can find the full recipe for this Crunchy Asian slaw to experiment further. In this post, we explored how to make Crunchy Asian Slaw. We tackled the ingredients, the step-by-step instructions, and helpful tips. You learned about flavor twists and dietary options to suit all needs. Remember, this slaw is not just a side; it's a vibrant dish full of taste and texture. With simple changes, you can make it your own. Enjoy your crunchy creation and feel free to share it with friends!

Crunchy Asian Slaw Fresh and Flavorful Side Dish

Looking for a fresh and vibrant side dish? Crunchy Asian Slaw is the answer! This slaw bursts with flavor and

For this dish, you will need the following key ingredients: - 2 large eggplants, sliced into ½-inch rounds - 1 cup all-purpose flour - 2 large eggs, beaten - 2 cups breadcrumbs (preferably Italian seasoned) - 3 cups marinara sauce - 2 cups shredded mozzarella cheese - 1 cup grated Parmesan cheese - 1 tablespoon Italian seasoning - 1 teaspoon garlic powder - Salt and pepper to taste - Fresh basil leaves for garnish These ingredients work together to create a dish that is both comforting and full of flavor. The eggplants serve as a hearty base, while the cheeses add rich creaminess. The marinara sauce brings a zesty touch. To enhance the dish further, consider adding: - Red pepper flakes for heat - Fresh herbs like oregano or thyme - A splash of balsamic vinegar for tanginess - Sliced mushrooms for an earthy taste These optional ingredients can elevate the flavor profile of your Eggplant Parmesan Bake, making it even more delightful. This dish packs a flavorful punch while providing essential nutrients. A typical serving offers: - Calories: 380 - Protein: 20g - Carbohydrates: 35g - Fat: 18g - Fiber: 5g Eggplants are low in calories and high in fiber. The cheese adds protein and calcium, making this dish a balanced option. Enjoying it as part of a meal can keep you satisfied and nourished. For the full recipe, including preparation and cooking steps, check out the [Full Recipe]. Start by slicing the eggplants into ½-inch rounds. Use a sharp knife for clean cuts. Next, sprinkle salt on both sides of the slices. This step helps draw out the moisture. Let the slices sit for about 30 minutes. Afterward, rinse them under cold water and pat them dry with paper towels. This process helps to remove any bitterness and excess water, making the eggplant ready for frying. Set up your breading station. Place the flour on one plate, beaten eggs in a bowl, and mix breadcrumbs with garlic powder and Italian seasoning on another plate. Dip each eggplant slice into the flour first, shaking off any excess. Then dip it in the beaten eggs, ensuring it is well-coated. Finally, coat the slice in the breadcrumb mix. Press down lightly to ensure a good layer sticks. This creates a crispy crust when cooked. Grab a 9x13-inch baking dish. Start by spreading a layer of marinara sauce on the bottom. This prevents the eggplant from sticking. Place half of the fried eggplant slices over the sauce. Then, sprinkle half of the mozzarella cheese on top, followed by a layer of Parmesan cheese. Repeat this process with another layer of marinara, eggplant, mozzarella, and Parmesan. Finish with the remaining marinara sauce, then top with a generous amount of mozzarella and Parmesan cheese. Preheat your oven to 375°F (190°C). Cover the dish with aluminum foil and bake for 25 minutes. After that, remove the foil and bake for an additional 15 minutes. You want the cheese to be bubbly and golden brown. Once done, let the dish rest for about 10 minutes. This helps the layers set and makes serving easier. Garnish with fresh basil leaves for a burst of flavor and color. For the full recipe, check the ingredients list above. To fry eggplant well, start by salting the slices. Salt pulls out water and makes the eggplant firm. Let the slices sit for 30 minutes, then rinse and dry them. This step helps reduce bitterness. Use a mix of flour, eggs, and seasoned breadcrumbs for coating. When frying, heat oil in a skillet until it shimmers. Fry in batches to avoid crowding. Golden brown means they are ready. Drain them on paper towels to keep them crisp. A good marinara sauce makes all the difference. You can use homemade or store-bought sauce. For homemade, cook down fresh tomatoes with garlic and herbs for great flavor. If you buy sauce, look for brands with no added sugar or artificial flavors. A chunky sauce adds texture to your dish. You can also add a pinch of red pepper flakes for a bit of heat. To melt cheese perfectly, use a mix of mozzarella and Parmesan. Mozzarella gives stretch, while Parmesan adds flavor. Grate the cheese fresh for the best melt. Layer the cheese evenly on top for even cooking. Cover the dish with foil for the first part of baking. This traps steam and helps melt the cheese well. Remove the foil for the last few minutes to brown the cheese nicely. Enjoy your Eggplant Parmesan Bake! Don't forget to check out the Full Recipe for more details. {{image_2}} To make a vegan version of the Eggplant Parmesan Bake, swap out dairy items. Use a plant-based cheese that melts well. Nutritional yeast can add a cheesy flavor. Replace eggs with a mix of ground flaxseed and water. This mix binds the breadcrumbs to the eggplant slices. The vegan option still tastes rich and satisfying. For a gluten-free Eggplant Parmesan Bake, use gluten-free breadcrumbs instead of regular ones. You can find these in most stores or make your own from gluten-free bread. Make sure your flour is also gluten-free. This way, you can enjoy the dish without worries about gluten. Want to add some protein? Layer cooked chicken or sausage into your Eggplant Parmesan Bake. Cook the meat before adding it to the layers. This addition makes the dish heartier and more filling. You can use shredded chicken or sliced sausage. Both options bring a new flavor to this classic dish. For the full recipe, check out the details above. After you enjoy your Eggplant Parmesan Bake, store leftovers in an airtight container. Let the dish cool to room temperature first. Then seal it tightly to keep moisture in and air out. You can keep it in the fridge for up to three days. To reheat your dish, use your oven for the best taste. Preheat your oven to 350°F (175°C). Place the leftovers in a baking dish and cover it with foil. Bake for about 20 minutes or until warmed through. This keeps the cheese melty and the eggplant soft. You can also use the microwave, but the oven gives better results. If you want to save some for later, freezing is a great option. First, let the dish cool completely. Cut it into portions for easier thawing. Wrap each piece tightly in plastic wrap and then in foil. Label each one with the date. You can freeze it for up to three months. When ready to eat, thaw it in the fridge overnight, then reheat as mentioned above. For the best flavor, enjoy it fresh! Try this [Full Recipe] for more tips. Yes, you can use other veggies. Zucchini, mushrooms, or bell peppers work well. Slice them like eggplant. Each veggie adds its own taste and texture. Just be sure to adjust cooking times. For softer options like zucchini, cook them less to keep a nice bite. You will know the eggplant is cooked when it is soft and tender. It should be golden on the outside and easy to pierce with a fork. If the eggplant looks brown and crispy, it is usually cooked well. Just make sure it is not burnt! Eggplant Parmesan Bake pairs great with many sides. A simple green salad adds freshness. Garlic bread is a classic choice, too. You might also like to serve it with pasta or rice for a hearty meal. Each side brings something special to the table. For the full recipe, check out the details above. Eggplant Parmesan Bake combines simple ingredients and easy steps. We covered all the main components for this tasty dish. I shared tips for perfect eggplant and great sauce choices. Remember, you can mix it up to fit your needs, like making it vegan or gluten-free. Enjoy this dish fresh or stored for later. Cook with confidence and have fun! You’ll impress guests and family alike with your skills. Let's make Eggplant Parmesan Bake a treat you love to share.

Eggplant Parmesan Bake Flavorful and Comforting Dish

If you love cozy, tasty dishes, you’ll adore this Eggplant Parmesan Bake. This dish combines rich flavors with easy steps,

- 1 can (15 oz) chickpeas, drained and rinsed - 1 large roasted red pepper, jarred or homemade - 3 tablespoons tahini - 2 tablespoons olive oil - 2 tablespoons lemon juice - 1 garlic clove, minced - 1 teaspoon ground cumin - Salt to taste - 2-3 tablespoons water, as needed for consistency To make roasted red pepper hummus, you need a few key ingredients. Chickpeas are the base of this dish. They add creaminess and protein. The roasted red pepper gives it a sweet and smoky flavor. Tahini adds richness and a nutty taste. Olive oil brings a smooth texture, while lemon juice adds brightness. Garlic gives a nice kick, and cumin adds warmth. Adding salt enhances the flavors. - Paprika - Fresh parsley Adding a sprinkle of paprika gives the hummus a pop of color. Fresh parsley adds a nice touch and a hint of freshness. These garnishes make your hummus look beautiful on the table. - Food processor - Serving bowl You will need a food processor to blend the hummus until it's smooth. A serving bowl helps present the hummus nicely. Having these tools makes the process easy and fun. For the full recipe, check out the instructions and enjoy making your own hummus at home! To start, you need to drain and rinse your chickpeas. This step removes some salt and keeps your hummus fresh. Open the can, pour it into a strainer, and rinse under cold water. If you prefer homemade roasted red peppers, you can roast them in your oven. Set your oven to 450°F (230°C). Place whole peppers on a baking sheet and roast for about 20 minutes. Turn them halfway through. They are done when the skin is blackened. After roasting, let them cool. Then, peel off the skin and remove the seeds. Now it’s time to blend! In a food processor, add the drained chickpeas, roasted red pepper, tahini, olive oil, lemon juice, minced garlic, ground cumin, and salt. Blend on high until the mixture is smooth. If the hummus is too thick, add 2 to 3 tablespoons of cold water. Blend after each tablespoon until you reach your desired creaminess. Taste the hummus. Adjust with more salt or lemon juice if needed. Once blended, transfer the hummus to a serving bowl. Use the back of a spoon to make a small well in the center. Drizzle a bit of olive oil into this well. Top with a sprinkle of paprika and chopped fresh parsley for color and taste. Serve your hummus with pita bread, fresh veggies, or crunchy crackers. You can find the full recipe above! Enjoy your tasty and healthy snack. To make your hummus pop, add spices. A little smoked paprika or cayenne gives warmth. You can also try adding a pinch of black pepper or a squeeze of lemon. Each spice changes the flavor a bit. For the right texture, blend until smooth. If it feels too thick, add water slowly. Start with one tablespoon and mix again. Keep adding until it’s creamy but not runny. Store hummus in an airtight container. This keeps it fresh and tasty. If you add a layer of olive oil on top, it helps too. Always label your container with the date. Homemade hummus lasts about five days in the fridge. To keep it fresh longer, divide it into smaller portions. This way, you only open what you need. Freezing works too! Just thaw it in the fridge before using. Hummus pairs well with pita bread, fresh veggies, or crunchy crackers. Cut carrots, cucumbers, and bell peppers for dippers. You can also spread it on sandwiches or wraps for added flavor. For gatherings, serve hummus in a bowl with a drizzle of olive oil. Add some paprika and fresh parsley on top. Use a fun platter with colorful dippers for a festive touch. For the full recipe, check out the Roasted Red Pepper Hummus Delight 🥙. Enjoy! {{image_2}} You can make roasted red pepper hummus even more exciting with flavors. - Spicy Roasted Red Pepper Hummus: Add a pinch of cayenne pepper. This brings heat and depth. You can also mix in some diced jalapeños for extra kick. - Garlic and Herb Variations: Try adding fresh herbs. Basil or cilantro work well. You can also increase the garlic for a bold taste. Some people have special dietary needs. You can easily adjust this recipe. - Making Hummus Nut-Free: This recipe is already nut-free. So, you can enjoy it without worry. Just make sure your tahini is made from sesame seeds only. - Vegan Considerations: This hummus is vegan as is. You can feel good sharing it with everyone, no matter their diet. You don’t have to only use chickpeas for hummus. - Alternatives to Chickpeas: White beans create a smooth and tasty hummus. You can also use lentils for a twist. Each option brings a new flavor. - Incorporating Different Roasted Vegetables: Try adding roasted carrots or beets. These veggies add sweetness and color. Mixing in different roasted vegetables will keep your hummus fresh and fun. Check out the Full Recipe to get started on these tasty variations! Each serving of roasted red pepper hummus has about 120 calories. This tasty dip packs essential nutrients. Here’s a quick look at the macronutrients: - Protein: 4 grams - Fat: 7 grams - Carbohydrates: 11 grams These numbers show that hummus provides a good balance of protein, fats, and carbs. Chickpeas are the main star in this dish. They are high in protein and fiber. This helps you feel full and supports gut health. They also help lower cholesterol. Tahini, made from sesame seeds, adds healthy fats to hummus. It also brings a rich, nutty flavor. Olive oil is another great fat source. It contains antioxidants and can help reduce inflammation. Roasted red pepper hummus is both gluten-free and vegan-friendly. This makes it a great snack for many diets. If you're watching carbs, hummus can fit in your meal plan. Just enjoy it in moderation. You can find the Full Recipe to make this nutritious dip at home. To make your hummus creamy, start with smooth ingredients. Use a high-quality food processor. This helps blend the chickpeas and peppers well. Here are some tips for a smooth texture: - Add water slowly: If your hummus is thick, add cold water one tablespoon at a time. - Use room temperature ingredients: Chill can make it harder to blend. - Blend longer: Give your food processor time to work. Blend until you see a creamy mix. These steps will help you achieve a dreamy, creamy hummus. You can find roasted red pepper hummus in many stores. Look in the deli or refrigerated section. Here are some recommended brands: - Sabra: A popular choice with a great flavor. - Hope Foods: Known for using fresh ingredients. - Trader Joe's: Their hummus has a nice taste and price. Check your local grocery store or health food store for these brands. Homemade hummus can last up to a week in the fridge. Store it in a sealed container. Here are signs your hummus has gone bad: - Change in smell: If it smells sour, toss it. - Change in color: If it looks brown or dull, it’s time to say goodbye. - Texture change: If it separates or gets too watery, it may not be safe. Keep an eye on your hummus to enjoy it fresh! Making hummus is simple and fun. We explored essential ingredients like chickpeas, tahini, and olive oil. You learned how to blend everything smoothly in a food processor. Also, I shared tips on storing and serving it with dippers. Remember, variations can change the flavor, making it your own. Whether adding spices or using other beans, the choices are endless. Enjoy making delicious hummus that suits your taste and keeps you healthy.

Roasted Red Pepper Hummus Flavorful and Easy Recipe

Are you ready to elevate your snack game? This Roasted Red Pepper Hummus recipe is both flavorful and easy to

To make a tasty chicken gyro bowl, gather these items: - 2 cups cooked rice or quinoa - 2 chicken breasts, grilled and sliced - 1 medium cucumber, diced - 1 large tomato, diced - 1/2 red onion, thinly sliced - 1 cup mixed greens (e.g., lettuce, spinach) - 1/2 cup tzatziki sauce - 1 tablespoon olive oil - 1 teaspoon dried oregano - Salt and pepper to taste - Fresh parsley or dill for garnish (optional) You will need some basic items from your pantry: - Olive oil: This adds flavor and helps cook the chicken. - Dried oregano: This herb gives the chicken a nice taste. - Salt and pepper: These make your dish taste better. Fresh ingredients make this bowl special: - Chicken breasts: Use fresh ones for the best flavor. - Vegetables: Choose ripe tomatoes and crunchy cucumbers. - Greens: Fresh lettuce or spinach adds color and crunch. Now you have everything you need for a delicious chicken gyro bowl. Enjoy cooking! First, cook your rice or quinoa. Follow the package instructions to make it right. Once done, fluff it with a fork and set it aside. This will be the base of your gyro bowl. A warm, fluffy base makes everything taste better. Now, let’s get to the chicken. Season your chicken breasts with olive oil, oregano, salt, and pepper. This step adds great flavor. Heat your grill or pan to medium-high. Cook each side for about 6-7 minutes. You want the juices to run clear. Once cooked, let the chicken rest for a few minutes. This helps keep it juicy. After resting, slice it into strips. Now for the fun part—assembling your bowl! Start with your base of rice or quinoa in a bowl. Next, add the sliced grilled chicken on top. Then, layer in the diced cucumber, tomatoes, and sliced red onion. Top it off with a handful of mixed greens. Finally, drizzle tzatziki sauce over everything. For a fresh touch, sprinkle parsley or dill on top. Enjoy your easy chicken gyro bowl now! If you want the full recipe, check out the detailed steps above. To get juicy chicken, start with good seasoning. I recommend using olive oil, oregano, salt, and pepper. This mix adds great flavor. Grill or pan-sear on medium-high heat. Cook for about 6-7 minutes per side. The chicken is done when the juices run clear. Let it rest for a few minutes before slicing. This keeps it tender. For a complete meal, serve the chicken gyro bowl with grilled pita bread. You can also add feta cheese for extra taste. Pair it with a light salad or some roasted veggies. The fresh flavors of cucumber and tomato enhance the dish nicely. If you want some heat, add sliced jalapeños or a sprinkle of chili flakes. Having the right tools makes cooking easier. Use a good chef's knife for cutting veggies and chicken. A cutting board is key for prep work. A grill pan or outdoor grill works best for chicken. Don't forget a mixing bowl for your tzatziki sauce. A set of measuring spoons and cups will help you get the right amounts. These tools make cooking fun and simple! {{image_2}} You can make this gyro bowl meat-free. Use grilled halloumi cheese or marinated tofu instead of chicken. Both options provide a nice texture. You can also add chickpeas for protein. They add a great crunch and flavor. Use your favorite veggies, like bell peppers or zucchini. Top with tzatziki to keep the classic taste. To make this dish gluten-free, simply skip any gluten-filled items. Use rice or quinoa as your base. Most tzatziki sauces are gluten-free, but check the label. For the veggies, all fresh options like cucumber and tomato are safe. You can even swap in gluten-free pita chips for crunch. To add more flavor, try different spices. A touch of smoked paprika or cumin gives a nice twist. You can also mix in fresh herbs like mint or cilantro for brightness. If you like heat, add sliced jalapeños or a dash of hot sauce. Experimenting can make your gyro bowl unique and exciting. For the full recipe, check out the Easy Chicken Gyro Bowl. To keep your chicken gyro bowl fresh, store it in an airtight container. Make sure it cools down before sealing. Leftovers last up to three days in the fridge. For the best taste, separate the chicken, veggies, and sauce. This way, each ingredient stays fresh and flavorful. When you're ready to eat, reheat your chicken gyro bowl in the microwave. Heat it for 1-2 minutes on medium power. Check that the chicken is warm throughout. You can also reheat it in a skillet over low heat. This keeps the chicken juicy and the veggies crisp. If you want to save your gyro bowl for later, you can freeze it. Store the chicken and rice or quinoa together in a freezer-safe bag. Avoid freezing the fresh veggies and sauce, as they don't freeze well. Your frozen chicken gyro bowl can last up to three months. When you're ready to eat, thaw it in the fridge overnight before reheating. Enjoy your meal anytime! If you don’t have tzatziki sauce, try plain yogurt mixed with herbs. You can add garlic, lemon juice, and cucumber for a similar taste. Hummus is also a great option. It adds creaminess and pairs well with chicken. You can even use a yogurt-based ranch dressing for a twist! Yes, you can grill or pan-sear the chicken ahead of time. Just cook it fully, slice it, and store it in the fridge. It stays fresh for about three days. Reheat the chicken before adding it to your bowl. This saves time for busy days! To make this chicken gyro bowl healthier, use brown rice or quinoa as a base. Add more veggies like bell peppers or spinach for extra nutrients. You can also reduce the amount of tzatziki sauce or use a low-fat version. This keeps the flavor while cutting down on calories! A chicken gyro bowl goes well with a fresh Greek salad or roasted veggies. You can also serve pita bread on the side. For a light dessert, try yogurt with honey and nuts. These options balance flavors and make a complete meal! For the full recipe, check out the Easy Chicken Gyro Bowl section. This blog post has covered everything you need for a chicken gyro bowl. We explored the key ingredients, from pantry staples to fresh items. I shared step-by-step instructions and cooking tips to help you grill chicken like a pro. We also discussed fun variations and storage tips. In closing, enjoy creating your own gyro bowl. Discover your favorite flavors and customize it. Cooking can be a fun and rewarding experience. Dive in and enjoy your meal!

Easy Chicken Gyro Bowl Flavorful and Quick Recipe

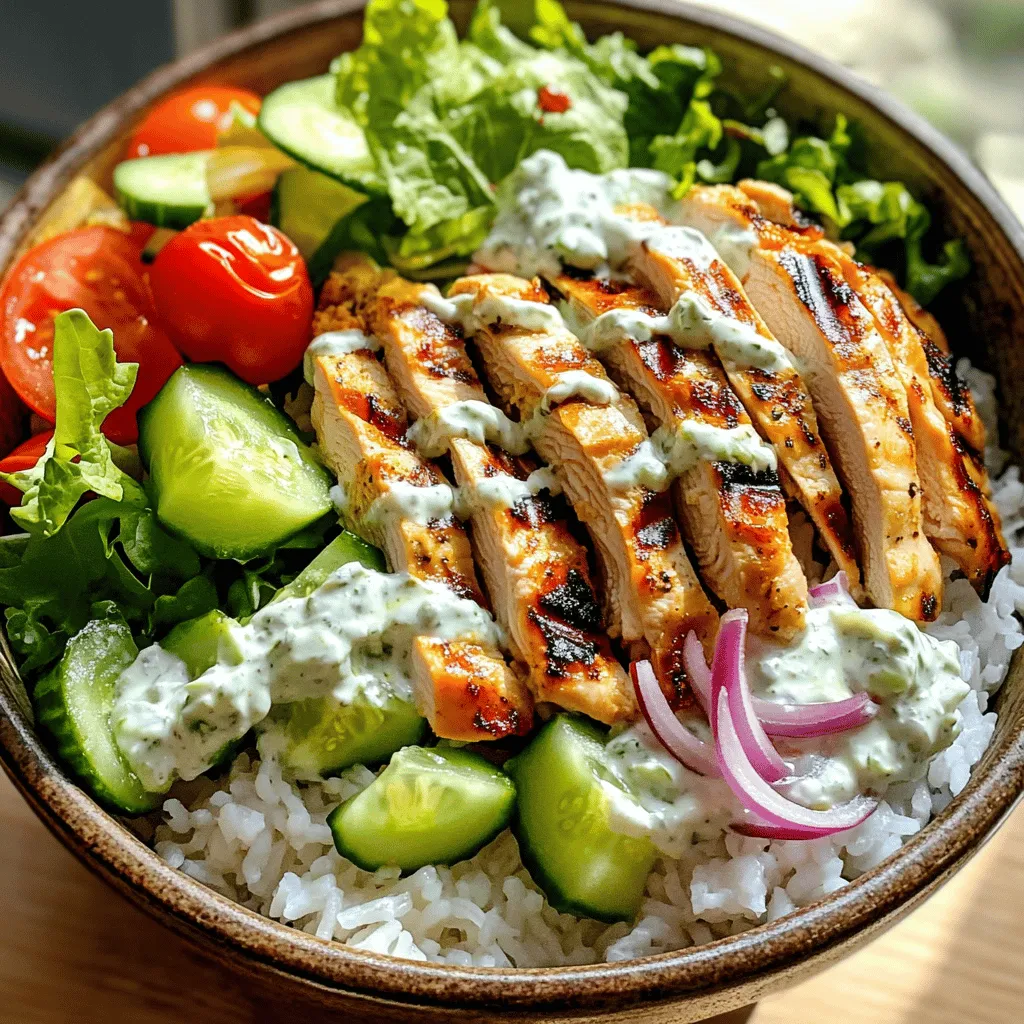
Are you ready to dive into a delicious meal that’s quick and easy? My Easy Chicken Gyro Bowl is the

- 1 large whole wheat tortilla - 1/2 cup black beans, rinsed and drained - 1 small bell pepper, diced (any color) - 1/4 cup red onion, finely chopped - 1 cup fresh spinach - 2 eggs, beaten The large whole wheat tortilla serves as the base. It gives you fiber and helps keep you full. Black beans add protein and a nice texture. Rinse them well to remove excess sodium. The fresh veggies, like bell pepper, red onion, and spinach, bring color and nutrients to your meal. Diced bell pepper adds crispness, while red onion gives a hint of sweetness. Spinach packs a nutrient punch and cooks quickly. - 1/4 teaspoon cumin - 1/4 teaspoon smoked paprika - Salt and pepper to taste - 1/4 avocado, sliced (optional) - Fresh cilantro for garnish (optional) - Salsa (optional, for serving) Cumin and smoked paprika enhance the flavor of your burrito. They add warmth and depth that make each bite delightful. Adjust the salt and pepper to suit your taste. Avocado adds creaminess and healthy fats. Fresh cilantro brightens the dish, while salsa adds a spicy kick if you like heat. Each ingredient in the burrito brings health benefits. Whole wheat tortillas provide fiber, which aids digestion. Black beans are high in protein and iron. Bell peppers are rich in vitamins A and C. Red onions have antioxidants, and spinach is low in calories but high in nutrients. Eating a healthy breakfast like this burrito fuels your body. It gives you energy for the day ahead. Skipping breakfast can lead to cravings later. Enjoying this burrito helps you stay satisfied and focused. For the full recipe, check out the details above for the perfect start to your day! - Sautéing vegetables in the skillet: Heat a non-stick skillet over medium heat. Add a splash of olive oil. Toss in the diced bell pepper and red onion. Cook them for about 3-4 minutes until soft. Next, add the corn and spinach. Stir until the spinach wilts, which takes about 1-2 minutes. - Incorporating the eggs: Push the veggie mix to one side of the skillet. Pour the beaten eggs into the empty space. Season with cumin, smoked paprika, salt, and pepper. Scramble the eggs until they are fully cooked. Mix them together with the veggies in the skillet. - Preparing the tortilla: In another skillet, warm the whole wheat tortilla for about 20 seconds on each side. This makes it soft and easy to roll. - Layering ingredients on the tortilla: Place the warmed tortilla flat on a clean surface. In the center, layer the black beans, followed by the veggie and egg mix. Top it off with slices of avocado. - Folding techniques for the perfect roll: Fold the sides of the tortilla inward, then roll it up from the bottom. Tuck in the filling as you go to keep everything inside. - Optional steps for toasting: Place the burrito seam-side down in the skillet. For extra crispiness, toast it for 1-2 minutes on each side. This adds a nice crunch. - Best serving practices: Slice the burrito in half before serving. Garnish with fresh cilantro and serve with salsa if you like. Enjoy your Healthy Veggie Breakfast Burrito packed with flavor! For the full recipe, check out the details above. To get the best scrambled eggs, beat them well before cooking. This adds air and makes them fluffy. Cook them over medium heat. Stir gently to keep them soft. Remove them from the heat just before they finish cooking. They will continue to cook from the residual heat. For sautéing veggies, use a non-stick skillet. Start with a little olive oil. Heat it over medium heat. Add diced bell peppers and red onion. Cook until soft, about 3-4 minutes. Then add corn and spinach. Stir often to avoid burning. Cook until the spinach wilts, about 1-2 minutes. This keeps the veggies bright and fresh. Make ahead by prepping the veggies and beans. You can store them in the fridge for up to three days. Just make sure to keep them in an airtight container. This saves time on busy mornings. For reheating, heat the burrito in a skillet. This keeps it crispy. You can also use the microwave. Just cover it with a damp paper towel to keep it moist. Heat for about 30 seconds, then check if it's warm. Pair your burrito with sides for a full meal. Fresh fruit or yogurt works great. You can also serve it with a small salad. This adds color and nutrients. For a complete breakfast spread, think about adding a smoothie or a drink. A green smoothie or fresh juice pairs well. You can also add a small bowl of salsa for dipping. These ideas make your meal fun and filling. For the full recipe, check out the Healthy Veggie Breakfast Burrito. {{image_2}} You can swap in many vegetables for your burrito. Try zucchini, mushrooms, or kale. These options add flavor and texture. Seasonal swaps work great too. In spring, add asparagus or peas. In winter, use roasted root veggies like sweet potatoes or carrots. This keeps your breakfast fresh and exciting. Want a protein boost? Try adding tofu or tempeh. Both are excellent sources of plant protein. Just sauté them with your veggies for a hearty meal. You can also use vegetarian sausage. Many brands offer tasty options that fit perfectly in your burrito. Choose what you love best! Feel free to get creative with spices. Add chili powder, garlic powder, or even a dash of turmeric. Fresh herbs like cilantro or parsley enhance the flavors, too. For a spicy kick, drizzle your burrito with hot sauce or sriracha. These simple tweaks turn your breakfast burrito into a flavorful feast. For the full recipe, check out the Healthy Veggie Breakfast Burrito 🥑. To keep your burritos fresh, wrap them tightly in foil or plastic wrap. You can also place them in an airtight container. This method helps to prevent drying out. Store them in the fridge for up to 3 days. If you want to keep them longer, freeze them for up to 3 months. Thaw frozen burritos in the fridge before reheating. When it’s time to enjoy your burrito, you have two great options. The microwave is quick and easy. Wrap the burrito in a damp paper towel. Heat for 1-2 minutes, checking to ensure it’s warm throughout. For a crispier texture, use a skillet. Heat on medium for about 3-4 minutes on each side. This method keeps the tortilla from getting soggy. Batch cooking is a smart way to start your day. Use glass or plastic containers with lids for easy storage. Portion out the burritos for quick access. You can make several at once and freeze them for busy mornings. Just grab one, reheat, and you’re ready to go! This prep makes healthy eating simple and fun. For the full recipe, refer to the Healthy Veggie Breakfast Burrito section. Yes, you can easily make this burrito vegan! For the eggs, use firm tofu. Crumble the tofu and sauté it in the skillet like scrambled eggs. To replace dairy, skip the avocado or use a dairy-free alternative like cashew cream. Nutritional yeast adds a cheesy flavor without dairy. To make this burrito gluten-free, choose corn tortillas or gluten-free wraps. You can find these options in most grocery stores. Always check the label to ensure they are certified gluten-free. This way, you can enjoy a tasty breakfast without worrying about gluten. Pair your burrito with fresh fruit like berries or sliced oranges. A simple green salad with lemon dressing also works well. Greek yogurt or a small bowl of salsa adds a nice touch, too. These sides are quick to prepare and healthy! You've learned how to make a healthy veggie breakfast burrito from scratch. We covered key ingredients, preparation steps, and tips for the perfect texture and flavor. Don't forget the nutritional benefits of a wholesome breakfast. With numerous variations, you can customize this dish to fit your taste. Whether you meal prep or serve fresh, you now have all the tools to enjoy a delicious start to your day. Embrace creativity in your kitchen, and make breakfast exciting!

Healthy Veggie Breakfast Burrito Packed with Flavor

Are you ready to kickstart your day with a burst of flavor? This Healthy Veggie Breakfast Burrito is not just

- 1 can chickpeas - 1/2 cup vegan BBQ sauce - 4 whole-grain burger buns - 1 tablespoon olive oil - 1 small red onion, finely chopped - 2 garlic cloves, minced - 1 teaspoon smoked paprika - 1/2 teaspoon cumin - Salt and pepper to taste - 1 avocado, sliced - Fresh cilantro for garnish The base of this dish is simple and easy. Chickpeas are the star. They bring protein and a great texture. For a burst of flavor, we use vegan BBQ sauce. It adds sweetness and tang. Whole-grain burger buns help you enjoy everything together. - Each serving has around 400 calories. - You get about 15 grams of protein. - Fiber content is around 10 grams. These numbers make this sandwich a great choice. It's filling, healthy, and keeps you satisfied. The mix of protein and fiber helps keep your energy up. You will love how tasty and nutritious this meal can be. If you want to know how to make it, check the Full Recipe for all steps. - Heat 1 tablespoon of olive oil in a skillet over medium heat. - Add 1 small finely chopped red onion and 2 minced garlic cloves. Sauté for about 3-4 minutes until the onion turns soft and clear. - Drain and rinse 1 can of chickpeas. Add them to the skillet. - Use a fork or potato masher to mash the chickpeas slightly. Leave some whole for texture. - Stir in 1 teaspoon of smoked paprika, 1/2 teaspoon of cumin, and salt and pepper to taste. Cook for 3 more minutes. - Pour in 1/2 cup of vegan BBQ sauce. Mix well and let it simmer for 5 minutes to heat through and thicken. - Toast 4 whole-grain burger buns until they are golden. - To assemble, scoop the BBQ chickpea mix onto the bottom half of each bun. - Top with sliced avocado and fresh cilantro. Place the top bun on and serve right away. For the complete recipe, check out the Full Recipe section. - Optimal chickpea consistency: You want your chickpeas to be slightly mashed. Leave some whole for texture. This adds creaminess and a nice bite. - Adjusting spice levels: Taste the mixture as you cook. If you like it spicy, add more smoked paprika or a pinch of cayenne pepper. If you prefer it milder, cut the spices by half. - Side dish suggestions: Serve your sandwiches with sweet potato fries or a fresh coleslaw. These sides add color and flavor. They make the meal feel complete. - Garnishing ideas: Top your sandwiches with sliced avocado and fresh cilantro. You can also add pickles for a tangy kick. Wrapping the sandwiches in parchment paper adds a nice touch for picnics. - What to do if the mixture is too dry: If your chickpea mixture feels dry, add a splash of BBQ sauce or a bit of water. This will help it stick together and enhance flavor. - Ways to enhance flavor: If you want a bolder taste, squeeze in some lemon juice or add a dash of hot sauce. Both options will brighten the flavors and give your sandwiches a nice zing. For the complete recipe, check out the Full Recipe section. {{image_2}} You can change the bun type to fit your taste. Try using: - Lettuce leaves for a low-carb option - Gluten-free buns if you need them - Pita bread for a fun twist If you want to switch up the protein, consider these legumes: - Black beans for a different flavor - Lentils for a hearty meal - Kidney beans for added color Adding spices can make a big difference. Here are some ideas: - Chili powder for a kick - Italian herbs for a fresh touch - Curry powder for a unique twist You can also add vegetables to your chickpea mix. Some great options are: - Bell peppers for sweetness - Corn for crunch - Spinach for a pop of color If you have specific dietary needs, here are some options: - Use gluten-free buns to make it safe for everyone - Skip the avocado for a nut-free meal - Choose a BBQ sauce that fits your dietary limits These variations keep your Vegan BBQ Chickpea Sandwiches exciting and accessible. For the full recipe, check the earlier section. To keep your Vegan BBQ chickpea sandwiches fresh, store leftovers in the fridge. Place the chickpea mixture in an airtight container. Seal it well to keep out air. The chickpea mix will stay fresh for about 3 days. If you want to freeze it, scoop the mix into freezer bags. Remove as much air as you can before sealing. It can last in the freezer for up to 2 months. When you are ready to eat, reheat the chickpea mix on the stove. Use a medium heat to warm it up slowly. Stir it often to avoid burning. You can also microwave it in 30-second intervals. Just remember to cover it to keep moisture in. For the best taste and texture, toast the buns lightly before serving again. This helps keep the bread crisp. In the refrigerator, your BBQ chickpea mix lasts up to 3 days. If you freeze it, you can keep it for 2 months. Always check for any off-smells or changes in color before eating. This ensures you enjoy a safe and tasty meal. How do I know when the chickpeas are done? You can tell when the chickpeas are done by their texture. After mashing, they should feel slightly chunky. This gives the sandwich a nice bite. Cook them until heated through and the spices blend well. Can I make the mixture ahead of time? Yes, you can make the chickpea mixture ahead of time. Store it in an airtight container in the fridge. It stays fresh for three days. Just heat it up when you want to serve. Is the BBQ sauce truly vegan? Most store-bought BBQ sauces are vegan, but always check the label. Look for sauces without honey or animal products. There are plenty of tasty vegan options available! Can I use dried chickpeas instead of canned? Yes, you can use dried chickpeas. Just soak them overnight and cook until tender. This takes longer but can add more flavor to your dish. What can I serve with Vegan BBQ Chickpea Sandwiches? These sandwiches pair well with sweet potato fries or a fresh coleslaw. You can also serve them with a salad for a light meal. How can I make this recipe for a large group? To serve a large group, simply double or triple the recipe. Use larger pots and pans for cooking. You can also prepare the mixture a day before and reheat it when ready to serve. These Vegan BBQ Chickpea Sandwiches are simple and tasty. We covered the key ingredients, like chickpeas and BBQ sauce. Then I shared easy steps to prepare and assemble your sandwiches. You learned tips for the best flavor and texture, plus how to store leftovers. Don't forget the variations to make it your own! These tips will help you create a great meal every time. Enjoy your cooking journey with these delicious sandwiches!

Vegan BBQ Chickpea Sandwiches Easy and Tasty Meal

Looking for a quick, tasty meal? Try my Vegan BBQ Chickpea Sandwiches! Packed with flavor and protein, these sandwiches are

To make cheesy cauliflower breadsticks, gather the following simple ingredients: - 1 large cauliflower head, cut into florets - 1 cup shredded mozzarella cheese - 1/2 cup grated Parmesan cheese - 2 large eggs - 1 teaspoon garlic powder - 1 teaspoon Italian seasoning - Salt and pepper to taste - 1/2 cup marinara sauce (for dipping) These ingredients are easy to find at any grocery store. The cauliflower serves as a great base, making this snack low-carb and healthy. The cheeses add richness and flavor, while the eggs help bind everything together. Garlic powder and Italian seasoning bring a tasty kick, enhancing the overall taste. Don't forget the marinara sauce for dipping! For the full recipe, check out the detailed steps on how to prepare this delightful treat. 1. Preheat the oven and prepare the baking sheet Start by preheating your oven to 425°F (220°C). While the oven heats, line a baking sheet with parchment paper. This step helps the breadsticks not stick and makes cleanup easy. 2. Steam cauliflower florets until tender Next, take your cauliflower head and cut it into small florets. Steam these florets for about 10 minutes. You want them soft enough to mash easily. Once they are tender, drain them well and let them cool a bit. 1. Drain and dry cauliflower After cooling, place the steamed cauliflower in a clean kitchen towel. Twist the towel and squeeze out as much moisture as you can. This step is key! Too much water will make your breadsticks soggy. 2. Combine ingredients in a large bowl Now, put the drained cauliflower in a large bowl. Add the mozzarella cheese, Parmesan cheese, eggs, garlic powder, Italian seasoning, salt, and pepper. Mix everything well until it’s fully combined. You should have a thick, cheesy mixture. 1. Spread mixture on the baking sheet and bake With your mixture ready, spread it onto the prepared baking sheet. Shape it into a rectangle about half an inch thick. Bake in the oven for 25 to 30 minutes. Look for golden edges and a firm top. 2. Optional: adding extra cheese at the end For an extra cheesy treat, remove the breadsticks from the oven after the first bake. If you want, sprinkle more mozzarella cheese on top. Return to the oven for 5 more minutes until the cheese melts beautifully. Enjoy your cheesy cauliflower breadsticks fresh out of the oven! For the full recipe, check the earlier section. When making cheesy cauliflower breadsticks, choosing the right cauliflower is key. Look for a head that is firm and free of brown spots. Fresh cauliflower will give you the best taste and texture. Draining moisture thoroughly is also important. After steaming, let the cauliflower cool. Then, use a clean kitchen towel to squeeze out as much water as possible. This prevents soggy breadsticks. A dry mixture forms a better base for baking. For dipping, marinara sauce is a classic choice. It pairs well with the cheesy flavors of the breadsticks. You can also try ranch or a spicy aioli for a twist. These breadsticks are great with soups or salads. They add a crunchy element to a soft soup. Serve them with a fresh salad for a balanced meal. One common mistake is overcooking the cauliflower. Overcooked cauliflower becomes mushy. Steam it just until tender, about 10 minutes. Another mistake is not measuring cheese and eggs correctly. Too much or too little can change the breadstick's texture. Stick to the recipe for balanced flavors and consistency. {{image_2}} You can make cheesy cauliflower breadsticks even more tasty. Adding herbs and spices can change the flavor a lot. Try adding: - 1 teaspoon of paprika for a smoky touch. - Fresh herbs like basil or parsley for freshness. - Red pepper flakes for a spicy kick. You can also add vegetables or meats to the mix. Chopped spinach, bell peppers, or cooked bacon can add great texture and flavor. If you need a gluten-free option, this recipe is perfect. Cauliflower is naturally gluten-free, so you can enjoy these breadsticks without worry. For vegetarian options, simply skip any meat and load up on your favorite veggies. Not everyone can eat mozzarella or Parmesan. You can use other cheeses that melt well, like provolone or gouda. For dairy-free options, try nut-based cheeses or vegan cheese that melts. These can taste just as good and keep your dish creamy. Feel free to experiment with these variations. Each change can make your cheesy cauliflower breadsticks a new delight! For the full recipe, check out the detailed instructions above. To keep your cheesy cauliflower breadsticks fresh, place them in an airtight container. Make sure they cool before sealing. This helps prevent moisture build-up. Store the breadsticks in the fridge for up to four days. If you have a lot left, consider slicing them for easy access later. When it's time to enjoy your leftovers, reheating is key. The best method is using the oven. Preheat it to 350°F (175°C). Place the breadsticks on a baking sheet and heat for about 10 minutes. This keeps them crispy. If you use a microwave, heat in short bursts. However, the texture may not be as nice. You can freeze cheesy cauliflower breadsticks for later. First, let them cool completely. Then, wrap them tightly in plastic wrap or foil. Place them in a freezer-safe bag. They can last up to three months. When you're ready to eat, thaw them in the fridge overnight. Reheat in the oven to restore their texture. For the best results, avoid thawing in the microwave. Yes, you can prepare cheesy cauliflower breadsticks ahead of time. After baking them, let them cool completely. Store them in an airtight container in the fridge. They stay fresh for up to three days. If you want to reheat them, use an oven for best results. This helps keep the breadsticks crispy. If you want a change from cauliflower, try broccoli. Broccoli has a similar texture when cooked. You can also use zucchini, but be sure to drain it well. Another option is eggplant, which adds a unique flavor. Each of these vegetables works well in this recipe. To achieve crispy cheesy cauliflower breadsticks, drain the cauliflower well. The less moisture, the better. Spread the mixture evenly on the baking sheet. Bake until the edges turn golden brown. For extra crispiness, you can broil them for a minute at the end. Just watch closely to avoid burning. This blog post shared a tasty way to make cheesy cauliflower breadsticks. We covered the ingredients, preparation, and baking steps to help you succeed. I also shared tips on perfecting the recipe and serving suggestions. Remember to avoid common mistakes, like overcooking the cauliflower. You can try different flavors and cheese options too. Enjoy these breadsticks as a snack or a meal side. Making them is fun and rewarding, and you’ll love how they turn out!

Cheesy Cauliflower Breadsticks Flavorful and Easy Snack

Looking for a tasty snack that’s both cheesy and healthy? Try my Cheesy Cauliflower Breadsticks! These easy-to-make delights use fresh

For a rich and tasty soup, gather these main ingredients: - 2 pounds ripe tomatoes, cut in half - 1 medium onion, quartered - 4 cloves garlic, unpeeled - 3 tablespoons olive oil - Salt and black pepper to taste - 1 tablespoon balsamic vinegar - 4 cups vegetable broth - 1 cup fresh basil leaves, plus more for garnish These ingredients shine together to create great flavor. The tomatoes bring sweetness. The onion adds depth. Garlic gives a nice aroma. You can use optional ingredients to make the soup even better: - 1 teaspoon sugar (optional, to balance acidity) - Crumbled feta cheese for serving (optional) Adding sugar can help reduce any sharpness from the tomatoes. Feta cheese adds a creamy touch when served on top. You will also need a few simple tools: - Baking sheet - Large pot - Immersion blender The baking sheet is for roasting the veggies. A large pot lets you combine and simmer all the flavors. An immersion blender helps you make the soup smooth. This recipe is easy and fun. You can find the Full Recipe to follow along step by step! To start, gather your fresh ingredients. You need ripe tomatoes, a medium onion, and garlic. Cut the tomatoes in half and quarter the onion. Leave the garlic unpeeled; this adds flavor. Place everything on a baking sheet. This step is simple but important for a tasty base. Now, it’s time to roast! Preheat your oven to 400°F (200°C). Once hot, drizzle olive oil over the veggies. Sprinkle salt and pepper on top. Roast for 30 to 35 minutes. You want the tomatoes to caramelize and get a bit charred. The smell will fill your kitchen with warmth. After roasting, let them cool. Peel the garlic, and set everything aside. In a large pot, combine your roasted veggies with balsamic vinegar and vegetable broth. Bring this to a simmer over medium heat. Add fresh basil leaves. If the soup tastes too acidic, add one teaspoon of sugar. Let it simmer for 10 minutes to blend the flavors. Use an immersion blender to blend the soup until smooth. Be careful with hot liquids if using a regular blender. Taste and adjust the seasoning. Serve hot with extra basil and crumbled feta if you like. This recipe is easy and full of flavor. For the full details, check the Full Recipe. To make great soup, start with ripe tomatoes. Look for tomatoes that feel heavy for their size. They should have a bright color and a sweet smell. Avoid tomatoes with bruises or soft spots. Roma tomatoes work well because they are meaty. But you can use any fresh tomato you find. The key is to pick tomatoes that are in season for the best taste. One common mistake is not roasting the tomatoes long enough. Roasting brings out their natural sweetness. If you rush this step, your soup may lack depth. Another mistake is blending the soup too quickly. Hot soup can splatter and make a mess. Always let it cool a bit or use an immersion blender. Lastly, don’t skip the seasoning. Taste and adjust the salt and pepper before serving. Enhance your soup with fresh herbs like basil or thyme. Add a pinch of red pepper flakes for some heat. You can also mix in a splash of cream for a richer taste. A teaspoon of sugar can balance the acidity of the tomatoes. For a twist, try adding roasted red peppers or sun-dried tomatoes. These add a nice depth to the flavor. Use the [Full Recipe] for more tips on perfecting this dish. {{image_2}} To make a creamy version, add one cup of heavy cream. Stir it in after blending the soup. This adds a rich, smooth texture. The cream balances the tomatoes' acidity well. You can also use coconut milk for a lighter taste. If you like heat, add red pepper flakes. Start with half a teaspoon and adjust to your taste. Mix them in while the soup simmers. This small change gives the soup a nice kick. It pairs perfectly with the sweet tomatoes and fresh basil. For a vegan version, skip the cream and cheese. Use coconut milk or almond milk instead. These options give the soup a creamy feel without dairy. You can still enjoy the rich flavor of tomatoes and basil. This keeps it healthy and plant-based. You can find the full recipe [here](insert recipe link). To keep your roasted tomato basil soup fresh, let it cool first. Pour the soup into an airtight container. Make sure to seal it tightly. Store it in the fridge for up to five days. If you want to keep it longer, freezing is a great option. To freeze the soup, use freezer-safe containers. Leave about an inch of space at the top. This allows for expansion when the soup freezes. It can last in the freezer for up to three months. When you're ready to enjoy it, thaw it in the fridge overnight. When reheating, use a pot on the stove over medium heat. Stir often to heat it evenly. If you prefer a microwave, heat it in a bowl. Cover the bowl to avoid splatters. Heat in short bursts, stirring in between. Taste the soup and adjust seasoning if needed. Yes, you can make Roasted Tomato Basil Soup ahead of time. This soup tastes even better the next day. When you make it early, the flavors deepen. Just cool it completely after cooking. Then store it in an airtight container in the fridge. It will stay fresh for about three days. To reheat, simply warm it on the stove or in the microwave. Stir well before serving to blend the flavors. Roasted Tomato Basil Soup pairs well with many sides. You can serve it with crusty bread or a grilled cheese sandwich. These options enhance the soup’s rich taste. A fresh salad also makes a great side. Try a simple green salad with light dressing. If you want to get fancy, serve it with a sprinkle of crumbled feta cheese on top. This adds a nice touch of creaminess and flavor. Homemade soup, like Roasted Tomato Basil Soup, usually lasts about three to four days in the fridge. Make sure to store it in an airtight container. If you notice any off smells or changes in color, it’s best to toss it out. For longer storage, consider freezing it. It can last up to three months in the freezer. Just remember to leave some space in the container for expansion. For the full recipe, check out the details above! Roasted Tomato Basil Soup is simple to make and full of flavor. We covered key ingredients, equipment, and step-by-step instructions for a perfect soup. I shared tips for selecting the best tomatoes and avoiding common errors. You can also explore delicious variations, from creamy to spicy, and learn how to store leftovers effectively. This soup is not just tasty; it warms the heart. With these insights, you’re ready to cook a comforting bowl of soup that your friends and family will love. Enjoy your cooking adventure!

Roasted Tomato Basil Soup Flavorful and Simple Recipe

If you’re craving comfort, look no further than my Roasted Tomato Basil Soup. This rich, hearty soup captures the essence

- 4 cups fresh cherries, pitted and halved - 1 cup almond flour - 1 cup rolled oats - 1/2 cup brown sugar - 1/2 cup cold unsalted butter, cubed - 1/4 teaspoon salt - 2 tablespoons cornstarch - 1 tablespoon lemon juice Fresh cherries are the star. Their sweet, tart flavor shines in this dish. Almond flour adds a nutty taste and a nice texture. Rolled oats give a hearty crunch that complements the fruit perfectly. - 1/4 cup sliced almonds - 1 teaspoon vanilla extract - 1 teaspoon cinnamon Consider adding sliced almonds for extra crunch. A dash of vanilla extract enhances the cherry flavor. Cinnamon brings warmth and depth to the dish. - Mixing bowls - Baking dish - Pastry cutter You will need mixing bowls for combining ingredients. A baking dish helps cook the crisp evenly. A pastry cutter makes blending butter into the dry mix easy. For the full recipe, visit the Cherry Almond Crisp section. 1. Preheat the oven First, set your oven to 350°F (175°C). This helps the crisp bake evenly. 2. Prepare the cherry filling In a bowl, mix 4 cups of pitted and halved cherries with 1 tablespoon of lemon juice and 2 tablespoons of cornstarch. Toss until the cherries are well coated. Transfer this mixture to a 9x13 inch baking dish. 3. Mix dry ingredients In another bowl, combine 1 cup of almond flour, 1 cup of rolled oats, 1/2 cup of brown sugar, 1 teaspoon of cinnamon, and 1/4 teaspoon of salt. Stir until well mixed. 1. Combine wet and dry ingredients Add 1/2 cup of cold cubed unsalted butter to the dry mix. Use a pastry cutter or your fingers to blend the butter in until you have coarse crumbs. 2. Fold in sliced almonds Gently mix in 1/4 cup of sliced almonds into the crumb mixture. This adds a nice crunch. 3. Assemble in baking dish Sprinkle the crumb topping evenly over the cherry filling in the baking dish. 1. Bake the crisp Place the baking dish in the preheated oven. Bake for 35-40 minutes, or until the topping is golden brown and the cherries are bubbling. 2. Check for doneness Look for a golden top and bubbling filling. This means your crisp is ready. 3. Cooling time Once baked, remove it from the oven and let it cool for about 10 minutes. This makes it easier to serve. Enjoy the warm Cherry Almond Crisp with a scoop of vanilla ice cream for a delightful treat! You can find the full recipe details for cooking this scrumptious dessert. - Choosing ripe cherries: Look for cherries that are dark red and firm. They should smell sweet and not be mushy. Fresh cherries make a big difference in taste. - How to measure almond flour: Scoop almond flour into your measuring cup with a spoon. Do not pack it down. Level off the top with a knife for an accurate measure. - Avoiding sogginess in the filling: Use cornstarch to help thicken the cherry juices. This keeps the filling from being too runny. - Pairing with ice cream: A scoop of vanilla ice cream on top of warm cherry almond crisp is pure bliss. The cold ice cream melts slightly and adds creaminess. - Garnishing tips: Sprinkle sliced almonds and a dusting of powdered sugar on top before serving. This adds a nice crunch and looks pretty. - Ideal serving temperature: Serve the crisp warm but not too hot. It should be just cool enough to enjoy without burning your mouth. - Over-mixing the topping: Mixing too much can make the topping tough. Just blend until you see crumbs. - Underbaking the crisp: If you take it out too early, the topping will not be crispy. Bake until it is golden brown. - Using excessive sugar: Too much sugar can mask the cherry flavor. Stick to the recipe for the best taste. For the full recipe, check the Cherry Almond Crisp section above. {{image_2}} You can change the fruit in your cherry almond crisp. Blueberries, apples, and peaches work great. Just keep the same amount as the cherries. You can also play with spices. If you want a warm taste, add a pinch of nutmeg. This will give your crisp a cozy, sweet flavor. For gluten-free options, swap almond flour for a gluten-free blend. It works well in this recipe. You can also make this dessert vegan. Use coconut oil instead of butter. It gives a nice flavor and texture. Use maple syrup or coconut sugar instead of brown sugar for sweetness. Serving your crisp in individual bowls makes it special. Each person gets their own treat! You can also use fun dishes like mason jars or ramekins. This adds a nice touch to your dessert. Top each serving with a scoop of ice cream. A sprinkle of sliced almonds will make it even better. For the full recipe, check the detailed instructions. To keep your cherry almond crisp fresh, refrigerate it in an airtight container. This helps maintain its flavor and texture. You can store leftovers for up to three days in the fridge. If you want to keep it longer, freezing is a great option. To freeze, wrap the crisp tightly in plastic wrap, then place it in a freezer bag. It stays fresh for about three months in the freezer. When you are ready to enjoy your cherry almond crisp again, the best way to reheat it is in the oven. Preheat your oven to 350°F (175°C). Place the crisp in an oven-safe dish and cover it with foil. Heat for about 15-20 minutes until it is warm throughout. For keeping the topping crispy, remove the foil for the last 5 minutes of reheating. In the refrigerator, your cherry almond crisp lasts up to three days. If you freeze it, it can last up to three months. Always label your containers with the date to keep track of freshness. Enjoy your delicious dessert knowing it will stay tasty for days! For the complete instructions and ingredients, check out the Full Recipe. If you need a substitute for almond flour, try these options: - Oat flour: Great for gluten allergies. - Coconut flour: Adds a unique taste. - Sunflower seed flour: Good for nut-free diets. These flours work well in most recipes. Yes, you can prepare this crisp in advance. - Make the cherry filling and topping separately. - Store them in the fridge for up to two days. When you are ready, combine and bake. For reheating, put it back in the oven at 350°F (175°C) for about 10 minutes. Look for these signs of perfect crispiness: - The topping turns golden brown. - The cherries bubble around the edges. To check the cherries, poke them; they should feel soft and juicy. You might find pre-made cherry almond crisps at local bakeries. Ask for seasonal pies or desserts. Online, check delivery services like Goldbelly or local grocery stores. These options save time and still satisfy your sweet tooth. For the complete instructions and ingredients, visit the [Full Recipe](#). This blog post covers how to make a delicious cherry almond crisp. It highlights key ingredients like fresh cherries and almond flour. You’ve learned how to prepare, bake, and store your crisp properly. I shared tips for serving and avoiding common mistakes. Remember, you can customize flavors and follow dietary needs too. Whether you serve it warm or cold, this dessert will impress. Enjoy your baking adventure and share the joy of this tasty treat!

Cherry Almond Crisp Delightful Dessert Recipe

Indulge in a delightful treat with my Cherry Almond Crisp recipe! This dish combines juicy cherries and nutty almond flavors

Older posts
Newer posts
← Previous Page1 … Page5 Page6 Page7 … Page58 Next →

dsad

© 2025 Home Cooking Style • Built with GeneratePress

Our Policies

  • Copyright Policy
  • Cookie Policy
  • GDPR Policy
  • Privacy Policy
  • Disclaimer
  • Terms Of Use

More Information

  • Home
  • About
  • Contact
  • Appetizers
  • Dessert
  • Dinner
  • Drinks
©2025, Home Cooking Style About Back To Top