Skip to content
DisclaimerTerms Of UseGDPR PolicyCookie Policy

Home Cooking Style

  • Home
  • Drinks
  • Appetizers
  • Dinner
  • Dessert
  • About
  • Contact
  • Privacy Policy
DisclaimerTerms Of UseGDPR PolicyCookie Policy

Amelia

This dairy-free chocolate mousse is a rich and creamy treat. It uses simple ingredients to create a dessert that fits many diets. You can whip it up in just 15 minutes, then chill it for a few hours. The result is a light and fluffy mousse that tastes amazing. - 1 cup full-fat coconut milk (chilled overnight) - 1 cup dark dairy-free chocolate chips (or dairy-free chocolate, chopped) - 2 tablespoons maple syrup (adjust for sweetness) - 1 teaspoon vanilla extract - Pinch of sea salt - Fresh berries (for garnish) - Mint leaves (for garnish) If you want to switch things up, you can try some alternatives. Use almond milk instead of coconut milk for a lighter taste. For sweeteners, agave syrup or honey can work well too. If you need it nut-free, avoid almond milk and stick with coconut milk. You can also use different types of dairy-free chocolate, like semi-sweet or dark chocolate. Explore what fits your taste buds! Start by chilling a can of full-fat coconut milk overnight. This step is key. When you open the can, you will find a thick layer of cream on top. Scoop out this solid cream and place it in a mixing bowl. Leave the watery liquid behind. This creamy base gives the mousse its rich texture. Next, we will melt the dark dairy-free chocolate. You can use a microwave or a double boiler. If using a microwave, place the chocolate chips in a bowl. Heat the chocolate in 20-second bursts. Stir it often to avoid burning. If you choose the double boiler, heat water in a pot and place a bowl with chocolate on top. Stir until smooth and melted. Now it’s time to mix everything. Add maple syrup, vanilla extract, and a pinch of sea salt into the melted chocolate. Stir well to combine. Then, gently fold the chilled coconut cream into the chocolate mixture. Use a spatula for this step. Be careful not to deflate the cream. Mix until it is fully combined and smooth. This is where the magic happens! To get the best texture, use chilled coconut milk. This makes a thick cream. Scoop out the solid part only. Leave the watery part behind. This cream blends well with melted chocolate. Gently fold the cream into the chocolate. Avoid stirring too hard, or you will lose the air. The mousse should be light and fluffy. Taste is key when making mousse. Start with two tablespoons of maple syrup. You can add more if you like it sweeter. Remember, dark chocolate has its own sweetness. Adjust slowly to find your perfect balance. Always taste as you mix. This helps you get it just right. Serve the mousse in clear cups for a pretty look. Top each serving with fresh berries. Berries add a nice pop of color. A sprig of mint adds freshness. You can also drizzle some melted chocolate on top. For extra flair, use a spoon to create fun designs. Enjoy this simple and delicious treat with friends and family. For the full recipe, see above. {{image_2}} You can add different flavors to your mousse for fun. Try mixing in a tablespoon of strong coffee for a mocha twist. Coffee enhances the rich chocolate flavor. You can also add a pinch of cinnamon or nutmeg for warmth. These spices give the mousse a cozy, unique taste. Consider adding a splash of orange zest for a bright, citrusy kick. The options are endless! This mousse is already vegan-friendly, but you can tweak it further. Use agave syrup instead of maple syrup for a different sweetener. You can swap coconut milk with almond milk, cashew milk, or any nut milk. Just remember that nut milks may change the mousse's texture. For creaminess, add extra coconut cream or silken tofu. These choices keep it tasty and dairy-free! You can serve the mousse in many ways. Individual cups look great and are easy to share. Use small glass jars or dessert cups for a neat look. If you want something special, try a tart shell. Fill a pre-baked shell with the mousse for a stunning dessert. Top it with fresh berries and mint for color and flavor. Both styles will impress your guests! To keep your mousse fresh, store it in airtight containers. Use small jars or bowls for best results. Make sure the mousse is fully chilled before sealing. This helps keep the texture smooth. Avoid placing it near strong-smelling foods, as it may absorb those odors. You can freeze dairy-free chocolate mousse, but it may change texture. Scoop the mousse into freezer-safe containers. Leave some space at the top for expansion. Seal tightly and label with the date. When ready to eat, thaw it in the fridge overnight for the best results. Dairy-free chocolate mousse lasts about 3 to 5 days in the fridge. If stored properly, it remains tasty for a while. Check for changes in smell or texture before serving. If it looks or smells off, it’s best to toss it out. Enjoy your mousse while it’s fresh for the best flavor! Yes, you can easily make this mousse nut-free. The main ingredient is coconut milk, which is safe for those with nut allergies. Ensure your chocolate chips are also nut-free. Most dark chocolate brands are free from nuts, but always check labels. You can enjoy this treat without worry! To boost the chocolate flavor, use a higher percentage of cocoa in your chocolate chips. You can also add cocoa powder to the mixture. Start with one tablespoon, and mix it in after melting the chocolate. Taste as you go. This way, you can find the perfect level of chocolate that you love! This mousse pairs well with many flavors. Fresh berries like raspberries and strawberries add a nice tartness. Mint leaves give a refreshing touch. You can also serve it with coconut whipped cream for extra creaminess. If you enjoy crunch, try adding nuts or granola on top. These pairings enhance the dessert and make it even more enjoyable! This blog post covered how to make a delicious dairy-free chocolate mousse. We explored the ingredients you need, step-by-step instructions, and helpful tips. You learned about storage and variations, like flavor options and serving styles. Now you can create your own tasty mousse with ease. Remember to adjust sweetness to your taste. Enjoy your dessert, and share it with friends or family. Happy cooking!

Dairy-Free Chocolate Mousse Simple and Delicious Treat

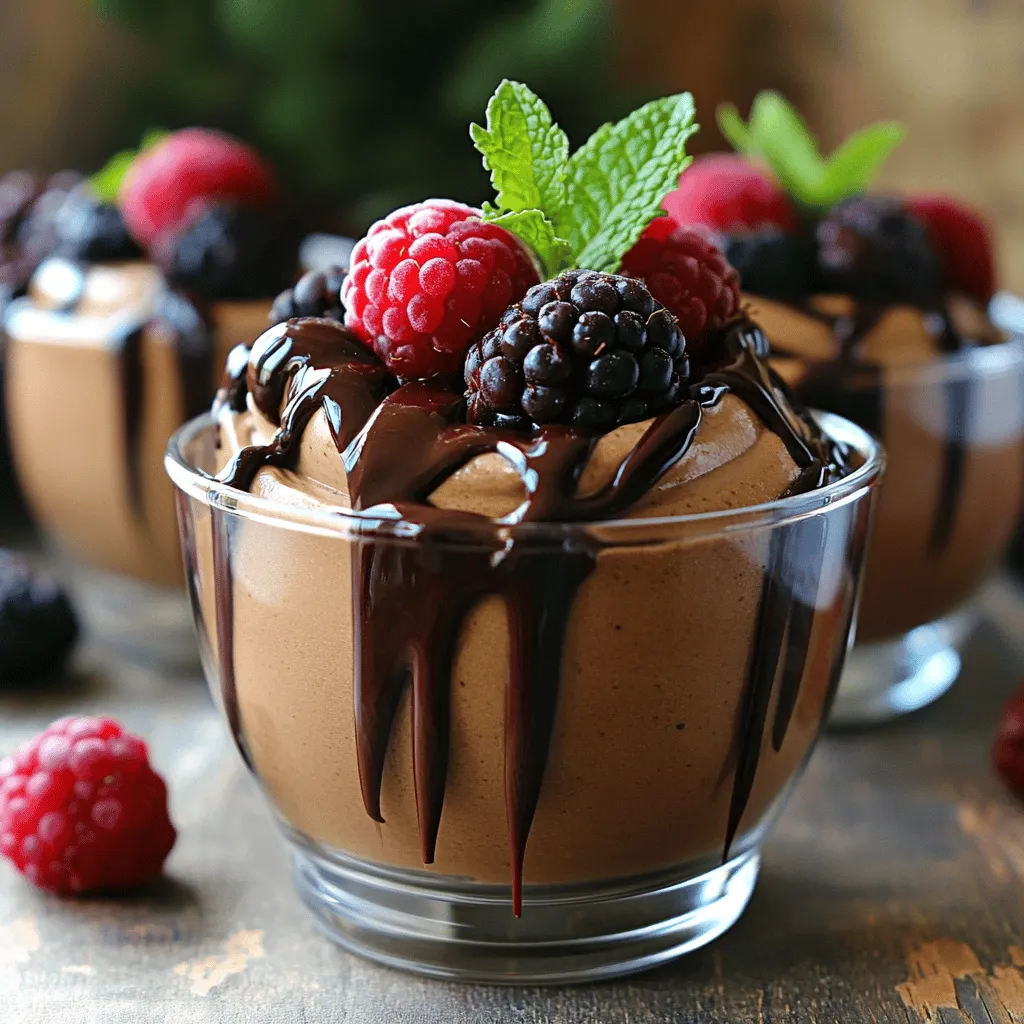
Craving a sweet treat that’s both rich and dairy-free? I’ve got just the recipe for you! My Dairy-Free Chocolate Mousse

To make cheesy spinach stuffed shells, you need a few simple ingredients. Here's the list: - 12 jumbo pasta shells - 2 cups fresh spinach, chopped - 1 cup ricotta cheese - 1 cup mozzarella cheese, shredded - 1/2 cup parmesan cheese, grated - 1 egg, lightly beaten - 1 teaspoon garlic powder - 1 teaspoon onion powder - Salt and pepper to taste - 2 cups marinara sauce - Fresh basil leaves, for garnish Each ingredient plays a key role in the dish. The jumbo pasta shells hold the filling and become soft and tasty when cooked. Fresh spinach adds color and nutrition. Ricotta cheese gives a creamy texture, while mozzarella and parmesan add rich flavor. The egg helps bind everything together. Garlic and onion powders boost the taste. Marinara sauce adds moisture and a nice tang. Lastly, fresh basil gives a bright finish. You can find the full recipe at the top of this article to see how these ingredients come together in this dish. Start by setting your oven to 350°F (175°C). This step is key for cooking the shells evenly. Boil a large pot of water and add salt. Cook the jumbo pasta shells according to the package until they are al dente. This means they should still have a slight bite. Once done, drain them and let them cool for a bit. In a mixing bowl, combine the chopped spinach, ricotta cheese, half of the mozzarella, and the parmesan cheese. Add the beaten egg, garlic powder, onion powder, salt, and pepper. Mix everything well until it's creamy and smooth. This filling packs a lot of flavor. Take each cooked shell and gently fill it with the spinach cheese mixture. Place the shells seam-side up in a 9x13 inch baking dish. Make sure they fit snugly but are not overcrowded. Pour marinara sauce over the stuffed shells. Cover them well so they soak up the flavor. This step adds a rich, tangy taste that complements the cheese. Sprinkle the remaining mozzarella cheese on top of the marinara sauce. This will melt beautifully and create a golden crust. Cover the dish with aluminum foil and bake it in the preheated oven for 20 minutes. After that, remove the foil and bake for an additional 10-15 minutes. Look for the cheese to be melted and bubbly. Once done, take the dish out of the oven and let it cool for a few minutes. Garnish with fresh basil leaves before serving. This adds a nice pop of color and flavor. For the full recipe, check out the details above. Enjoy your tasty creation! To make a great filling, start with fresh ingredients. Use soft ricotta cheese for a smooth texture. Mix in chopped spinach and cheese for a rich flavor. I like to add garlic and onion powder to boost taste. Make sure to blend well for a creamy filling. When cooking pasta, aim for al dente. This means it should be firm but not hard. Al dente pasta holds its shape better when stuffed. If you overcook it, the shells may tear. Always follow the package directions for best results. You can mix different cheeses for your filling. Try using goat cheese for a tangy kick. Cream cheese can add a rich and creamy flavor. You can even swap mozzarella for a sharper cheese like provolone. Each cheese will change the taste, so feel free to experiment. Serve cheesy spinach stuffed shells warm for the best taste. Let them cool for a few minutes after baking. This helps the cheese set a bit. For an elegant touch, garnish with fresh basil leaves. You can also sprinkle extra cheese on top before serving for added flavor. For the full recipe, check out the complete instructions. {{image_2}} You can easily add meat to cheesy spinach stuffed shells. Ground beef, chicken, or turkey work well. Cook the meat first, then mix it with the spinach filling. This adds protein and flavor to the dish. Just use about one cup of cooked meat for a balanced taste. If you want to keep it vegetarian, consider adding more veggies. Chopped mushrooms, bell peppers, or zucchini can enhance the dish. You can also mix in some artichoke hearts. These options add texture and flavor without meat. It’s a fun way to change things up while keeping it healthy. For a gluten-free version, use gluten-free pasta shells. Many stores offer these now. Make sure to check the box for cooking times. You can follow the same steps in the recipe. This option ensures everyone can enjoy this cheesy delight. While marinara is classic, you can try other sauces. Alfredo or pesto sauce would add a rich taste. If you like a kick, use a spicy arrabbiata sauce. Each sauce gives a new twist to the dish. Feel free to experiment and find your favorite! You can store leftover cheesy spinach stuffed shells in the fridge. Place them in an airtight container. They will stay fresh for up to three days. Make sure to cover them well with plastic wrap if you do not have a container. This will keep them from drying out. When you're ready to eat, simply take them out and enjoy! To reheat your cheesy spinach stuffed shells, preheat your oven to 350°F (175°C). Place the shells in a baking dish. Add a little marinara sauce on top to keep them moist. Cover the dish with foil. Heat for about 20 minutes or until they are warm. If you prefer a quicker method, you can use a microwave. Heat them for 1-2 minutes. Check to ensure they are hot all the way through. You can freeze cheesy spinach stuffed shells for later use. First, let them cool completely. Then, place them in a freezer-safe container or bag. Make sure to remove as much air as possible. They will last for up to three months in the freezer. When you are ready to eat them, thaw in the fridge overnight. Then, follow the reheating instructions to warm them up. This makes for an easy meal on a busy day! For the full recipe, check out the details above. It takes about 15 minutes to prep and 35 minutes to cook. So, you can enjoy this dish in around 50 minutes. Yes, you can! Prepare the shells and filling a day before. Store them in the fridge. Just add sauce and cheese before baking. This makes dinner easy for busy days. You can use cottage cheese or cream cheese. Both will give a creamy texture. You can also try goat cheese for a tangy twist. Yes! Thawed frozen spinach works well. Just make sure to drain it well to avoid excess water in your filling. A fresh salad pairs nicely with these shells. You can also serve garlic bread or steamed veggies. These sides balance the rich flavors of the dish. No, this recipe is not gluten-free due to the pasta. You can use gluten-free pasta shells for a safe option. This will keep the flavor while meeting gluten-free needs. For the full recipe, check the earlier section. Cheesy spinach stuffed shells are simple and tasty. We covered the ingredients, step-by-step instructions, and tips for perfecting the dish. I shared variations to suit different diets and storage info for leftovers. You can enjoy this meal fresh or reheated later. Experiment with flavors and ingredients to make it your own. Cooking should be fun, and these shells are a great way to enjoy good food. Now, grab your ingredients and start cooking!

Cheesy Spinach Stuffed Shells Savory and Simple Dish

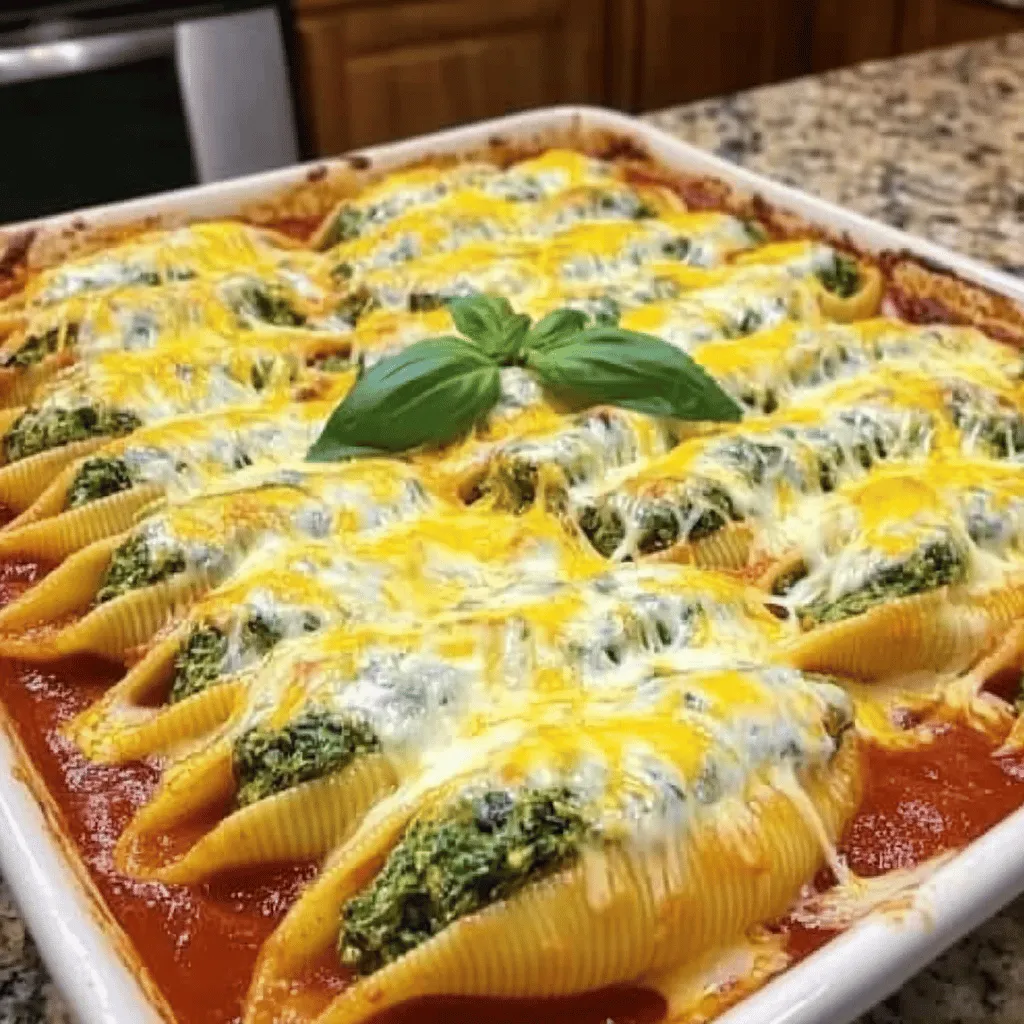
Looking for a dish that’s both cheesy and easy? Cheesy Spinach Stuffed Shells are the perfect solution! With just a

- 1 lb (450g) boneless, skinless chicken breasts - 1/4 cup honey - 1/4 cup Dijon mustard - 2 tablespoons soy sauce (low sodium) - 1 tablespoon olive oil The main ingredients create a strong base for your skewers. The chicken gives protein and a juicy texture. Honey adds sweetness, while Dijon mustard brings a tangy flavor. Soy sauce offers depth, and olive oil keeps everything moist. - 1 cup cherry tomatoes - 1 bell pepper (any color), cut into 1-inch pieces - Fresh parsley for garnish These optional ingredients add color and flavor. Cherry tomatoes burst with sweetness, while bell peppers add crunch. Fresh parsley makes a great garnish and brightens the dish. - 1 teaspoon garlic powder - 1 teaspoon onion powder - 1/2 teaspoon smoked paprika - Salt and pepper to taste Seasonings are key for flavor. Garlic powder and onion powder give depth. Smoked paprika adds a hint of smokiness. Salt and pepper enhance all the flavors in the dish. For the Full Recipe, gather these ingredients and get ready to grill! First, grab a medium bowl. Combine these ingredients: - 1/4 cup honey - 1/4 cup Dijon mustard - 2 tablespoons soy sauce - 1 tablespoon olive oil Next, add the seasonings: - 1 teaspoon garlic powder - 1 teaspoon onion powder - 1/2 teaspoon smoked paprika - Salt and pepper to taste Whisk everything together until it blends well. This marinade packs a punch and will flavor your chicken perfectly. Now, take your chicken. Use 1 lb of boneless, skinless chicken breasts and cut them into 1-inch cubes. Place the chicken in a large resealable bag or a glass dish. Pour the marinade over the chicken. Make sure every piece is coated. Seal the bag or cover the dish. Refrigerate this mix for at least 1 hour. For the best flavor, marinate overnight. When you’re ready to grill, preheat your grill or grill pan over medium-high heat. If using wooden skewers, soak them in water for at least 30 minutes. This helps keep them from burning. Now, thread the marinated chicken cubes onto the skewers. You can add cherry tomatoes and bell pepper pieces if you want extra color and flavor. Place the skewers on the grill. Cook for about 10-12 minutes. Turn them occasionally until the chicken is fully cooked. The internal temperature should reach 165°F. Once cooked, remove the skewers from the grill. Let them rest for a couple of minutes. Serve hot, garnished with fresh parsley. You can also serve with any leftover sauce for dipping. For the full recipe, check out the complete details above! Marinating the chicken is key for great flavor. I suggest marinating overnight. This gives the flavors time to soak in. If you're short on time, at least marinate for one hour. You can mix up your marinade too. Try adding lemon juice for a tangy kick. Or, use maple syrup instead of honey for a different taste. For grilling, aim for medium-high heat. This helps the chicken cook evenly. Make sure not to overcrowd the grill. Leave space between each skewer. This allows hot air to circulate. To keep chicken moist, don’t overcook it. Cook until it reaches 165°F (75°C). Use a meat thermometer for accuracy. When serving, arrange the skewers on a large platter. Drizzle them with extra honey mustard sauce. Garnish with fresh parsley for a pop of color. Pair these skewers with a fresh salad or grilled veggies. This adds color and flavor to your meal. You can also serve with rice or quinoa for a hearty side. {{image_2}} You can easily swap chicken for other proteins. Turkey works great for a leaner option. Simply follow the same marinating steps. Tofu is a fantastic choice for a plant-based meal. Use firm tofu and press it to remove excess moisture. Cut it into cubes and marinate it just like the chicken. This method brings out the sweet and tangy flavors of the marinade. Get creative with the marinade. You can explore spicy flavors by adding sriracha or chili powder. For a citrus twist, mix in lime or orange juice. These changes give the skewers a whole new taste. Experimenting with flavors makes each grilling experience unique. Don't be afraid to adjust the sweetness or heat to match your taste. Vegetarian skewers are fun and colorful! Use a mix of bell peppers, zucchini, and mushrooms. You can also add grains like quinoa or couscous. Thread the veggies onto the skewers, alternating colors for a vibrant look. Brush them with olive oil and season with your favorite spices. Grilling brings out their natural sweetness, making them a hit at any gathering. For a filling meal, serve the skewers with a side of rice or a fresh salad. For the full recipe, check out the details above. Store leftovers in an airtight container. This keeps them fresh and safe. You can enjoy them for up to three days. After that, the quality may decline. Always check for any off smells or changes in color before eating. If you want to freeze pre-marinated chicken, place it in a freezer bag. Remove as much air as possible. This helps prevent freezer burn. You can freeze it for up to three months. When ready to use, thaw the chicken overnight in the fridge. To reheat, grill or pan-sear until the chicken reaches 165°F (75°C). Get creative with your leftovers! You can shred the chicken for salads or wraps. Another fun idea is to mix it with rice for a quick stir-fry. You can also make a tasty quesadilla. Just add cheese and some veggies, and grill until crispy. Marinating the chicken helps it soak up all the flavors. I recommend marinating for at least one hour. For the best taste, let it sit overnight. This gives the honey and mustard time to work their magic. The longer you marinate, the more flavorful the chicken will be. Just remember, don’t go over 24 hours, as the chicken can become mushy. You should soak wooden skewers before using them. Soaking prevents them from burning on the grill. It helps them stay strong while cooking. If you forget to soak, you risk having them catch fire. Just 30 minutes in water will do the trick. It’s a simple step that makes a big difference in your grilling. You can serve many delicious sides with honey mustard chicken skewers. Here are some ideas: - Grilled vegetables: Bell peppers, zucchini, and onions are great choices. - Fresh salad: A light green salad with a tangy dressing pairs well. - Rice or quinoa: These grains soak up the extra sauce nicely. - Dips: Offer extra honey mustard sauce or a yogurt dip for added flavor. These sides add color and balance to your meal, making it even more enjoyable. Check the Full Recipe for more ideas on how to serve your skewers! This blog post shared a simple recipe for honey mustard chicken skewers. You learned about the main and optional ingredients, seasonings, and the step-by-step grilling process. Remember to marinate overnight for the best taste and explore different flavors. Grilling can be fun and delicious with these tips. You can try this recipe with other proteins or create vegetarian skewers. Enjoy your tasty skewers, share them with friends, and feel confident in your cooking skills!

Honey Mustard Chicken Skewers Flavorful Grilling Recipe

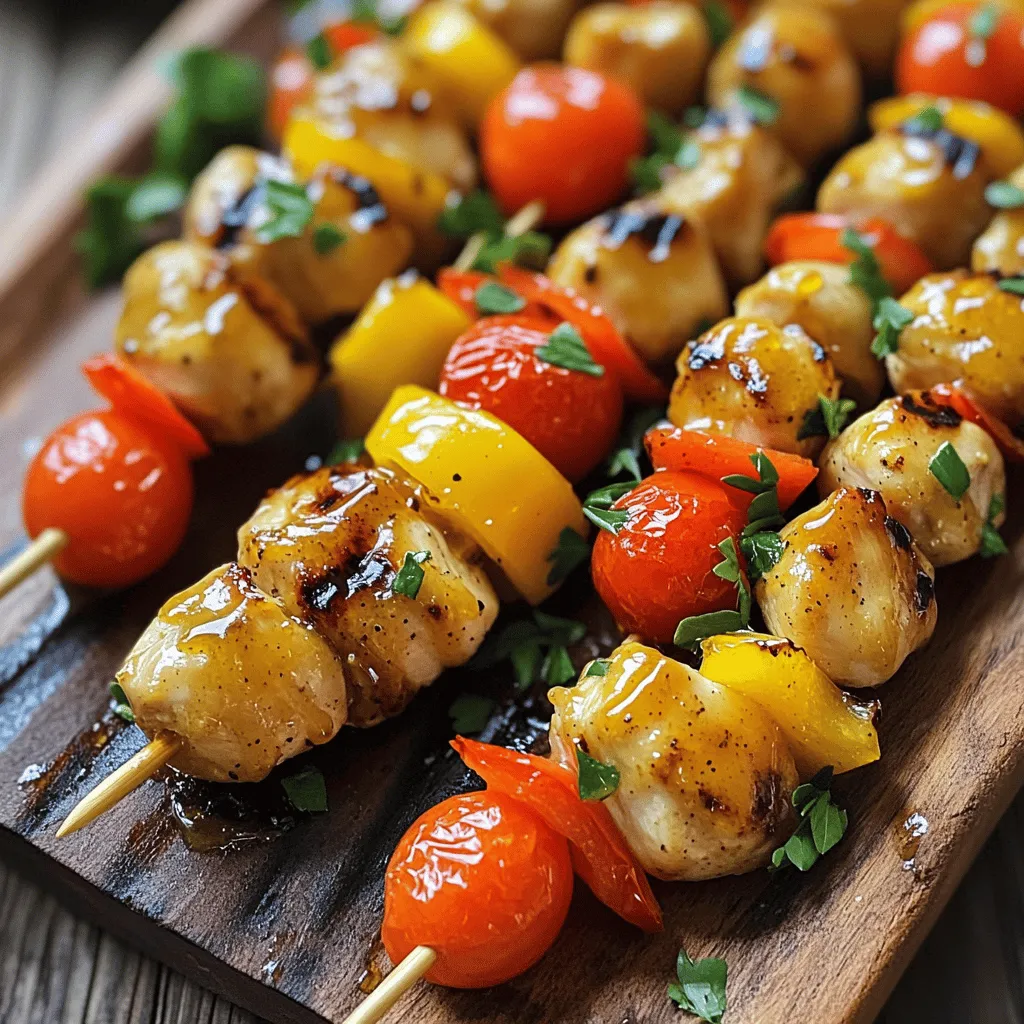
Get ready to fire up your grill! In this post, I’ll show you how to make Honey Mustard Chicken Skewers

- 1 pound boneless, skinless chicken breasts - Bell peppers (red, yellow, green) - 1 medium red onion - 3 cloves garlic - Olive oil In this recipe, the chicken takes center stage. I like using boneless, skinless chicken breasts for their tenderness. Slice them into thin strips to ensure they cook quickly and evenly. Bell peppers add color and crunch. I often use red, yellow, and green peppers for a vibrant dish. A medium red onion brings sweetness and depth to the fajitas, while minced garlic adds a punch of flavor. Finally, a splash of olive oil helps everything cook nicely. - Ground cumin - Chili powder - Smoked paprika - Salt and pepper - Juice of 1 lime Spices are the heart of this dish. Ground cumin gives a warm, earthy taste. Chili powder brings heat and complexity, while smoked paprika adds a rich, smoky flavor. Don’t forget salt and pepper to enhance all the tastes. A squeeze of fresh lime juice at the end brightens up the dish and balances the flavors. - Fresh cilantro for garnish - Tortillas for serving To serve, sprinkle fresh cilantro on top for a burst of freshness. Soft tortillas wrap everything up perfectly. You can use flour or corn tortillas, depending on your preference. Both options work well for scooping up those tasty chicken and veggie bits! If you want the full recipe, check out the complete guide on One-Pan Chicken Fajitas. To start, you need to marinate the chicken. In a large bowl, mix the sliced chicken with olive oil, minced garlic, ground cumin, chili powder, smoked paprika, salt, pepper, and lime juice. This spice mix is important for flavor. Toss the chicken well to coat it evenly. Once mixed, let the marination sit for 15 minutes. This wait allows the spices to soak in, making the chicken tastier. Now it’s time to cook the chicken. Heat a large skillet over medium-high heat. Add the marinated chicken in a single layer. You want to hear that sizzle! Let it cook undisturbed for about 4-5 minutes. This step is key for browning. Stir occasionally to ensure even cooking. When the chicken is golden brown, it’s ready for the next step. Once the chicken starts to brown, add the sliced bell peppers and onions to the pan. Combine everything well. Cooking time for the veggies and chicken is about 7-10 minutes. Stir often. You want the vegetables to soften and the chicken to finish cooking. The colors will look beautiful, and the smell will be amazing. That's how you create a delicious one-pan meal. For detailed preparation, you can refer to the Full Recipe. To make your one-pan chicken fajitas pop, adjust the seasoning to your taste. You can start with the basic spices in the recipe, but don’t be shy! Add more chili powder or cumin for extra depth. If you like heat, consider adding a pinch of cayenne or some sliced jalapeños. This small change can make a big impact on the flavor. A beautiful dish makes the meal even more enjoyable. Serve your fajitas on a large platter. Wrap warm tortillas in a clean kitchen towel to keep them soft. For garnish, sprinkle fresh cilantro on top. Add lime wedges around the dish. This brightens up the look and adds a fresh zing when squeezed over the fajitas. Prepping ingredients ahead of time can save you a lot of effort. Slice your chicken and veggies the night before. Store them in the fridge in airtight containers. This way, you can cook quickly after a long day. For cooking, use a hot skillet to sear the chicken fast. This helps lock in juices and cuts your cooking time. {{image_2}} You can swap chicken for other proteins. Shrimp cooks fast and adds a nice taste. Beef is another great choice; it gives a hearty flavor. For those who prefer plant-based meals, tofu or mushrooms work well. Both absorb spices, making them tasty and satisfying. Get creative with your fajitas by adding fruits. Pineapple gives a sweet twist, while mango adds a tropical flair. Experimenting with spices can also change the game. Try adding chipotle for heat or oregano for a fresh flavor. Each mix offers a new taste adventure. Fajitas aren't just for wraps. You can serve them in bowls for a fun twist. Layer rice, beans, and the chicken mix for a filling meal. Sliders are another option; use small tortillas or slider buns. This way, everyone can enjoy their own tasty bite. After cooking, let your fajitas cool down. Place them in airtight containers. Glass or plastic containers work well. This helps keep your fajitas fresh. Store them in the fridge. They will last about three to four days. To freeze cooked fajitas, let them cool completely. Then, pack them in freezer-safe bags. Remove as much air as you can. This keeps the fajitas from freezer burn. When you want to eat them, thaw in the fridge overnight. Reheat them in a skillet over low heat. You can also use the microwave for quick reheating. You can keep fajitas in the fridge for three to four days. Check for signs of spoilage before eating. Look for changes in color or smell. If fajitas feel slimy, it’s best to throw them away. Always trust your senses to ensure food safety. For more cooking ideas, check out the Full Recipe. One-Pan Chicken Fajitas are a simple and tasty dish. You cook chicken, peppers, and onions in one pan. This makes clean-up easy. You slice the chicken and veggies, then cook them with spices. The result is a colorful, flavorful meal. The spices include cumin, chili powder, and smoked paprika. For extra flavor, squeeze lime juice over the dish before serving. This recipe takes about 30 minutes from start to finish. Yes, you can use frozen chicken. However, I recommend using fresh chicken for the best taste. If you use frozen chicken, thaw it first. You can place it in the fridge overnight. If you forgot to thaw it, you can use the microwave. Just make sure the chicken is fully thawed before cooking. This helps it cook evenly and stay juicy. To make chicken fajitas spicier, you have a few options. First, add cayenne pepper to the spice mix. Start with a small pinch and adjust to taste. You can also add sliced jalapeños while cooking. If you like heat, use fresh serrano peppers. For extra flavor, try using a spicy salsa when serving. These tips will give your fajitas a nice kick! Several sides go well with chicken fajitas. Here are some great options: - Mexican rice - Refried beans - Corn salad - Guacamole - Chips and salsa - A fresh green salad You can also enjoy a cool drink like iced tea or margaritas. These sides balance the flavors and add fun to your meal! In this post, we explored how to make tasty chicken fajitas. We covered main ingredients, spices, and cooking steps. Plus, I shared tips for flavor and presentation. You can easily adapt this recipe with different proteins or veggies. Remember to store leftovers correctly to keep them fresh. With these tips, you’ll enjoy delicious fajitas any time. Connecting flavors and ingredients brings joy to cooking. I hope you feel ready to try making these at home!

One-Pan Chicken Fajitas Flavorful and Easy Recipe

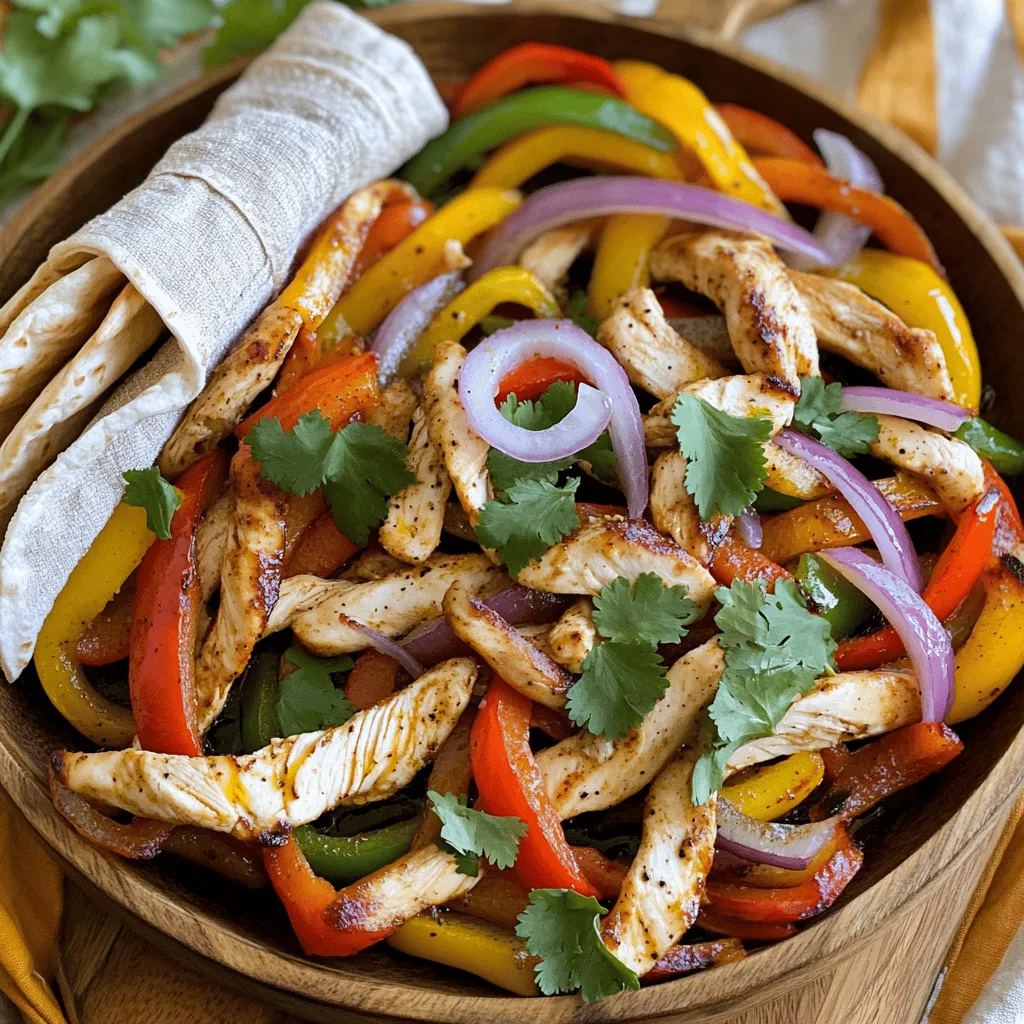
Are you ready to enjoy a meal that’s both easy and packed with flavor? This One-Pan Chicken Fajitas recipe is

- Whole chicken (4-5 lbs) - 4 tablespoons olive oil - 4 cloves garlic, minced - 2 large lemons (one zested and juiced, one sliced) - 1 tablespoon fresh thyme leaves (or 1 teaspoon dried thyme) - 1 tablespoon fresh rosemary, chopped (or 1 teaspoon dried rosemary) - 1 onion, quartered - Fresh parsley, for garnish The main ingredients create a bright and fresh flavor. The whole chicken brings a juicy and tender base. Olive oil adds richness, while garlic gives it a bold taste. Lemons provide acidity, which brightens every bite. Fresh herbs add depth and aroma. - Salt and pepper to taste - 1 teaspoon paprika To make the marinade, combine the olive oil, minced garlic, lemon zest, lemon juice, thyme, rosemary, paprika, salt, and pepper in a bowl. Mix well to blend the flavors. The salt enhances the chicken's natural taste. Paprika adds a hint of smokiness. This marinade is key for juicy, flavorful chicken. Lemon garlic roasted chicken pairs well with many sides. Think of roasted vegetables, mashed potatoes, or a fresh salad. These options bring balance to the meal. For garnish, use fresh parsley. It adds a pop of color and freshness. You can also serve the chicken with lemon slices and onion wedges around it. This makes a beautiful presentation. For the full recipe, check out the detailed guide. 1. Preheating the oven: Start by preheating your oven to 425°F (220°C). This high heat helps to crisp the chicken skin. 2. Drying and marinating the chicken: Pat the whole chicken dry with paper towels. This step is key for crispy skin. In a bowl, mix olive oil, minced garlic, lemon zest, lemon juice, thyme, rosemary, paprika, salt, and pepper. This is your marinade. 3. Marinate the chicken: Gently loosen the skin over the breast and thighs. Rub half of the marinade under the skin and inside the cavity. Use the rest of the marinade on the outside of the chicken. This gives flavor to every bite. 4. Stuff the cavity: Add the quartered onion and lemon slices inside the chicken. This will make the meat juicy and add more flavor. 5. Truss the chicken: If you want, tie the legs together with kitchen twine. Tucking the wings under the body helps it cook evenly. 1. Steps for placing and roasting the chicken: Place the chicken breast-side up in a roasting pan. Roast in the preheated oven for about 1 hour and 15 minutes. Use a meat thermometer to check that the internal temperature reaches 165°F (75°C). 2. Importance of basting during cooking: Halfway through roasting, baste the chicken with its juices. This keeps the meat moist and adds flavor. 1. Proper resting time for juiciness: Once cooked, take the chicken out of the oven. Let it rest for about 15 minutes. This step is important for keeping it juicy. 2. Carving techniques and serving methods: To carve, start by removing the legs and thighs. Then cut the breast meat. Serve the chicken on a platter and drizzle with pan juices. Garnish with fresh parsley for a beautiful finish. For the full recipe, check out the detailed instructions. To get that perfect crispy skin, start by drying the chicken well. Use paper towels to remove all moisture. This step is key. If the skin is wet, it won't crisp up. Roasting at a high temperature works wonders. Set your oven to 425°F (220°C). This heat helps to render the fat and achieve that golden brown color. Halfway through cooking, baste the chicken with its juices. This adds flavor and keeps the skin crispy. To boost flavor, think about adding fresh herbs. Try sage or oregano for a twist. You can also mix in spices like cumin or coriander. Each will bring a new taste. Marinating the chicken is crucial. Aim for at least one hour, but overnight is even better. The longer it sits, the more flavor it absorbs. Just remember to keep it in the fridge while marinating to stay safe. One common mistake is overcooking the chicken. Use a meat thermometer to ensure it reaches 165°F (75°C). This way, you avoid dry meat. Watch for undercooking too. Always check the thickest part of the chicken. To prevent soggy skin, ensure that the chicken is well-dried before roasting. Also, do not cover it while cooking. This keeps moisture in and can ruin that crispy texture. For the full recipe, check out the complete guide to making Lemon Garlic Roasted Chicken. {{image_2}} You can change the herbs in this dish. Try using sage or oregano. These herbs add new flavors. You can also mix in fresh basil or dill for a twist. Adjust the amount based on your taste. If you like strong flavors, use more herbs. If you prefer milder flavors, use less. This way, you make the dish your own. Lemons are great, but you can try other fruits. Oranges and limes work well too. They give a sweet or tart taste that is fun. You can even mix citrus fruits for a unique flavor. For example, combine lemon with lime. This blend makes the chicken taste fresh and bright. You can cook this chicken in different ways. A rotisserie gives a nice, even cook. A slow cooker makes it very tender. An air fryer can make the skin crispy. Each method has its own cooking time. A rotisserie might take about 1.5 hours. The slow cooker could take 6-8 hours on low. The air fryer usually cooks in about 1 hour. Choose the method that fits your schedule best. To store your Lemon Garlic Roasted Chicken, let it cool first. This step helps keep the meat juicy. Once chilled, place the chicken in airtight containers. Glass or plastic containers work well. You can also wrap the chicken tightly in foil or plastic wrap. Make sure to store leftovers in the fridge. They will stay fresh for about 3 to 4 days. When you reheat the chicken, do it gently to keep it moist. The best method is using the oven. Preheat the oven to 350°F (175°C). Place the chicken in a baking dish and cover it with foil. This cover helps keep the steam in. Heat for about 20 to 30 minutes, or until warm. You can also use a microwave, but be careful. Heat in short bursts, checking often to avoid drying it out. To freeze cooked chicken, make sure it cools completely. Wrap it well in plastic wrap, then in foil. This double wrap prevents freezer burn. You can also use freezer bags. Write the date on the bag. Chicken can last up to 4 months in the freezer. To thaw, place the frozen chicken in the fridge overnight. For quicker thawing, use the microwave on the defrost setting. Always ensure the chicken is heated through before serving. For a delicious Lemon Garlic Roasted Chicken recipe, check out the Full Recipe. Lemon Garlic Roasted Chicken lasts about 3 to 4 days in the fridge. To keep it fresh: - Let the chicken cool down. - Store it in an airtight container. - Wrap it tightly with plastic wrap or aluminum foil. This helps prevent moisture loss and keeps it flavorful. If you want to enjoy it longer, consider freezing it. Yes, you can use frozen chicken for Lemon Garlic Roasted Chicken. Here’s how: - Thaw the chicken safely in the fridge overnight. - If you need it quick, use the cold water method. Submerge the chicken in cold water, changing the water every 30 minutes. - Once thawed, pat it dry and marinate as usual. Make sure to marinate for a few hours to get the best flavor. You can serve many delicious sides with this chicken. Here are some great options: - Roasted vegetables: Carrots, potatoes, and Brussels sprouts work well. - Rice or quinoa: They soak up the tasty juices. - Salads: A fresh green salad adds a nice crunch. - Bread: Crusty bread is perfect for sopping up juices. These pairings enhance the meal and create a well-rounded dinner. For the full recipe, check out the details provided! Lemon garlic roasted chicken is a simple, tasty dish. You learned about the key ingredients, including fresh herbs and lemons. We covered how to season and marinate your chicken for rich flavor. Following the step-by-step instructions ensures your chicken turns out juicy and crispy. Remember to rest the chicken before carving for the best taste. With these tips and variations, you can make this dish your own. Enjoy the flavors with your favorite sides, and don’t forget: practice makes perfect!

Lemon Garlic Roasted Chicken Flavorful and Easy Dish

If you’re searching for a dish that is both simple and bursting with flavor, look no further! This Lemon Garlic

- 4 medium zucchini, spiralized into noodles - 1 bell pepper (red or yellow), thinly sliced - 1 cup snap peas, trimmed - 1 carrot, julienned - 3 green onions, sliced (white and green parts separated) - 2 cloves garlic, minced - 1 tablespoon fresh ginger, grated - 3 tablespoons soy sauce (or tamari for gluten-free) - 1 tablespoon sesame oil - 1 tablespoon olive oil - 1 teaspoon red pepper flakes (adjust to taste) When I create this dish, I focus on fresh and bright flavors. Zucchini noodles are a fun twist for pasta lovers. They soak up all the tasty sauces and spices. I love using vibrant vegetables like bell peppers and snap peas. They add color and crunch. Carrots give a sweet flavor and nice texture. Aromatics like garlic and ginger bring warmth to every bite. - Sesame seeds - Fresh cilantro Garnishes can take this dish to the next level. I often sprinkle sesame seeds for a slight crunch. Fresh cilantro adds a burst of flavor and color. These toppings make the dish look and taste great. You can choose to skip them, but I always recommend using them. - Olive oil - Soy sauce (or tamari) - Sesame oil Choosing the right oils and sauces is key. I prefer olive oil for its rich taste. It helps cook the veggies just right. Soy sauce adds a savory depth to the stir fry. For a nutty flavor, I add sesame oil. Together, they create a delicious sauce that coats every noodle. This combination makes the dish rich and satisfying. For a gluten-free option, tamari works well too. For more detailed cooking steps and tips, you can check out the Full Recipe. Start by spiralizing your zucchini. A spiralizer makes long, thin noodles. This tool is fun to use! Once you have your noodles, place them in a colander. Sprinkle some salt over them. The salt helps pull out extra moisture. Let them rest for about 15-20 minutes. This step is key to keeping your stir fry from getting soggy. Next, heat a large skillet or wok over medium-high heat. Add olive oil and let it warm up. Once hot, toss in the white parts of the green onions, garlic, and ginger. Stir-fry these for about 1-2 minutes. You want them fragrant but not burnt. This step adds a lot of flavor to your dish. Now, it's time to add the colorful veggies! Toss in the sliced bell pepper, snap peas, and julienned carrot. Stir-fry these for 4-5 minutes. You want them to soften just a bit while still being crisp. This keeps the texture lively and fresh. Now add your spiralized zucchini noodles to the skillet. Drizzle them with soy sauce and sesame oil. Sprinkle in red pepper flakes for a kick. Toss everything together gently. Cook for another 3-4 minutes. You want the noodles warm but not mushy. This is where all the flavors blend together! Finally, remove the skillet from the heat. Transfer your stir fry to a serving platter. Garnish with the green onion tops, sesame seeds, and fresh cilantro if you like. This adds a nice touch to the dish. Serve it hot and enjoy your tasty creation! For the full recipe, check out the details above. To make the best zucchini noodles, you need to avoid sogginess. Start by salting your spiralized zucchini. This step helps draw out extra moisture. Let them sit for 15-20 minutes in a colander. After that, rinse and pat them dry with a paper towel. For spiralizing, a good tool makes a big difference. I recommend using a sturdy spiralizer. It can make long, even strands. This helps your noodles cook evenly and look nice on the plate. To make your dish pop, consider adding spices. A pinch of red pepper flakes adds heat. You could also try a dash of black pepper or smoked paprika for depth. Instead of store-bought sauces, try homemade ones. A simple mix of soy sauce and sesame oil can elevate your stir fry. You can even add a bit of honey or lime juice for a sweet and tangy flavor boost. Pair your zucchini noodle stir fry with protein for a complete meal. Grilled chicken, shrimp, or tofu all work well. Just cook the protein separately and toss it in before serving. For side dishes, think about a fresh salad or some steamed rice. Both complement the stir fry nicely. You can also serve it with a light soup for a warm and comforting meal. If you're ready to try this recipe, check out the Full Recipe for step-by-step instructions. Happy cooking! {{image_2}} You can boost the nutrition of your zucchini noodle stir fry by adding protein. Chicken, shrimp, or tofu work great. - Chicken: Use bite-sized pieces. Cook them in the skillet until golden brown, about 5-7 minutes. Set aside before adding the veggies. - Shrimp: Peel and devein shrimp. Sauté in the skillet for about 3-4 minutes until they turn pink. Remove and then add them back with the zucchini noodles. - Tofu: Choose firm tofu for the best texture. Cut it into cubes and pan-fry until golden on each side, about 8-10 minutes. Add it in with the veggies. If you need a gluten-free meal, use gluten-free soy sauce or tamari. This keeps the flavors intact without the gluten. - Substitute regular soy sauce with tamari, which tastes great. - You can also use coconut aminos as a low-sodium option. - Add more fresh vegetables like bell peppers or carrots to make it heartier and gluten-free. For a vegetarian or vegan twist, you can swap out dairy and meat for plant-based options. - Use dairy-free cheese like cashew cheese or nutritional yeast for a cheesy flavor. - For plant-based protein, try chickpeas or lentils. Cook them separately and mix them in at the end for extra protein and fiber. This dish is flexible, and you can adapt it to your needs. Check out the Full Recipe for all the details. To keep your zucchini noodle stir fry fresh, store it in an airtight container. Place it in the fridge as soon as it cools down. This method helps reduce waste and keeps your meal tasty. The stir fry lasts about 3 to 4 days in the fridge. If you want to enjoy it later, follow the next steps. You can freeze leftover zucchini noodle stir fry for future meals. First, let it cool completely. Then, portion it into freezer-safe bags or containers. Remove as much air as possible to prevent freezer burn. This way, it can last up to 2 months in the freezer. When you're ready to eat, remove it from the freezer and thaw it in the fridge overnight. To reheat your stir fry, use a skillet over medium heat. Add a splash of water or oil to prevent sticking. Heat it for about 5 minutes, stirring often. This keeps the noodles from getting mushy. You can also use a microwave, but be careful not to overcook the noodles. Enjoy your tasty meal again! Yes, you can prep zucchini noodles ahead of time. To do this, spiralize your zucchini and place the noodles in a colander. Sprinkle them with a little salt. This step helps draw out water. Let them sit for about 15-20 minutes. Afterward, rinse and pat them dry. This way, your noodles will hold up well during cooking. If you don’t have zucchini, try other vegetables. Spaghetti squash is a great option. It has a similar texture and is easy to cook. You can also use sweet potatoes or carrots, spiralized into noodles. These add a different flavor and nutrients. Rice noodles or whole wheat pasta are good choices for traditional noodles. Zucchini Noodle Stir Fry is very healthy. Zucchini is low in calories and high in water. It helps you feel full without adding extra calories. The dish is packed with vitamins and minerals from fresh vegetables. You get fiber, which is great for digestion. Plus, using fresh herbs adds flavor without extra salt or fat. To reduce water in zucchini noodles, salt them. After spiralizing, put them in a colander and sprinkle salt. Let them sit for 15-20 minutes. This draws out moisture. Rinse and pat the noodles dry before cooking. You can also cook them quickly on high heat to avoid sogginess. This keeps them firm and tasty. In this blog post, we explored how to make a delicious zucchini noodle stir fry. We covered key ingredients, preparation steps, and helpful tips. You learned how to enhance flavor and make the dish your own with variations. Remember, you can easily store and reheat leftovers, keeping meals quick and tasty. Enjoy experimenting with this healthy, versatile dish, and impress your friends and family. Make this zucchini noodle stir fry your go-to recipe for a nutritious and satisfying meal!

Zucchini Noodle Stir Fry Tasty and Nutritious Meal

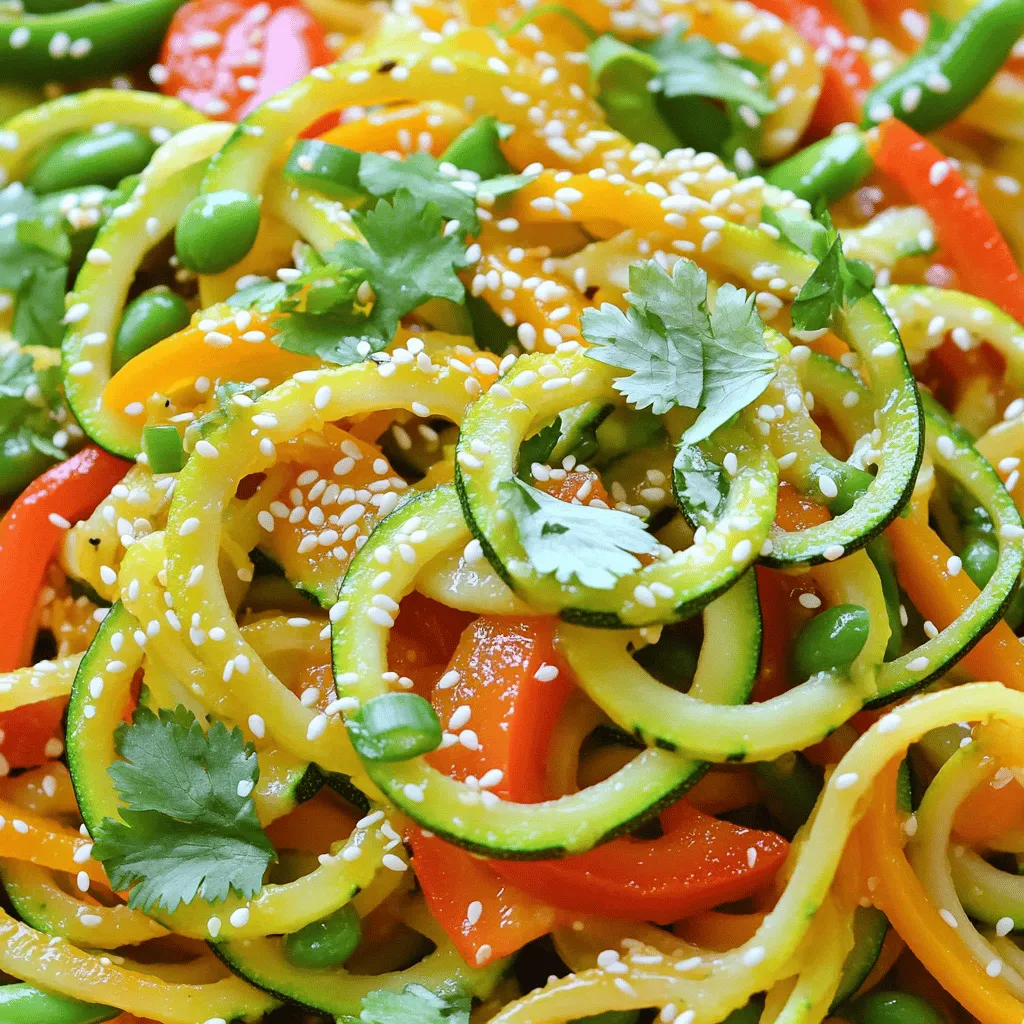
Are you ready to transform your meals with a fresh twist? My Zucchini Noodle Stir Fry is both tasty and

When you want to make Creamy Tomato Basil Pasta, gather these simple ingredients: - 300g penne pasta - 1 tablespoon olive oil - 3 cloves garlic, minced - 1 can (400g) crushed tomatoes - 1 teaspoon dried oregano - ½ teaspoon red pepper flakes (optional) - 200ml heavy cream - 100g grated Parmesan cheese - Salt and pepper to taste - 1 cup fresh basil leaves, chopped - Extra Parmesan cheese for serving Using fresh ingredients helps the dish taste great. The penne pasta gives a nice bite. Olive oil adds good flavor and helps cook garlic. Minced garlic brings a rich taste that pairs well with tomatoes. Crushed tomatoes are the base of the sauce. Dried oregano gives it an Italian flair. Red pepper flakes add a hint of heat if you like spice. Heavy cream makes the sauce creamy and smooth. Parmesan cheese adds a salty, nutty flavor. Finally, fresh basil leaves bring a bright, fresh note to the dish. For more details on how to prepare this dish, check out the Full Recipe. 1. Boil water and cook the penne: Start by bringing a large pot of salted water to a boil. Once boiling, add 300g of penne pasta. Cook it according to the package instructions until it is al dente. This usually takes about 10-12 minutes. 2. Reserve pasta water: Before you drain the pasta, make sure to save about a cup of the pasta water. This starchy water will help you adjust the sauce later. 1. Sauté garlic in olive oil: In a large skillet, heat 1 tablespoon of olive oil over medium heat. Add 3 cloves of minced garlic and sauté for about 1 minute. Keep an eye on it so it doesn’t burn. 2. Add tomatoes and seasoning: Pour in 1 can (400g) of crushed tomatoes. Then add 1 teaspoon of dried oregano and ½ teaspoon of red pepper flakes if you like some heat. Stir well and let this simmer for about 5-7 minutes. This allows all the flavors to blend nicely. 3. Simmer for flavor: Taste your sauce and adjust seasoning as needed. Let it bubble gently to develop rich flavors. 1. Stir in heavy cream: Lower the heat and slowly add 200ml of heavy cream to your sauce. Stir until it all mixes well. Let it simmer for another 3-4 minutes so it thickens slightly. 2. Mix pasta with sauce and cheese: Add the drained penne pasta to the creamy tomato sauce. If you find the sauce too thick, use a little of the reserved pasta water to loosen it. Next, mix in 100g of grated Parmesan cheese until melted. 3. Add salt, pepper, and basil: Season with salt and pepper to taste. Then gently fold in 1 cup of chopped fresh basil leaves, saving a few for garnish. Now you have a delicious creamy tomato basil pasta ready to enjoy! For the full recipe, you can refer to the earlier section. - Best pasta for creamy sauces: I recommend using penne pasta. Its hollow shape holds the sauce well. You can also try fettuccine or rigatoni for a fun twist. - How to prevent clumping: Make sure to stir the pasta right after draining. Adding a splash of olive oil helps keep it separate. If the sauce is too thick, use reserved pasta water to loosen it up. - Additional herbs and spices: Fresh herbs like parsley or thyme can brighten the dish. A pinch of sugar can balance acidity from the tomatoes. - Cheese substitutes: If you don’t have Parmesan, use Pecorino Romano or even a vegan cheese alternative. Nutritional yeast gives a cheesy flavor, too. - Garnishing suggestions: Top your pasta with fresh basil leaves and a drizzle of olive oil. A sprinkle of extra cheese adds a nice touch. - Serving ideas: Serve in warm bowls to keep the pasta hot. Pair it with crusty bread or a light salad for a complete meal. Enjoy your deliciously creamy tomato basil pasta! {{image_2}} If you want to keep it vegetarian, you can swap heavy cream for a plant-based option. Using cashew cream or coconut milk works great. You can also add veggies to the sauce. Spinach, bell peppers, or mushrooms add flavor and nutrients. Just sauté them with the garlic for a few minutes before adding the tomatoes. For a vegan dish, choose plant-based cheeses and creams. Almond or soy milk can replace heavy cream. Nutritional yeast can give a cheesy flavor without dairy. For the pasta, look for brands made from lentils or chickpeas. These options are both tasty and healthy. If you need gluten-free options, use gluten-free pasta. Brands made from rice or quinoa work well. Cooking times may vary, so check the package instructions. You want the pasta to be al dente. This way, it holds up well in the creamy sauce. For the Full Recipe, check the main article section. Creamy tomato basil pasta lasts about 3 to 5 days in the fridge. To store it well, let it cool before you put it in an airtight container. Make sure you cover the pasta tightly to keep it fresh. If you want to keep it longer, consider freezing it instead. You can freeze creamy tomato basil pasta for up to 3 months. To freeze it, place the cooled pasta in a freezer-safe container. Make sure to leave some space at the top, as it may expand. When you want to eat it, take it out and thaw it overnight in the fridge. To reheat, warm it in a skillet over medium heat. You can add a splash of milk or pasta water to help it regain its creamy texture. Stir well as it heats. If you have leftover pasta, you can use it in many ways. Try mixing it into a frittata for a tasty breakfast. You can also use it as a filling for stuffed peppers or mix it into soup for added heartiness. The creamy tomato basil sauce can also be repurposed. Use it as a dip for breadsticks or drizzle it over grilled chicken or veggies. It adds great flavor and can elevate many everyday dishes. Can I make this recipe ahead of time? Yes, you can make this creamy tomato basil pasta ahead. Cook the pasta and sauce, then cool them. Store them in separate containers in the fridge for up to three days. When ready to eat, just reheat the sauce and pasta together. What can I substitute for Parmesan cheese? If you need a substitute for Parmesan cheese, try Pecorino Romano or nutritional yeast for a vegan option. Both options add a nice flavor, making your dish still delicious. Is this dish suitable for meal prep? Yes, this dish is great for meal prep. You can pack it in single servings. Just reheat when you are ready to eat. How to fix a too-thick sauce? If your sauce is too thick, add a bit of the reserved pasta water. Start with a small amount and stir until you reach your desired consistency. Can I add meat to this recipe? Absolutely! You can add cooked chicken, sausage, or ground beef to the sauce. Just make sure the meat is cooked through before mixing it with the pasta. Best types of pasta for this dish? I recommend using penne pasta, as it holds sauce well. Other good options include fusilli or rigatoni. Fresh vs dried basil, which is better? Fresh basil is best for this recipe. It provides a vibrant flavor and aroma. Dried basil works in a pinch, but fresh basil makes your dish shine! This blog shared a recipe for creamy tomato basil pasta. We covered ingredients, step-by-step instructions, and helpful tips. You learned about cooking pasta perfectly and making a flavorful sauce. I also shared variations for different diets and storage tips for leftovers. Enjoy experimenting with this dish! It’s simple, tasty, and easy to adapt. Remember, cooking should be fun. Happy cooking!

Creamy Tomato Basil Pasta Quick and Easy Recipe

Are you craving a simple yet delicious meal? This Creamy Tomato Basil Pasta is just what you need! With just

- 2 cups cooked chicken, shredded - 3 cups fresh broccoli florets - 1 cup cooked brown rice (or quinoa for a twist) - 1 cup sharp cheddar cheese, grated - 1 cup cream of mushroom soup (or homemade if you prefer) - ½ cup milk - ¼ cup mayonnaise - 1 teaspoon garlic powder - 1 teaspoon onion powder - Salt and pepper to taste - ½ cup breadcrumbs - 2 tablespoons olive oil - ½ teaspoon paprika (for garnish) - If you want to change the brown rice, try quinoa or cauliflower rice. - For gluten-free options, use gluten-free cream of mushroom soup and breadcrumbs. - You can swap out the cheese for mozzarella, Monterey Jack, or vegan cheese options. In this dish, I love how every ingredient works together. The chicken adds protein, while the broccoli brings color and nutrients. The cheese melts in, making it creamy and rich. You can find the full recipe to guide you through each step. This meal is easy to adapt, so feel free to mix and match with what you have on hand. - Preheat the oven to 350°F (175°C). - Steam broccoli florets for 3-4 minutes until tender. To start, I always set my oven to 350°F. This gets it warm and ready for baking. While the oven heats, I steam the broccoli. I like to keep it bright and just tender. This helps it stay green and tasty in the dish. - Combine ingredients in a large bowl: chicken, broccoli, rice, cheese, soup, milk, and spices. - Pour the mixture into a greased baking dish. Next, I grab a big bowl. I add the cooked chicken, steamed broccoli, cooked rice, and cheese. I also include the soup, milk, and spices. It’s important to mix well so every bite has great flavor. Once it is mixed, I pour everything into a greased baking dish. This helps it not stick when it bakes. - Add breadcrumb and cheese topping. - Bake for 25-30 minutes until golden brown and bubbly. Now comes the fun part! I sprinkle breadcrumbs and some extra cheese on top. This gives a nice crunchy layer. After that, I slide the dish into the oven. I bake it for 25-30 minutes. The top should turn golden brown and bubbly. You can smell the yummy flavors as it cooks. This Cheesy Broccoli Chicken Casserole is an easy family meal. You can find the full recipe above to try it yourself! - Ensure chicken is cooked and shredded for easy mixing. This makes the casserole smooth. - Do not overcook broccoli to preserve nutrients and color. Bright green broccoli looks great! - Serve with a fresh salad or crusty bread. This adds crunch and freshness. - Best enjoyed warm, garnished with parsley. It makes the dish pop with color! - Reduce cheese or substitute with low-fat alternatives. This cuts fat but keeps flavor. - Add more vegetables like bell peppers or carrots. This boosts nutrition and adds color. For the full recipe and more details, check out the [Full Recipe]. {{image_2}} You can spice up your casserole easily. One fun option is to add jalapeños or red pepper flakes for a kick. If you love mushrooms, sauté some and mix them in for a rich taste. These small tweaks can make a big difference in flavor. If you're looking for a vegetarian dish, try using chickpeas or tofu instead of chicken. Both options add protein and keep the dish hearty. For a low-carb version, swap the rice for cauliflower. This keeps it light and healthy without losing taste. Want to take your casserole global? For a Mexican flair, mix in some taco seasoning and top with creamy avocado. If Italian is more your style, blend in pesto and use mozzarella cheese. These twists can turn an everyday meal into a special treat. For the full recipe, you can follow the steps I outlined earlier. Enjoy creating your own version of this cheesy broccoli chicken casserole! Store your leftovers in an airtight container. They will stay fresh in the fridge for up to 3 days. If you want to keep them longer, freezing is a great option. You can freeze the casserole for up to 2 months. Just make sure to let it cool before you freeze it. This way, it stays safe and tasty. When it’s time to eat, you have a few choices for reheating. For the best texture, reheat it in the oven. Set the oven to 350°F (175°C) and heat until warm. If you’re in a hurry, you can microwave it. Just heat in portions to keep it even. To help it stay creamy, add a splash of milk before reheating. Meal prep is super easy with this casserole. You can prepare it ahead of time and keep it in the fridge unbaked. When you are ready to serve, just pop it in the oven. This way, you will enjoy a fresh, warm meal without all the work. Yes, but reduce cooking time as frozen broccoli is pre-cooked. Frozen broccoli cooks faster than fresh. I often use frozen for quick meals. Just remember to check for doneness sooner. Absolutely! Assemble the casserole and refrigerate it before baking. This saves time on busy nights. You can prepare it in the morning and bake it later. Just allow it to sit at room temperature for a bit before cooking. You can use homemade mushroom sauce, sour cream, or any other cream-based soup. I often make my own sauce for a fresh taste. Each option brings a unique flavor, so try what you have on hand! Substitute cheese and milk with dairy-free alternatives like almond milk and nutritional yeast. Nutritional yeast gives a cheesy flavor without dairy. You can enjoy this casserole without losing its creamy texture. This blog post guides you through making a delicious chicken and broccoli casserole. You learned the essential ingredients, step-by-step instructions, and tips for perfecting this dish. I also shared variations, storage advice, and answered common questions. Enjoying this casserole can be easy and fun, with plenty of ways to customize it. Whether you’re cooking for family or meal prepping, this recipe will not disappoint. Dive in and get cooking!

Cheesy Broccoli Chicken Casserole Easy Family Meal

Looking for a meal that’s quick, cheesy, and packed with goodness? This Cheesy Broccoli Chicken Casserole is your answer! With

- 1 lb (450g) flank steak, thinly sliced against the grain - 8 oz (225g) shiitake mushrooms, sliced - 1 bell pepper (red or green), sliced - 1 cup broccoli florets - 4 green onions, chopped (white and green parts separated) - 4 cloves garlic, minced - 2 tablespoons ginger, minced - 3 tablespoons soy sauce - 1 tablespoon oyster sauce - 1 tablespoon sesame oil - 2 tablespoons vegetable oil - 1 tablespoon cornstarch - 1/4 cup beef broth - 1 teaspoon sugar - Sesame seeds for garnish - Salt and pepper to taste - Vegetable oil - Garlic and ginger for seasoning - Beef broth and sugar - Sesame seeds - Fresh herbs or additional green onions When I cook Asian beef with mushrooms, I always gather my ingredients first. This makes cooking easier. I start with flank steak. Slicing it against the grain makes it tender. Shiitake mushrooms add a great flavor. I also like to add a bell pepper and broccoli. These give the dish color and crunch. For the marinade, I mix soy sauce, oyster sauce, sesame oil, and cornstarch. This combination gives the beef a lovely taste and helps it stay juicy. Don't forget the cooking essentials! I use vegetable oil for stir-frying. Garlic and ginger add a warm spice. Beef broth adds depth, and sugar balances the flavors. Finally, garnishing is key! I love to sprinkle sesame seeds on top. Fresh green onions or herbs make it look great too. This dish is not just tasty; it looks beautiful as well! For the full recipe, check the section above. To start, you need to prepare the marinade. This will help the beef become tender and flavorful. In a medium bowl, mix together: - 3 tablespoons soy sauce - 1 tablespoon oyster sauce - 1 tablespoon sesame oil - 1 tablespoon cornstarch - A pinch of salt and pepper The cornstarch helps to lock in moisture. Combine these ingredients well. Add 1 lb of thinly sliced flank steak. Make sure all the beef is covered by the marinade. Let the beef marinate for at least 20 minutes. This gives the flavors time to soak in. For the best results, use medium-high heat when cooking the beef. Heat 1 tablespoon of vegetable oil in a large skillet. Once the oil is hot, add the marinated beef in a single layer. Cook for about 2-3 minutes. You want it browned and cooked through. Be careful not to overcrowd the pan. This helps the beef brown evenly. After cooking, remove the beef and set it aside. Now, it’s time to stir-fry the vegetables. In the same skillet, add another tablespoon of vegetable oil. Start with 4 cloves of minced garlic and 2 tablespoons of minced ginger. Sauté for about 30 seconds until fragrant. Then, add: - 8 oz sliced shiitake mushrooms - 1 sliced bell pepper - 1 cup broccoli florets Stir-fry these veggies for 5-7 minutes. You want them tender but still crisp. This keeps the dish fresh and colorful. After that, return the beef to the skillet, along with 1/4 cup of beef broth and the white parts of 4 chopped green onions. Stir everything well and let it cook for another 2-3 minutes. This allows the sauce to thicken slightly. You can find the full recipe for more detailed steps. Seasoning brings life to your dish. Use soy sauce and oyster sauce generously. Marinate your beef for at least 20 minutes. This helps make the meat tender and flavorful. Let it rest after cooking too. Resting allows juices to settle, making each bite juicier. A large skillet or wok works best for stir-frying. These tools help heat circulate evenly. Always heat your pan before adding oil. This helps sear the beef quickly. Cook on medium-high heat for best results. Stir constantly to avoid burning and ensure even cooking. To serve, place the stir-fry over jasmine rice or noodles. This adds a nice base. Use a large bowl for a family-style meal. Garnish with sesame seeds and extra green onions. A sprig of fresh herbs can add color and freshness. Bright colors make the dish more appealing. {{image_2}} You can easily swap the flank steak for other proteins. Chicken or tofu work great. They both absorb the flavor well. For veggies, try snap peas or carrots. They add crunch and color. Use what you have on hand. This makes the dish flexible and fun. To boost flavor, consider adding sauces or spices. Teriyaki sauce gives a sweet touch. A splash of fish sauce adds depth. If you like heat, add chili pastes or fresh peppers. Slicing jalapeños or adding sriracha can spice things up. Customize it to your taste. For gluten-free options, use tamari instead of soy sauce. This keeps the taste without gluten. If you want low-carb, skip the sugar and serve with cauliflower rice. This version remains tasty and satisfying. You can enjoy Asian beef with mushrooms while meeting your dietary needs. To store leftovers, let the dish cool first. Place it in an airtight container. This keeps the beef and mushrooms fresh. Use glass or plastic containers with tight lids for best results. Store it in the fridge. You can keep it for up to three days. Want to freeze the dish? First, let it cool completely. Then, use freezer-safe containers. You can also use freezer bags. Make sure to remove as much air as possible before sealing. This keeps it fresh for up to three months. When ready to eat, move it to the fridge overnight to thaw. When reheating, use a skillet or microwave. For the skillet, heat it on medium. Add a splash of broth to keep it moist. Stir until it’s hot. This usually takes about 5-7 minutes. If using the microwave, heat in short bursts. Stir in between to avoid hot spots. Aim for an internal temperature of 165°F (74°C) for safe eating. You can swap the beef for tofu or tempeh. Both options work well in stir-fries. Use firm tofu for the best texture. Cut it into small cubes and press to remove excess water. Marinate it like you do with the beef. You can also use seitan, which has a meat-like texture. Try adding extra vegetables like zucchini or snap peas for more flavor. Yes, you can prep this dish ahead of time. Marinate the beef or tofu a day early. Store it in the fridge for better flavor. You can also chop the veggies in advance. Keep them in an airtight container. Just stir-fry everything on the day you want to serve it. This method saves time and keeps your meal fresh. This dish pairs well with rice or noodles. Jasmine rice is a great choice. You can also use brown rice for a healthier option. If you prefer noodles, try egg noodles or rice noodles. Serve some steamed broccoli or a side salad for a balanced meal. You can add pickled vegetables for a crunchy side. Enjoy the mix of flavors and textures! In this post, we discussed how to create a delicious Asian beef with mushrooms. You learned about essential ingredients, cooking techniques, and tips for flavor. I provided garnishing ideas and variations to suit your taste. Remember, marinating beef enhances flavor, and proper cooking preserves texture. You can easily adjust this recipe for different diets or preferences. Enjoy making this meal, and feel free to share your results! Explore and customize your dish, and have fun in the kitchen!

Asian Beef with Mushrooms Flavorful Stir-Fry Recipe

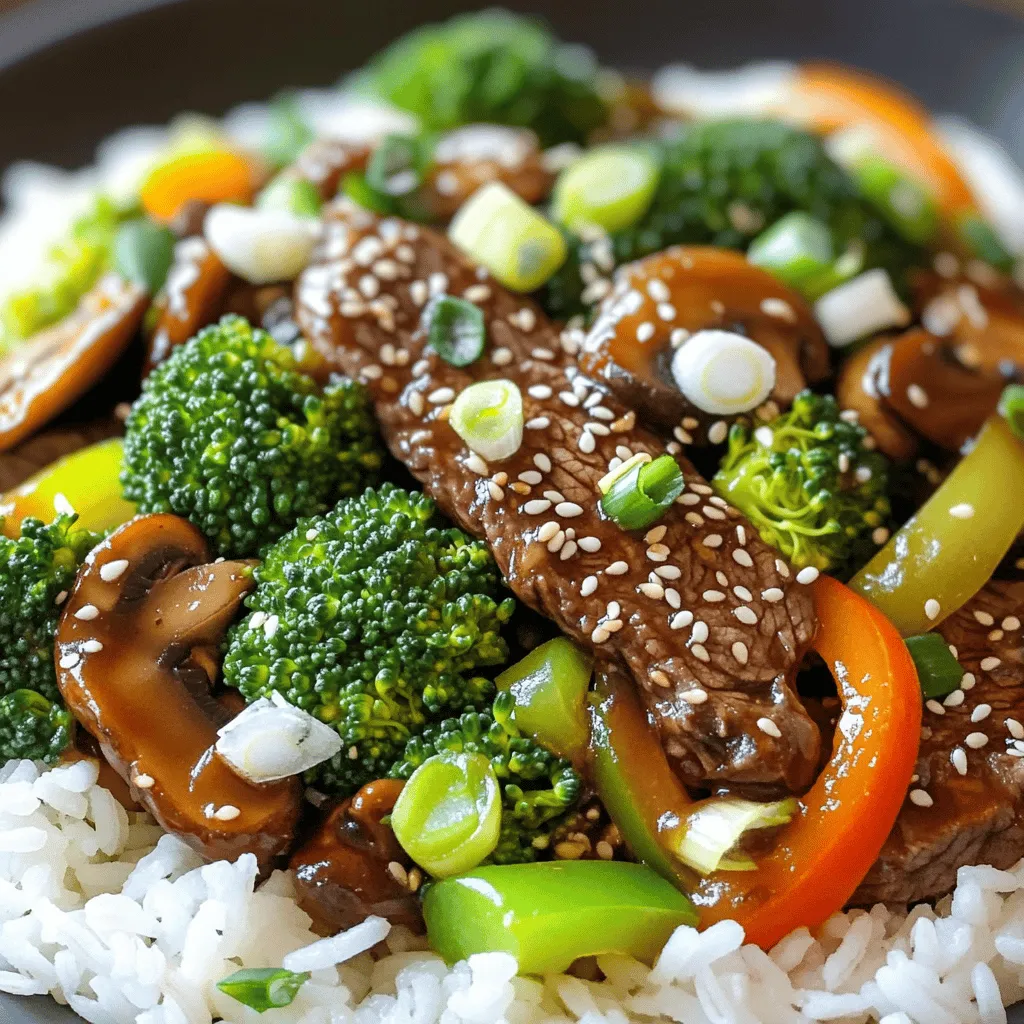
Craving a dish that packs a punch? This Asian Beef with Mushrooms stir-fry is vibrant, tasty, and super easy to

For a perfect crust, gather these items: - 2 ½ cups all-purpose flour - 1 teaspoon cinnamon - ½ teaspoon baking powder - 1 teaspoon salt - 1 cup unsalted butter, cold and cubed - ½ cup granulated sugar - 1 large egg The filling brings the pie to life. You will need: - 4 medium apples (Granny Smith or Honeycrisp), peeled, cored, and sliced - ½ cup brown sugar - 1 teaspoon ground cinnamon - 1 tablespoon lemon juice This layer adds a rich taste. Use these ingredients: - 8 ounces cream cheese, softened - ½ cup granulated sugar - 1 teaspoon vanilla extract - 1 large egg The topping gives a sweet crunch. You will need: - ¼ cup granulated sugar - 1 tablespoon cinnamon For the complete recipe, check the Full Recipe. This pie combines the sweet taste of apples with creamy cheese. You will love how it melts in your mouth! To start, grab a mixing bowl. Add 2 ½ cups of all-purpose flour, 1 teaspoon of cinnamon, ½ teaspoon of baking powder, and 1 teaspoon of salt. Mix these dry ingredients well. Next, take 1 cup of cold, cubed butter. Use a pastry cutter or your fingers to blend it into the flour mix. Keep mixing until it looks like coarse crumbs. Now, add ½ cup of granulated sugar and 1 large egg. Mix until everything is combined. Form the dough into a ball, wrap it in plastic, and chill it in the fridge for 30 minutes. While the dough chills, let's prepare the filling. Take 4 medium apples, like Granny Smith or Honeycrisp, and peel, core, and slice them. In a large bowl, toss the apples with ½ cup of brown sugar, 1 teaspoon of ground cinnamon, and 1 tablespoon of lemon juice. Let this sit for 10-15 minutes. This step helps the apples soak up the flavors. Now, it's time for the cream cheese layer. In a separate bowl, add 8 ounces of softened cream cheese. Mix this with ½ cup of granulated sugar, 1 teaspoon of vanilla extract, and 1 large egg. Beat these ingredients together until the mixture is smooth and creamy. This layer adds a rich taste to the pie. Preheat your oven to 350°F (175°C). Roll out about 2/3 of your chilled dough on a floured surface. Place it into a 9-inch pie pan. Spread the cream cheese mixture evenly over this crust. Next, layer the spiced apple filling over the cream cheese layer. This creates a yummy contrast of flavors. For the topping, roll out the remaining dough. You can cut it into strips for a lattice design or cover the pie completely. If you cover it fully, make slits for steam to escape. Trim and seal the edges. In a small bowl, mix ¼ cup of granulated sugar with 1 tablespoon of cinnamon. Sprinkle this mixture evenly over the crust for added flavor. Finally, place your pie in the oven. Bake it for 45-50 minutes or until the crust turns golden brown and the filling bubbles up. Once done, let the pie cool at room temperature for at least 30 minutes. This cooling time helps the filling set. For the best experience, serve it warm or at room temperature, maybe with a scoop of vanilla ice cream. Remember, you can find the full recipe for this delightful treat above! The crust is key for a great pie. Start with cold butter. This keeps the crust flaky. Use a pastry cutter or your fingers to mix. Stop when the mix looks like sand. Chill the dough for at least 30 minutes. This helps it hold shape when baked. Choose apples that are crisp and tart. Granny Smith and Honeycrisp work well. Peel and core each apple first. Then, slice them thinly. Thin slices cook faster and blend better with the filling. Toss the apples with brown sugar and cinnamon. This adds flavor and draws out juice. After baking, let the pie cool for 30 minutes. This helps the filling set. If you cut it too soon, it may spill. Serve warm or at room temperature. Pair it with vanilla ice cream for a tasty treat. You can also drizzle caramel on top for extra flavor. Check out the Full Recipe for more details! {{image_2}} You can switch out apples for other fruits. Pears add a sweet touch. Cherries bring a tart flavor. Peaches offer a juicy twist. Just make sure to adjust the sugar based on the fruit's sweetness. This keeps your pie balanced and tasty. Want a gluten-free crust? Use a mix of almond flour and coconut flour. You can also use a store-bought gluten-free pie crust. Just follow the package directions. This way, everyone can enjoy this pie without worry. To make this pie vegan, swap cream cheese for a plant-based option. Look for brands that use nuts or soy. You can also blend silken tofu with a bit of lemon juice and sugar. This gives a creamy texture that works well here. For more ways to enjoy this recipe, check the Full Recipe. After enjoying your snickerdoodle cream cheese apple pie, let it cool completely. Cover it with plastic wrap or foil. This keeps the pie fresh and tasty for up to 3 days in the fridge. Make sure to store it in an airtight container to lock in flavors. If you want to save some for later, freezing is a great option. Slice the pie into pieces. Wrap each piece tightly in plastic wrap, then place them in a freezer bag. This way, you can enjoy a slice whenever you want! The pie will stay good for up to 3 months in the freezer. Just remember to label the bag with the date. To enjoy your pie warm, preheat your oven to 350°F (175°C). Place the pie or slices on a baking sheet. Cover with foil to prevent burning. Heat for about 15-20 minutes. If you want it warm and gooey, you can also use the microwave. Heat a slice for 30-45 seconds, but keep an eye on it. Enjoy your snickerdoodle cream cheese apple pie again with these easy steps! For the full recipe, check out the complete guide. Yes, you can use store-bought crust. It saves time and still tastes good. Just follow the package instructions for baking. If you want a homemade taste, try making your own crust. Granny Smith and Honeycrisp apples work best for this pie. These apples offer a nice balance of sweet and tart flavors. They hold their shape well when baked, giving you a great texture. This pie lasts about 3 to 4 days in the fridge. Keep it covered to maintain freshness. If you notice any changes in smell or texture, it’s best to toss it. Yes, you can make this pie in advance. It tastes great after resting in the fridge. Just bake the pie, let it cool, and then store it covered. You can also freeze it for up to 3 months. Serve the pie warm or at room temperature. A scoop of vanilla ice cream pairs nicely. You can sprinkle some cinnamon on top or drizzle caramel for extra flavor. For a fun touch, try adding whipped cream! In this blog post, we covered the essential ingredients for the crust, filling, and toppings of the Snickerdoodle Cream Cheese Apple Pie. I shared clear steps to make each part of the pie, from crust to baking. You now have tips for a better crust and storage info to keep it fresh. Exploring variations lets you customize your pie easily. This recipe is fun and tasty, perfect for gatherings. Enjoy making this pie and sharing it with friends and family for sweet smiles.

Snickerdoodle Cream Cheese Apple Pie Delightful Recipe

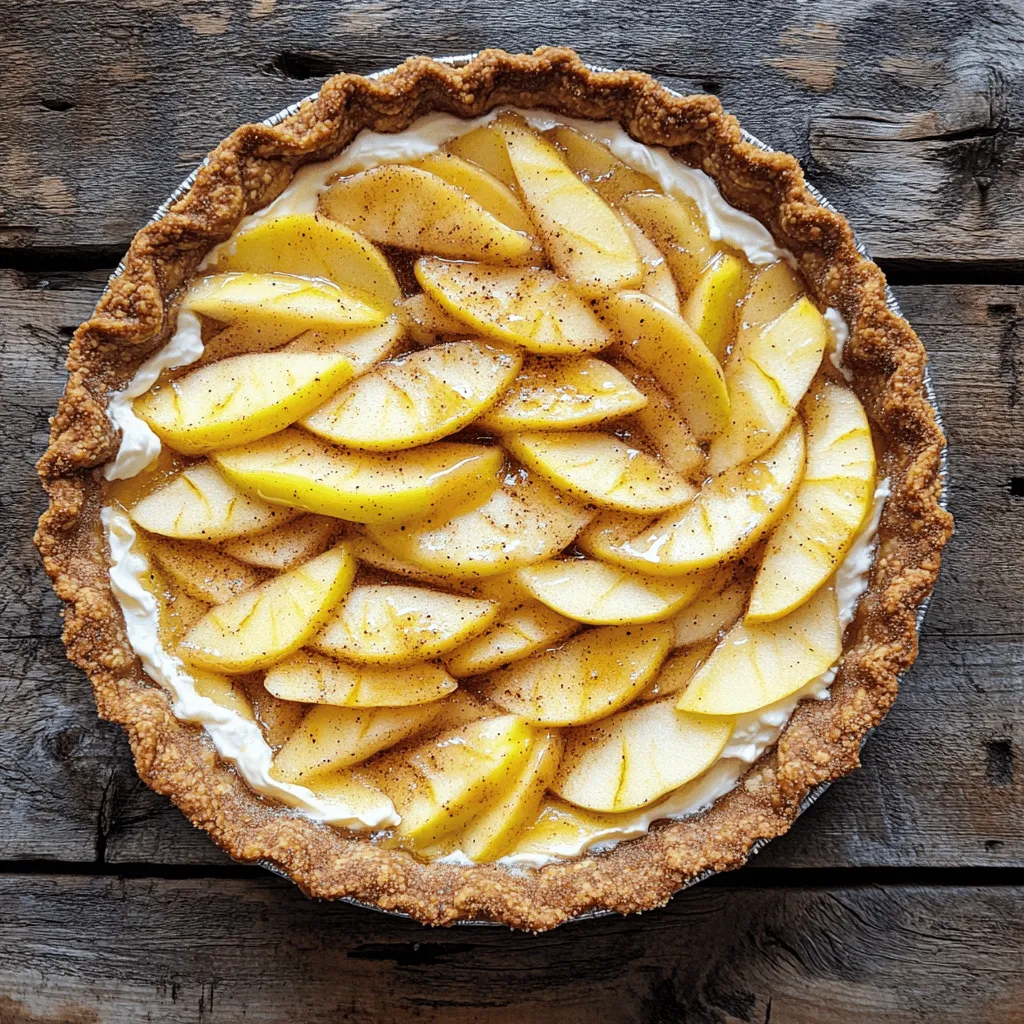
Are you ready to impress everyone with a unique dessert? My Snickerdoodle Cream Cheese Apple Pie blends creamy goodness with

Older posts
Newer posts
← Previous Page1 … Page53 Page54 Page55 … Page58 Next →

dsad

© 2025 Home Cooking Style • Built with GeneratePress

Our Policies

  • Copyright Policy
  • Cookie Policy
  • GDPR Policy
  • Privacy Policy
  • Disclaimer
  • Terms Of Use

More Information

  • Home
  • About
  • Contact
  • Appetizers
  • Dessert
  • Dinner
  • Drinks
©2025, Home Cooking Style About Back To Top