Skip to content
DisclaimerTerms Of UseGDPR PolicyCookie Policy

Home Cooking Style

  • Home
  • Drinks
  • Appetizers
  • Dinner
  • Dessert
  • About
  • Contact
  • Privacy Policy
DisclaimerTerms Of UseGDPR PolicyCookie Policy

Amelia

To make the best creamy spinach artichoke dip, you need some key ingredients. Here’s what you’ll need: - 1 cup fresh spinach, chopped - 1 cup canned artichoke hearts, drained and chopped - ½ cup cream cheese, softened - ½ cup sour cream - ½ cup mayonnaise - 1 cup shredded mozzarella cheese - ¼ cup grated Parmesan cheese - 2 cloves garlic, minced - 1 teaspoon lemon juice - Salt and pepper to taste You can add more flavor with these optional ingredients: - ¼ teaspoon red pepper flakes for heat - A squeeze of fresh lemon juice for brightness - Chopped herbs like parsley or basil for freshness Adding these extras can give your dip a unique twist. Using fresh ingredients makes a big difference in taste. Here are some tips: - Spinach: Look for vibrant, dark green leaves. Avoid wilted or yellowing leaves. - Artichokes: Choose canned artichokes packed in water, not oil. This keeps them light. - Cheeses: Go for blocks of cheese instead of pre-shredded. Freshly shredded cheese melts better. - Cream Cheese: Use full-fat cream cheese for creaminess. It gives a rich flavor. When you pick high-quality ingredients, your creamy spinach artichoke dip will shine. For the full recipe, check out the instructions above! Start by preheating your oven to 375°F (190°C). This step warms the oven for even cooking. In a medium bowl, mix the cream cheese, sour cream, and mayonnaise. Use a hand mixer or spatula to blend them until smooth. A creamy base is key to a great dip. Next, add the chopped spinach and artichoke hearts to the creamy mix. Stir them in well, making sure they are evenly spread. This mix should look bright and inviting. Then, add minced garlic, lemon juice, shredded mozzarella, and Parmesan cheese. Season with salt, pepper, and red pepper flakes if you like some heat. Mix until everything is combined. Once your mixture is ready, spoon it into an oven-safe dish. Spread it evenly across the dish. Place it in the preheated oven and bake for about 25-30 minutes. You want the dip to be bubbly and golden on top. After baking, let it cool for a few minutes before serving. This dip tastes great warm with pita chips or fresh veggies. For the full recipe, see the earlier section. To get the creamiest texture for your dip, use room-temperature ingredients. This helps them blend well. I recommend softening the cream cheese first. Mixing it with a hand mixer gives you a smooth base. Make sure you stir in the spinach and artichokes gently. This keeps the dip fluffy and light. Using full-fat cream cheese and mayonnaise also adds richness. One common mistake is overcooking the dip. This can make it dry. Bake just until bubbly and golden on top. Another mistake is not seasoning enough. A pinch of salt and pepper makes a big difference. Don’t skip the garlic; it adds great flavor. Lastly, avoid using frozen spinach. It can make the dip watery. Always choose fresh spinach for the best taste. Serve your dip warm for the best flavor. I love using toasted pita chips for a crunchy bite. Fresh vegetable sticks are a healthy option too. You can also try crispy tortilla chips. For a fun twist, add some red pepper flakes for heat. Garnish with extra Parmesan and spinach leaves for color. These small details make a big impact on your dish. For the full recipe, check out the details above. {{image_2}} If you want a lighter dip, you can swap some ingredients. Use low-fat cream cheese and Greek yogurt instead of sour cream and mayonnaise. This way, you keep the flavor but cut some calories. You can also use reduced-fat mozzarella cheese. These changes still give you that creamy texture without the extra fat. To make your dip more exciting, try adding spices. You can mix in a pinch of cayenne for heat or smoked paprika for a smoky taste. Want more zest? Add a squeeze of fresh lime juice. You can also use fresh herbs like parsley or basil. Each tweak brings a new twist to the classic flavor. This dip shines when served with the right snacks. Pair it with crunchy pita chips or fresh veggie sticks like carrots and cucumbers. Tortilla chips also work well. For a fun twist, spread it on toasted bread for mini bruschetta. Each option makes the dip even more enjoyable. For the full recipe, check the details above. To store leftover dip, let it cool first. Transfer it to an airtight container. This helps keep out air and moisture. Place it in the fridge. It will stay fresh for about 3-4 days. Always use a clean spoon when serving. This helps keep the dip safe to eat. When you are ready to enjoy the dip again, reheating is key. Preheat your oven to 350°F (175°C). Place the dip in an oven-safe dish. Cover it with foil to keep it moist. Heat it for about 15-20 minutes. Stir halfway through for even warmth. You can also microwave it. Heat in short bursts of 30 seconds. Stir in between to avoid hot spots. You can freeze this dip, too! Start by letting it cool completely. Transfer it to a freezer-safe container. Leave some space at the top, as it may expand. It can last for up to two months in the freezer. To thaw, move it to the fridge overnight. Reheat as mentioned above for the best taste. Enjoy your creamy spinach artichoke bliss later with full flavor! I love to serve Creamy Spinach Artichoke Dip warm. It tastes best fresh from the oven. You can pair it with toasted pita chips or crunchy tortilla chips. Fresh vegetable sticks also work well. For a fun twist, add a sprinkle of extra Parmesan on top. This makes it look great and adds flavor. The warm, cheesy dip is a crowd-pleaser at parties and gatherings. Yes, you can make this dip ahead of time! Prepare it completely and store it in the fridge. Cover it to keep it fresh. When you are ready to serve, just bake it as usual. This dip tastes just as good, even when reheated. You can save time by making it the day before a party. Just remember to let it cool slightly before serving. Absolutely! You can create a vegan version with some simple swaps. Use vegan cream cheese instead of regular cream cheese. Replace sour cream and mayonnaise with plant-based yogurt or cashew cream. For the cheese, try using nutritional yeast for a cheesy flavor. You can also add more spices to boost the taste. This way, everyone can enjoy a creamy dip. Check the Full Recipe for more ideas! We explored how to make a delicious Creamy Spinach Artichoke Dip. You learned about key ingredients and how to mix them well. Following the tips can help you avoid mistakes and ensure a creamy texture. We also covered variations to suit your taste and storage methods for leftovers. Remember, you can adjust flavors and serve this dip in fun ways. With these steps, you can impress anyone with your dip-making skills. Keep experimenting and enjoy every bite!

Creamy Spinach Artichoke Dip Irresistible Flavor Boost

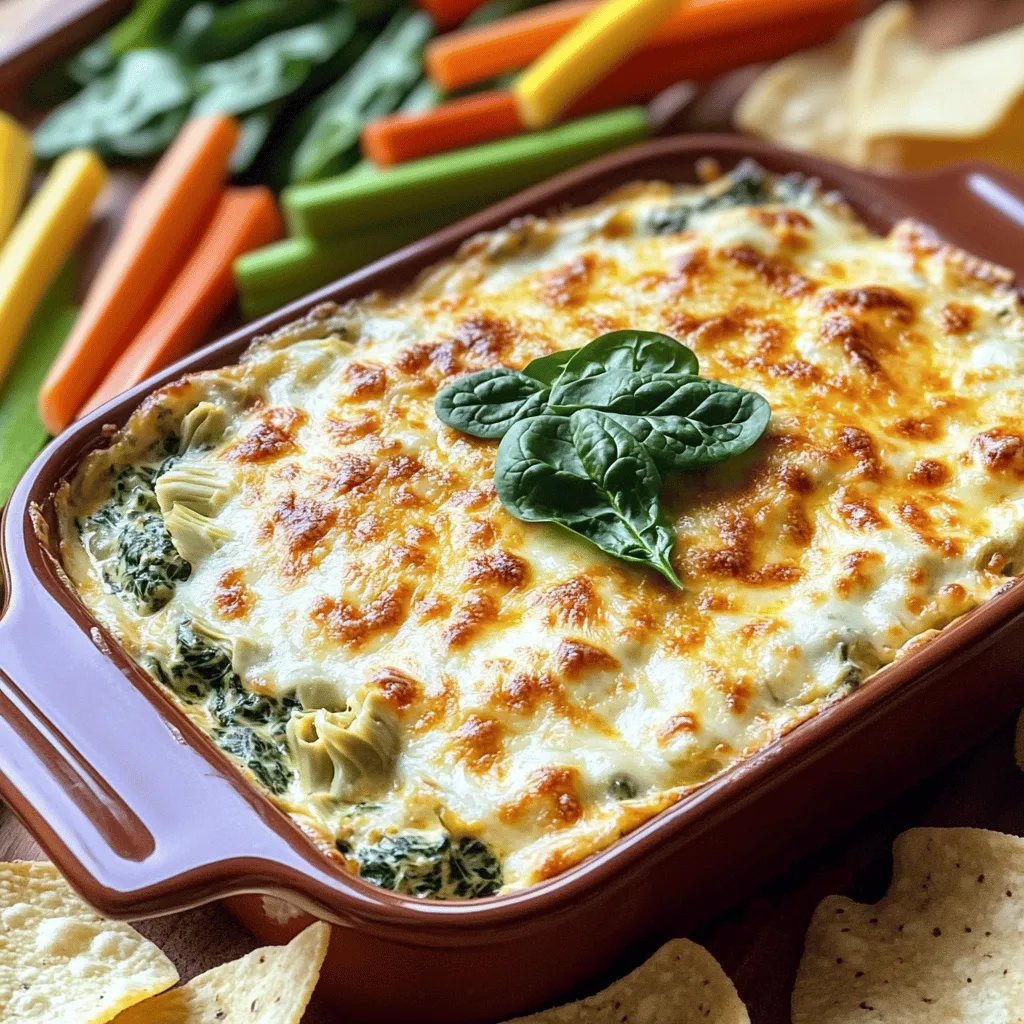
Are you ready to elevate your snack game? My Creamy Spinach Artichoke Dip is a flavor bomb that will impress

To make this easy and tasty dessert, you need these main ingredients: - 1 can (15 oz) pumpkin puree - 1 can (12 oz) evaporated milk - 3 large eggs - 1 cup granulated sugar - 1 tablespoon pumpkin pie spice - 1 teaspoon vanilla extract - 1 box (15.25 oz) yellow cake mix - 1 cup unsalted butter, melted These ingredients blend to create a rich and creamy filling with a crunchy topping. The pumpkin puree gives it that classic fall flavor. The evaporated milk makes it smooth, while the eggs help it set just right. You can add some fun twists with these optional ingredients: - 1 cup chopped pecans - Whipped cream or vanilla ice cream for serving Adding pecans gives a nice crunch and extra flavor. Serving with whipped cream or ice cream makes it even better. This dessert serves about 9-12 people. Each serving has around: - Calories: 300 - Total Fat: 16g - Saturated Fat: 10g - Cholesterol: 90mg - Sodium: 200mg - Total Carbohydrates: 37g - Dietary Fiber: 2g - Sugars: 20g - Protein: 4g This dessert is rich, so enjoy it in moderation. You can find the full recipe [Full Recipe] to see all the details. To start, gather your ingredients. You will need: - 1 can (15 oz) pumpkin puree - 1 can (12 oz) evaporated milk - 3 large eggs - 1 cup granulated sugar - 1 tablespoon pumpkin pie spice - 1 teaspoon vanilla extract - 1 box (15.25 oz) yellow cake mix - 1 cup unsalted butter, melted - 1 cup chopped pecans (optional) First, preheat your oven to 350°F (175°C). This helps bake your cake evenly. In a large bowl, mix the pumpkin puree, evaporated milk, eggs, sugar, pumpkin pie spice, and vanilla extract. Use a whisk to blend until smooth. This mixture is the base of your cake. Once combined, pour it into a greased 9x13-inch baking dish. Spread it evenly across the bottom. Next, sprinkle the dry yellow cake mix over the pumpkin layer. Make sure there are no large clumps. Now, drizzle the melted butter over the top. Do not mix it in; this will create a crumbly topping while baking. If you want extra crunch, sprinkle the chopped pecans on top. Place the baking dish in your preheated oven. Bake for 50-60 minutes. The top should turn golden brown and set. To check if it's done, insert a toothpick in the center. If it comes out with a few moist crumbs, it’s ready. When your cake is done, take it out of the oven. Let it cool for about 15-20 minutes. This cooling time helps it set up nicely. Serve it warm, topped with whipped cream or a scoop of vanilla ice cream. For extra fun, drizzle caramel sauce over the top. Enjoy your delicious Pumpkin Pie Dump Cake! To get the best texture, mix your ingredients well. Make sure the pumpkin puree and eggs blend smoothly. This helps create a creamy base. When you sprinkle the cake mix, do not mix it into the pumpkin layer. The dry mix sits on top and forms a nice crust as it bakes. One big mistake is overmixing the pumpkin mixture. This can make the final cake dense. Another mistake is using cold butter. Always melt your butter first. Cold butter can lead to uneven baking. Lastly, don’t skip the cooling step. Letting it cool helps the cake set better. Use unsalted butter for a balanced flavor. Melt it until it’s just liquid. This helps create that crunchy top layer. For the cake mix, opt for a standard yellow mix. It gives a light, sweet flavor that pairs well with pumpkin. Be sure to spread the cake mix evenly to avoid clumping. You want a nice, even topping for the perfect bite. Follow these tips for a Pumpkin Pie Dump Cake that is both simple and tasty. Check out the Full Recipe for all the details! {{image_2}} You can make this dish gluten-free easily. Just swap the yellow cake mix for a gluten-free blend. Many brands offer great mixes that work well. Check the label to ensure it’s truly gluten-free. This change keeps the flavor, while making it safe for those with gluten issues. Want to kick up the flavor? Add more spices! You could use cinnamon or nutmeg to give it warmth. A splash of maple extract can add a sweet twist. You can even try adding a bit of ginger for a spicy kick. These little changes make a big difference in taste. Toppings are a fun way to change your cake. You can use whipped cream or vanilla ice cream for a classic touch. Try adding caramel sauce for extra sweetness and flavor. If you want a crunch, sprinkle some chopped pecans or walnuts on top. Each topping changes the cake's flavor and texture, making it unique. After enjoying your pumpkin pie dump cake, let it cool completely. Cover the dish tightly with plastic wrap or aluminum foil. You can also transfer leftovers to an airtight container. Store it in the fridge for up to 4 days. This keeps it fresh and tasty. When you're ready to enjoy leftovers, preheat your oven to 350°F (175°C). Place the cake in an oven-safe dish. Cover it with foil to keep it moist. Heat for about 15-20 minutes. You can also microwave individual servings for 30-60 seconds. Just make sure to check that it's warm all the way through. If you want to save some for later, this cake freezes well. Cut it into portions and wrap each one in plastic wrap. Then, place the wrapped slices in a freezer bag. You can freeze it for up to 3 months. When you're ready to eat, just thaw it in the fridge overnight before reheating or enjoying it cold. For more details on making this delicious dessert, check out the Full Recipe. Yes, you can make Pumpkin Pie Dump Cake ahead of time. After baking, let it cool. Cover it tightly with foil or plastic wrap. Store it in the fridge for up to three days. This cake tastes great cold or warmed up. Just reheat it in the oven for a few minutes. Pumpkin Pie Dump Cake lasts about three to four days in the fridge. If you want to keep it longer, freeze it. Wrap it well in plastic wrap and foil. It can last up to three months in the freezer. Just thaw it in the fridge before serving. Yes, fresh pumpkin works great in this recipe. Start by roasting a fresh pumpkin. Cut it in half, scoop out the seeds, and roast it cut-side down. Bake it until soft. Then, mash or puree the pumpkin. Use this fresh pumpkin puree just like the canned one. It may have a slightly different taste, but it will be just as good. For the full recipe, check out the Pumpkin Spice Delight Dump Cake. In this post, we explored how to make a delicious Pumpkin Pie Dump Cake. We covered the main and optional ingredients, gave step-by-step baking instructions, and shared tips for a great texture. Variations included gluten-free options and tasty toppings. We also discussed how to store leftovers and answered common questions. Embrace the ease of this recipe and impress your guests. Enjoy every bite!

Pumpkin Pie Dump Cake Simple and Tasty Dessert

Looking for a simple and tasty dessert? Pumpkin Pie Dump Cake is the answer! This easy recipe combines all the

- Pasta options: You can use fettuccine or penne pasta. Both work great. Fettuccine gives a nice, wide surface for sauce, while penne holds sauce inside its tubes. Choose what you love! - Chicken selection: I recommend boneless, skinless chicken breasts. They cook quickly and stay juicy. You can also use thighs if you prefer darker meat. - Essential spices and seasonings: The magic comes from smoked paprika, onion powder, oregano, and cayenne pepper. These spices add depth and warmth. Adjust the cayenne to control the heat. - Fresh herbs: Fresh parsley brightens the dish. If you can’t find parsley, try basil or cilantro. Both add a fresh touch. - Cheese options: Cheddar is the star cheese here, but feel free to experiment! You can try Monterey Jack, gouda, or even a sprinkle of parmesan for extra flavor. - Additional veggies to enhance flavor: Cherry tomatoes and corn are great choices. You could also toss in bell peppers or spinach for extra color and nutrition. These additions make the dish even more vibrant. For the complete cooking details, check out the Full Recipe. Start by filling a large pot with water. Add a generous amount of salt. This step adds flavor to the pasta. Bring the water to a rolling boil. Once boiling, add 12 oz of your favorite pasta, either fettuccine or penne. Cook according to the package instructions. You want it to be al dente, firm but not hard. This usually takes about 8 to 10 minutes. Once done, drain the pasta and save ½ cup of the pasta water for later. For the chicken, use 1 lb of boneless, skinless breasts. Cut them into small cubes. Season these pieces well with salt, pepper, smoked paprika, onion powder, oregano, and cayenne pepper. This mix adds a bold taste. If you prefer not to use chicken, try mushrooms or tofu for a tasty alternative. These options keep the dish hearty and satisfying. Heat a large skillet over medium heat. Add 2 tablespoons of unsalted butter to the pan. Once melted, add the seasoned chicken. Cook until the chicken turns golden brown. This should take about 6 to 8 minutes. Remove the chicken and set it aside. In the same skillet, add 2 more tablespoons of butter and 2 cloves of minced garlic. Sauté the garlic for about 1 minute until it becomes fragrant. This step adds depth to the dish. Now, it’s time to bring everything together. Add the cherry tomatoes and corn kernels to the skillet. Sauté these for about 3 to 4 minutes until the tomatoes soften. Return the cooked chicken to the pan. Pour in the heavy cream and the reserved pasta water. Stir everything together until well combined. To achieve a creamy texture, add the cooked pasta and mix gently. Gradually add in 1 cup of shredded cheddar cheese. Keep stirring until the cheese melts fully. Adjust the seasoning with salt and pepper as needed. Enjoy the rich, creamy goodness of Cowboy Butter Chicken Pasta! For more details, check the Full Recipe. To make the cowboy butter flavor just right, adjust the spice levels to your taste. If you like it spicy, add more cayenne pepper. If you prefer it mild, use less. You can also mix in other spices. Consider adding chili powder, thyme, or even a splash of lemon juice. These changes can give the dish a new twist. Avoid sticky pasta by stirring it in the pot after adding it to boiling water. This keeps it separated. Also, make sure to cook it until it's al dente. This means it should still have a slight bite. For reheating leftovers, add a splash of water or cream. This helps to keep the pasta moist and creamy. For creative plating, try using a large bowl or individual plates. You can top the pasta with more cheddar cheese and a sprinkle of smoked paprika. This adds color and flavor. When it comes to sides, consider serving garlic bread or a fresh salad. For beverages, iced tea or a light white wine pairs well with this dish. {{image_2}} You can easily make this dish vegetarian. Swap the chicken for hearty veggies or tofu. Use a mix of bell peppers, zucchini, and mushrooms. They add great flavor and texture. For protein, I recommend adding legumes like chickpeas or lentils. They will make your meal filling and nutritious. If you need a gluten-free meal, choose gluten-free pasta. Brands like Banza or Tinkyada work well. They hold up nicely in this dish. For the sauce, use gluten-free butter and check the cream brand. Most heavy cream is gluten-free, but it's wise to double-check labels. Want to give your Cowboy Butter Chicken Pasta a kick? Add jalapeños or chipotle for a Southwestern twist. It brings a smoky heat that complements the creamy sauce. If you lean towards Italian flavors, add fresh basil and grated parmesan. These additions create a fresh and aromatic experience. The beauty of this dish is its flexibility. You can craft it to suit your taste! To store leftover Cowboy Butter Chicken Pasta, let it cool first. Place it in an airtight container. This helps keep the flavors fresh. You can store it in the fridge for up to three days. Try to use shallow containers. This allows the pasta to cool quickly and evenly. Reheat your pasta gently to keep it creamy. You can use a microwave or a stovetop. If using a microwave, cover the container to trap moisture. Stir in a splash of water or cream to help with creaminess. Avoid reheating more than once. This keeps the pasta from getting dry and chewy. To freeze Cowboy Butter Chicken Pasta, let it cool down completely. Place it in a freezer-safe container. You can also use freezer bags. Make sure to remove as much air as possible. This helps prevent freezer burn. When ready to use, thaw it in the fridge overnight. For best results, reheat gently after thawing. Cowboy Butter Chicken Pasta is a hearty dish that combines pasta, chicken, and a rich, flavorful sauce. The dish has roots in American comfort food, inspired by cowboy cooking. It brings together simple ingredients to create a meal that feels indulgent yet easy to prepare. The creamy sauce made from butter, garlic, and spices gives the dish its signature taste. Yes, you can make this dish dairy-free. Instead of using butter, try coconut oil or a vegan butter alternative. For the cream, use coconut cream or a dairy-free cream made from nuts. These swaps will keep the dish creamy and delicious without dairy. To manage the heat level, you can adjust the amount of cayenne pepper. Start with less cayenne if you prefer a milder dish. You can also add more spices like smoked paprika for flavor without extra heat. If you enjoy spice, consider adding diced jalapeños or red pepper flakes for an extra kick. Leftovers of Cowboy Butter Chicken Pasta can last up to three days in the fridge. Store them in an airtight container to keep them fresh. When reheating, add a splash of water or cream to maintain its creamy texture. Yes, you can prepare some parts in advance. Cook the chicken and veggies, then store them separately. Cook the pasta just before serving for the best texture. Combine everything when you are ready to eat for a quick and easy meal. You can find the Full Recipe for Cowboy Butter Chicken Pasta in the recipe section of this article. It includes all the steps and ingredients you need to create this fantastic dish. This blog post covers everything you need to make Cowboy Butter Chicken Pasta. We explored key ingredients like pasta, chicken, and spices. You learned cooking methods and tips for flavor and presentation. We even discussed variations for dietary needs and storage advice for leftovers. Cooking can be fun and easy. Let your creativity shine as you make this dish! Enjoy experimenting with ingredients that suit your taste. Your kitchen adventures await!

Cowboy Butter Chicken Pasta Flavorful Comfort Dish

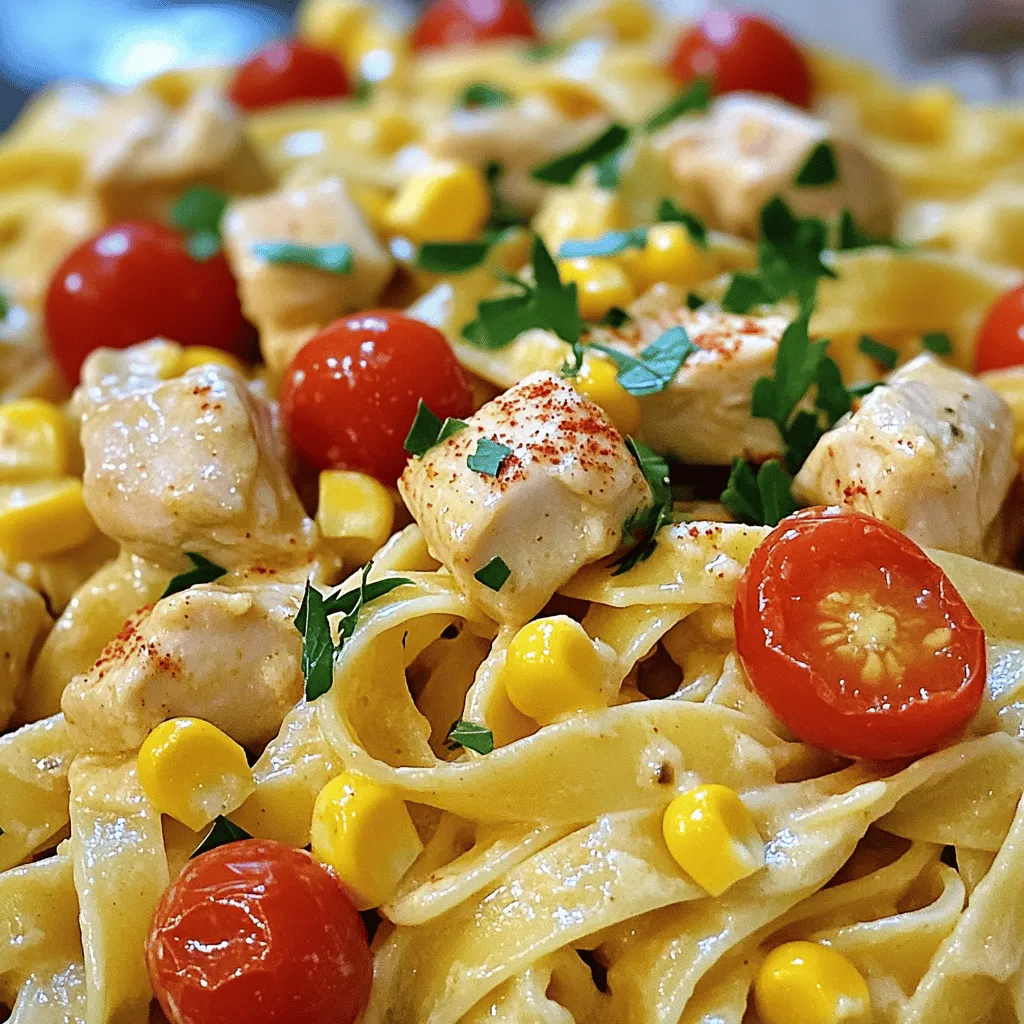
Are you ready to dive into a bowl of comfort? Cowboy Butter Chicken Pasta is not just a meal; it’s

To make Sweet Potato and Black Bean Chili, gather these ingredients: - 2 medium sweet potatoes, peeled and diced - 1 can (15 oz) black beans, drained and rinsed - 1 can (14 oz) diced tomatoes with green chilies - 1 medium onion, chopped - 3 cloves garlic, minced - 1 red bell pepper, chopped - 2 cups vegetable broth - 2 teaspoons ground cumin - 1 teaspoon smoked paprika - 1 teaspoon chili powder - 1 tablespoon olive oil - Salt and pepper to taste - Fresh cilantro for garnish - Lime wedges for serving Each ingredient brings a unique flavor. Sweet potatoes add creaminess, while black beans give protein. The spices like cumin and chili powder make it warm and hearty. If you have allergies, you can swap ingredients. Use quinoa instead of black beans for a gluten-free option. For a soy-free choice, ensure any vegetable broth is safe. I recommend fresh ingredients for the best taste. Fresh garlic and onions pack more flavor than dried ones. Canned tomatoes are fine, but fresh tomatoes add a lovely texture. For the Full Recipe, follow the detailed steps to create this flavorful delight. To make Sweet Potato and Black Bean Chili, follow these simple steps. Each step helps build rich flavors. 1. Heat the Oil: In a large pot, warm 1 tablespoon of olive oil over medium heat. This helps the flavors come alive. 2. Sauté the Onions: Add 1 chopped medium onion. Cook for about 5 minutes, until the onions are soft and clear. This adds a sweet base. 3. Add Garlic and Bell Pepper: Stir in 3 minced cloves of garlic and 1 chopped red bell pepper. Cook for another 2-3 minutes until you smell their lovely aroma. 4. Incorporate Sweet Potatoes: Toss in 2 diced sweet potatoes. Mix them well with the onions and peppers. Cook for 5 minutes, letting them soften a bit. 5. Season the Veggies: Sprinkle in 2 teaspoons of ground cumin, 1 teaspoon of smoked paprika, and 1 teaspoon of chili powder. Stir everything to coat the veggies with spices. 6. Add Tomatoes and Broth: Pour in 1 can of diced tomatoes (with green chilies) and 2 cups of vegetable broth. Bring the mix to a gentle simmer. This is where the magic happens! 7. Mix in Black Beans: Once simmering, add 1 can of black beans (drained and rinsed). Season with salt and pepper. Cover the pot and reduce heat to low. Let it cook for about 25-30 minutes. The sweet potatoes should be tender. 8. Taste and Adjust: After cooking, taste the chili. You can add more chili powder if you like it hot or more salt for flavor. 9. Serve It Up: Remove from heat and ladle the chili into bowls. Garnish with fresh cilantro and a squeeze of lime juice for brightness. - Visual Cues: Look for translucent onions and fragrant garlic. These show you’re on the right track. - Fresh Ingredients: Use fresh sweet potatoes for the best taste. They add sweetness and texture. - Texture Matters: Ensure your sweet potatoes are tender but not mushy. This keeps the chili hearty. Enjoy your Sweet Potato and Black Bean Chili as a warm, filling meal! For complete details, check the Full Recipe. To make your sweet potato and black bean chili even better, follow these tips: - Enhancing Flavor and Texture: - Add a splash of lime juice before serving. It brightens the flavors. - Use fresh herbs like cilantro for garnish. They add color and taste. - Consider roasting the sweet potatoes before adding them to the chili. This gives them a deeper, sweeter flavor. - Suggested Kitchen Tools: - A large pot is key for even cooking. Make sure it has a heavy bottom. - A sharp knife is important for chopping ingredients quickly and safely. - Use measuring spoons for spices to keep flavors balanced. - Common Mistakes to Avoid: - Don’t skip the sautéing step. Cooking onions and garlic first builds a strong base flavor. - Avoid overcooking the chili. It should simmer gently for the best texture. - Taste your chili before serving. Adjust salt and spices as needed. These tips will help you create a delicious meal that everyone will love. For the full recipe, refer to the earlier section. Enjoy cooking! {{image_2}} You can easily adapt this sweet potato and black bean chili to fit your taste. Here are some ideas: - Add Proteins: If you want more protein, try adding cooked quinoa or cubed tofu. Both options blend well and add a nice texture. You can also use ground turkey or chicken for a meatier dish. - Adjust Spice Levels: Not everyone loves heat. You can lower the spice by cutting back on chili powder. If you like it spicy, add more chili powder or even jalapeños. Start with a little, taste, and add more if needed. - Change Flavor Profiles: Feel free to mix in other veggies or herbs. Zucchini, corn, or spinach can add extra nutrients. Fresh herbs like thyme or oregano can brighten the flavors. Just chop them up and toss them in as the chili simmers. These adaptations let you customize the chili to your liking. Enjoy experimenting! For the full recipe, check out the Cozy Sweet Potato & Black Bean Chili section. To keep your sweet potato and black bean chili fresh, follow these steps: - Refrigerating: Let the chili cool down before storing. Use an airtight container. It can stay in the fridge for about 4-5 days. - Freezing: For longer storage, freeze the chili. Use freezer-safe bags or containers. Leave some space for expansion. It can last up to 3 months in the freezer. To reheat your chili: - Microwave: Pour the chili into a microwave-safe bowl. Heat for 2-3 minutes, stirring halfway through. - Stovetop: Place the chili in a pot over low heat. Stir it often until warmed through. Always check for spoilage. Signs include off smells, color changes, or mold. If you see these, it’s best to throw it out. Now, you can enjoy your delicious sweet potato and black bean chili multiple times! For the full recipe, refer back to the beginning of this article. Yes, you can! To make sweet potato and black bean chili in a slow cooker, start by sautéing the onions, garlic, and bell pepper in a pan. Then, add them to the slow cooker with the other ingredients. Cook on low for 6 to 8 hours or on high for 3 to 4 hours. This method allows the flavors to blend beautifully. Serve the chili hot in bowls. Top it with fresh cilantro and a squeeze of lime juice. You can add cornbread or rice on the side for a complete meal. This dish is perfect for cozy nights or gatherings with friends. If you need a substitute for black beans, try using kidney beans or pinto beans. Both options will work well and add a different taste to the chili. You can also use chickpeas for a twist on texture. You can use several toppings for your chili. Sour cream or Greek yogurt adds creaminess. Shredded cheese, diced avocado, or green onions bring extra flavor. Feel free to get creative with your toppings! You can find the full recipe for cozy sweet potato and black bean chili above in the article. It has all the details you need to make this delicious dish! This article covered everything you need to know about making delicious chili. We explored key ingredients, helpful steps, and cooking tips to boost flavor. You learned about common substitutes and storage methods. Don't forget to try fun variations to suit your taste. With these insights, you can create a perfect chili every time. Enjoy the process, and share your version with friends. Cooking should be fun, so feel free to experiment!

Sweet Potato and Black Bean Chili Flavorful Delight

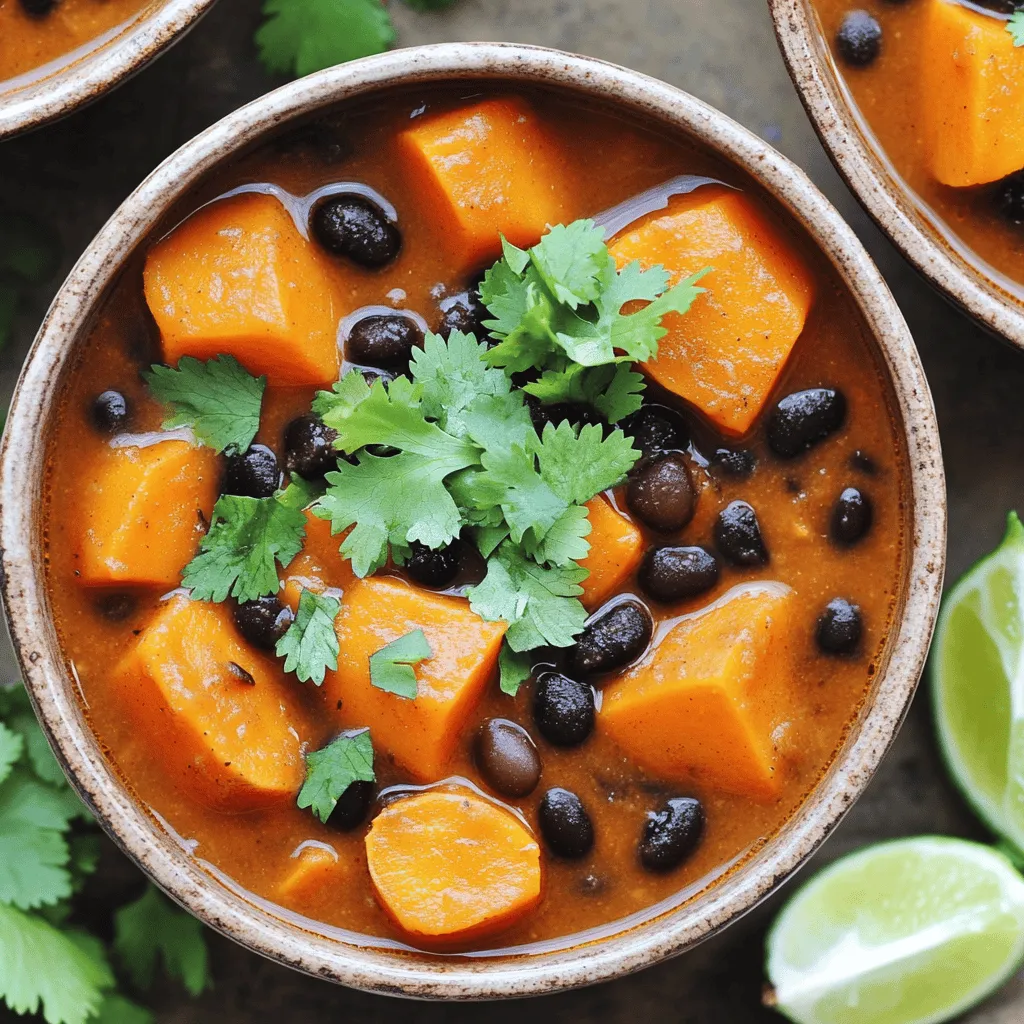
Looking for a hearty dish that warms your soul? Sweet Potato and Black Bean Chili is your answer! This vibrant

- 1 cup rolled oats - 1 ripe banana, mashed - 1 cup milk (dairy or non-dairy) You need rolled oats as the base. They give the pancakes a great texture. Use a ripe banana, as it adds natural sweetness. You can pick any milk you like. Almond or soy milk works well for a dairy-free option. - 1/2 teaspoon baking powder - 1/2 teaspoon cinnamon - 1/4 teaspoon salt - 1 large egg (or flax egg for vegan option) - 1 tablespoon honey or maple syrup (optional) - 1/2 teaspoon vanilla extract - Cooking spray or butter for frying Baking powder helps the pancakes rise. Cinnamon adds warmth and flavor. A pinch of salt balances the sweetness. If you want a vegan option, you can use a flax egg. Honey or maple syrup is optional but adds a lovely touch. Vanilla extract enhances all the flavors. Finally, use cooking spray or butter to fry the pancakes. These ingredients come together to create a simple and tasty meal. For the full recipe, check out the detailed instructions. To start, take 1 cup of rolled oats and place them in a blender. Blend the oats until they turn into a fine flour. This oat flour is key for our pancakes. It gives them a great texture and a lovely flavor. Next, grab a large bowl. Combine the oat flour with 1/2 teaspoon of baking powder, 1/2 teaspoon of cinnamon, and 1/4 teaspoon of salt. Mix these dry ingredients well. In another bowl, mash 1 ripe banana until it’s smooth. Add 1 cup of milk, 1 large egg, 1 tablespoon of honey or maple syrup, and 1/2 teaspoon of vanilla extract. Stir this mixture until it’s all combined. Now, pour the banana mixture into the dry ingredients. Mix gently until just combined. Let the batter sit for 5 minutes. This helps it thicken a bit. Now it's time to cook! Heat a non-stick skillet over medium heat. Lightly grease it with cooking spray or butter. Pour about 1/4 cup of pancake batter onto the skillet for each pancake. Cook them for about 2-3 minutes. You will see bubbles forming on the surface when they are ready to flip. Once the edges look set, flip the pancakes. Cook for another 2-3 minutes until they are golden brown. Repeat this with the remaining batter. Adjust the heat as needed to avoid burning. Enjoy your pancakes warm! You can find the complete recipe in the [Full Recipe]. To make your banana oatmeal pancakes fluffy, you should let the batter rest. This resting time helps the oats absorb moisture. A good five minutes is usually enough. During this time, you can heat your skillet. Now, let’s talk about the heat. It’s important to adjust the heat properly. You want medium heat for even cooking. If it’s too hot, the pancakes will burn outside but stay raw inside. If it’s too low, they will take longer to cook and may become tough. When it comes to serving, presentation matters. Stack your pancakes high on a plate. Drizzle them with honey or maple syrup to add sweetness. Sliced bananas on top look great and add flavor. For a special touch, sprinkle cinnamon over the stack. You can also pair these pancakes with sides. Greek yogurt adds creaminess and protein. A handful of berries brings freshness and color. Fresh orange juice or a smoothie can make a perfect drink choice. Want to boost nutrition? You can add protein powders to the batter. This gives your pancakes a protein kick. Nut butters, like almond or peanut, are great options too. Stir in a spoonful for extra flavor and nutrition. Have dietary needs? You can make easy substitutions. Use a flax egg instead of a regular egg for a vegan option. Choose non-dairy milk, like almond or oat milk, to keep it plant-based. These swaps keep the taste while meeting different diets. For the complete method, check the Full Recipe. {{image_2}} You can make banana oatmeal pancakes even more fun by adding flavors. Try mixing in chocolate chips for a sweet twist. The melted chocolate adds a rich taste that kids and adults love. You can also add nuts like walnuts or pecans for a crunchy texture. This gives each bite a nice surprise. Another idea is to use spices. A pinch of nutmeg can warm up the flavor. It pairs well with the banana and gives the pancakes a cozy feel. Cinnamon is great, but nutmeg takes it to another level. Experiment with these ideas to find your favorite mix. If you follow a vegan diet, you can still enjoy these pancakes. Use a flax egg instead of a regular egg. To make a flax egg, mix one tablespoon of ground flaxseed with three tablespoons of water. Let it sit for a few minutes until it thickens. This works well in the recipe. Also, you can choose non-dairy milk like almond or oat milk. This keeps the pancakes vegan and delicious. For those who need gluten-free options, use gluten-free rolled oats. These oats work just like regular oats but are safe for gluten-free diets. You can enjoy banana oatmeal pancakes without worry. These variations make the recipe fit many diets. Try them out and enjoy your pancakes your way! To keep your banana oatmeal pancakes fresh, store them in the fridge. Place them in an airtight container. They stay good for about three days. You can also freeze them. Stack the pancakes with parchment paper between each one. This helps you pull them apart later. Then, wrap the stack tightly in plastic wrap. Place the wrapped pancakes in a freezer bag. They can last up to two months in the freezer. When you want to eat them, reheat the pancakes. For refrigerated pancakes, microwave them for 20-30 seconds. This warms them up nicely. If they are frozen, microwave them for about 1 minute. You can also use a toaster oven. Heat them at 350°F for 5-7 minutes for a crispy edge. Enjoy them warm for the best taste! You can make pancake mix ahead of time. To do this, combine the dry ingredients. These are oat flour, baking powder, cinnamon, and salt. Store this mix in an airtight container. It stays fresh for up to two weeks. Just add the wet ingredients when you are ready to cook. Batch cooking is another great idea. Make a double or triple batch of pancakes. Cook them all and let them cool. Store them in the fridge or freezer. This way, you have a quick meal ready for busy mornings. Simply reheat, and you have a delicious breakfast in no time. For the full recipe, check out the detailed instructions above! To make banana oatmeal pancakes vegan, you can swap out the egg for a flax egg. Just mix one tablespoon of ground flaxseed with two and a half tablespoons of water. Let it sit for five minutes until it thickens. For the milk, use any non-dairy milk like almond milk or oat milk. These swaps work well and keep the pancakes tasty. Yes, you can freeze banana oatmeal pancakes. Let them cool completely after cooking. Then, place them in a single layer on a baking sheet. Once frozen, stack them in an airtight container or a freezer bag. They can last up to three months in the freezer. To enjoy, just pop them in the toaster or microwave until warm. You can serve banana oatmeal pancakes with many tasty toppings. Fresh fruit like berries or sliced bananas works great. Drizzle maple syrup or honey for sweetness. Greek yogurt adds creaminess. You can also sprinkle nuts or seeds on top for a nice crunch. To make your pancakes fluffier, let the batter rest for about five minutes before cooking. This helps the baking powder work better. Also, don’t overmix the batter. A few lumps are fine and help keep the pancakes light. You can also add a touch more baking powder for extra lift. Banana oatmeal pancakes can last in the fridge for about three to four days. Store them in an airtight container to keep them fresh. To reheat, you can use a microwave or a toaster. This way, they stay warm and yummy. Banana oatmeal pancakes are easy to make and delicious. We covered key ingredients, steps, and helpful tips. You can customize them with fun flavors or dietary needs. Store extras easily for busy days. Enjoy these pancakes warm, topped how you like. They're a great choice for breakfast or a snack. Now, get cooking and enjoy these tasty pancakes!

Savory Banana Oatmeal Pancakes Easy and Quick Meal

Looking for a quick and tasty breakfast? You’re in the right place! These Savory Banana Oatmeal Pancakes are easy to

To make this tasty dip, gather these simple ingredients: - 1 cup creamy peanut butter - 1/2 cup unsalted butter, softened - 3/4 cup brown sugar, packed - 1/2 cup granulated sugar - 1 teaspoon vanilla extract - 1 cup all-purpose flour (heat-treated) - 1/4 teaspoon salt - 1/2 cup mini chocolate chips - Fresh fruit, pretzels, or graham crackers for dipping Choosing good ingredients makes a big difference. Here are some tips: - Use fresh unsalted butter for a rich taste. - Pick a creamy peanut butter without added sugar. - Choose light brown sugar for a soft, caramel flavor. - Select mini chocolate chips for easier dipping. - For flour, ensure it’s heat-treated to avoid any raw taste. You can adapt this dip for different diets. Here are some swaps: - For gluten-free, use almond flour or a gluten-free flour blend. - To make it vegan, switch to a plant-based butter and use maple syrup instead of sugar. - You can use dairy-free chocolate chips for a fully vegan option. These changes keep the dip tasty while meeting dietary needs. To start, gather all your ingredients. You will need peanut butter, butter, sugars, vanilla, flour, salt, and chocolate chips. In a large bowl, add the softened unsalted butter and creamy peanut butter. Mix these two until they are smooth. Next, add the brown sugar and granulated sugar. Mix until everything is fluffy. This step is key to making your dip light and tasty. Now, pour in the vanilla extract and mix again. Now it’s time to add the heat-treated flour and salt. Stir these in gently. Make sure not to overmix; just combine until you can’t see any flour. It should look creamy and rich. Finally, fold in the mini chocolate chips. This is where you get that delicious cookie dough flavor. Once you have mixed everything well, transfer the dip to a serving bowl. Cover it and place it in the fridge for at least 30 minutes. This helps the dip to set and brings out the flavors. When ready to serve, take it out and enjoy it with fresh fruit, pretzels, or graham crackers. For a fun touch, drizzle some melted chocolate on top. This makes your dip look extra special and inviting. For the full recipe, click here. When making chocolate chip cookie dough dip, a few mistakes can happen. First, do not skip the heat-treating of the flour. This step helps kill bacteria. Second, avoid over-mixing the flour. Doing so can make the dip tough. Lastly, ensure your butter is soft. Cold butter does not mix well and makes lumps. You can take this dip to the next level. Try adding a pinch of sea salt. This will balance the sweetness. For a richer taste, mix in some cocoa powder. You can also swap regular peanut butter for crunchy peanut butter. This change adds a fun texture. Add a splash of maple syrup for a unique flavor twist. To wow your guests, focus on how you serve the dip. Use a fun, colorful bowl. Arrange fresh fruits, pretzels, and graham crackers around it. You can even drizzle melted chocolate on top for flair. Consider using small cups for individual servings. This makes it easy for guests to enjoy. For a festive touch, add some sprinkles on top. {{image_2}} You can make Chocolate Chip Cookie Dough Dip your own! Start by switching the peanut butter with almond or cashew butter for a new flavor. You can even try different cookie dough flavors. Instead of mini chocolate chips, add chunks of dark chocolate or white chocolate. Want a fun twist? Mix in some crushed cookies like Oreos or graham crackers. Each change gives a fresh taste to this classic dip. For a festive touch, add peppermint extract during winter holidays. You can fold in sprinkles for birthdays or celebrations. In summer, consider adding some crushed berries for a fruity flavor. Each season brings a chance to create something special with the dip. This dip pairs well with many snacks. Fresh fruit like apples, strawberries, or bananas make great dippers. You can also use pretzels or graham crackers for crunch. For a fun idea, serve it with mini chocolate chip cookies for double the cookie goodness! Arrange everything on a platter for a colorful and tasty display. Try these options to impress your friends at any gathering. To keep your Chocolate Chip Cookie Dough Dip fresh, store it in an airtight container. This helps to prevent the dip from drying out. Place it in the fridge right after serving. Always use a clean spoon when scooping out more dip. This stops germs from getting in and keeps it safe to eat. When stored properly, your dip can last up to a week in the fridge. However, it tastes best within the first few days. After that, the flavors may fade a bit. Always check for any changes in smell or texture before eating. You can freeze this dip if you want to save it for later. Just scoop it into a freezer-safe container. Make sure to leave some space at the top, as the dip will expand when frozen. It can last up to three months in the freezer. To eat, thaw it in the fridge overnight. Stir it well before serving. You can find the full recipe for this delicious dip to make it whenever you crave it! No, do not use regular flour. Heat-treated flour is safe to eat raw. It kills harmful bacteria. You can easily heat-treat flour at home. Spread flour on a baking sheet. Bake at 350°F for five minutes. Let it cool before using. Your dip should be smooth and creamy. If it’s too thick, add a bit of milk. Start with one tablespoon and mix well. If it’s too runny, add more heat-treated flour. Mix until you get the right texture. You can serve this dip with many tasty items. Here are some great options: - Fresh fruit like apples and strawberries - Pretzels for a salty crunch - Graham crackers for a sweet touch - Vanilla wafers for a classic pairing These choices make your dip even more fun! This blog post covered how to make a delicious Chocolate Chip Cookie Dough Dip. We discussed the best ingredients and tips for selecting quality items. I shared how to prepare, mix, and serve the dip for a great consistency. We explored common mistakes and fun variations to impress your guests. Finally, I offered storage tips, so you can enjoy leftovers later. With these insights, you can create a fantastic dip that pleases everyone. Enjoy making it your own!

Chocolate Chip Cookie Dough Dip Delightful Treats

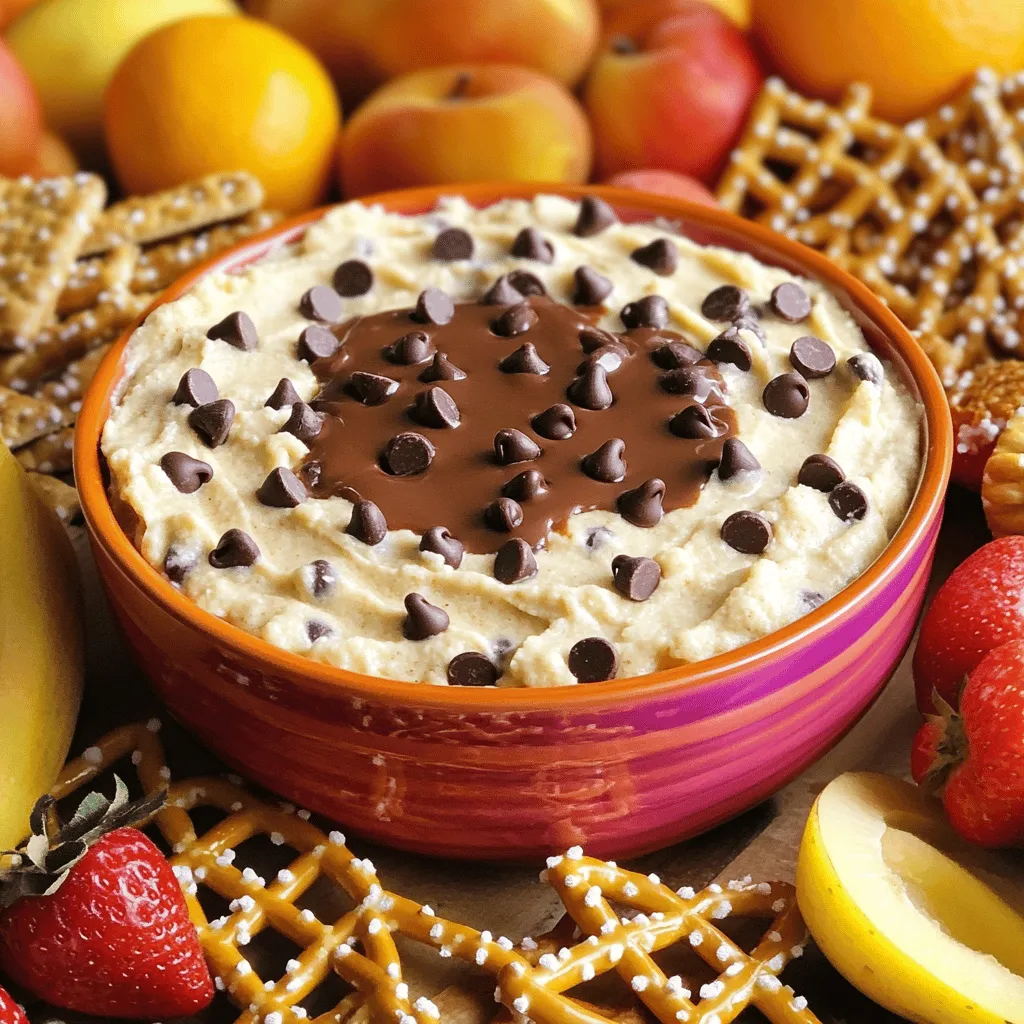
Indulge in the sweet joy of Chocolate Chip Cookie Dough Dip! This treat combines creamy richness with classic flavors. It’s

- 1 cup warm water (110°F) - 2 teaspoons active dry yeast - 1 tablespoon sugar - 2 ½ cups all-purpose flour - 1 teaspoon salt - 3 tablespoons olive oil - 2 teaspoons garlic powder - 1 teaspoon Italian seasoning - 1 cup shredded mozzarella cheese - ¼ cup grated Parmesan cheese - Fresh parsley, chopped (for garnish) The warm water wakes up the yeast. This step is vital for the dough to rise. Yeast helps the breadsticks become light and fluffy. The sugar feeds the yeast, helping it grow and activate. All-purpose flour provides structure and texture to the breadsticks. Salt adds flavor and balances the other ingredients. Olive oil keeps the dough moist and adds a rich taste. Garlic powder and Italian seasoning give the breadsticks their signature flavor. Mozzarella cheese melts beautifully, making the breadsticks cheesy and gooey. Parmesan cheese adds a sharp taste, enhancing the overall flavor. Feel free to get creative! You can add toppings like crushed red pepper flakes for heat or extra garlic powder for more flavor. Fresh herbs like basil or oregano can brighten the taste. Consider a sprinkle of sesame seeds or poppy seeds for crunch. You can also serve the breadsticks with marinara sauce or garlic butter for dipping. For the full recipe, see the instructions above. Enjoy making these tasty cheesy garlic breadsticks! To start, gather your ingredients. Mix warm water, yeast, and sugar in a bowl. Let it sit for five minutes until it froths. This shows the yeast is alive. In a large bowl, combine flour and salt. Create a well in the center. Pour in the frothy yeast mix and olive oil. Stir until a dough forms. Knead the dough on a floured surface for five to seven minutes. You want it smooth and elastic. This step develops the gluten, which gives the breadsticks structure. After kneading, place the dough in a greased bowl. Cover it with a kitchen towel. Let it rise in a warm spot for about one hour. The dough should double in size during this time. This rising process adds airiness to the breadsticks. Once it has risen, punch the dough down to release air. Roll it out into a rectangle, about half an inch thick. Sprinkle garlic powder and Italian seasoning evenly over the surface. Then, cover it with mozzarella and Parmesan cheese. Cut the dough into strips, about one inch wide. Now, preheat your oven to 400°F (200°C). Place the strips on a parchment-lined baking sheet, leaving space between them. Bake for 15 to 20 minutes. The breadsticks should turn golden brown, and the cheese will bubble. Once done, take them out and let them cool slightly. Garnish with fresh parsley for a pop of color. For a special touch, serve with marinara sauce or garlic butter on the side. Enjoy your delicious cheesy garlic breadsticks! You can find the Full Recipe to make it easier. To make the best cheesy garlic breadsticks, use fresh ingredients. Fresh garlic gives a strong flavor. If you can, try roasting garlic before adding it to the dough. This makes it sweet and rich. Use high-quality cheese for a better taste. Mozzarella melts nicely, while Parmesan adds a nice sharpness. Mix the garlic powder and Italian seasoning well into the dough. This helps to spread the flavor evenly. One common mistake is over-kneading the dough. Knead just enough to make it smooth and elastic. If it's too tough, the breadsticks will be dense. Another mistake is not letting the dough rise enough. This step is key for fluffy breadsticks. Make sure your water is not too hot when activating the yeast. If it is, the yeast will die and the dough won't rise. Lastly, don’t skip the baking time. Keep an eye on them to avoid burning. Cheesy garlic breadsticks pair well with many dishes. Serve them alongside pasta, pizza, or salad. They also shine as an appetizer. Set them in a basket lined with parchment paper for a nice touch. Consider adding a small bowl of marinara sauce or garlic butter for dipping. This adds extra flavor and fun to your meal. For a fresh twist, sprinkle chopped herbs on top before serving. Enjoy these breadsticks warm for the best experience! For the full recipe, visit the recipe section. {{image_2}} You can easily add herbs to your cheesy garlic breadsticks. Fresh or dried herbs enhance flavor. Try mixing in oregano, basil, or thyme. Sprinkle them on top before baking. This adds a nice touch and aroma. You can also mix herbs in the dough. This gives every bite a burst of flavor. Stuffed cheesy garlic breadsticks are a fun twist. You can fill them with your favorite ingredients. Consider using cooked spinach and ricotta cheese. Or try pepperoni and mozzarella for a savory bite. To make stuffed breadsticks, roll out the dough thinly. Add the filling, then fold and seal the edges. This keeps all the cheesy goodness inside. If you need a gluten-free option, it’s simple to adapt. Use gluten-free flour instead of all-purpose flour. Look for a blend that mimics regular flour. Follow the same steps as in the full recipe. You might need to adjust the water slightly. Gluten-free dough can be a bit different. Don’t worry, they’ll still be tasty and cheesy! To keep your cheesy garlic breadsticks fresh, place them in a sealed bag. You can also use an airtight container. Make sure to store them at room temperature. They can last for about 2 to 3 days this way. If you want to keep them longer, consider freezing them. When it's time to enjoy your leftover breadsticks, preheat your oven to 350°F (175°C). Place the breadsticks on a baking sheet. Heat them for about 5 to 10 minutes. This method keeps them crispy and warm. You can also use a microwave, but they might get soft. Heat them for about 20-30 seconds if using the microwave. If you want to save your cheesy garlic breadsticks for later, freezing is a great option. Allow the breadsticks to cool completely first. Wrap them in plastic wrap, then place them in a freezer bag. They can last in the freezer for up to 3 months. When you're ready to eat them, thaw in the fridge overnight or bake straight from the freezer for a few extra minutes. For the full recipe, check out the details above. You can make these Cheesy Garlic Breadsticks ahead of time. First, prepare the dough as the recipe shows. After kneading, let it rise once, then punch it down. Wrap the dough tightly in plastic wrap and store it in the fridge for up to 24 hours. When you are ready, let it come to room temperature. Roll it out, add toppings, and bake as usual. This makes meal prep easy! You have many choices for dipping sauces. Here are my favorites: - Marinara sauce - Garlic butter - Ranch dressing - Pesto sauce Each sauce pairs well with the cheesy flavor of the breadsticks. Feel free to try your own favorite sauces too! Yes, you can use other types of cheese. While mozzarella and Parmesan are classic, you can mix it up! Try using cheddar for a sharp taste. Gouda or provolone also work well for added creaminess. Blend different cheeses to create your perfect flavor. Get creative with your cheese choices! Cheesy garlic breadsticks are easy to make and very tasty. We covered ingredients, step-by-step instructions, and tips for flavor. Try new variations to keep things fun. Store them well to enjoy later. Remember, these breadsticks can be made ahead of time, and various sauces enhance their taste. With these ideas, you can impress family and friends at your next meal. Happy baking!

Cheesy Garlic Breadsticks Irresistible Flavor Awaits

Are you ready to enjoy the warm, gooey goodness of Cheesy Garlic Breadsticks? With just a few simple ingredients and

For a great Slow Cooker Chicken Tikka Masala, you need some key items: - 2 lbs chicken thighs, boneless and skinless - 1 can (14 oz) diced tomatoes - 1 can (13.5 oz) coconut milk - Spices: garam masala, cumin, coriander, turmeric, chili powder These ingredients create a rich and creamy dish. Chicken thighs give you juicy meat that absorbs all those flavors. Diced tomatoes and coconut milk add a nice sauce base. The spices bring warmth and depth. You can also add some optional ingredients for extra flair: - Fresh cilantro for garnish - Alternative proteins like chicken breast or tofu - Variations in spices for different flavor profiles Fresh cilantro adds a pop of color and fresh taste. If you want to switch proteins, chicken breast or even tofu work well. You can also play with spices. Try adding a pinch of cinnamon for a different twist. For the full recipe, check out the details above. Enjoy making this tasty dish! To start, you need to sauté onions, garlic, and ginger. Heat olive oil in a skillet over medium heat. Add the chopped onion and cook until it turns translucent, about 5-7 minutes. Then, stir in the minced garlic and grated ginger. Cook them for one more minute until you smell the aromas. Next, it's time to measure your spices correctly. Use a measuring spoon for accuracy. This ensures the flavors balance well. For this recipe, you'll need garam masala, cumin, coriander, turmeric, and chili powder. Remember, these spices give your dish its unique taste. Now, let's add the ingredients into the slow cooker. In the slow cooker, mix the sautéed onion mixture, diced tomatoes, coconut milk, and tomato paste. Then, add the garlic, ginger, and all the spices. Stir them well to combine. After mixing, add the chicken chunks. Make sure they get coated in the sauce. When it comes to cooking times, you have options. Cook on low for 6-7 hours for tender chicken. If you're short on time, you can set it to high for 3-4 hours. Your chicken will be ready when it's tender and fully cooked. Once the cooking time is up, stir the chicken tikka masala well. Taste it and adjust the seasoning if needed. You may want to add more salt or spices to suit your taste. For serving, I recommend basmati rice or naan. The rice helps soak up the sauce, while the naan is perfect for dipping. Serve the chicken tikka masala in bowls, layered with rice, and sprinkle fresh cilantro on top for a beautiful presentation. Enjoy your meal! To make your chicken tender, always use thighs. They stay juicy and cook well. Cut the chicken into even chunks. This helps them cook at the same rate. For cooking times, I suggest 6-7 hours on low or 3-4 hours on high. Check the chicken at the end. If you prefer it more tender, cook for a bit longer. Using a slow cooker is easy, but a few tips can help. First, don't lift the lid too much. Each time you do, heat escapes and cooking time increases. Second, layer ingredients correctly. Place the meat at the bottom. This helps it cook evenly. Lastly, avoid overfilling the cooker. Leave some space for steam to circulate. If you can’t find coconut milk, try unsweetened almond milk or cashew cream. Both work well and add a nice flavor. For toppings, fresh cilantro is a must for color and taste. You can also use sliced green onions or a dollop of yogurt. These add a nice touch to your dish. If you want a spicy kick, add fresh chilies or chili flakes right before serving. For the full recipe, refer to the instructions above. {{image_2}} You can easily make chicken tikka masala gluten-free. Just check the labels on your spices and sauces. Many brands offer gluten-free options. To make it dairy-free, skip the coconut milk. Use almond milk or cashew cream instead. For a vegan twist, swap the chicken for chickpeas or lentils. Both options are filling and tasty. Just add them to the slow cooker at the same time as the other ingredients. They will soak up all the great flavors. Want to kick up the heat? Add more chili powder or fresh peppers. You can also mix in smoked paprika for depth. Try adding a pinch of cinnamon for warmth, or some cardamom for a sweet note. Pair your tikka masala with basmati rice or warm naan. A side of cucumber salad or raita can cool down the heat. These sides balance the spices and make your meal complete. Chicken tikka masala varies across regions. In the UK, it often features a creamy sauce. In India, it may be spicier and less creamy. You can also find versions with different meats, like lamb or paneer. Regional spices change the flavor too. In the south of India, curry leaves are popular. In Punjab, they use more tomatoes and cream. Explore these styles to find your favorite version. To keep your chicken tikka masala fresh, store it in an airtight container. Let the dish cool before sealing it. Place it in the fridge if you plan to eat it in a few days. Chicken tikka masala stays good in the fridge for up to four days. If you want to save it longer, freeze it. In the freezer, it can last for three months. To enjoy the flavors again, reheat your chicken tikka masala carefully. The microwave is quick; just heat it in short bursts. Stir often to ensure even heating. You can also use the stovetop. Warm it in a pot over low heat, stirring regularly. This method helps keep the sauce thick and tasty. Want to make meals easy? Prep some chicken tikka masala for later. Before freezing, divide it into portions. Use freezer-safe bags or containers. This way, you can grab just what you need. When you want a meal, thaw it overnight in the fridge. Then, reheat and serve. You’ll have a delicious dinner ready in no time! For the full recipe, check out the complete guide. Can I use frozen chicken for this recipe? Yes, you can use frozen chicken. Just add about an hour to the cooking time. Ensure the chicken reaches a safe temperature of 165°F. What can I substitute for garam masala? You can mix ground cumin, coriander, and a pinch of cinnamon. This blend gives a nice flavor boost. How long does chicken take to cook in a slow cooker? Chicken usually takes 6-7 hours on low or 3-4 hours on high. Always check for tenderness. Differences in cooking times between chicken thighs and breasts Chicken thighs are more forgiving. They stay juicy and may take the same time. Breasts cook quicker but can dry out if overcooked. What to serve with chicken tikka masala? Serve with basmati rice or warm naan. Both soak up the sauce well and enhance the meal. Can I make this dish spicier? Yes! Add more chili powder or fresh chilies for heat. Start small to find your perfect spice level. In this blog post, we explored how to make a delicious chicken tikka masala, focusing on essential and optional ingredients. I provided step-by-step instructions for prepping, slow cooking, and serving. You also learned tips to enhance your dish and variations for dietary needs. In closing, you have all the tools to create a mouth-watering meal. Enjoy experimenting with flavors and ingredients. Happy cooking!

Slow Cooker Chicken Tikka Masala Flavorful Dinner Idea

Looking for a hearty meal that’s easy to make? My Slow Cooker Chicken Tikka Masala is the answer. This dish

For spicy shrimp tacos, you need a few key ingredients: - 1 pound large shrimp, peeled and deveined - 2 tablespoons olive oil - 1 tablespoon chili powder - 1 teaspoon cumin - 1/2 teaspoon paprika - 1/2 teaspoon garlic powder - 1/4 teaspoon cayenne pepper (adjust for heat preference) - Salt and pepper to taste - Juice of 1 lime - 8 small corn tortillas - 1 cup red cabbage, thinly sliced - 1 avocado, sliced - 1/4 cup fresh cilantro, chopped - 1/2 cup sour cream or Greek yogurt - Optional: hot sauce for extra spice if desired Each ingredient plays a special role in the flavor of the dish. The shrimp bring a sweet and briny taste. Olive oil helps the spices cling well to the shrimp. Chili powder gives a warm heat, while cumin adds earthiness. Paprika and garlic powder boost the flavor depth. Cayenne pepper brings the kick, and lime juice brightens everything. The corn tortillas hold the shrimp and toppings together, while red cabbage adds crunch. Avocado gives creaminess, and cilantro adds freshness. Sour cream or yogurt finishes the taco with a cool touch. For added flavor, consider these optional ingredients: - Hot sauce for extra spice - Fresh lime wedges for squeezing - Diced tomatoes for a fresh taste - Pickled onions for tanginess - Cotija cheese for a salty bite If you have dietary needs, you can swap out some ingredients. Use gluten-free tortillas if needed. For a dairy-free option, skip the sour cream or use a dairy-free yogurt. You can also try shrimp alternatives like fish or chicken if you prefer. Each choice can change the taste and texture of your tacos, making them your own. For the full recipe, check out the detailed instructions. To start, you need to make the spicy marinade. In a medium bowl, mix these ingredients: - 2 tablespoons olive oil - 1 tablespoon chili powder - 1 teaspoon cumin - 1/2 teaspoon paprika - 1/2 teaspoon garlic powder - 1/4 teaspoon cayenne pepper (adjust to your taste) - Salt and pepper to taste - Juice of 1 lime Mix well to combine all the flavors. Next, add 1 pound of peeled and deveined shrimp to the bowl. Toss the shrimp until they are well coated with the marinade. Let them sit for about 15-20 minutes. This time helps the shrimp soak up the flavors, making them taste amazing. While the shrimp marinate, preheat a skillet over medium-high heat. Once hot, add the shrimp in a single layer. Cook them for about 2-3 minutes on each side. You want them pink and opaque. Don’t overcook them; they can become rubbery. For the tortillas, use another skillet. Warm them over low heat for about 30 seconds on each side. This step makes them soft and easy to fold without tearing. Now it’s time to build your tacos! Take a warmed tortilla and place a few pieces of cooked shrimp in the center. Then add toppings like: - 1 cup red cabbage, thinly sliced - 1 avocado, sliced - 1/4 cup fresh cilantro, chopped - 1/2 cup sour cream or Greek yogurt For extra spice, drizzle some hot sauce on top. Layering the ingredients like this helps you get every bite just right. Each taco should be colorful and full of flavor. For the full recipe, check the earlier section. Enjoy the bold and flavorful delight of your Spicy Shrimp Tacos! For the best shrimp texture, choose large, fresh shrimp. Cooking shrimp quickly helps keep them tender. I recommend heating your skillet over medium-high heat. Once hot, add a bit of oil. This helps the shrimp cook evenly and avoid sticking. Cook the shrimp for 2-3 minutes on each side. They should turn pink and opaque. Overcooking makes them tough, so watch closely. If you have a busy kitchen, prep everything before cooking. This way, you can focus on making the shrimp just right. To make your tacos pop, consider adding extra spices. A pinch of smoked paprika adds depth. You can try a dash of onion powder or even fresh jalapeños for more heat. When it comes to toppings, sliced radishes add crunch. You can also use mango salsa for a sweet twist. For side dishes, think about serving black beans or a light salad. These pair well with the shrimp's bold flavors. You might also enjoy some cilantro-lime rice as a tasty side. For even more flavor, check out the Full Recipe for a complete guide. {{image_2}} You can swap shrimp for other proteins in your tacos. Fish like tilapia or cod works well. For a meat option, try chicken or beef. Each choice brings its own taste and texture. If you want a vegetarian or vegan taco, use marinated tofu or jackfruit. Both options soak up flavors nicely. They offer a satisfying bite, just like shrimp. Changing the flavor profile can make a big difference. For a tropical twist, add pineapple or mango salsa. This brings a sweet contrast to the spicy shrimp. If you prefer a smoky flavor, try using smoked paprika or chipotle powder in your marinade. This adds depth and richness. You can also experiment with unique sauces. A cilantro-lime crema enhances freshness. Or, a spicy mango sauce adds a fruity kick. Each sauce can transform your taco experience! For the full recipe, check the main section. Enjoy crafting your own spicy shrimp tacos! To keep your shrimp tacos fresh, store the leftovers in separate containers. This helps the shrimp and toppings stay crisp. Place the shrimp in an airtight container in the fridge. Toppings like cabbage and avocado should also have their own containers. Shrimp can stay good for about 2 days. The toppings last around 1 day, especially the avocado. To reheat shrimp, place them in a skillet over medium heat. Cook until warmed through, about 2-3 minutes. For the tortillas, warm them in a dry skillet for about 30 seconds on each side. This keeps them soft and pliable. Avoid using the microwave, as it can make tortillas rubbery. Enjoy your spicy shrimp tacos just like when they were fresh! For the full recipe, see above. For shrimp tacos, I recommend using large shrimp. They have a firm texture and hold up well. Large shrimp are about 16-20 per pound. They cook quickly and absorb flavors nicely. I often use wild-caught shrimp for their taste and quality. If you prefer smaller shrimp, use about 21-25 per pound. Just remember, smaller shrimp may cook faster. Yes, you can prepare shrimp tacos ahead of time. Marinate the shrimp earlier in the day or even the night before. Keep them in the fridge until you're ready to cook. You can also prep the toppings like cabbage and avocado. Just store them separately. Warm the tortillas right before serving. This keeps everything fresh and tasty. To adjust the spice level, you can change the cayenne pepper amount. If you like it mild, use less or skip it. For more heat, add extra cayenne or hot sauce. You can also try adding jalapeños or a spicy salsa. Always taste as you go. This way, you create a taco that matches your heat preference. Serve Spicy Shrimp Tacos on a colorful platter. Arrange the tacos with lime wedges and extra cilantro. This makes it look inviting. You can stack the tortillas or lay them flat. Add a drizzle of sour cream or Greek yogurt on top for creaminess. Consider placing toppings like cabbage and avocado in separate bowls. This allows guests to customize their tacos. For the full recipe, check out the Spicy Shrimp Tacos section. In this guide, we explored the steps to make Spicy Shrimp Tacos. We covered essential ingredients and optional add-ins to elevate flavor. Marinating the shrimp is key for taste, while cooking tips ensure perfect shrimp and warm tortillas. You can mix up flavors with different proteins or sauces. Lastly, we discussed storage tips for leftovers and reheating without losing quality. Now, you have all you need to create a tasty taco experience at home. Enjoy every bite and make it your own!

Spicy Shrimp Tacos Bold and Flavorful Delight

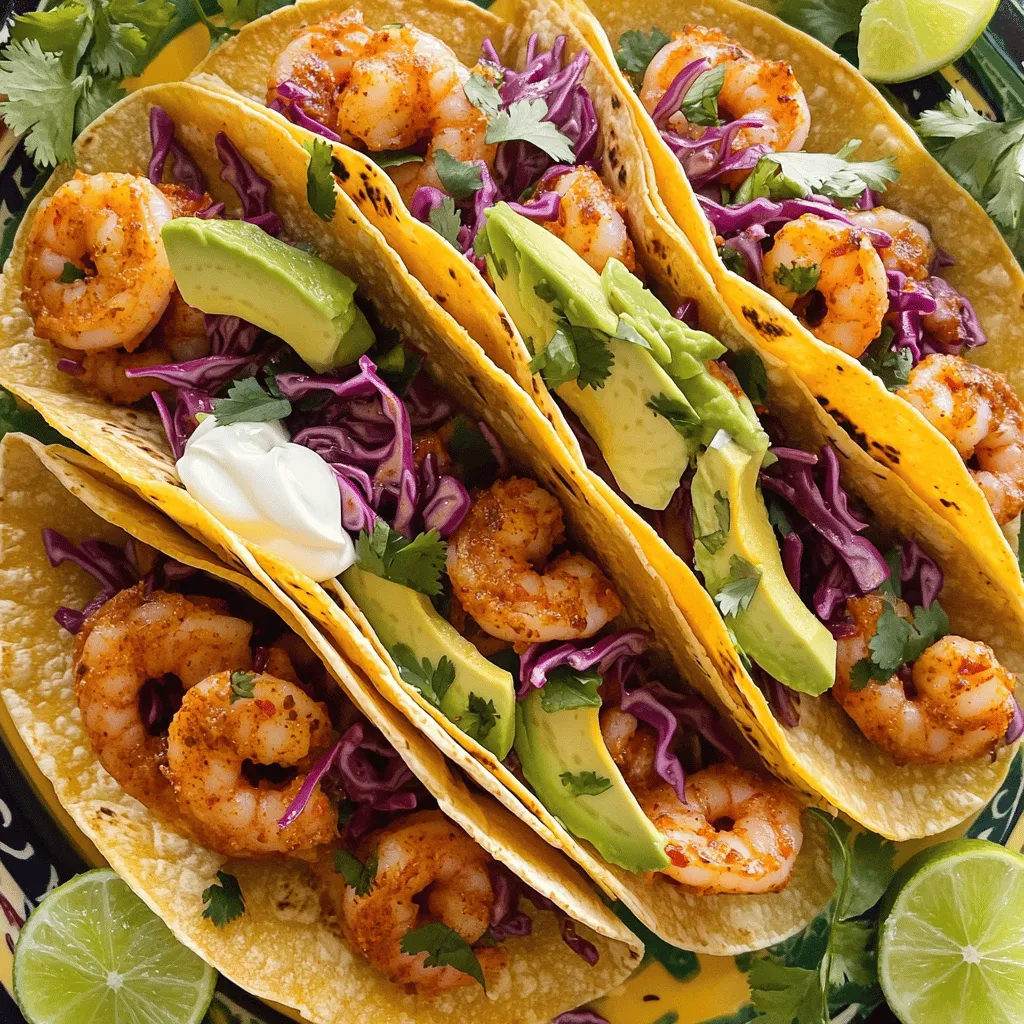
Are you ready to spice up your taco night? My Spicy Shrimp Tacos are a bold and flavorful delight that’s

To make a tasty Mediterranean Chickpea Salad, gather these ingredients: - 2 cups canned chickpeas, rinsed and drained - 1 cup cherry tomatoes, halved - 1 cucumber, diced - 1/2 red onion, finely chopped - 1/2 bell pepper (red or yellow), diced - 1/4 cup kalamata olives, pitted and sliced - 1/4 cup feta cheese, crumbled - 1/4 cup fresh parsley, chopped - 3 tablespoons olive oil - 2 tablespoons lemon juice - 1 teaspoon dried oregano - Salt and pepper to taste This salad is a powerhouse of nutrition. Chickpeas give you protein and fiber. Tomatoes and cucumbers add vitamins and hydration. Feta cheese provides calcium, while olives offer healthy fats. The olive oil and lemon juice help with heart health. Each serving is low in calories but high in flavor, making it a perfect meal choice. You can easily swap ingredients if needed. Here are some ideas: - Use canned black beans instead of chickpeas for a different taste. - Swap feta with avocado for a creamier texture. - If you don’t have kalamata olives, use green olives instead. - Fresh herbs like basil and mint can replace parsley for a new flavor. - For a gluten-free option, ensure all packaged items are certified gluten-free. These swaps keep the dish fresh and exciting while meeting different dietary needs. Check out the Full Recipe for more tips! Start by gathering your ingredients. You need chickpeas, tomatoes, cucumber, onion, bell pepper, olives, parsley, and feta. Rinse and drain the chickpeas well. This helps them taste fresh and clean. Next, chop the cherry tomatoes and cucumber into bite-sized pieces. Finely chop the red onion and bell pepper. Slice the olives and crumble the feta cheese. Finally, chop the parsley into small bits for a fresh touch. In a small bowl, combine olive oil, lemon juice, dried oregano, salt, and pepper. Use a whisk to blend these ingredients well. This dressing will bring all the flavors together. The lemon juice adds brightness, while the olive oil gives richness. Make sure you taste the dressing. Adjust the seasoning to your liking. If you want it tangier, add more lemon juice. In a large mixing bowl, add the chickpeas, tomatoes, cucumber, onion, bell pepper, olives, and parsley. Pour the dressing over the salad mixture. Gently toss everything to coat the ingredients evenly. You want every bite to be flavorful. After that, add the crumbled feta cheese. Toss gently again so you don’t break the cheese. Taste the salad and adjust the salt, pepper, or lemon juice if needed. Cover the bowl and refrigerate for at least 30 minutes. This lets the flavors mix and develop. Before serving, give it a final gentle toss. You can find the full recipe in the earlier section. Enjoy your flavorful Mediterranean Chickpea Salad! To boost the flavor of your Mediterranean chickpea salad, use fresh herbs. Fresh parsley is a must, but you can also try mint or basil. These add bright notes that elevate the dish. A squeeze of fresh lemon juice just before serving adds zest. You can also mix in some capers for a salty kick. Always rinse and drain your chickpeas well. This helps remove extra salt and improves texture. Chop your veggies into similar sizes for even bites. Use a sharp knife to make cutting easier. When mixing the salad, toss gently to keep the feta cheese intact. This keeps the salad looking fresh and appealing. Serve this salad chilled for the best taste. It pairs well with grilled meats or can be a meal on its own. Consider adding crusty bread on the side for a complete meal. I like to use a large bowl for serving, and you can garnish with lemon slices for a pop of color. For an exciting twist, add edible flowers on top! For the full recipe, check out the details in the earlier section. {{image_2}} You can easily add protein to your Mediterranean Chickpea Salad. Tuna or chicken work well. For tuna, use canned tuna in olive oil or water. Drain it and mix it into the salad. This adds a nice flavor and texture. If you prefer chicken, use cooked, shredded chicken. This makes the salad more filling. Both options keep it tasty and healthy. If you want a vegan salad, skip the feta cheese. Instead, use avocado for creaminess. You can also add nutritional yeast. This gives a cheesy taste without dairy. Another option is to use a vegan cheese. These options keep the salad rich in flavor. They also maintain the salad's wonderful texture. You can change the salad with seasonal ingredients. In spring, add fresh peas or asparagus for crunch. Summer is perfect for ripe peaches or strawberries for sweetness. In fall, consider roasted pumpkins or sweet potatoes. Winter brings great options like roasted beets or kale. Seasonal ingredients keep the salad fresh and exciting. You can always change it up to enjoy new flavors! For a full recipe, check the Mediterranean Chickpea Salad section. After you enjoy your Mediterranean Chickpea Salad, store any leftovers right away. Place the salad in an airtight container. This keeps it fresh and tasty. The salad will stay good in the fridge for about 3 days. Mix it gently before you eat. This blends the flavors again. If you want to save the salad for later, freezing is an option. However, I do not recommend freezing it. The veggies can get mushy when thawed. If you must freeze it, leave out the fresh veggies and feta cheese. You can add them back when you defrost the salad. For the best storage, use glass or high-quality plastic containers. These types do not absorb odors. Make sure the lid is tight to keep air out. Label your container with the date. This way, you know when to eat it. Enjoy this salad fresh for the best taste! For the full recipe, check out the [Full Recipe]. You can enjoy Mediterranean Chickpea Salad on its own. It works well as a side dish too. Pair it with grilled chicken or fish for a complete meal. You can also serve it with pita bread or warm naan. For a bigger feast, add a simple soup or a grain dish. The flavors blend well with many foods. This salad stays fresh in the fridge for 3 to 5 days. Store it in an airtight container. The flavor improves as it sits. However, the vegetables may soften over time. If you want the best texture, eat it in the first couple of days. Yes, you can make this salad ahead of time. It tastes great after chilling for at least 30 minutes. This lets the flavors mix well. Prepare it a day or two before serving for the best taste. Just remember to add the feta cheese right before serving. This keeps it fresh and intact. For the full recipe, check out the details above. This blog post covered how to make a delicious Mediterranean chickpea salad. We explored the key ingredients and their nutrients. You learned how to prepare, mix, and serve the salad like a pro. I shared tips to boost flavor and offered variations for proteins and seasonal options. You also got storage advice to keep your salad fresh. In conclusion, enjoy making this dish your own. Experiment with flavors and share it with friends.

Mediterranean Chickpea Salad Fresh and Flavorful Meal

Looking for a fresh and light meal? You’ve come to the right place! This Mediterranean Chickpea Salad packs vibrant flavors

Older posts
Newer posts
← Previous Page1 … Page52 Page53 Page54 … Page59 Next →

dsad

© 2025 Home Cooking Style • Built with GeneratePress

Our Policies

  • Copyright Policy
  • Cookie Policy
  • GDPR Policy
  • Privacy Policy
  • Disclaimer
  • Terms Of Use

More Information

  • Home
  • About
  • Contact
  • Appetizers
  • Dessert
  • Dinner
  • Drinks
©2025, Home Cooking Style About Back To Top