Skip to content
DisclaimerTerms Of UseGDPR PolicyCookie Policy

Home Cooking Style

  • Home
  • Drinks
  • Appetizers
  • Dinner
  • Dessert
  • About
  • Contact
  • Privacy Policy
DisclaimerTerms Of UseGDPR PolicyCookie Policy

Amelia

- 3 ripe peaches, diced - 1 cup cream cheese, softened - 1/2 cup Greek yogurt - 1/2 cup mini marshmallows To make the Peach Cobbler Cheesecake Salad, you need ripe peaches. They add a sweet and juicy flavor. Choose peaches that are soft but not mushy. The cream cheese gives the salad a rich and creamy texture. Greek yogurt adds a nice tang, balancing the sweetness. Mini marshmallows add a fun and soft bite, making every spoonful delightful. - 1/3 cup powdered sugar - 1 teaspoon vanilla extract - 1 teaspoon ground cinnamon - 1 cup granola (preferably cinnamon-based) For sweetness, you’ll need powdered sugar. It blends easily into the cream cheese mix. Vanilla extract adds a lovely aroma and enhances the overall flavor. Ground cinnamon brings warmth, reminding you of peach cobbler. Granola gives a crunchy layer, and cinnamon-based granola is a great choice to match the flavors. - Fresh mint leaves - Honey Fresh mint leaves add a pop of color and freshness. They brighten the dish and make it more appealing. Honey can be drizzled on top for an extra touch of sweetness. It pairs well with the peaches and cream cheese. Both garnishes make your Peach Cobbler Cheesecake Salad look even more inviting. For the full recipe, check out the detailed instructions to create this treat! First, you need to make the cream cheese mixture. In a medium bowl, beat together 1 cup of softened cream cheese, 1/2 cup of Greek yogurt, 1/3 cup of powdered sugar, and 1 teaspoon of vanilla extract. Mix until it is smooth and creamy. This step is key for a rich texture. Next, gently fold in 3 diced peaches and 1/2 cup of mini marshmallows. Be careful not to mash the peaches too much. This will give your salad a delightful sweetness and fun texture. Finally, sprinkle in 1 teaspoon of ground cinnamon. Stir gently until everything is just mixed. The cinnamon adds warmth and depth to your salad. Now, it’s time to layer your salad. You can use clear bowls or a large dish for this. Start with a layer of the peach cheesecake mixture. Then, add a layer of 1 cup of granola. Repeat this process until you use all the ingredients. To make it visually appealing, top the final layer with some granola and a few peach slices. This will make your salad look beautiful and inviting. Chilling your Peach Cobbler Cheesecake Salad is very important. It helps the flavors blend together nicely. Place your salad in the refrigerator for at least 30 minutes. For the best flavor, try to chill it longer if you can. This gives the peaches and cream time to soak up all the sweet goodness. When you're ready to serve, add some fresh mint leaves on top. This adds a nice pop of color and freshness. You can find the full recipe [here]. For serving Peach Cobbler Cheesecake Salad, use clear glass dishes. This shows off the colorful layers. You can also present it in a large bowl for sharing. Pair it with vanilla ice cream for a sweet treat. A warm slice of pie can add a comforting touch too. To boost the flavor, try adding spices like nutmeg or ginger. These can give your salad a warm twist. You can also mix in other fruits, like berries or bananas, for added sweetness. Adjust the sweetness by adding more or less powdered sugar. Taste as you go to find your perfect balance. One big mistake is overmixing the ingredients. This can break down the peaches and make the salad mushy. Be gentle when folding in ingredients. Another mistake is using under-ripe or overripe peaches. Look for peaches that are firm but slightly soft when you press them. This ensures the best taste and texture in your salad. For the full recipe, check out the previous section for all the details. {{image_2}} You can make this salad with many fruits. Try using fresh plums or cherries. Both fruits bring a sweet and tangy twist. You can also use apples in the fall. They add a crisp texture and flavor. Mix different fruits to create a fun flavor medley. If you want a lighter version, swap the cream cheese with cottage cheese. It gives you a similar creamy texture but with fewer calories. Use low-fat yogurt instead of Greek yogurt. For sweetness, try using honey or maple syrup. They add flavor without extra refined sugar. To give your salad some crunch, add nuts or seeds. Chopped pecans or walnuts work well. You can also sprinkle in some sunflower seeds for a nut-free option. Adding flavored granola will enhance the taste even more. Try using a honey or almond granola for extra flavor. For the full recipe, check out the Peach Cobbler Cheesecake Salad . To keep your Peach Cobbler Cheesecake Salad fresh, store leftovers in the fridge. Use an airtight container to prevent moisture loss. Glass or plastic containers work great. Make sure to seal it tightly. This helps maintain the creamy texture and peach flavors. Can you freeze Peach Cobbler Cheesecake Salad? Yes, but it is not ideal. Freezing can change the texture of the cream cheese and yogurt. If you choose to freeze, use a freezer-safe container. Leave some space for expansion. Thaw in the fridge before serving. In the fridge, Peach Cobbler Cheesecake Salad lasts about 3-5 days. Look for signs of spoilage, like a sour smell or changes in color. If it smells off or looks slimy, it’s best to toss it. Always trust your senses to keep your meals safe. Yes, you can make this salad ahead of time. It actually tastes better after chilling. To prep, mix the cream cheese, yogurt, and sugar. Add the peaches and marshmallows just before serving. This keeps the peaches fresh and crunchy. Chill it in the fridge for at least 30 minutes before serving. You can also layer it in bowls or a dish the night before. Just cover it tightly to keep it fresh. When choosing peaches, look for ripe, firm ones. They should have a slight give and a sweet smell. Yellow peaches are great for this salad. They are sweet and juicy. You can also use white peaches for a milder flavor. If you can't find fresh peaches, canned peaches work too. Just drain them well before using. This way, you get the best flavor for your salad. To make this recipe for more people, simply double each ingredient. Use 6 peaches instead of 3, and double the cream cheese and yogurt. Adjust the amount of granola and marshmallows too. If you have a big crowd, you can serve it in a large bowl. This way, everyone can help themselves. Keep the layers pretty by following the same layering method. Enjoy this Peach Cobbler Cheesecake Salad at your next gathering. For the full recipe, you can refer back to the recipe section above. You now know how to make a delicious Peach Cobbler Cheesecake Salad. We explored fresh ingredients like ripe peaches, cream cheese, and marshmallows. I shared step-by-step instructions to create layers and chill the salad for great flavor. Remember to avoid common mistakes, and try variations with other fruits. Store leftovers properly and enjoy it later. This salad is perfect for summer gatherings or simple desserts. With easy tips, you can make it a hit at any event. Dive in and create your own tasty version!

Peach Cobbler Cheesecake Salad Delightful Recipe

Are you ready to experience a dessert that’s a crowd-pleaser? This Peach Cobbler Cheesecake Salad blends the creamy richness of

To make this delicious cake, you need: - 2 cups all-purpose flour - 1 ½ teaspoons baking powder - 1 teaspoon baking soda - 1 teaspoon ground cinnamon - ½ teaspoon ground nutmeg - ½ teaspoon salt - 1 cup granulated sugar - ½ cup brown sugar, packed - 1 cup vegetable oil - 4 large eggs - 2 cups finely grated carrots (about 4 medium carrots) - 1 cup crushed pineapple, drained - 1 teaspoon vanilla extract - ½ cup chopped walnuts or pecans (optional) - ½ cup shredded coconut (optional) You can add a few fun touches if you like: - ½ cup chopped walnuts or pecans adds crunch. - ½ cup shredded coconut gives a nice tropical flavor. Here’s what you will need to bake this cake: - Two 9-inch round cake pans - Mixing bowls - Whisk and spatula - Grater for carrots - Toothpick for testing doneness - Wire rack for cooling When you gather these ingredients and tools, you set the stage for a fantastic baking experience. This cake bursts with flavor and is perfect for any occasion. For the complete recipe, check out the Full Recipe section. Start by preheating your oven to 350°F (175°C). This temperature helps bake the cake evenly. Next, grease and flour two 9-inch round cake pans. You can also line them with parchment paper for easy removal later. In a medium bowl, sift together the dry ingredients: 2 cups of all-purpose flour, 1 ½ teaspoons of baking powder, 1 teaspoon of baking soda, 1 teaspoon of ground cinnamon, ½ teaspoon of ground nutmeg, and ½ teaspoon of salt. This step ensures your cake will rise well and have a smooth texture. Set this mixture aside. In a large mixing bowl, whisk together 1 cup of granulated sugar, ½ cup of brown sugar, and 1 cup of vegetable oil until they blend fully. This mix gives sweetness and moisture to the cake. Add 4 large eggs one at a time, beating well after each addition. Finally, stir in 1 teaspoon of vanilla extract. Gradually add the dry mixture to the wet ingredients. Stir gently until just mixed. Over-mixing can make the cake tough, so be careful. Now, fold in 2 cups of finely grated carrots, 1 cup of crushed pineapple (drained), and the optional ½ cup of chopped walnuts or pecans, plus ½ cup of shredded coconut. This adds a tropical twist and texture. Divide the batter evenly between the two cake pans. Place them in the oven and bake for 30-35 minutes. To check for doneness, insert a toothpick in the center. If it comes out clean, your cakes are ready! Let the cakes cool in the pans for 10 minutes. Then, carefully remove them and place them on a wire rack to cool completely. Cooling is important for frosting later. To frost the cake, start by making the cream cheese frosting. In a medium bowl, beat together 8 oz of softened cream cheese and ½ cup of softened unsalted butter until smooth. Gradually add 4 cups of powdered sugar, mixing well. Add 1 teaspoon of vanilla extract and 1-2 tablespoons of milk or cream. Adjust the milk for the right consistency. Once the cakes are cool, place one layer on a plate. Spread a layer of frosting on top. Place the second layer on top, then frost the top and sides of the cake. For a fun touch, garnish with toasted coconut or chopped nuts. Serve with fresh pineapple on the side for extra flavor. This step-by-step guide will help you create a delightful Tropical Pineapple Carrot Cake. For the full recipe, you can refer back to the ingredients and instructions shared earlier. Enjoy your baking adventure! To keep your cake moist and tasty, use fresh ingredients. Start with ripe carrots and juicy pineapple. Make sure to drain the pineapple well before adding it to the batter. This step prevents excess liquid from forming. Also, don’t over-bake. Check for doneness with a toothpick. It should come out clean but not dry. Finally, adding oil helps keep the cake moist. The vegetable oil in the recipe adds a rich texture. Grate your carrots finely for the best results. Use a box grater or a food processor for quick grating. Make sure to wash and peel them first. This step removes dirt and bitterness. You want about 2 cups of finely grated carrots. It helps the flavor blend well and keeps the cake soft. If you have leftover carrots, save them for salads or snacks. For a smooth frosting, make sure your cakes are cool. Spread a layer of cream cheese frosting on one cake layer. Place the second layer on top and frost the top and sides. Use a spatula to create swirls for a nice look. If you want a cleaner edge, use a bench scraper. Don’t forget to add extra toppings like toasted coconut or nuts for flair. This gives your cake a beautiful finish and adds texture. You can find the full recipe for the cake above. {{image_2}} You can easily make this cake gluten-free. Just swap the all-purpose flour for a gluten-free blend. Look for one that works well in baking. Many brands offer good options. Also, check the baking powder to ensure it's gluten-free. This way, everyone can enjoy a slice! To make a vegan version, replace the eggs with flaxseed meal. Mix one tablespoon of flaxseed meal with three tablespoons of water for each egg. Let it sit until it thickens. Use a plant-based oil, like coconut or canola oil. For the frosting, use vegan cream cheese and butter for a tasty vegan treat. Feel free to get creative with fruits and nuts! You can add raisins or dried cranberries for a sweet bite. Chopped pecans or macadamia nuts add a crunchy texture. For a tropical twist, try adding mango or shredded coconut. Experimenting with flavors makes the cake even more fun and exciting! For the full recipe, check out the recipe section above. To keep your Tropical Pineapple Carrot Cake fresh, wrap it well. Use plastic wrap or foil to cover the cake tightly. This helps keep the moisture in. Store it at room temperature for up to three days. If you want it to last longer, place it in the fridge. The cake will stay good for about a week in the fridge. Freezing is a great option for longer storage. First, let the cake cool completely. Then, slice it into pieces. Wrap each slice in plastic wrap, then place them in a freezer bag. This keeps the cake fresh for up to three months. When you’re ready to enjoy, take out a slice and let it thaw in the fridge overnight. You can serve this cake cold or warm it up. If you want it warm, preheat your oven to 350°F (175°C). Place the cake on a baking sheet. Heat it for about 10-15 minutes. Check it often to avoid drying out. If you prefer it cold, simply take it out of the fridge and enjoy as is. Both ways are tasty! For the full recipe, check out the instructions above. This cake gains its tropical vibe from the sweet pineapple and coconut. The crushed pineapple adds moisture and a burst of flavor, while shredded coconut brings texture. Together, they create a sunny taste that reminds you of warm beaches. Yes, you can use fresh pineapple! Just peel, core, and crush it before adding to the mix. Fresh pineapple may add a brighter taste. Make sure to drain any excess juice to keep the cake's texture right. When stored properly, this cake stays fresh for about 3 to 5 days. Keep it covered at room temperature if you plan to eat it soon. For longer storage, place it in the fridge. You can also freeze it for up to three months. Just wrap it well to prevent freezer burn. Enjoy your Tropical Pineapple Carrot Cake! You can find the full recipe above. This post covered how to make a tasty Tropical Pineapple Carrot Cake. You learned about key ingredients, preparation steps, and essential tools needed. I shared tips to keep your cake moist and techniques for perfect frosting. You also discovered variations like gluten-free and vegan options. In the end, baking this cake can bring joy to your table. Enjoy experimenting with flavors and making it your own!

Tropical Pineapple Carrot Cake Delightful and Easy Recipe

Get ready to enjoy a slice of paradise with my Tropical Pineapple Carrot Cake! This delightful cake combines sweet pineapple

- 8 ounces fettuccine or spaghetti - 4 tablespoons unsalted butter - 4 cloves garlic, minced - 1 cup heavy cream - 1 cup grated Parmesan cheese (plus more for serving) - 1/2 teaspoon salt (or to taste) - 1/4 teaspoon black pepper - 1/4 teaspoon red pepper flakes (optional) - 2 tablespoons fresh parsley, chopped (for garnish) - Large pot for boiling pasta - Large skillet for the sauce - Whisk and spatula for mixing Gathering the right ingredients is key to making creamy garlic Parmesan pasta a hit. You need good pasta, fresh garlic, and rich cheese. I always prefer fettuccine or spaghetti for this dish. They hold the sauce well and make each bite creamy. The butter gives the sauce a smooth base. Fresh minced garlic adds a bold flavor that complements the cheese. Heavy cream is a must for that rich, creamy texture. I love using grated Parmesan cheese; it melts nicely and adds a salty punch. For seasoning, salt and black pepper are essential. They enhance the overall taste. If you like a little heat, add red pepper flakes. Finally, fresh parsley adds color and a fresh taste. Make sure you have the right tools. A large pot helps cook the pasta evenly. A skillet is best for making the sauce. Use a whisk to blend the cream and cheese smoothly. A spatula is great for mixing the pasta and sauce together. You can find the full recipe in the sections above. Enjoy making this simple yet delicious meal! To start, cook the pasta according to the package instructions. I often choose fettuccine or spaghetti for this dish. While the pasta cooks, save 1 cup of pasta water before draining. This water helps adjust the sauce later. Next, let's make the sauce. In a large pot or skillet, melt the butter over medium heat. Once it melts, add the minced garlic. Sauté it for 1-2 minutes until it smells great. Be careful not to burn it! After that, pour in the heavy cream. Stir it well and let it simmer for 2-3 minutes. This step thickens the sauce nicely. Now, it's time to bring it all together. Gradually whisk in the grated Parmesan cheese, salt, black pepper, and red pepper flakes if you like some spice. Keep stirring until the cheese melts and the sauce is smooth. Add the drained pasta to the creamy sauce. Toss to coat it well. If the sauce seems too thick, add some of the reserved pasta water until you reach your desired texture. You can find the full recipe for more details. To make your creamy garlic parmesan pasta even better, try adding grated lemon zest. This small touch gives the dish a fresh and bright flavor. You can also add sautéed vegetables to boost nutrition. Spinach, cherry tomatoes, or even bell peppers work well. They add color and nutrients without changing the taste too much. When making the sauce, keep the heat moderate. This helps prevent the garlic from burning. Burnt garlic can ruin your sauce. Add the cheese gradually. This way, it melts smoothly into the sauce. If you add it all at once, you might end up with clumps. Serve your creamy garlic parmesan pasta with a side salad. A fresh salad balances the rich pasta. You can also pair it with garlic bread. This combo makes for a complete and satisfying meal. For the best look, serve the pasta in deep bowls. Top with extra Parmesan and parsley for a beautiful finish. For the full recipe, check out the [Full Recipe]. {{image_2}} When you want to mix things up, try these fun variations with creamy garlic Parmesan pasta. Each twist keeps the dish exciting and tasty. - Include grilled chicken or shrimp: Adding grilled chicken or shrimp boosts the protein. This makes the dish heartier and gives it a nice texture. - Stir in cooked bacon for extra flavor: Crumbled bacon adds a smoky crunch. Just mix it in before serving for a delightful surprise. - Substitute pasta with zucchini noodles: Zucchini noodles are fresh and light. They soak up the creamy sauce well. This option is perfect for a low-carb meal. - Use nutritional yeast instead of cheese for a vegan version: Nutritional yeast gives a cheesy flavor without dairy. It’s great for those who want a vegan meal. - Increase red pepper flakes for more heat: If you love spice, add more red pepper flakes. This kick can elevate the dish. - Add a splash of hot sauce before serving: A little hot sauce can make a big difference. Just a splash will give it a delightful zing. Feel free to explore these variations to make each meal unique. The creamy garlic Parmesan pasta adapts well, so you can enjoy it your way! For the complete guide, check out the Full Recipe. To store leftovers, place the creamy garlic parmesan pasta in an airtight container. This keeps the flavors fresh and prevents it from drying out. When you're ready to reheat, use a skillet over medium heat. Add a splash of milk or cream to help it rehydrate. Stir often until warmed through. You can freeze creamy garlic parmesan pasta for longer storage. To do this, let the pasta cool completely. Then, divide it into portions and place them in freezer-safe bags. Squeeze out the air to avoid freezer burn. When you're ready to eat, thaw it overnight in the fridge. Reheat gently on the stove to keep the sauce smooth. Creamy garlic parmesan pasta lasts about 3 to 5 days in the fridge. Check for signs that it has gone bad. If you see mold or it has a sour smell, it's time to toss it out. Always trust your senses when checking for food safety. Yes, you can! This dish works great with various pasta types. Here are a few options: - Penne - Rigatoni - Farfalle - Whole wheat pasta Each type adds a unique twist to the creamy sauce. Choose your favorite! To make this dish gluten-free, pick a pasta that fits your needs. Some great options include: - Gluten-free penne - Brown rice spaghetti - Chickpea pasta These choices keep the flavors while being easy on your tummy. Absolutely! You can make this dish vegan with simple swaps. Try these tips: - Use coconut cream instead of heavy cream. - Replace Parmesan cheese with nutritional yeast. - Choose a vegan butter or oil for sautéing. These changes keep the rich taste while making it plant-based. Pair this creamy pasta with tasty sides and beverages. Here are some ideas: - A fresh green salad with lemon vinaigrette - Garlic bread for extra flavor - Roasted vegetables for a healthy touch - A crisp white wine, like Sauvignon Blanc These options enhance your meal and make it more enjoyable. This blog post presented a simple recipe for creamy garlic parmesan pasta. We covered the essential ingredients, step-by-step instructions, and helpful tips to enhance flavor. You also learned about easy variations and storage practices. Experimenting with this dish can lead to many delicious meals. Remember, cooking is about having fun and enjoying the process. So grab your tools and get started in the kitchen!

Creamy Garlic Parmesan Pasta Irresistible Delight

If you crave comfort food that’s quick and easy, you’ll love this creamy garlic Parmesan pasta. With rich flavors and

- 4 large bell peppers (any color) - 1 cup quinoa, rinsed - 2 cups vegetable broth - 1 can (15 oz) black beans, rinsed and drained - 1 cup corn (fresh or frozen) - 1 cup diced tomatoes (canned or fresh) - 1 tsp cumin - 1 tsp smoked paprika - ½ tsp garlic powder - ½ tsp onion powder - Salt and pepper to taste - 1 cup shredded cheese (cheddar or mozzarella) - Fresh cilantro or parsley for garnish For this recipe, I love using fresh ingredients when possible. Fresh bell peppers add a nice crunch. Fresh corn brings a sweet flavor that you just can't beat. However, you can also use canned options if fresh ones aren't available. When it comes to dietary needs, you can easily make this dish vegan. Simply swap the cheese for a plant-based option. Nutritional yeast can also add a cheesy flavor without dairy. If you’re gluten-free, quinoa is a great choice as it is naturally gluten-free. Enjoy getting creative with your ingredients! 1. Preheat the oven and cook quinoa: Start by preheating your oven to 375°F (190°C). This ensures a nice cooking temperature. While the oven warms up, you need to cook the quinoa. In a medium saucepan, add 1 cup of rinsed quinoa and 2 cups of vegetable broth. Bring this mixture to a boil. Once it boils, lower the heat, cover, and let it simmer for about 15 minutes. When it's done, the quinoa will be fluffy and all the broth will be absorbed. 2. Preparing the bell peppers: Next, grab your 4 large bell peppers. Cut off the tops and scoop out the seeds and membranes inside. You want them hollow. Keep the tops; we can use them later. Place the hollowed peppers in a baking dish, standing upright. 3. Making the quinoa filling mixture: In a large mixing bowl, combine your cooked quinoa with the following: - 1 can (15 oz) black beans, rinsed and drained - 1 cup corn (fresh or frozen) - 1 cup diced tomatoes (canned or fresh) - 1 tsp cumin - 1 tsp smoked paprika - ½ tsp garlic powder - ½ tsp onion powder - Salt and pepper to taste Mix everything well until all ingredients are evenly combined. This mixture is tasty and filled with good nutrition. 1. Stuffing bell peppers: Take your quinoa filling and stuff it into each bell pepper. Press down gently to pack the filling in. Make sure to fill them well but leave a bit of space at the top. 2. Covering and baking times: If you want, place the tops of the peppers back on. Now, cover the baking dish with aluminum foil. This helps the peppers cook evenly. Bake in the oven for 25 minutes. 3. Final steps for broiling or garnishing: After 25 minutes, take off the foil. Bake for an additional 10 to 15 minutes. This will make the peppers tender and the cheese, if added, nice and bubbly. When they are done, take them out and let them cool for a few minutes. Finally, garnish with fresh cilantro or parsley for a pop of color and flavor. For the full recipe, refer to the earlier section. Enjoy your delicious stuffed bell peppers! - How to ensure quinoa is cooked perfectly Rinse your quinoa before cooking. This removes bitterness. Then, use two parts liquid for one part quinoa. Bring it to a boil, then lower the heat. Cover and let it simmer for about 15 minutes. When done, the grains look like tiny spirals. - Tips for selecting the best bell peppers Choose firm, shiny bell peppers. They should feel heavy for their size. Look for rich color; vibrant peppers taste sweeter. Avoid any with soft spots or wrinkles. Each color has a unique flavor, so mix it up! - Cheese melting tips for that perfect topping Shred your cheese for faster melting. Sprinkle it on right before the last 10 minutes of baking. If you want a golden crust, broil for a few minutes at the end. Watch closely to prevent burning. - Suggestions for garnishing Fresh herbs like cilantro or parsley add color and flavor. A squeeze of lime juice brightens the dish. You can also sprinkle some chili flakes for a hint of heat. - Serving ideas such as accompaniments or side dishes Serve your stuffed peppers with a side salad for crunch. Rice or quinoa pairs well too. Consider a dollop of yogurt or sour cream for creaminess. These sides balance the dish and add variety. {{image_2}} You can easily adapt this recipe to fit different diets. If you want gluten-free stuffed peppers, just use quinoa and avoid any gluten-containing ingredients. For a vegan option, skip the cheese or use vegan cheese instead. Both options taste great and keep the dish healthy. If you want to add protein, consider using cooked chicken or ground beef. These meats will mix well with the quinoa and add flavor. You could also try turkey or lamb for a twist. Adjust the spices to complement the meat you choose. To change the flavor, use different spices or herbs. For example, you can add chili powder for a kick or Italian seasoning for a fresh taste. A sprinkle of fresh herbs like basil or parsley can brighten the dish. You can also swap in other vegetables. Try zucchini, spinach, or mushrooms for extra nutrition. Chopped veggies can mix right into the quinoa filling. They add color and flavor, making the dish even more appealing. For the full recipe, check out the complete guide above. After making stuffed bell peppers, you might have some left. To store them, let the peppers cool down. Place them in an airtight container. You can refrigerate them for up to three days. If you want to keep them longer, freeze them. Wrap each pepper in plastic wrap, then place them in a freezer bag. They will stay fresh for up to three months. When you’re ready to eat them again, you can reheat them. You have two great options for reheating: the microwave or the oven. If using the microwave, place a pepper on a microwave-safe plate. Heat it for 1-2 minutes. Check if it’s warm all the way through. If not, heat for another minute. For oven reheating, preheat it to 350°F (175°C). Place the peppers in a baking dish and cover with foil. Bake for about 15-20 minutes. This keeps the peppers from drying out and helps maintain their flavor and texture. For the best taste, always check the peppers before serving. Enjoying your stuffed bell peppers again will be a treat! How can I make stuffed peppers in advance? You can prepare the filling and stuff the peppers a day ahead. Just store them in the fridge. Bake them right before serving for the best taste. Can I use different grains besides quinoa? Yes! You can swap quinoa with rice, farro, or even barley. Each grain adds a unique flavor and texture. What's the best way to avoid soggy bell peppers? To keep them firm, pre-bake the peppers for about 10 minutes before stuffing. This helps reduce moisture. How healthy are stuffed bell peppers? Stuffed bell peppers are very healthy. They are full of fiber, protein, and vitamins. They can fit into many diets. What are the calorie counts for each serving of this recipe? Each serving has about 350 calories. This includes the quinoa, beans, and cheese. It's a balanced meal! Are stuffed peppers low-carb? Stuffed peppers can be low-carb. If you skip the beans or cheese, you can lower the carb count. This blog post covered how to make tasty stuffed bell peppers. We discussed ingredients, preparation steps, and baking methods. You learned tips to cook quinoa perfectly and chose the best peppers. We explored variations for different diets and added flavor ideas. Lastly, we shared how to store leftovers and reheat them well. Thoughtfully preparing stuffed peppers can impress anyone at your table. Enjoy trying these recipes and making them your own!

Savory Stuffed Bell Peppers with Quinoa Delight

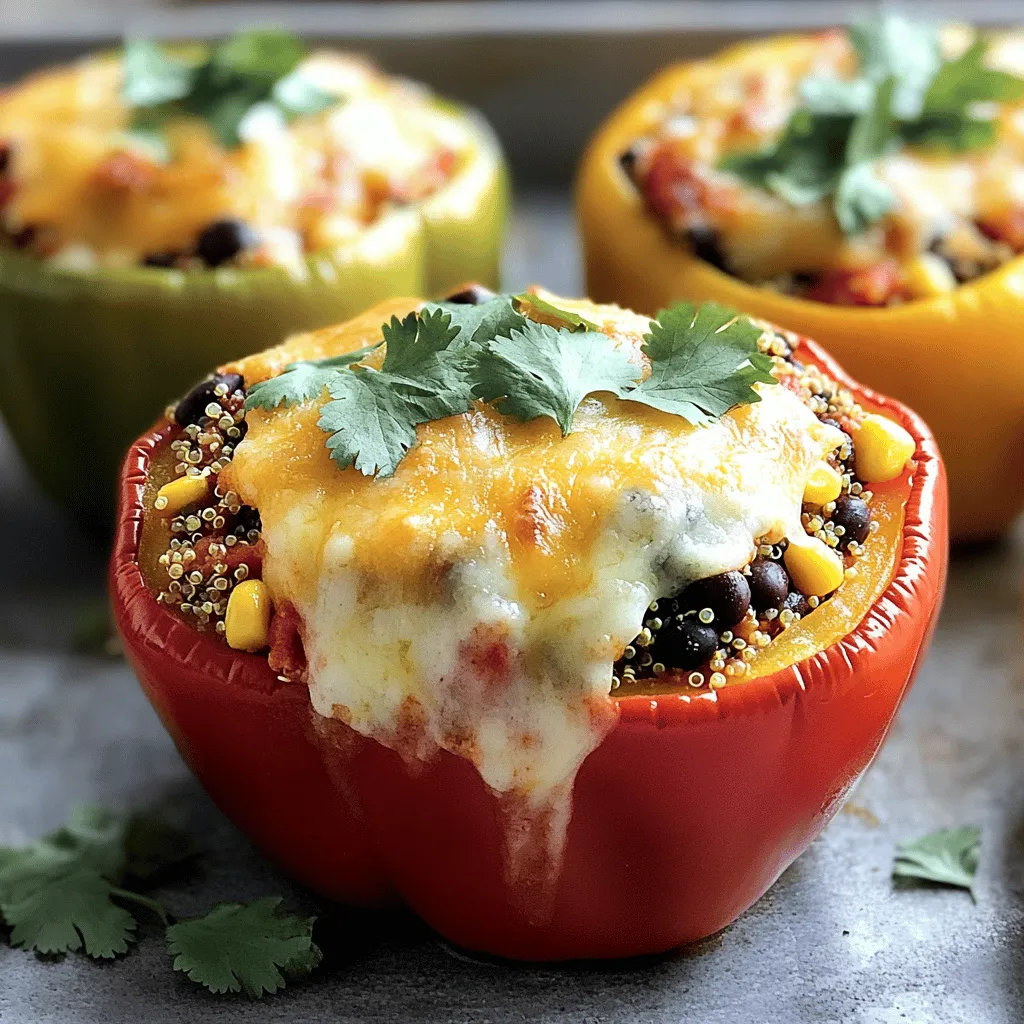
Are you ready to savor a delicious and healthy dish? These Savory Stuffed Bell Peppers with Quinoa are perfect for

For the best lemon blueberry muffins, use these fresh ingredients: - 1 ½ cups all-purpose flour - 1 cup fresh blueberries (or frozen, thawed) - ½ cup granulated sugar - ½ teaspoon baking soda - ½ teaspoon baking powder - ¼ teaspoon salt - 1 large egg - ½ cup buttermilk - ⅓ cup vegetable oil - 1 tablespoon lemon zest (freshly grated) - 2 tablespoons lemon juice - 1 teaspoon vanilla extract These ingredients give you the perfect mix of sweet and tart. The lemon zest adds bright flavor. The blueberries burst with juice, making each bite a treat. You can make your muffins even better with some optional touches: - 2 tablespoons coarse sugar for topping This sugar gives a nice crunch and extra sweetness on top. You can also use a sprinkle of lemon zest for added flair. If you need to swap some ingredients, here are a few ideas: - Use whole wheat flour for a healthier option. - Swap buttermilk with regular milk or yogurt, adding a splash of lemon juice. - If you don’t have blueberries, try raspberries or chopped strawberries. These swaps keep the muffins tasty while fitting your needs. For the full recipe, check out the detailed instructions above. Enjoy baking! First, gather your dry ingredients. You will need all-purpose flour, baking powder, baking soda, salt, and granulated sugar. In a medium bowl, whisk these ingredients together. Make sure they mix well. This step helps your muffins rise nicely. Next, take another bowl for the wet ingredients. Start by beating one large egg. Then add buttermilk, vegetable oil, lemon zest, lemon juice, and vanilla extract. Mix until everything blends smoothly. This mixture adds moisture and flavor to your muffins. Now, combine the wet and dry ingredients in one bowl. Pour the wet mix into the dry mix. Gently fold them together with a spatula. Be careful not to overmix! Next, fold in the blueberries until they are spread evenly. Spoon the batter into a muffin tin, filling each cup about three-quarters full. If you want extra sweetness, sprinkle coarse sugar on top. Preheat your oven to 375°F (190°C). Bake the muffins for 18 to 20 minutes. They should turn golden brown. A toothpick inserted in the center should come out clean. Let them cool for five minutes in the pan, then transfer them to a wire rack. For the complete guide, refer to the Full Recipe. Enjoy your fresh and flavorful lemon blueberry muffins! To achieve the perfect texture in your lemon blueberry muffins, use fresh ingredients. Fresh blueberries burst with flavor and moisture. Make sure to gently fold them into the batter to prevent them from breaking apart. Use buttermilk instead of regular milk. This adds moisture and a slight tang, enhancing the muffin's flavor. Don't overmix the batter; this can lead to tough muffins. Mix just until combined for a light, fluffy texture. One common mistake is not preheating the oven. Always ensure your oven is at the right temperature before baking. This helps the muffins rise properly. Overfilling the muffin cups can also lead to messy results. Fill them only about three-quarters full. Lastly, avoid opening the oven door too soon. Doing this can cause the muffins to sink. To store leftover muffins, place them in an airtight container. They will stay fresh for up to three days at room temperature. For longer storage, freeze them. Wrap each muffin in plastic wrap and place them in a freezer bag. They can last up to three months in the freezer. To reheat, place the muffin in the microwave for about 15-20 seconds, or until warm. You can also warm them in a preheated oven at 350°F for about 5-10 minutes. Enjoy your delicious lemon blueberry muffins anytime! For the full recipe, check the details above. {{image_2}} You can mix it up by using other fruits. Try raspberries, strawberries, or even peaches. Each fruit brings a unique taste. For example, raspberries add a tart kick. Strawberries offer sweetness, while peaches give a nice juicy bite. Just keep the same amount of fruit to maintain the muffin's texture. If you need gluten-free muffins, swap all-purpose flour for gluten-free flour. You can use almond flour or oat flour as great options. For dairy-free versions, replace buttermilk with almond milk or coconut milk. Add a teaspoon of vinegar to mimic the tangy flavor of buttermilk. These changes keep your muffins tasty and light. Feel free to get creative with your muffins! Add chopped nuts like walnuts or pecans for crunch. You can also sprinkle in spices like cinnamon or nutmeg for warmth. A pinch of ginger adds a nice zing, too. These fun add-ins make each bite exciting and unique. Lemon blueberry muffins shine best with a few select drinks. Here are my top picks: - Coffee: A hot cup enhances the zesty flavors. - Tea: Herbal or green tea adds a refreshing touch. - Milk: A glass of cold milk balances the sweetness. - Lemonade: For a citrus boost, enjoy them with lemonade. Each drink complements the bright taste of the muffins. These muffins fit any occasion. Here are some fun ways to serve them: - Brunch: Serve alongside fruit salad for a colorful spread. - Picnics: Pack them in a basket for a delightful treat outdoors. - Dessert table: Stack them on a tiered stand for a stunning display. - Gifts: Wrap them in pretty paper for a sweet gift idea. These creative serving ideas will wow your guests! Presentation matters, even for muffins. Here are some tips to make them pop: - Use colorful liners: Bright liners add a fun touch. - Dust with powdered sugar: A light sprinkle looks elegant. - Garnish with lemon zest: Add zest on top for extra flair. - Arrange on a platter: Group them neatly for a polished look. These simple steps will make your muffins look as good as they taste. Check out the Full Recipe to get started! To stop muffins from sticking, you can line the pan with paper liners. These make it easy to lift out the muffins. If you prefer, grease the pan with butter or oil. Make sure to cover the sides and bottom well. This creates a non-stick surface. Let the muffins cool for a few minutes before removing them. This small step makes a big difference. Yes, you can make the batter ahead. Mix the dry and wet ingredients in separate bowls. Then, store them in the fridge for up to 24 hours. When you are ready to bake, combine them and fold in the blueberries. Avoid overmixing to keep the muffins light and fluffy. You can also freeze the batter for later use. Just remember to thaw it in the fridge before baking. Each muffin has about 150 calories. They also contain around 4 grams of fat and 2 grams of protein. You will find 24 grams of carbs and 1 gram of fiber. The muffins include key vitamins and minerals like vitamin C and calcium from the blueberries and buttermilk. Enjoy the fresh taste while also getting some nutrients. For the complete recipe, check the Full Recipe. You now have a complete guide to making the best lemon blueberry muffins. We covered the key ingredients and tips for mixing, baking, and storing. You learned about fun variations and serving suggestions to impress your friends. Knowing how to fix common mistakes will improve your baking skills. Use this knowledge to create delicious muffins every time. Enjoy your baking journey, and make those muffins shine!

Lemon Blueberry Muffins Fresh and Flavorful Delight

If you love fresh flavors, Lemon Blueberry Muffins are a must-try! I’ll share my favorite recipe that blends zesty lemon

Making homemade tomato basil soup is easy when you have the right ingredients. Here’s what you need: - 2 tablespoons olive oil - 1 medium onion, chopped - 3 cloves garlic, minced - 4 cups ripe tomatoes, chopped (or 2 cans of whole tomatoes) - 2 cups vegetable broth - 1 teaspoon sugar (to balance acidity) - 1 teaspoon salt (adjust to taste) - 1/2 teaspoon black pepper - 1/2 cup fresh basil leaves, roughly chopped - 1/2 cup heavy cream (optional, for creaminess) - Crusty bread for serving (optional) You can change up the soup to fit your taste. Here are some optional ingredients: - 1 teaspoon red pepper flakes for heat - 1 carrot, diced for sweetness - 1 celery stalk, diced for depth - Parmesan cheese for topping - A squeeze of lemon for brightness Having the right tools makes cooking easier. Here’s what I recommend: - Large pot for cooking - Immersion blender for smooth soup - Chopping knife for prep - Cutting board for safety - Measuring spoons and cups for accuracy This list helps you gather all you need for a delicious homemade tomato basil soup. You can find the full recipe above to guide you through the cooking process. To make this soup, gather your ingredients. You will need: - 2 tablespoons olive oil - 1 medium onion, chopped - 3 cloves garlic, minced - 4 cups ripe tomatoes, chopped (or 2 cans of whole tomatoes) - 2 cups vegetable broth - 1 teaspoon sugar (to balance acidity) - 1 teaspoon salt (adjust to taste) - 1/2 teaspoon black pepper - 1/2 cup fresh basil leaves, roughly chopped - 1/2 cup heavy cream (optional, for creaminess) - Crusty bread for serving (optional) Start by heating the olive oil in a large pot over medium heat. Add the chopped onion. Cook it for about 5 minutes until it turns soft and clear. Then, add the minced garlic. Cook for one more minute. Stir it often to keep it from burning. Next, add the chopped tomatoes. If you use canned tomatoes, pour them in whole and break them up. Cook this mixture for 10 to 15 minutes. You want the tomatoes to break down and release their juices. After the tomatoes are soft, pour in the vegetable broth. Add the sugar, salt, and black pepper. Bring everything to a simmer. Let it simmer for about 20 minutes. This time allows all the flavors to mix well. Once the time is up, take the pot off the heat. Use an immersion blender to puree the soup until it is smooth. If you don’t have an immersion blender, you can blend it in batches with a regular blender. After blending, put the pot back on the heat. Stir in the fresh basil and heavy cream if you want a creamy texture. Taste it and adjust the seasonings if needed. Let the soup warm through for another 5 minutes. Now, serve the soup hot. Drizzle a little olive oil on top for extra flavor. You can enjoy it with crusty bread on the side. This delightful dish is simple yet full of rich flavors. For the complete method, check the Full Recipe. When making tomato basil soup, watch out for a few common mistakes. First, don't skip the onion and garlic. They add a strong base flavor. Next, avoid using overripe or bad tomatoes. Fresh, ripe tomatoes make a big difference. Also, don't rush the simmering time. Let the soup cook long enough for the flavors to blend well. Lastly, always taste before serving. Adjust the salt and pepper as needed to get the best flavor. There are simple ways to boost the flavor of your soup. Adding a teaspoon of balsamic vinegar can give a nice tang. Fresh herbs like thyme or oregano can add depth. You can also use smoked paprika for a subtle smoky flavor. If you like heat, try a pinch of red pepper flakes. Experimenting with these ingredients can take your soup from good to great. If you want a creamy texture, heavy cream is an option. Stir it in just before serving for the best results. You can also use coconut milk for a dairy-free choice. Blending the soup well makes it smoother, too. If you prefer a chunkier soup, blend only half. This keeps some texture while still being creamy. Remember, the key is to find the right balance that you enjoy. {{image_2}} You can easily make this soup vegan and dairy-free. Just skip the heavy cream. Instead, use coconut milk or cashew cream. Both options add creaminess without dairy. If you want extra flavor, try adding nutritional yeast. It gives a cheesy taste without cheese. Use vegetable broth, as listed in the Full Recipe, to keep it plant-based. These changes ensure everyone can enjoy the soup. If you like heat, this soup is easy to spice up. Add crushed red pepper flakes or diced jalapeños. Start with a small amount and increase to your taste. You can mix in smoked paprika for a smoky flavor. This twist makes the soup warm and exciting. Don’t forget to balance the heat with a touch of sugar. It helps keep the flavors bright and fresh. Adding veggies boosts the soup's nutrition. Try carrots, bell peppers, or spinach. Chop them finely and sauté with the onions. This adds color and flavor. You can also add zucchini or kale later in the cooking process. They cook quickly and keep their nutrients. This way, you create a tasty and healthy bowl of soup everyone will love. After you enjoy your homemade tomato basil soup, let it cool. Once cooled, transfer it to an airtight container. Make sure to seal it well to keep the flavors fresh. Store your leftovers in the fridge. This soup stays good for about 3 to 5 days. If you want to keep it longer, freezing is a great option. To freeze your soup, first, cool it completely. Pour it into freezer-safe bags or containers, leaving space at the top. This is important because liquids expand when frozen. Label the containers with the date. You can freeze the soup for up to 3 months. When you're ready to enjoy it again, just thaw it in the fridge overnight. When reheating, pour the soup into a pot. Heat it slowly over medium heat, stirring often. This helps the flavors come back to life. If the soup seems too thick, add a splash of water or broth. You can also use the microwave, but stir it halfway through to heat evenly. Enjoy it warm for a cozy meal. For the full recipe, check the full recipe section. Homemade tomato basil soup lasts about 3 to 5 days in the fridge. Store it in an airtight container. Make sure to let it cool down first before sealing it. For best taste, eat it within the first few days. Yes, you can use canned tomatoes instead of fresh. Canned tomatoes are great when fresh ones are not in season. They are often picked at their peak ripeness, which gives good flavor. Just use two cans of whole tomatoes in place of four cups of fresh tomatoes. You can serve your tomato basil soup with several side dishes. Here are a few ideas: - Grilled cheese sandwiches - Crusty bread - Salad with mixed greens - Garlic bread - Cheese toast These sides add to the meal and make it more filling. Yes, homemade tomato basil soup is healthy. It has fresh ingredients and no preservatives. Tomatoes are high in vitamins and antioxidants. Basil adds flavor and nutrients too. If you skip heavy cream, it can be lower in calories and fat. Enjoy it as a balanced meal option! For the full recipe, check out the Homemade Tomato Basil Bliss section! You learned how to make tasty homemade tomato basil soup. We covered the key ingredients and tools needed. Following step-by-step instructions, you'll make a warm bowl of soup. We shared tips to avoid common mistakes and enhance flavors. You also explored variations, including vegan options and extra vegetables. Storing leftovers, freezing, and reheating were discussed, too. Making this soup is simple and rewarding. Enjoy the rich flavor and comfort in every bite! You now have all you need to create this favorite dish.

Homemade Tomato Basil Soup Flavorful and Simple Treat

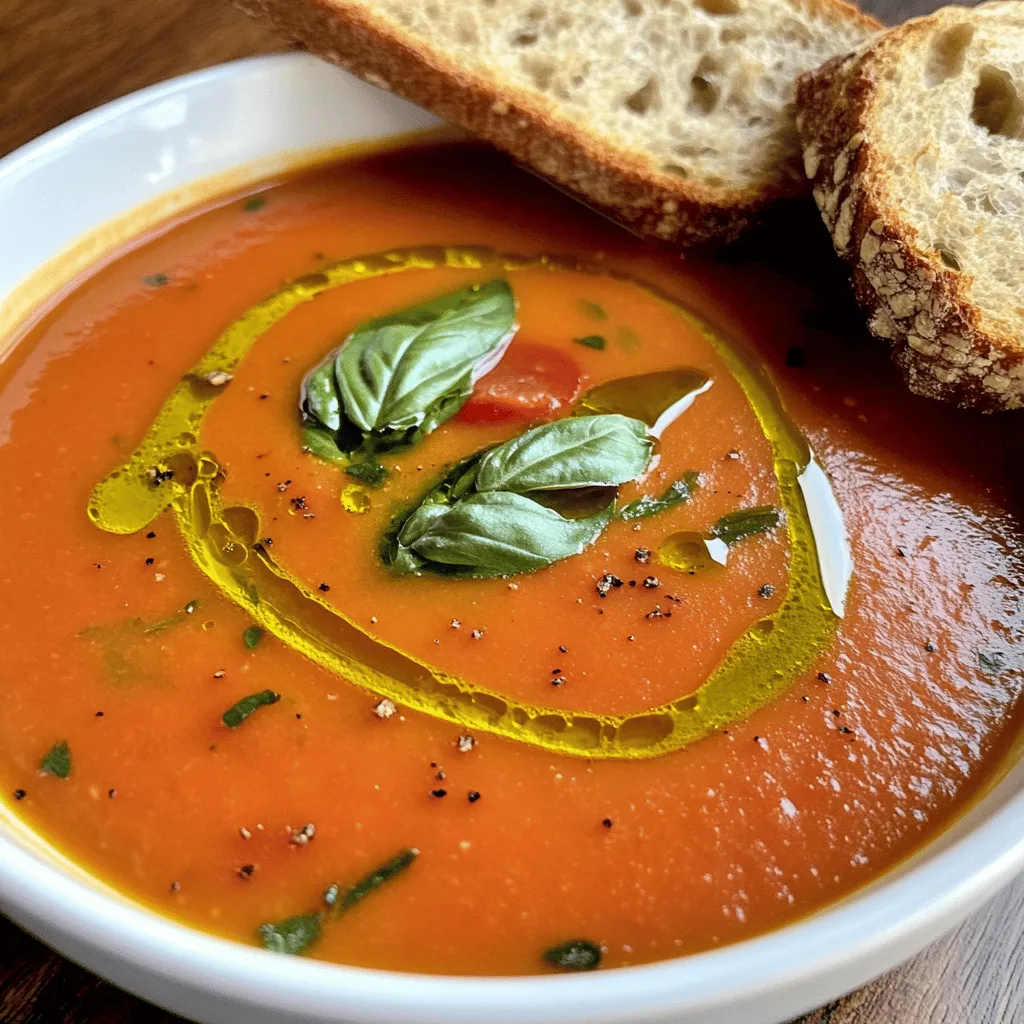
If you crave a cozy bowl of comfort, this Homemade Tomato Basil Soup is for you! Simple to make and

- 1 red bell pepper, cut into 1-inch pieces - 1 yellow bell pepper, cut into 1-inch pieces - 1 zucchini, sliced into thick rounds - 1 red onion, cut into wedges - 1 cup cherry tomatoes - 1 cup mushrooms, whole or halved - 4 tablespoons olive oil - 2 teaspoons garlic powder - 1 teaspoon smoked paprika - Salt and pepper to taste - Fresh basil leaves for garnish I love using fresh, colorful veggies for these skewers. Each one adds a unique taste. The red and yellow bell peppers bring sweetness, while the zucchini adds a nice crunch. Red onion gives a sharp flavor, and cherry tomatoes burst with juice. Mushrooms add umami, which rounds out the dish. - Alternative vegetable options (eggplant, asparagus, etc.) - Various marinades and spices Feel free to mix and match your vegetables. Eggplant adds a lovely texture, and asparagus brings a fresh taste. Also, try different marinades for extra flavor. You can use teriyaki, lemon herb, or even a simple balsamic glaze to change things up. Each serving has roughly: - Calories: 150 - Fat: 8g - Carbs: 18g - Protein: 4g This dish is not just tasty; it’s also good for you! It’s low in calories and packed with nutrients. Grilled vegetable skewers are a great choice for a healthy meal. Enjoy them as a side or main dish! Check out the Full Recipe for more details. First, preheat your grill to medium-high heat. This step is key for great grilling. While the grill heats, prepare your vegetables. Wash them well and cut them into the sizes listed in the recipe. Next, mix the olive oil and seasonings. In a large bowl, combine the olive oil, garlic powder, smoked paprika, salt, and pepper. Stir until the mixture blends well. This oil will add a nice flavor to the veggies. Now, it's time to thread the vegetables onto skewers. Use metal or soaked wooden skewers. Start with one type of vegetable. Slide it onto the skewer, leaving space between each piece. Aim for 4-5 pieces of each type per skewer. For a colorful look, alternate the vegetables. Start with a bell pepper, then add zucchini, and follow with onion and mushrooms. This not only makes the skewers pretty but also adds different flavors. Place the skewers on the preheated grill. Grill them for about 10-12 minutes. Turn the skewers occasionally to cook evenly. Keep an eye on them. You want a nice char but not burnt. To check if they are done, look for a slight char and tenderness. You can poke a fork into the veggies. If it goes in easily, they are ready. After grilling, let the skewers cool for a minute. Garnish with fresh basil leaves for a tasty finish. Enjoy your colorful, grilled vegetable skewers! For the complete recipe, refer to the Full Recipe. To prevent vegetables from sticking to the grill, oil the grill grates well. You can use a paper towel dipped in oil. Hold it with tongs and wipe the grates before placing the skewers on. This simple step keeps your veggies intact and makes cleanup easier. For the perfect char without burning, keep a close eye on the grill. You want to cook them over medium-high heat. Turn the skewers every few minutes. This way, you get nice grill marks without charring them too much. To enhance the flavor of your grilled vegetable skewers, try a mix of spices. Garlic powder, smoked paprika, and salt create a great base. You can add a pinch of red pepper flakes for some heat. If you want a fresh kick, consider squeezing lemon juice over the veggies right before serving. Balancing flavors is key. If you add something spicy, pair it with something mild. This mix keeps each bite interesting. For example, sweet bell peppers pair nicely with savory mushrooms. If your vegetables are undercooked, give them more time on the grill. Check them often and turn the skewers to ensure even cooking. If they are overcooked, reduce the heat next time. Remember, thinner pieces cook faster. For uneven cooking, try cutting your vegetables into similar sizes. This ensures they cook at the same rate. Also, consider rearranging them on the skewer. If one type cooks faster, place it further from the heat source. For the full recipe and more tips, check out the Grilled Rainbow Vegetable Skewers section. {{image_2}} You can mix many veggies for your skewers. Seasonal vegetables are perfect. Try using fresh asparagus, eggplant, or sweet corn. They add unique flavors. For a fruity twist, think about adding pineapple or peaches. These fruits caramelize nicely on the grill. Their sweetness pairs well with savory veggies. You can even make a colorful rainbow skewer with different colors and shapes. This keeps your meal fun and exciting. Marinades can take your skewers to the next level. A simple teriyaki sauce adds rich flavor. You can also try a lemon herb mix for a zesty kick. Fresh herbs like rosemary or thyme add depth. Think about mixing in citrus zest for brightness. Just a little lemon or lime peel can make a big difference. This gives your skewers an extra layer of taste that everyone will love. Grilled vegetable skewers are great on their own but pair well with sides. Serve them with a light quinoa salad or some crusty bread. These sides balance the flavors nicely. For dips, try a cool yogurt sauce or a spicy salsa. These add extra zing to your meal. You can even drizzle your skewers with balsamic glaze for a sweet touch. This will impress your guests and make your dish shine. For the full recipe, check out Grilled Rainbow Vegetable Skewers . To keep your grilled vegetable skewers fresh, refrigerate them right away. Place the skewers in an airtight container. You can also wrap them tightly in plastic wrap. If you plan to eat them later, freezing is a great choice. Use a freezer-safe bag or container to avoid freezer burn. When you are ready to enjoy your skewers again, reheat them gently. You can use a microwave, but I recommend using an oven or grill. This method keeps the texture and flavor. If using a microwave, heat in short bursts. This way, they warm evenly without getting soggy. If using an oven, place skewers on a baking sheet at 350°F for about 10 minutes. Grilled vegetable skewers will last in the fridge for up to 4 days. If you freeze them, they can stay good for up to 3 months. Just remember to label your containers with the date. This helps you keep track of freshness. Yes, you can use wooden skewers. To prevent them from burning, soak them in water for 30 minutes before using. This keeps them moist while you grill. If you use dry skewers, they may catch fire. Great choices include bell peppers, zucchini, onions, cherry tomatoes, and mushrooms. You can also use eggplant, asparagus, or corn. These vegetables hold up well on the grill and taste amazing. To add more flavor, try using spices like garlic powder and smoked paprika. You can also marinate the veggies in olive oil, lemon juice, or balsamic vinegar. Fresh herbs like basil or thyme add great taste too. Yes, you can prepare the skewers in advance. Cut and marinate the vegetables a few hours before grilling. Just store them in the fridge until you're ready to cook. This saves time and makes grilling easy. For the full recipe, check out the complete guide on grilled rainbow vegetable skewers! Grilling vegetable skewers is simple and fun. You learn how to choose fresh ingredients and prepare them. I shared important tips for grilling and seasoning to enhance flavors. You can customize these skewers to fit your taste with various veggies and marinades. Don't forget about storage tips and reheating methods to enjoy leftovers. So, fire up your grill and create delicious skewers. Your meals can be healthy and tasty all summer long!

Grilled Vegetable Skewers Flavorful and Healthy Option

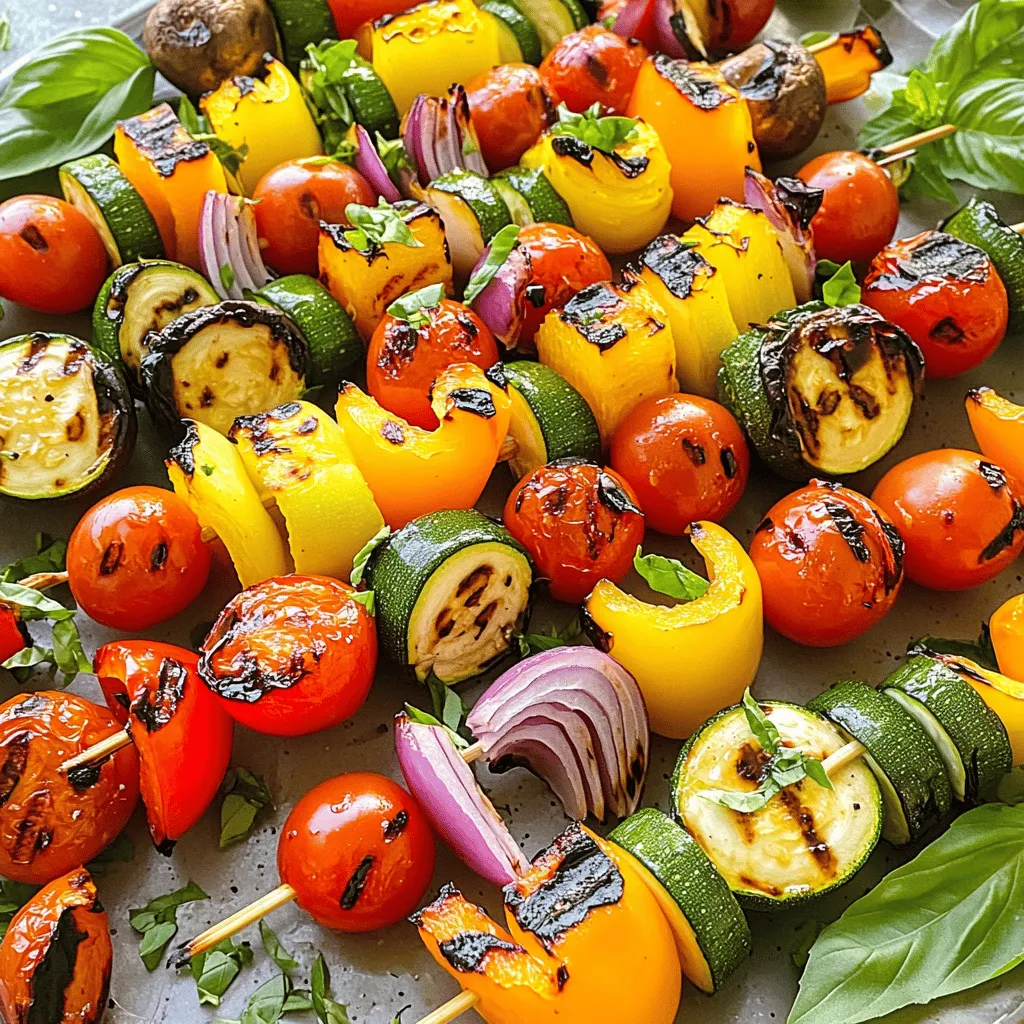
Looking for a tasty, healthy dish? Grilled vegetable skewers are the answer. These colorful, flavorful bites are packed with nutrients

- Sliced strawberries - Granulated sugar - Heavy cream - Powdered sugar - Vanilla extract - Store-bought pound cake or sponge cake - Optional ingredient: Greek yogurt - Garnish: Fresh mint leaves To create a delightful strawberry shortcake trifle, you need fresh ingredients. Start with ripe, juicy strawberries. These give the trifle its bright taste. You will also need granulated sugar to sweeten the strawberries. This draws out their natural juices. Next, heavy cream is key for the whipped topping. Pair it with powdered sugar and vanilla extract for flavor. You can add Greek yogurt for a creamier texture if you like. A store-bought pound cake or sponge cake serves as the base, making it easy to layer. Finally, fresh mint leaves add a nice touch as a garnish. - Mixing bowls - Whisk or electric mixer - Trifle dish or serving glasses Having the right tools makes cooking fun and easy. You need mixing bowls for combining ingredients. A whisk or electric mixer is essential for whipping the cream. A trifle dish or individual serving glasses will showcase your beautiful dessert. With these tools, you are ready to make a stunning trifle that everyone will love. For the complete recipe, check the Full Recipe link. Start by hulling and slicing the fresh strawberries. In a mixing bowl, combine the sliced strawberries with granulated sugar. Toss them well to coat. This step helps the strawberries release their juices. Let them sit for about 15 minutes. During this time, they will macerate and become sweeter. Next, grab another mixing bowl and pour in the heavy cream. Add powdered sugar and vanilla extract to the bowl. Use a whisk or an electric mixer to whip until soft peaks form. This means the cream should hold its shape but still be smooth. If you want a creamier texture, fold in Greek yogurt gently. This step is optional but adds a nice touch. Now comes the fun part: assembling the trifle! In a clear trifle dish or individual serving glasses, start with a layer of cake cubes. You can use store-bought pound cake or sponge cake. Next, spoon a layer of the macerated strawberries over the cake. Follow this with a layer of the whipped cream mixture. Repeat the layers until you fill the dish. Make sure to end with a lovely layer of whipped cream on top. For a pop of color and freshness, garnish with whole strawberries and fresh mint leaves. You can find the Full Recipe in the section above. Enjoy your delicious creation! To make perfect whipped cream, start with cold heavy cream. Pour it into a mixing bowl. Use a whisk or an electric mixer to whip the cream. Whip until you see soft peaks. This means the cream holds its shape but is still light. If you want creamier whipped cream, gently fold in Greek yogurt at this stage. If you have leftover whipped cream, store it in an airtight container. Keep it in the fridge for up to two days. When layering your trifle, start with cake cubes at the bottom. Make sure to spread them evenly. Add strawberries next, then a layer of whipped cream. Repeat this process until you fill the dish. For a nice finish, end with whipped cream on top. To make it look pretty, place whole strawberries and mint leaves on the top. This adds color and makes it inviting. Strawberry shortcake trifle pairs well with light drinks. Try serving it with lemonade or iced tea. It’s great for summer picnics or garden parties. You can also serve it at birthdays or family gatherings. This dessert is a hit at any occasion. It looks beautiful and tastes amazing. Enjoy your trifle with family and friends! If you want the Full Recipe, you can find it in the article. {{image_2}} You can switch up the fruits in your trifle. Try blueberries or raspberries for a twist. Each fruit brings a new taste and color. You can also flavor the whipped cream. Use almond or coconut extract for a fun change. This small step adds depth to your dessert. If you need a gluten-free version, use gluten-free cake. Many stores sell gluten-free options. For a vegan trifle, swap the heavy cream for coconut cream. You can also use plant-based yogurt. These simple swaps keep the trifle tasty and inclusive for everyone. Think about how you want to serve your trifle. Individual servings work great for parties. Use small glasses for a personal touch. A family-style trifle looks stunning on a table. Choose what fits your event best. The choice adds to the fun of serving this delightful treat. For the full recipe, check out the detailed instructions. To keep your Strawberry Shortcake Trifle fresh, refrigerate any leftovers. Use an airtight container to prevent moisture loss. This simple step helps the flavors stay rich and tasty. If you have individual servings, cover them with plastic wrap or place lids on your glasses. This way, your trifle will be ready to enjoy later! If you want to save your trifle for later, freezing is an option. You can freeze the layers separately. Wrap the cake and the whipped cream in plastic wrap and store them in freezer bags. When you are ready to serve, let the layers thaw in the fridge overnight. Once thawed, reassemble your trifle as you did before. Layer the cake, strawberries, and cream for a fresh look. In the fridge, your Strawberry Shortcake Trifle lasts about three days. After that, the layers may not hold up well. The cake can get too soggy, and the cream may not taste fresh. Enjoy it within this time for the best flavor and texture. Yes, you can make it ahead of time. This is great for parties. Just layer the trifle, but add the cream and strawberries close to serving time. This keeps everything fresh and bright. If you need to prepare early, store layers separately. Keep the cake, cream, and strawberries in the fridge. Assemble them when ready to serve. I suggest using a soft pound cake or sponge cake. These cakes soak up the strawberry juice well. They stay soft and light. You can also use homemade cake if you have time. Store-bought options work great too. Just choose a flavor you love. To avoid sogginess, don’t layer too much syrupy fruit. Use just enough juice. The cake should soak, but not drown. Add a layer of whipped cream before the fruit. This creates a barrier. Store in the fridge with a cover to keep it fresh too. Yes! You can use coconut cream for a dairy-free option. Greek yogurt adds creaminess and tang. If you want a lighter option, use whipped topping. Each choice will change the flavor a bit. Keep this in mind when you pick. Serve it in clear glasses or a trifle dish. This shows off the layers. You can also use small cups for individual servings. Add mint leaves or whole strawberries on top for color. This makes it look fancy and fun. You can find the Full Recipe in the article. It has all the details you need to make this delightful dessert. You now have all the steps to make a delightful Strawberry Shortcake Trifle. Start with fresh strawberries and simple ingredients, then layer them with whipped cream and cake. Don’t forget the tips for perfecting your layers and storage methods. Feel free to get creative with flavors and dietary needs. Your trifle can impress at any gathering. Enjoy making this tasty dessert; it's sure to please everyone!

Strawberry Shortcake Trifle Delightful Summer Treat

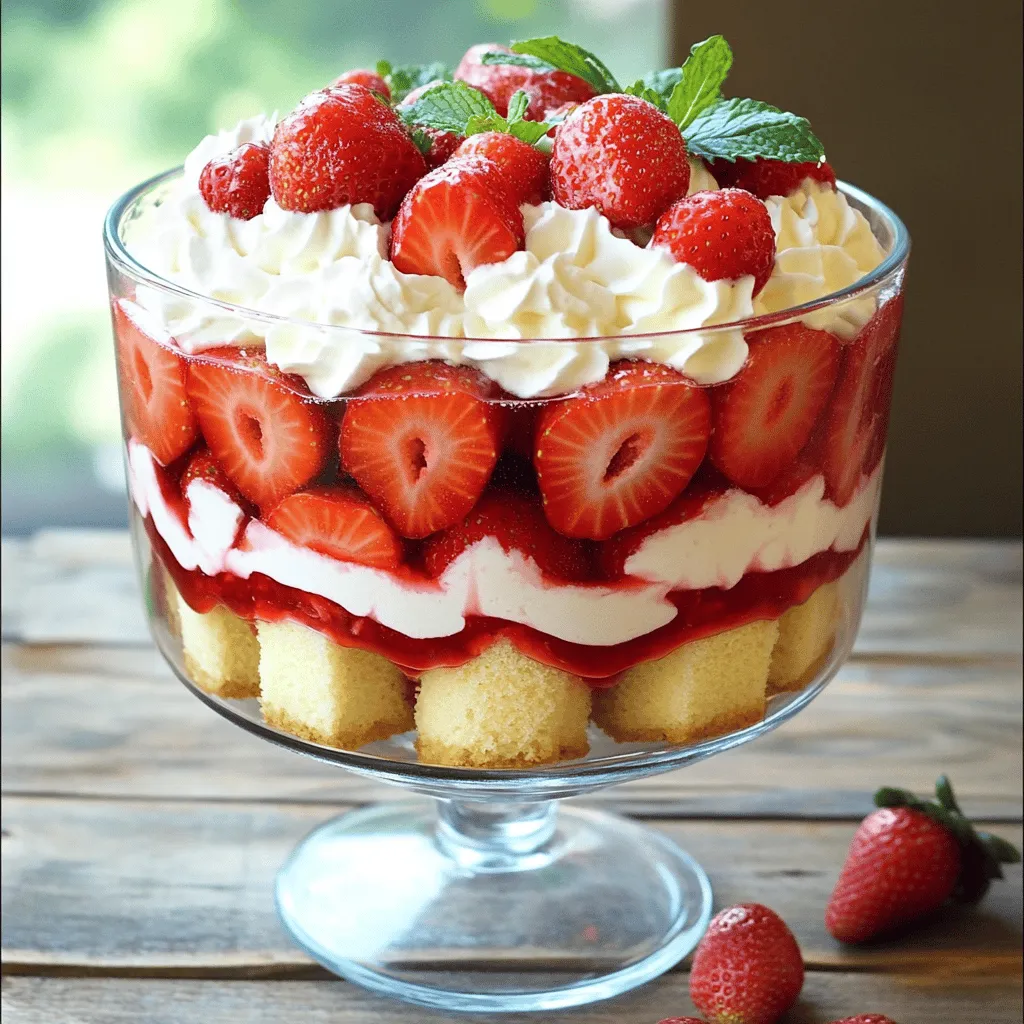
Looking for the perfect summer dessert? Try my Strawberry Shortcake Trifle! This delightful treat layers fresh strawberries, whipped cream, and

- Ripe avocados - Whole-grain bread - Additional toppings: cherry tomatoes, cucumber, feta cheese, pomegranate seeds Avocado toast starts with ripe avocados. Choose ones that yield slightly when you press them. Then, grab some whole-grain bread. This gives your toast a hearty base. You can add toppings like cherry tomatoes for a burst of flavor. Thinly sliced cucumber adds crunch, while feta cheese gives a creamy touch. Finally, pomegranate seeds add a sweet pop. - Olive oil - Lemon juice - Salt and pepper - Fresh herbs Seasoning your avocado toast is key to great taste. Use olive oil to add richness. A splash of lemon juice brightens the flavor. Don't forget salt and pepper to enhance all the tastes. Fresh herbs like basil or cilantro can add a nice touch. They make each bite fresh and vibrant. For the full recipe, check out Avocado Toast Delight 🥑. Toasting bread is key for great avocado toast. Start with whole-grain bread for a hearty flavor. Use a toaster or a skillet for even heat. For the best crispiness, toast until golden brown. This gives your toast a nice crunch that holds the toppings well. Now, let's prepare the avocados. Cut the ripe avocados in half and take out the pit. Scoop the green flesh into a bowl. Use a fork to mash the avocado until it's creamy but still chunky. Add one tablespoon of lemon juice to keep it fresh. Season with salt and pepper to taste. This mix is simple yet full of flavor. It’s time to build your toast! Start with your toasted bread as the base. Spread a generous layer of the avocado mixture on each slice. For toppings, get creative! On two slices, add halved cherry tomatoes and crumbled feta cheese. On the other two, layer thin cucumber slices and sprinkle pomegranate seeds. Finish with fresh herbs for color and taste. For a stunning presentation, place the toast on a wooden board or a large platter. Drizzle olive oil on top and scatter extra toppings around for a vibrant look. Enjoy your delicious avocado toast variations! You can find the complete recipe [Full Recipe]. How to choose ripe avocados: When selecting avocados, look for ones that feel slightly soft. Gently press the skin; if it yields a bit, it is ripe. Dark green or black skin can be a good sign of ripeness. Avoid hard avocados; they are not ready to eat yet. Preventing browning of mashed avocado: To keep mashed avocado fresh, add lemon juice right after you mash it. The acid helps slow browning. Store it in an airtight container and press plastic wrap directly on the surface to limit air exposure. Best bread types for avocado toast: Whole-grain bread is ideal for avocado toast. It adds flavor and texture. Sourdough and rye are also great choices. Their unique flavors pair well with creamy avocado. Gluten-free options: If you need gluten-free bread, look for brands made with almond flour or rice flour. They offer great texture and taste. Suggestions for spices and additional toppings: Sprinkle red pepper flakes or za'atar on your toast for a kick. Crumbled feta or goat cheese adds a creamy richness. You can also add sliced radishes, pickled onions, or even nuts for crunch. Pairing avocado toast with beverages: Avocado toast pairs well with fresh juices, like orange or green juice. A nice cup of herbal tea also complements the flavors well. Consider a light sparkling water for a refreshing touch. For a full recipe that showcases these tips, check out the Avocado Toast Delight 🥑. {{image_2}} For a hearty meal, try adding eggs on your avocado toast. Here are a few ideas: - Poached Egg: Place a perfectly poached egg on top. The runny yolk adds creaminess. - Fried Egg: A sunny-side-up egg creates a nice visual and rich taste. - Scrambled Eggs: Mix scrambled eggs with herbs or cheese for extra flavor. Another great option is smoked salmon. Its salty taste pairs well with creamy avocado. You can add capers, dill, or red onion for a lovely touch. For a plant-based twist, try these tasty toppings: - Chickpeas: Mash chickpeas with avocado for a protein boost. - Hummus: Spread a layer of hummus before adding avocado for extra flavor. - Roasted Vegetables: Add roasted peppers, zucchini, or sweet potatoes for a hearty bite. Explore unique flavor profiles by using different spices or herbs. Try adding za'atar for a Middle Eastern flair or chili flakes for heat. Using seasonal fruits and veggies can enhance your avocado toast. In spring, top with radishes or asparagus. In summer, add fresh corn or heirloom tomatoes. For a fun holiday twist, think about pumpkin spice in the fall. In winter, use roasted root vegetables or pomegranate seeds for a festive touch. Keep it fresh and colorful, and your avocado toast will always wow your guests! For a full recipe, check out Avocado Toast Delight 🥑. How do you store unused avocado mixture? To keep your avocado fresh, put it in a bowl. Press plastic wrap directly on the mixture. This cuts air exposure. You can add a splash of lemon juice, too. This helps prevent browning. Use the mixture within one day for the best taste. How do you keep toppings fresh for future use? Store toppings in separate containers. Use airtight jars or bags. Keep them in the fridge. Veggies like cucumbers and tomatoes will stay crisp. This way, you can enjoy your avocado toast later. What are the best practices for storing assembled toast? It’s best to eat avocado toast fresh. If you need to store it, keep the bread and toppings separate. Put the toast in a paper bag. This helps it stay crispy. What are the best reheating techniques for optimal texture? To reheat, use a toaster or an oven. This keeps the bread crispy. Avoid microwaving, as it makes the bread soggy. Heat for a few minutes until warm. How can you prepare in advance for quick breakfasts? You can make the avocado mixture ahead of time. Store it in the fridge, as mentioned earlier. Toast the bread fresh in the morning. This gives you a quick breakfast without fuss. How can you customize for weekly meal input? You can choose different toppings each week. Try eggs, smoked salmon, or seasonal veggies. This keeps your meals exciting and new. Use the Full Recipe for lots of options to explore. To keep your avocado toast crisp, start with toasted bread. Use whole-grain bread for better texture. Toast until it is golden brown. You can also add a layer of oil or butter on the bread before toasting. This helps seal the bread and keep it from getting soggy. For healthy toppings, try sliced radishes for crunch. You can add arugula or spinach for greens. A sprinkle of hemp seeds or chia seeds boosts nutrition too. Fresh herbs like cilantro or dill add flavor without many calories. You can prep avocado toast in advance but with care. Toast the bread and store it in an airtight container. Mash the avocado just before eating. To keep it fresh, add a bit of lemon juice to the avocado. This helps slow down browning. Avocado toast pairs well with fresh juices or smoothies. A green smoothie adds nutrition and energy. For a lighter drink, try herbal tea or iced tea. Coffee complements the flavors nicely, making it a perfect breakfast or brunch drink. Avocado toast is simple and satisfying. We explored key ingredients, from ripe avocados to fresh herbs. You learned optimal toasting techniques and how to mash avocados for flavor. We also shared tips for choosing the best bread and creating a meal prep plan. With variations from protein-packed options to seasonal toppings, there’s a recipe for everyone. Remember, enjoy your toast fresh but store leftovers properly for later. This dish is not just food; it’s a canvas for your creativity. Get cooking and enjoy each bite!

Avocado Toast Variations for Simple and Flavorful Meals

Avocado toast is a simple meal that everyone loves. It’s rich in taste and packed with nutrients. In this article,

To make a rich chocolate lava cake, you need simple yet key ingredients. This recipe gives you a warm, gooey center that melts in your mouth. You can make this dessert in about 30 minutes. It's perfect for special occasions or a cozy night in. Here are the must-have ingredients for your chocolate lava cake: - 1/2 cup unsalted butter (plus extra for greasing) - 1 cup semi-sweet chocolate chips - 2 large eggs - 2 large egg yolks - 1/4 cup granulated sugar - 2 tablespoons all-purpose flour - 1/2 teaspoon vanilla extract - Pinch of salt These ingredients work together to create a soft, rich cake with a flowing center. The butter and chocolate give it that decadent taste, while the eggs help it rise. You can make your cake even more delightful with these optional ingredients: - Powdered sugar (for dusting) - Fresh berries (for a fruity touch) - Vanilla ice cream (for added creaminess) These optional items can enhance the look and taste of your dessert. They pair well with the warm chocolate and create a beautiful presentation. Enjoy exploring different ways to serve your cake! Start by preheating your oven to 425°F (220°C). Grab four ramekins that can hold 6 oz each. Use some butter to grease the inside of each ramekin. This helps the cake come out easily. Then, sprinkle a little flour inside to prevent sticking. Tap out any extra flour. This simple step makes a big difference. Next, take a microwave-safe bowl and add your butter and chocolate chips. Microwave them for about 30 seconds. Pull it out and stir. If it’s not fully melted, heat it again in 15-second bursts. Keep stirring until smooth. Let the mixture cool for a few minutes. This cooling helps keep the eggs from cooking when mixed in. In a separate bowl, whisk together two large eggs and two egg yolks. Add in the granulated sugar and mix until it looks thick and pale; this should take about three minutes. Next, gently fold the melted chocolate mixture into the egg mix. Be careful not to deflate your eggs. Now, sift in the flour, vanilla extract, and a pinch of salt. Fold until just combined; don’t overmix or your cakes will be tough. Divide the batter evenly among the ramekins, filling them about three-quarters full. Place the ramekins on a baking sheet for easy handling. Bake in your preheated oven for 12 to 14 minutes. The edges should feel firm, while the center stays soft. The tops should look slightly puffed but not fully set. When done, remove them from the oven and let them sit for one minute. Run a knife around the edges, then invert each ramekin onto a plate. A gentle tap helps release the cake. For a lovely touch, dust with powdered sugar and serve with fresh berries. Enjoy your delicious work! For the complete process, refer to the Full Recipe. One common mistake is overmixing the batter. This can make your cake dense. Mix just until all the ingredients blend together. Another mistake is not greasing the ramekins well. If they stick, the cake won’t come out nicely. Use butter and a light dusting of flour to avoid this issue. To get that ideal gooey center, timing is key. Bake for 12-14 minutes, no more. The edges should be firm, but the middle must stay soft. You can even check by gently shaking the ramekin. If it jiggles, it's ready! Serve your chocolate lava cake warm. The heat helps the chocolate flow smoothly when you cut into it. Let it sit for one minute after baking. This allows the cake to set just enough to hold its shape but stay gooey inside. Dust with powdered sugar and add berries for a lovely touch. For an extra treat, top with vanilla ice cream. For more details, you can refer to the Full Recipe. {{image_2}} You can make your chocolate lava cake even more special. Try adding a shot of espresso for a coffee kick. Mix in a teaspoon of orange zest for a fresh, citrusy twist. You can also use mint extract for a cool flavor. Get creative, and find the mix that lights up your taste buds. Do you prefer different chocolate? Dark chocolate gives a richer taste. White chocolate offers a sweet and creamy feel. You can even blend chocolates for a new flavor. Each type brings a unique experience to your lava cake. Explore these options to find your favorite. If you need gluten-free, it’s easy to swap the flour. Use a gluten-free flour blend instead. Make sure it has a good mix of starches to keep the cake light. You can also try almond flour or coconut flour for a nutty twist. With these swaps, everyone can enjoy this delicious dessert. Check out the Full Recipe for detailed steps on making your cake gluten-free. After enjoying your chocolate lava cake, you may have some left. To store it, let the cake cool completely. Place it in an airtight container. This keeps it fresh for up to two days in the fridge. If you plan to eat it later, be sure to cover it well. This way, it won't dry out. When you're ready to enjoy your leftover cake, reheating it is key. Preheat your oven to 350°F (175°C). Place the cake on a baking sheet. Heat it for about 10 minutes. This warms the cake without making it tough. You want to keep that gooey center. If you're in a hurry, you can use the microwave. Heat it for about 15 seconds. Check if it's warm enough. Be careful not to overheat it, or it will lose its magic. If you want to save your chocolate lava cake for later, freezing is a great option. Wrap each cooled cake tightly in plastic wrap. Then, place them in a freezer bag. Make sure to remove as much air as possible. This helps prevent freezer burn. You can freeze them for up to three months. When you're ready to enjoy, let them thaw in the fridge overnight. Then, reheat as described above. This way, you can savor that delicious chocolate goodness anytime! For the full recipe, check out the Divine Chocolate Lava Cake section. You can tell your Chocolate Lava Cake is done when the edges are firm. The center should look soft and slightly jiggly. If the tops puff up but do not set, you are in good shape. A quick tip: set a timer for 12-14 minutes. Check it at 12 minutes for that perfect gooey center. Yes, you can prepare the batter ahead of time! Just fill the ramekins and cover them with plastic wrap. Store them in the fridge for up to 24 hours. When you are ready to bake, just pop them in the oven. You may need to add a minute or two to the baking time since they are cold. You can serve your Chocolate Lava Cake with a few tasty options. Fresh berries, like raspberries or strawberries, add a nice touch. A dusting of powdered sugar makes it look fancy. You could also top it with a scoop of vanilla ice cream for extra creaminess. Each option adds a new layer of flavor and fun! You now have all you need to bake a great chocolate lava cake. Start with simple ingredients and follow the easy steps. Avoid common mistakes for the best gooey center. Experiment with flavors or choose gluten-free options for fun variations. Store leftovers correctly, and you can enjoy this treat later. Remember, practice makes perfect. Each bake brings you closer to that ideal texture and taste. Enjoy the process, and happy baking!

Decadent Chocolate Lava Cake Simple and Delicious Recipe

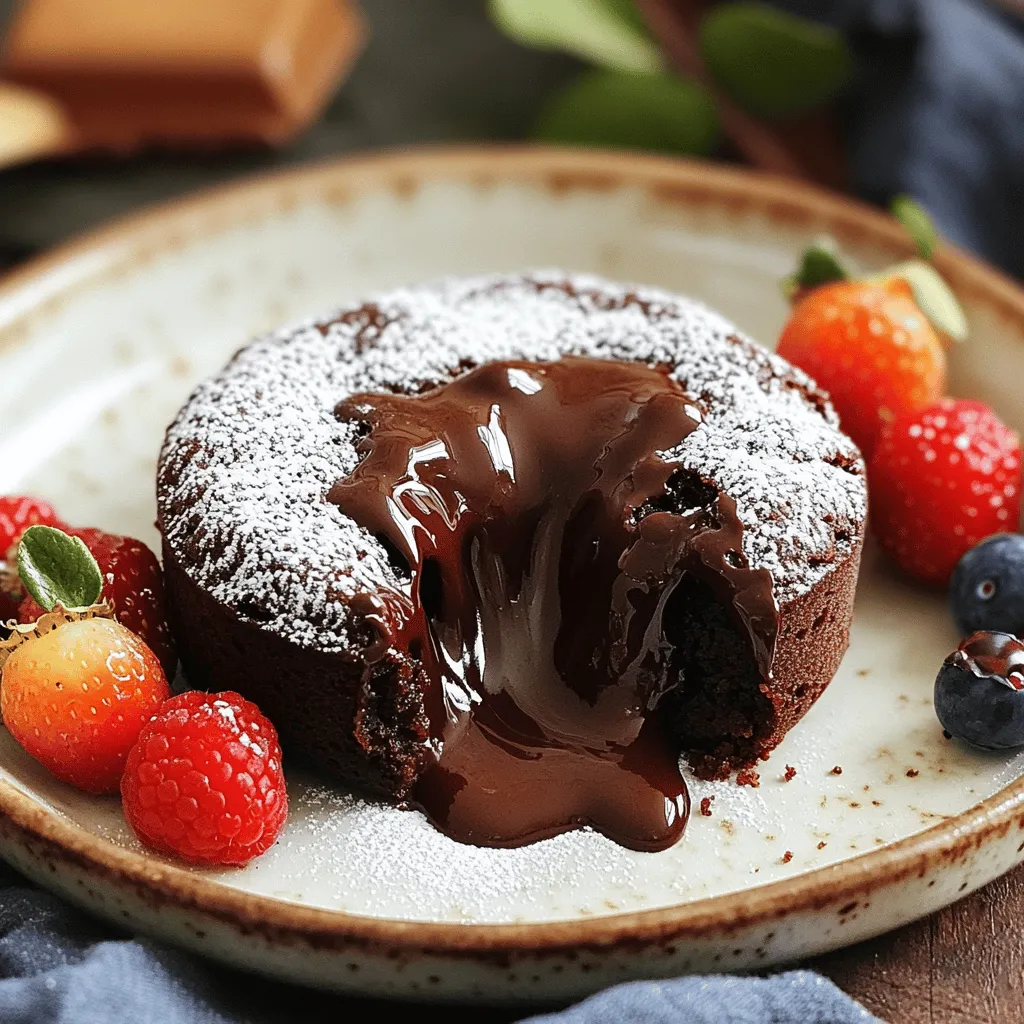
If you love chocolate, this Decadent Chocolate Lava Cake recipe is for you! Picture a warm cake with a rich,

Older posts
Newer posts
← Previous Page1 … Page48 Page49 Page50 … Page60 Next →

dsad

© 2025 Home Cooking Style • Built with GeneratePress

Our Policies

  • Copyright Policy
  • Cookie Policy
  • GDPR Policy
  • Privacy Policy
  • Disclaimer
  • Terms Of Use

More Information

  • Home
  • About
  • Contact
  • Appetizers
  • Dessert
  • Dinner
  • Drinks
©2025, Home Cooking Style About Back To Top