Skip to content
DisclaimerTerms Of UseGDPR PolicyCookie Policy

Home Cooking Style

  • Home
  • Drinks
  • Appetizers
  • Dinner
  • Dessert
  • About
  • Contact
  • Privacy Policy
DisclaimerTerms Of UseGDPR PolicyCookie Policy

Amelia

- 1 ½ cups graham cracker crumbs - ½ cup unsalted butter, melted - 2 cups cream cheese, softened - 1 cup Nutella - ½ cup powdered sugar - 1 teaspoon vanilla extract - 1 cup heavy cream - Chocolate shavings (for garnish) - Hazelnuts, chopped (for garnish) This no-bake Nutella cheesecake uses simple, easy-to-find ingredients. The graham cracker crumbs create a tasty base. You can swap graham crackers for Oreos if you like chocolate more. The butter helps hold the crust together, so don’t skip it. For the filling, cream cheese gives the cheesecake its rich texture. Nutella adds a deep, chocolate flavor. If you want a lighter version, you can use mascarpone cheese instead of cream cheese. The powdered sugar sweetens the mix, so adjust it to your taste. The vanilla extract brings out the flavors, making every bite special. Heavy cream is key for a light, fluffy texture. If you can’t find heavy cream, try using whipped topping. For garnish, chocolate shavings and chopped hazelnuts make the dessert look great and add a nutty crunch. These ingredient choices make this dessert a creamy delight. You can find the Full Recipe above for complete instructions! To make the no-bake Nutella cheesecake, follow these steps: 1. Make the crust. In a mixing bowl, mix 1 ½ cups of graham cracker crumbs with ½ cup of melted butter. Stir until it looks like wet sand. 2. Press the crust. Take the crumb mixture and press it into the bottom of a 9-inch springform pan. Make sure it’s even. Refrigerate it for 10 minutes to set. 3. Mix the filling. In another bowl, beat 2 cups of softened cream cheese until it’s smooth. Then, add 1 cup of Nutella, ½ cup of powdered sugar, and 1 teaspoon of vanilla extract. Mix until creamy. 4. Whip the cream. In a different bowl, whip 1 cup of heavy cream until it forms stiff peaks. 5. Combine the mixtures. Gently fold the whipped cream into the Nutella mixture. Be careful to keep the air in the whipped cream. 6. Pour the filling. Pour the Nutella cheesecake mixture over the chilled crust. Smooth the top with a spatula. 7. Chill the cheesecake. Cover the pan with plastic wrap and refrigerate for at least 4 hours. For the best texture, chill overnight. 8. Serve the cheesecake. Once set, carefully take the cheesecake out of the springform pan. 9. Garnish it. Add chocolate shavings and chopped hazelnuts on top before serving. Tips for perfect texture: - Make sure the cream cheese is very soft. This helps it mix well. - When folding in the whipped cream, do it gently to keep it fluffy. - Chill the cheesecake long enough to set. It needs time to become firm. Serve your no-bake Nutella cheesecake in slices. Here are some fun ideas: - Add fresh fruit. Slices of strawberries or raspberries add a nice touch. - Drizzle chocolate sauce. A little drizzle of chocolate sauce makes it extra special. - Pair with coffee or tea. This cheesecake goes well with a warm drink. Enjoy your delightful cheesecake with friends or family for a sweet treat! When making a No-Bake Nutella Cheesecake, avoid some common mistakes. Don't skip softening the cream cheese. If it’s too cold, your mixture will be lumpy. Another mistake is over-mixing the whipped cream. This can make your cheesecake dense. Mix gently to keep that light texture. For a richer flavor, use high-quality Nutella. The better the chocolate, the tastier the cheesecake. You can also add a pinch of salt to balance the sweetness. This small step can enhance the overall taste. Get creative when garnishing your cheesecake. Use chocolate shavings for a simple yet elegant look. Chopped hazelnuts add a nice crunch and flavor. You can also drizzle some extra Nutella on top for a fun touch. For seasonal themes, think of using fresh berries in summer. They add color and a bit of tartness. In winter, consider a sprinkle of crushed peppermint candies for a festive flair. These small touches make your cheesecake even more special. {{image_2}} You can make this cheesecake even more fun with different flavors. Here are some ideas: - Peanut Butter: Mix in ½ cup of creamy peanut butter. This adds a nutty twist. - Mint: Add 1 teaspoon of peppermint extract for a refreshing taste. - Coffee: Stir in 1 tablespoon of instant coffee for a mocha flavor. - Fruit: Top with fresh strawberries or raspberries for a fruity touch. Feel free to experiment with different types of chocolate, too. You can use dark chocolate or white chocolate for a change. Drizzle some chocolate sauce on top for extra flair. It's all about what you love! If you want to adjust this recipe for dietary needs, here are some options: - Dairy-Free: Use dairy-free cream cheese and coconut whipped cream. - Gluten-Free: Swap graham cracker crumbs with gluten-free cookies or nuts. - Low-Sugar: Choose sugar-free powdered sugar and reduce the Nutella. These changes help you enjoy this cheesecake, no matter your diet. Plus, you still get that creamy delight! For the complete recipe, check out the Full Recipe section. To keep your no-bake Nutella cheesecake fresh, cover it well. Use plastic wrap or a tight lid. This helps to prevent it from absorbing other smells from the fridge. If you want to freeze the cheesecake, first let it set in the fridge for 4 hours. After that, slice it into pieces. Wrap each piece in plastic wrap, then place them in a freezer bag. This way, they stay fresh. When you want to enjoy a slice, take it out and thaw it in the fridge overnight. In the fridge, your cheesecake can last for about 5 days. Keep it covered all the time to maintain its flavor and texture. Check for signs that it’s no longer good to eat. If you see mold or if it smells off, it’s best to throw it away. If the texture has changed or it feels slimy, that’s a sign too. Always trust your senses when it comes to food safety! How long does it take to set a No-Bake Nutella Cheesecake? It usually takes about 4 hours for the cheesecake to set in the fridge. For best results, I recommend letting it chill overnight. This makes it firmer and tastier. Can I use a different crust besides graham crackers? Yes, you can. Try using Oreo cookies for a chocolate crust or even a nut-based crust. Just crush the cookies or nuts and mix with melted butter. Press it into the pan like you would with graham crackers. What to do if my cheesecake is too soft? If your cheesecake is too soft, it may need more time in the fridge. You can also add a bit more whipped cream or cream cheese to the mix next time. This will help it firm up. Is it possible to make this cheesecake in advance? Absolutely! You can make this cheesecake one to two days ahead of time. Just keep it covered in the fridge. This can actually help the flavors blend, making it even tastier. For the full recipe, check out the details provided earlier. This article covered how to make a delicious cheesecake. We explored the key ingredients, giving you exact measurements and alternatives to help you choose. I shared step-by-step instructions, tips for perfect texture, and serving ideas. You also learned how to avoid common mistakes and find fun ways to decorate. We discussed variations for flavors and dietary needs, as well as best storage practices. Use this guide to make your cheesecake a hit, and enjoy every bite. Happy baking!

No-Bake Nutella Cheesecake Creamy Delight Recipe

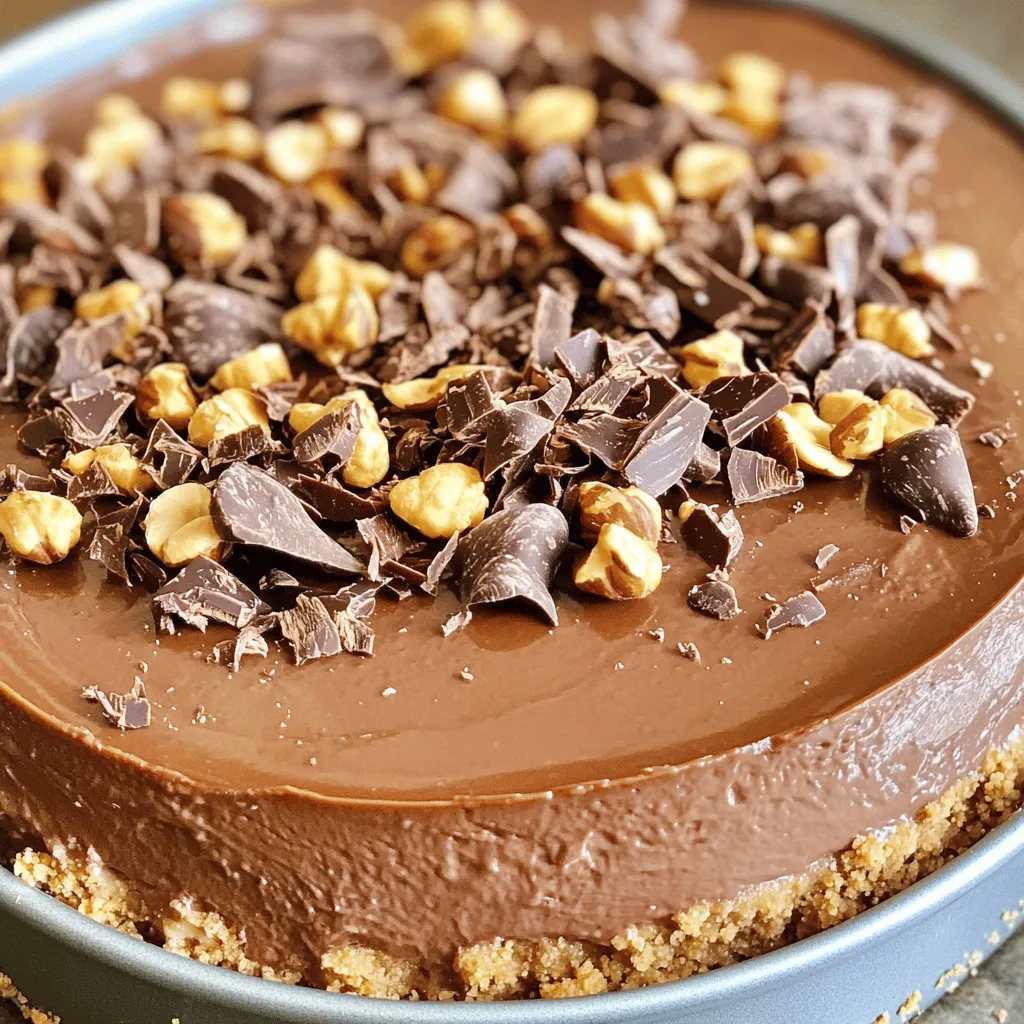
Are you ready to indulge in a creamy dream? This No-Bake Nutella Cheesecake is the perfect treat for any dessert

To make Lemon Garlic Herb Grilled Chicken, you need fresh and simple ingredients. Here’s what you will need: - 4 boneless, skinless chicken breasts - 3 tablespoons olive oil - Juice and zest of 2 lemons - 4 cloves garlic, minced - 1 tablespoon fresh rosemary, finely chopped - 1 tablespoon fresh thyme, finely chopped - 1 tablespoon fresh parsley, finely chopped - Salt and pepper to taste These ingredients work together to create a bright and zesty flavor. The lemon adds a fresh taste, while the garlic gives depth. The herbs bring in an earthy note, making every bite enjoyable. I love using fresh herbs whenever possible. They truly elevate the dish. You can also adjust the herbs to your taste. If you like, try adding some oregano or basil for a twist. For best results, use high-quality olive oil. It binds the flavors and keeps the chicken moist. The lemon juice not only adds flavor but also helps tenderize the chicken. This recipe is perfect for summer grilling or any time you crave a light meal. For the full recipe, check the cooking steps that follow. You will be amazed at how easy it is to create this delicious dish at home! To start, you need to make the marinade. In a bowl, whisk together the olive oil, lemon juice, lemon zest, minced garlic, rosemary, thyme, parsley, salt, and pepper. This mix brings out bright flavors. It smells amazing! Next, take your chicken breasts and place them in a large resealable bag or a shallow dish. Pour the marinade over the chicken. Make sure each piece is well coated. Seal the bag or cover the dish. For the best flavor, let it marinate in the fridge for at least 30 minutes. If you have time, letting it sit for up to 2 hours works wonders. Now, it’s time to prepare the grill. Preheat it to medium-high heat. This is key for juicy chicken. A hot grill creates a nice sear and keeps moisture locked in. For a perfect grilling surface, clean the grates with a brush. This helps prevent sticking. You can also oil the grates lightly. Use a paper towel dipped in oil and tongs to rub it on. Remove the chicken from the marinade and let the excess drip off. Discard the leftover marinade. Place the chicken on the hot grill. Grill each breast for about 6-7 minutes per side. You want nice grill marks. To check for doneness, use a meat thermometer. The internal temperature should reach 165°F (75°C). This ensures your chicken is safe to eat and perfectly cooked. Once done, remove the chicken from the grill and let it rest for 5 minutes. This helps keep it juicy. You can find the full recipe to guide you through this delicious process. For the best flavor, marinate your chicken for at least 30 minutes. If time allows, go for two hours. This longer marination gives the chicken a chance to soak in all those tasty flavors. When you mix your marinade, balance the flavors. Use equal parts lemon juice and olive oil. The garlic adds a nice kick. Fresh herbs like rosemary, thyme, and parsley bring brightness. Adjust the herbs to your taste. If you love one herb more, use more of it. To avoid dry chicken, watch the cooking time closely. Grill the chicken for 6-7 minutes on each side. This helps keep it juicy. Also, make sure to preheat your grill. A hot grill creates nice grill marks and sears the chicken. For even cooking, place the chicken on the grill carefully. Keep space between each piece. This helps air flow around them. Use a meat thermometer to check for doneness. It should read 165°F (75°C) inside. For a beautiful presentation, serve on a large platter. Garnish with fresh lemon slices and extra chopped herbs. This makes the dish pop with color. Pair your chicken with sides that complement its flavors. Grilled vegetables or a fresh salad work great. You could also serve it with rice or a light pasta dish. For the full recipe, check out the detailed instructions above. {{image_2}} You can switch up the herbs for more fun. Try basil or oregano instead of rosemary. Each herb gives a new taste. Mix thyme with dill for a fresh twist. You can also add some heat with spices. A pinch of red pepper flakes can spice it up. For a smoky flavor, try smoked paprika. Experimenting with herbs makes this dish yours. If you want to try citrus flavors, use lime or orange juice. They add a sweet touch. For a tangy kick, you can use vinegar-based marinades. Apple cider vinegar or balsamic vinegar works well. These options change the taste while still keeping it tasty. Don’t be afraid to mix different acids for a unique flavor. You can cook this chicken in different ways. If you don’t have a grill, try the oven. Set it to 400°F (200°C) and bake for 20-25 minutes. Just make sure the chicken is cooked through. You can also pan-sear the chicken on the stove. Heat some oil in a pan and cook for about 6-7 minutes per side. Both methods give you juicy chicken. For a complete guide, check the Full Recipe. To keep your grilled chicken fresh, store it right. Place the chicken in an airtight container. Make sure it is cool before sealing it. You can keep it in the fridge for up to four days. If you want to save it longer, consider freezing. When reheating chicken, I suggest using the oven or stovetop. These methods help keep the chicken moist and tasty. Preheat your oven to 350°F (175°C). Place the chicken in a baking dish with a splash of water or broth. Cover it with foil to lock in moisture. Heat for about 15-20 minutes. If using a stovetop, warm it in a skillet over medium heat, adding a little oil or butter. This keeps the chicken juicy. To freeze grilled chicken, let it cool completely. Then, wrap each piece tightly in plastic wrap. After that, place the wrapped chicken in a freezer bag. This helps prevent freezer burn. When you want to use it, thaw it in the fridge overnight. You can then reheat it or add it to your favorite dishes. I suggest marinating the chicken for at least 30 minutes. This helps the flavors soak in. For a stronger taste, let it sit for up to 2 hours. Just keep it in the fridge while it marinates. Make sure each piece is well coated with the marinade. This step really makes a difference in taste. Yes, you can use bone-in chicken. Just adjust the cooking time. Bone-in chicken takes longer to cook. It usually needs about 10 to 15 extra minutes on the grill. Check that it reaches an internal temperature of 165°F. This ensures it's safe to eat while still juicy. You can pair this chicken with many sides. Fresh grilled vegetables work great. A simple salad with lemon vinaigrette is also nice. You might enjoy serving it with rice or quinoa for a hearty meal. Adding a side of garlic bread can make it even better. For the full recipe, check the earlier section! In this blog post, we explored how to make Lemon Garlic Herb Grilled Chicken. We covered the ingredients, marinating process, grilling tips, and variations you can try. Storing and reheating tips were also discussed. Cooking can be simple and fun. With fresh herbs and a bit of care, you can make a delicious meal. I hope you feel inspired to try this method. Enjoy your cooking!

Lemon Garlic Herb Grilled Chicken Flavorful Recipe

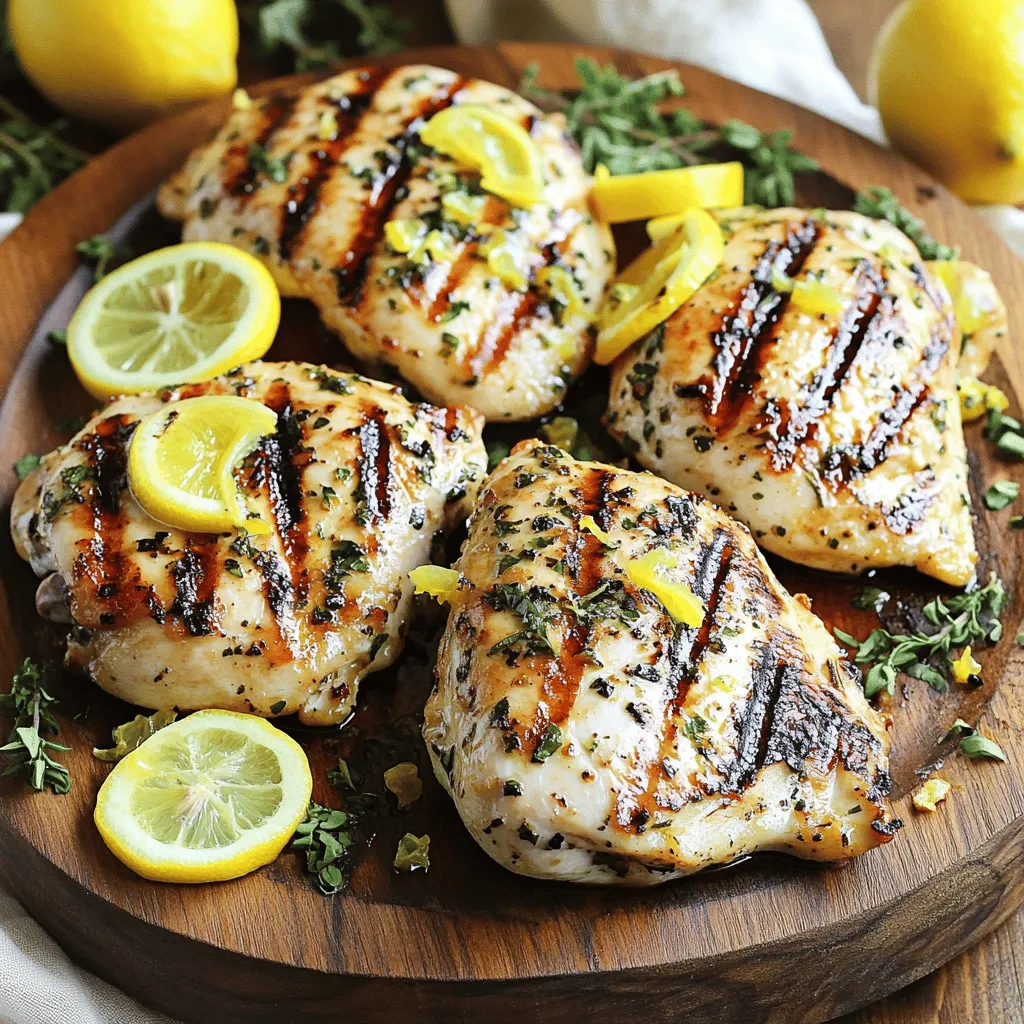
If you’re craving a dish that bursts with flavor, look no further! This Lemon Garlic Herb Grilled Chicken recipe combines

- 2 cups cooked rice (white or brown) - 4 cups fresh broccoli florets - 1 cup shredded sharp cheddar cheese - 1 cup cream of mushroom soup - 1/2 cup milk - 1/2 cup onion, finely chopped - 2 cloves garlic, minced - 1/2 teaspoon salt - 1/2 teaspoon black pepper - 1/4 teaspoon paprika - 1 cup breadcrumbs (for topping) - 2 tablespoons olive oil (for the breadcrumbs) When I make Cheesy Broccoli Rice Casserole, these ingredients are key. The rice gives it a solid base. Broccoli adds color and nutrients. Sharp cheddar cheese brings rich flavor. Cream of mushroom soup keeps it moist and creamy. A touch of milk helps bind everything together. The seasonings and extras boost the taste. Chopped onion and minced garlic add depth. Salt and pepper enhance all flavors. A hint of paprika offers warmth. The breadcrumbs on top give a nice crunch. Olive oil helps the crumbs turn golden. For the full recipe, you can check the linked details. This dish is simple yet delicious. - Preheat the oven to 350°F (175°C). - Steam broccoli florets until tender, about 5 minutes. First, I love to start with a clean kitchen. Preheating the oven makes sure the casserole cooks evenly. While the oven warms up, I steam the broccoli. This step makes the broccoli bright green and soft. Just five minutes is enough to get it ready without losing its crunch. - Combine cooked rice, steamed broccoli, cheddar cheese, soup, milk, onion, garlic, salt, pepper, and paprika. In a large bowl, I mix everything together. I add the cooked rice and steamed broccoli. Then comes the star: shredded cheddar cheese. The cream of mushroom soup adds creaminess. I pour in milk for extra smoothness. Next, I add chopped onion and minced garlic for flavor. Finally, I sprinkle in salt, pepper, and paprika. This mix creates a rich, cheesy filling that everyone loves. - Transfer the mixture to a greased casserole dish. - Prepare and sprinkle the breadcrumb topping. After mixing, I transfer everything into a greased casserole dish. It’s important to spread the mixture evenly. This way, every bite has the same great taste. For the topping, I mix breadcrumbs with olive oil. This makes the topping crispy and golden when baked. I sprinkle this mixture over the casserole, adding a nice crunch. - Bake for 25-30 minutes until bubbling and golden brown. Now, it’s time to bake! I place the casserole in the preheated oven. I let it bake for 25-30 minutes. I watch for the bubbles and golden brown top. This is when the magic happens, filling the kitchen with a warm, cheesy smell. Once it’s done, I take it out and let it cool a bit. Then, it’s ready to serve! For the full recipe, check out the details above. - Use fresh or frozen broccoli as desired. Fresh broccoli gives a nice crunch, while frozen is quick and easy. - Ensure rice is fully cooked to avoid excess moisture. Overcooked rice can make your casserole mushy. - Garnish with fresh parsley or lemon slices before serving. This adds color and freshness to your dish. A simple touch can make your meal look gourmet! - Adjust baking time for different oven models. Some ovens heat faster, so keep an eye on your casserole. You want it bubbly and golden brown. {{image_2}} You can change this dish easily by swapping ingredients. For cheese, I love using mozzarella or gouda. These cheeses add a nice twist to the flavor. If you want something creamy but different, try cream of chicken soup instead of cream of mushroom. You can also make your own soup at home to control the taste. If you need to make this dish gluten-free, just use gluten-free breadcrumbs. It still tastes great! For a vegan version, plant-based cheese works well. You can also use coconut cream or almond milk instead of regular cream and milk. These swaps let everyone enjoy this tasty casserole. Store leftovers in an airtight container for up to 3 days. This keeps the flavors fresh. Make sure to let the casserole cool before sealing it. This step helps prevent excess moisture and keeps the dish tasty. You can freeze an unbaked casserole for up to 2 months. Just cover it tightly with plastic wrap and foil. When you are ready to enjoy it, bake it directly from frozen. This makes meal prep easy and quick. Reheat in the oven for the best texture. Set the oven to 350°F (175°C) and cover the dish with foil. This helps keep the casserole moist. If you are short on time, you can use the microwave. Just heat it in short bursts, stirring in between. This ensures even warming without drying it out. You can pair this dish with a few tasty sides. A fresh salad adds crunch and color. Garlic bread brings warmth and flavor. Roasted vegetables make a great choice too. Each side complements the casserole well, making your meal more enjoyable. Yes, you can prepare this casserole in advance. Just make it up to the baking step. Then, cover it and store it in the fridge. When you are ready, simply bake it as per the recipe. This saves time on busy days. Adding protein is easy and fun. You can mix in cooked chicken for heartiness. Sausage adds a savory kick. Beans are a great option too for a meat-free version. Choose what your family enjoys most to make it their favorite. For the best results, reheat leftovers in the oven. This keeps the texture nice and crispy. Preheat your oven to 350°F (175°C) and bake until warm. If you’re in a hurry, the microwave works, but the texture might not be as great. This blog post shares a simple and tasty recipe for Cheesy Broccoli Rice Casserole. We discussed the main ingredients, step-by-step instructions, and tips for making the dish shine. You learned about ingredient swaps and how to store leftovers. In summary, this casserole can fit many diets and preferences. It’s easy to make and great for meals any time. Enjoy your cooking and impress your loved ones with this delicious dish!

Cheesy Broccoli Rice Casserole Savory Family Favorite

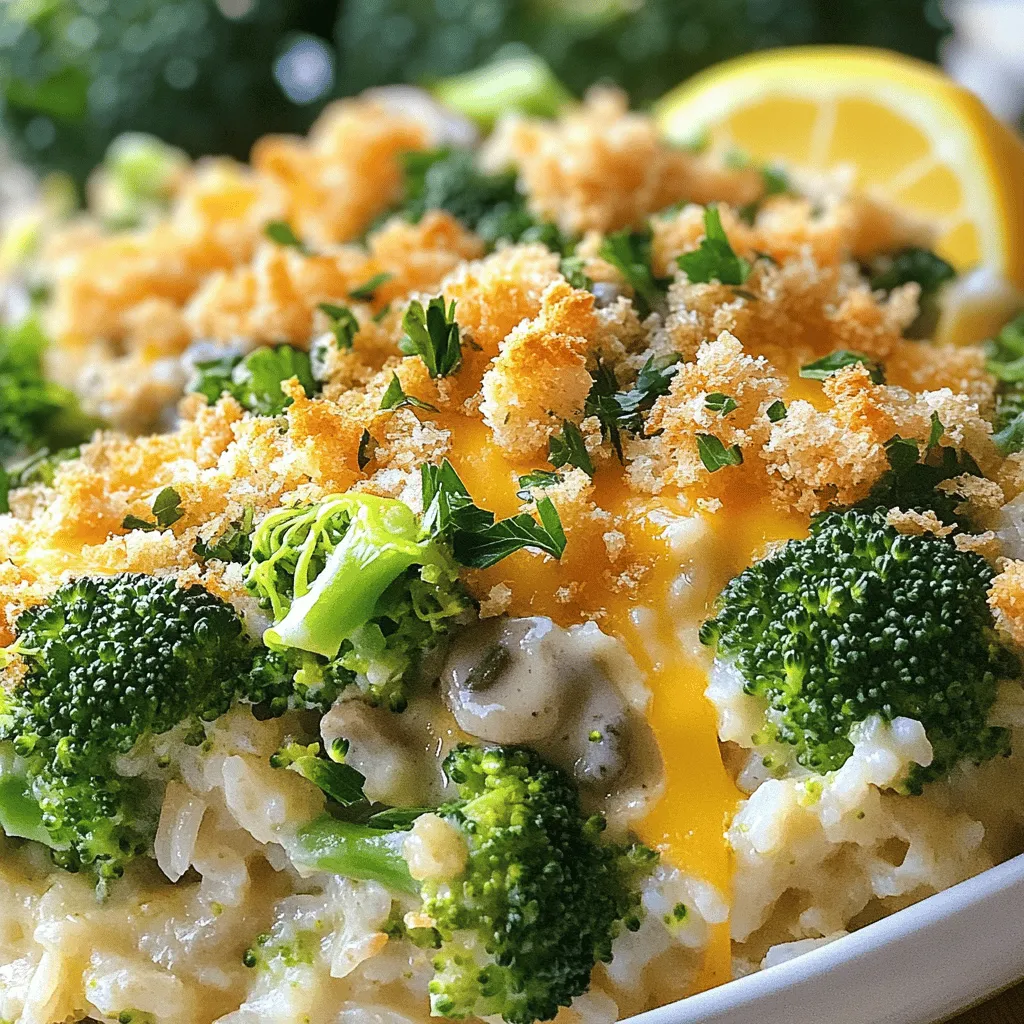
Are you ready to create a dish that’s both creamy and delicious? My Cheesy Broccoli Rice Casserole is the perfect

To make a fresh and tasty Mediterranean quinoa salad, gather these simple ingredients: - 1 cup quinoa - 2 cups vegetable broth or water - 1 cup cherry tomatoes, halved - 1 cucumber, diced - 1 bell pepper, diced (your choice of color) - 1/2 red onion, finely chopped - 1 cup cooked chickpeas (canned or boiled) - 1/2 cup Kalamata olives, pitted and sliced - 1/2 cup feta cheese, crumbled (optional for vegan) - 1/4 cup fresh parsley, chopped - 1/4 cup fresh mint, chopped - 1/4 cup olive oil - Juice of 1 lemon - 1 teaspoon dried oregano - Salt and pepper to taste You can make this salad your own by adding or changing some ingredients. Here are some ideas: - Avocado for creaminess - Spinach for extra greens - Artichoke hearts for a unique touch - Roasted vegetables for added flavor - Nuts or seeds for crunch Each ingredient in this salad offers great health benefits: - Quinoa: A complete protein, rich in fiber and minerals. - Chickpeas: High in protein and good for digestion. - Olives: Packed with healthy fats and antioxidants. - Tomatoes: Full of vitamins and promote heart health. - Feta cheese: Adds calcium and flavor but can be skipped for a vegan version. This salad is not only delicious but also a powerhouse of nutrients. You can enjoy it as a meal or a side dish. For the full recipe, check the link above. Start by rinsing the quinoa under cold water. This step removes any bitter taste. Use a fine mesh strainer for this. Next, bring two cups of vegetable broth or water to a boil in a medium saucepan. Once boiling, add one cup of rinsed quinoa. Lower the heat and cover the pot. Let it simmer for about 15 minutes. The quinoa is ready when all the liquid is absorbed. After cooking, remove it from the heat and let it cool down. While the quinoa cools, gather the other ingredients. In a large mixing bowl, combine cherry tomatoes, diced cucumber, and bell pepper. Add finely chopped red onion and cooked chickpeas. Toss in sliced Kalamata olives and crumbled feta cheese if you like. Finally, add chopped parsley and mint. Mix everything well to combine the flavors. Once the quinoa is cool, fluff it with a fork. Then, add the quinoa to the bowl with the other ingredients. For the dressing, take a small bowl and whisk together olive oil, lemon juice, dried oregano, salt, and pepper. This mixture will add a bright flavor to the salad. Drizzle the dressing over the quinoa mixture. Toss gently until all ingredients are well-coated. Taste the salad and adjust the seasoning if needed. If you want a stronger lemon flavor, add more juice. Let the salad sit for at least 20 minutes before serving. This allows all the flavors to blend nicely. If you prefer, refrigerate it for a few hours for an even better taste. Check the Full Recipe for all the details! To cook quinoa perfectly, rinse it well. This helps remove any bitter taste. Use two cups of liquid for every cup of quinoa. Bring the liquid to a boil before adding the quinoa. Then, lower the heat, cover it, and let it simmer for about 15 minutes. Once the water is absorbed, fluff it with a fork. Let it cool before mixing it with other ingredients. You can enhance the flavor of your salad in many ways. Add fresh herbs like dill or basil for a bright taste. Feel free to mix in other veggies like carrots or arugula. For a spicy kick, add some chopped jalapeños or a dash of red pepper flakes. You can also swap feta for avocado for a creamier texture. Experiment with different dressings too. A balsamic vinaigrette can add a unique twist. Serve your Mediterranean quinoa salad in a large bowl or on individual plates. Garnish with extra herbs or lemon wedges for a pop of color. You can also layer the salad in a jar for a fun, portable lunch option. Enjoy it chilled or at room temperature. This dish works well as a side or a main meal. Don't forget to let it sit for a bit before serving to let the flavors blend. You can find the Full Recipe here for more details! {{image_2}} You can make your Mediterranean quinoa salad even tastier by adding grilled chicken. Simply season chicken breasts with salt, pepper, and a bit of olive oil. Grill them until they are cooked through and juicy. Once they cool, slice them into strips. Mix these strips into your salad for extra protein and flavor. This makes the dish more filling, perfect for lunch or dinner. If you want a vegan twist, skip the feta cheese. Instead, use avocado for creaminess. You can also add more chickpeas or nuts for protein and crunch. For a gluten-free option, quinoa is already a great choice. Just ensure all your other ingredients are gluten-free. This way, everyone can enjoy the salad without worry. Using fresh, seasonal produce can make your salad shine. In spring, add peas and asparagus for crunch and color. In summer, ripe peaches or strawberries can add sweetness. In fall, consider roasted butternut squash or apples. In winter, try using hearty greens like kale or arugula. These changes keep your salad fresh and exciting all year round. For the complete recipe, check the Full Recipe section. After enjoying your Mediterranean quinoa salad, store leftovers in an airtight container. This keeps the salad fresh. Place it in the fridge. It should last up to three days. If you notice any sogginess, drain some liquid before storing. You can freeze this salad for meal prep. However, some ingredients do not freeze well. I suggest freezing the quinoa alone. Once it cools, pack it in freezer bags. It will keep for about two months. When ready to eat, thaw it in the fridge overnight. To reheat, use the microwave. Place the quinoa in a bowl with a splash of water. Cover it to keep moisture. Heat for a minute, then stir. If you prefer, enjoy the salad cold. It tastes great straight from the fridge too! For full details on making this dish, check the Full Recipe. You can add many tasty ingredients to this salad. Try adding grilled chicken or shrimp for protein. You can include nuts like almonds or walnuts for crunch. Avocado adds creaminess and healthy fats. Roasted vegetables, such as zucchini or eggplant, make a great addition too. For a spicy kick, add some jalapeños or red pepper flakes. This salad is flexible, so feel free to get creative! When stored properly, this salad can last up to five days in the fridge. Make sure to keep it in an airtight container. The flavors will blend better over time. However, if you add fresh herbs or avocado, they may not last as long. Enjoy it fresh for the best taste! Yes, you can make this salad ahead of time. In fact, it tastes even better after resting. Prepare it a day before serving for the best flavor. Just follow the Full Recipe for guidance. Store it in the fridge until you are ready to enjoy. You can add fresh herbs just before serving for a fresh burst of flavor. The Mediterranean Quinoa Salad offers a range of flavors and health benefits. We covered the key ingredients, step-by-step preparation, and useful tips. You can customize it, add protein, or make it vegan. Remember to store leftovers properly and enjoy this dish throughout the week. This salad is versatile and can fit your taste. Try it today for a fresh, healthy meal. Your body will thank you for it!

Mediterranean Quinoa Salad Fresh and Nutritious Meal

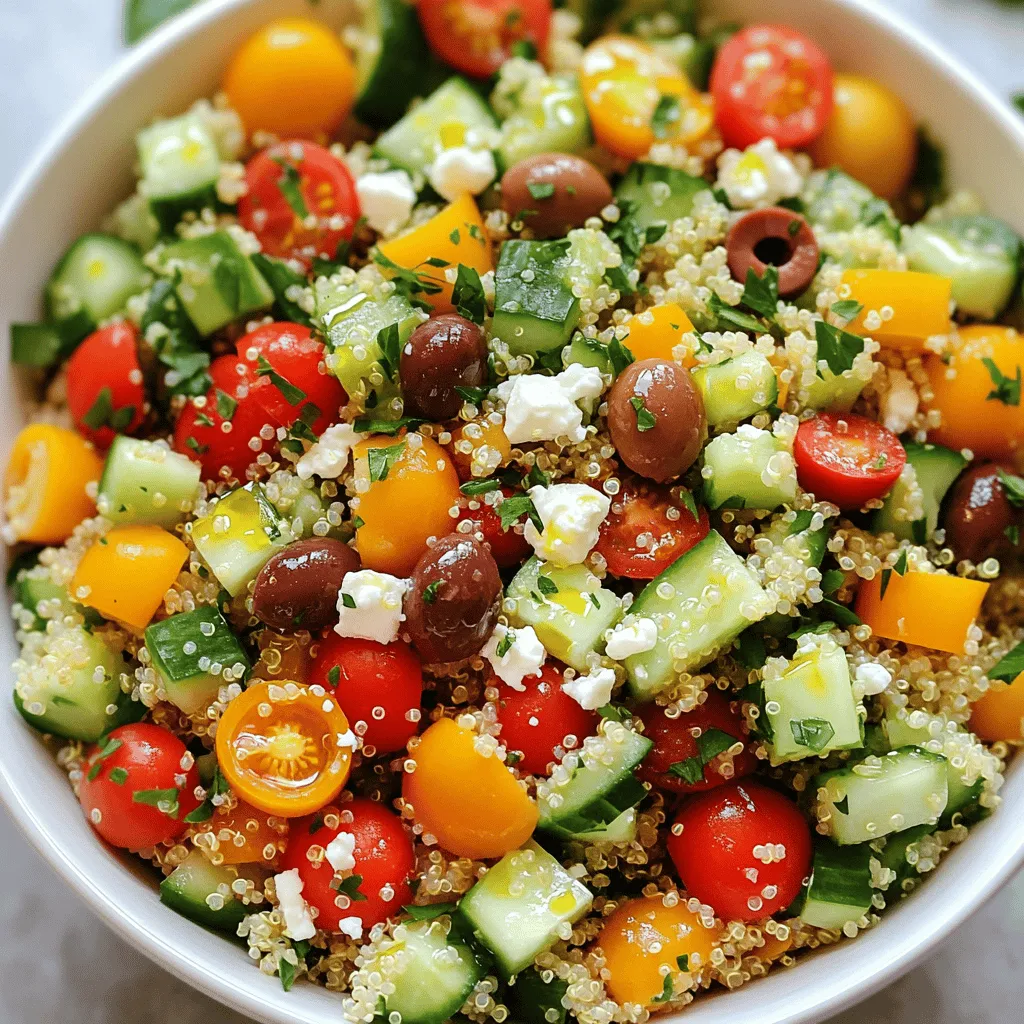
Are you ready to dive into a dish that’s both fresh and nutritious? The Mediterranean Quinoa Salad is your answer!

For my Instant Pot Vegetable Soup, gather these simple ingredients: - 1 tablespoon olive oil - 1 onion, diced - 2 cloves garlic, minced - 2 carrots, sliced - 2 celery stalks, sliced - 1 bell pepper, diced (any color) - 1 medium zucchini, diced - 1 cup green beans, cut into 1-inch pieces - 1 can (14.5 oz) diced tomatoes (with juice) - 4 cups vegetable broth - 1 teaspoon dried oregano - 1 teaspoon dried thyme - 1 bay leaf - Salt and pepper to taste - 1 cup frozen peas - 2 cups fresh spinach You can use fresh or frozen produce in this recipe. Fresh veggies add crispness and flavor. They are great if you have them on hand. Frozen vegetables are just as nutritious and save time. They are easy to keep in the freezer for quick meals. I often mix both for the best taste and texture. This soup is flexible. If you have specific dietary needs, here are some swaps: - Use low-sodium vegetable broth for less salt. - Swap olive oil for avocado or coconut oil for a different flavor. - For a vegan option, ensure your broth is plant-based. - If you're gluten-free, check that your broth is certified gluten-free. - You can add beans for protein if you're vegetarian or vegan. These changes make the soup fit for everyone! To start, I turn on my Instant Pot and set it to Sauté mode. I add 1 tablespoon of olive oil and let it heat up. Next, I toss in 1 diced onion and 2 minced garlic cloves. I cook this blend until the onion turns soft and clear, which takes about 3-4 minutes. This step builds a solid flavor base for the soup. After the aromatics are ready, I stir in 2 sliced carrots, 2 sliced celery stalks, 1 diced bell pepper, 1 diced medium zucchini, and 1 cup of green beans. I sauté these veggies for another 3-4 minutes. They should be slightly tender but not mushy. This mix adds great color and nutrition to the dish. Now, I mix in 1 can of diced tomatoes (with juice), 4 cups of vegetable broth, 1 teaspoon of dried oregano, 1 teaspoon of dried thyme, and 1 bay leaf. I season with salt and pepper to taste. I stir everything well to combine. After that, I close the lid and make sure the valve is set to Sealing. Then, I set it to Manual or Pressure Cook for 8 minutes. When the cooking time is done, I carefully switch the valve to Venting to release the pressure. Once the steam stops, I open the lid. I stir in 1 cup of frozen peas and 2 cups of fresh spinach. The heat from the soup wilts the spinach perfectly. I taste and adjust the seasoning if needed. Now, the soup is ready to serve! To get the best texture in your soup, use fresh vegetables. Fresh veggies keep their crunch. When you sauté, cook until slightly soft. This step adds depth. Don’t skip this part! For a smoother soup, blend it briefly after cooking. Use an immersion blender for ease. If you like a chunky soup, skip the blending. You can boost flavor with simple herbs. Dried oregano and thyme work well. Fresh herbs like basil or parsley add brightness. A splash of lemon juice at the end gives a fresh kick. If you want some heat, add red pepper flakes. This adds a nice warmth without overpowering the taste. Serve your soup hot in a bowl. Top it with fresh herbs for color. A sprinkle of Parmesan cheese makes it richer. Pair it with crusty bread for a full meal. You can also serve it with a side salad for extra crunch. Enjoy your warm, hearty bowl of goodness! For the full recipe, check out the earlier section. {{image_2}} You can easily boost the protein in your vegetable soup. Try adding cooked beans, like kidney or black beans. You can also add lentils for extra protein and fiber. If you prefer meat, shredded chicken or diced turkey work well. Just remember to adjust the cooking time if you add raw meat. Experiment with spices and herbs to create new flavors. For a warm kick, add cayenne pepper or crushed red pepper flakes. If you like fresh herbs, try basil, cilantro, or dill. You can also swap out dried oregano and thyme for herbs like rosemary or tarragon. Each choice gives a unique twist to your soup. Using seasonal vegetables makes your soup fresh and exciting. In spring, add peas or asparagus. In summer, toss in corn or bell peppers. Autumn is a great time for squash or sweet potatoes. In winter, root vegetables like parsnips or turnips add heartiness. Feel free to mix and match according to what you have on hand. For the full recipe, check out the Hearty Instant Pot Vegetable Soup above. You can store leftover soup in the fridge. Use a clean, airtight container. It stays fresh for about 3 to 4 days. Make sure it cools completely before sealing. This helps prevent bacteria growth. If you want to keep it longer, freezing is great. Pour the cooled soup into freezer-safe containers. Leave some space at the top for expansion. It lasts in the freezer for about 3 months. Just remember to label your containers with the date. To reheat, thaw the soup overnight in the fridge. You can use the stove or microwave. If using the stove, heat it on medium. Stir often to avoid burning. If using the microwave, heat in 1-minute intervals, stirring in between. Add a splash of broth or water if it seems too thick. Enjoy your soup warm! For the complete recipe, check out the Full Recipe section. Yes, you can use any broth you like! Vegetable broth gives a nice flavor. Chicken broth works well too. If you need a low-sodium option, choose a low-sodium broth. This change will still keep the soup tasty. To thicken your soup, you have a few options. You can mash some of the veggies after cooking. Another way is to add a cornstarch slurry. Mix 1 tablespoon of cornstarch with 2 tablespoons of water, then stir it in. Let it cook for a few minutes until it thickens. Yes, you can make this soup in a slow cooker! Simply follow the same steps. Sauté your aromatics in a pan first, then add everything to the slow cooker. Set it on low for 6-8 hours or high for 3-4 hours. You'll get a great flavor. You can swap veggies based on what you have. Use potatoes instead of zucchini for a heartier soup. Kale can replace spinach for a different taste. Bell peppers can be swapped for corn or peas. Just keep your flavor balance in mind when making these swaps. For the full recipe, check the other sections! In this post, we explored key ingredients, step-by-step cooking instructions, and useful tips for making soup. We also looked at variations, storage info, and answered common questions. With the right ingredients and techniques, you can create a comforting dish. Don't hesitate to experiment with flavors and textures. Cooking is about finding what you love. Enjoy your soup-making journey!

Instant Pot Vegetable Soup Simple and Flavorful Recipe

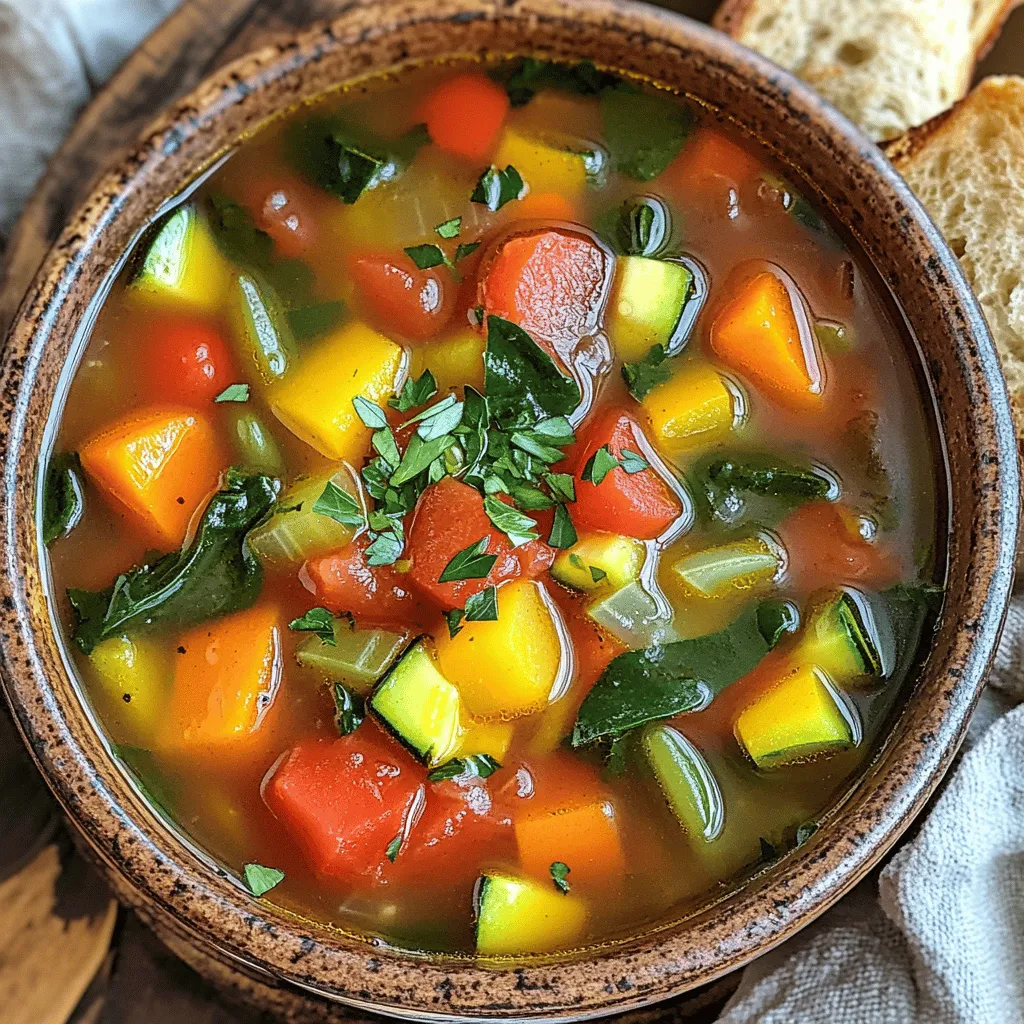
Looking for a quick, healthy meal? My Instant Pot Vegetable Soup is your answer! This tasty recipe is simple to

- 1 cup quinoa, rinsed and drained - 2 cups vegetable broth - 1 can (15 oz) black beans, rinsed and drained - 1 cup corn (fresh or frozen) - 1 red bell pepper, diced - 1 small red onion, finely chopped - 1 avocado, diced - 1 cup cherry tomatoes, halved - 1 cup shredded lettuce - Fresh cilantro, for garnish - Lime wedges, for serving The main ingredients are simple and fresh. Quinoa serves as the hearty base. It cooks in vegetable broth for extra flavor. Black beans add protein and fiber. Corn gives sweetness and crunch. The bell pepper and onion provide a nice bite. Avocado adds creaminess, while tomatoes bring juiciness. Finally, lettuce adds a fresh, crisp touch. - 1 teaspoon cumin - 1 teaspoon smoked paprika - 1 teaspoon chili powder - Salt and pepper to taste Spices make your salad pop. Cumin adds warmth, while smoked paprika gives a slight smokiness. Chili powder adds a touch of heat. Salt and pepper enhance all the flavors. Adjust them to fit your taste. - 2 tablespoons olive oil A simple dressing ties everything together. Olive oil adds richness and helps the spices stick to the veggies. You can mix it with the spices for a quick flavor boost. For the Full Recipe, you can follow the detailed steps to create this vibrant dish. Enjoy your cooking! To cook the quinoa, combine 1 cup of rinsed quinoa and 2 cups of vegetable broth in a medium saucepan. Bring it to a boil over high heat. Once it boils, reduce the heat to low and cover the pot. Let it simmer for about 15 minutes. The quinoa will be fluffy and the liquid will be gone. Set it aside to cool slightly. While the quinoa cooks, prepare the dressing. In a small bowl, whisk together 2 tablespoons of olive oil, 1 teaspoon of cumin, 1 teaspoon of smoked paprika, 1 teaspoon of chili powder, and salt and pepper to taste. Mix it well until it is smooth. This dressing adds a lot of flavor to the salad. In a large mixing bowl, mix together 1 can of rinsed black beans, 1 cup of corn, 1 diced red bell pepper, 1 finely chopped small red onion, and 1 cup of halved cherry tomatoes. Pour the dressing over the mixture and toss gently. Once the quinoa has cooled a bit, layer it in bowls as the base. Top each bowl with the bean mixture, followed by diced avocado and 1 cup of shredded lettuce. Garnish with fresh cilantro and serve with lime wedges for squeezing over the salad. Enjoy your vibrant Vegan Taco Salad Bowls! For the full recipe, check out the complete guide. To cook quinoa perfectly, rinse it well before cooking. This helps remove its bitter coating. Use a 2:1 ratio of vegetable broth to quinoa. Bring the broth to a boil, then reduce to a simmer. Cover the pot and cook for about 15 minutes. Once done, let it sit for a few minutes before fluffing with a fork. The quinoa should be light and airy, not mushy. You can make this salad your own by adding your favorite vegetables. Try diced cucumbers, shredded carrots, or even roasted sweet potatoes. For extra protein, add chickpeas or tofu. You can also mix in nuts or seeds like pumpkin seeds or walnuts for crunch. These additions boost flavor and nutrition, making each bowl unique. Serve the taco salad bowls in bright, colorful bowls. This makes the meal look more appetizing. Layer the ingredients neatly for a beautiful display. Start with quinoa at the base, then add the bean mixture. Top off with avocado and lettuce. Garnish with fresh cilantro for a pop of color. You can also squeeze lime wedges over the top for added zest. These small touches make a big difference in presentation. This section highlights how to elevate your Vegan Taco Salad Bowls with tips on texture, customization, and presentation. Explore the full recipe to get all the details! {{image_2}} You can switch black beans for kidney or pinto beans. Each type adds its unique taste and texture. Kidney beans offer a firmer bite, while pinto beans bring a creamy feel. You could also use lentils for extra protein. Lentils cook quickly and have a great flavor. They can make your salad even heartier and more filling. Want some heat? Add jalapeños or a splash of hot sauce. This will give your salad a nice kick. You can also use lime or lemon zest to brighten the flavors. A little zest adds freshness and makes the dish pop. It’s a simple way to elevate your salad without much effort. For a twist, try a tahini or avocado-based dressing. Tahini adds a nutty flavor, while avocado makes things creamy. Both options are rich and tasty. If you prefer store-bought dressings, look for vegan brands. Many offer great flavors that pair well with any salad. Just make sure they are free from animal products. For the full recipe, check out Vibrant Vegan Taco Salad Bowls. To keep your Vegan Taco Salad Bowls fresh, store leftovers in airtight containers. This helps maintain flavor and texture. Keep the avocado separate to avoid browning. If you slice the avocado, sprinkle it with lime juice. This simple trick slows down browning and keeps it green. Prepping ingredients ahead of time saves time on busy nights. Cook quinoa and store it in the fridge. Chop your veggies and place them in containers. You can mix the black beans and corn in a bowl. When dinner time comes, grab your prepped items and assemble your bowls quickly. You can freeze some components of your salad. Quinoa and black beans freeze well. Place them in freezer bags and remove as much air as possible. To thaw, move them to the fridge overnight. Avoid freezing fresh veggies like avocado and lettuce, as they do not thaw well. If you want a different grain, try brown rice or farro. These grains will give you a nice texture. You can also use couscous or bulgur for a quick option. Each of these grains has its own flavor. Cook them the same way as quinoa for the best results. Yes, this recipe is gluten-free! All the main ingredients are gluten-free. Just make sure any extra items you add are also gluten-free. This way, you can enjoy your salad without worry. Leftovers will stay fresh for up to three days in the fridge. Store them in an airtight container to keep them tasty. If you add avocado, eat it within a day to avoid browning. You can prep many parts in advance. Cook the quinoa and store it in the fridge. Chop your veggies a day ahead, too. Just keep the dressing separate until you’re ready to eat. This makes assembly quick and easy. To boost protein, consider adding tofu or tempeh. Both are great plant-based options. You can also try chickpeas or lentils for more texture. If you want more crunch, add some nuts or seeds. These will make your salad even more satisfying! This blog post covers a vibrant salad recipe with quinoa, beans, and fresh veggies. You learned how to cook quinoa perfectly and create a tasty dressing. I shared tips to customize your salad, store leftovers, and offered variations. This salad is not just healthy; it's also quick to make and full of flavor. Enjoy experimenting with different ingredients to fit your tastes. Remember, a colorful dish is a fun dish! Happy cooking and assembling your own delicious salads!

Vegan Taco Salad Bowls Fresh and Flavorful Delight

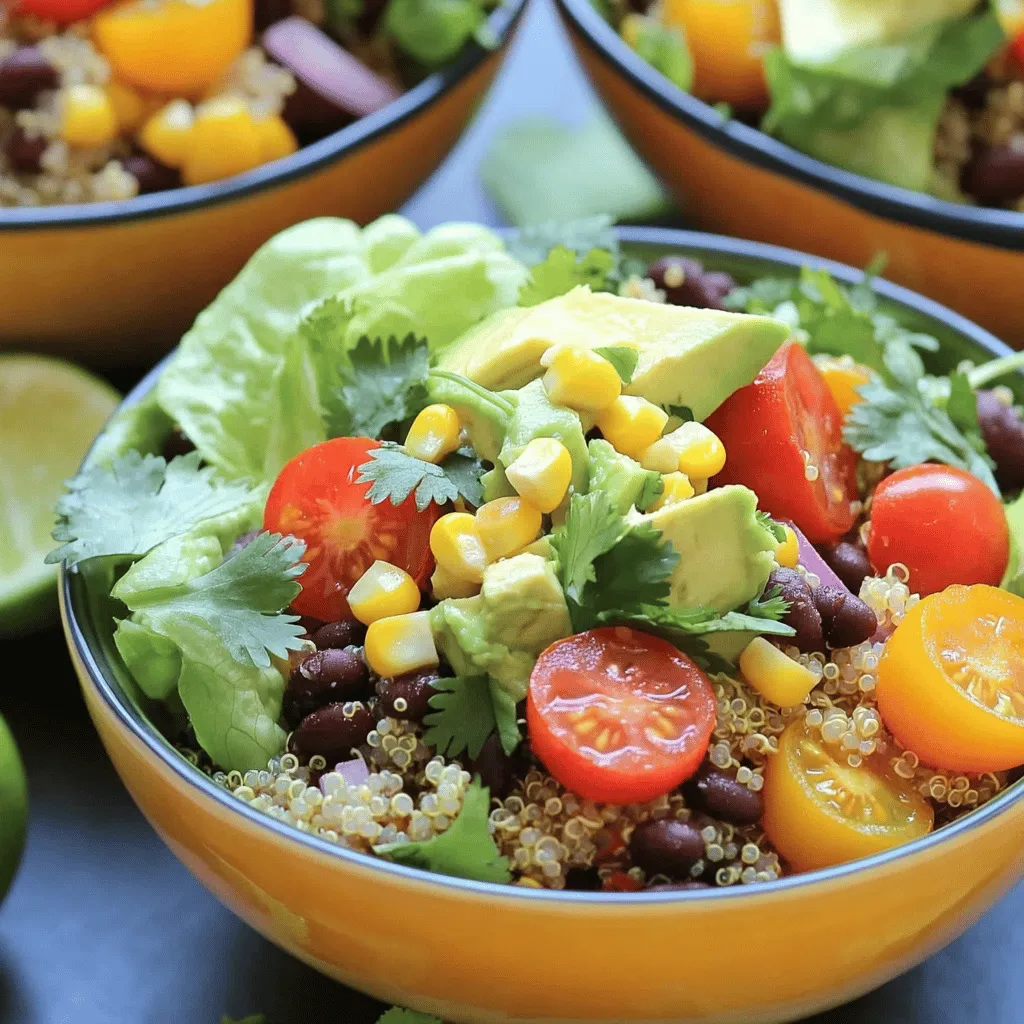
Craving a vibrant and nutritious meal? Let me introduce you to Vegan Taco Salad Bowls—a tasty and fresh delight that’s

To make Zucchini Noodles with Pesto, you need a few fresh ingredients. Here’s what you’ll need: - 4 medium zucchinis - 1 cup fresh basil leaves - ½ cup pine nuts (toasted) - 1 clove garlic - ½ cup olive oil - ¼ cup grated Parmesan cheese (or nutritional yeast for a vegan option) - Salt and pepper to taste - 1 cup cherry tomatoes, halved - Optional: ½ teaspoon red pepper flakes for heat These ingredients come together to create a dish that is light, fresh, and full of flavor. The zucchini serves as a great alternative to pasta, making it a fun and healthy meal option. The pesto adds a rich taste that perfectly complements the noodles. You can find the full recipe in the section above. Start by making your zucchini noodles. You can use a spiralizer, julienne peeler, or a mandoline. Choose whichever tool you have or prefer. The goal is to create long, noodle-like strands. After you make the noodles, place them in a colander. Sprinkle salt over them and let them sit for about ten minutes. This process helps draw out extra moisture. After ten minutes, rinse off the salt and pat the noodles dry with paper towels. Next, it's time to make the pesto. In a food processor, add fresh basil leaves, toasted pine nuts, and one clove of garlic. Pour in half a cup of olive oil and add grated Parmesan cheese if you want. Blend the mixture until it becomes smooth. If it looks too thick, add more olive oil little by little. You can also season it with salt and pepper to taste. Now, let's cook those zucchini noodles! Rinse them under cold water to remove any salt and dry them well. Heat a large skillet over medium heat. Add a little olive oil and sauté the noodles for about two to three minutes. You want them to be slightly tender but still crisp. Keep an eye on them so they don’t overcook. Once the noodles are cooked, remove the skillet from the heat. Toss the warm noodles with the pesto you made earlier. Add in halved cherry tomatoes for a pop of color and flavor. If you enjoy a little heat, mix in red pepper flakes. Combine everything well so the noodles are coated evenly. Serve the dish warm, and for a nice touch, garnish with extra pine nuts, fresh basil leaves, and a sprinkle of Parmesan cheese. For the full recipe, check the detailed instructions above. Choosing the best basil is key for great pesto. Look for bright green, fresh leaves. Avoid wilted or brown leaves. The aroma should be strong and sweet. This basil will give your pesto a vibrant taste. Toasting pine nuts adds depth to your pesto. Place them in a dry skillet over low heat. Stir often to prevent burning. Toast for about 3-5 minutes until golden. Let them cool before blending. This step makes your pesto richer and more flavorful. To avoid soggy zucchini noodles, start by salting them. After spiralizing, place them in a colander and sprinkle with salt. Let them rest for about 10 minutes. This draws out excess moisture. Rinse the noodles before cooking to remove the salt. For optimal sautéing, use a large skillet over medium heat. Add just a drizzle of olive oil. Sauté the zucchini noodles for only 2-3 minutes. You want them tender yet crisp. Avoid cooking too long, or they will become mushy. Pair zucchini noodles with proteins like grilled chicken or shrimp. They also work well with beans for a plant-based meal. This adds protein and makes the dish more filling. Get creative with garnishing. Add extra pine nuts for crunch and basil leaves for freshness. A sprinkle of Parmesan cheese enhances flavor. For a kick, toss on red pepper flakes. These touch-ups make your dish fun and appealing. {{image_2}} You can switch up your pesto for fun flavors. Try making it with sun-dried tomatoes for a tangy twist. Just blend them in with basil and nuts. Or, you can use arugula instead of basil. It adds a peppery kick. If you're looking for vegan options, skip the cheese. Use nutritional yeast for that savory taste. Blend it with nuts and olive oil for a creamy texture. Want to make your meal heartier? Add proteins! Grilled chicken pairs well with zucchini noodles. Shrimp is another great choice; it cooks quickly and adds a sweet taste. If you prefer plant-based options, try tofu. Just cube it and sauté until golden. You can also include beans or legumes. Chickpeas or lentils add protein and fiber, making your dish even better. You can change your dish with seasonal veggies. In summer, add fresh cherry tomatoes for sweetness. In fall, use roasted squash for a cozy flavor. Different pasta alternatives can also work. Try spiralizing carrots or sweet potatoes for a colorful plate. Each season brings unique tastes, so feel free to explore! For a complete recipe, check out the [Full Recipe]. To keep your zucchini noodles and pesto fresh, store them separately. This way, the noodles won’t get soggy. Place the zucchini noodles in an airtight container. Make sure they are dry to avoid extra moisture. For the pesto, use another container and cover it tightly. This helps keep the flavors strong. Always refrigerate both items. They will last for about three days in the fridge. You can freeze zucchini noodles for later use. Just spiralize them first, then spread them on a baking sheet. Freeze them until solid, then transfer to a freezer bag. This helps keep their shape. For your pesto, pour it into ice cube trays before freezing. Once frozen, pop out the cubes and store them in a bag. This way, you can use just what you need later. When reheating your zucchini noodles, use a skillet over medium heat. This method helps keep them tender. Add a splash of olive oil to keep them moist. Stir gently for about two minutes. Avoid cooking too long, as they may become mushy. For pesto, you can warm it gently in a small pan. This keeps the flavors fresh without overcooking. Enjoy your meal with the full recipe! Zucchini noodles are a great choice for health. They are low in calories and carbs. Each zucchini has many vitamins, like vitamin C and potassium. Here are some key benefits: - Low in calories: Great for weight loss. - High in fiber: Helps with digestion. - Packed with vitamins: Boosts your immune system. Zucchini noodles provide a fresh, light meal. They can replace regular pasta, making your dish healthier. To keep zucchini noodles crisp, follow these tips: - Salt the noodles: After spiralizing, sprinkle with salt. Let them rest for 10 minutes. This draws out moisture. - Rinse and dry: Rinse noodles under cold water and pat them dry. - Quick cooking: Sauté for just 2-3 minutes. Overcooking makes them soggy. These steps help maintain their texture and keep them delicious. Yes, you can use store-bought pesto for convenience. It saves time and effort. However, consider these factors: - Flavor quality: Homemade pesto often tastes fresher and richer. - Ingredients: Check for quality; some brands add fillers. - Personal touch: Store-bought pesto may lack the unique flavors you enjoy. If you're short on time, a store-bought option works well. For a full flavor experience, try my homemade pesto recipe in the [Full Recipe]. This blog post shared a tasty way to enjoy zucchini noodles with fresh pesto. We covered the key ingredients, step-by-step instructions, and some handy tips. You learned how to create pesto and keep your noodles crisp. Variations let you mix in seasonal veggies or proteins. Finally, I shared how to store leftovers effectively. Zucchini noodles offer a healthy meal that’s easy to make. With a little practice, you can impress anyone at your table. Enjoy experimenting with these flavors and techniques!

Zucchini Noodles with Pesto Flavorful and Fresh Meal

If you’re craving a fresh, tasty meal, you need to try zucchini noodles with pesto. This dish is fun to

- 2 ½ cups unsweetened shredded coconut - 2/3 cup sweetened condensed milk - 1 teaspoon vanilla extract - ½ teaspoon almond extract - ½ teaspoon sea salt - 2 large egg whites - 1/4 cup granulated sugar - 4 ounces dark chocolate (70% cocoa or higher) - Sea salt flakes (for topping, optional) When I make coconut macaroons with dark chocolate, I focus on quality ingredients. The unsweetened shredded coconut gives a great texture and flavor. Sweetened condensed milk adds just the right amount of sweetness and moisture. The vanilla and almond extracts bring depth to the taste. A pinch of sea salt balances the sweetness. You need two large egg whites to create a light, airy texture. Granulated sugar helps stabilize the whipped egg whites. For the chocolate, I like to use dark chocolate with at least 70% cocoa. It pairs perfectly with the sweetness of the macaroons. Finally, adding sea salt flakes on top is optional, but I find it makes the treat even better. If you want to dive deeper into the baking process, don’t forget to check the Full Recipe for step-by-step guidance! 1. Preheating the Oven and Preparing the Baking Sheet Start by preheating your oven to 325°F (160°C). Line a baking sheet with parchment paper. This step helps prevent sticking. 2. Mixing the Coconut Mixture In a large bowl, combine 2 ½ cups of unsweetened shredded coconut, 2/3 cup of sweetened condensed milk, 1 teaspoon of vanilla extract, ½ teaspoon of almond extract, and ½ teaspoon of sea salt. Mix until everything is well blended. The mixture should hold together when pressed. 3. Whipping the Egg Whites In a separate bowl, beat 2 large egg whites with a handheld mixer. Whip until soft peaks form, which takes about 2 minutes. Gradually add 1/4 cup of granulated sugar. Continue beating until stiff peaks form, which should take 2-3 more minutes. 1. Folding the Egg Whites into the Coconut Mixture Gently fold the whipped egg whites into the coconut mixture. Be careful not to deflate the egg whites. Mix until just combined for the best texture. 2. Molding and Placing on Baking Sheet Use a tablespoon or cookie scoop to drop mounds of the mixture onto the prepared baking sheet. Space them about 2 inches apart to allow for spreading. 1. Baking Process and Timing Bake the macaroons in your preheated oven for 20-25 minutes. They should be golden brown on top when done. 2. Cooling the Macaroons Once baked, remove the baking sheet from the oven. Let the macaroons cool completely on the sheet. This helps them firm up. 1. Melting the Dark Chocolate In a microwave-safe bowl, melt 4 ounces of dark chocolate, which should be 70% cocoa or higher. Heat in 30-second intervals, stirring until smooth. 2. Dipping the Macaroons in Chocolate After the macaroons have cooled, dip the bottoms into the melted chocolate. Let the excess chocolate drip off before placing them back on the parchment paper. You can find the Full Recipe for more details on making these delicious treats. Enjoy your time in the kitchen! Importance of Egg White Whipping Whipping egg whites is key to a light and airy texture in your macaroons. Start with clean, dry bowls to ensure the egg whites whip well. Use a handheld mixer on medium speed. Beat until soft peaks form, which takes about two minutes. Then, add granulated sugar slowly. Keep mixing until you see stiff peaks, which takes another two to three minutes. This step is crucial, as stiff peaks help the macaroons hold their shape while baking. Mixing Techniques to Avoid Deflation Be gentle when folding the whipped egg whites into the coconut mixture. Use a spatula and fold in a circular motion. This keeps the air from escaping. Mix just until combined; over-mixing can lead to flat macaroons. The final mixture should look thick and slightly shiny, ready for mounding on your baking sheet. Using Different Extracts You can customize the flavor of your macaroons. While vanilla and almond extracts work well, try other options too. Coconut extract adds more coconut flavor and makes each bite richer. A hint of rum extract can provide a tropical twist. Experimenting with extracts can transform your macaroons into something special. Adding Toppings or Additional Flavors Toppings can elevate your macaroons. Try sprinkling sea salt flakes on top of the chocolate for a sweet-salty combo. You can also add crushed nuts or colorful sprinkles for a fun look. For added texture, mix in chocolate chips or dried fruits to the coconut mixture before baking. These small changes can give you a unique treat every time. For the complete recipe, check out the Full Recipe. {{image_2}} Coconut macaroons are a great base. You can change them up in fun ways! - Coconut Macaroons with White Chocolate: Swap dark chocolate for white chocolate. The sweet, creamy flavor pairs well with coconut. Just melt the white chocolate and dip the cooled macaroons like before. - Chocolate-Covered Macaroons with Different Fillings: Get creative! Try adding fillings like peanut butter or fruit jams inside the macaroon. After baking, dip them in chocolate for a tasty twist. You can easily modify the recipe for different diets. - Vegan Coconut Macaroons Option: To make vegan macaroons, replace the egg whites with aquafaba. This is the liquid from canned chickpeas. Whip it just like egg whites until it forms stiff peaks. Use maple syrup instead of sweetened condensed milk for sweetness. - Gluten-Free Ingredients: Good news! This recipe is naturally gluten-free. Just check the labels on your ingredients to be sure. Your macaroons will still taste great! You can enjoy these variations and dietary options to make coconut macaroons that fit your taste and needs. For the complete recipe, refer to the Full Recipe section. To keep your coconut macaroons fresh, store them in an airtight container. This will prevent them from drying out. Place a piece of parchment paper between layers to avoid sticking. You can keep them at room temperature for up to three days. If you want to store them longer, freezing works great. Wrap each macaroon in plastic wrap. Then, put them in a freezer-safe bag. They can stay frozen for up to three months. When ready to enjoy, just thaw them in the fridge overnight. In the refrigerator, your macaroons can last about a week. Keep them in an airtight container for best results. You’ll know they have spoiled if they smell off or show signs of mold. If they feel hard or dry, it's time to toss them. Enjoy them fresh for the best taste! How do you make coconut macaroons from scratch? To make coconut macaroons, mix unsweetened coconut with sweetened condensed milk, vanilla, almond extract, and sea salt. Then whip egg whites with sugar until stiff peaks form. Fold the egg whites into the coconut mix, scoop onto a baking sheet, and bake until golden. Can I use sweetened coconut instead of unsweetened? Yes, you can use sweetened coconut. It will make your macaroons sweeter. Just note that you may want to reduce the sweetened condensed milk to balance the sweetness. How can I prevent my macaroons from collapsing? To prevent collapsing, ensure your egg whites reach stiff peaks. Fold gently, and do not overmix. Also, space the macaroons well on the baking sheet to allow them to rise. What type of dark chocolate is best for melting? Use dark chocolate with 70% cocoa or higher. This kind melts smoothly and gives a rich flavor. Chopping the chocolate helps it melt evenly. Can I make these macaroons ahead of time? Yes, you can make macaroons ahead. Store them in an airtight container for up to a week. You can also freeze them, but dip them in chocolate just before serving for the best taste. For more details, you can check the Full Recipe. This blog post covered how to make delicious coconut macaroons. We discussed the key ingredients, preparation steps, and baking tips. You learned how to enhance flavors and explore variations. The storage section showed you how to keep your treats fresh. Making coconut macaroons is fun and simple. You can experiment with flavors or dietary needs. Enjoy every bite of your sweet creations!

Coconut Macaroons with Dark Chocolate Delightful Treat

Are you craving a sweet treat that’s both crunchy and chewy? These Coconut Macaroons with Dark Chocolate are the perfect

To make easy chocolate chip cookies, you need these main ingredients: - 1 cup (2 sticks) unsalted butter, softened - 3/4 cup granulated sugar - 3/4 cup packed brown sugar - 1 teaspoon vanilla extract - 2 large eggs - 2 1/4 cups all-purpose flour - 1 teaspoon baking soda - 1/2 teaspoon salt - 2 cups semi-sweet chocolate chips - 1/2 cup chopped walnuts (optional) Each ingredient plays a key role. The butter gives cookies their rich flavor. Both sugars add sweetness and help with texture. Eggs bind the dough, making it soft. Flour provides structure, while baking soda helps them rise. If you have dietary needs, there are substitutions. Use coconut oil instead of butter for dairy-free cookies. You can swap regular flour for gluten-free flour. Use flax eggs in place of regular eggs for a vegan option. Want to mix it up? Add 1/2 cup of oats for a chewy texture. Try dark chocolate chips for a richer taste. You can also add a pinch of cinnamon for warmth. For a festive touch, use holiday-themed sprinkles or chunks of candy. For the full recipe, check out the complete guide to making decadent chocolate chip cookies. 1. Preheat your oven. Set it to 375°F (190°C). This step is key for even baking. 2. Prepare your baking sheets. Line two baking sheets with parchment paper. This helps prevent sticking. 3. Mix and cream ingredients. In a large bowl, cream together the softened butter, granulated sugar, and brown sugar. Mix until smooth and creamy, about 2-3 minutes. 4. Beat in the eggs and vanilla. Add the vanilla extract and eggs one at a time. Mix until fully blended. 5. Combine dry and wet ingredients. In another bowl, whisk together the flour, baking soda, and salt. Gradually add this to the butter mixture. Mix until just combined. 1. Proper cookie placement. Drop rounded tablespoons of dough onto the prepared sheets. Leave enough space between cookies for spreading. 2. Bake the cookies. Place the sheets in the preheated oven. Bake for 9-11 minutes. Look for golden edges and soft centers to know they’re done. 1. Cooling on the baking sheet. Let the cookies cool on the sheets for 5 minutes. This helps them set. 2. Transfer to a wire rack. Move the cookies to a wire rack to cool completely. 3. Ideal serving suggestions. Serve warm with a glass of milk. For extra flair, arrange them on a decorative plate and sprinkle with sea salt. Enjoy your delicious cookies! When baking chocolate chip cookies, a few mistakes can ruin your batch. - Overmixing the dough: Mixing too much can make cookies tough. Mix just until you see no dry flour. - Incorrect measuring techniques: Use measuring cups for dry and liquid ingredients. Spoon flour into the cup, then level it off with a knife. This method ensures accuracy. Want chewy cookies? Here are some tips: - Use brown sugar: It adds moisture and a rich flavor. A mix of brown and white sugar works well too. - Adjust baking time: For softer cookies, take them out when the edges are golden but the centers look underbaked. They will firm up as they cool. For crispy cookies, add a bit more flour and bake a minute longer. Chilling the dough is a game-changer: - Chilling benefits: It helps the flavors develop and makes the dough easier to handle. Chill for at least 30 minutes. - Using precision tools: A cookie scoop ensures even-sized cookies. This method helps them bake evenly, giving you a perfect batch every time. For the full recipe, check the section above. Enjoy your baking! {{image_2}} You can change the flavor of your cookies easily. Try using different types of chocolate. Dark chocolate adds richness. White chocolate gives a creamy touch. You can also mix chocolates for a fun twist. Adding spices or extracts can create unique flavors. A dash of cinnamon brings warmth. A splash of almond extract offers a nutty taste. Get creative with your flavors to find your favorite! You can make gluten-free chocolate chip cookies too. Use gluten-free flour blends instead of all-purpose flour. This simple swap keeps the taste great. If you want vegan cookies, replace butter with coconut oil. Use flax eggs instead of regular eggs. For nut-free options, skip the nuts. You can also use seeds or dried fruits. These changes keep your cookies safe for everyone! Make your cookies festive for the holidays! Add crushed peppermint for a minty spin. For fall, try pumpkin spice or maple flavor. These variations make your treats special for any season. You can also get creative with themed cookies. Shape them for Halloween or decorate them for Christmas. Fun shapes and colors add excitement to your baking! To keep your cookies fresh, always store them in an airtight container. This method stops air from drying them out. You can store cookies at room temperature for about a week. If you want to keep them longer, you should refrigerate them. However, cookies can get hard in the fridge, so it’s best to use an airtight container. You can freeze both cookie dough and baked cookies. For cookie dough, scoop it into balls and place them on a baking sheet. Freeze the balls for about an hour, then transfer them to a freezer bag. This way, you can bake fresh cookies anytime! For baked cookies, let them cool completely, then wrap them tightly in plastic wrap before freezing. To thaw, leave them at room temperature for about 30 minutes. This keeps your cookies soft and tasty. Cookies can last a week at room temperature, about two weeks in the fridge, and up to three months in the freezer. Check for signs of freshness. If cookies feel hard or have a stale smell, it’s time to toss them. For the best taste, enjoy them fresh! When stored correctly, these easy chocolate chip cookies can stay delicious for days. For the full recipe, refer back to the earlier section. The best type of chocolate for cookies is semi-sweet chocolate. It gives a nice balance of sweetness and richness. Dark chocolate has a stronger flavor and less sugar, which some people love. Milk chocolate is sweeter and creamier, but it can be too sweet for some. My choice? Semi-sweet chocolate chips work great for classic cookies. To make your cookies chewier, try these tips: - Use more brown sugar than white sugar. Brown sugar adds moisture. - Add an extra egg yolk. This keeps cookies soft. - Don’t overbake. Take them out when they are still soft in the middle. They will firm up as they cool. - Chill the dough for at least 30 minutes. This helps to create a chewy texture. Yes, you can use margarine instead of butter. Margarine can make cookies softer and less rich. Butter adds a nice flavor and makes cookies crispier. If you want a buttery taste, stick with butter. If you need a dairy-free option, margarine is a good choice, but it may change the taste slightly. If you want to skip eggs, here are some great substitutes: - Applesauce: Use 1/4 cup for each egg. - Mashed banana: Use 1/4 cup for each egg. - Yogurt: Use 1/4 cup for each egg. - Flaxseed meal: Mix 1 tablespoon with 3 tablespoons of water and let it sit for 5 minutes. This works like one egg. These options can help if you have allergies or follow a special diet. To make more cookies, simply double or triple the recipe. Keep these tips in mind: - Use 2 cups of butter instead of 1 for double. - Adjust the baking time. Larger batches may need a few more minutes. - Bake in batches if your oven is small. This way, all cookies bake evenly. These steps will help you make enough cookies to share! You can find the Full Recipe above for more details. This guide covers everything you need for perfect cookies. We discussed key ingredients, from substitutions to optional mix-ins. Step-by-step instructions made baking easy, from mixing to cooling. I shared tips to avoid common mistakes and enhance flavors. You also learned fun variations and storage tips to keep your cookies fresh. Remember, baking is fun and rewarding. Enjoy learning and experimenting with your cookie recipes, knowing you can create treats for everyone!

Easy Chocolate Chip Cookies Simple and Tasty Treat

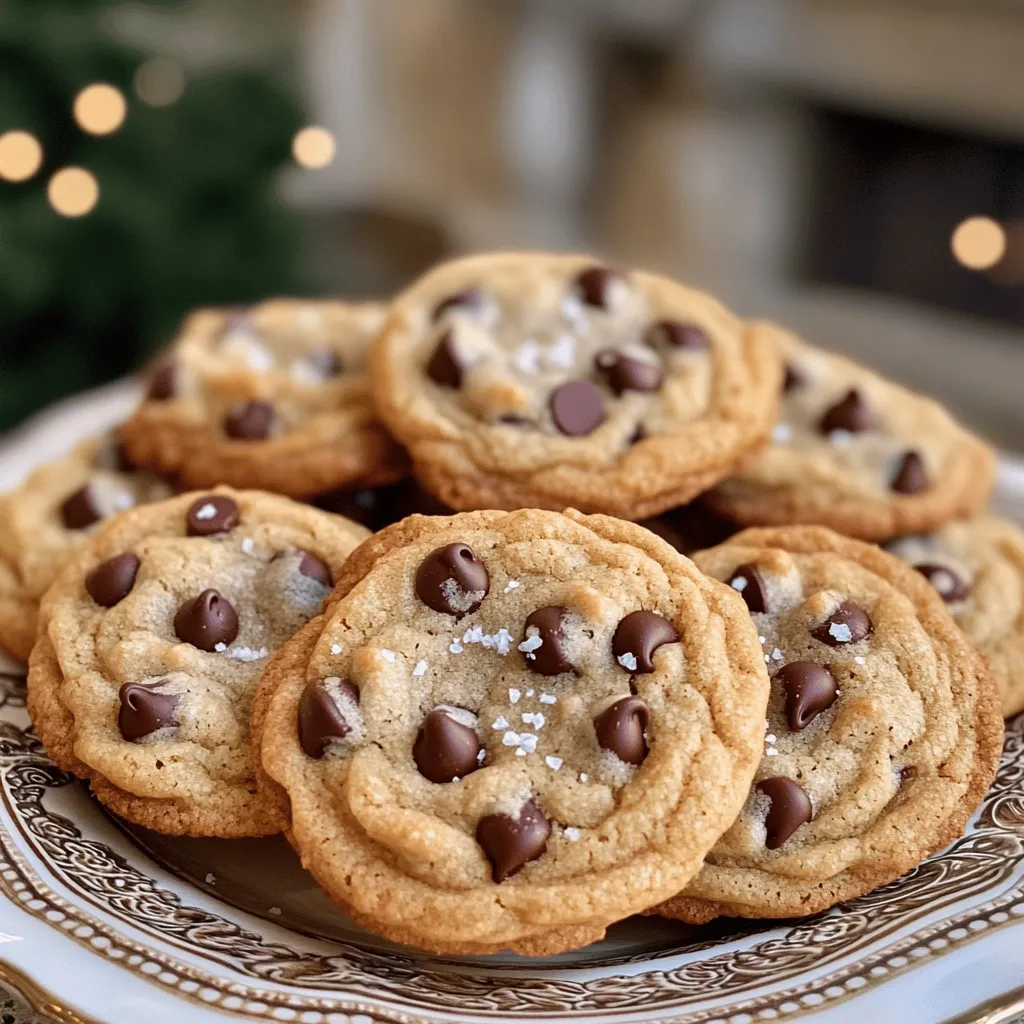
Craving warm, gooey chocolate chip cookies? You’re in the right place! In this guide, I’ll share my favorite easy recipe

- Fresh Strawberries - Granulated Sugar - Water - Lemon Juice - Optional Flavor Enhancements Candied strawberries need a few simple ingredients. First, fresh strawberries are key. Choose ripe, bright red strawberries for the best taste. They should be firm and free from blemishes. The sweet and juicy flavor of these fruits shines through in the final treat. Next, we need granulated sugar. This sugar gives the strawberries their sweet coating. The sugar crystalizes when cooked, making the strawberries shiny and delicious. Water is also important. It helps dissolve the sugar when you make the syrup. Lemon juice adds a little zing and balances the sweetness. It also helps the sugar harden properly. You can add optional flavor enhancements like vanilla extract. This small touch adds a nice depth to the flavor. If you want to try something new, experiment with other extracts like almond or coconut. For cooling, parchment paper is a must. It keeps the strawberries from sticking and helps them set properly. These ingredients work together to create a simple yet delightful treat. For the full recipe, check out the instructions in the next section. First, wash the strawberries under cool water. Make sure to remove all dirt. After washing, dry them completely with a clean towel. Any water left on the strawberries will stop the sugar from sticking well. Lay them out in a single layer to air dry. This step is very important for a good candy coating. In a medium saucepan, mix together one cup of sugar, half a cup of water, and one tablespoon of lemon juice. Heat this mixture over medium heat. Stir it until the sugar dissolves completely. Once it boils gently, stop stirring. Let it simmer for about 8 to 10 minutes. Use a candy thermometer to check when it reaches 300°F. This is called the hard crack stage. If you do not have a thermometer, drop a tiny bit into cold water. It should form a hard candy. Now, it’s time to dip the strawberries. Hold each strawberry by the stem. Quickly dip it into the hot syrup, swirling to coat it evenly. Let the extra syrup drip back into the pan. Place the dipped strawberries on parchment paper to cool. This will help them harden nicely. Repeat the dipping with all the strawberries. In about 15 to 20 minutes, they will be ready to enjoy. For extra flair, you might want to drizzle them with melted dark chocolate or sprinkle edible glitter on top. To get a great candy coating, temperature matters. Sugar syrup must reach 300°F. Use a candy thermometer for the best results. If you don’t have one, drop some syrup in cold water. It should form hard candy. This is called the hard crack stage. Controlling the heat ensures the sugar doesn’t crystallize. This can happen if the syrup cooks too fast. Stir the mixture only until the sugar dissolves. One common mistake is overcooking the syrup. If you let it boil too long, it may burn. Keep an eye on it, and do not walk away. Moisture is another issue. If strawberries are wet, sugar won’t stick. Dry them well after washing. Even a little water can ruin your candy coating. For a stunning display, arrange the candied strawberries on a pretty plate. You can drizzle melted dark chocolate over them. Edible glitter adds a fun sparkle too! Garnishes can elevate your treat. Try fresh mint leaves or a sprinkle of nuts. These details make your candied strawberries not just tasty, but beautiful as well. For the full recipe, refer back to the main guide. {{image_2}} You can easily change the flavor of your candied strawberries. One fun way is by adding flavors to the syrup. Here are some ideas: - Citrus Zest: Add orange or lime zest for a bright taste. - Spices: A pinch of cinnamon or nutmeg gives a warm flavor. - Extracts: Swap vanilla for almond or peppermint extract to mix things up. You can also try using different berries. Instead of strawberries, use: - Raspberries: They have a tart flavor that pairs well with sugar. - Blueberries: These will add a sweet burst in each bite. - Blackberries: Their rich flavor adds depth to the treat. For those looking for healthier options, using natural sweeteners in your syrup can be great. Consider using: - Honey: It adds a unique taste and is less processed. - Maple Syrup: This gives your strawberries a warm, rich flavor. - Agave Nectar: It’s sweet and has a low glycemic index. If you want vegan candied strawberries, swap out regular sugar. Use organic cane sugar or coconut sugar for a vegan-friendly twist. Both options will still give you that sweet crunch, making them perfect for everyone! Remember, the Full Recipe is a great way to start your candied strawberry journey. Enjoy experimenting with these variations! To keep your candied strawberries fresh, store them in a cool, dry place. Avoid direct sunlight to prevent melting. Use an airtight container to keep moisture out. You can also line the container with parchment paper to prevent sticking. Shelf Life of Candied Strawberries Candied strawberries last about 3 to 5 days when stored properly. After that, they may lose their crispness. If they become too soft, it’s best to eat them soon. If your candied strawberries lose their crunch, you can refresh them. Place them in a preheated oven at 200°F for about 10 minutes. Keep an eye on them to avoid melting. Afterward, let them cool completely. This will help restore their crisp texture. Enjoy your shiny treats again! To ensure the sugar sticks well, start by drying your strawberries. After washing them, use a clean towel to pat them dry. Any moisture can stop the sugar from sticking. You want the surface to be completely dry. This is key to a good candy coating. You can use frozen strawberries, but the texture changes. Frozen berries become soft and mushy when thawed. This can make the candy coating less firm. Fresh strawberries work best for a crunchy bite. Candied strawberries shine as a topping. They go well with many desserts. Try them on cakes, ice cream, or pancakes. They also look great on a fruit platter. Candied strawberries have roots in old candy-making traditions. They became popular in Europe. People love their sweet taste and shiny look. Over time, they became a classic treat worldwide. You can find them at fairs and special events. In this post, we explored how to make the best candied strawberries. We covered essential ingredients, like fresh strawberries and sugar, and detailed step-by-step instructions. I shared tips to avoid common mistakes and suggested fun variations, including flavors and dietary options. Candied strawberries can be a delightful treat for all. With a bit of practice, you’ll create a sweet treat that impresses anyone. Enjoy your candied strawberries, and don’t be afraid to get creative!

Candied Strawberries Simple and Delicious Treat

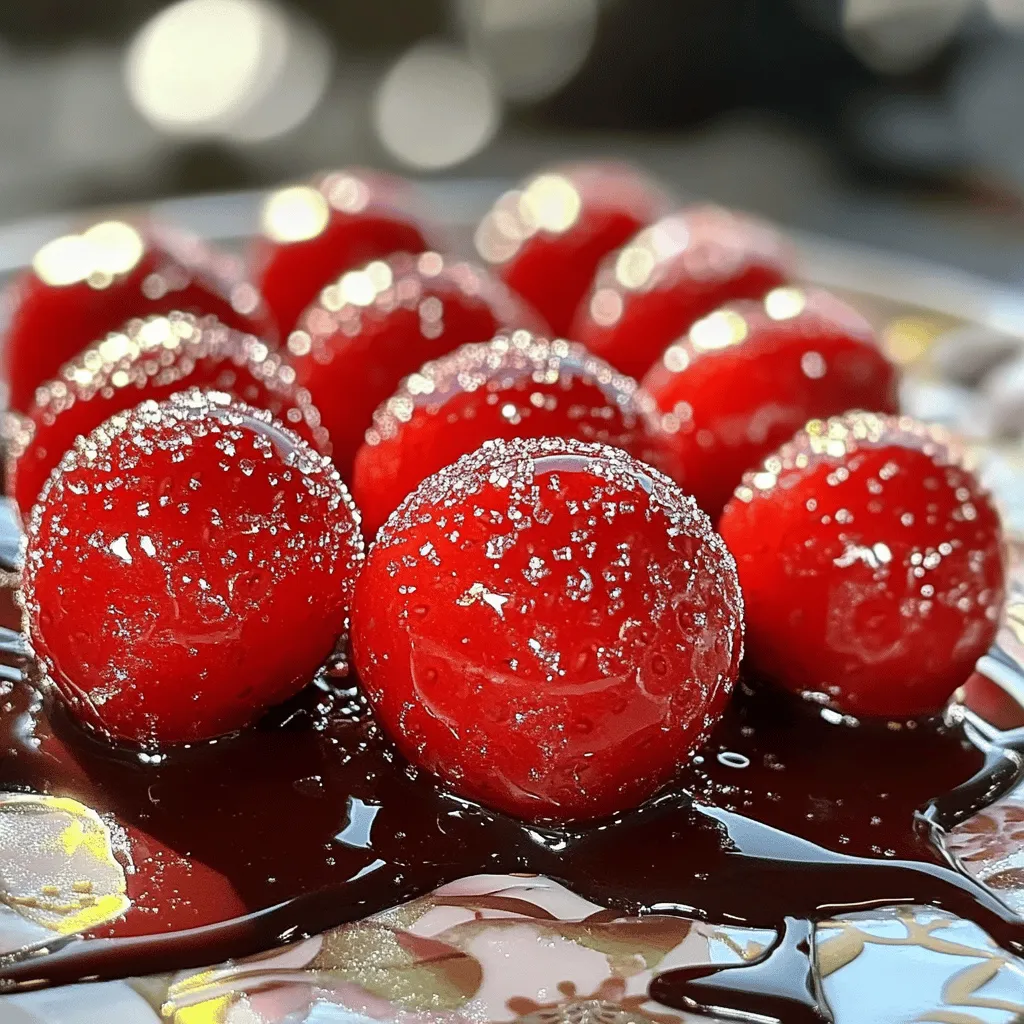
If you’re looking to impress your friends or enjoy a sweet treat, candied strawberries are a win! This simple recipe

Older posts
Newer posts
← Previous Page1 … Page46 Page47 Page48 … Page61 Next →

dsad

© 2025 Home Cooking Style • Built with GeneratePress

Our Policies

  • Copyright Policy
  • Cookie Policy
  • GDPR Policy
  • Privacy Policy
  • Disclaimer
  • Terms Of Use

More Information

  • Home
  • About
  • Contact
  • Appetizers
  • Dessert
  • Dinner
  • Drinks
©2025, Home Cooking Style About Back To Top