Skip to content
DisclaimerTerms Of UseGDPR PolicyCookie Policy

Home Cooking Style

  • Home
  • Drinks
  • Appetizers
  • Dinner
  • Dessert
  • About
  • Contact
  • Privacy Policy
DisclaimerTerms Of UseGDPR PolicyCookie Policy

Amelia

- 8 oz elbow macaroni - 2 cups sharp cheddar cheese, shredded - 1 cup Gruyère cheese, shredded - 1 cup whole milk - 1 cup heavy cream - 4 tablespoons unsalted butter - 3 tablespoons all-purpose flour - 1 teaspoon Dijon mustard - 1 teaspoon garlic powder - 1/2 teaspoon onion powder - Salt and pepper to taste - 1 tablespoon truffle oil - 1 cup panko breadcrumbs - Fresh parsley, chopped for garnish (optional) I love using these ingredients to create the best mac and cheese. The combination of sharp cheddar and Gruyère brings depth to the dish. The cream and milk make it rich and smooth. Truffle oil adds a fancy twist, making it stand out. When picking your cheese, go for quality. Freshly shredded cheese melts better and tastes great. The butter and flour make a nice roux, which is key for a creamy sauce. Use the Dijon mustard and spices to enhance the flavor without overpowering it. Don't skip the panko breadcrumbs. They add a crunchy topping that contrasts the creamy inside. If you like, sprinkle fresh parsley on top for color and a hint of freshness. This list of ingredients sets the stage for a cozy meal. You will enjoy the rich flavors and creamy texture in every bite. For the full recipe, check out the complete guide to making this comforting dish. To cook elbow macaroni to al dente, start with a large pot. Fill it with water and add a pinch of salt. Bring the water to a rolling boil. Add the macaroni and cook it according to the package instructions, usually around 8-10 minutes. You want the pasta to be firm but not hard. Once done, drain the pasta in a colander and set it aside to let it cool slightly. To make the roux, grab a medium saucepan and heat it over medium heat. Melt 4 tablespoons of unsalted butter. Once melted, whisk in 3 tablespoons of all-purpose flour. Cook this mix for about 1-2 minutes until it turns golden. This is your roux base. Now, gradually whisk in 1 cup of whole milk and 1 cup of heavy cream. This slow process prevents lumps from forming. Cook this mixture for about 3-5 minutes until it thickens. Stir in 1 teaspoon of Dijon mustard, 1 teaspoon of garlic powder, and 1/2 teaspoon of onion powder. Add salt and pepper to taste. Finally, remove the pan from heat and mix in 2 cups of shredded cheese until it melts smoothly. In a large mixing bowl, combine the cooked macaroni with your cheese sauce. Mix well until every piece is coated. Now, stir in 1 tablespoon of truffle oil for a gourmet touch. Preheat your oven to 350°F (175°C). Grease a baking dish and transfer the mac and cheese mixture into it. For the topping, mix 1 cup of panko breadcrumbs with a drizzle of olive oil. Sprinkle this evenly over the mac and cheese. Bake for 25-30 minutes until the top is golden brown and bubbly. Remove from the oven and let it cool for a few minutes before serving. For a finishing touch, sprinkle fresh parsley on top. You can find the full recipe for this creamy truffle mac & cheese to make it at home! To get the creamiest mac and cheese, start with your cheese choice. I recommend using a mix of sharp cheddar and Gruyère. The sharp cheddar gives a bold flavor, while Gruyère adds a rich creaminess. Make sure your cheese is freshly shredded. Pre-packaged cheese often has additives that prevent melting well. The milk-to-cream ratio also matters. Using a 1:1 ratio of whole milk and heavy cream works best. This mix keeps the sauce rich but not too heavy. If you want a lighter option, you can increase the milk and reduce the cream. To boost the flavor, try adding fresh herbs or spices. A bit of thyme or rosemary can elevate your dish. You can also sprinkle in some smoked paprika for a subtle kick. For a special touch, drizzle a little truffle oil on top before serving. If you prefer, you can use garlic-infused olive oil or even chili oil for a different twist. How you serve your mac and cheese can make a big difference. For a fancy look, use individual ramekins. This way, each person has their own portion. If you go for a large dish, try to make it look inviting. Top it with panko breadcrumbs for a crunchy layer. Garnishing also adds visual appeal. You can sprinkle chopped parsley or chives on top right before serving. This not only adds color but also brings a fresh taste to the dish. For a touch of elegance, drizzle a tiny bit of truffle oil on top before serving. For the full recipe, check out the [Full Recipe]. {{image_2}} Using different cheeses can change the whole dish. You can mix sharp cheddar with mozzarella for a stretchier bite. Gruyère adds a nice nutty flavor. For a smoky touch, try smoked gouda. If you want a lower-fat option, use part-skim cheeses. They will still melt well. Just remember, low-fat cheese might not be as creamy. Want to make your mac and cheese more fun? Add bacon for a crispy texture. Cook it until golden, then crumble it into the mix. You can also toss in veggies like spinach or broccoli. They add color and nutrition. For a full meal, try adding cooked chicken or shrimp. This makes it hearty and satisfying. If you need a gluten-free option, swap regular pasta for gluten-free macaroni. Check labels to ensure your pasta is safe. For a vegan mac and cheese, use cashew cream or coconut milk instead of dairy. Nutritional yeast gives a cheesy flavor without using cheese. You can also try vegan cheeses made from nuts or soy. They melt well and taste great! For more details on making the perfect mac and cheese, check out the Full Recipe! To store mac and cheese in the fridge, let it cool first. Use an airtight container for best results. This keeps it fresh and tasty. You can store it for about 3 to 5 days. Check for signs of spoilage. If it smells sour or has mold, throw it away. Reheating is easy, just microwave or bake it. Add a splash of milk to restore creaminess when reheating. Freezing mac and cheese is simple. First, cool it completely. Then, spoon it into a freezer-safe container. Make sure to leave some space at the top. This helps with expansion when it freezes. Wrap the container tightly with plastic wrap. For best quality, use it within 2 to 3 months. To reheat frozen mac and cheese, thaw it in the fridge overnight. Bake it at 350°F (175°C) until it's heated through, about 20 to 30 minutes. Add a bit of milk if needed, and enjoy your creamy comfort food again! For the detailed recipe, check out the Full Recipe. The secret lies in the cheese, milk, and technique. For a rich taste, use sharp cheddar and Gruyère cheese. These two cheeses melt well and give the dish depth. You can also add a bit of Dijon mustard for a tangy kick. You need to make a smooth cheese sauce. Start by making a roux with butter and flour. This thickens the sauce and adds flavor. Then, slowly whisk in milk and cream. This step helps avoid lumps. Cook it until thickened. Finally, mix in your cheeses until they melt and become creamy. Using fresh ingredients is key. Fresh cheeses melt better than pre-shredded ones. This will take your mac and cheese to the next level. Yes, you can make mac and cheese ahead of time. Prepare the dish up to the baking step. After mixing the pasta with the cheese sauce, place it in a baking dish. Cover it and store it in the fridge for up to two days. When you're ready to eat, preheat your oven. Bake it for about 30-35 minutes or until bubbly. If it is cold from the fridge, you might need to add a few extra minutes. This method saves you time on busy days. Elbow macaroni is the classic choice for mac and cheese. Its shape holds the cheese sauce well. However, you can use other shapes too. Shells and cavatappi are also great options. They have curves that catch the sauce nicely. Avoid using thin pasta like spaghetti. It does not hold the sauce well. Choose a pasta that can stand up to the creamy cheese. This makes every bite delicious! In this article, we explored the key ingredients, steps, and tips for making creamy truffle mac and cheese. You learned how to cook pasta, create a smooth cheese sauce, and enhance the dish's flavor. Remember, the choice of cheese and add-ins can change the taste. You can customize it for any diet or preference. Follow the storage tips to enjoy leftovers later. Dive in and make this dish your own! Enjoy every cheesy bite.

The Best Mac & Cheese Creamy Comfort Recipe Guide

Are you ready to dive into the world of creamy comfort? In this guide, I’ll show you how to make

- 1 pound potato gnocchi - 2 tablespoons olive oil - 1 small onion, finely chopped - 3 cloves garlic, minced - 2 cups cherry tomatoes, halved - 1 teaspoon dried oregano - 1 teaspoon red pepper flakes (optional) - Salt and pepper to taste - 1 cup vegetable broth - ½ cup heavy cream - 1 ball of burrata cheese - Fresh basil leaves for garnish Gather these ingredients before you start cooking. Using fresh ingredients makes this dish taste great. The potato gnocchi adds a nice texture. The cherry tomatoes bring sweetness and color. I like to use a small onion for a mild flavor. If you want some heat, add red pepper flakes. The burrata cheese is the star. It’s creamy and rich. You can tear it apart to let the goodness ooze out. Fresh basil leaves add a pop of flavor and color. You can find the full recipe to make this dish shine. Remember, good ingredients lead to great meals! - Bring a large pot of salted water to a gentle boil. - Add the gnocchi and cook according to the package directions until they float. This means they are done! It usually takes about 2-3 minutes. Drain and set them aside. - In a large skillet, heat the olive oil over medium heat. - Add the chopped onion and sauté for about 3-4 minutes until it becomes soft and clear. - Next, add the minced garlic and sauté for another minute until it smells great. - Stir in the halved cherry tomatoes, dried oregano, and red pepper flakes if you want some heat. - Add salt and pepper to taste. Cook for about 5 minutes, stirring now and then. You want the tomatoes to soften and release their juices. - Pour in the vegetable broth and let it simmer for a few minutes. This helps all the flavors mix well. - Then, add the heavy cream and stir until it's all combined. Let the sauce bubble for another 2-3 minutes to thicken. - Gently fold the cooked gnocchi into the sauce. Make sure each piece is well-coated. - Warm everything through for an additional 2 minutes. This allows the gnocchi to soak up all that delicious sauce. - Transfer the creamy gnocchi to plates or a serving bowl. - Tear the burrata cheese into pieces and place it on top. - Finally, sprinkle fresh basil leaves over everything for a pop of color and flavor. For the full recipe, check out the detailed instructions above. Enjoy your meal! To make great gnocchi, texture is key. You want them soft yet firm. Cook the gnocchi in a large pot of salted water. When they float, they are done. This takes about 2-3 minutes. Drain them right away. To avoid mushy gnocchi, don't overcook them. Use fresh gnocchi if possible. Dried gnocchi can work, but they may need a bit longer. You can also toss them lightly in olive oil after draining. This keeps them from sticking together. Adding herbs and spices can take your dish to the next level. Fresh basil is a must with tomato gnocchi. You can also try thyme or parsley. They add a lovely taste. When using dried ingredients, make sure they are fresh. Dried oregano works well, but fresh gives a brighter flavor. If you want a kick, add red pepper flakes. They give a nice heat that pairs well with the creamy sauce. Presentation matters! A simple drizzle of olive oil can make your dish shine. It adds a rich look and flavor. Finish with freshly cracked black pepper. This adds a nice crunch and boosts the taste. Arrange the burrata on top in pieces for a beautiful display. Serve with crusty bread to soak up all that tasty sauce. For the full recipe, check out the details above. {{image_2}} You can use gluten-free gnocchi if you need a gluten-free meal. Many brands offer tasty options made from rice or corn. You can also make homemade gnocchi with different flours, like chickpea or sweet potato. This gives you a chance to play with flavors and textures. You can change the sauce by using different types of tomatoes. Fresh tomatoes add bright flavor, while canned tomatoes provide convenience. Try fire-roasted tomatoes for a smoky taste. If you want a lighter dish, swap heavy cream for half-and-half or coconut cream. This still gives you a rich texture without as many calories. Adding protein can make this dish more filling. You can toss in cooked chicken or shrimp for extra flavor. If you prefer a meatless meal, add more veggies like spinach, zucchini, or bell peppers. This keeps the dish colorful and packed with nutrients. For the full recipe, check out the details above. To keep your gnocchi fresh, store it in a sealed container. Refrigerate it within two hours of cooking. This helps prevent bacteria. The gnocchi will stay good in the fridge for up to three days. To freeze gnocchi in sauce, use a freezer-safe container. Layer it with parchment paper if needed. This will help keep the gnocchi from sticking together. When you are ready to eat the leftovers, you can reheat them. The best way is to use a skillet on medium heat. Add a splash of water or broth to keep it moist. Stir gently until heated through. You can also microwave it in a bowl with a lid. Heat in short bursts, stirring in between. This helps maintain the texture and flavor. In the fridge, your leftovers will last for about three days. If you see any signs of spoilage, like a sour smell or mold, throw it out. These signs mean your dish has gone bad. Always trust your senses; they are your best guide. Enjoy your 30 Minute Tomato Gnocchi with Burrata fresh, but you can save some for later! Cooking gnocchi is quick and easy. For store-bought potato gnocchi, they usually cook in 2-3 minutes. They float when they are ready. If you use homemade gnocchi, cooking times may vary slightly. Always check the texture to ensure they are tender but not mushy. Yes, you can make this dish vegan! Here are some simple swaps: - Use plant-based gnocchi, which are often available. - Replace the heavy cream with coconut milk or cashew cream. - Skip the burrata or use a vegan cheese alternative. This dish pairs well with several sides: - A fresh green salad with a light vinaigrette. - Garlic bread for a crunchy texture. - Steamed vegetables like broccoli or green beans to add color and nutrients. Yes, you can prep parts of the meal ahead. Cook the gnocchi and store in the fridge. Make the sauce and let it cool before storing. Combine when you are ready to eat. Just be mindful that reheating may change the texture slightly. This blog post guides you through making a delicious tomato gnocchi with burrata. We covered key ingredients, cooking steps, and storage tips. I shared ways to enhance flavor through spices and herbs, along with variations to suit your tastes. When you prepare this dish, you enjoy a rich, creamy meal that's quick to make. The right tips can make your gnocchi great. Explore this recipe, and feel free to make it your own! Enjoy the process and the tasty results.

30 Minute Tomato Gnocchi with Burrata Delight

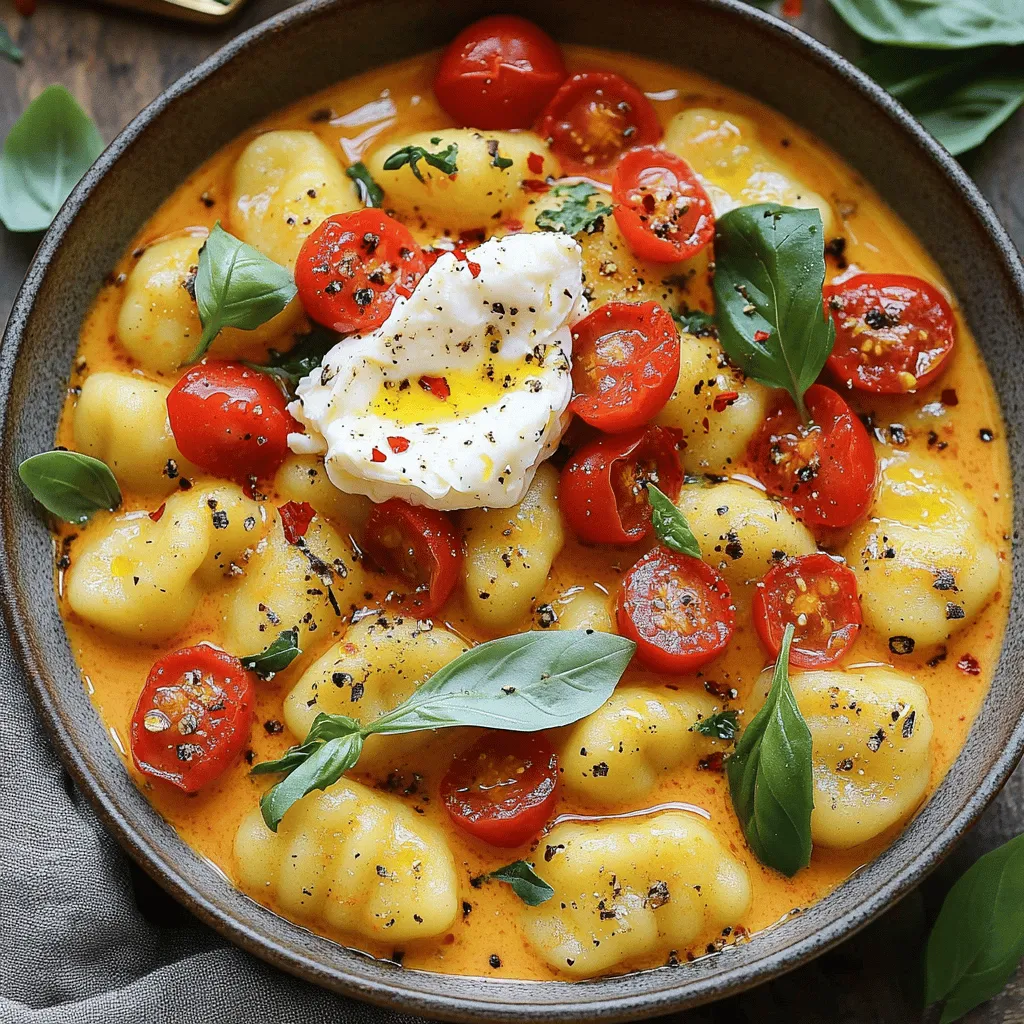
Ready for a delicious meal in just 30 minutes? This Tomato Gnocchi with Burrata is both quick and bursting with

- 1 lb steak (sirloin or ribeye), cut into bite-sized cubes - 4 medium russet potatoes, diced - 1 cup cheddar cheese, shredded - 1/2 cup sour cream - 1/4 cup green onions, chopped The steak is the star here. Sirloin or ribeye works great. Both give rich flavor. Potatoes add heartiness and texture. Use russet potatoes for the best taste. They cook nicely and absorb flavors well. Cheese adds creaminess. Cheddar is my top choice for this dish. It melts beautifully over everything. Sour cream gives a cool touch, while green onions add a fresh crunch. - 1 cup beef broth - 2 tablespoons olive oil - 1 teaspoon garlic powder - 1 teaspoon onion powder - 1 teaspoon smoked paprika - Salt and pepper to taste Beef broth is key for moisture. It helps the steak and potatoes cook tender. Olive oil is great for searing the steak. Seasonings like garlic powder and onion powder bring depth. Smoked paprika adds a nice, smoky flavor. Don't forget salt and pepper to taste. They are essential for bringing out all the flavors. - Optional toppings: crispy bacon bits, jalapeños, or extra cheese - Substitutions: use chicken for a lighter option or vegetable broth for a vegetarian dish You can get creative with toppings. Crispy bacon bits add crunch and flavor. Jalapeños give a spicy kick. Extra cheese is always a win! For lighter options, swap steak with chicken. If you want it vegetarian, use vegetable broth instead of beef broth. This dish can fit many diets with some simple swaps. For the Full Recipe, refer back to the main article. Seasoning Techniques Start by cutting your steak into bite-sized cubes. I like to use sirloin or ribeye for this recipe. Next, season the steak with garlic powder, onion powder, smoked paprika, salt, and pepper. Mix these spices well to coat each piece evenly. This step adds flavor that makes the dish shine. Searing Process Heat olive oil in a skillet over medium-high heat. Once hot, add the seasoned steak cubes. Sear them for about 3-4 minutes. Make sure to brown all sides. This helps to lock in flavor and juices. After searing, remove the steak from heat and set it aside. Best Practices for Layering Layering is key for even cooking. Start by placing the diced potatoes at the bottom of your crockpot. This ensures they cook well without burning. After that, add the seared steak cubes on top of the potatoes. Importance of Liquid Now, pour beef broth over the layers. This liquid is crucial. It keeps the steak and potatoes moist and tender. Without it, the dish may dry out during cooking. Low vs. High Cooking Settings Cover your crockpot and choose your cooking setting. If you have time, cook on low for 6-8 hours. This gives the best flavor. If you’re in a hurry, the high setting works too at 3-4 hours. Checking for Doneness When the cooking time is up, check if the potatoes are tender and the steak is cooked through. A fork should easily pierce the potatoes. If they aren't done, cook a bit longer. This ensures a perfect meal every time. How to Achieve Perfectly Tender Steak To get tender steak, always start with good quality meat. I suggest using sirloin or ribeye. Cut the steak into bite-sized cubes for even cooking. Season the cubes with garlic powder, onion powder, smoked paprika, salt, and pepper. Searing the steak in olive oil for 3-4 minutes is key. This browns the outside and locks in flavor. After searing, place the steak in the crockpot with the potatoes. This method keeps it juicy and tender. Preventing Potato Overcooking To avoid mushy potatoes, choose medium russet potatoes. Dice them into uniform pieces to ensure they cook evenly. Layer them at the bottom of the crockpot. This method helps them cook just right, soaking up all the delicious flavors without turning to mush. Cooking on low for 6-8 hours or high for 3-4 hours will yield the best results. Serving Suggestions with Garnishes For a fun touch, serve this dish in bowls. Top each serving with shredded cheddar cheese and a dollop of sour cream. Add chopped green onions for a pop of color. You can also sprinkle some paprika on top for an extra flair. This makes your meal look as good as it tastes! Suggested Side Dishes Pair this loaded bake with a simple salad or steamed veggies. A fresh garden salad with a light dressing complements the rich flavors of the dish. You could also serve crusty bread on the side for dipping. This adds a nice contrast to the meal. Recommended Crockpot Size A 6-quart crockpot works best for this recipe. It has enough space for the steak, potatoes, and broth. This size allows for even cooking without crowding the ingredients. If you have a smaller model, you may need to adjust the recipe. Extra Utensils for Searing Use a heavy skillet for searing the steak. A cast-iron skillet gives great heat retention. This ensures a nice brown crust on the steak. Have a spatula ready for flipping the meat. You will also need measuring cups and spoons for easy prep. {{image_2}} You can switch up the protein in your loaded bake. If you want chicken, use diced chicken breast. Cook it in the same way as the steak. It will be just as tasty! Pork is another great choice. Use pork loin or tenderloin for a different flavor. For a plant-based option, try using tofu or tempeh. Both provide protein and soak up flavors well. You can also use chickpeas for a unique twist. Just make sure to adjust cooking times as needed. Want to kick it up a notch? Add hot sauce or BBQ sauce. This will bring a nice kick to your dish. You can also mix in a few tablespoons of your favorite sauce while cooking. Adding vegetables can boost nutrition and flavor. Try adding bell peppers, carrots, or even corn. They will blend well with the potatoes and steak. Just chop them up and layer them in the crockpot with the other ingredients. Cheese is key in this dish! Cheddar is classic, but feel free to explore. You can use Monterey Jack for a milder taste. Pepper Jack adds a spicy twist. If you prefer vegan cheese, there are many options out there. Look for nut-based or soy-based cheeses. They melt well and can add creaminess. Just make sure to add it in the last 30 minutes of cooking for the best results. For the full recipe, check out the detailed instructions above! To keep your leftover Crockpot Loaded Steak and Potato Bake fresh, store it right. First, let it cool to room temperature. Then, place the dish in an airtight container. This will help keep moisture in and odors out. You can also divide the leftovers into smaller containers for easy meals later. Use glass or BPA-free plastic containers. Glass is great for reheating since it can go from fridge to microwave. If you use plastic, make sure it is made for food storage. Label each container with the date to track freshness. To freeze your dish, first cool it completely. Then, transfer it to a freezer-safe container. Make sure to leave some space at the top, as food expands when frozen. You can also wrap the dish in plastic wrap and then in foil for added protection. When you are ready to enjoy it, thaw the dish in your fridge overnight. If you need it faster, you can run the container under cold water. Reheat in the microwave or oven until it is hot all the way through. Stir it well during reheating to make sure the heat spreads evenly. In the fridge, your dish will last about 3 to 4 days. Make sure to eat it before then for the best taste. Check for changes in smell or color. If the dish looks dry or has a strange odor, it is best to throw it out. Always trust your senses; if it seems off, don't eat it. The cooking time varies based on your crockpot setting. If you cook on low, it takes about 6-8 hours. If you choose high, it only takes about 3-4 hours. Just check the potatoes for tenderness toward the end. They should be soft when pricked with a fork. Yes, you can prepare this dish in advance. Start by cutting the steak and potatoes. Season the steak and place everything in the crockpot. Cover it and keep it in the fridge overnight. In the morning, just plug in the crockpot, and you’re set for dinner! You can use chicken broth or vegetable broth as a substitute. Both options work well and add flavor. If you want a richer taste, use homemade broth. Just make sure it complements your other ingredients. To find the complete Crockpot Loaded Steak and Potato Bake recipe, check out my website. You will find all the details you need to create this tasty dish. In this blog post, we covered how to make a delicious Crockpot Loaded Steak and Potato Bake. You learned about key ingredients, from steak choices to essential seasonings. We discussed step-by-step cooking instructions and shared helpful tips for perfect results. You now have variations to try and storage tips to keep leftovers fresh. Embrace your creativity in the kitchen. Experiment with flavors and textures. This dish is not just easy but also fun to make. Enjoy your cooking adventure!

Crockpot Loaded Steak and Potato Bake Easy Dinner Delight

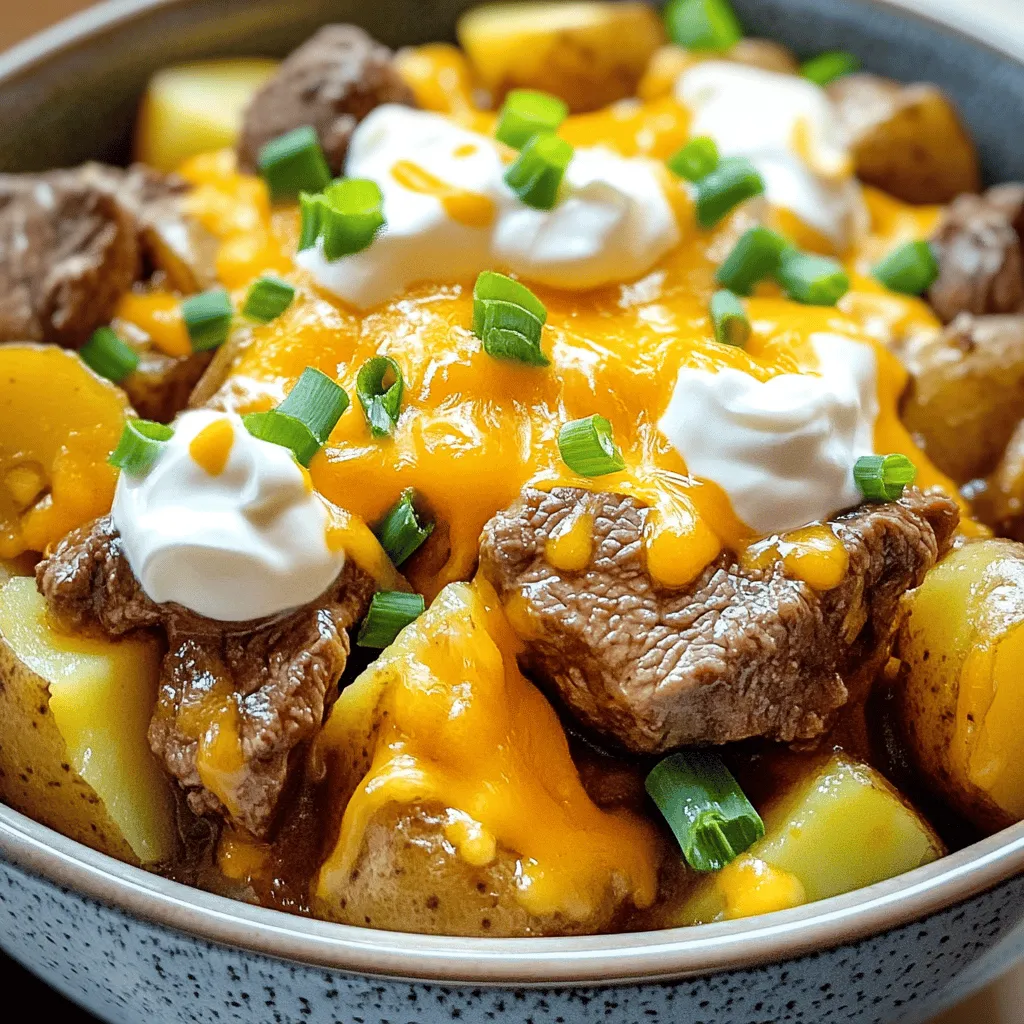
Looking for an easy dinner that packs a punch? You’ve come to the right place! My Crockpot Loaded Steak and

- 4 large bell peppers (any color) - 1 lb ground turkey - 1 cup cooked quinoa - 1 can (15 oz) black beans, rinsed and drained - 1 cup corn kernels (fresh or frozen) - 1 small onion, finely chopped - 2 cloves garlic, minced - 1 teaspoon cumin - 1 teaspoon chili powder - 1 teaspoon smoked paprika - Salt and pepper to taste - 1 cup shredded cheese (cheddar or Monterey Jack) - Fresh cilantro, chopped (for garnish) To make these stuffed bell peppers shine, you need fresh and colorful ingredients. Start with bell peppers. You can choose red, green, yellow, or orange. Each adds its unique taste and look. Ground turkey gives a lean protein option. It cooks quickly and absorbs flavors well. Quinoa is a fantastic grain to use. It adds texture and a nutty flavor. Black beans add protein and fiber, making the dish more filling. Sweet corn is a fun addition, giving a pop of sweetness. Onion and garlic are key for flavor. They create a lovely base for your filling. The spices—cumin, chili powder, and smoked paprika—bring warmth and depth. Salt and pepper are essential for seasoning. Finally, cheese makes everything better. It melts beautifully on top of your peppers. Fresh cilantro adds a burst of freshness at the end. For the full recipe, refer to the details provided earlier. Enjoy creating a colorful, tasty meal! 1. Preheat your oven to 375°F (190°C). This helps cook the peppers evenly. 2. Cut the tops off the bell peppers. Remove the seeds and membranes gently. Place them upright in a baking dish. 3. Heat a tablespoon of oil in a large skillet over medium heat. Sauté the chopped onion for 3-4 minutes. It should look soft and clear. Now, add the minced garlic and cook for one more minute. 4. Add 1 lb of ground turkey to the skillet. Season with 1 teaspoon of cumin, 1 teaspoon of chili powder, 1 teaspoon of smoked paprika, salt, and pepper. Cook until the turkey is browned, about 6-8 minutes. 1. In the skillet, stir in 1 cup of cooked quinoa, 1 can of black beans, and 1 cup of corn. Mix well and heat everything for another 2-3 minutes. 2. Remove the skillet from the heat. Stir in 1/2 cup of shredded cheese until it melts and combines well. 1. Stuff each bell pepper generously with the turkey and quinoa mixture. Top each stuffed pepper with the remaining cheese. 2. Cover the baking dish with foil. Bake in the preheated oven for 25 minutes. After that, take off the foil and bake for another 10-15 minutes. Look for bubbly and golden cheese. 3. Once they are done, take the peppers out of the oven. Let them cool for a few minutes. Garnish with fresh cilantro before serving. For the complete recipe, see the [Full Recipe]. To make your stuffed bell peppers burst with flavor, use fresh herbs like parsley or cilantro. Both add brightness and freshness. You can also sprinkle some oregano for an earthy touch. For perfect stuffing consistency, blend your ingredients well. Mix the ground turkey with quinoa, beans, and corn until they are evenly combined. This helps each bite taste great. You can cook stuffed peppers in several ways. Try using an Instant Pot for a quick meal. Set it to high pressure for about 10 minutes. If you like grilling, stuff the peppers and wrap them in foil. Grill them over medium heat for about 25 minutes. Remember, different peppers cook at different speeds. For smaller peppers, reduce the cooking time by 5-10 minutes. Serve your stuffed peppers with a side salad for a fresh crunch. A simple green salad pairs well. You can also add rice or bread to soak up any sauce. For garnish, sprinkle fresh cilantro or a dollop of sour cream on top. This adds color and flavor to your dish. You can find the full recipe here: [Full Recipe]. {{image_2}} You can easily change the meat in this recipe. If you prefer, swap ground turkey for chicken or beef. Both options will give you a tasty stuffed pepper. For a vegetarian choice, try using lentils or mushrooms. Both add flavor and texture. Lentils are rich in protein, while mushrooms create a hearty and satisfying bite. Adding different vegetables can change the whole dish. Try diced tomatoes, zucchini, or spinach for added nutrition. You can also mix in grains like brown rice or farro for a unique twist. If you like heat, top your peppers with jalapeños or a spicy salsa. For a milder version, stick with fresh herbs or a light drizzle of olive oil. Cheese can change the flavor of your stuffed peppers. Use cheddar, mozzarella, or Monterey Jack for a classic taste. If you want something different, try feta or goat cheese for a tangy touch. For those avoiding dairy, there are many dairy-free cheese options. Look for brands that melt well to keep your pepper gooey and delicious. For the complete recipe, check out the [Full Recipe]. To keep your stuffed peppers fresh, follow these steps. Allow the peppers to cool completely after baking. Then, place them in an airtight container. Store the container in the fridge. This method helps maintain moisture and flavor. Make sure to consume leftovers within 3 to 4 days for the best taste. Freezing stuffed peppers is easy and great for future meals. First, let the cooked peppers cool. Wrap each pepper tightly in plastic wrap. Place wrapped peppers in a freezer-safe bag or container. This method prevents freezer burn. You can freeze them for up to 3 months. When ready to eat, thaw them overnight in the fridge. Reheat in the oven at 350°F (175°C) for about 20-25 minutes. This keeps the peppers warm and tasty. Stuffed bell peppers last about 3 to 4 days in the fridge. After that, they may lose their flavor or texture. If you notice any signs of spoilage, it’s best to toss them. Always check for any off smells or unusual textures before eating. Enjoy your stuffed peppers while they’re fresh! For the full recipe, check out the link above. How long does it take to bake stuffed bell peppers? It takes about 35 to 40 minutes to bake stuffed bell peppers. First, you cover them with foil for 25 minutes. Then, you remove the foil and bake for another 10 to 15 minutes. This helps the cheese melt perfectly. Can I make stuffed peppers ahead of time? Yes, you can make stuffed peppers ahead. Prepare them, then store in the fridge. Bake them when you are ready to eat. They taste great fresh or from the fridge. What can I substitute for quinoa in the recipe? You can use rice, couscous, or even barley. These grains add texture and flavor. Just ensure they are cooked before mixing with the turkey. Are stuffed peppers healthy? Stuffed peppers can be quite healthy. They are low in calories and rich in nutrients. Ground turkey is leaner than beef, and you add veggies, too. It’s a balanced meal. What are the best bell pepper colors to use? All colors of bell peppers work well. Red, yellow, and orange are sweeter. Green ones are a bit more bitter. Choose what you like best for taste and color. How do I know when ground turkey is cooked? Ground turkey is cooked when it reaches 165°F (74°C). It should be brown with no pink spots. Use a meat thermometer for the best results. Can I eat the bell pepper skin? Yes, you can eat the bell pepper skin. It adds crunch and nutrients. Make sure to wash them well before cooking. Stuffed bell peppers are easy to make and delicious. You learned the right ingredients and steps. You can enhance flavors and explore fun variations. The tips on storing and reheating leftovers ensure nothing goes to waste. Try these ideas in your kitchen. Experiment with different fillings and cooking methods. Serve them to friends or family for a tasty meal. Enjoy the process and the results. You will impress everyone with your stuffed peppers!

Stuffed Bell Peppers with Ground Turkey Delight

Looking for a tasty dinner idea? Stuffed Bell Peppers with Ground Turkey Delight is your answer! These colorful, healthy peppers

To make this creamy tomato basil soup, you need: - 4 cups ripe tomatoes, chopped - 1 medium onion, chopped - 3 cloves garlic, minced - 2 cups vegetable broth - 1 cup fresh basil leaves, packed - 1 cup heavy cream (or coconut cream for a vegan option) - 2 tablespoons olive oil - 1 teaspoon sugar - Salt and pepper to taste - Croutons and extra basil for garnish If you lack fresh tomatoes, use canned tomatoes. Choose whole or diced tomatoes. For a lighter soup, swap heavy cream with milk or a plant-based milk. If you prefer a vegan option, use coconut cream instead of heavy cream. You can also replace olive oil with avocado oil. If you're short on basil, parsley adds a nice touch, too. Select tomatoes that are firm and bright in color. Ripe tomatoes should feel slightly soft. For onions, pick ones with smooth skin and no soft spots. Garlic should be plump and firm. When choosing basil, look for vibrant green leaves without brown spots. Fresh herbs enhance flavor, so always choose the best quality. For the full recipe, you can refer to the section above. To start, gather all your ingredients. You will need ripe tomatoes, onion, garlic, vegetable broth, fresh basil, heavy cream, olive oil, sugar, salt, and pepper. Chop the tomatoes, onion, and garlic. This step makes cooking easier and faster. Heat olive oil in a large pot over medium heat. Add the chopped onion and cook for about 5 minutes. The onions should look clear. Then, add the minced garlic and cook for another minute. It will smell great! Next, add the chopped tomatoes and sugar. Cook for 10 to 12 minutes, stirring now and then. The tomatoes should soften and release juice. Pour in the vegetable broth and bring it to a boil. Once it boils, lower the heat and let it simmer for 15 minutes. This helps the flavors mix well. After simmering, remove the pot from heat and stir in the fresh basil. To blend the soup, you can use an immersion blender. This tool makes it easy to blend right in the pot. If you don’t have one, carefully transfer the soup in batches to a countertop blender. Be cautious, as the soup is hot. Blend until smooth, then return it to the pot on low heat. Stir in the heavy cream until warmed, but do not let it boil. Finally, season with salt and pepper to taste. Enjoy your creamy tomato basil delight! For the complete instructions, check the Full Recipe. To make your soup rich and creamy, choose the right cream. Heavy cream works best. If you prefer a vegan option, coconut cream is a great choice. Blend the soup well after cooking. This step creates a smooth texture. Always stir in the cream on low heat. This keeps the soup warm without boiling. Boiling can cause the cream to separate. Taste is key. You can add more garlic or onion for a bolder flavor. A pinch of sugar balances the acidity from tomatoes. Fresh herbs like thyme or oregano can add depth. If you like spice, try adding red pepper flakes. Always taste the soup before serving. Adjust salt and pepper to your liking. Serve your creamy tomato basil soup hot. Garnish with croutons for crunch. A sprinkle of fresh basil adds flavor and color. For a full meal, pair it with a grilled cheese sandwich. A light salad also works well. You can even serve it in a bread bowl for a fun twist. Check out the Full Recipe for more ideas! {{image_2}} To make a vegan version of creamy tomato basil soup, swap the heavy cream for coconut cream. This change keeps the rich texture and adds a subtle sweetness. Use vegetable broth instead of chicken broth for depth. If you want to boost the flavor, try adding a splash of lemon juice. Fresh basil remains essential for the vibrant taste. This version is just as creamy and delicious! Good news! The classic creamy tomato basil soup is gluten-free. Just be sure to check your broth and any added toppings like croutons. You can make your own gluten-free croutons easily. Just use gluten-free bread, season it, and bake until crispy. This keeps your soup safe for those avoiding gluten. Want to get creative? You can add roasted red peppers for a smoky flavor. A pinch of red pepper flakes can give it a nice kick. For a touch of sweetness, toss in some diced carrots while cooking. If you like a fresh twist, add a swirl of pesto before serving. These options can take your soup to a new level of flavor. For the full recipe, check out the Creamy Tomato Basil Bliss Soup recipe! After enjoying your creamy tomato basil soup, you may have some left. To store it, let the soup cool down. Then, pour it into an airtight container. Make sure to leave some space at the top, as the soup can expand when frozen. Store it in the fridge if you plan to eat it within three days. For longer storage, freezing is best. If you want to keep your soup for more than a few days, you can freeze it. Use freezer-safe containers or bags. Pour the cooled soup into the containers, ensuring no air is left. You can freeze the soup for up to three months. When ready to enjoy, just take it out of the freezer and let it thaw in the fridge overnight. To reheat your creamy tomato basil soup, do it gently. Pour the soup into a pot and heat it on low. Stir often to prevent sticking. If it seems too thick, add a splash of vegetable broth or water. You want it warm, not boiling, to keep the flavors fresh. For an extra touch, garnish with croutons and more basil before serving. Enjoy every spoonful! Yes, you can use canned tomatoes. They make a great base for your soup. Canned tomatoes are often picked at peak ripeness. This means they can taste just as good as fresh ones. I recommend using whole or diced canned tomatoes. Just drain some extra liquid if needed. You can still enjoy rich flavors in your creamy tomato basil soup. Creamy tomato basil soup lasts about 3 to 4 days when stored in the fridge. Make sure to keep it in an airtight container. If you want to enjoy it later, you can freeze it. It will stay good in the freezer for up to 3 months. Just remember to thaw it in the fridge overnight before reheating. You can serve many tasty items with creamy tomato basil soup. Here are some ideas: - Grilled cheese sandwiches - Fresh crusty bread - A green salad - Garlic bread - Croutons on top of the soup These pairings enhance the meal and add variety. Enjoy exploring different combinations with your creamy tomato basil soup! This blog post covered how to make creamy tomato basil soup. You learned about key ingredients and their substitutes. I shared tips for choosing fresh produce and how to prepare your dish. We discussed cooking methods, blending techniques, and tips for a creamy texture. I provided variations for vegan and gluten-free options. Finally, I offered storage tips and answered common questions. Enjoy creating your delicious soup with these insights!

Creamy Tomato Basil Soup Delightfully Simple Recipe

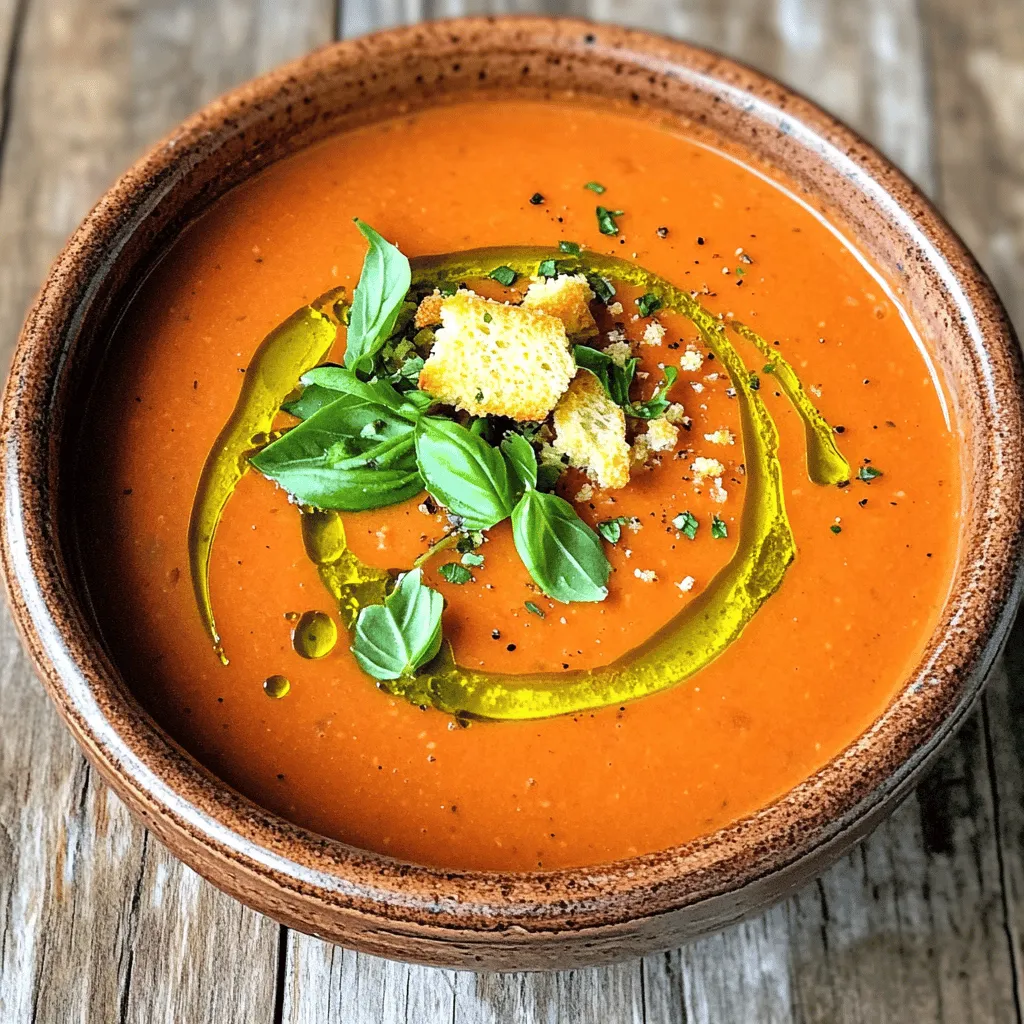
If you love warm, comforting flavors, you’ll adore this creamy tomato basil soup. This delightfully simple recipe combines fresh tomatoes

To make a tasty chocolate banana smoothie, gather these ingredients: - 2 ripe bananas - 2 tablespoons unsweetened cocoa powder - 1 tablespoon almond butter (or any nut butter of choice) - 1 cup unsweetened almond milk (or milk of your choice) - 1 tablespoon honey or maple syrup (adjust for sweetness) - 1/2 teaspoon vanilla extract - A pinch of sea salt - Ice cubes (optional, for a thicker smoothie) When measuring ingredients, use dry measuring cups for solids like cocoa powder. For liquids, a liquid measuring cup works best. Always level off dry ingredients with a straight edge to avoid too much or too little. For sticky ingredients like almond butter, spray the measuring cup with a little oil. This helps it slide right out! You can swap some ingredients for what you have! If you don’t have almond butter, peanut butter works great too. You can use any milk you like, such as soy or oat milk. If you want a vegan option, choose maple syrup instead of honey. For a richer flavor, try adding a dash of cinnamon or a spoonful of your favorite protein powder. This recipe is flexible, so feel free to get creative! Start by peeling the bananas. Break them into small chunks. This helps the blender mix them easily. Next, gather all your ingredients. You will need cocoa powder, almond butter, almond milk, honey or maple syrup, vanilla extract, and sea salt. Place the banana chunks into the blender first. Add the cocoa powder, almond butter, and almond milk. Then, include honey or maple syrup, vanilla extract, and sea salt. If you want a thicker smoothie, toss in some ice cubes. Blend on high speed for 1-2 minutes. Stop to scrape down the sides if needed. Blend until smooth and creamy. Taste the smoothie. If you want it sweeter, add more honey or syrup and blend again. Pour your smoothie into tall glasses. For a fun touch, top with cocoa nibs or a banana slice on the rim. Enjoy your Chocolate Banana Smoothie immediately for the best taste. This delightful treat is perfect for breakfast or a snack! For the full details, refer to the Full Recipe. To get that smooth and creamy texture, use ripe bananas. They blend well and add natural sweetness. If you want it thicker, add ice or use less milk. Blend on high for one to two minutes. Stop and scrape the sides of the blender to mix everything well. Taste your smoothie before serving. If you want it sweeter, add more honey or maple syrup. You can also try adding a splash of vanilla for added flavor. Remember, everyone has different tastes, so adjust to your liking! Don’t skip the sea salt; it enhances the chocolate flavor. Avoid adding too much cocoa powder, or it may taste bitter. If the smoothie is too thick, don’t hesitate to add more milk. Lastly, blend it long enough to break down all lumps. For the full recipe, follow the steps closely to avoid any mishaps. {{image_2}} You can easily add nutritional boosters to your smoothie for extra health. Consider adding protein powder to support muscle growth. A scoop of vanilla or chocolate protein can enhance the flavor. You can also try chia seeds for fiber and omega-3 fatty acids. Just one tablespoon gives you a nice nutrient boost. Flax seeds work well too, adding healthy fat and fiber. Mixing in other fruits can create fun flavor combinations. Try adding a handful of strawberries or blueberries for a twist. These fruits add a burst of color and taste. You could also use peanut butter instead of almond butter for a richer flavor. Vanilla extract adds warmth, while a dash of cinnamon gives a cozy touch. Don't hesitate to experiment with these options! If you prefer a dairy-free option, use plant-based milk. Almond milk, coconut milk, or oat milk are great choices. They blend well and keep the smoothie creamy. For a vegan option, replace honey with maple syrup or agave nectar. This keeps it sweet without any animal products. You can enjoy a delicious smoothie that fits your diet. You can store your chocolate banana smoothie in the fridge. Use a sealed container. It stays fresh for up to 24 hours. When you’re ready to drink it, give it a quick shake. This mixes any settled ingredients. Freezing is a great option too! If you want to save some smoothie for later, pour it into ice cube trays. Once frozen, pop the cubes into a bag. They last for about three months in the freezer. You can blend a few cubes with fresh milk for a quick treat. To keep your smoothie fresh, use ripe bananas. They add natural sweetness and creaminess. Always use fresh ingredients for the best taste. If you notice any changes in smell or color, it’s best to toss it. Enjoy your smoothie right after making it for the best flavor, as noted in the Full Recipe. A chocolate banana smoothie is tasty and packed with good stuff. The ripe bananas give you potassium, which helps your heart and muscles. Cocoa powder adds antioxidants, which protect your body. Almond butter gives you healthy fats and protein, helping you feel full. This smoothie is a great way to start your day or have as a snack. Yes, you can make this smoothie ahead of time. Just blend everything and store it in the fridge. It’s best to drink it within a day. If it thickens, stir it before drinking. Keep in mind that the flavor is best fresh, so enjoy it soon after making. To thicken your smoothie without ice, try adding a banana or some nut butter. You can also use yogurt, which adds creaminess. Another option is to blend in oats or chia seeds. These ingredients will give you a nice thick texture without watering it down. Absolutely! This recipe is great for kids. They will love the sweet taste of bananas and chocolate. You can also reduce the sweetener if you want it less sugary. It’s a fun way to give them healthy nutrients while enjoying a treat. Yes, frozen bananas work well in this recipe. They make the smoothie extra cold and creamy. Just toss them right into the blender. If you use frozen bananas, you might not need extra ice. This gives you a delicious smoothie without any extra hassle. For the full recipe, check out the Choco-Banana Bliss Smoothie! This guide covered how to make a chocolate banana smoothie from start to finish. You learned about the key ingredients, how to prepare them, and tips to perfect your blend. I shared helpful tricks for fixing common mistakes and suggested fun variations and storage tips. With this knowledge, you can make a delicious smoothie that fits your taste and needs. Dive in and enjoy blending!

Chocolate Banana Smoothie Delightful and Creamy Treat

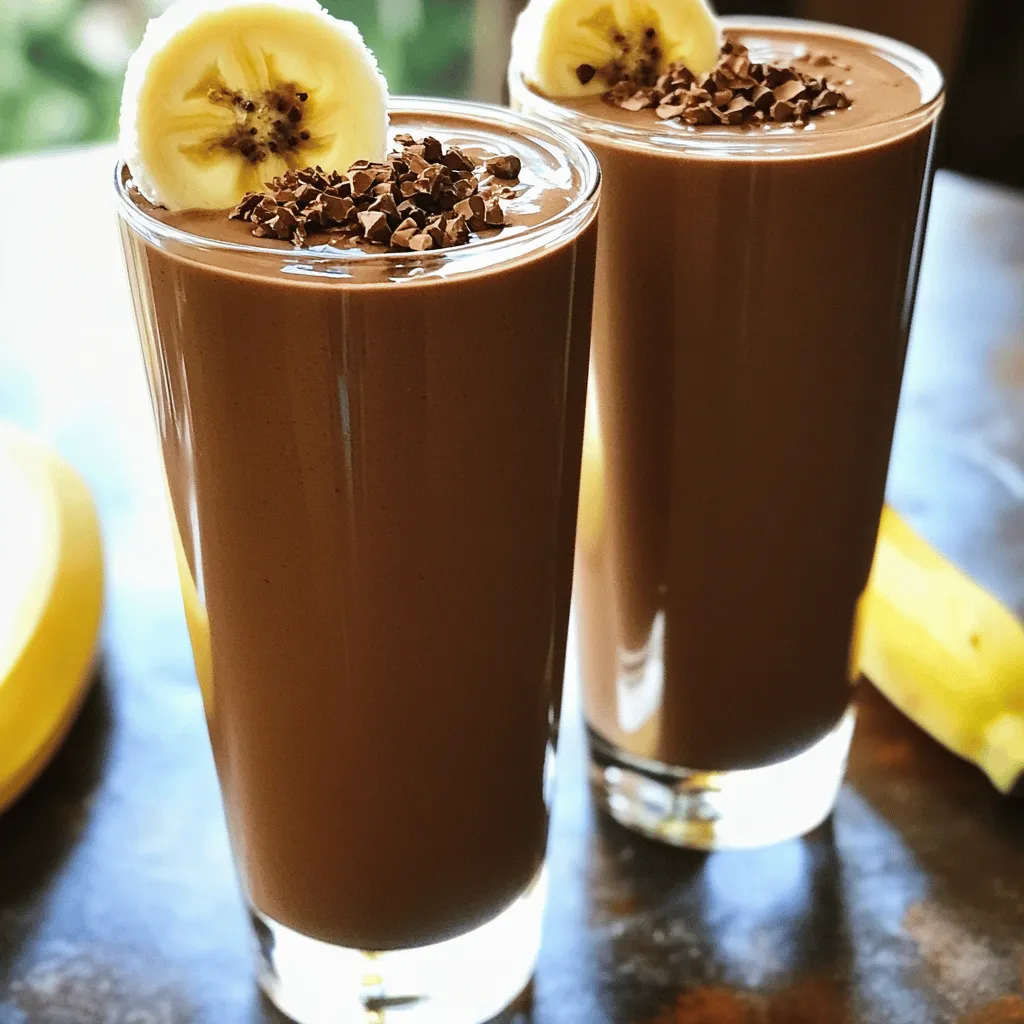
Craving a sweet treat that’s both healthy and satisfying? You’re in the right place! The Chocolate Banana Smoothie is your

The main ingredients in my Zucchini Noodle Pad Thai create a fresh and tasty dish. Here’s what you need: - 2 medium zucchinis, spiralized - 1 cup firm tofu, cubed - 1 cup bean sprouts - 2 eggs, lightly beaten - 1 red bell pepper, thinly sliced - 3 green onions, chopped - 3 cloves garlic, minced - 2 tablespoons tamari or soy sauce - 1 tablespoon lime juice - 1 tablespoon peanut butter - 1 teaspoon sesame oil - 2 tablespoons crushed peanuts (for garnish) - Fresh cilantro for garnish - Salt and pepper to taste Each ingredient plays a key role in building flavor. Zucchini noodles stand in for pasta, making this dish light and healthy. Tofu adds protein, while the bell pepper and bean sprouts offer crunch and freshness. You can swap out some ingredients if you want. If you don’t like tofu, chicken or shrimp work well. For a nut-free option, leave out the peanut butter and replace it with sunflower seed butter. You can use coconut aminos instead of tamari or soy sauce for a gluten-free choice. If you want more veggies, add carrots or snap peas. These changes keep the dish fresh and fun. This dish is not just tasty; it is also full of nutrients. Here are some benefits: - Zucchini is low in calories and high in fiber. It helps digestion and keeps you full. - Tofu is a great source of protein and contains iron and calcium. - Bean sprouts are rich in vitamins and minerals. They are low in calories and add crunch. - Eggs are packed with protein and healthy fats. They keep you energized. - Peanut butter provides healthy fats and protein, which help with satiety. By using these ingredients, you create a dish that is both nourishing and satisfying. For the full recipe, check out my Zucchini Noodle Pad Thai. To start, take your zucchinis and spiralize them into thin noodles. This tool makes it easy to create fun shapes. Set the zucchini noodles aside for later. Make sure to use fresh zucchinis. Fresh ones have a crisp taste that works well in this dish. Next, heat sesame oil in a non-stick skillet over medium heat. Add the cubed tofu to the hot skillet. Cook it until golden brown, about 5 to 7 minutes. This gives the tofu a nice texture. When the tofu is ready, remove it from the skillet and set it aside. In the same skillet, add minced garlic and sliced red bell pepper. Sauté these for 2 to 3 minutes. You want the bell pepper to be tender. Then, push the veggies to one side of the skillet. Pour the beaten eggs into the empty space. Scramble the eggs until they just set. Mix everything together after that. Now, add the zucchini noodles and sautéed tofu back into the skillet. Toss all the ingredients together. This helps mix the flavors. In a small bowl, mix tamari, lime juice, and peanut butter until smooth. Pour this sauce over the noodle mixture. Stir well to coat everything evenly. Finally, add the bean sprouts and chopped green onions. Toss gently for another 1 to 2 minutes. This warms everything through. Taste and season with salt and pepper as needed. Remove from heat and serve hot. For a garnish, add crushed peanuts and fresh cilantro on top. This dish is so vibrant and tasty! For the full recipe, check out the details above. To make zucchini noodles, you need a spiralizer. Choose firm zucchinis for best results. Cut off the ends before spiralizing. Start slow, and keep an even pressure. This ensures long, beautiful noodles. If you don't have a spiralizer, a vegetable peeler works too. Just peel thin strips to mimic noodles. To boost flavor, use fresh ingredients. Fresh garlic adds depth. Lime juice brightens the dish. For heat, add red pepper flakes. You can also toss in fresh herbs like basil or mint. Mixing different textures can elevate your dish. Try adding crunchy veggies or nuts, such as crushed peanuts. This dish is flexible! For a vegan option, skip the eggs or use chickpea flour. If you need gluten-free, use tamari instead of soy sauce. You can also replace tofu with tempeh or seitan. Adjust the vegetables to fit your taste. Feel free to add your favorites! For the full recipe, check out the Zucchini Noodle Pad Thai 🥒 section. {{image_2}} You can make Zucchini Noodle Pad Thai vegetarian or vegan easily. For a vegetarian twist, use eggs as in the recipe. If you prefer vegan, skip the eggs and add more tofu or veggies. You can also try chickpeas for added protein. They add great texture and taste. If you want a meatier dish, add cooked chicken or shrimp. Both options pair well with the zucchini noodles. For chicken, use thinly sliced breast. For shrimp, go for medium or large shrimp, peeled and deveined. Sauté them after cooking the tofu. You can also mix and match proteins for more flavor. To make this dish gluten-free, choose tamari instead of soy sauce. Tamari is a great substitute that keeps the flavor. For low-carb options, stick with zucchini noodles and skip any added sugars. You can also add more low-carb veggies, like bell peppers and mushrooms, to make the dish even more filling. For the full recipe, refer to the ingredients and instructions above. To keep your Zucchini Noodle Pad Thai fresh, store it in an airtight container. This way, it stays moist and tasty. I like to let it cool down first before sealing it. Leftovers will last in the fridge for up to three days. If you want to keep it longer, freezing is a great option. When you're ready to enjoy your leftovers, reheating is simple. I suggest using a skillet for the best results. Heat a little oil over medium heat. Add your leftovers and stir until warm. This method keeps the noodles from getting mushy. You can also use the microwave if you're in a hurry. Just heat in short bursts, stirring in between. Freezing Zucchini Noodle Pad Thai is easy but needs some care. First, cool the dish completely. Then, portion it into freezer-safe bags or containers. Remove as much air as possible to prevent freezer burn. This dish can be frozen for up to a month. When you're ready to eat, thaw it in the fridge overnight. Then, reheat as mentioned above. Enjoy your meal any time with these simple storage tips! Zucchini noodles, or zoodles, are low in carbs and calories. They offer a great way to enjoy a classic dish like Pad Thai without the heavy pasta. They provide vitamins A and C, along with fiber. This means you can fill up without feeling weighed down. Plus, they add a fresh taste and bright color to your meal. Yes, you can prepare some parts of Zucchini Noodle Pad Thai ahead of time. Spiralize the zucchini and store it in the fridge for up to 2 days. Cook the tofu and veggies, then keep them in a container. When you are ready to eat, just heat everything and add the sauce. This makes it quick to enjoy on busy nights. To prevent soggy noodles, salt them before cooking. Sprinkle salt on the spiralized zucchini and let it sit for about 10 minutes. This draws out excess moisture. After that, pat them dry with a paper towel. Cook them quickly over high heat, mixing them in with other ingredients. This keeps them firm and crunchy in your dish. For the full recipe, check out the Zucchini Noodle Pad Thai! Zucchini noodle Pad Thai is a fun and healthy twist on the classic dish. We've covered the key ingredients and their nutrition, plus step-by-step cooking tips. You can adjust this meal based on your taste and diet needs. Remember, proper storage helps keep leftovers fresh, while reheating keeps flavors vibrant. You can enjoy many variations, from vegetarian to gluten-free. Explore these options to find your favorite version. Enjoying healthy meals can be easy and delicious!

Zucchini Noodle Pad Thai Flavorful and Healthy Dish

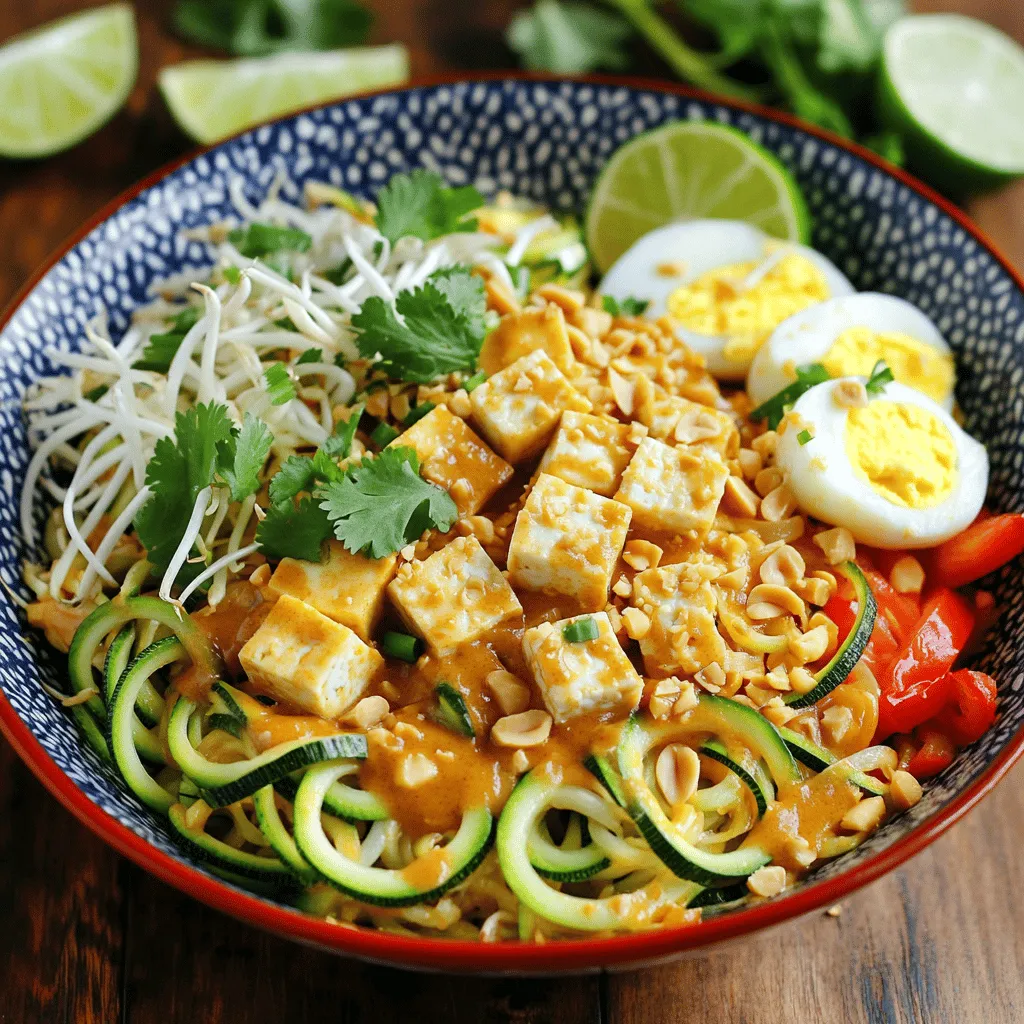
If you’re craving a delicious dish that’s both healthy and quick to make, try Zucchini Noodle Pad Thai! This flavorful

- 1 lb (450g) chicken breast, thinly sliced - 2 tablespoons honey - 3 tablespoons soy sauce - 3 cloves garlic, minced - 1 tablespoon fresh ginger, grated - 1 bell pepper (red or yellow), sliced - 1 cup broccoli florets - 1 cup snap peas - 2 tablespoons vegetable oil - Salt and pepper to taste - 1 tablespoon sesame seeds (for garnish) - Green onions, chopped (for garnish) To make the best honey garlic chicken stir-fry, gather all these fresh and vibrant ingredients. The chicken breast is your main protein, and it cooks quickly and evenly. Honey adds a sweet touch, while the soy sauce brings depth and umami. Aromatics like garlic and ginger boost the flavor. Fresh vegetables keep the dish colorful and crunchy. I love using bell peppers, broccoli, and snap peas. They not only taste great but also add nutrition. Finally, garnishing with sesame seeds and green onions gives a nice finish to your stir-fry. For the full recipe, check out the detailed instructions to guide you through the cooking process. Enjoy cooking! Start by making a flavorful mix. In a medium bowl, combine honey, soy sauce, garlic, and ginger. This blend gives the chicken a sweet and savory taste. Next, add the sliced chicken. Make sure to coat each piece well in the marinade. Let it sit for at least 15 minutes. This step is key to infusing the chicken with flavor. Heat about two tablespoons of vegetable oil in a large skillet or wok. Make sure your pan is hot before adding the chicken. Remove the chicken from the marinade, but save the marinade for later. Place the chicken in the hot skillet. Stir-fry it for about 5 to 7 minutes. Look for a nice golden brown color. This shows the chicken is cooked and ready. Now it’s time to add some crunch! Toss in sliced bell pepper, broccoli florets, and snap peas. Stir-fry the mix for another 3 to 4 minutes. You want the veggies tender but still crisp. Then, pour in the reserved marinade. This will coat the chicken and veggies nicely. Let it cook for an extra 2 to 3 minutes. The sauce will thicken and bring everything together. Enjoy your honey garlic chicken stir-fry! For the full recipe, check the earlier section. For the best taste, marinate your chicken for at least 15 minutes. This time allows the chicken to soak up the sweet and savory mix of honey, soy sauce, garlic, and ginger. If you have more time, let it marinate for 30 minutes to an hour. This extra time deepens the flavors. When seasoning, remember to taste as you go. If you want more sweetness, add a touch more honey. For saltiness, sprinkle in a pinch of salt or extra soy sauce. This way, you can adjust the flavor to fit your taste. To stir-fry well, heat your skillet or wok until it’s hot. This helps the chicken sear quickly, sealing in juices. Add the chicken in a single layer, giving it space to cook evenly. Stir it often to avoid burning. When adding vegetables, be cautious not to overcook them. Keep them bright and crisp by cooking for just a few minutes. They should be tender but still have a nice snap. This keeps the dish fresh and vibrant. {{image_2}} You can switch up the protein in this dish. If you prefer shrimp, use 1 lb of large shrimp. Just peel and devein them before cooking. Shrimp cooks fast, so add them to the skillet for only 3-4 minutes. For a vegetarian option, try tofu. Press and cube 1 lb of firm tofu, then pan-fry until golden. If you like beef, switch to 1 lb of thinly sliced flank steak. Cook it for about 5-6 minutes until it’s brown. Each option brings its own taste and texture. Feel free to mix in different veggies! Instead of bell peppers, you can use zucchini or carrots. These add a nice crunch. If you don’t have broccoli, green beans or asparagus work too. Snap peas can be swapped for sugar snap peas or even sliced snow peas. The key is to pick veggies you enjoy. They should cook quickly and stay crisp. You can adjust the sauce to fit your taste. If you like it sweeter, add more honey. Start with an extra tablespoon and taste. For more saltiness, add a splash of soy sauce. If you want a kick, try adding red pepper flakes or sriracha. This dish is all about balance. Find what works best for you, and enjoy a meal that feels just right. For the complete recipe, check the Full Recipe section. To store your honey garlic chicken stir-fry, place leftovers in an airtight container. This helps keep the flavors fresh. You can also use plastic wrap if you don't have a container. The dish stays good in the fridge for about 3 to 4 days. Make sure to cool it down before sealing it. This step helps prevent moisture buildup, which can make it soggy. When you're ready to eat again, reheat the honey garlic chicken stir-fry in a skillet over medium heat. Stir it often to warm it evenly. You can also use the microwave, but cover it with a damp paper towel to keep it moist. This helps maintain the texture and flavor. Avoid cooking it too long, or the chicken may dry out. Enjoy your meal just like the first time! For the full recipe, check out the Honey Garlic Chicken Stir-Fry section above. Yes, you can prepare the honey garlic chicken stir-fry ahead of time. To save time on busy days, try these meal prep tips: - Marinate the Chicken: Marinate your chicken the night before. This allows the flavors to soak in well. - Chop Veggies: Slice your bell pepper, broccoli, and snap peas in advance. Store them in the fridge. - Cook and Store: You can cook the whole dish and store it in an airtight container. It lasts in the fridge for about 3-4 days. This way, you can heat it up when you’re ready to eat! You can easily make a vegetarian version of honey garlic stir-fry. Here are some ideas for plant-based ingredients: - Tofu: Use firm tofu as a protein substitute. Press it to remove water, then cube it. - Vegetables: Add more colorful veggies like carrots, zucchini, or mushrooms for texture and flavor. - Sauce: Keep the honey, or use maple syrup for a vegan option, and mix it with soy sauce, garlic, and ginger. This way, you can enjoy the same great taste in a plant-based meal! To make your meal complete, consider these side dish options: - Rice: Serve over steamed jasmine or brown rice. It soaks up the sauce nicely. - Noodles: Try it with soba or rice noodles for a different twist. - Salad: A fresh green salad or a simple cucumber salad can balance the meal. These sides enhance the dish and make it more satisfying! For the full recipe of honey garlic chicken stir-fry, check out the recipe section above. In this blog post, we explored how to make a tasty honey garlic chicken stir-fry. We covered the key ingredients, from chicken and fresh veggies to the delicious sauce. I shared step-by-step instructions and handy tips for flavor and cooking. You can easily swap proteins or veggies based on your taste. Remember, proper storage keeps leftovers fresh for your next meal. With a little practice, you can master this dish and impress anyone at your table. Enjoy your cooking journey!

Honey Garlic Chicken Stir-Fry Fast and Flavorful Meal

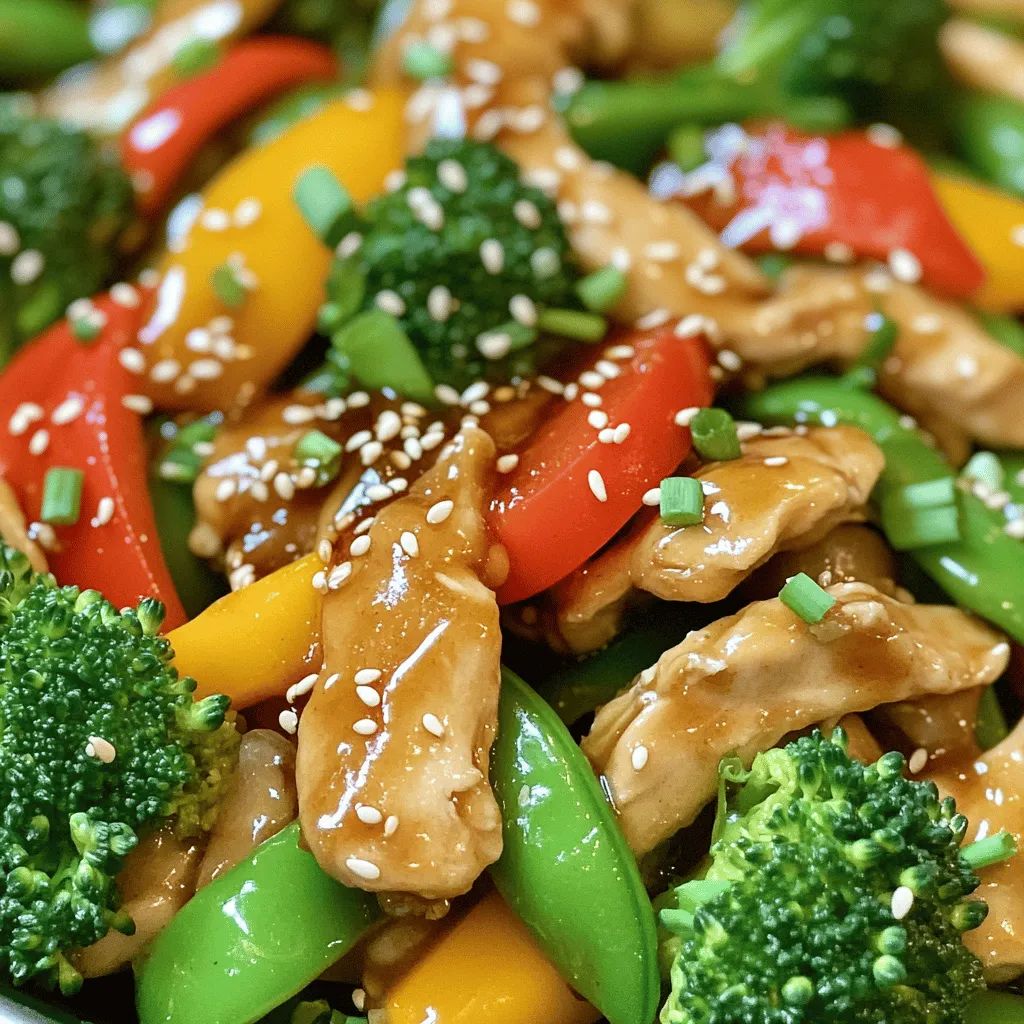
Are you ready to whip up a meal that’s quick, tasty, and a real crowd-pleaser? My Honey Garlic Chicken Stir-Fry

- 1 cup fresh spinach, chopped - 1 cup artichoke hearts, drained and chopped - 1 cup cream cheese, softened - 1/2 cup sour cream - 1/2 cup mayonnaise - 1 cup grated Parmesan cheese - 1/2 cup shredded mozzarella cheese - 2 cloves garlic, minced - 1/2 teaspoon onion powder - Salt and pepper to taste - Olive oil for greasing For this creamy spinach artichoke dip, I choose fresh and simple ingredients. The spinach adds a bright color and healthy touch. Artichokes bring a unique, tender bite. Cream cheese gives the dip its rich base. Sour cream and mayonnaise add extra creaminess and tang. You can use Greek yogurt instead of cream cheese for a lighter dip. For sour cream and mayonnaise, low-fat options work well without losing flavor. Want to spice it up? Add chopped jalapeños for a kick. If you love sun-dried tomatoes, toss some in for extra flavor. These small changes can make your dip unique and fun! For the full recipe, check out the cooking steps to create this delightful snack. - Preheat your oven to 350°F (175°C). Grease a baking dish with olive oil. - In a large bowl, mix the softened cream cheese, sour cream, and mayonnaise until smooth. This base makes the dip creamy and rich. - Next, fold in the chopped spinach and drained artichokes. This gives the dip texture and flavor. - Add the minced garlic, grated Parmesan cheese, and shredded mozzarella cheese to the mix. - Sprinkle in the onion powder, then season with salt and pepper to taste. Stir gently until everything is well combined. - Transfer the dip to your greased baking dish. Spread it evenly. - Bake for 25-30 minutes. You'll know it's done when the dip is bubbly and lightly golden on top. - Once baked, let it cool for a few minutes before serving. Enjoy with crispy chips or toasted bread. For the full recipe, check the earlier section. To get the right creamy consistency, start with softened cream cheese. This makes mixing easier. Mix the cream cheese, sour cream, and mayonnaise until smooth. Be careful not to overmix. Overmixing can make the dip too thin. Gently fold in the spinach and artichokes to keep it thick and creamy. Seasoning is key. Try adding garlic powder or a pinch of cayenne for a kick. Fresh herbs like parsley or basil can add a nice touch. Always use fresh spinach and artichokes for the best taste. Fresh ingredients make a big difference in flavor. For great accompaniments, use crispy tortilla chips or toasted baguette slices. You can also serve with fresh veggies like carrots and celery. To impress your guests, present the dip in its baking dish. Drizzle some olive oil on top and add a sprinkle of extra Parmesan. This simple touch makes it look gourmet. Enjoy with your friends! {{image_2}} You can easily make this dip healthier. For low-calorie swaps, use Greek yogurt instead of sour cream and mayonnaise. This change keeps the dip creamy while cutting calories. You can also use low-fat cream cheese for a lighter option. If you want a vegan alternative, try cashew cream or silken tofu. These substitutes add creaminess without dairy. Adding different types of cheese can make this dip even better. Try using feta for a tangy kick or pepper jack for some heat. You can also incorporate fresh herbs like basil or dill. These herbs add freshness and flavor. Just mix them in when you combine the other ingredients. For a Mediterranean-style twist, add chopped olives and feta cheese. This version gives a salty, briny flavor that pairs well with the spinach and artichokes. If you like spice, make a spicy version by mixing in buffalo sauce. This adds a kick that will please heat lovers. Each variation brings a new taste to this classic dip, making it fun to try! After enjoying your creamy spinach artichoke dip, store any leftovers in an airtight container. It’s best to refrigerate the dip within two hours of serving. This keeps it fresh and safe. Your dip can last up to four days in the fridge. Always check for any off smells or changes in texture before eating. To reheat the dip, use an oven or microwave. If using the oven, warm it at 350°F until hot, about 15 minutes. Stir it halfway to keep the texture smooth. In the microwave, heat in intervals of 30 seconds. Stir well after each interval. This helps avoid separation of ingredients. You want it creamy, not grainy! Yes, you can freeze this dip! To freeze, place it in a freezer-safe container. Make sure to leave some space at the top for expansion. It can stay fresh for about two months. When ready to eat, thaw it in the fridge overnight. Reheat as mentioned above. Enjoy your creamy spinach artichoke dip even after a long time! You can enjoy this dip with many tasty options. Here are a few ideas: - Tortilla chips - Sliced baguette - Pita chips - Fresh veggie sticks like carrots or celery - Crackers Each of these choices adds a different crunch and flavor. Tortilla chips bring a nice saltiness. Sliced baguette gives a soft, chewy bite. Fresh veggies add a crisp, healthy touch. Feel free to mix and match based on your taste! Yes, you can prep this dip in advance. Here's how: 1. Make the dip as directed in the Full Recipe. 2. Place the dip in a baking dish and cover it with plastic wrap. 3. Store it in the fridge for up to 24 hours. When you're ready to serve, bake it straight from the fridge. Just add a few extra minutes to the bake time. This makes it a perfect dish for busy days or parties! If you like some heat, there are easy ways to add spice: - Mix in chopped jalapeños or other hot peppers. - Add a dash of hot sauce to the creamy base. - Sprinkle some red pepper flakes into the mixture. Start with a little and taste as you go. You want it spicy but still balanced. These ideas let you create a dip that suits your heat level! This blog covered all you need to know about making a tasty Creamy Spinach Artichoke Dip. We explored the key ingredients, step-by-step instructions, and tips for better flavor and texture. You learned about easy substitutions and fun variations to suit your taste. Remember, great dips are all about using fresh ingredients. So whether you're serving it at a party or enjoying it at home, make it your own. Enjoy mixing, baking, and sharing this dip with friends and family!

Creamy Spinach Artichoke Dip Irresistible Party Snack

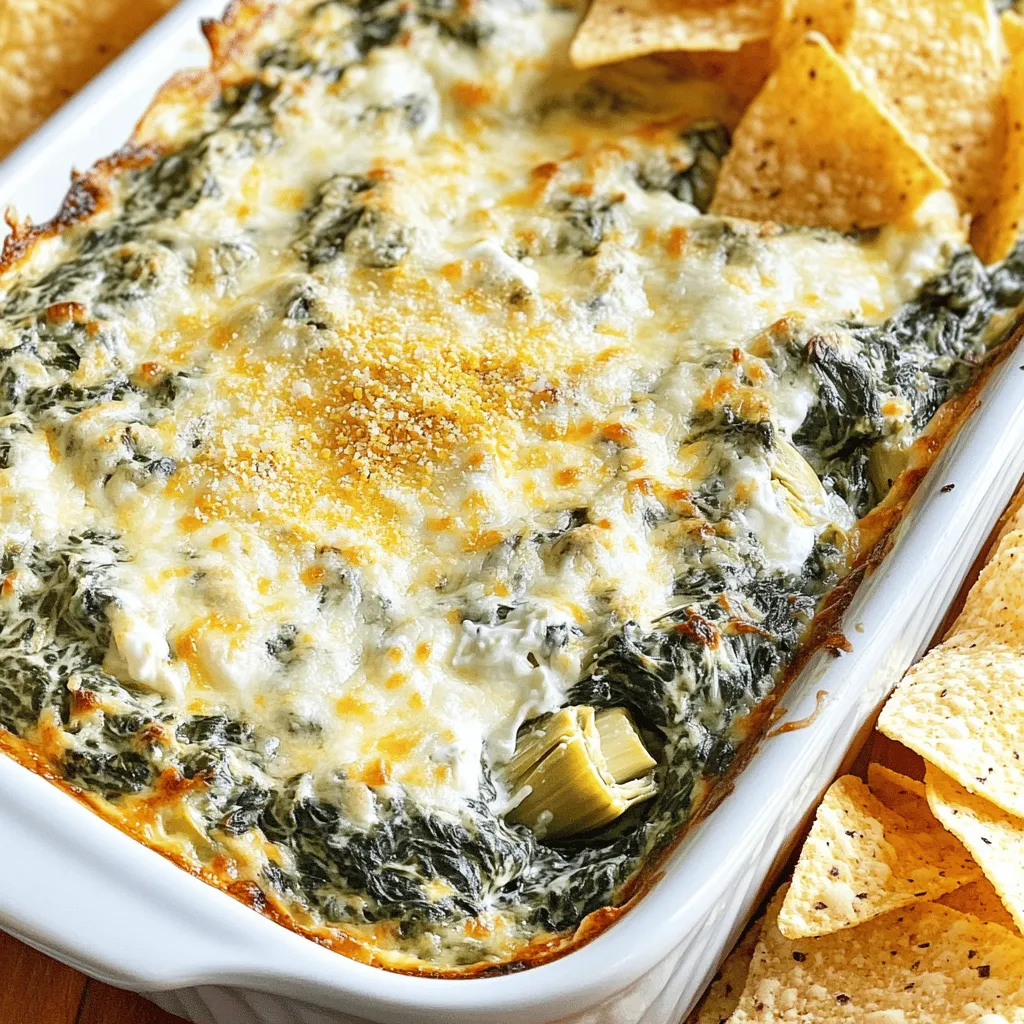
Looking for the perfect party snack? Look no further! My Creamy Spinach Artichoke Dip is a crowd-pleaser that will vanish

To create my tasty apple cinnamon overnight oats, you need these simple ingredients: - 1 cup rolled oats - 1 ½ cups almond milk (or any milk of choice) - 1 medium apple, diced (preferably a sweet variety like Fuji or Honeycrisp) - 1 teaspoon ground cinnamon - 2 tablespoons maple syrup (adjust to taste) - 1 tablespoon chia seeds - ¼ cup Greek yogurt (optional, for creaminess) - ¼ teaspoon vanilla extract - Pinch of salt - Chopped nuts (like walnuts or pecans) for topping (optional) If you don't have a few items, no worries! Here are some swaps: - Rolled oats: Use quick oats, but the texture may change. - Almond milk: Any milk works, like cow's milk, soy, or oat milk. - Apple: Swap for pear or banana if you want a different taste. - Maple syrup: Honey or agave syrup can sweeten instead. - Chia seeds: You can skip these, but they add fiber. - Greek yogurt: Try a plant-based yogurt for a dairy-free option. Each ingredient adds flavor and nutrition to your oats: - Rolled oats: They provide fiber, helping you feel full. - Almond milk: This milk adds creaminess and is low in calories. - Apple: Apples add sweetness and vitamins like vitamin C. - Cinnamon: This spice boosts flavor and may help lower blood sugar. - Maple syrup: This natural sweetener contains minerals and antioxidants. - Chia seeds: They are high in omega-3 fatty acids and fiber. - Greek yogurt: This adds protein and creaminess, making oats richer. - Vanilla extract: It enhances flavor without extra sugar. - Salt: A pinch of salt balances the sweetness. - Nuts: Chopped nuts add healthy fats and a crunchy texture. These ingredients combine to make a filling, healthy breakfast that you can enjoy any day! For the full recipe, check the details above. To make these tasty apple cinnamon overnight oats, start by gathering your ingredients. You will need rolled oats, almond milk, a diced apple, ground cinnamon, maple syrup, chia seeds, Greek yogurt, vanilla extract, and a pinch of salt. Here’s what to do: 1. In a medium bowl, mix the rolled oats and almond milk. 2. Add the diced apple, ground cinnamon, and maple syrup to the bowl. 3. Stir in the chia seeds, Greek yogurt, vanilla extract, and salt. 4. Make sure every ingredient blends well. 5. You can divide the mixture into two jars or airtight containers. 6. Seal the jars and place them in the fridge. Leave them overnight or for at least four hours. The key to great overnight oats is how you prepare them. Here’s how to get that perfect creamy texture: - Use rolled oats for a chewy bite. Instant oats can get mushy. - Almond milk adds a nice flavor but feel free to use any milk you like. - If you want creamier oats, add a little more Greek yogurt or a splash of milk in the morning. - Stir your oats well before eating. This helps mix the flavors. Overnight oats are all about saving time. Here are some ways to make it even easier: - Prepare your oats the night before, so breakfast is ready when you wake up. - You can make a batch for the week. Just keep them sealed in the fridge. - Use jars for easy storage and a quick grab-and-go option. - Chop your apple in advance and store it in lemon juice to prevent browning. For the full recipe, check out the details above. Enjoy your delicious apple cinnamon overnight oats! To boost flavor, try using fresh spices. Fresh cinnamon gives a strong taste. You can also add nutmeg for warmth. If you like crunch, mix in nuts or seeds. Walnuts or pecans work well. For creaminess, Greek yogurt is a great choice. It makes each bite richer and smoother. Making overnight oats is simple. You can prepare multiple jars at once. Just follow the full recipe and store them in the fridge. They stay fresh for several days. This way, you have a quick breakfast ready every morning. Grab a jar, and you are set to go! Serve your oats in clear jars to show off the layers. Add a slice of apple on top for a nice touch. A sprinkle of cinnamon adds color and flavor. If you want more sweetness, drizzle maple syrup before serving. Enjoy your delicious and healthy breakfast! {{image_2}} You can make overnight oats your own. Try adding different toppings and mix-ins. Here are some ideas: - Nuts: Add walnuts, pecans, or almonds for crunch. - Seeds: Sprinkle pumpkin seeds or sunflower seeds for extra nutrition. - Dried Fruit: Raisins, cranberries, or apricots can add sweetness. - Nut Butter: Stir in peanut or almond butter for creaminess and flavor. - Fresh Berries: Blueberries or strawberries can brighten your oats. These additions help change the taste and texture of your dish. Mix and match to find your favorite combination. While apple cinnamon is a classic, many other flavors work well. Here are a few tasty combos: - Banana Nut: Use ripe bananas and add chopped walnuts. - Berry Bliss: Mix in strawberries and blueberries for a fruity twist. - Chocolate Hazelnut: Add cocoa powder and chopped hazelnuts for a treat. - Pumpkin Spice: Stir in canned pumpkin, cinnamon, and nutmeg for fall vibes. - Coconut Mango: Use coconut milk and diced mango for a tropical flavor. These options let you explore new tastes while keeping it simple. If you want a vegan version, it’s easy to switch things up. Here are some ideas: - Milk: Substitute almond milk with oat or coconut milk. - Yogurt: Use coconut yogurt instead of Greek yogurt for creaminess. - Sweetener: Maple syrup is already vegan, but feel free to use agave nectar. - Chia Seeds: These seeds are vegan-friendly and add healthy fats. Switching to plant-based options ensures everyone can enjoy this dish. You can still enjoy delicious flavors without dairy. For the full recipe, check out the Apple Cinnamon Delight Overnight Oats. Store your Apple Cinnamon Overnight Oats in airtight containers. Glass jars work great. Keep them in the fridge to stay fresh. Make sure to seal the lids tightly. This way, they won’t absorb other food smells. You can also layer different flavors in each jar. This keeps your breakfast fun and exciting! These oats last about four to five days in the fridge. If you want to save them longer, freeze your mixture. Just use freezer-safe containers. When you freeze them, they can last up to three months. To thaw, move them to the fridge overnight. This gives them time to soften before you eat them. Check for changes in smell or color. If your oats smell sour or look off, throw them away. Also, if you see any mold, don’t eat them. Fresh oats should smell sweet and look vibrant. Trust your senses. They are your best guide to safe eating. For the full recipe, check out the Apple Cinnamon Delight Overnight Oats. Yes, you can make overnight oats in advance. I often prepare them the night before or even a few days ahead. It saves time in the morning. Just mix all the ingredients and store them in jars. They taste great after a night in the fridge. Overnight oats last about 3 to 5 days in the fridge. I recommend eating them within this time for the best taste. The oats may absorb more liquid over time, so stir them before enjoying. You can use instant oats, but the texture will change. Instant oats cook faster and become mushy. I prefer rolled oats for a chewier bite. They soak up the liquid well and keep their shape. To make overnight oats gluten-free, use certified gluten-free oats. Regular oats can be processed in facilities with gluten. Always check labels to ensure they are safe for gluten-free diets. You can add many healthy toppings to overnight oats. Here are some ideas: - Fresh fruits like berries or banana slices - Chopped nuts such as almonds or walnuts - Seeds like chia or flaxseed - A dollop of nut butter for creaminess - A sprinkle of coconut flakes for added flavor These toppings make your breakfast even more delicious and nutritious. For the full recipe, check out the section above. This blog post covered the key aspects of making apple cinnamon overnight oats. We explored the ingredient list, substitutions, and benefits. I provided clear steps for preparation and tips for perfect texture. You learned how to enhance flavor and save time in the mornings. We also discussed fun variations and storage tips to keep oats fresh. In conclusion, overnight oats are easy, tasty, and healthy. Enjoy making them your way!

Apple Cinnamon Overnight Oats Irresistible Breakfast

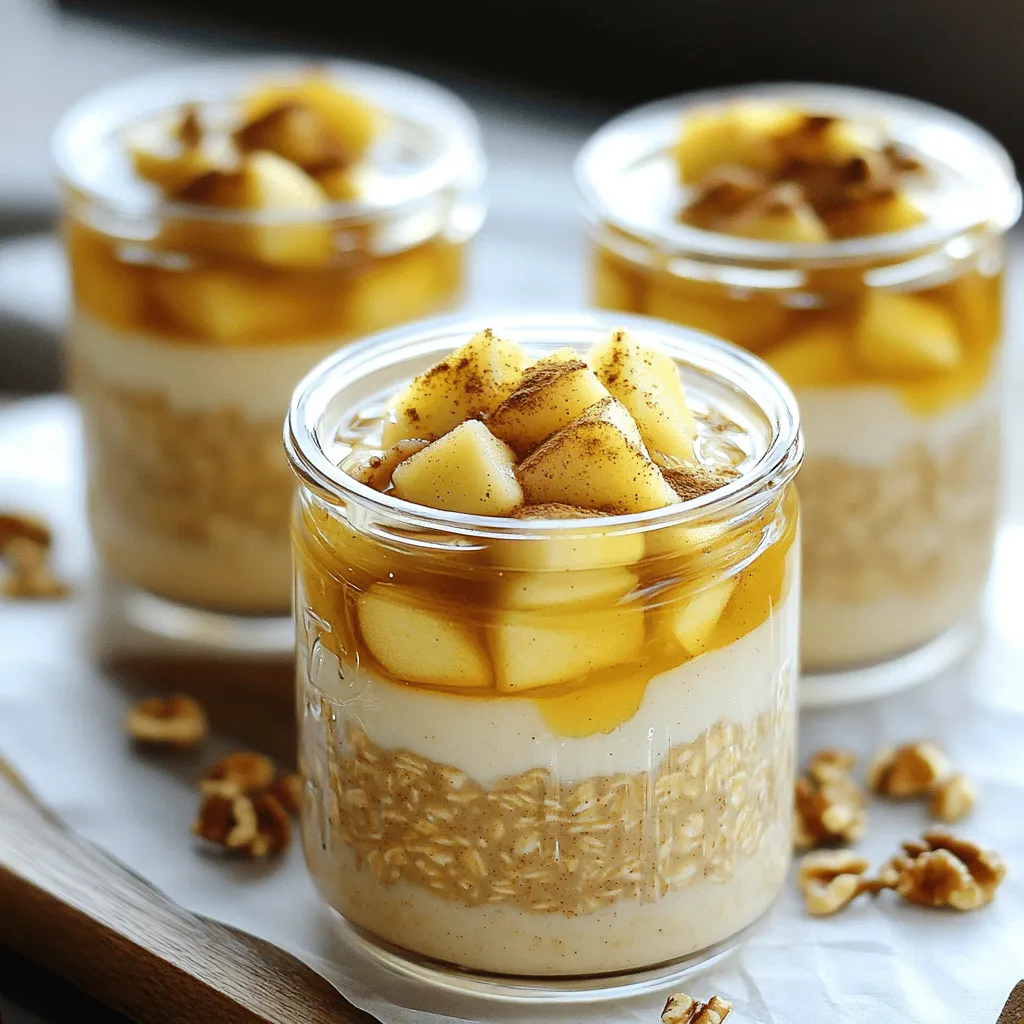
Looking for a quick, tasty breakfast? You’ll love Apple Cinnamon Overnight Oats! This easy recipe combines wholesome ingredients for a

Older posts
Newer posts
← Previous Page1 … Page45 Page46 Page47 … Page61 Next →

dsad

© 2025 Home Cooking Style • Built with GeneratePress

Our Policies

  • Copyright Policy
  • Cookie Policy
  • GDPR Policy
  • Privacy Policy
  • Disclaimer
  • Terms Of Use

More Information

  • Home
  • About
  • Contact
  • Appetizers
  • Dessert
  • Dinner
  • Drinks
©2025, Home Cooking Style About Back To Top