Skip to content
DisclaimerTerms Of UseGDPR PolicyCookie Policy

Home Cooking Style

  • Home
  • Drinks
  • Appetizers
  • Dinner
  • Dessert
  • About
  • Contact
  • Privacy Policy
DisclaimerTerms Of UseGDPR PolicyCookie Policy

Amelia

To make crispy air fryer falafel, you need simple and fresh ingredients. Here’s what you will need: - Dried chickpeas (1 cup, soaked overnight) - Chopped onion (1 small) - Minced garlic (3 cloves) - Fresh parsley (1/4 cup, chopped) - Fresh cilantro (1/4 cup, chopped) - Ground cumin (1 teaspoon) - Ground coriander (1 teaspoon) - Baking powder (1/2 teaspoon) - Salt and pepper to taste - All-purpose flour or chickpea flour (2 tablespoons) - Olive oil spray These ingredients blend together to create a tasty and nutritious snack. Soaking the chickpeas overnight makes them soft and easy to blend. Fresh herbs give the falafel bright flavors. Spices like cumin and coriander add warmth and depth. The baking powder helps the falafel rise, making them fluffy inside. Using flour binds the mixture, ensuring your falafel hold their shape. Don’t forget the olive oil spray; it helps them crisp up nicely in the air fryer. For the full recipe, you can check out the complete guide on preparing crispy air fryer falafel. Enjoy cooking! - Rinse and drain soaked chickpeas. - Check for softness but not mushiness. This step is key for the right texture. - Combine chickpeas, onion, garlic, and herbs in a food processor. - Pulse until well combined but slightly chunky. You want some texture for the best falafel. - Stir in flour and mix until combined. - Shape the mixture into small balls or patties. Aim for the size of a golf ball for even cooking. - Preheat air fryer to 375°F (190°C). - Lightly spray the balls with olive oil and air fry for 12-15 minutes. Flip halfway for even crispiness. Enjoy your crispy air fryer falafel! For full details, check the Full Recipe. To get crispy falafel, soaking chickpeas overnight is key. This softens them and helps with blending. If you skip this step, the falafel may turn out dense. After soaking, drain and rinse the chickpeas well. Adjusting the flour is also important for binding. Use just enough flour to hold the mixture together. If your mix feels too wet, add a bit more flour. Be careful not to overdo it. You want a sticky but manageable dough. Add spices or herbs to boost flavor. Ground cumin and coriander are great choices, but don't stop there! Try adding paprika or chili powder for extra zest. Fresh herbs like mint or dill can also add a unique twist. When serving, consider pairing the falafel with tahini sauce or hummus. These dips enhance the flavors and make your snack even better. You can also add fresh veggies like sliced cucumbers or cherry tomatoes for a fun touch. If your falafel mixture is too wet, add more flour. It should be thick enough to form balls. If it’s too dry, you can add a splash of water or a little olive oil. For even cooking, make sure not to overcrowd the air fryer. Each ball needs space for hot air to circulate. Flip the falafel halfway through cooking to ensure they crisp up nicely. Following these tips will lead to perfect, crispy air fryer falafel. For the full recipe, check out the Crispy Air Fryer Falafel section. {{image_2}} You can switch dried chickpeas for canned ones. Canned chickpeas are soft and easy to use. However, they may give a creamier texture. If you want a gluten-free option, use chickpea flour. It binds the mix well and keeps it tasty. Want to spice things up? Try adding chili powder or paprika. These spices give falafel a nice kick. You can also add grated vegetables like carrots or zucchini. This adds extra nutrition and flavor to your falafel mix. How you serve falafel can change the meal. You can wrap them in pita bread with veggies and sauce. Or, lay them out on a platter with dips. Pair falafel with a fresh salad or grain bowl for a complete meal. You can explore serving ideas in the Full Recipe for more inspiration. To keep your falafel fresh, store leftovers in the fridge. Place them in an airtight container. They will last up to four days. Make sure they cool to room temperature before sealing. This step prevents moisture buildup, which can make them soggy. For longer storage, you can freeze falafel. Place them in a single layer on a baking sheet. Freeze for about two hours until firm. Then, transfer them to a freezer bag. They can last up to three months. Remember to label the bag with the date for easy tracking. To enjoy leftover falafel, reheating is key. The best way is using an air fryer. Set it to 375°F (190°C) and heat for about 5-7 minutes. This method keeps them crispy. You can also use an oven. Preheat it to 350°F (175°C). Place falafel on a baking sheet and heat for 10-12 minutes. Check to ensure they are hot throughout. Avoid using a microwave, as it can make falafel soggy. Keeping them crispy makes all the difference in taste! You can use canned chickpeas, but the texture will differ. Canned chickpeas are softer. This may make your falafel mushy. If you choose to use them, drain and rinse them well. You may need to add more flour to help bind the mixture. This will help keep your falafel from falling apart. Cooked falafel can last in the fridge for about 3 to 4 days. Store them in an airtight container to keep them fresh. This will help maintain their flavor and texture. If you notice any signs of spoilage, discard them. Always trust your senses when it comes to food safety. Yes, you can prep falafel ahead of time! Form the balls and keep them in the fridge for up to 24 hours. You can also freeze them before cooking. Just make sure to place them in a single layer on a tray. Once frozen, transfer them to a bag or container. When you’re ready to cook, just air fry them straight from the freezer! Crispy air fryer falafel pairs well with many dips and sides. You can serve them with tahini sauce or hummus. These dips add creaminess and flavor. You can also add sliced cucumbers and cherry tomatoes for freshness. Another idea is to serve them on a salad or in a wrap for a tasty meal. For the full recipe, check the previous sections. This blog post shared how to make tasty falafel using simple ingredients and steps. You learned how to prepare chickpeas, blend ingredients, and shape falafel balls. We also explored tips for the perfect texture, flavor options, and storage. Now, with these easy methods, you can enjoy crispy falafel at home. Experiment with flavors and keep leftovers fresh. Making falafel is fun and rewarding, so dive in and enjoy your cooking!

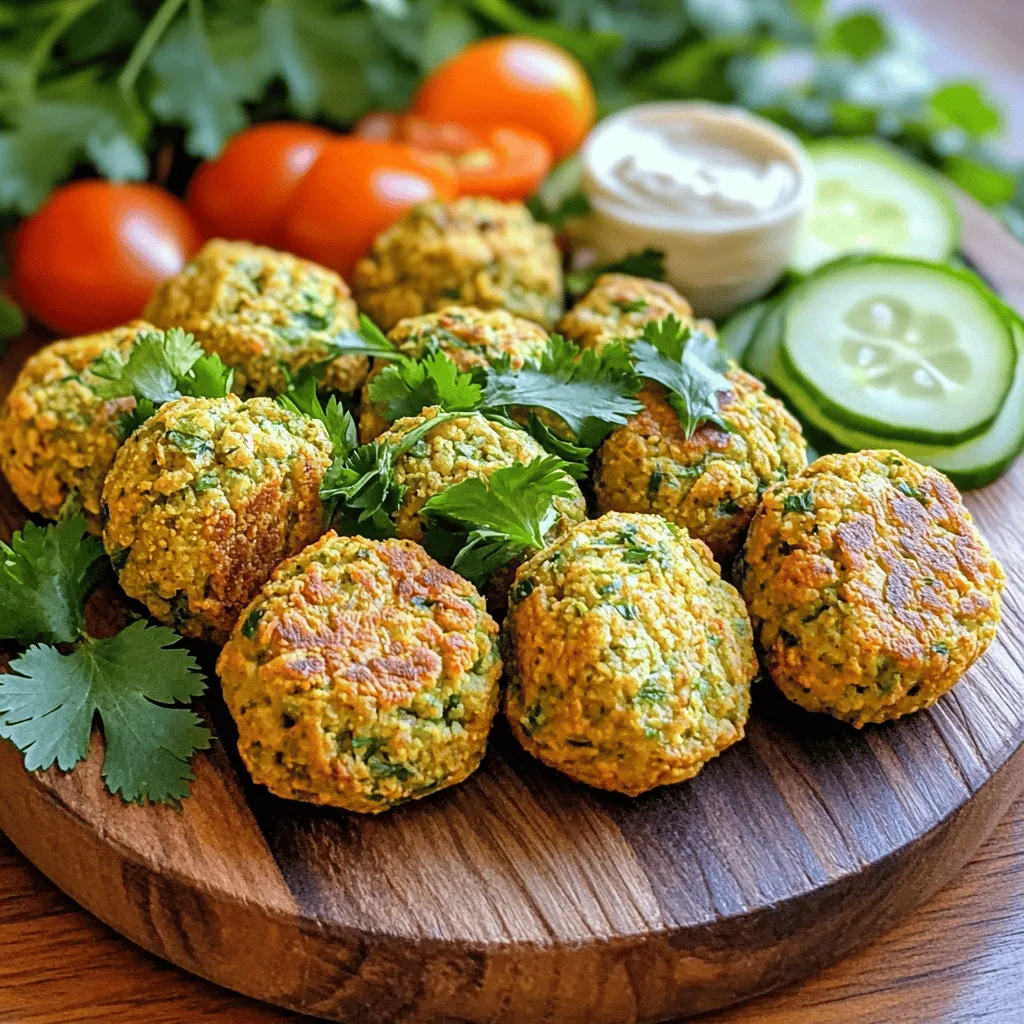
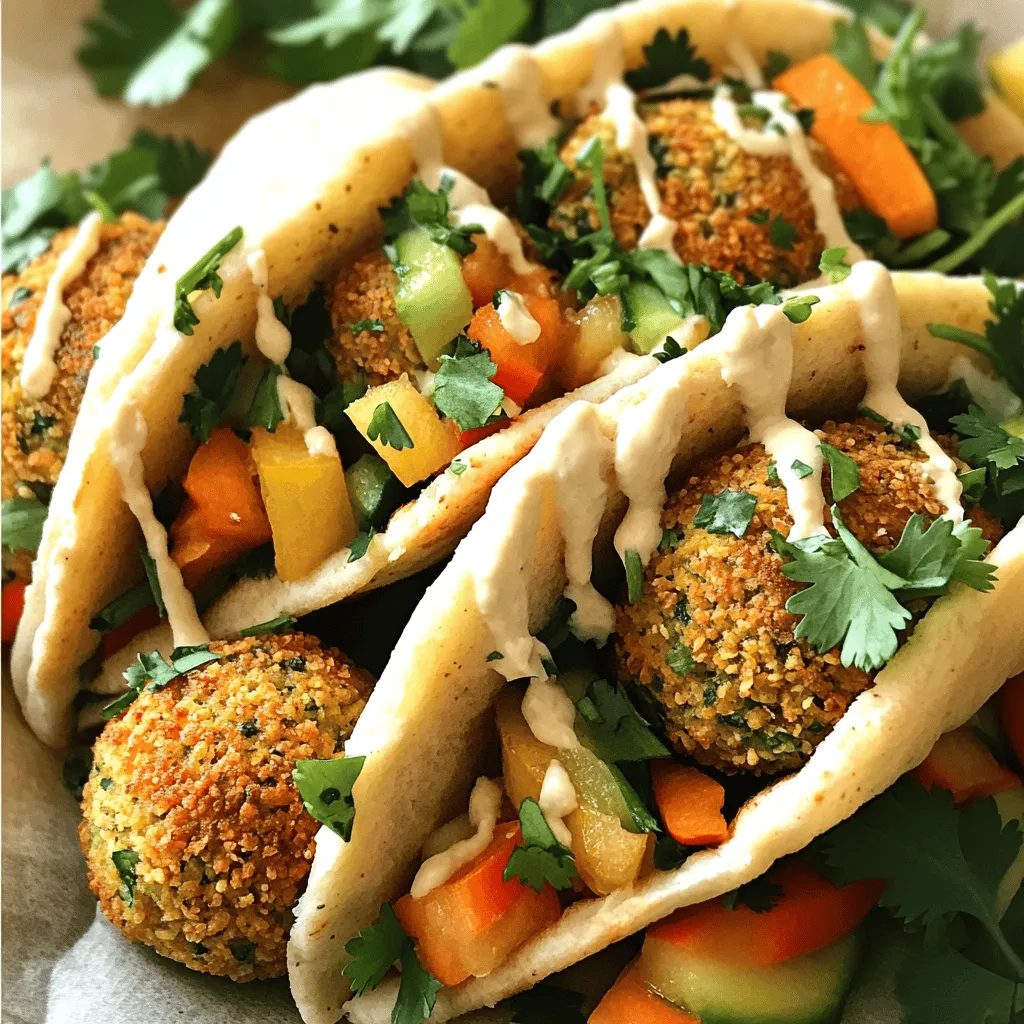
Crispy Air Fryer Falafel Simple and Flavorful Snack

Looking for a delicious snack that’s easy to make? You’ll love these crispy air fryer falafels! They are packed with

When making Honey Sriracha Roasted Carrots, you need a few key ingredients. Each one plays an important role in creating the dish's unique flavor. - Baby carrots or regular carrots - Honey and Sriracha sauce - Olive oil, garlic powder, and smoked paprika - Salt and pepper, and garnish options You can use baby carrots or regular carrots. If you pick regular carrots, peel them and cut them into sticks. The honey will add sweetness, while Sriracha gives a spicy kick. Olive oil helps everything roast evenly. Garlic powder adds depth, and smoked paprika brings a warm, smoky flavor. Don't forget salt and pepper to enhance the taste. Fresh cilantro makes a great garnish, adding a pop of color and freshness. For the full recipe, check out the complete details. Remember, using fresh ingredients makes a big difference in flavor. Each bite will burst with sweet and spicy goodness, making it a perfect side dish for any meal! First, preheat your oven to 400°F (200°C). This temperature helps the carrots roast nicely and caramelize. While the oven warms up, get your carrots ready. If you use baby carrots, you can leave them whole. If you use regular carrots, peel and cut them into sticks. Aim for even sizes, so they cook at the same rate. In a large mixing bowl, combine 2 tablespoons of honey and 1 tablespoon of Sriracha sauce. You can adjust the Sriracha based on how spicy you want your dish. Next, add 2 tablespoons of olive oil, 1 teaspoon of garlic powder, and 1 teaspoon of smoked paprika. Season with salt and pepper to taste. Whisk these ingredients together until the mixture is smooth and well combined. Use a steady wrist action to blend everything evenly. Now, add your carrots to the bowl. Toss them in the honey-Sriracha mixture until they are fully coated. Next, spread the carrots out evenly on a baking sheet lined with parchment paper. This step helps prevent sticking. Roast them in the preheated oven for about 25-30 minutes. Stir the carrots halfway through to ensure they cook evenly. Check for doneness by piercing them with a fork; they should be tender and caramelized. Once done, take them out and let them cool slightly before serving. Enjoy your Honey Sriracha Roasted Carrots from the Full Recipe! To make your Honey Sriracha Roasted Carrots just right, play with the spice level. Start with one tablespoon of Sriracha. If you want more heat, add a little more. You can also try mixing in different spices. A pinch of cumin or coriander can add depth. Fresh herbs like thyme or rosemary can give a nice twist. These simple changes can elevate your dish. Baking and roasting sound similar, but there are key differences. Roasting cooks at a higher heat. It helps the carrots caramelize, making them sweet and tasty. For the best results, spread the carrots in a single layer. This way, they cook evenly. To get that perfect caramelization, turn them halfway through cooking. This ensures all sides get that nice, golden color. Pair these carrots with a main dish for a complete meal. They work well with grilled chicken, fish, or even tofu. For a pop of color, consider serving them on a white plate. This contrast makes the bright orange carrots stand out. You can also sprinkle some fresh cilantro on top for a fresh touch. For the full recipe, check the recipe section above. {{image_2}} You can change the flavor of your Honey Sriracha Roasted Carrots with different carrots. Try using purple, yellow, or even rainbow carrots. They add color and a bit of sweetness to your dish. Regular carrots work well too. Just peel and cut them into sticks. If you want to switch up the sweetener, maple syrup is a great option. It has a nice depth of flavor. You can also use agave nectar for a lighter taste. For sauces, consider adding soy sauce or teriyaki sauce for a different twist. This can make the dish more savory. You can cook these carrots in several ways. The oven gives a nice roast, but an air fryer works quickly. In the air fryer, cook them at 375°F for about 15 minutes. Shake the basket halfway through for even cooking. Grilling is another fun method. Toss the carrots in the honey-Sriracha mix, then skew them. Grill for about 10-15 minutes. This method adds a smoky flavor that pairs well with the sauce. If you want a vegan dish, replace honey with maple syrup. This keeps the sweetness and is also plant-based. For low-sugar options, try using a sugar-free sweetener. Look for alternatives like stevia or monk fruit. You can adjust the Sriracha to keep it flavorful without the added sugar. Exploring these variations can help you enjoy Honey Sriracha Roasted Carrots in new ways. For the full recipe, check the complete guide above. To store leftover Honey Sriracha Roasted Carrots, first let them cool completely. Place the carrots in an airtight container. This helps keep them fresh and tasty. You can store them in the fridge for up to 4 days. If you have a lot of leftovers, think about using smaller containers. This way, you can grab a portion easily. To reheat your roasted carrots, you have a few options. You can use the oven, microwave, or even a skillet. If using the oven, preheat it to 350°F (175°C). Spread the carrots on a baking sheet and heat for about 10-15 minutes. This method helps keep the carrots crisp and flavorful. In the microwave, place the carrots in a microwave-safe dish. Cover them with a damp paper towel to keep moisture in. Heat in short bursts of 30 seconds. Stir after each burst to ensure even heating. For the skillet method, heat a bit of olive oil over medium heat. Add the carrots and stir occasionally until heated through. This method can add a nice touch of freshness. To maintain texture and flavor, avoid overheating. Carrots can turn mushy if cooked too long. Enjoy your flavorful side dish again! For the complete recipe, please refer to the Full Recipe. Honey Sriracha roasted carrots last about 4 to 5 days in the fridge. Store them in an airtight container. This keeps them fresh and ready to eat. When you are ready to enjoy them again, just reheat. They still taste great even after a few days. You can use frozen carrots, but fresh ones are better. Frozen carrots may lose some crunch. If you choose to use frozen carrots, thaw them first. Pat them dry to remove excess moisture. This helps the honey and Sriracha stick better. To make your dish spicier, add more Sriracha. Start with a small amount and taste as you go. You can also add red pepper flakes or cayenne pepper. These will give your carrots an extra kick. If you like heat, don’t be shy to experiment! Roasting Honey Sriracha Carrots is simple and rewarding. You learned the key ingredients, tips, and variations to make this dish shine. From preparing your oven to enhancing flavors, each step brings out the best in those carrots. Don't forget to store leftovers properly for future meals. Now, it's your turn to try this tasty recipe. Enjoy the balance of sweet and spicy and share your experience!

Honey Sriracha Roasted Carrots Flavorful Side Dish

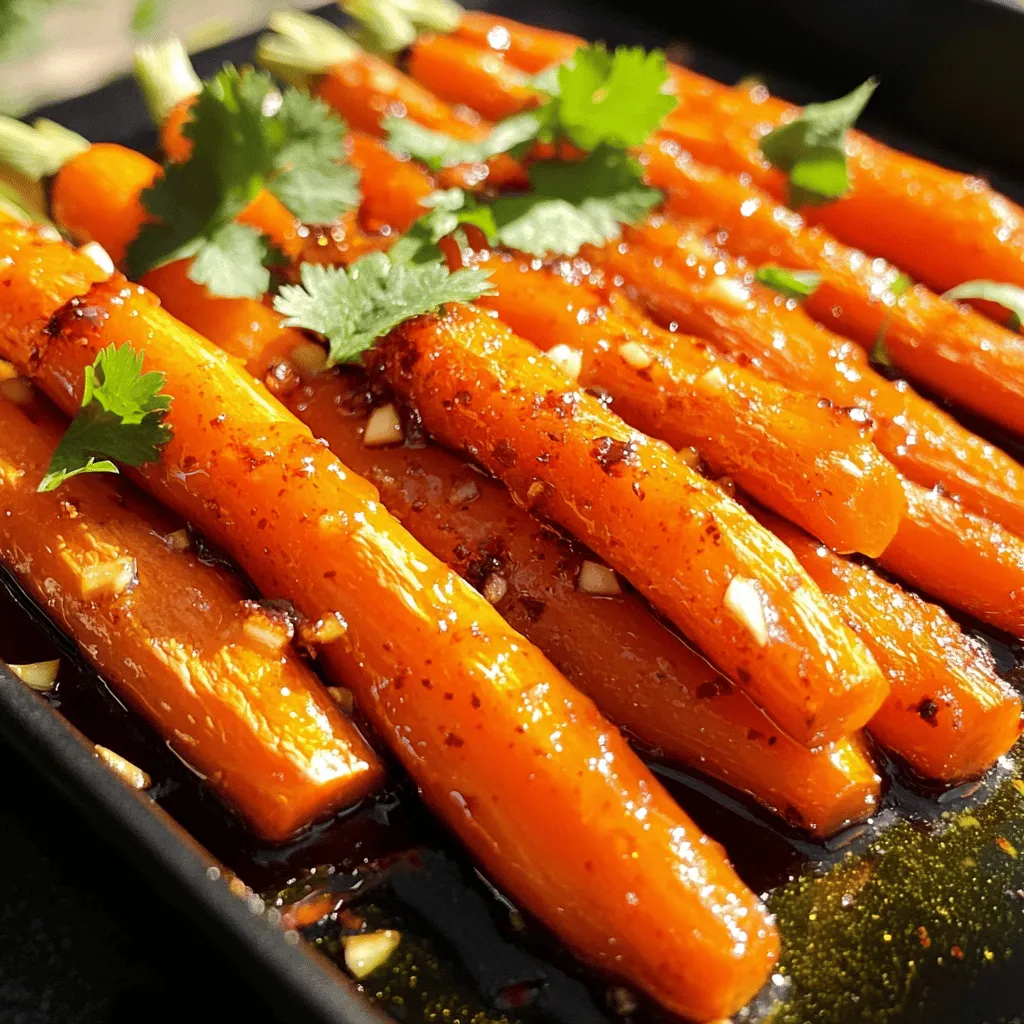
Looking for a side dish that packs a punch? Try my Honey Sriracha Roasted Carrots! These sweet and spicy bites

- Large flatbread or naan - Sliced mushrooms (cremini or shiitake) - Olive oil The main ingredients for balsamic mushroom flatbread are simple yet flavorful. A large flatbread or naan serves as the base. You can choose either cremini or shiitake mushrooms. Both add great taste. Olive oil helps cook the mushrooms perfectly. - Minced garlic - Balsamic vinegar - Fresh thyme leaves Next, we have seasonings. Minced garlic gives a strong, rich flavor. Balsamic vinegar adds a sweet and tangy twist. Fresh thyme leaves bring an earthy note. You can use dried thyme if fresh isn't available. - Shredded mozzarella cheese - Crumbled goat cheese - Fresh basil leaves Finally, we add cheese and garnishes. Shredded mozzarella melts beautifully and adds creaminess. Crumbled goat cheese gives a tangy burst. Fresh basil leaves on top add color and freshness. You can find the full recipe to explore all the details! - Preheat your oven to 400°F (200°C). - In a skillet, heat 1 tablespoon of olive oil over medium heat. - Add 2 cups of sliced mushrooms to the skillet. - Sauté the mushrooms for 5-7 minutes. They should turn golden brown. - Wait until the water from the mushrooms evaporates. - Add 2 minced garlic cloves to the skillet with the mushrooms. - Stir in 1 tablespoon of balsamic vinegar. - Sprinkle in 1 teaspoon of fresh thyme leaves, plus salt and pepper to taste. - Cook for an additional 2 minutes until fragrant. - Remove the skillet from the heat. - Place 1 large flatbread or naan on a baking sheet. - Evenly distribute the mushroom mixture over the flatbread. - Sprinkle ½ cup of shredded mozzarella cheese on top. - Add ¼ cup of crumbled goat cheese for extra flavor. - Bake in your preheated oven for 10-12 minutes. - Watch for the cheese to melt and the edges to get crispy. - Remove from the oven and let it cool for a few minutes. - Garnish with fresh basil leaves before slicing and serving. For the full recipe, check the detailed instructions above. To get the best flavor and texture from your mushrooms, sauté them well. Heat olive oil in a skillet over medium heat. Then, add the sliced mushrooms. Cook them for about 5-7 minutes until golden brown. This step helps remove moisture and gives them a nice crisp. When they are brown, add minced garlic, balsamic vinegar, and thyme. Stir well and cook for 2 more minutes. This mix brings out a rich flavor. Adjusting the seasoning is key. Taste your mixture and add salt and pepper as needed. You can also try adding a pinch of chili flakes for some heat. Each cook has their own taste, so make it yours! Balsamic mushroom flatbread pairs well with many sides. A fresh green salad is great. Try a simple mix of lettuce, cucumber, and a light vinaigrette. You can also serve it with dips like hummus or tzatziki. These add flavor and texture contrasts. For a more filling meal, serve it with roasted vegetables. They add color and a healthy touch. Presentation matters! To make your flatbread look great, use a wooden board or a colorful plate. Slice it into pieces and arrange them nicely. Garnishing with fresh basil leaves adds a pop of color. You can also drizzle a little balsamic glaze on top for a fancy touch. This not only looks good but also enhances the flavor. For more ideas, check out the Full Recipe for balsamic mushroom flatbread. {{image_2}} You can change up your flatbread with fun toppings. Try adding arugula for some peppery flavor. Sun-dried tomatoes bring a sweet and tangy taste. You might want to add some protein too. Chicken or crispy bacon works great. These options boost flavor and make your meal heartier. Don't feel stuck with just one type of flatbread. Pita bread offers a soft and chewy base. If you need gluten-free options, look for suitable brands. You can also mix up the cheese. Feta or gouda can add a nice twist. Each type of cheese gives your dish a new taste. Seasonal ingredients can liven up your flatbread. Think about using fresh vegetables like zucchini or bell peppers in summer. In fall, roasted squash or Brussels sprouts can be tasty. You can also adjust your flatbread for holidays. Adding cranberries for Thanksgiving or herbs for Christmas can make it festive. Each season brings new flavors to explore. To keep your balsamic mushroom flatbread fresh, store leftovers in the fridge. Wrap it tightly in plastic wrap or place it in an airtight container. This helps to keep moisture out and flavors in. Consume the leftovers within three days for the best taste. When reheating, use an oven or toaster oven. This method keeps the flatbread crispy. Preheat the oven to 350°F (175°C). Place the flatbread on a baking sheet and heat for about 10 minutes. Check it to ensure it warms evenly. You can freeze flatbread before or after baking. If freezing before baking, assemble the flatbread with the mushroom mix but skip the cheese. Wrap it tightly in plastic wrap, then place it in a freezer bag. This keeps it fresh for up to three months. If you freeze after baking, let the flatbread cool completely first. Then, wrap it in plastic wrap and store in a freezer-safe container. This way, it lasts about two months. For the best taste, consume your balsamic mushroom flatbread within three days when stored in the fridge. If you freeze it, the flatbread stays good for about two to three months. Always check for signs of spoilage. Look for mold or an off smell. If you notice either, it’s best to throw it away. Enjoy your dish safely! For the full recipe, check out the detailed instructions above. You can make this dish vegetarian by focusing on the toppings. Use only mushrooms, cheese, and fresh herbs. For the cheese, choose options like mozzarella and goat cheese. These add richness without meat. You can also add more veggies like spinach or bell peppers for extra flavor. This keeps the taste strong and satisfying. Yes, you can use dried mushrooms. Just soak them in hot water for about 20-30 minutes. This helps them become soft and flavorful again. After soaking, drain and chop them. Use these in place of fresh mushrooms. The taste may change slightly, but they will still work well in the flatbread. Many sides go great with this flatbread. Consider serving it with a fresh salad. A simple green salad with vinaigrette works well. You can also add a side of roasted vegetables. Another option is a light soup, like tomato or vegetable. These sides balance the flavors and make a complete meal. Yes, you can prep this dish in advance. Prepare the mushroom mix and store it in the fridge. You can also assemble the flatbread without baking it. Cover it well and keep it chilled. When you're ready to eat, just bake it. This makes it easy for busy days while still enjoying a tasty meal. Absolutely! If you want a vegan option, use plant-based cheese. There are many great dairy-free cheeses on the market now. If you prefer lactose-free, choose lactose-free mozzarella. You can also skip cheese altogether and add more herbs or veggies. This allows you to enjoy the dish while meeting your dietary needs. This recipe for balsamic mushroom flatbread is both easy and delicious. You learned about the best ingredients, step-by-step cooking, and ways to customize your dish. Whether you want to serve it as a snack or main meal, the options are endless. You can adjust flavors and even try new toppings. Take your time in the kitchen and enjoy making this flatbread. Your friends and family will love the effort. Keep experimenting with flavors to find your perfect combination. Happy cooking!

Balsamic Mushroom Flatbread Savory and Simple Treat

If you’re craving a quick and tasty dish, look no further than balsamic mushroom flatbread! This savory treat combines rich,

To create these tasty muffins, you need some key ingredients. Here’s what you need: - 1 medium zucchini, grated - 1 cup all-purpose flour - 1/2 cup whole wheat flour - 1/2 cup brown sugar - 1/4 cup granulated sugar - 1/2 teaspoon baking soda - 1/2 teaspoon baking powder - 1/2 teaspoon salt - 1 teaspoon ground cinnamon - 2 large eggs - 1/2 cup vegetable oil (or melted coconut oil) - 1 teaspoon vanilla extract - 1 cup semi-sweet chocolate chips These ingredients work together to make the muffins moist, sweet, and flavorful. The zucchini adds moisture and nutrients without altering the taste. When measuring ingredients, accuracy matters. You want the right texture in your muffins. For flour, spoon it into the cup and level it off. You can swap all-purpose flour with gluten-free flour for a gluten-free option. The zucchini can be replaced with carrots for a different flavor. If you want less sugar, you can cut down the brown and granulated sugar by a bit. Want to make your muffins even better? Here are a few add-ins you can try: - 1/2 cup chopped walnuts or pecans - 1/2 cup raisins or dried cranberries - 1/4 cup shredded coconut These extras can add texture and taste. They bring a fun twist to the classic recipe. You can find the full recipe [here](#). Start by gathering your ingredients. You need a medium zucchini, which gives moisture and flavor. Grate it finely to blend well. Next, measure out your flours, sugars, and spices. It's best to have everything ready before you mix. This makes the process smooth and fun. In one bowl, mix the dry ingredients. Combine all-purpose flour, whole wheat flour, baking soda, baking powder, salt, and ground cinnamon. In another bowl, mix the grated zucchini with both sugars. Let it sit for five minutes. This step helps release moisture from the zucchini. After that, add eggs, oil, and vanilla to the zucchini mix. Stir until smooth. Now, slowly add the dry mix to the wet mix. Be gentle; you don't want to overmix. Once your batter is ready, it's time to bake. Preheat your oven to 350°F (175°C). Line your muffin tin with paper liners or grease it. Divide the batter into the muffin cups, filling them about two-thirds full. Bake for 20-25 minutes. Check with a toothpick; it should come out clean. After baking, cool the muffins in the pan for five minutes. Then, transfer them to a wire rack to cool completely. For a lovely touch, you can dust them with powdered sugar. To see the complete recipe, check the Full Recipe section. To get the best muffin texture, start with fresh zucchini. Grate it finely. This helps the zucchini mix well and adds moisture. Let the grated zucchini sit with the sugars. This step draws out extra water, making your muffins soft. When mixing the batter, be gentle. Overmixing can lead to tough muffins. Stop mixing when you see a few flour streaks. This keeps the muffins light and airy. One big mistake is not measuring your flour correctly. Too much flour makes muffins dry. Always spoon flour into your measuring cup and level it off. Another mistake is skipping the resting time for the zucchini. This step helps with moisture and flavor. Don’t forget to check your oven temperature. An oven that is too hot can burn the muffins. An oven thermometer can help with this. To boost flavor, add spices like nutmeg or ginger. A pinch can change the taste. You can also mix in extras like chopped nuts or dried fruit. These add texture and flavor. If you want a richer taste, try using dark chocolate chips instead of semi-sweet. This simple swap gives a deeper chocolate flavor. For a unique twist, add a splash of almond extract for added depth. For the complete method and ingredients, check out the Full Recipe. {{image_2}} You can easily make these muffins gluten-free. Swap the all-purpose flour for a gluten-free flour blend. Make sure it has xanthan gum for the right texture. For a vegan version, replace the eggs with flax eggs. Mix 1 tablespoon of ground flaxseed with 2.5 tablespoons of water. Let it sit for a few minutes to thicken. You can also use plant-based oil instead of vegetable oil. This keeps your muffins moist and tasty. Adding fruits or nuts can change the flavor of your muffins. You can toss in blueberries, chopped apples, or even dried cranberries. Each fruit adds a unique taste and goes well with chocolate. If you like nuts, walnuts or pecans add crunch. Just remember to chop them small so they mix well. Experiment with spices too. A pinch of nutmeg or ginger can give a warm twist. Sweetness can be adjusted based on your taste. If you want less sugar, reduce the brown and granulated sugars. You can replace some sugar with mashed bananas or applesauce for added moisture. This keeps the muffins soft. If you prefer a denser muffin, use more whole wheat flour. For a lighter texture, stick with all-purpose flour. Finding the right balance makes your muffins just how you like them. For the full recipe, check out the instructions provided earlier. To keep your chocolate chip zucchini muffins fresh, use an airtight container. Place parchment paper between layers to avoid sticking. You can also wrap each muffin in plastic wrap before storing. This helps lock in moisture and flavor. For longer storage, consider refrigerating them, especially in warm weather. When stored at room temperature, these muffins last about 2 to 3 days. If you keep them in the fridge, they can last up to a week. For the best taste, enjoy them fresh. However, they still taste great even after a few days. Just make sure to check for any signs of spoilage. To enjoy your muffins again, simply reheat them. You can use a microwave for about 10 to 15 seconds. If you prefer a crispy edge, pop them in the oven at 350°F for about 5 minutes. This brings back the fresh-baked flavor. Serve them warm with a bit of butter or your favorite spread for an extra treat. You can find the full recipe for these delicious treats to enjoy at any time. Yes, you can freeze Chocolate Chip Zucchini Muffins. After they cool, wrap each muffin in plastic wrap. Place the wrapped muffins in a freezer bag. They will stay fresh for up to three months. When you want to eat one, just take it out and thaw it at room temperature. You can also heat it in the microwave for a warm treat. If you don’t have zucchini, you can use grated carrots or applesauce. Grated carrots will add a nice sweetness. Applesauce will keep the muffins moist. Just remember that these substitutes can change the flavor slightly. You can also try using summer squash if you have it on hand. It works similarly to zucchini. Chocolate Chip Zucchini Muffins can be a healthy treat. Zucchini adds moisture without many calories. The whole wheat flour boosts fiber. The sugars can be reduced if you want a lighter muffin. You can also add nuts for extra protein. So, enjoy these muffins as a tasty snack or breakfast option! For the full recipe, check out the deliciously moist Chocolate Chip Zucchini Muffins. In this post, we explored the making of chocolate chip zucchini muffins. We discussed essential ingredients and offered measurement tips. You learned step-by-step instructions for mixing, baking, and achieving perfect texture. We also shared ways to customize flavors with add-ins and alternatives. Remember, baking is fun and allows for creativity. Enjoy experimenting with these recipes, and don’t be afraid to add your twist. Happy baking!

Chocolate Chip Zucchini Muffins Healthy and Delicious

Chocolate chip zucchini muffins are a tasty way to sneak in some veggies! You get sweet, soft muffins packed with

- Greek yogurt (plain or vanilla) - Sweetener options (honey or maple syrup) - Mixed berries (strawberries, blueberries, raspberries, blackberries) - Additional toppings (granola, shredded coconut, chia seeds) You need simple ingredients to create Greek Yogurt Berry Bark. Start with Greek yogurt. You can use plain or vanilla. Both options work great in this recipe. Next, choose a sweetener. Honey adds a nice touch, while maple syrup offers a unique flavor. For the fruity layer, use mixed berries. Strawberries, blueberries, raspberries, and blackberries all complement the yogurt well. Feel free to mix and match. To add some crunch, consider extra toppings. Granola brings a nice texture, while shredded coconut can enhance the taste. Chia seeds are optional but great for extra nutrition. Greek yogurt is a powerhouse. It is rich in protein, which helps build muscle. It also contains probiotics that support gut health. The creamy texture makes it a delightful base for desserts. Berries are packed with vitamins and antioxidants. They help fight inflammation and support heart health. Eating berries can also boost your mood. Combining yogurt and berries gives you a tasty treat that is good for you. When making Greek Yogurt Berry Bark, you can adjust ingredient amounts. If you like it sweeter, add more honey or maple syrup. You can also use flavored yogurt for a twist. If you cannot find Greek yogurt, regular yogurt will work, too. Just remember, it may be thinner. For a dairy-free option, look for coconut yogurt or almond yogurt. These can still create a delicious bark. To start, prep your baking sheet. Line it with parchment paper. Make sure the paper hangs over the edges. This helps when you remove the bark later. Next, mix the yogurt and sweetener. In a bowl, combine the Greek yogurt and honey or maple syrup. Stir until it is smooth. This makes a creamy base for your bark. Now, it's time to spread the yogurt. Pour the yogurt mixture onto the baking sheet. Use a spatula to smooth it out. Aim for about half an inch thick. Then, distribute the toppings. Place your mixed berries on top of the yogurt. Press them down gently. This helps them stick to the yogurt. After that, sprinkle the granola and shredded coconut evenly. If you want, add chia seeds for extra nutrition. For freezing, place the baking sheet in the freezer. Let it freeze for about 2 to 3 hours. You want the yogurt bark to be firm and solid. Once it's frozen, remove it from the baking sheet. Use the parchment paper edges to lift it out. Cut or break the bark into pieces. Serve right away, or store the pieces in an airtight container. They can stay in the freezer for up to a week. To make great Greek yogurt berry bark, focus on thickness. Aim for about 1/2 inch. This thickness helps it freeze well and makes it easy to break into pieces. If it’s too thin, it may break apart easily. Make sure toppings stick to the yogurt. Press down the berries gently. This will help them stay in place. If they slide off, your bark may not look as good. You can add extracts or zests to boost flavor. A few drops of vanilla extract work wonders. For a citrus twist, add some lemon or orange zest. This small step makes a big difference. Seasonal fruits also enhance the taste. In summer, use fresh strawberries or peaches. In fall, try apples or pears. Mixing fruits keeps the bark exciting and fresh. Plating is key for a beautiful treat. Serve the bark on a colorful platter. It makes the dish pop. For extra flair, garnish with fresh berries around the edges. This adds color and looks inviting. You can also cut the bark into fun shapes. Use cookie cutters for stars or hearts. This makes it more fun, especially for kids. The more creative you get, the more enjoyable it becomes! For the full recipe and more tips, check out the [Full Recipe]. {{image_2}} You can change up your Greek yogurt berry bark with fun flavors. One great option is to add tropical fruits like pineapple and mango. These fruits add a bright, sweet flavor that feels like a mini-vacation. Just chop the fruits small and mix them into the yogurt. Another tasty choice is to add chocolate. You can either mix in cocoa powder or sprinkle chocolate chips on top. This gives the bark a rich and creamy taste. If you want a vegan version, you can use dairy-free yogurt. Almond or coconut yogurt works well. You can still add honey, but use agave syrup for a vegan sweetener. For those watching sugar, you can use less sweetener. You can even skip it completely if you like. The berries are sweet enough on their own! Make your bark fit the seasons! In summer, use fresh berries like strawberries and blueberries. They are juicy and sweet. In fall, try using apples or pears with some cinnamon. You can even make it festive for the holidays with red and green fruits. Think cranberries and kiwis for a holiday twist. Each season offers a new chance to enjoy this treat! To keep Greek Yogurt Berry Bark fresh, use an airtight container. This will stop moisture from getting in. Wrap each piece in plastic wrap for extra protection. You can also use freezer bags. Just make sure to squeeze out as much air as possible before sealing. This helps maintain the bark's texture and flavor. When you want to enjoy the bark, take it out of the freezer. Let it thaw in the fridge for about 30 minutes. This keeps it from melting too fast. You can also leave it out at room temperature for 15 minutes. For leftovers, just put them back in the airtight container and return them to the freezer. Greek Yogurt Berry Bark can last up to one week in the freezer. After that, the flavor may fade. Look for signs of spoilage, like ice crystals or changes in texture. If you see these signs, it’s best to toss the bark. Enjoy the fresh taste while you can! Yes, you can use other types of yogurt. Regular yogurt or dairy-free yogurt works well. Just pick a flavor you like. Greek yogurt gives a thick, creamy texture. Other yogurts may be thinner. This could change the final texture of your bark. To lower the calories, you can reduce the sweetener. Use less honey or maple syrup. You can also swap some yogurt for lower-fat yogurt. Another option is to skip the granola or use a lighter version. This helps cut down on calories while keeping flavors. Adding nuts or seeds is a great idea! You can mix in almonds, walnuts, or pumpkin seeds. Just make sure to chop them small. This way, they stick well to the yogurt. They add a nice crunch and boost nutrition. To keep the yogurt from being icy, avoid freezing too long. Check it after 2 hours. If it’s firm, you can take it out. You can also add a bit of nut butter to the mix. This helps create a creamier texture. Absolutely! Greek Yogurt Berry Bark is a fun and healthy treat for kids. They will enjoy the sweet berries and crunchy toppings. You can get them involved in making it too. It’s a great way to teach them about healthy snacks. Making Greek Yogurt Berry Bark is simple and fun. You need just a few tasty ingredients and can tailor it to your taste. The health benefits of Greek yogurt and berries boost your snack game. Follow the steps for perfect freezing and serving. Remember, this treat can fit many diets, from vegan to low-sugar. With these tips, your bark can impress everyone. Enjoy experimenting with flavors and serving ideas. Your kitchen offers endless possibilities for creativity. Now it’s time to make your berry bark and treat yourself!

Greek Yogurt Berry Bark Tasty and Healthy Treat

Are you craving a sweet treat that’s both tasty and good for you? Look no further! Greek Yogurt Berry Bark

- 3 lbs ripe tomatoes, quartered - 1 large onion, peeled and quartered - 4 cloves garlic, unpeeled - Fresh basil leaves Fresh ingredients make this soup shine. Ripe tomatoes are the star. Their sweetness adds depth. Choose firm, red tomatoes for the best flavor. The large onion brings a nice balance. Roasting it softens its bite and adds sweetness. Garlic, when roasted, becomes creamy and mild. Toss in fresh basil for a fragrant touch. - Olive oil - Salt - Pepper - Sugar Pantry staples are key to this dish. Olive oil helps to caramelize the veggies. It also adds richness to the soup. Salt and pepper enhance the flavors, making them pop. A bit of sugar balances the acidity of the tomatoes. These staples are simple but essential. - 1 tablespoon balsamic vinegar - ½ cup heavy cream Optional add-ins can elevate the soup. Balsamic vinegar adds a tangy depth. It brings a complex flavor that impresses. Heavy cream makes the soup rich and velvety. Adding cream is great if you enjoy a creamy texture. Experiment with these to find your perfect bowl. For the full recipe, refer to the detailed instructions provided. To start, you need fresh tomatoes and onion. I like to use ripe tomatoes for the best taste. Quarter them and place them on a baking sheet. Next, peel the onion and quarter that too. Toss those on the sheet as well. Now, we have garlic. I keep the garlic unpeeled. Just place the cloves in between the tomatoes and onion. This method keeps the garlic sweet and mild when we roast it. Set your oven to 400°F (200°C). This heat allows the vegetables to caramelize well. Roast the tomatoes, onion, and garlic for 30 to 35 minutes. You want them soft and a little browned. This adds great flavor to your soup. After roasting, let the vegetables cool a bit. Squeeze the garlic out of its skin into a blender. Add the roasted tomatoes and onion. Pour in the vegetable broth and blend until smooth. If you want a chunkier soup, blend a bit less. Next, pour the blended mixture into a pot. Heat it on medium. Now, add fresh basil and balsamic vinegar if you want a deeper taste. Let it simmer for 10 to 15 minutes. This time helps all the flavors mix well. If you like a creamier soup, add heavy cream in the last few minutes. Make sure to stir well. Lastly, taste your soup and adjust salt and pepper as needed. You’ll find that this roasted tomato basil soup is a warm hug in a bowl. For the full recipe, check back in the ingredients section. To make the best roasted tomato basil soup, you need to balance the flavors. Tomatoes can be acidic, so I often add a teaspoon of sugar. This helps to calm that sharp taste. If you want deep flavor, try a splash of balsamic vinegar. It adds a nice touch! For creaminess, you can stir in heavy cream at the end. This gives the soup a rich texture. If you want a lighter version, skip the cream. The soup still tastes great! Roasting your veggies is key to great flavor. I like to roast tomatoes and onions until they are soft and caramelized. This brings out their natural sweetness. Spread them out on a baking sheet and don’t crowd them. This way, they roast evenly. When it comes to blending, you can use either a blender or a food processor. A blender makes the soup silky smooth. If you prefer some chunks, use a food processor. Blend just a little, and you’ll have a heartier soup! Garnishing your soup makes it look fancy. I love adding a fresh basil sprig on top. A drizzle of olive oil also adds a nice shine. For a complete meal, serve the soup with crusty bread or homemade croutons. The crunch adds a nice contrast to the smooth soup. You can find the Full Recipe above to guide you in making this delicious dish! {{image_2}} You can easily make roasted tomato basil soup gluten-free. Just check your broth. Most vegetable broths are gluten-free. Choose one that states it clearly on the label. For dairy-free options, skip the heavy cream. Instead, use coconut milk for a creamy touch. Almond or oat milk also works, but they change the flavor. Adjust the seasoning to match your taste. Adding beans or lentils makes the soup heartier. White beans blend well into the soup. They add protein without changing the taste much. If you like lentils, use cooked green or brown lentils. Stir them in just before serving for added texture and nutrition. You can add herbs and spices for more flavor. Try a pinch of red pepper flakes for heat. Thyme or oregano pairs well with tomato. Fresh herbs like parsley can brighten the dish. Experiment with your favorite spices to find the best mix. For the full recipe, check the main article. To store leftover soup, let it cool first. Pour the soup into a clean, airtight container. Seal it tightly to keep out air. Place it in the fridge right away. This helps keep it fresh. Use the soup within 3 to 5 days. When you are ready to eat, just reheat it on the stove. You can freeze roasted tomato basil soup for later. Start by letting the soup cool down completely. Pour it into freezer-safe containers or bags. Leave some space at the top for expansion. Label the bags with the date. This makes it easy to track. When you want to eat it, take it out of the freezer. Thaw it in the fridge overnight. Reheat it on the stove, stirring often until hot. Roasted tomato basil soup lasts well in the fridge for about 3 to 5 days. In the freezer, it can last up to 3 months. However, for the best taste, eat it within 1 to 2 months. Enjoy it while it's fresh! For the full recipe, refer to the earlier section. Tomato basil soup has many health benefits. It is low in calories and rich in vitamins. Tomatoes are high in vitamin C, which helps your immune system. They also contain lycopene, a powerful antioxidant. This helps protect your cells from damage. Basil adds flavor and has anti-inflammatory properties. The soup also provides hydration, thanks to its high water content. Yes, you can use canned tomatoes instead of fresh ones. Canned tomatoes are often picked at their peak ripeness. They can be just as tasty and save time. However, fresh tomatoes have a brighter flavor. Canned tomatoes may have added salt or preservatives, so check the label. For the best taste, choose whole canned tomatoes for your soup. There are several ways to thicken your soup. You can blend it less to keep some chunks. Adding a bit of heavy cream makes it creamy and rich. You can also stir in some cooked rice or lentils. Another option is to simmer the soup longer to reduce it. This concentrates the flavors and thickens the texture. In this blog post, we explored how to make a delicious roasted tomato basil soup. We discussed the fresh ingredients you'll need and pantry staples that enhance flavor. I shared step-by-step cooking instructions, along with tips for perfecting taste and presentation. You can also adapt the soup to fit gluten-free or dairy-free diets. Finally, we covered storage tips and answered common questions about health benefits and thickness. Enjoy creating this tasty dish—it's simple and satisfying!

Roasted Tomato Basil Soup Flavorful Comfort Dish

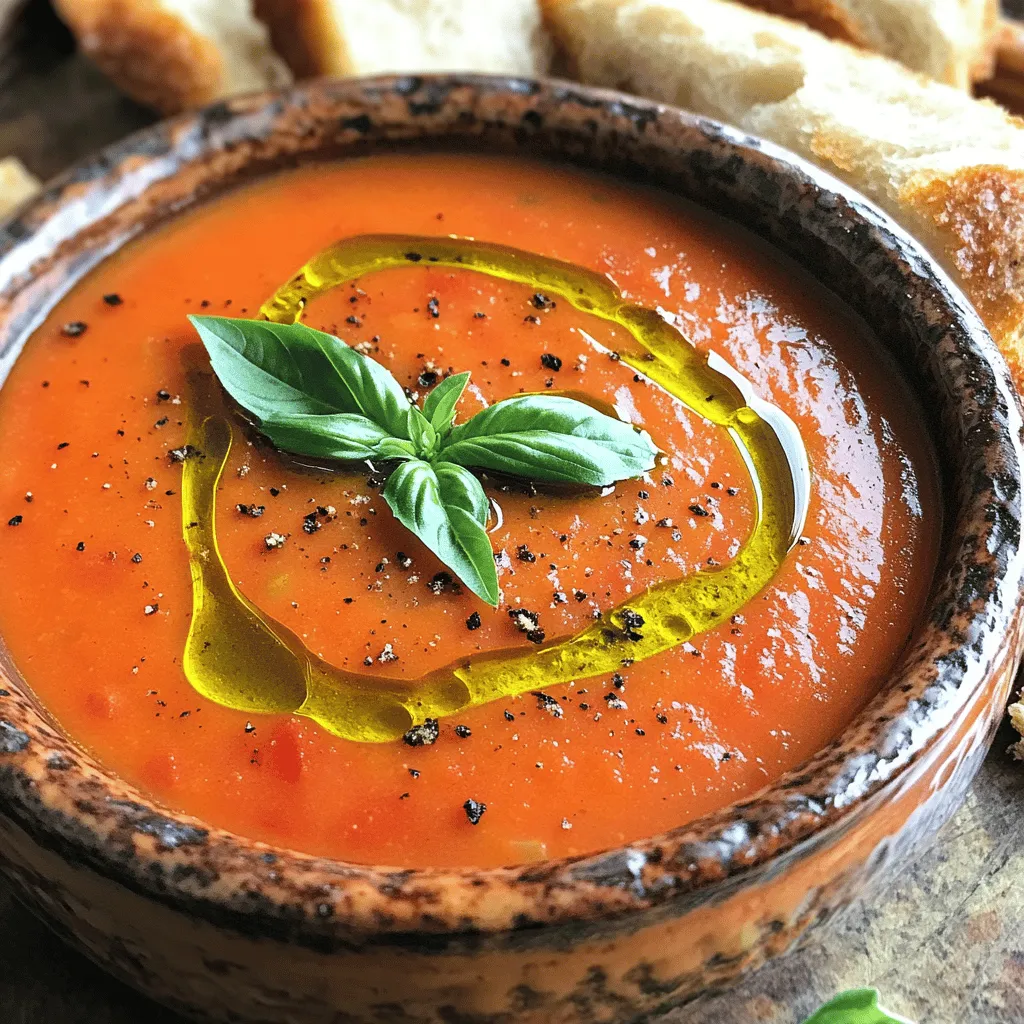
Are you craving a warm bowl of comfort? Let me introduce you to the joy of Roasted Tomato Basil Soup!

To make Spicy Cajun Chicken Pasta, you will need a few key items. Here’s what you need: - 2 boneless, skinless chicken breasts - 2 tablespoons Cajun seasoning - 2 tablespoons olive oil - 3 cloves garlic, minced - 1 bell pepper (red or green), sliced - 1 small onion, diced - 1 cup cherry tomatoes, halved - 1 cup heavy cream - 1 cup chicken broth - 8 oz fettuccine or penne pasta - Salt and pepper to taste These ingredients create a delicious mix of flavors. The Cajun seasoning gives a nice kick. The cream adds richness to the dish. Adding garnishes can enhance the dish's look and taste. Consider these options: - Fresh parsley, chopped - Grated Parmesan cheese - Crushed red pepper flakes These garnishes not only add color but also extra flavor. Fresh parsley brightens the dish while Parmesan gives a savory touch. Having the right tools makes cooking easier. Here’s what I recommend using: - Large pot for boiling pasta - Large skillet for cooking the chicken and sauce - Wooden spoon for stirring - Knife and cutting board for chopping These tools help you cook efficiently. With them, you’ll create a meal that impresses everyone. For the complete cooking process, refer to the Full Recipe. Start by boiling a large pot of salted water. Add 8 oz of fettuccine or penne pasta. Cook the pasta according to the package directions. Stir occasionally to prevent sticking. Drain the pasta when it is al dente, then set it aside for later. Take 2 boneless, skinless chicken breasts. Evenly coat them with 2 tablespoons of Cajun seasoning on both sides. Use your hands to make sure the seasoning sticks. This will give your chicken a flavorful kick. In a large skillet, heat 2 tablespoons of olive oil over medium-high heat. Once hot, add the seasoned chicken breasts. Cook them for 6-7 minutes on each side. Look for a golden color and ensure they are fully cooked. After cooking, remove the chicken and let it rest. Slice it into thin strips when cool. In the same skillet, add 3 cloves of minced garlic, 1 sliced bell pepper, and 1 diced onion. Sauté these for 3-4 minutes until they soften. Then, add 1 cup of halved cherry tomatoes. Cook for 2 more minutes until the tomatoes begin to blister. Next, lower the heat to medium-low. Pour in 1 cup of heavy cream and 1 cup of chicken broth. Stir well and let it simmer for about 5 minutes. This melds the flavors together. Now, add the cooked pasta to the skillet. Toss everything together until the pasta is well coated in the sauce. Then, return your sliced chicken to the skillet. Mix again and season with extra salt and pepper to taste. Remove the skillet from heat. Garnish your dish with fresh chopped parsley. Serve the spicy Cajun chicken pasta in deep bowls. For a delightful finish, sprinkle with grated Parmesan cheese. Enjoy this dish with garlic bread for a complete meal. For the full recipe, refer to the earlier section. To get that true Cajun taste, choose a good Cajun seasoning. Make sure it has the right mix of herbs and spices. You can make your own, too! Just mix paprika, garlic powder, onion powder, thyme, and cayenne. Use enough seasoning on your chicken for a bold flavor. Marinate the chicken for at least 30 minutes if you have time. This helps the flavors soak in. Cooking the chicken right is key. Don’t overcrowd the pan. This lets the chicken sear well and stay juicy. Always let it rest after cooking. This keeps the juices inside. When you sauté the veggies, cook them just until they soften. You want them to keep some crunch. This adds great texture to your dish. For serving, use deep bowls to hold all that creamy pasta. Top with grated Parmesan cheese and fresh parsley. This adds flavor and looks nice. Serve with garlic bread on the side. It’s perfect for soaking up the sauce. Try a light salad to balance the meal. You could also add a splash of lemon juice for a fresh kick. For the full recipe, check out the complete cooking steps! {{image_2}} You can easily make a vegetarian version of spicy Cajun chicken pasta. Replace the chicken with hearty vegetables like zucchini, bell peppers, and mushrooms. Use the same Cajun seasoning to keep that bold flavor. For the sauce, add extra vegetable broth to maintain richness. This dish still feels filling and satisfying. For a seafood twist, swap chicken for shrimp or scallops. Cook the seafood just until it turns pink. Then, follow the same steps for the sauce. The seafood brings a lovely flavor that pairs well with Cajun spice. You can also add some crab meat for extra luxury. This version feels like a treat! If you need a gluten-free meal, choose gluten-free pasta. Most stores have great options for fettuccine or penne. The sauce stays the same, ensuring you still enjoy that creamy texture. Just be cautious while cooking, as gluten-free pasta can cook faster than regular pasta. Keep an eye on it to prevent mushiness. For more ideas, check out the Full Recipe. After you enjoy your meal, let the leftovers cool. Place them in an airtight container. Store the container in the fridge. Leftovers can stay fresh for about three days. Make sure to label the container with the date. This helps you keep track of freshness. When you’re ready to eat your leftovers, you have a few options. You can use the microwave or heat them on the stove. If using the microwave, place the pasta in a bowl. Add a splash of chicken broth or cream to keep it moist. Heat it in short intervals, stirring in between. If using the stove, warm it up in a skillet over low heat. Stir often to avoid burning. If you want to save some for later, freezing works well. Start by letting the dish cool completely. Then, transfer it to a freezer-safe container. Be sure to leave some space for expansion. You can freeze it for up to three months. When you’re ready to eat, thaw it in the fridge overnight. Reheat it on the stove or in the microwave, just like you would with leftovers. For the full recipe, check out the Spicy Cajun Chicken Pasta Delight! Fettuccine or penne works best for Spicy Cajun Chicken Pasta. These shapes hold the sauce well. Fettuccine offers a nice, flat surface. Penne has tubes that trap the sauce inside. You can also use spaghetti or rotini if you prefer. Yes, you can use shrimp, sausage, or tofu. Shrimp cooks fast and adds a sweet flavor. Sausage gives a smoky taste. If you want a meat-free option, tofu absorbs the sauce well. Just adjust cooking times as needed. To reduce the spice, use less Cajun seasoning. You can also add more cream to mellow the heat. Another trick is to include a bit of sugar. This balances the heat and adds a nice touch. A simple green salad works great. Garlic bread is another excellent choice. You can also serve roasted vegetables for added color and nutrients. Consider a light coleslaw for a refreshing crunch. Yes, you can prepare the chicken and sauce ahead of time. Store them separately in the fridge. Cook the pasta fresh just before serving. This keeps everything tasting great. For the best flavor, eat within two days. For the full recipe, check out the details above. This blog post covered the essentials for making Spicy Cajun Chicken Pasta. You learned about key ingredients, step-by-step cooking instructions, and helpful tips for perfecting flavors. We also explored tasty variations and how to store leftovers. In the end, cooking is fun. Don’t be afraid to try new ideas. Enjoy making this dish and sharing it with others. Cooking brings people together, and this recipe is a great start!

Spicy Cajun Chicken Pasta Flavorful and Simple Dish

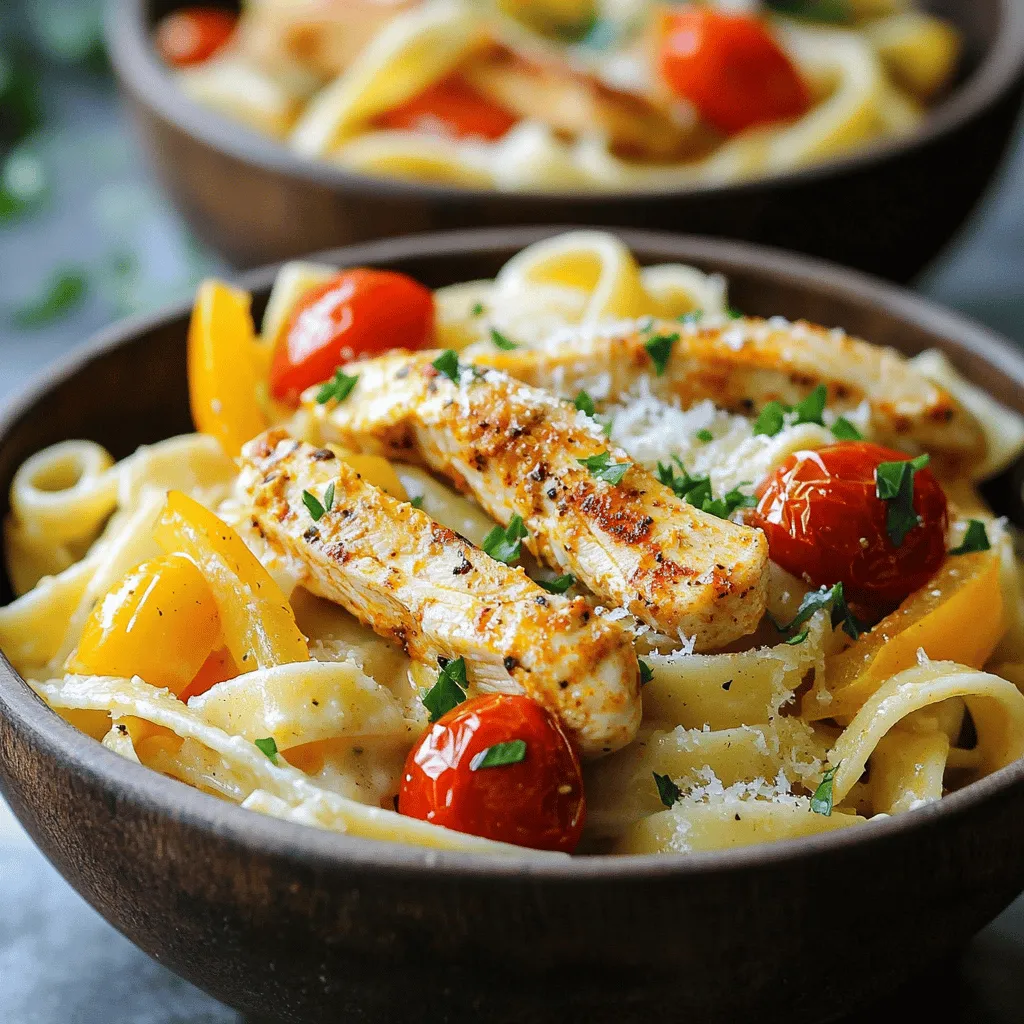
Are you ready to spice up your dinner routine? This Spicy Cajun Chicken Pasta is a bold and easy dish

To make Easy Chicken Shawarma Wraps, you need just a few key items: - 1 lb boneless, skinless chicken thighs - 2 tablespoons olive oil - 2 teaspoons ground cumin - 2 teaspoons ground coriander - 1 teaspoon smoked paprika - 1 teaspoon garlic powder - 1 teaspoon onion powder - 1/2 teaspoon cayenne pepper (optional for heat) - Salt and pepper to taste These ingredients create a rich marinade that makes the chicken flavorful and juicy. When you’re ready to serve, gather these fresh toppings: - 4 large pita or flatbreads - 1 cup lettuce, shredded - 1 medium tomato, diced - 1/2 cucumber, sliced - 1/4 red onion, thinly sliced - 1/2 cup tahini sauce or garlic yogurt sauce These fresh ingredients add crunch and creaminess to your wraps. You can change the marinade to suit your taste. Here are some ideas: - Use lemon juice instead of olive oil for a tangy twist. - Add fresh herbs like parsley or cilantro for a fresh taste. - Swap smoked paprika for regular paprika if you prefer less smoke. These small changes can make each wrap unique and exciting. For the complete recipe, check the Full Recipe. To start, gather your ingredients for the marinade. In a large bowl, mix: - 2 tablespoons olive oil - 2 teaspoons ground cumin - 2 teaspoons ground coriander - 1 teaspoon smoked paprika - 1 teaspoon garlic powder - 1 teaspoon onion powder - 1/2 teaspoon cayenne pepper (if you want heat) - Salt and pepper to taste Stir these ingredients well. This mix gives the chicken its bold flavor. Next, add 1 lb of boneless, skinless chicken thighs to the marinade. Make sure every piece is well-coated. Cover the bowl and place it in the fridge. Let it marinate for at least 30 minutes. For even more taste, you can marinate it for up to 2 hours. Now, it’s time to cook the chicken. Preheat your grill or skillet to medium-high heat. Cook the marinated chicken for about 6-7 minutes on each side. You want it fully cooked and slightly charred. Once cooked, remove it from the heat and let it rest for 5 minutes. After resting, slice the chicken thinly against the grain. While the chicken is resting, warm 4 large pita or flatbreads on the grill or in a skillet for a few seconds. This makes them soft and easy to wrap. Now, it’s assembly time! On each pita, place: - Shredded lettuce - Diced tomato - Sliced cucumber - Thinly sliced red onion Then, add the sliced chicken on top. Drizzle with 1/2 cup of tahini sauce or garlic yogurt sauce. Finally, roll the wraps tightly, tucking in the ends as you go. Serve these wraps right away or wrap them in parchment paper for a tasty meal on the go. For the full recipe, refer to the instructions above. Enjoy your delicious Easy Chicken Shawarma Wraps! You can cook chicken shawarma in several ways. The grill gives a smoky flavor. A skillet works well for a quick meal. An oven also produces great results. If you want that charred taste, grilling is best. Just remember to preheat the grill or skillet. This step ensures even cooking. Cook the chicken until it reaches 165°F for safety. Cutting the chicken right boosts its taste. Always slice against the grain. This method makes the meat tender and juicy. Start with cooked chicken that has rested. Letting it rest for a few minutes keeps the juices inside. Use a sharp knife to make clean cuts. Thin slices work best for wraps. Aim for pieces about 1/4 inch thick. Assembling your wraps can be fun. Start with a warm pita or flatbread. This step helps the wrap stay flexible. Place a good amount of lettuce, tomato, cucumber, and onion first. Then, add the sliced chicken. Don’t forget the sauce; it adds flavor and moisture. Roll the wrap tightly, tucking in the ends. This technique keeps everything inside. If you want to take it on the go, wrap it in parchment paper. Enjoy your delicious meal! For the full recipe, check out the Easy Chicken Shawarma Wraps. {{image_2}} You can switch up the protein in this recipe. Try beef or lamb if you want something richer. For a vegetarian choice, use marinated tofu or chickpeas. Both options bring great flavor and texture to your wraps. Cooking times may vary, so check for doneness. The sauce can make or break your wrap. If tahini is not your favorite, try garlic yogurt sauce for a creamy twist. You can also use a spicy harissa sauce for a kick. A simple mix of lemon juice and olive oil adds brightness and freshness, too. Feel free to customize your wraps! Swap out lettuce for spinach or arugula for a fresh taste. Try adding roasted peppers or olives for a Mediterranean flair. You can even throw in some feta cheese for extra creaminess. The key is to make it your own! For the full recipe, check out the link above. To keep your leftover shawarma chicken fresh, place it in an airtight container. Make sure it cools completely before sealing. Store it in the fridge for up to three days. If you want to keep it longer, freeze it. Wrap the chicken tightly in foil or plastic wrap. Then, place it in a freezer-safe bag. It will last up to three months in the freezer. If you have assembled wraps, store them carefully. Wrap each shawarma in parchment paper or aluminum foil. This keeps them fresh and prevents them from getting soggy. Place the wraps in an airtight container in the fridge. They should be eaten within one day for the best taste and texture. When you are ready to enjoy your leftovers, reheating is simple. For chicken, preheat your oven to 350°F (175°C). Place the chicken on a baking sheet and cover it with foil. Bake for about 10 minutes, or until heated through. If you have assembled wraps, you can reheat them in a skillet. Heat over medium heat for a few minutes on each side. This helps keep the wraps crispy. Enjoy your tasty meal again! For the full recipe, check out the earlier sections. Serve Easy Chicken Shawarma Wraps warm and fresh. Place them on a plate. You can add extra tahini sauce on the side for dipping. These wraps taste great with a squeeze of lemon juice too. If you want, serve them with a side of pickled vegetables. This adds crunch and a bit of tang. You can also wrap them in parchment paper for easy eating on the go. This makes them perfect for picnics or lunchboxes. Yes, you can make the marinade ahead of time. Mix the olive oil and spices in a bowl. Cover it and store it in the fridge. This makes meal prep easier, saving you time. You can also marinate the chicken overnight for deeper flavor. Just remember, the longer you marinate, the more intense the taste will be. This works well if you plan to serve the wraps later in the week. A few great sides go well with chicken shawarma. Consider a fresh salad with cucumbers, tomatoes, and parsley. Hummus and pita chips make a tasty appetizer too. You can also serve roasted vegetables for a warm side. Fries or sweet potato fries are a fun option as well. Each of these sides adds flavor and texture to your meal. Enjoy mixing and matching to find your favorite combinations! You learned about making easy chicken shawarma wraps. We talked about key ingredients, marinades, and cooking steps. Tips helped you optimize flavor and wrap assembly. You also saw variations for proteins and sauces. Lastly, we covered storage and reheating options. Enjoy trying these wraps at home. They’re fun, tasty, and easy to customize. You’ll impress yourself and others with your cooking skills!

Easy Chicken Shawarma Wraps Tasty and Simple Meal

Are you craving a quick and tasty meal? Look no further! Easy Chicken Shawarma Wraps are the perfect solution. With

To make Mango Coconut Energy Balls, gather these key ingredients: - 1 cup dried mango, chopped - 1 cup unsweetened shredded coconut - 1 cup rolled oats - 1/2 cup almond butter (or any nut butter) - 1/4 cup honey (or maple syrup for vegan option) - 1/4 cup chia seeds - 1 teaspoon vanilla extract - Pinch of salt These ingredients work together to create a sweet and chewy snack. The dried mango offers a burst of fruity flavor. Shredded coconut gives a tropical touch and a satisfying texture. Rolled oats add heartiness and fiber. Nut butter binds everything while adding healthy fats. Honey sweetens the mix and helps it stick. Chia seeds pack in extra nutrients, and vanilla boosts the taste. You can easily adjust your energy balls to fit your taste. Here are some fun ideas: - Add 1/4 cup of nuts for a crunch. - Mix in some chocolate chips for sweetness. - Use spices like cinnamon or ginger for warmth. - Swap dried mango for other dried fruits, like apricots or cranberries. These options allow you to create a snack that feels special to you. Experimenting with flavors makes cooking fun and personal. Every ingredient in these energy balls brings health benefits: - Dried Mango: Rich in vitamins A and C, it supports eye health and boosts immunity. - Shredded Coconut: High in fiber, it aids digestion and provides lasting energy. - Rolled Oats: A great source of whole grains, they help keep you full and steady blood sugar. - Almond Butter: Packed with protein and healthy fats, it promotes heart health. - Honey: Natural sweetener with antioxidants, it can soothe a sore throat. - Chia Seeds: Loaded with omega-3s, they support brain health and help keep you hydrated. - Vanilla Extract: Adds flavor and may have antioxidant properties. - Salt: Enhances flavor and helps with electrolyte balance. Incorporating these ingredients makes your snack tasty and nutritious. This recipe not only satisfies your cravings but also supports your well-being. For the complete recipe, check the Full Recipe section. Start by gathering your dry ingredients. You need dried mango, shredded coconut, and rolled oats. Take one cup of each. Place them in a large mixing bowl. Stir them well to mix everything evenly. This step is key for flavor. Next, we move to the wet ingredients. In another bowl, combine half a cup of almond butter, a quarter cup of honey, and chia seeds. Add one teaspoon of vanilla extract and a pinch of salt. Mix until it’s smooth. This mix adds creaminess and sweetness. Now, pour the wet mix into the bowl with the dry ingredients. Use a spatula or your hands to combine everything. If the mix is too sticky, add more shredded coconut or oats. Once mixed well, refrigerate for about 30 minutes. This helps it firm up for shaping. After chilling, take the mixture out. Use your hands to roll it into small balls. Aim for about one inch in diameter. If you like coconut, roll the balls in more shredded coconut. This adds a fun texture and flavor. Place the energy balls on a parchment-lined tray. Refrigerate them for another 30 minutes to set. Once firm, store them in an airtight container. They last up to one week in the fridge. Enjoy these as a snack or post-workout treat. For the full recipe, check out the earlier section. To get the right texture for your Mango Coconut Energy Balls, balance is key. You want them firm but not hard. Start with the base ingredients: dried mango, shredded coconut, and oats. If the mix feels too dry, add more almond butter. If it’s too wet, toss in a bit more oats or coconut. Chill the mixture for 30 minutes before shaping. This makes it easier to form balls. Sticky hands can be a hassle when shaping energy balls. To reduce stickiness, keep your hands damp. A little water on your palms helps the mixture slide off easily. You can also roll the finished balls in more shredded coconut. This adds flavor and keeps them from sticking together. Store your energy balls in an airtight container. This keeps them fresh and tasty. Place them in the fridge for up to a week. If you want to keep them longer, freeze them. They last for about three months in the freezer. Make sure to label the container with the date. This way, you’ll know when they were made. These snacks are perfect for a quick energy boost any time! {{image_2}} You can switch up the sweeteners in this recipe. Instead of honey, use maple syrup. It makes the energy balls vegan. You can also try agave syrup for a different taste. As for nut butters, almond butter works great, but peanut butter adds a strong flavor. Sunflower seed butter is another option for those with nut allergies. To make these energy balls more exciting, add spices or chocolate chips. A pinch of cinnamon or nutmeg can enhance the taste. If you love chocolate, mix in some dark chocolate chips. Dried fruits, like cranberries or apricots, can also add a fun twist. Experiment with different ingredients to find your favorite combo! To keep this recipe vegan, use maple syrup instead of honey. For a gluten-free option, ensure your oats are certified gluten-free. This way, everyone can enjoy these tasty snacks! You can also substitute rolled oats with ground nuts or seeds for a different texture. For the full recipe, check the earlier section and let your creativity shine! To keep your mango coconut energy balls fresh, store them in an airtight container. This helps prevent air from making them dry. Place the container in the fridge. They stay good for about one week. If you want to eat them later, freezing is a great option. You can freeze these energy balls for up to three months. First, roll them into balls and place them on a baking sheet. Make sure they are not touching. Freeze them for about two hours. Once frozen, move them to a freezer bag or container. Label it with the date. This way, you always know when you made them. Check for any off smells or changes in texture. If they feel slimy or smell sour, it's best to throw them away. If they look dry but smell okay, they may still be safe to eat. Always trust your senses. Keeping these tips in mind helps you enjoy your mango coconut energy balls safely! Mango Coconut Energy Balls last about one week in the fridge. Store them in an airtight container. This keeps them fresh and tasty. If you want them to last longer, freeze them. They can stay good for up to three months in the freezer. You can use fresh mango, but it changes the texture. Fresh mango has more moisture. This can make the energy balls too wet. If you want to use fresh mango, add more oats or coconut to help balance it out. You can swap almond butter for sunflower seed butter for nut allergies. Use maple syrup instead of honey for a vegan option. If you need gluten-free, ensure your oats are certified gluten-free. You can also use any seeds in place of chia seeds. Yes, these energy balls are great to make ahead. You can prepare them up to a week in advance. Just keep them in the fridge. They also freeze well, so you can make a big batch and enjoy them later. For the full recipe, check the instructions to get started! In this post, we explored how to make tasty Mango Coconut Energy Balls. We covered essential and optional ingredients, along with their health benefits. You learned step-by-step instructions for mixing, shaping, and serving. I shared tips to get the right texture and ideas for fun variations. Finally, we discussed storage practices and answered common questions. These energy balls are easy to make and great for snacks. Enjoy creating your own versions!

Mango Coconut Energy Balls Tasty and Nutritious Snack

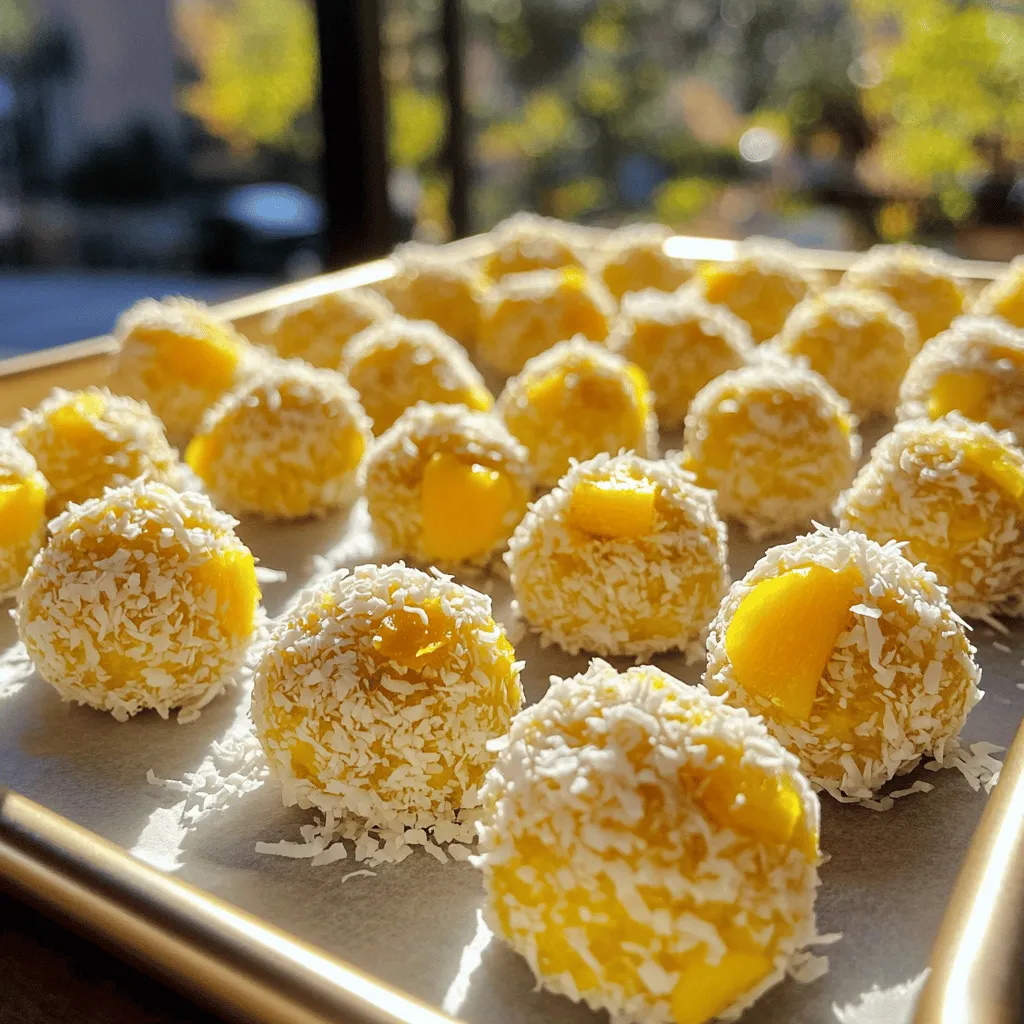
If you’re searching for a tasty and nutritious snack, look no further! Mango Coconut Energy Balls are packed with flavor

- 1 cup dried chickpeas, soaked overnight - 1 small onion, roughly chopped - 2 cloves garlic, minced - 1/4 cup fresh parsley, chopped - 1/4 cup fresh cilantro, chopped - 1 teaspoon ground cumin - 1 teaspoon ground coriander - 1/2 teaspoon baking powder - 1/4 teaspoon cayenne pepper (optional) - Salt and pepper to taste - 3 tablespoons olive oil (plus extra for baking) - 1/2 cup breadcrumbs (preferably whole wheat) Now, let’s talk about the ingredients. You need dried chickpeas. Soak them overnight to soften. This makes them easier to blend. Next, chop a small onion and mince two garlic cloves. These add a lot of flavor. Then, chop fresh parsley and cilantro. These herbs give the falafel a bright taste. For spices, you will need ground cumin and ground coriander. These warm spices create a lovely base flavor. Baking powder helps the falafel rise and stay fluffy. If you like heat, add cayenne pepper. Adjust salt and pepper to your taste. To bind everything, use olive oil and whole wheat breadcrumbs. The oil adds richness, while breadcrumbs help hold the mixture together. With this list, you can create a crispy, flavorful falafel. Check out the full recipe to see how to bring these ingredients together. - Preheat your oven to 400°F (200°C) and line a baking sheet with parchment paper. - Drain and rinse the soaked chickpeas, then transfer them to a food processor. - Add onion, garlic, parsley, cilantro, spices, and salt to the food processor. - Pulse until finely ground, maintaining some texture — avoid turning it into a paste. - Mix olive oil and breadcrumbs into the falafel mixture. - Shape into small balls or patties and arrange them on the baking sheet. - Lightly drizzle or brush tops with olive oil and bake for 20-25 minutes. This process allows you to create crispy baked falafel that is full of flavor. Enjoy making these at home! For a detailed recipe, check the Full Recipe. - Use dry chickpeas instead of canned for better texture. - Ensure falafel aren’t overcrowded on the baking sheet. To get that perfect crunch, start with dry chickpeas. Soak them overnight. This makes them plump and ready to blend. Canned chickpeas can make your falafel mushy. Next, when you place your falafel balls on the baking sheet, give them space. Crowding can lead to steaming instead of crisping. - Add spices like paprika or nutmeg for different flavor profiles. - Incorporate other herbs like dill or mint for a fresh taste. Spices can change your falafel game. A sprinkle of paprika gives warmth. Nutmeg adds a hint of sweetness. Fresh herbs like dill or mint bring brightness to every bite. Experiment with these flavors to find your favorite mix. - Flip the falafel halfway through for even crispiness. - Consider broiling for the last 2-3 minutes for added browning. When baking, flip your falafel halfway. This helps them brown evenly. For an extra crispy finish, turn on the broiler for the last few minutes. Just watch closely to avoid burning. This technique gives your falafel that golden look and delightful crunch. {{image_2}} If you need a gluten-free option, swap breadcrumbs with gluten-free alternatives like almond flour or crushed rice crackers. This change keeps the falafel crispy while catering to your dietary needs. For a vegan option, check that all added ingredients are certified vegan, including any sauces you choose to pair with your falafel. You can easily change the flavor of your falafel. For a Mediterranean style, mix in chopped olives and sundried tomatoes. This twist adds a burst of flavor and makes your falafel more exciting. If you like heat, create a spicy version by adding more cayenne pepper or some chopped jalapenos. This will give your falafel a nice kick that spice lovers will enjoy. How you serve your falafel can change the whole meal. You can stuff it in warm pita bread, add it to salads, or even include it in a mezze platter with other tasty bites. Pair your falafel with sauces like tzatziki for a cooling contrast or try a tahini sauce for a nutty flavor. The options are endless, and each serving style adds its own twist to this delicious dish. For the full recipe, check the link provided. You can store any leftover falafel in an airtight container. Keep it in the fridge for up to 3 days. If you want to keep it longer, freeze the baked falafel. It stays good for up to 3 months. When you're ready to eat, just reheat it. To make your falafel crispy again, use the oven. Heat it at 350°F (175°C) for about 10 minutes. This way, it will regain its crunch. Be careful with the microwave. It might make the falafel soft and chewy. You can add leftover falafel to many dishes. Toss them in salads, wraps, or grain bowls for a tasty meal. Crumble falafel over pizza for extra protein. You can even mix it into sauces for a flavor boost. For a full recipe, check out the Crispy Baked Falafel recipe above! To make falafel crispy, start with dry chickpeas, not canned. Soak them overnight. This gives falafel a great texture. When you blend the mixture, do not over-process it. Keep some texture for crunch. Also, use a good amount of olive oil when baking. Finally, flip them halfway through baking for even crispiness. Yes, you can make falafel in advance. Prepare the mixture and form the balls. Then, store them in the fridge for up to two days. You can also freeze them for longer storage. Just bake them straight from the freezer, adding a few extra minutes to the cooking time. Baked falafel pairs well with many sides. Here are some great options: - Pita bread - Hummus - Tahini sauce - Fresh veggies like cucumbers and tomatoes - A crunchy salad These items add flavor and texture to your meal. Yes, baked falafel is healthier than fried. Baking uses less oil, making it lower in calories. Fried falafel absorbs more oil, adding extra fat. Baked falafel still has great flavor and a nice crunch. It’s a tasty option for health-conscious eaters. You can use canned chickpeas, but the texture may change. Canned chickpeas are softer, so reduce the liquids in your recipe. Drain and rinse them well before blending. You may need to add more breadcrumbs to help the mixture hold together. Leftover baked falafel can last in the fridge for three days. Store them in an airtight container to keep them fresh. For longer storage, freeze them for up to three months. Reheat in the oven to regain their crispiness. Making baked falafel is simple and enjoyable. We covered ingredients like chickpeas, herbs, and spices. You learned how to blend and shape your falafel, then bake them for the perfect texture. With tips for crispiness and flavor variations, your options are endless. Don't forget how to store leftovers and use them in new dishes. Enjoy creating delicious meals that are both healthy and satisfying. It’s time to make your own tasty falafel!

Crispy Baked Falafel Easy and Flavorful Recipe

Craving a healthy, crunchy snack? Try my Crispy Baked Falafel recipe. Using simple ingredients like chickpeas, fresh herbs, and spices,

Older posts
Newer posts
← Previous Page1 Page2 Page3 Page4 … Page57 Next →

dsad

© 2025 Home Cooking Style • Built with GeneratePress

Our Policies

  • Copyright Policy
  • Cookie Policy
  • GDPR Policy
  • Privacy Policy
  • Disclaimer
  • Terms Of Use

More Information

  • Home
  • About
  • Contact
  • Appetizers
  • Dessert
  • Dinner
  • Drinks
©2025, Home Cooking Style About Back To Top