Skip to content
DisclaimerTerms Of UseGDPR PolicyCookie Policy

Home Cooking Style

  • Home
  • Drinks
  • Appetizers
  • Dinner
  • Dessert
  • About
  • Contact
  • Privacy Policy
DisclaimerTerms Of UseGDPR PolicyCookie Policy

Amelia

- 2 cups all-purpose flour - 1/3 cup granulated sugar - 1 tablespoon baking powder - 1/2 teaspoon salt - 1/4 cup cold unsalted butter, cubed - 1/2 cup heavy cream - 1 large egg - Zest of 1 lemon - 1 tablespoon lemon juice - 1 cup fresh (or frozen, thawed) raspberries - Optional: powdered sugar for dusting Gathering the right ingredients is key to making perfect Lemon Raspberry Scones. You will need two cups of all-purpose flour for a sturdy base. The sugar adds a touch of sweetness, while baking powder helps them rise. Salt balances the flavors. Use cold unsalted butter. It keeps the scones flaky. Heavy cream gives them a rich taste, and the egg adds moisture and helps bind everything together. The zest and juice from one lemon bring a bright, tangy flavor. Fresh raspberries add a burst of fruity goodness. If you like, dust your scones with powdered sugar for a sweet finish. For the full recipe, you can check the details provided above. Having everything ready will make the cooking process smooth and enjoyable. - Preheat your oven to 400°F (200°C) and line a baking sheet with parchment paper. - In a large bowl, combine 2 cups of all-purpose flour, 1/3 cup granulated sugar, 1 tablespoon baking powder, and 1/2 teaspoon salt. Whisk these dry ingredients together well. - Add 1/4 cup of cold unsalted butter, cubed, into the flour mixture. Use a pastry cutter or your fingers to cut the butter in until the mix looks like coarse crumbs. - In another bowl, whisk together 1/2 cup of heavy cream, 1 large egg, the zest of 1 lemon, and 1 tablespoon of lemon juice until it’s all mixed. - Pour the wet mixture into the dry ingredients. Gently mix it all together until just combined. Be careful not to overmix! - Fold in 1 cup of fresh raspberries, trying not to break them too much. - Turn the dough out onto a floured surface. Knead it a couple of times until it comes together. Pat it into a circle about 1 inch thick. - Cut the dough into 8 wedges and place them on the prepared baking sheet. - Bake for 15-18 minutes, or until the scones turn lightly golden brown. A toothpick should come out clean when inserted. - Let the scones cool on the sheet for 5 minutes before moving them to a wire rack. If you like, dust with powdered sugar before serving. Follow the [Full Recipe] for more details and tips to make your scones shine! To make great scones, avoid overmixing the dough. Mix just until combined. Overmixing makes the scones tough. You want them light and fluffy. When cutting butter into flour, use a pastry cutter or your fingers. Cold butter is key. It helps create that flaky texture. Aim for pea-sized pieces in the flour. This helps the scones rise nicely. Adding a splash of vanilla extract boosts the flavor. Just a teaspoon can make a difference. It adds warmth to the bright lemon and raspberry. You can also try different fruits. Blueberries, strawberries, or blackberries work well. Each fruit brings its unique taste. This way, you can enjoy new flavors all year. For the full recipe, check out the complete instructions above. Enjoy baking! {{image_2}} You can change up your Lemon Raspberry Scones based on what’s fresh. In spring and summer, try using blueberries or strawberries. They add a nice twist. You can also mix in citrus like orange or lime zest for a bright flavor. If you like a crunch, add nuts such as almonds or walnuts. Chopped nuts not only taste great but also give a nice texture to the scones. If you need gluten-free scones, use gluten-free flour blends. Many options work well without losing flavor. For those who want dairy-free scones, try almond milk or coconut cream instead of heavy cream. You can also use plant-based butter in place of regular butter. These changes help everyone enjoy the sweet and tangy delight of Lemon Raspberry Scones. You can find the full recipe linked above for more details. To keep your scones fresh, store them at room temperature. Place them in an airtight container. This helps maintain their soft texture. Try not to stack them, as they might squish. If you want to keep them longer, freeze them. Wrap each scone in plastic wrap, then place them in a freezer bag. This way, you can enjoy Lemon Raspberry Scones later. When you're ready to enjoy your scones again, reheating is simple. For quick reheating, use a microwave. Place a scone on a microwave-safe plate. Heat for about 10-15 seconds. This warms it up nicely but can make it soft. If you prefer a crisp texture, use an oven. Preheat the oven to 350°F (175°C). Bake the scones for about 5-10 minutes. This method keeps them nice and crunchy on the outside. Enjoy your scones like they just came out of the oven! - Can I use frozen raspberries in this recipe? Yes, you can use frozen raspberries. Just thaw and drain them first. This will help keep your dough from getting too wet. Thawed raspberries also work well and still taste great in the scones. - How do I know when scones are done baking? Scones are done when they turn lightly golden brown. Insert a toothpick into the center. If it comes out clean, your scones are ready. Keep an eye on them towards the end of baking for the best results. - What can I serve with Lemon Raspberry Scones? You can serve these scones with clotted cream, butter, or lemon curd. A dollop of whipped cream adds a nice touch too. Fresh fruit or a cup of tea pairs perfectly for a delightful treat. - Why did my scones not rise? If your scones did not rise, check your baking powder. It should be fresh and active. Also, avoid overmixing the dough. This can make the scones tough and prevent them from rising well. - How to fix dry scones? If your scones are dry, try adding a bit more cream next time. You can also brush the tops with cream before baking. This adds moisture and helps keep them soft. If they are already baked, serve them with a spread to add moisture. You now have a clear guide to making delicious lemon raspberry scones. We've covered everything from essential ingredients to mixing and baking techniques. You learned tips to perfect your scones and saw variations to try. Remember, avoid overmixing and store your scones properly for the best results. Scones can bring joy to any meal or gathering. Enjoy the process, and don’t hesitate to get creative with flavors! Happy baking!

Lemon Raspberry Scones Sweet and Tangy Delight

If you love bright flavors that dance on your taste buds, you’ll adore these Lemon Raspberry Scones. This sweet and

To make crispy air fryer zucchini fries, you need the following ingredients: - 2 medium zucchini, cut into thick fries - 1 cup breadcrumbs (preferably panko for extra crunch) - 1/2 cup grated Parmesan cheese - 1 tablespoon Italian seasoning - 1/2 teaspoon garlic powder - 1/2 teaspoon onion powder - 2 large eggs - Salt and pepper to taste - Cooking spray or olive oil spray These ingredients work together to create a tasty snack. The zucchini gives a fresh taste, while the panko breadcrumbs add crunch. Parmesan cheese adds a nice flavor boost. The spices bring everything together. Make sure to cut the zucchini into thick fries. This helps them stay crisp while cooking. Use fresh zucchini for the best results. If you want to make it gluten-free, substitute breadcrumbs with ground nuts or gluten-free crumbs. By gathering these ingredients, you set yourself up for a fun cooking experience. You will enjoy every bite of these crispy air fryer zucchini fries. For the complete recipe, check out the Full Recipe section. - Preheat your air fryer to 400°F (200°C). - In a bowl, combine the breadcrumbs, grated Parmesan, Italian seasoning, garlic powder, onion powder, salt, and pepper. Mix well. - In another bowl, beat the eggs until they are smooth and well combined. - Take each zucchini fry and dip it into the eggs. Make sure it is fully coated. - Next, roll the egg-coated fry in the breadcrumb mixture until it is covered. Place it on a plate. - Lightly spray the air fryer basket with cooking spray to prevent sticking. - Arrange the zucchini fries in a single layer in the basket. Do not overcrowd, as this helps them cook evenly. - Lightly spray the tops of the fries with cooking spray to make them extra crispy. - Cook for 10-12 minutes. Flip the fries halfway through cooking to ensure they brown evenly. - Carefully remove the zucchini fries from the air fryer. Let them rest for a few minutes before serving. For the full recipe, check out the details above. To get that perfect crispiness, use cooking spray. A light coat helps your fries turn golden brown. I recommend spraying both the air fryer basket and the tops of the fries. This simple step makes all the difference. Avoid overcrowding the air fryer basket. If you pile too many fries in, they steam instead of crisp. Cook in batches if needed for the best results. For frying, use medium-sized zucchini. Look for firm ones with shiny skin. These have the best texture and flavor. Cut the zucchini into thick fries, about half an inch wide. This helps them hold their shape and cook evenly. Thin fries can burn easily and lose texture. Serve your crispy zucchini fries with tasty dips. Marinara sauce or ranch dressing pairs well. You can also try garlic aioli or tzatziki for a fresh twist. Garnish with fresh parsley for a pop of color. This makes your dish look more inviting and fun! For the full recipe, check out the link provided. {{image_2}} You can boost the taste of your zucchini fries in fun ways. Adding spices makes a big difference. Try paprika for a smoky flavor. Or add cayenne for some heat. You can also mix in herbs like oregano or thyme for a fresh taste. If you want to switch up the cheese, Parmesan is great, but you can use cheddar or mozzarella. Each cheese brings its own style. Cheddar adds a sharp taste, while mozzarella gives a nice stretch. Want to make your fries gluten-free? Use almond flour or crushed rice cereal instead of breadcrumbs. These options still give a great crunch. You can also use crushed nuts, like almonds or pecans, for a nutty twist. They add a unique flavor and texture. You can even mix coatings. Try half breadcrumbs and half crushed nuts for a fun combo. Each bite will be different and exciting. Cooking zucchini fries in the oven is another option. Preheat your oven to 425°F (220°C). Spread the fries on a baking sheet instead of in the air fryer. Bake for about 20-25 minutes, flipping halfway through. The fries will still be crispy, but the texture may vary. In the air fryer, cooking time is shorter. You get crispy fries in about 10-12 minutes. The hot air circulates better in the air fryer, giving an even crunch. If you want quick and easy, the air fryer is your best bet. For larger batches, the oven might work better. For the full recipe, check out the detailed instructions above. To keep your crispy zucchini fries fresh, use an airtight container. Glass or plastic containers work well. Be sure to let the fries cool before sealing them. This will help avoid moisture build-up, which can make them soggy. Store the container in the fridge. They stay good for about three days. To reheat in the air fryer, set it to 350°F (175°C). Place the fries in a single layer. Heat them for about 5 minutes. This method helps to keep them crispy. If you don’t have an air fryer, you can use an oven. Preheat the oven to 400°F (200°C). Spread the fries on a baking sheet. Bake them for about 10 minutes. This will also help restore their crunch. For best results, avoid using a microwave. It can make your fries soft and chewy. Enjoy your crispy zucchini fries again with these simple tips! The best dipping sauces for zucchini fries include marinara sauce, ranch dressing, and garlic aioli. You can also try spicy sriracha mayo or tzatziki for a fun twist. Each sauce adds a different layer of flavor to the crispy fries. Experiment and find your favorite! Yes, you can make these zucchini fries ahead of time. Prepare them up to the coating step. Place the coated fries on a plate and cover them with plastic wrap. Store them in the fridge for a few hours. When ready to cook, just pop them in the air fryer! Leftovers can last in the fridge for about 3 to 4 days. Store them in an airtight container to keep them fresh. You can reheat them in the air fryer for a crispy texture again. Zucchini fries are a healthy snack option. They are low in calories and packed with vitamins. When cooked in the air fryer, they use less oil than deep-frying. This makes them a great choice for a guilt-free treat! Using frozen zucchini for this recipe is not recommended. Frozen zucchini has a higher water content, which can make the fries soggy. Fresh zucchini gives the best results for crispy, delicious fries. Stick to fresh zucchini for the best flavor and texture. For the full recipe, check the earlier sections! You now have a simple guide to making delicious zucchini fries in an air fryer. We covered key ingredients, step-by-step instructions, and tips for the best results. Experiment with flavors and storage techniques to make them your own. Enjoy these tasty bites with your favorite dips. You can impress your friends and family with this easy recipe. Keep exploring different variations for more fun!

Crispy Air Fryer Zucchini Fries Easy to Make Snack

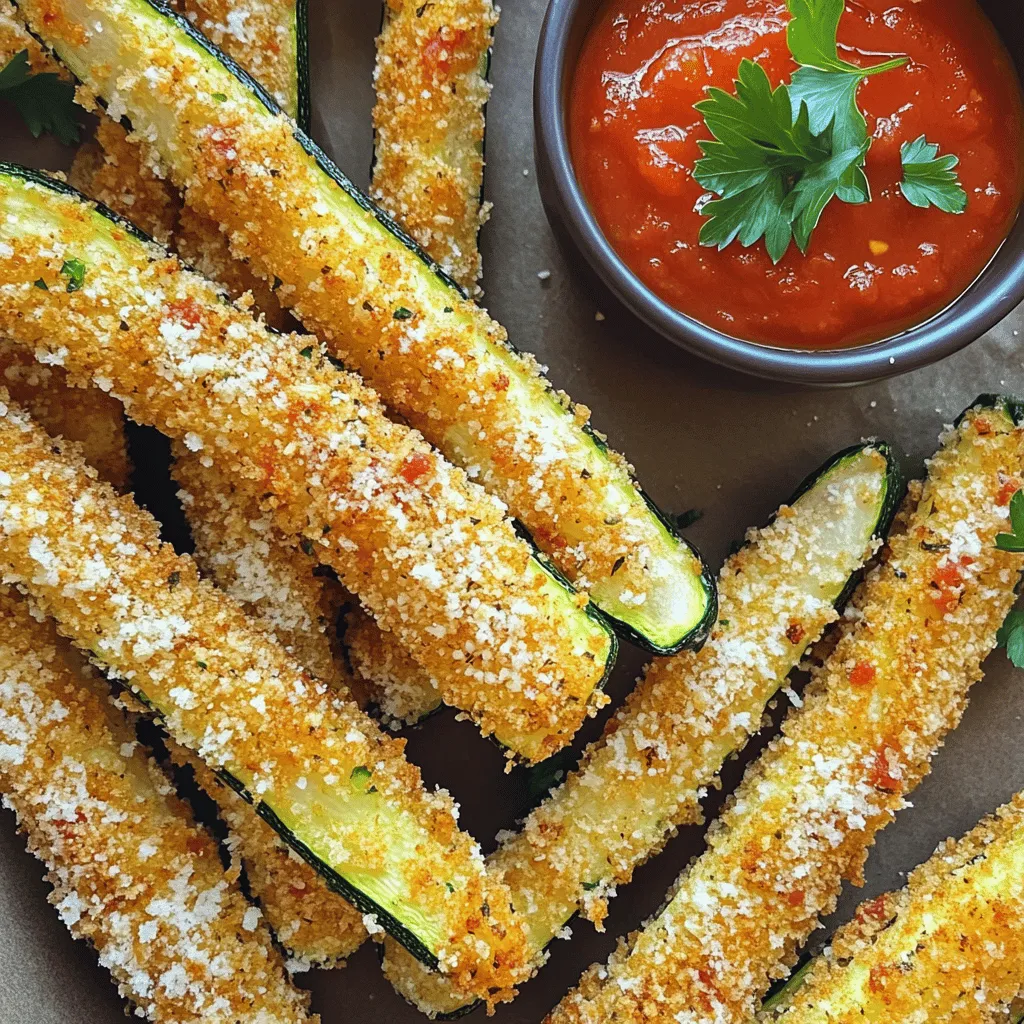
Looking for a tasty snack that’s easy to make? Crispy air fryer zucchini fries are your answer! With just a

- 2 cups cooked chicken, shredded - 1 cup cream cheese, softened - 1 cup shredded cheddar cheese - 1/2 cup salsa - 12 small corn tortillas - 1 tsp garlic powder - 1 tsp cumin - Salt and pepper to taste - Fresh cilantro, chopped - Lime wedges When making baked chicken taquitos, fresh and quality ingredients make a big difference. Start with cooked chicken. I like to use rotisserie chicken for its flavor and ease. Shred it finely so it mixes well with other ingredients. Next, cream cheese adds a rich texture. Softened cream cheese blends smoothly with the chicken. I use cheddar cheese for its sharp taste. It melts perfectly when baked. Salsa adds moisture and flavor. You can choose mild or spicy, depending on your taste. The corn tortillas are essential. They hold the filling and crisp up nicely. Warm them briefly in the microwave. This makes them easier to roll without breaking. Now, let’s talk seasonings. Garlic powder and cumin bring warmth and depth. Add salt and pepper to enhance all the flavors. Fresh cilantro adds a bright touch. I like to sprinkle it on top before serving. Don’t forget lime wedges for a zesty kick! The full recipe includes all these ingredients and detailed steps. These taquitos are sure to please your family and friends! 1. Preheat your oven to 400°F (200°C). This will ensure even cooking. 2. Line a baking sheet with parchment paper for easy cleanup. 3. In a large bowl, mix together: - 2 cups cooked chicken, shredded - 1 cup cream cheese, softened - 1 cup shredded cheddar cheese - 1/2 cup salsa - 1 tsp garlic powder - 1 tsp cumin - Salt and pepper to taste Stir until everything combines well. 1. Warm the corn tortillas in the microwave for about 30 seconds. This makes them soft and easy to roll. 2. Take a tortilla and place about two tablespoons of the chicken mix in the center. 3. Roll the tortilla tightly and tuck in the sides. This helps keep the filling inside. 4. Repeat with the rest of the tortillas and filling until done. 1. Place the rolled taquitos seam-side down on your prepared baking sheet. 2. Lightly spray the tops with cooking spray. This gives them that nice crispy finish. 3. Bake in the oven for 20-25 minutes. They should be golden brown and crispy. 4. Flip them halfway through baking for even crispiness. Now you are ready to enjoy your crispy and flavorful baked chicken taquitos! For the complete recipe, check out the [Full Recipe]. To get a nice crispy texture, use cooking spray. It helps the taquitos brown evenly. Spray the tops just before baking. This small step makes a big difference. Flip the taquitos halfway through baking. This ensures that both sides become golden and crunchy. To avoid cracking your tortillas, heat them first. Warm them in the microwave for about 30 seconds. This makes them flexible and easy to roll. Using a tortilla warmer also helps keep them warm. It prevents the tortillas from drying out, making rolling easier. For serving, salsas and dips add flavor. Choose a fresh salsa or guacamole. They complement the taquitos well. A cool drink also pairs nicely. Try serving them with a light beer or a refreshing soda. These options enhance your taquito experience. {{image_2}} You can spice up your taquitos in fun ways. For a kick, add jalapeños to the chicken mix. Chop them finely and mix them in with the chicken, cheese, and spices. This will give your taquitos heat and flavor. If you're looking for a vegetarian option, try using black beans and corn instead of chicken. Mash the black beans and mix them with corn, cheese, and spices. This combination is hearty and satisfying, making it a great choice for everyone. To make these taquitos gluten-free, swap out the corn tortillas for gluten-free ones. Many stores offer good options that taste great. Just check the labels to ensure they fit your dietary needs. If you need a dairy-free option, try using a dairy-free cheese substitute. Brands like Daiya or Violife offer great flavors. These can work well in your taquitos without losing taste. Taquitos can shine as appetizers or main dishes. Serve them with salsa or guacamole for a fun snack at parties. They also work well as a main dish with a side salad or rice. For casual dinners, put a platter of taquitos on the table. Let everyone grab their own, making it a fun and easy meal. You can also set out various dips, like sour cream or salsa, to make it interactive. For the full recipe, check out the detailed instructions above! To keep your baked chicken taquitos fresh, store them in an airtight container. Make sure they cool down before sealing. This helps prevent sogginess. Baked taquitos last in the fridge for about 3 to 4 days. If you want them to taste great, reheat them in the oven for crispiness. You can freeze the taquitos before or after baking. If you freeze them before baking, wrap each taquito tightly in plastic wrap. Place them in a freezer bag to save space. If you bake them first, let them cool completely before freezing. To reheat frozen taquitos, preheat your oven to 375°F. Bake them for 15 to 20 minutes until they are hot and crispy. Enjoy them with salsa or guacamole! To make Baked Chicken Taquitos from scratch, follow these simple steps: 1. Preheat your oven to 400°F (200°C) and line a baking sheet with parchment paper. 2. Mix your filling in a bowl. Combine 2 cups of shredded chicken, 1 cup of softened cream cheese, 1 cup of shredded cheddar, 1/2 cup of salsa, 1 tsp of garlic powder, 1 tsp of cumin, and season with salt and pepper. 3. Warm the tortillas in the microwave for about 30 seconds. This makes them soft and easy to roll. 4. Fill the tortillas. Place about two tablespoons of the mixture in each tortilla's center. Roll tightly and tuck in the sides. 5. Place on the baking sheet seam-side down. Lightly spray the tops with cooking spray. 6. Bake for 20-25 minutes until golden brown and crispy. Flip them halfway for even cooking. 7. Cool slightly and serve with fresh cilantro and lime wedges. This is a quick and tasty way to enjoy taquitos at home. Yes, you can prepare taquitos in advance. Here are some tips: - Assemble the taquitos and place them on a baking sheet. Cover tightly with plastic wrap or foil. - Refrigerate for up to 24 hours before baking. Just remember to remove the wrap before baking. - You can also freeze the assembled taquitos. Place them in an airtight container or freezer bag. They can last up to three months. - To bake from frozen, preheat the oven and add a few extra minutes to the baking time. Meal prepping makes it easier to enjoy these tasty treats any day of the week. Taquitos pair well with various sides and dips. Here are some great options: - Salsa: Choose your favorite type, whether mild or spicy. - Guacamole: Creamy and rich, it complements the crispy taquitos. - Sour cream: A classic choice for dipping. - Black beans: Serve them on the side for added protein and fiber. - Rice: A simple side of Mexican rice works well too. - Salad: A fresh side salad can add crunch and balance. These suggestions will enhance your taquito experience and delight your guests! In summary, we covered how to make baked chicken taquitos. You learned about the main ingredients, like shredded chicken and cheese. The step-by-step instructions helped you prepare and assemble these tasty bites. We also shared tips for achieving a crispy texture and offered flavor variations. Storing your taquitos properly is key to enjoying them later. Overall, baked taquitos are fun, easy, and versatile. Experiment with different ingredients and enjoy them with friends or family. Happy cooking!

Baked Chicken Taquitos Crispy and Flavorful Delight

Baked Chicken Taquitos are your next tasty obsession! These little rolls of joy combine shredded chicken, cream cheese, and spices

To make Easy Veggie Chili, you need a few key items. Here’s what you’ll want to gather: - 1 can (15 oz) black beans, drained and rinsed - 1 can (15 oz) kidney beans, drained and rinsed - 1 can (28 oz) diced tomatoes (with juice) - 1 medium bell pepper, chopped (any color) - 1 medium onion, diced - 2 cloves garlic, minced - 1 cup corn kernels (fresh or frozen) - 2 tablespoons chili powder - 1 teaspoon cumin - 1 teaspoon smoked paprika - ½ teaspoon cayenne pepper (adjust to taste) - Salt and pepper to taste - 2 tablespoons olive oil - Fresh cilantro for garnish (optional) - Avocado slices for topping (optional) These ingredients create a strong base for the chili. Each brings its own taste and health benefits. For example, beans are high in protein and fiber. Tomatoes add vitamins and antioxidants. Bell peppers give a nice crunch and color. You can also customize your chili with optional ingredients. Consider adding: - Zucchini or carrots for extra veggies - Jalapeños for more heat - Quinoa or rice for added texture These choices let you tailor the dish to your taste. Plus, they can boost the nutrition. By using fresh or canned ingredients, you can make this dish easy and quick. This recipe, from the Full Recipe section, ensures that you enjoy a delicious meal in no time! Start by chopping and measuring all your ingredients. This step makes cooking easy and fun. Take your time to dice the onion and bell pepper into small pieces. Use a sharp knife for clean cuts. Mince the garlic finely for the best flavor. Here are some tips for effective prep work: - Keep your workspace clean and organized. - Use a cutting board to protect your counter. - Always wash your veggies under cold water. Sautéing your veggies is important for flavor. Heat olive oil in a large pot over medium heat. Add the diced onion and bell pepper. Cook them for about 5 minutes until they soften. Stir in the minced garlic next. Cook for another minute until it smells great. This step brings out the sweet taste of the veggies. Now, let’s cook the chili. Keep the pot on medium heat. Add the spices next: chili powder, cumin, smoked paprika, and cayenne pepper. Stir well to coat the veggies. This step helps the spices release their full flavor. Then, pour in the diced tomatoes with their juice. Next, add the black beans, kidney beans, and corn. Mix everything together. Bring the mixture to a simmer, then reduce the heat to low. Cover the pot and let it simmer for 20-30 minutes. Stir occasionally. Check the taste and add salt and pepper as needed. If you want more heat, add extra cayenne pepper. Once your chili is ready, it’s time to serve. Ladle it into bowls for a beautiful presentation. Add a dollop of sour cream or Greek yogurt on top. Sprinkle fresh cilantro for a pop of color. For side dishes, serve it with cornbread or tortilla chips. These pair nicely with the chili. You can also add toppings like avocado slices, shredded cheese, or jalapeños. Get creative and enjoy your meal! For the full recipe, check the Full Recipe section. To make your veggie chili pop with flavor, start with the spices. - Adjust the heat by adding more cayenne pepper or chili powder if needed. - If you prefer milder chili, reduce the cayenne and use more cumin or smoked paprika. For herbs and seasonings: - Fresh cilantro adds a bright taste at serving. - Try adding a bay leaf while it simmers for depth. - You can also sprinkle some oregano for an earthy note. To enrich the chili: - Add one cup of diced zucchini or carrots for texture. - A splash of lime juice at the end can brighten the whole dish. - If you want a creamier texture, stir in some coconut milk. You can make veggie chili in many ways. Each method gives a unique taste. Slow Cooker Method: - Simply add all your ingredients to the slow cooker. - Set it on low for 6-8 hours or high for 3-4 hours. - This method deepens the flavors as it cooks slowly. Instant Pot Adaptation: - Use the sauté function to cook the onions and peppers first. - Then add all other ingredients and seal the lid. - Cook on high pressure for 10 minutes, then let it release naturally. Stovetop versus Oven Methods: - Cooking on the stovetop gives you more control over the heat. - If you want a baked chili, transfer it to a baking dish after cooking. - Bake at 350°F for 30 minutes for a nice crust on top. With these tips and tricks, you can make your veggie chili even better! For the full recipe, check out the detailed instructions. {{image_2}} You can make your veggie chili even better by trying some fun changes. Here are a few ideas: - Black bean and corn chili: Swap out some beans for extra black beans and add corn. This gives a sweet and hearty flavor. - Adding different vegetables: You can use veggies like zucchini or carrots. Chop them small and add them during cooking. They add nutrition and color. - Protein options: If you want more protein, try adding tofu or tempeh. These options make the chili filling and boost your energy. If you have special diet needs, you can still enjoy this chili: - Gluten-free alternatives: Most ingredients are gluten-free. Just check the chili powder and any toppings. - Vegan variations for toppings: Use avocado, fresh cilantro, or vegan sour cream. These toppings add creaminess without dairy. - Low-carb options: Swap beans for more veggies. Use cauliflower or mushrooms for a lower-carb dish. This keeps it light but still tasty. For the full recipe, check out the details above. These variations help you create a chili that suits your taste and diet. To keep your veggie chili fresh, store it in an airtight container. Place it in the fridge within two hours of cooking. This helps keep flavors intact. Use a container that fits your chili amount well to avoid excess air. If you want to save some for later, freezing works great. Divide the chili into smaller portions. Use freezer-safe bags or containers. Leave some space at the top of bags for expansion. Label each bag with the date. Chili can last up to three months in the freezer. When it’s time to eat your leftovers, reheat them on the stove or microwave. If using the stove, heat over medium heat until hot. Stir often to avoid sticking. In the microwave, cover the bowl with a lid or paper towel. Heat for 1-2 minutes, checking halfway through. Add a splash of water if it seems too thick. In the fridge, veggie chili stays fresh for about 4-5 days. In the freezer, you can keep it for up to three months. Always check for signs of spoilage. If you see mold or an off smell, it’s best to throw it away. A change in color or texture can also mean it’s time to discard. Keeping an eye on these details ensures you enjoy delicious meals every time! Can I substitute fresh ingredients with canned? Yes, you can use canned ingredients. Canned beans and tomatoes work well. They save time. Just rinse the beans to cut down on sodium. Use canned veggies if fresh ones aren’t available. How can I make this chili spicier? To add heat, use more cayenne pepper. You can also add diced jalapeños or spicy salsa. Taste as you go. This way, you control the spice level to fit your taste. What other beans can I use in this recipe? You can use pinto beans or black-eyed peas. Feel free to mix different beans. Each type adds a unique flavor and texture. How do I know when the chili is done? The chili is ready when it thickens and the flavors blend. You’ll see steam and the mixture bubbles. Stir it occasionally to check the texture. Can I make it a day in advance? Yes, you can make the chili ahead of time. It tastes even better the next day. Just store it in the fridge and heat it up when ready to serve. What should I serve with my veggie chili? Serve it with rice or cornbread for a filling meal. You can also add toppings like cheese, sour cream, or avocado. Fresh cilantro adds a nice touch, too. For the full recipe, check my earlier section! In this post, I shared how to make easy veggie chili. You learned about the essential ingredients and their benefits. I provided step-by-step cooking instructions and serving ideas. Tips to enhance flavor and variations for dietary needs add flexibility. Proper storage methods keep your chili fresh. Now, you can enjoy a delicious and healthy dish. Experiment with flavors and find your favorite twists. Happy cooking!

Easy Veggie Chili Flavorful Meal in Minutes

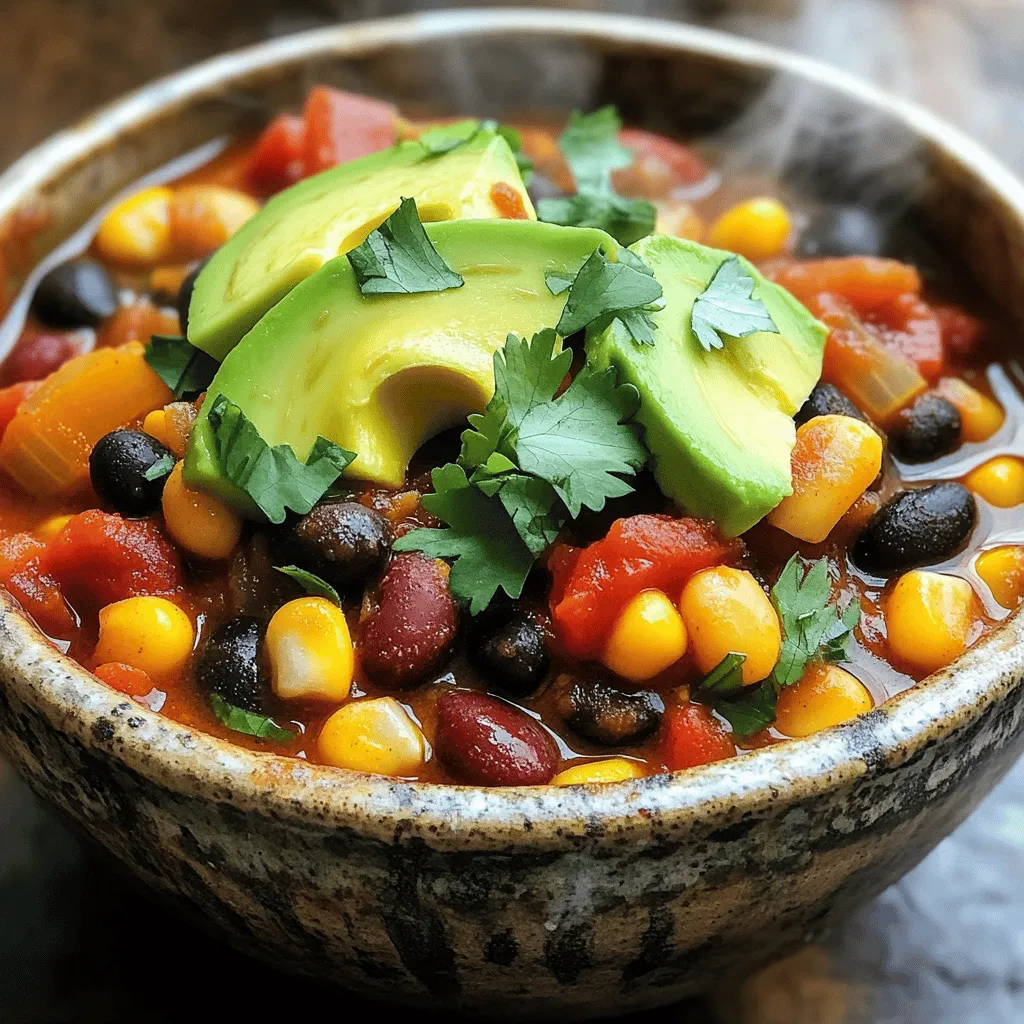
Looking for a quick, tasty meal? This Easy Veggie Chili is the answer! Packed with flavor and nutrition, you can

- 4 boneless, skinless chicken thighs - 1 cup fresh orange juice - Zest of 1 orange - 1 tablespoon soy sauce - 2 tablespoons honey - 1 tablespoon cornstarch - 2 tablespoons olive oil - 3 cloves garlic, minced - 1 teaspoon ginger, grated - Salt and pepper to taste When I make Orange Glazed Chicken, I focus on using fresh ingredients. Fresh orange juice makes a big difference in taste. You want to zest an orange to get the oils, which add a bright flavor. The soy sauce adds depth, while honey gives it a lovely sweetness. Cornstarch helps thicken the glaze, making it stick to the chicken. I also make sure to have garlic and ginger ready. They bring warmth and spice to the dish. Use good quality olive oil for cooking the chicken. Finally, don't forget to season with salt and pepper. These ingredients come together to create a dish that is both simple and packed with flavor. For the complete recipe, check out the [Full Recipe]. - Whisk together orange juice, zest, soy sauce, honey, and grated ginger. - Reserve 1/4 cup of the mixture for glazing later. Start by gathering your ingredients. I love using fresh orange juice for a bright flavor. In a mixing bowl, combine the orange juice, zest, soy sauce, honey, and grated ginger. Whisk until smooth. This mixture will be the heart of our dish. After mixing, set aside 1/4 cup for glazing. This step is key for that glossy finish later. - Season chicken thighs with salt and pepper. - Heat olive oil and sear chicken thighs for 5-7 minutes on each side. Next, take your chicken thighs and sprinkle salt and pepper on both sides. This simple seasoning really enhances the flavor. Heat two tablespoons of olive oil in a large skillet over medium-high heat. Once the oil is hot, add the chicken thighs. Sear them for 5-7 minutes on each side. Look for a nice golden color to develop. This browning adds great flavor and texture. - Simmer with reserved mixture for 2-3 minutes. - Add cornstarch slurry and stir until sauce thickens. After the chicken is cooked through, pour the reserved orange juice mixture over the chicken. Let it simmer for 2-3 minutes. This helps the chicken absorb all that tasty flavor. Now, mix one tablespoon of cornstarch with a bit of water to create a slurry. Add this slurry to the skillet and stir. Keep stirring until the sauce thickens, about 1-2 minutes. This will give you a luscious glaze that clings to the chicken. Serve your orange glazed chicken drizzled with this sauce for a stunning dish. For the best flavor, always use fresh orange juice. The juice gives a bright taste that bottled juice can’t match. You want that sunny burst in every bite! To make the glaze thick, mix cornstarch with a little water to make a slurry. This step is key. It helps the sauce cling to the chicken and gives it a nice shine. Pair your orange glazed chicken with rice or steamed vegetables. Rice soaks up the glaze, adding great flavor. Steamed veggies bring color and crunch to your plate. For a beautiful finish, sprinkle fresh cilantro on top. It adds a pop of green and a fresh taste. Choose a large skillet for searing chicken. A non-stick surface makes cooking and cleaning easier. You want to get a nice brown color on your chicken, so don’t crowd the pan. Use a meat thermometer to check for doneness. Chicken should reach 165°F to be safe to eat and juicy. For the full recipe, check out the details above. Enjoy your cooking! {{image_2}} You can switch the chicken thighs for chicken breasts. Chicken breasts are leaner and cook faster. They still soak up that sweet orange glaze well. For a vegetarian choice, use tofu. Press the tofu to remove extra water. Then, cut it into cubes and follow the same steps. This gives you a nice, tasty meal without meat. Want to spice things up? Add some chili flakes for heat. It gives the dish a nice kick. You can also switch the honey for maple syrup. This adds a different sweetness and depth to the glaze. Feel free to mix and match flavors to find what you love. Try orange glazed chicken in a wrap for a fun twist. Use a tortilla and add veggies for crunch. You can also serve it over a bed of mixed greens. This makes a light and fresh meal. The greens balance the sweetness of the glaze. Explore these serving styles for a new dining experience! To store leftovers, let the chicken cool first. Place it in an airtight container. This keeps the chicken fresh and prevents strong odors. You can store it in the fridge for up to three days for the best taste. For long-term storage, you can freeze orange glazed chicken. Wrap it tightly in plastic wrap, then place it in a freezer-safe bag. This helps avoid freezer burn. It will stay good for up to three months. When you are ready to use it, thaw in the fridge overnight. This method helps keep the texture nice. To reheat the chicken and keep it moist, use the stovetop or oven. If using the stovetop, add a splash of water or broth to the pan. Cover it to trap the steam. If using the oven, wrap the chicken in foil to keep it from drying out. Avoid the microwave, as it can make the chicken rubbery. Reheat gently until warm all the way through. You can cook orange glazed chicken in several ways. Each method gives a tasty result. - Grilling: This method adds a smoky flavor. Preheat the grill to medium-high. Brush chicken with oil before grilling. Cook for 6-8 minutes per side. - Baking: Preheat your oven to 400°F (200°C). Place seasoned chicken in a baking dish. Bake for 25-30 minutes. Baste with orange glaze halfway through for more flavor. - Stovetop: This is quick and easy. Heat oil in a skillet over medium-high heat. Sear chicken for 5-7 minutes on each side. Pour on the glaze to finish cooking. Yes, you can prepare orange glazed chicken ahead of time. This saves time for busy days. - Meal Prep: Marinate chicken in the orange glaze for a few hours or overnight. This lets the flavors soak in. Cook it on the day you plan to eat. - Timing: If you cook it in advance, store it in the fridge. It lasts for up to 3 days. Just reheat before serving. Many side dishes pair well with orange glazed chicken. Here are some ideas: - Rice: Serve with steamed white or brown rice. The glaze soaks into the rice for extra flavor. - Vegetables: Roasted or steamed vegetables add color and nutrition. Broccoli, carrots, or snap peas work well. - Salad: A fresh green salad balances the meal. Use citrus dressing to tie in the orange flavor. Orange glazed chicken can fit well into a healthy diet. Here’s why: - Nutritional Info: It's high in protein from the chicken. The orange juice adds vitamins like C. - Health Tips: Use less honey for less sugar. Choose skinless chicken to cut down on fat. Add more veggies on the side for a balanced meal. For the complete recipe, check [Full Recipe]. This blog post has shared a tasty orange glazed chicken recipe. You learned about main ingredients like chicken thighs and fresh orange juice. I outlined cooking steps, tips for the best glaze, and ways to serve the dish. Consider trying variations, like using tofu or adding chili flakes. Storing leftovers properly helps maintain flavor. This recipe is not only simple but also offers healthy options. Enjoy making this dish, and share it with others!

Orange Glazed Chicken Simple and Flavorful Recipe

Looking for a quick and tasty dinner idea? You’re in the right place! This Orange Glazed Chicken recipe is simple,

For these tasty chickpea shawarma wraps, gather these key items: - 1 can (15 oz) chickpeas, drained and rinsed - 2 tablespoons olive oil - 1 tablespoon ground cumin - 1 tablespoon ground coriander - 1 teaspoon smoked paprika - 1 teaspoon garlic powder - 1/2 teaspoon cayenne pepper (adjust for spice preference) - Salt and pepper to taste - 4 whole wheat or regular wraps - 1 cup tahini sauce (store-bought or homemade) - 1 cup diced cucumber - 1 cup diced tomatoes - 1/2 red onion, thinly sliced - Fresh parsley, chopped (for garnish) - Lemon wedges (for serving) You can add extra flavor and texture to your wraps. Here are some ideas: - Avocado slices for creaminess - Pickled radishes for a tangy crunch - Feta cheese for a salty kick - Sriracha or hot sauce for heat - Hummus as a spread for more flavor Each serving of these chickpea shawarma wraps is packed with nutrients. Here’s a quick overview: - Calories: About 350 - Protein: Roughly 15 grams - Fat: Around 10 grams This meal is not only delicious but also provides a good balance of protein and healthy fats. Enjoy these wraps as a filling lunch or dinner option! Check out the Full Recipe for more details. First, preheat your oven to 400°F (200°C). This step is key for roasting your chickpeas. Next, grab a large bowl. In it, combine the drained chickpeas, olive oil, cumin, coriander, smoked paprika, garlic powder, cayenne pepper, salt, and pepper. Mix everything well. Ensure the chickpeas are fully coated with the spices. This mix brings out the best flavor. Spread the spiced chickpeas on a baking sheet. Make sure they are in a single layer. This helps them roast evenly. Place the sheet in the oven. Roast the chickpeas for about 20-25 minutes. Halfway through, toss them to ensure even cooking. When they look golden brown and slightly crispy, they are done. Let them cool slightly before using. Now, it’s time to assemble your wraps. Start with a whole wheat wrap. Spread a generous amount of tahini sauce over the wrap. Next, add a handful of the roasted chickpeas. Then, layer on the cucumber, tomato, and onion mixture. Don’t forget to season this mix lightly. For a fresh touch, garnish with chopped parsley and a squeeze of lemon juice. Finally, roll the wrap tightly. Fold in the sides as you go. This helps keep all the fillings inside. Serve immediately, and enjoy your tasty wraps! For the complete recipe, check out the [Full Recipe]. To make chickpeas crispy, start with a hot oven. Preheat to 400°F (200°C). Then, drain and rinse your chickpeas well. Dry them with a towel to remove excess moisture. This helps them crisp up nicely. Toss the chickpeas with olive oil and spices in a bowl. Spread them out in a single layer on a baking sheet. Avoid crowding the pan. Roast for 20-25 minutes. Toss them halfway through for even cooking. Watch closely to prevent burning. You want golden brown, not black. You can adjust the spices to fit your taste. If you like heat, add more cayenne pepper. For a milder flavor, skip it completely. You can also try different herbs, like smoked paprika or cumin. Want a twist? Add some curry powder for a new flavor. Swap out the tahini for hummus or yogurt. You can even add roasted veggies, like bell peppers or zucchini. The wrap is your canvas, so get creative! These wraps pair well with many sides. Try a fresh salad with lemon vinaigrette. A side of roasted vegetables also works great. For drinks, a cool lemonade or mint tea complements the wraps. You can serve extra tahini sauce on the side for dipping. Lemon wedges add a fresh zing, too. Enjoy your meal with friends for a fun gathering! {{image_2}} You can swap chickpeas for other legumes or proteins. Lentils make a great option. They cook fast and have a nice texture. Black beans are another tasty choice. They add a different flavor and work well in wraps. If you prefer meat, try grilled chicken or beef shawarma. These choices give you variety while keeping the dish fun. Not everyone can eat gluten. For gluten-free wraps, use lettuce leaves. They act as great wraps and add freshness. You can also try corn tortillas. They are soft and easy to use. If you want low-carb options, consider using cauliflower wraps. They are light and still hold your fillings well. Let’s get creative with flavors! Try adding Mediterranean spices like za'atar or sumac. These spices add a unique taste. You can also include ingredients from Asian cuisines. Try adding kimchi or pickled vegetables for a spicy kick. For a Mexican twist, add avocado or pico de gallo. Each option gives your wraps a new flair. Check out the Full Recipe for more ideas! To keep your chickpea shawarma wraps fresh, wrap them tightly in plastic wrap or foil. Place them in an airtight container. This helps to lock in moisture and flavor. Store them in the fridge for up to three days. If the wraps sit too long, the wraps may get soggy. You can freeze these wraps for later enjoyment. If you want to freeze them, it's best to do so unassembled. Store the roasted chickpeas and veggies in separate containers. Wrap the tortillas in foil or freezer bags. This way, you can enjoy a fresh taste when you reassemble them later. They can stay in the freezer for up to three months. When it's time to eat, reheating is easy! To keep the texture, use an oven or a skillet. For the oven, preheat it to 350°F (175°C). Place the wraps on a baking sheet and heat for about 10-15 minutes. If using a skillet, heat it over medium heat. Place the wrap in the skillet for about 3-5 minutes on each side. This method keeps the wraps crispy and warm without losing flavor. Yes, you can make these wraps ahead of time. Preparing the chickpeas and veggies in advance is smart for busy days. Store each part separately. This keeps everything fresh. When you want to eat, just assemble your wrap. The tahini sauce can also be made in advance and stored in the fridge. This way, you save time and enjoy a quick meal. Chickpea shawarma wraps go well with many sides. Here are some great options: - Hummus with pita bread - Greek salad with feta - Roasted vegetables for extra crunch - Homemade fries for a fun twist - Yogurt sauce for dipping Each of these sides adds flavor and balance to your meal. Making tahini sauce at home is simple. Here’s a quick recipe: - 1/2 cup tahini - 1/4 cup water (adjust for thickness) - 2 tablespoons lemon juice - 1 clove garlic, minced - Salt to taste Mix all the ingredients in a bowl. Whisk until smooth. Adjust the water for your desired thickness. This sauce adds a creamy touch to your wraps. Use this method to make your tahini sauce fresh and tasty. For more details, check out the Full Recipe. This blog post covered how to make chickpea shawarma wraps. You learned about essential and optional ingredients, nutritional facts, and easy preparation steps. Roasting chickpeas and assembling wraps was detailed to ensure great flavor. I shared tips for perfecting your roast and customizing your wraps. You can even explore variations and storage options. In the end, these wraps are tasty and versatile. They can fit any diet or occasion. Enjoy your cooking and share these wraps with friends!

Chickpea Shawarma Wraps Flavorful and Nutritious Meal

Are you craving a meal that’s both tasty and healthy? Look no further than chickpea shawarma wraps! In this post,

To make a great Spinach Strawberry Feta Salad, you need fresh items. Here’s what you’ll need: - 4 cups fresh baby spinach, washed and dried - 1 cup fresh strawberries, hulled and sliced - 1/2 cup crumbled feta cheese - 1/4 cup walnuts, roughly chopped - 1/4 red onion, thinly sliced Each ingredient plays a role. The baby spinach gives a crisp base. Strawberries add a sweet burst. Feta cheese brings a salty note. Walnuts add crunch, while red onion gives a slight bite. This mix makes the salad bright and tasty. Next, let’s talk about the dressing. It pulls everything together. Here’s what you’ll need for the dressing: - 1/4 cup balsamic vinegar - 2 tablespoons honey - 1 tablespoon olive oil - Salt and pepper to taste The balsamic vinegar offers a tangy flavor. Honey adds sweetness and balances the vinegar. Olive oil gives a smooth texture. Salt and pepper enhance all the flavors. Combine these ingredients for a simple yet delicious dressing. For the full recipe, check out the Full Recipe section and enjoy making this vibrant salad! Start by making the dressing. In a small bowl, whisk together the balsamic vinegar, honey, olive oil, salt, and pepper. This mix brings a sweet and tangy flavor to the salad. Make sure you blend it well. Set this dressing aside while you work on the salad. Grab a large salad bowl. First, add the fresh spinach. This forms the base of your salad. Next, layer on the sliced strawberries, crumbled feta cheese, chopped walnuts, and thinly sliced red onion. Each topping adds its own unique flavor and crunch. Make sure to spread everything evenly for a balanced taste in every bite. Now it’s time to add the dressing. Drizzle it over the salad. Then, toss everything gently to combine. Be careful not to bruise the spinach or strawberries. After mixing, take a moment to taste the salad. Adjust the seasoning if needed. You might want to add more salt, pepper, or dressing for extra flavor. Serve immediately for the best taste and freshness. For the full recipe, check out Spinach Strawberry Feta Delight. - Serve the salad right after making it. This keeps the colors bright and the flavors fresh. - When washing spinach, fill a bowl with cold water. Swirl the spinach to remove dirt. Lift it out gently, leaving dirt behind. Repeat if needed until the water is clear. - You can change the dressing to suit your taste. Add more honey for sweetness, or more balsamic vinegar for tang. - Experiment with spices! A pinch of cinnamon or a dash of crushed red pepper can add a new twist. - For a stunning look, use a large, shallow bowl. This allows the colors to shine. - Sprinkle extra crumbled feta and walnuts on top for texture. Place whole strawberries on the side for a pop of color. - Arrange the ingredients in layers instead of mixing them. This makes each element stand out, making the dish more appealing. For the full recipe, check out Spinach Strawberry Feta Delight. {{image_2}} You can easily swap some ingredients in this salad. If you want a nutty crunch, use almonds or pecans instead of walnuts. Both add great flavor. For cheese, try goat cheese for a tangy twist or a creamy blue cheese for something bold. These swaps keep the dish fresh and fun. Seasonal fruits can make this salad even better. In summer, add peaches or blueberries. In fall, try apples or pears. These fruits add natural sweetness and change the flavor profile. Using what's in season makes the dish more vibrant and tasty. For a vegan option, skip the feta and honey. Use a plant-based cheese and maple syrup instead. This keeps it creamy and sweet. If you need gluten-free options, this salad is already safe. Just check the balsamic vinegar and honey for any hidden gluten. Enjoy a delicious meal that fits your needs. If you want the complete recipe, check out the Full Recipe. To keep your salad fresh, store it in the fridge. Use an airtight container. Make sure to keep the dressing separate. This keeps the spinach crisp. You can mix the dressing in just before serving. If you want to make this salad ahead of time, prep the ingredients first. Wash and dry the spinach, slice the strawberries, and chop the nuts. Store each ingredient in its own container. Combine them with the feta just before serving. This keeps everything fresh and tasty. How long will this salad last in the fridge? Typically, it stays good for about 2 days. After that, the spinach may wilt, and the strawberries can spoil. Always check for freshness before eating. If it looks or smells off, it's best to toss it. Enjoy the vibrant flavors of this salad while it’s fresh! For the full recipe, check out the Spinach Strawberry Feta Delight! You can prep this salad ahead of time. Start by washing and drying the spinach. You can slice the strawberries and chop the red onion. Store each item in separate containers. Keep the feta and walnuts in their own bags too. This way, they stay fresh. Mix the dressing in a small jar. When you are ready to serve, simply combine the ingredients in a bowl. Drizzle the dressing on top. Toss gently for the best taste and texture. This method helps the salad stay crisp and bright. Spinach is rich in vitamins A, C, and K. It also has iron and calcium. This leafy green boosts your immune system. Strawberries are full of antioxidants. They are high in fiber and low in calories. These berries help improve heart health. Feta cheese adds protein and calcium too. It is lower in fat compared to other cheeses. Walnuts are a great source of healthy fats. They support brain health and reduce inflammation. This salad packs a nutritious punch! Yes, you can easily customize this recipe. If you are dairy-free, try using a vegan cheese or omit the feta. For nut allergies, replace walnuts with seeds like sunflower seeds. You can also use pumpkin seeds for extra crunch. If you want a gluten-free option, this salad is naturally gluten-free. You can add grilled chicken or chickpeas for more protein. Adjust the ingredients to fit your diet. Enjoy the fresh flavors while keeping it safe for your needs. For the full recipe, check out the Spinach Strawberry Feta Delight! This blog post covered fresh ingredients, step-by-step instructions, helpful tips, and variations for Spinach Strawberry Feta Salad. You learned how to prepare a tasty dressing and layer your salad for the best flavor. The key is to use fresh ingredients and serve it right away. Feel free to customize the recipe to fit your needs. Experiment and have fun with ingredients. A vibrant salad isn’t just a meal; it’s a joy to make and share. Enjoy your healthy creation!

Spinach Strawberry Feta Salad Fresh and Flavorful Dish

Looking for a light, tasty dish that bursts with flavor? The Spinach Strawberry Feta Salad is your go-to! With fresh

To make chili lime grilled shrimp, you need the following items: - 1 lb large shrimp, peeled and deveined - 2 tablespoons olive oil - Juice of 2 limes - Zest of 1 lime - 2 cloves garlic, minced - 1 teaspoon chili powder - 1/2 teaspoon cumin - 1/4 teaspoon smoked paprika - Salt and pepper to taste - Fresh cilantro, chopped (for garnish) - Lime wedges (for serving) These ingredients come together to create a bright, zesty flavor that makes this dish a summer favorite. The shrimp soak up the lime and spices, offering a refreshing taste. When picking shrimp, freshness is key. Look for shrimp that smell like the ocean, not fishy. The shells should be shiny and firm. If you can, buy shrimp that are wild-caught. They often have better flavor and texture than farmed shrimp. If buying frozen, ensure they are not icy or have freezer burn. To add more depth to your grilled shrimp, consider these add-ins: - Fresh jalapeños for heat - A dash of hot sauce for extra spice - Pineapple chunks for sweetness - Avocado for creaminess These add-ins can spice up the dish and make it even more exciting. Feel free to explore and find your favorite mix! For the full recipe, check the details above. Start by gathering your ingredients for this tasty dish. You will need: - 1 lb large shrimp, peeled and deveined - 2 tablespoons olive oil - Juice of 2 limes - Zest of 1 lime - 2 cloves garlic, minced - 1 teaspoon chili powder - 1/2 teaspoon cumin - 1/4 teaspoon smoked paprika - Salt and pepper to taste - Fresh cilantro, chopped (for garnish) - Lime wedges (for serving) In a medium bowl, mix the olive oil, lime juice, lime zest, minced garlic, chili powder, cumin, smoked paprika, salt, and pepper. Whisk until everything blends well. Next, add the shrimp and toss to coat them fully in the marinade. Cover the bowl and let it chill in the fridge for at least 30 minutes. If you have time, let it marinate for up to 2 hours for a more intense flavor. Preheat your grill to medium-high heat. If you use wooden skewers, soak them in water for about 15 minutes. This helps stop them from burning on the grill. Once ready, thread the marinated shrimp onto the skewers. Leave a little space between each shrimp for even cooking. Place the skewers on the grill and cook for 2-3 minutes on each side. The shrimp should turn opaque and develop those lovely grill marks. Once done, take them off the heat and let them rest for a minute. To serve, place the grilled shrimp on a plate. Sprinkle chopped fresh cilantro on top for a burst of color and flavor. Add lime wedges on the side for squeezing over the shrimp. This dish pairs well with a fresh salad or grilled veggies. For the full recipe, you can refer to the earlier section. Enjoy your flavorful summer delight! To make your shrimp shine, focus on the marinade. Use fresh lime juice and zest for a bright taste. Marinate the shrimp for at least 30 minutes. This helps the flavors soak in well. If you have time, go up to 2 hours for even more flavor. When you grill, use medium-high heat. This ensures a good sear on the shrimp. Avoid overcrowding on the grill. Give each shrimp space to cook evenly. Cook for just 2-3 minutes per side. They should turn opaque and have nice grill marks. One common mistake is overcooking shrimp. Watch the clock closely. If you cook too long, they can turn rubbery. Another mistake is not marinating long enough. Quick marinades may not give you the bold flavor you want. Also, don’t forget to soak wooden skewers if you use them. This prevents burning and keeps your shrimp intact while grilling. Lastly, avoid using too much salt in the marinade. You can always add more later, but you can't take it out. To boost flavor, try adding herbs or spices. Fresh cilantro works great as a garnish. You can also add a pinch of cayenne for heat. For a sweet touch, consider a bit of honey in the marinade. Pair your shrimp with lime wedges. The extra squeeze of lime right before eating elevates the dish. If you try the Full Recipe, consider serving it with a cool salad or rice. This complements the shrimp and adds a nice balance. {{image_2}} You can mix up the marinade for chili lime grilled shrimp. To add heat, try using fresh jalapeños or crushed red pepper flakes. You can also swap lime juice for lemon juice for a different taste. If you want a sweet touch, add some honey or agave syrup. These small changes can make the dish unique and fun. Sauces can elevate your grilled shrimp. A creamy avocado sauce pairs well with the spicy shrimp. You can blend ripe avocados, lime juice, and a pinch of salt. Another great choice is a zesty cilantro lime sauce made with fresh cilantro, garlic, and yogurt. These sauces add flavor and creaminess that balance the heat. If you want to swap shrimp, consider chicken or firm tofu. These options soak up the marinade well. For a plant-based meal, try using tempeh or jackfruit. Both can take on the chili lime flavor nicely. Adjust the cooking time as needed to ensure everything cooks through. To store leftover chili lime grilled shrimp, let it cool first. Place the shrimp in an airtight container. Refrigerate them within two hours of cooking. The shrimp will stay fresh for up to three days. If you want to save more, make sure they are sealed well. This helps keep the flavor intact. When you reheat shrimp, do it gently. You can use a skillet on low heat. Add a splash of water to keep them moist. Stir often to avoid overcooking. You can also use a microwave. Heat in short bursts of 30 seconds. Check the shrimp often to ensure they don’t become tough. If you want to keep the shrimp longer, freezing is a great option. Place cooked shrimp in a single layer on a baking sheet. Freeze them until solid, then transfer to a freezer bag. Remove as much air as possible. Frozen shrimp can last for up to three months. When you're ready to eat, thaw them overnight in the fridge. You can then reheat them as mentioned earlier. You can tell shrimp are cooked when they turn pink and opaque. The flesh will also curl into a C shape. If they look gray or translucent, they need more time. Cooking shrimp takes about 2-3 minutes on each side on the grill. Keep an eye on them, as overcooked shrimp can get tough. Always trust your eyes and check the color. Yes, you can make chili lime grilled shrimp in the oven. Preheat your oven to 400°F (200°C). Place the marinated shrimp on a baking sheet lined with foil. Bake for about 8-10 minutes or until they turn pink and opaque. This method is great if you don’t have a grill. You still get tasty shrimp with lots of flavor. Grilled shrimp pair well with many side dishes. Here are a few ideas: - Rice: Fluffy white rice or cilantro-lime rice. - Salad: A fresh green salad with a light dressing. - Vegetables: Grilled or roasted veggies like zucchini or bell peppers. - Tacos: Use the shrimp in soft or crispy tacos for a fun twist. These sides add color and balance to your meal. For the full recipe, check the details above. In this post, we covered how to make great grilled shrimp. We looked at the best ingredients, including shrimp and add-ins, and I shared tips for cooking them perfectly. You learned step-by-step instructions, helpful tips, and tasty variations for your recipe. Remember, fresh shrimp and good prep lead to great meals. Enjoy your grilling and try different flavors to make your dish unique. Happy cooking!

Chili Lime Grilled Shrimp Flavorful Summer Delight

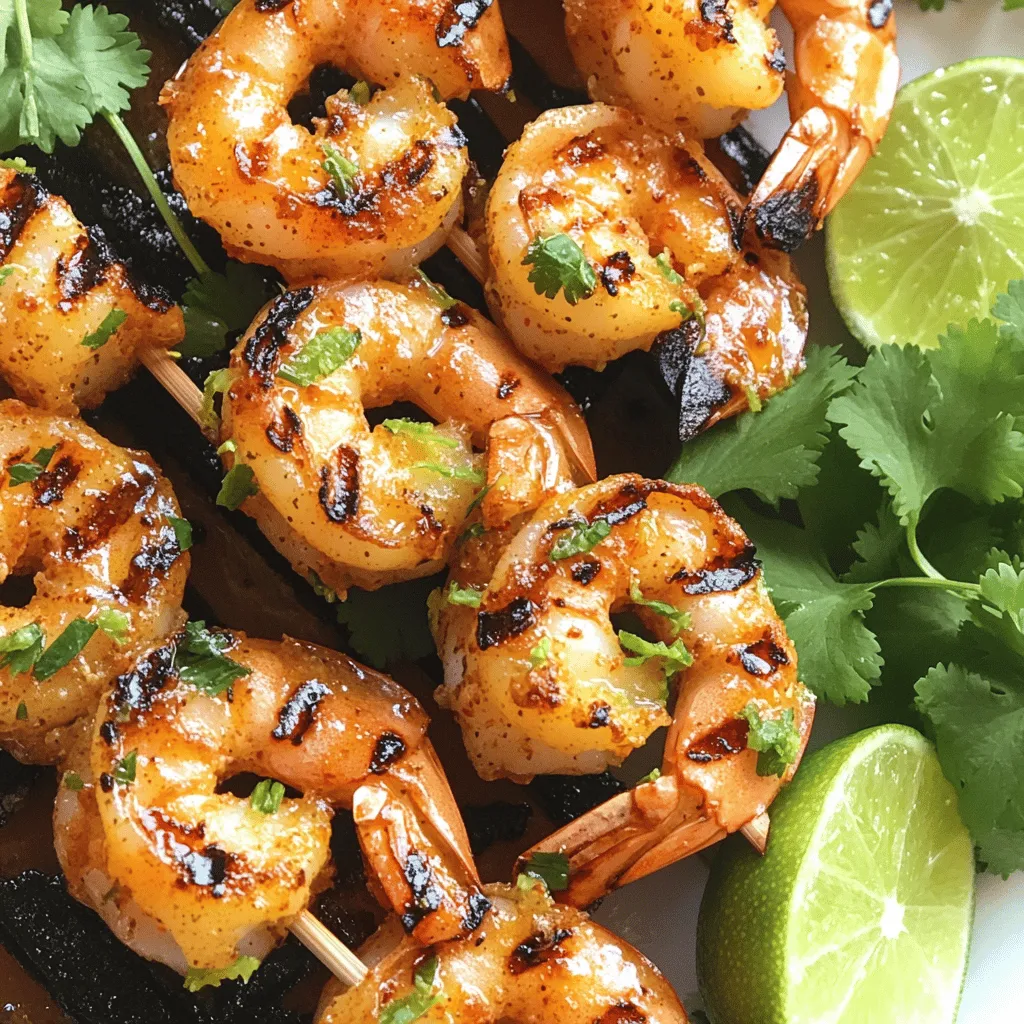
Get ready to elevate your summer cookouts with a burst of flavor. My Chili Lime Grilled Shrimp recipe is easy,

To make delicious apple cinnamon granola bars, you need a few simple items. Here is what you will need: - 2 cups rolled oats - 1 cup unsalted almonds, chopped - 1 cup dried apples, diced - 1/2 cup honey or maple syrup - 1/4 cup almond butter (or any nut butter) - 1 teaspoon cinnamon - 1/2 teaspoon vanilla extract - 1/4 teaspoon salt - 1/2 cup mini chocolate chips (optional) These ingredients work together to create a sweet and crunchy snack. Each one plays a key role in flavor and texture. Each ingredient in these granola bars has health benefits. Here’s what you need to know: - Rolled oats provide fiber. This helps keep you full longer. - Almonds are rich in healthy fats and protein. They support heart health. - Dried apples add natural sweetness and vitamins. They boost energy levels. - Honey or maple syrup offers sweetness with some nutrients. Use them in moderation. - Almond butter adds creaminess and more protein. It also provides healthy fats. - Cinnamon can help control blood sugar levels. It adds warm flavor, too. - Vanilla extract gives a lovely aroma and taste. It can make snacks feel special. - Salt enhances all the flavors in your bars. Just a pinch makes a big difference. - Mini chocolate chips (optional) bring joy! They are a fun treat in each bite. Overall, these ingredients create a balanced snack that satisfies your taste buds and is good for you. If you need to change something, there are easy swaps. Here are some ideas: - Rolled oats: You can use quick oats, but they may change the texture. - Almonds: Try walnuts, pecans, or sunflower seeds if you have nut allergies. - Dried apples: Use any dried fruit like cranberries or raisins for a different taste. - Honey or maple syrup: Agave nectar or brown rice syrup work well too. - Almond butter: Peanut butter or sunflower seed butter can be great substitutes. - Cinnamon: Try nutmeg or pumpkin spice for a twist on flavor. - Vanilla extract: You can skip it, but it adds a lovely taste. - Salt: You can reduce or leave it out if you prefer. - Mini chocolate chips: Omit them for a healthier bar or use dark chocolate. These substitutions keep the bars tasty while meeting your needs. You can still enjoy a wholesome snack! To make these tasty apple cinnamon granola bars, start by gathering your ingredients. You will need: - 2 cups rolled oats - 1 cup unsalted almonds, chopped - 1 cup dried apples, diced - 1/2 cup honey or maple syrup - 1/4 cup almond butter (or any nut butter) - 1 teaspoon cinnamon - 1/2 teaspoon vanilla extract - 1/4 teaspoon salt - 1/2 cup mini chocolate chips (optional) Next, preheat your oven to 350°F (175°C). Line a 9x9 inch baking pan with parchment paper. Leave some paper hanging over the edges. This helps you lift the bars out later. In a large bowl, mix the rolled oats, chopped almonds, dried apples, and cinnamon. Stir until everything blends well. In a small pot, heat honey or maple syrup and almond butter over low heat. Stir until it melts and combines smoothly. Remove it from the heat and add vanilla and salt. Pour this wet mix over the dry ingredients. Stir until all the dry bits get coated. If you like, fold in mini chocolate chips for extra sweetness. Now, transfer the mixture into the lined baking pan. Press it down firmly with a spatula. This helps to keep the bars together. Bake your granola bars for 20 to 25 minutes. You want the edges to turn golden brown. Keep an eye on them to avoid burning. After baking, take them out of the oven and let them cool in the pan. This step is vital for making sure they hold their shape. Let the bars cool completely before cutting. Use the parchment paper to lift the whole mixture out of the pan. Place it on a cutting board. Use a sharp knife to cut the cooled mixture into bars or squares. This will give you neat portions for snacking. For easy storage, keep these granola bars in an airtight container. You can also freeze them for longer freshness. Try this full recipe for a delicious snack that everyone will love! You can make your apple cinnamon granola bars unique. Start with the base recipe, then add your favorite nuts or seeds. Try walnuts, pecans, or sunflower seeds for a twist. You can also use different dried fruits like cranberries or raisins. If you want a bit more crunch, add coconut flakes or pumpkin seeds. For a fun treat, mix in mini chocolate chips or yogurt-covered raisins. To keep your granola bars fresh, store them in an airtight container. This helps prevent them from getting stale or losing flavor. If you want to keep them longer, freeze the bars. Wrap each one in plastic wrap or parchment paper before placing them in a freezer bag. This way, they stay fresh for up to three months. Just remember to thaw them in the fridge before eating. Serving your granola bars can be fun! You can cut them into squares or bars for easy snacking. For a nice touch, drizzle some honey or maple syrup on top. If you’re hosting a gathering, stack them on a plate with fresh fruit. They make a great addition to breakfast or a midday snack. Pair them with yogurt or a smoothie for a tasty and healthy meal. Enjoy your creation! {{image_2}} You can easily change the flavor of your apple cinnamon granola bars. Try adding different nuts like walnuts or pecans. You can also use other dried fruits, such as cranberries or raisins. For a fun twist, consider mixing in some coconut flakes or pumpkin seeds. Each option brings its own taste and texture, making the bars unique. If you need gluten-free bars, just choose certified gluten-free oats. For a vegan option, replace honey with maple syrup. You can use any nut or seed butter to keep it vegan. Always check labels to ensure all ingredients meet your dietary needs. This way, everyone can enjoy these tasty snacks. No-bake granola bars are simple to make. Just mix your oats, nuts, and dried fruits in a bowl. Heat your nut butter and sweetener until smooth. Combine everything and press it into a pan. Let it chill in the fridge for a few hours. This method saves time and keeps the bars chewy. You can find the full recipe for a no-bake version as well. To keep your apple cinnamon granola bars fresh, store them in an airtight container. This protects them from air and moisture. Be sure to let them cool completely before sealing. If you stack them, place parchment paper between the layers to prevent sticking. This simple step helps keep your bars intact and ready to enjoy. If you want to save some granola bars for later, freezing is a great option. Wrap each bar tightly in plastic wrap or foil. Then, place the wrapped bars in a freezer-safe bag. Make sure to label the bag with the date. When you're ready to eat one, simply thaw it at room temperature or heat it in the microwave for a few seconds. When stored properly, your granola bars will last about a week at room temperature. In the fridge, they can last up to two weeks. If you freeze them, they can hold their flavor for up to three months. Watch for signs of spoilage, like an off smell or changes in texture. If they feel hard or crumbly, it's best to toss them. Enjoy your homemade snacks while they are fresh and tasty. You can use walnuts or pecans instead of almonds. Both add a nice crunch. If you're nut-free, try seeds like sunflower or pumpkin. They work well and taste great. You can also use a mix of seeds to boost flavor and texture. Yes, you can use fresh apples. Just chop them into small pieces. However, fresh apples have more moisture. You may need to bake your bars a bit longer. Dried apples add sweetness and chewiness, so adjust sugar if using fresh. Look for a golden brown edge. The center should feel firm but not hard. A toothpick can help too; it should come out clean. If it’s sticky, bake a few more minutes. Let them cool completely to set before cutting. You can find them at most grocery stores. Look in the snack or health food aisle. Online, many brands sell apple cinnamon bars. Check sites like Amazon or health-focused stores for more options. In this blog post, I covered how to make great granola bars. We explored the ingredients, their health benefits, and tasty alternatives. You learned step-by-step instructions for preparation, baking, cooling, and cutting. I also shared tips on customizing your bars and keeping them fresh. We discussed different flavors and dietary options, plus storage best practices. Remember, making granola bars is fun and easy. You can create your perfect snack in no time. Enjoy experimenting with flavors and sharing them with friends!

Apple Cinnamon Granola Bars Healthy Snack Option

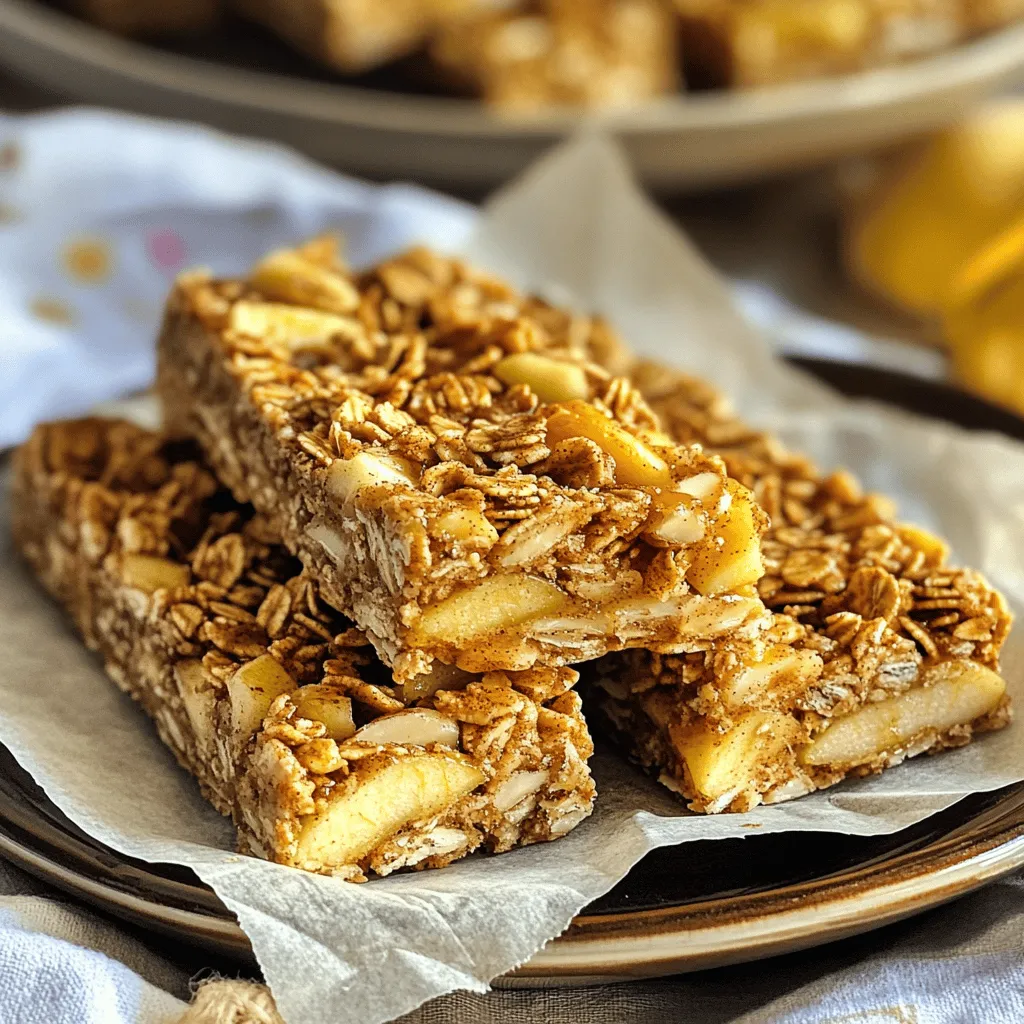
Looking for a healthy snack that’s easy to make and tasty? Try my Apple Cinnamon Granola Bars! Packed with wholesome

- 2 large heads of broccoli, cut into florets - 3 tablespoons olive oil - 1/2 cup grated Parmesan cheese - 1 teaspoon garlic powder - 1 teaspoon onion powder - 1/2 teaspoon red pepper flakes (optional) - Salt and black pepper to taste - Zest of 1 lemon - Fresh lemon wedges for drizzling - Optional garnishes When you gather your ingredients, you set the stage for a tasty dish. Start with fresh broccoli. Choose vibrant green heads. Cut them into bite-sized florets. This helps them cook evenly. Next, grab some olive oil. It adds a rich flavor and helps the seasonings stick. You’ll need Parmesan cheese for a cheesy, savory touch. Grate it finely for best results. For seasoning, garlic powder and onion powder bring depth. Red pepper flakes add a little kick. Use them if you like some heat. Don’t forget salt and black pepper; they enhance all the flavors. Lastly, lemon zest brightens the dish. It adds freshness and balance. You can serve your broccoli with lemon wedges. Drizzle the juice over the top for extra zing. This recipe is all about vibrant flavors. It’s easy to make and pairs well with many meals. Check out the full recipe for all the cooking steps. Enjoy your tasty side! - Preheat the oven to 400°F (200°C). - In a large bowl, mix the broccoli florets with olive oil. - Add garlic powder, onion powder, red pepper flakes, salt, and black pepper. - Toss well to coat the broccoli evenly. - Spread the seasoned broccoli on a baking sheet. - Roast for 20 minutes, stirring halfway through. - Check for tenderness and a golden color. - Remove the baking sheet from the oven. - Evenly sprinkle the grated Parmesan cheese over the broccoli. - Return the baking sheet to the oven. - Bake for 5 to 7 minutes until the cheese melts and turns golden. This method gives you a tasty side dish that pairs well with many meals. For the full recipe, check out the details above! Seasoning is key before roasting. It helps bring out the best taste. I recommend using fresh broccoli for the best flavor. Fresh broccoli has a better crunch and taste than frozen. If you must use frozen, thaw it first and dry it well. To get crispy yet tender broccoli, don’t crowd the pan. Give the florets space on the baking sheet. Use high heat—400°F (200°C) is perfect. This helps the broccoli brown nicely while cooking through. For extra flavor, try adding herbs like thyme or rosemary. You can also mix in spices like paprika or cumin. Combining your broccoli with other veggies, such as bell peppers or carrots, adds variety. These additions can make your dish even more exciting. Follow the full recipe for more details on creating this tasty dish! {{image_2}} You can switch up the cheese for your Parmesan roasted broccoli. Pecorino Romano offers a salty bite that makes this dish extra tasty. If you want a dairy-free option, try nutritional yeast. It brings a cheesy flavor without the dairy. Mixing cheeses can create a fun flavor twist. For example, combine Parmesan with cheddar for a richer taste. If you need gluten-free options, this dish is naturally gluten-free. Just check the labels on your seasonings. For a dairy-free version, use nutritional yeast instead of Parmesan. This makes the dish vegan-friendly. If you want a vegetarian option, stick with the Parmesan or try a plant-based cheese that melts well. You can enhance your broccoli with seasonal veggies. Carrots or Brussels sprouts blend well and add color. Consider using fresh herbs like thyme or rosemary. They give a nice aroma and taste that changes with the seasons. This way, you can enjoy new flavors all year. After you enjoy your Parmesan roasted broccoli, store any leftovers. Place the broccoli in an airtight container. This keeps it fresh and tasty. Make sure to cool it down first. You can keep it in the fridge for up to three days. If you want to enjoy it later, think about freezing. To reheat your broccoli, use the oven. Preheat it to 350°F (175°C). Spread the broccoli on a baking sheet. Heat it for about 10 minutes. This method helps keep the texture nice and crispy. Avoid using the microwave if you can. The microwave can make the broccoli soggy, and we don't want that! You can freeze Parmesan roasted broccoli, but it’s best to eat fresh. If you freeze it, place it in a freezer-safe container. You can also use a freezer bag. Try to remove as much air as possible. When you're ready to eat, thaw in the fridge overnight. To reheat, use the oven again for the best results. It will taste almost as good as fresh! To make Parmesan roasted broccoli, follow these steps. First, preheat your oven to 400°F (200°C). In a large bowl, mix broccoli florets with olive oil, garlic powder, onion powder, red pepper flakes, salt, and black pepper. Toss until the broccoli is coated. Spread the broccoli on a baking sheet lined with parchment paper. Roast for 20 minutes, stirring halfway through. Then, sprinkle grated Parmesan cheese on top and roast for another 5-7 minutes until the cheese is melted. Finally, add lemon zest before serving. For the full recipe, check the details above. Yes, you can prepare Parmesan roasted broccoli ahead of time. You can wash and cut the broccoli a day before. Store it in the fridge in an airtight container. You can also mix the broccoli with olive oil and seasonings in advance. Just keep it in the fridge until you are ready to roast. You can roast it fresh when you need it. Parmesan roasted broccoli pairs well with many dishes. You can serve it with grilled chicken or fish. It also goes great with pasta, rice, or quinoa. For a vegetarian option, try it alongside stuffed peppers or a hearty grain salad. This dish adds a bright green color and flavor to your table. Yes, Parmesan roasted broccoli is a healthy choice. Broccoli is high in vitamins C and K. It is also rich in fiber, which is good for digestion. Adding Parmesan cheese gives some protein and calcium. The olive oil adds healthy fats. This dish is a great way to enjoy veggies while keeping it tasty. In this post, we explored how to make delicious Parmesan roasted broccoli. We covered essential ingredients like broccoli, olive oil, and seasonings. You learned the importance of roasting techniques and how to enhance flavors. Don’t forget the tips for storage and reheating to keep your leftovers tasty. With variations for dietary needs, this dish fits well into any meal plan. Try this simple recipe to enjoy a healthy and flavorful side that impresses. Healthy eating can be both easy and tasty!

Parmesan Roasted Broccoli Flavorful Side Dish Recipe

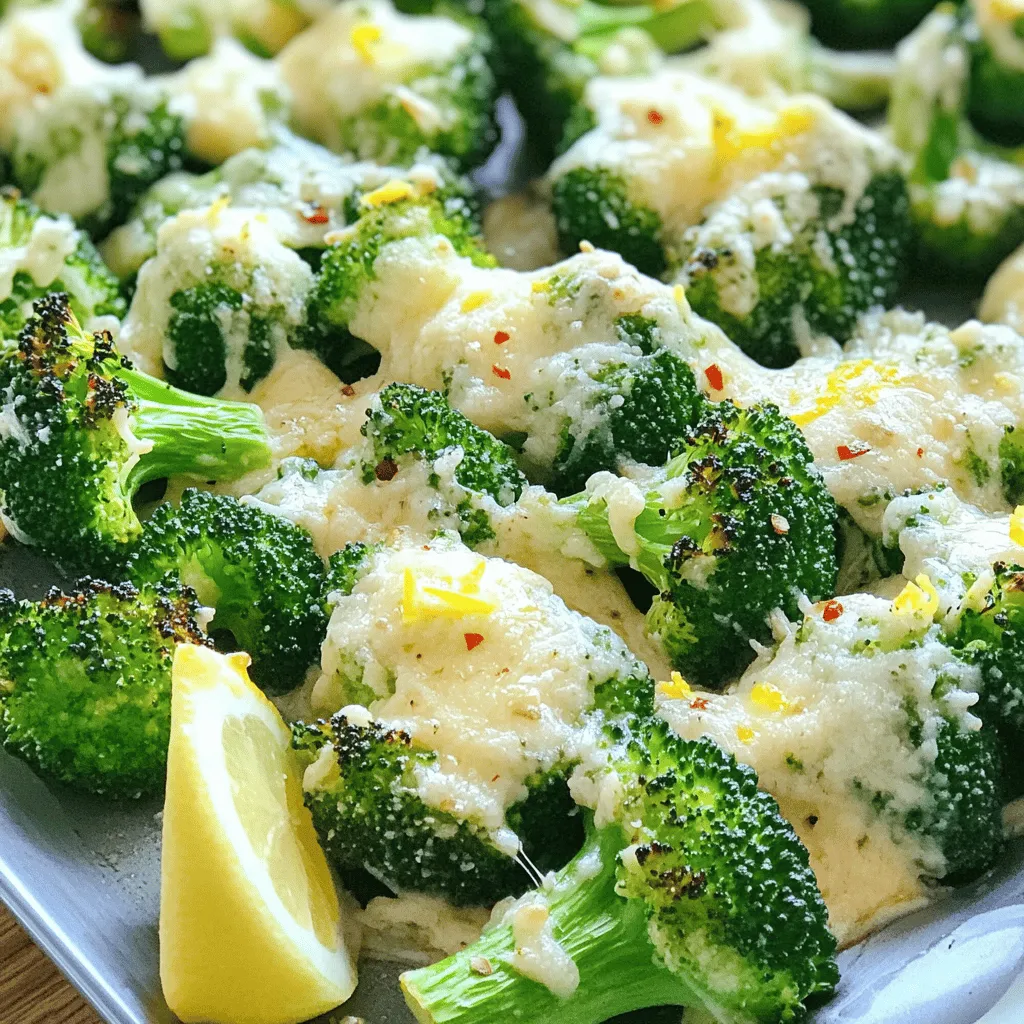
Looking for a quick, tasty side? Parmesan Roasted Broccoli is your new go-to! This simple recipe brings out the best

Older posts
Newer posts
← Previous Page1 Page2 Page3 … Page57 Next →

dsad

© 2025 Home Cooking Style • Built with GeneratePress

Our Policies

  • Copyright Policy
  • Cookie Policy
  • GDPR Policy
  • Privacy Policy
  • Disclaimer
  • Terms Of Use

More Information

  • Home
  • About
  • Contact
  • Appetizers
  • Dessert
  • Dinner
  • Drinks
©2025, Home Cooking Style About Back To Top