![- Ripe avocado - Fresh cilantro leaves - Lime juice - Garlic - Ground cumin - Salt and black pepper - Extra-virgin olive oil - Water for consistency To make the best avocado cilantro lime dressing, the ingredients matter. Each one adds a unique flavor. Let’s break down the key components. 1. Ripe avocado: The base of the dressing. It gives a creamy texture and rich taste. 2. Fresh cilantro leaves: They add a bright, herbal flavor. Make sure they are clean and dry. 3. Lime juice: This gives a zesty kick. Fresh lime juice works best for taste. 4. Garlic: It adds depth. Use minced garlic for an even blend. 5. Ground cumin: This spice brings warmth. It balances the freshness of lime and cilantro. 6. Salt and black pepper: These enhance all flavors. Adjust them to your taste. 7. Extra-virgin olive oil: This adds richness. It helps to blend everything smoothly. 8. Water for consistency: Use as needed. It helps thin the dressing if it’s too thick. You can find the full recipe for this zesty dressing at the end of the article. To start, you need to gather all your ingredients. Here is what you will need: - 1 ripe avocado, pitted and peeled - 1/2 cup fresh cilantro leaves, packed - 1/4 cup lime juice (about 2 limes) - 2 cloves garlic, minced - 1/2 teaspoon ground cumin - 1/4 teaspoon salt (adjust to taste) - 1/4 teaspoon black pepper - 1/4 cup extra-virgin olive oil - 1-2 tablespoons water (for consistency) Next, you will need a few tools to make this dressing. Grab a blender or a food processor, measuring cups, and a spatula. Step 1: Combining ingredients in the blender Start by placing the avocado, cilantro, lime juice, minced garlic, ground cumin, salt, and black pepper into the blender. Step 2: Blending for the perfect consistency Blend the mixture on high until it becomes smooth and creamy. You may need to stop and scrape down the sides. This helps make sure everything blends well. Step 3: Adjusting flavor with seasonings While blending, slowly drizzle in the olive oil until it mixes in fully. If the dressing feels too thick, add 1-2 tablespoons of water. Blend again to get your desired consistency. Step 4: Allowing flavors to meld in the refrigerator Once blended, taste the dressing. If needed, adjust the seasoning by adding more salt or lime juice. Then, transfer the dressing to an airtight container and refrigerate for at least 30 minutes. This resting time helps the flavors blend beautifully. For the full recipe, check out the details mentioned earlier. Enjoy crafting this fresh and flavorful sauce! To get the right thickness for your dressing, start with the basic recipe. If it’s too thick, add water. Start with one tablespoon and blend again. You can add more water if needed. This will help you find your favorite texture. If you prefer not to use olive oil, try avocado oil or grapeseed oil. Both options will keep the flavors light and fresh. They won’t overpower the other ingredients. You can also use yogurt for a creamier dressing. It offers a tangy taste and smooth texture. Want a little kick? Add jalapeño or chili for some heat. Dice a small piece and blend it in. This will make your dressing lively and fun. You can also mix in other herbs to boost the flavors. Fresh parsley or dill can add a new twist. Just chop them finely and blend in with the other ingredients. Experiment with these additions to find your perfect blend. This way, you can make the dressing your own. For the complete recipe, check the [Full Recipe]. {{image_2}} You can easily switch up the flavors in your dressing. Try using lemon or orange juice instead of lime juice. This change adds a different taste while keeping it fresh. If you want a vegan version, replace the olive oil with avocado oil. This keeps the dressing creamy and rich without dairy. This dressing is super versatile. It pairs well with salads, seafood, or tacos. Drizzle it over your favorite greens or use it as a sauce on grilled fish. You can also store it in dips or spreads for a tasty snack. It adds flavor to your meals and makes everything more exciting! To keep your Avocado Cilantro Lime Dressing fresh, store it in an airtight container. Glass jars work well for this purpose. Make sure the lid seals tightly to keep air out. In the fridge, this dressing lasts about 3 to 5 days. After that, the avocado can brown, and the flavor may change. Can you freeze the dressing? Yes, you can freeze Avocado Cilantro Lime Dressing. To do this, pour the dressing into an ice cube tray. Once frozen, transfer the cubes to a freezer bag. This way, you can take out just what you need. How to thaw and use? When you’re ready to use the dressing, remove a cube from the freezer. Let it thaw in the fridge overnight. If you need it faster, you can thaw it in a bowl of warm water. After thawing, stir the dressing well before using. For the best taste, use it within 2 months. For the full recipe, check out the Zesty Avocado Cilantro Lime Dressing section. How long does Avocado Cilantro Lime Dressing last? This dressing stays fresh for about 3 to 5 days in the fridge. Store it in an airtight container to keep it tasting great. The lime juice helps slow down browning, but some color change might still happen. Can I make this dressing in advance? Yes, you can make this dressing ahead of time. It actually tastes better after resting for a bit. Just blend it, store it, and refrigerate. Give it a good stir before using it again. Is it possible to adjust the spice level? Absolutely! If you want a bit of heat, add diced jalapeño or red pepper flakes. Start small and mix. You can always add more if you want a stronger kick. What to serve with Avocado Cilantro Lime Dressing? This dressing is great on salads, tacos, or grilled meats. It also pairs well with shrimp or fish. Try drizzling it on roasted veggies for a fresh touch. Can I use dried herbs instead of fresh? While fresh herbs provide more flavor, you can use dried if needed. Use about one-third of the amount since dried herbs are stronger. Mix them in and taste to adjust. How to repurpose leftover dressing? You can use leftover dressing as a dip for veggies or chips. It also works well as a marinade for chicken or fish. Get creative and add it to grain bowls for extra flavor. For the full recipe, check out Zesty Avocado Cilantro Lime Dressing. This blog post shared an easy recipe for Avocado Cilantro Lime Dressing. We covered all the ingredients and steps you need. You learned tips for the best texture and flavor. We also explored variations you can try and how to store it. In conclusion, this dressing is a simple way to enhance your meals. Feel free to experiment with ingredients to find your favorite flavor. Enjoy crafting this healthy addition to your table!](https://homecookingstyle.com/wp-content/uploads/2025/07/056e8486-ce43-4766-9b64-70ff73299d16.webp)
Avocado Cilantro Lime Dressing Fresh and Flavorful Sauce
If you’re seeking a fresh and zesty dressing, you’re in the right place! My Avocado Cilantro Lime Dressing brings the
If you’re seeking a fresh and zesty dressing, you’re in the right place! My Avocado Cilantro Lime Dressing brings the
![- 2 pounds baby potatoes, halved - 4 cloves garlic, minced - 3 tablespoons olive oil The main stars of this recipe are the baby potatoes. They cook fast and get crispy. I love using garlic because it adds a strong flavor. Olive oil helps the potatoes get golden and crispy. - Juice and zest of 1 large lemon - 1 teaspoon dried oregano - 1 teaspoon paprika - Salt and pepper, to taste Lemon juice and zest bring a bright taste. The dried oregano adds a nice herbal note. Paprika gives a subtle warmth. Salt and pepper balance all the flavors. - Fresh parsley, chopped (for garnish) Fresh parsley adds color and a hint of freshness. It makes the dish look pretty too. You can skip it, but I highly recommend it. For the full recipe with instructions, check out the [Full Recipe]. Enjoy your cooking! - Preheat your oven to 425°F (220°C). This helps the potatoes cook evenly. - Line a large baking sheet with parchment paper. This makes cleanup easy. - In a large mixing bowl, add 2 pounds of halved baby potatoes. - Add 4 cloves of minced garlic to the bowl. Garlic gives great flavor. - Pour in 3 tablespoons of olive oil to coat the potatoes. - Squeeze the juice and add the zest of 1 large lemon. This adds zest. - Sprinkle in 1 teaspoon of dried oregano and 1 teaspoon of paprika. - Season with salt and pepper to taste. Mix all ingredients well. - Spread the potatoes in a single layer on the baking sheet. This helps them roast. - Make sure they are spaced apart for even cooking. - Roast in the preheated oven for 25-30 minutes. - Halfway through, turn the potatoes to ensure they brown evenly. - They should be golden brown and crispy on the outside when done. - Once cooked, remove the baking sheet from the oven. - Let the potatoes cool slightly for a few minutes. - Transfer the potatoes to a serving dish. - Garnish with freshly chopped parsley for color and flavor. Follow these steps for a delicious side dish! For the full recipe, check out the [Full Recipe]. For lemon garlic roasted potatoes, baby potatoes are my favorite. They roast well and stay tender inside. Look for firm, smooth potatoes without blemishes. If you can't find baby potatoes, use small Yukon Gold or red potatoes. Halve them for even cooking. The size matters since smaller pieces cook faster and more evenly. Spacing is key to getting crispy potatoes. When you spread them out, make sure there is space between each piece. This helps them roast and brown nicely. If they are too close, they may steam instead of crisp up. Keep an eye on the time, too. I usually roast them for 25 to 30 minutes. Flip them halfway through for even browning. Want to change the flavor? It's easy! You can add fresh herbs like rosemary or thyme. They add a nice touch. If you want a stronger lemon taste, add more zest or juice. Just remember to adjust the garlic too. Too much can overpower the dish. Be creative and make it your own! Check the full recipe to get started. {{image_2}} You can easily change the flavor of your lemon garlic roasted potatoes. One way is to add herbs like rosemary or thyme. These herbs give a nice earthy taste. Just chop them up and mix them in with the other ingredients. You can also try different spice blends. For instance, adding cumin or chili powder can give a warm kick to the dish. Roasting other vegetables with your potatoes is a fun way to mix things up. Try adding bell peppers, zucchini, or carrots. These veggies roast well and add color and flavor. You can also pair potatoes with seasonal produce. For example, sweet potatoes or butternut squash work well in the fall. Just ensure all veggies cook evenly. If you need to make your lemon garlic roasted potatoes gluten-free, don't worry! The recipe is already gluten-free as it stands. If you want it vegan, just stick to the basic ingredients. You can also look for low-carb alternatives. Instead of potatoes, consider using cauliflower. It will give you a similar texture with fewer carbs. For the full recipe, check the mentioned section above. Store leftover lemon garlic roasted potatoes in the fridge. Let them cool first. Place them in an airtight container. This will keep them fresh and tasty. You can use glass or plastic containers. Just make sure they seal well. You can freeze roasted potatoes for later. Cool them completely before freezing. Spread them in a single layer on a baking sheet. Freeze until solid, then transfer to a freezer bag. This helps keep their shape. When you reheat, use the oven. This makes them crisp again. Avoid the microwave, as it may make them soggy. Roasted potatoes last about 3 to 5 days in the fridge. If they smell bad or look slimy, throw them away. Always check for signs of spoilage before eating. Fresh potatoes will have a firm texture and a nice scent. If you follow these tips, you can enjoy your lemon garlic roasted potatoes longer. For the full recipe, visit [Full Recipe]. Yes, you can use various potatoes for this recipe. - Yukon Gold: These potatoes are creamy and buttery. - Red Potatoes: They hold their shape well and add color. - Fingerling Potatoes: They have a unique shape and taste great. Each type gives a different flavor and texture, so feel free to experiment! You can use other oils if you want a different flavor. - Avocado Oil: This oil has a mild taste and is healthy. - Canola Oil: This oil is neutral and works well for roasting. - Butter: Melted butter adds rich flavor but may not be vegan. Choose what fits your diet or taste best. Look for signs to tell when your potatoes are ready. - Color: They should turn golden brown and crispy. - Texture: A fork should easily pierce the potatoes. - Time: Roasting takes about 25-30 minutes at 425°F. To test, poke a potato with a fork. If it feels soft inside, they are done! This guide covered how to make delicious roasted baby potatoes. We looked at key ingredients, flavor boosters, and optional garnishes. I shared steps to prepare, cook, and finish your dish. You learned tips for choosing the right potatoes and ways to customize flavors. Variations include adding herbs or different veggies. Finally, I explained how to store leftovers properly. Enjoy making and sharing this simple recipe. It’s a great way to savor good food!](https://homecookingstyle.com/wp-content/uploads/2025/07/916060da-e907-469d-9be7-e441239d7599.webp)
Looking for a simple, yet delicious side dish? Try my Lemon Garlic Roasted Potatoes! These baby potatoes burst with flavor

Are you ready for a snack that’s both tasty and easy to make? My Cheesy Roasted Broccoli Bites are just
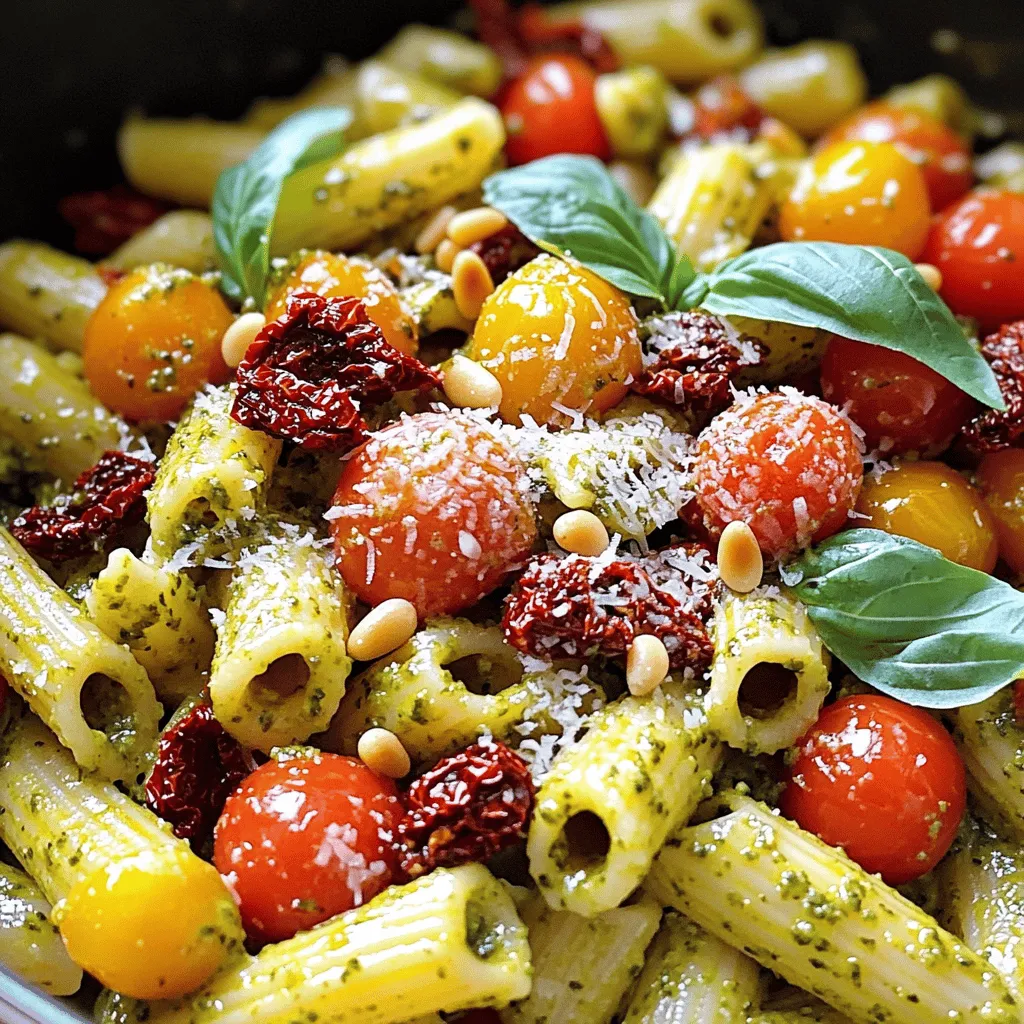
Craving a dish that bursts with flavor? My Savory Sun-Dried Tomato Pesto Pasta is your answer! This easy recipe combines

Looking for a delicious and easy way to make crispy sweet potato fries? You’ve come to the right place! With

Get ready to taste the sunshine with my Zesty Avocado Corn Salad! This fresh and flavorful treat bursts with vibrant

Do you want a quick and tasty meal that packs a punch? These Spicy Black Bean Quinoa Tacos are your
![- 1 medium butternut squash, peeled and diced - 1 large onion, chopped - 2 cloves garlic, minced - 2 tablespoons olive oil - 4 cups vegetable broth - ½ cup coconut milk (for creaminess) - 1 teaspoon ground cumin - 1 teaspoon ground coriander - ½ teaspoon nutmeg - Salt and pepper to taste The main star of this soup is the butternut squash. It gives a sweet and nutty taste. You want to peel and dice it into small pieces. This helps it cook faster and blend well. Onions and garlic add a nice depth of flavor. Chop the onion into small pieces. Mince the garlic cloves finely for a strong aroma. Olive oil is key for roasting. It helps the squash and onion caramelize, which adds rich flavor. Vegetable broth is a great base. It makes the soup hearty and full of goodness. You can use homemade or store-bought broth. Coconut milk is optional but adds creaminess. It also gives a nice hint of sweetness. When it comes to spices, cumin and coriander bring warmth. They pair perfectly with butternut squash. Nutmeg adds a hint of sweetness. Adjust salt and pepper to your taste. For the full recipe, check the section earlier. This soup is easy to make and so rewarding! 1. Preheat your oven to 400°F (200°C). This heat will help caramelize the squash. 2. On a large baking sheet, spread the diced butternut squash and chopped onion. 3. Drizzle the vegetables with 2 tablespoons of olive oil. 4. Sprinkle with salt, pepper, cumin, coriander, and nutmeg. 5. Toss everything until well coated. 1. Roast in the oven for 25-30 minutes. The squash should be tender and caramelized. 2. Stir the veggies halfway through to ensure even cooking. 1. In a large pot, add the roasted squash, onions, and 2 minced garlic cloves. 2. Pour in 4 cups of vegetable broth and bring to a simmer over medium heat. 3. Let it simmer for about 10 minutes. 4. Blend the mixture until smooth. Use an immersion blender or a countertop blender. 5. If using, stir in ½ cup of coconut milk for extra creaminess. 6. Adjust seasoning with salt and pepper as needed. 7. Heat through, then remove from the heat. For the complete recipe, see the [Full Recipe]. How to Select the Right Butternut Squash When choosing butternut squash, look for ones that feel heavy for their size. The skin should be a deep tan color and free from soft spots. A firm squash means fresh flavor. Also, pick a squash with a long neck. The neck has more flesh and less seed. Ensuring Smooth Consistency with Blending Techniques To achieve a smooth soup, use an immersion blender. It is easier and less messy. If you use a regular blender, let the soup cool a bit first. Blend in small batches to avoid spills. Make sure to blend until it’s silky and lump-free for that perfect texture. Presentation Tips for an Elegant Bowl Serve the soup in a deep bowl for a cozy feel. Swirl in a bit of coconut milk for a nice look. You can also drizzle some olive oil on top. This adds shine and makes it appealing. A sprinkle of toasted pumpkin seeds adds a nice crunch and color. Garnish Ideas for Added Flavor and Texture Garnish with fresh herbs like parsley or cilantro for brightness. Chopped nuts or seeds can give it extra texture. A pinch of smoked paprika can add a nice touch of heat. These small additions can change the flavor and make your soup stand out. How to Properly Store Leftover Soup Let the soup cool completely before storing. Use airtight containers to keep it fresh. The soup will last in the fridge for about five days. You can also freeze it for up to three months. Just make sure to leave space in the container for expansion. Best Practices for Reheating When reheating, do it slowly over low heat. Stir often to prevent sticking. If the soup seems too thick, add a splash of broth or water. This will help return it to the right consistency. Always taste before serving to adjust seasoning as needed. For the best flavor, enjoy it warm! For a detailed guide on making this rich and flavorful soup, check out the Full Recipe. {{image_2}} To make a vegan version of roasted butternut squash soup, consider using different non-dairy creamers. Almond milk or cashew cream can add a nice touch. They keep the soup creamy without dairy. You can also enhance the flavor by adding extra vegetables. Carrots or sweet potatoes blend well with squash. You can roast them together for a richer taste. When making this soup gluten-free, ensure all your ingredients are safe. Most vegetables and spices are gluten-free, but check labels on store-bought broth. You can pair the soup with gluten-free bread or crackers. This adds texture and makes the meal more filling. Look for options made from rice or chickpeas for a tasty crunch. To create an extra creamy soup, I recommend blending for longer. The smoother your soup, the richer it feels. You can also add dairy alternatives for extra richness. Cream cheese or sour cream can work well. If you prefer non-dairy, try cashew cream for a nutty flavor. This can elevate the soup's taste, making it feel luxurious and satisfying. For the Full Recipe, check the detailed instructions to guide your cooking process. Each serving of roasted butternut squash soup has: - Calories: About 150 - Carbohydrates: 30 grams - Fiber: 5 grams - Protein: 3 grams These numbers can change based on added ingredients. For example, adding coconut milk boosts the calories and fat content. The soup is rich in vitamins A and C. It also provides potassium and magnesium. These nutrients help keep your body strong and healthy. - Butternut Squash: This main ingredient is full of vitamins and minerals. It supports eye health and boosts your immune system. - Onion: Onions have antioxidants. They help fight inflammation and improve heart health. - Garlic: Garlic has many health benefits. It can help lower blood pressure and support your immune system. - Coconut Milk: By adding coconut milk, you get healthy fats. These fats can improve heart health and aid digestion. Butternut squash is a superfood. It is low in calories but high in nutrients. Eating butternut squash can help maintain a healthy weight. Its high fiber content aids digestion. This squash also has antioxidants. Antioxidants protect your cells from damage. Eating butternut squash can also support heart health. The potassium in it helps regulate blood pressure. Plus, the vitamins in butternut squash help fight against chronic diseases. This recipe is generally safe for most diets. However, it is important to note potential allergens: - Coconut milk: Some people have nut allergies. Ensure to check for coconut allergy. - Spices: Rarely, people may be allergic to spices like cumin or coriander. If you have allergies or dietary needs, you can make swaps: - For coconut milk: Try almond milk or oat milk for a creamy texture. - For vegetable broth: Use homemade broth to avoid additives. These changes will keep the flavors while making the soup safe for your needs. For the full recipe, check the previous sections. How can I make this soup spicier? You can add heat by mixing in cayenne pepper or red pepper flakes. Start with a pinch, then taste. If you want more spice, you can add more. You can also use spicy curry powder for a different kick. Can I freeze roasted butternut squash soup? Yes, you can freeze this soup! Let it cool completely, then pour it into freezer-safe containers. It will last up to three months in the freezer. When you’re ready to eat, thaw it overnight in the fridge. How long does the soup last in the fridge? Roasted butternut squash soup stays fresh for about four to five days in the fridge. Store it in an airtight container for best results. Is it safe to reheat multiple times? It is best to reheat the soup only once. Each time you reheat, you risk losing flavor and texture. If you have leftovers, try to reheat only what you will eat. Can I add protein to this soup? Yes! You can add cooked chicken, turkey, or even beans for a boost of protein. If you want a vegan option, add lentils for texture and nutrition. What sides pair well with roasted butternut squash soup? This soup goes well with crusty bread or a fresh salad. Grilled cheese or a simple sandwich also makes a nice pairing. You can serve it with roasted veggies for a complete meal. Roasted butternut squash soup is simple and full of flavor. You learned about the key ingredients, spices, and techniques to make it great. There are tips for serving and storing to keep your soup fresh. You also saw variations for vegan and gluten-free diets, so everyone can enjoy it. This cozy soup warms up chilly days and adds nutrition to your meals. Now, gather your ingredients and start cooking! You won’t be disappointed with the comforting flavors.](https://homecookingstyle.com/wp-content/uploads/2025/07/ebd19535-62bc-4545-98f3-cdbe4c89b3c2.webp)
Get ready to warm your soul with this rich and flavorful roasted butternut squash soup! With just a few simple

Are you ready to indulge in a crunchy, sweet treat? Crispy Coconut Shrimp is bursting with flavor and perfect for

Want a quick and tasty meal? You’ll love these Easy Teriyaki Chicken Bowls! This recipe is simple and packed with
