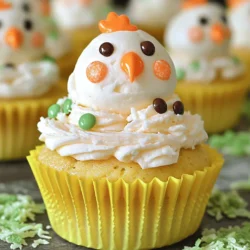
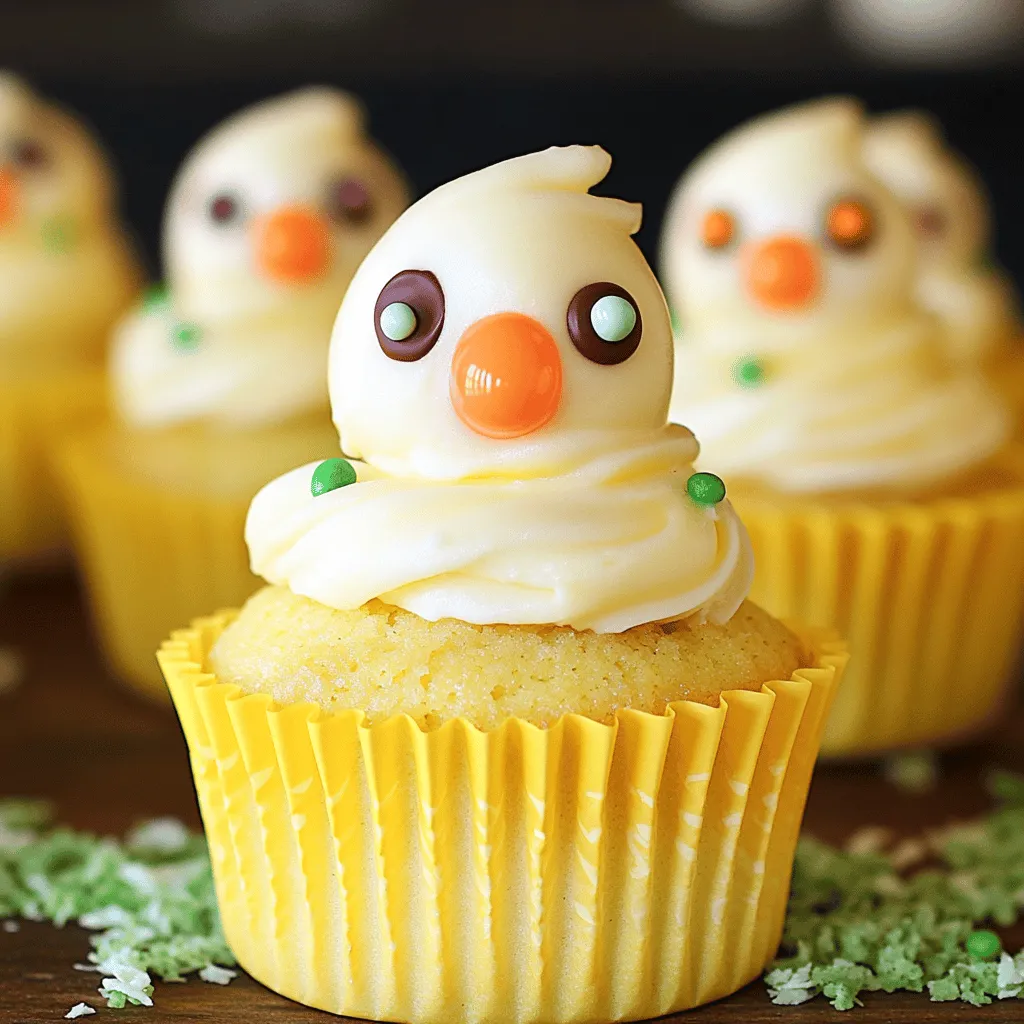
Are you ready to make Easter extra fun? These Easter Chicks Cupcakes are perfect for any celebration. With their bright colors and cute designs, they’ll grab everyone’s attention! I’ll show you how to create fluffy cupcakes that taste amazing and look delightful. Let’s dive into the sweet details, from essential ingredients to easy decorating tips, and make this Easter a tasty hit!
Ingredients
Essential Ingredients
– 1 ¾ cups all-purpose flour
– 1 cup granulated sugar
– ½ cup unsalted butter, softened
– ½ cup whole milk
– 3 large eggs
– 2 teaspoons baking powder
– 1 teaspoon vanilla extract
– ½ teaspoon salt
To make Easter Chicks Cupcakes, start with essential ingredients. All-purpose flour gives the cupcakes structure. Granulated sugar adds sweetness. Unsalted butter makes them rich and moist. Whole milk keeps the batter smooth. Eggs bind everything together and add fluffiness. Baking powder helps them rise. Vanilla extract gives a lovely flavor. Salt balances the sweetness.
Decorating Ingredients
– Yellow food coloring
– 1 batch buttercream frosting
– Orange candy melts
– Mini chocolate chips
– Green coconut flakes
For decorating, yellow food coloring transforms the frosting into cute chicks. Buttercream frosting acts as a base and adds sweetness. Orange candy melts create the beaks, giving a fun touch. Mini chocolate chips serve as the eyes. Green coconut flakes mimic grass, adding a playful look.
These ingredients make your cupcakes not just tasty but also bright and festive.
Step-by-Step Instructions
Preparing the Oven and Batter
– Preheat the oven to 350°F (175°C).
– Mix dry and wet ingredients in separate bowls. In one bowl, whisk 1 ¾ cups of flour, 2 teaspoons of baking powder, and ½ teaspoon of salt. In another bowl, cream ½ cup of softened butter with 1 cup of granulated sugar until fluffy. Add 3 large eggs, one at a time, mixing well. Stir in 1 teaspoon of vanilla extract and ½ cup of whole milk.
Combining Ingredients
– Gradually add the dry ingredients to the wet mixture. Mix until just combined. Don’t over-mix; this keeps your cupcakes light.
– To get that sunny chick color, add a few drops of yellow food coloring. Stir until you achieve the shade you like.
Baking and Cooling
– Fill your cupcake liners about ⅔ full with batter. This helps them rise nicely.
– Bake in your preheated oven for 18-20 minutes. Check with a toothpick; it should come out clean.
– Let the cupcakes cool completely in the tin before moving them to a wire rack. This prevents them from getting soggy.
Now you have a great base for your Easter Chicks Cupcakes!
Tips & Tricks
Achieving the Perfect Cupcake Texture
To make fluffy cupcakes, you need to mix well. Start by creaming butter and sugar until light. This step adds air, which helps the cupcakes rise. Always add eggs one at a time. Mix each egg in fully before adding the next. This ensures a smooth batter.
Ingredient temperature is key. Use room temperature butter, eggs, and milk. Cold ingredients can make the batter dense. Always measure ingredients precisely. Too much flour can make them dry.
Decorating Techniques
Piping frosting can be fun. Use a piping bag with a large round tip. Start from the edge and swirl inward for a nice effect. Practice on a plate if you need to. Don’t rush; take your time.
For adorable chick features, cut orange candy melts into triangles for beaks. Press them gently into the frosting. Use mini chocolate chips for eyes. You can stick them in the frosting easily. Get creative!
Presentation Ideas
Colorful liners make a big difference. Yellow cupcake liners fit the theme perfectly. Use fun serving platters to show off your treats. A bright platter can attract attention.
Arrange cupcakes in a circle for a festive display. You can add green coconut flakes around them to look like grass. This small touch brings everything together.
Variations
Flavor Variations
You can easily switch up the taste of your Easter Chicks Cupcakes. Here are two fun ideas:
– Chocolate Easter Chicks Cupcakes: To make these, replace ½ cup of flour with ½ cup of cocoa powder. This gives your cupcakes a rich chocolate flavor. Follow the same baking steps as the original recipe. The chocolate pairs well with the yellow frosting.
– Lemon-flavored batter: For a bright twist, add the zest of one lemon to the batter. You can also swap out the vanilla extract for lemon extract. This gives your cupcakes a light, zesty flavor that is perfect for spring.
Decorating Alternatives
When it comes to decorating, you can be as creative as you like! Here are some alternatives:
– Different animal designs for Easter: Instead of chicks, try making bunnies or lambs. Use white frosting for bunnies and add pink candy for the ears. For lambs, use fluffy white frosting and mini chocolate chips for the eyes.
– Alternative toppings: You can use colorful sprinkles or edible glitter. These add a festive touch. Consider using coconut flakes dyed in different colors for fun grass-like decorations. Each option makes your cupcakes unique and eye-catching.
Storage Info
Best Ways to Store Cupcakes
To keep your Easter Chicks Cupcakes fresh, store them correctly.
– Room Temperature Storage: If you plan to eat them within two days, store them at room temperature. Place them in an airtight container. This helps keep them soft and tasty.
– Refrigeration Tips for Frosted Cupcakes: If you need to store them longer, put them in the fridge. Use a container that seals well to avoid drying out. The frosting will harden a bit, but they will stay fresh.
Freezing Cupcakes
Freezing your cupcakes is a great way to keep them for later.
– How to Freeze Frosted vs. Unfrosted Cupcakes: If your cupcakes are unfrosted, wrap each one in plastic wrap. For frosted cupcakes, freeze them on a tray first until firm. Then, wrap them carefully. This way, the frosting stays intact.
– Thawing Methods for Frozen Cupcakes: To enjoy your frozen cupcakes, move them to the fridge overnight. If you are in a hurry, leave them out at room temperature for about an hour. They will taste fresh and delightful.
FAQs
How do I make sure my cupcakes are moist?
To keep cupcakes moist, use the right ingredient ratios. Use enough fat, like butter, to add moisture. Adding whole milk also helps. Bake your cupcakes for the right time. Overbaking can dry them out. Check with a toothpick at 18 minutes. If it comes out clean, they are ready. Let them cool in the pan for a few minutes before moving them.
Can I use alternative frosting?
Yes, you can use different frostings! Cream cheese frosting is a great choice. It adds a tangy flavor. Whipped cream can also work if you prefer a lighter touch. You can even use chocolate ganache for a rich twist. Each frosting gives a unique taste, so feel free to experiment with what you like best.
How far in advance can I make these cupcakes?
You can bake these cupcakes up to three days in advance. Keep them covered at room temperature to stay fresh. If you frost them early, store in the fridge to keep the frosting firm. They can last in the fridge for about a week. For longer storage, freeze them for up to three months. Just remember to thaw them before serving.
You now have all the tools to bake fun and tasty cupcakes. Start with the right ingredients and follow the step-by-step instructions. Use our tips to get the best texture and make decorating easy. Don’t forget, you can also try fun flavor and design variations. Store your cupcakes well to keep them fresh. Enjoy your baking and get creative! Your Easter celebrations will be even sweeter with these delightful cupcakes.